We’re soaking up a white Christmas over here! Nope, we didn’t wake up to any snow on the lawn, but there was a dusting of white elsewhere on the premises…
We used last week to sand, prime, and paint all of our upper kitchen cabinets and – shocker – we ended up going with white. So yeah, it’s a little bit different from our original plan to paint them a light gray-tan on top… and a little more like what we did in our last kitchen – but just for those uppers. We have a completely different plan in store for the lowers – and it actually involves wood stain and no paint at all – so maybe as we move into 2014 we’re getting progressively less predictable? Or more woodsy? We also have some ideas for those countertops which we’ve never done before (either a refinishing/paint technique or a concrete coating one – both of which are budget friendly, so they should be great for Phase 1).
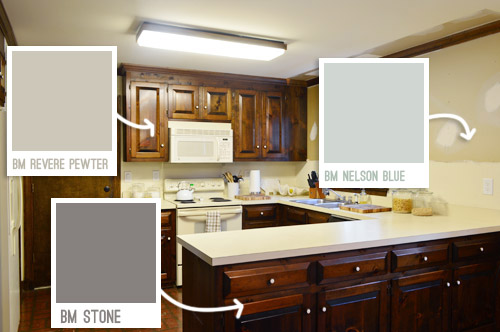
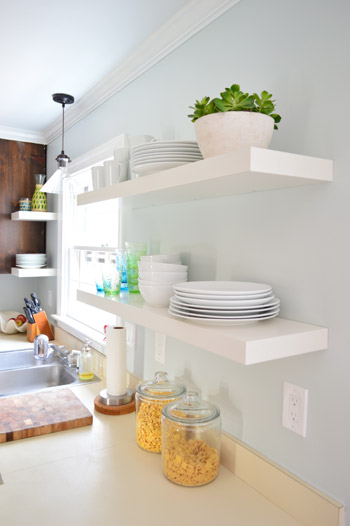
The tides shifted from Revere Pewter to Simply White (which is one of the top white paint colors out there)for those upper cabinets around the time that we installed the range hood and put up the floating shelves. While we liked the idea of the white shelves & hood contrasting with putty colored upper cabinets, we started to worry that also having the darker lower cabinets might just be too much going on (white and putty on top with a third darker color for cabinetry on the bottom).
But the main thing we couldn’t wrap our heads around was a way to make crown situations like this one make sense with colored upper cabinetry. Usually crown matches the color of the cabinet, but wouldn’t it be weird to paint just a section of this crown to match the cabinets since there’s no indent where the cabinets end (it’s just one long piece along that entire area)? We already didn’t like the look of the mismatched cabinet and crown that we had going on, so continuing that theme with a new color on those uppers just didn’t seem like the right way for us to go.
So we went with white. As much as we wanted to do something new, we never like to do something different just for the sake of being different. And at least this way we can still stick with our plan to do the lower cabinets in a deep tone for that “tuxedo” look that we’ve always loved but never had the guts to try.
Now that we got through the why of what we did, let’s get a little into the how. Clocking in at nearly 2,000 words, this post is hardly short, but is gonna be quick and dirty compared to the picture-and-video-tastic tutorial that we did last time around since we used the same technique. So we’ll just share some broad details here, and you can reference that post for the nitty gritty. First up we removed the cabinet doors and gave every surface a light sanding, just to get rid of any glossiness and rough things up for better paint adhesion. Sherry used a hand sander on the doors in the garage with 150 grit paper, and I used an 150 grit sanding block on the frames inside.
Next we wiped everything down with a liquid deglosser. This is a low-VOC brand called Next that we had leftover from last time (originally found at Home Depot, although we hear it’s not there anymore). It’s an optional step, but we figure it never hurts to prepare the surface – especially when it just takes a bit of wiping. Plus after you sand it’s a nice way to get the sawdust off.

We then taped off the walls and other obstacles around the cabinets (like our newly installed hood) with painters tape to protect them and to make each of our sure-to-be-many coats go on as fast as possible.
With everything taped, we primed the frames with a brush and a small foam roller. We used a Kilz Premium primer because it’s stain-blocking but still no-VOC. This picture is after two coats of primer. Sherry’s the cutter-inner of the family, so she did the brushwork with a short handled 2″ angled brush, and I did the foam rollering, following right behind her around the room so I could roll over the edges that she brushed for the smoothest finish.
We considered using our paint sprayer for those interior frames, but ultimately decided to do the indoor stuff by hand. The amount of taping and drop-clothing that would’ve been required to protect the kitchen (and the three adjoining rooms) from paint over-spray just didn’t seem worth it – especially when weighing the need for a functional kitchen (and not subjecting a pregnant lady and three year old to the fine paint mist that seems to linger afterwards).
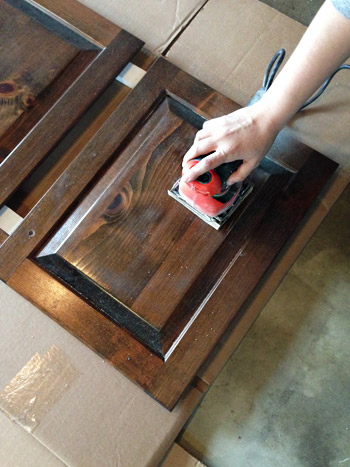
But we did use the paint sprayer outside to prime and paint our cabinet doors. And by outside, I mean the garage (since we had quite a bit of rain last week that ruined any chances we had of spraying outdoors). I set up a little station where I could coat one door at a time and then lay them out to dry.
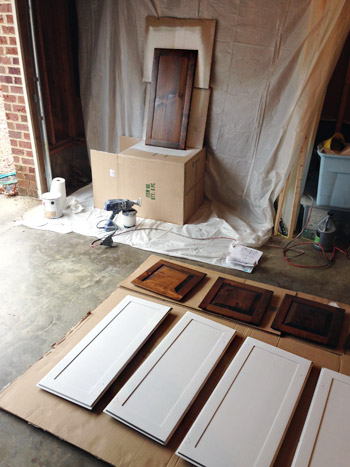
For anyone out there thinking about using a sprayer on doors during cabinet painting, it’s a great way to get a nice smooth coat with less effort than doing the whole thing by hand. But you’ll probably want to get your bearings by practicing on a few other things first (you might not want your first spray job to be cabinets since it can take a little while to master the whole not-too-thick-and-drippy thing).
Back to the spraying process. After 24 hours of drying time, I flipped them over and did the other side. The actual spraying was pretty fast, but the waiting for the thick coverage to dry (and cleaning the sprayer in between daily coats) didn’t make it the breeziest process in the world. Although it certainly required less time than all the coats the frames inside took.
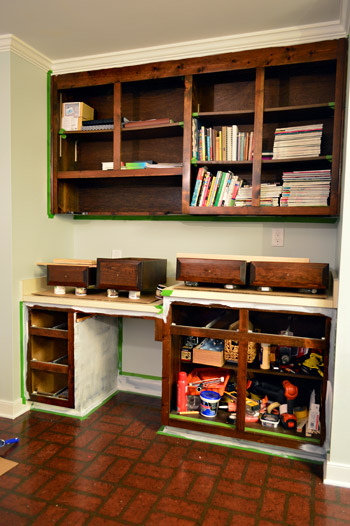
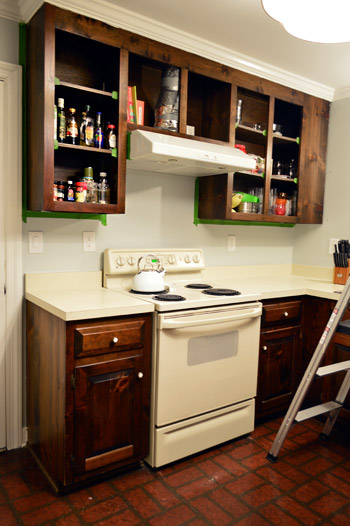
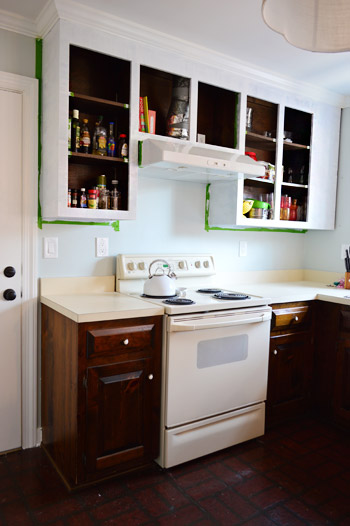
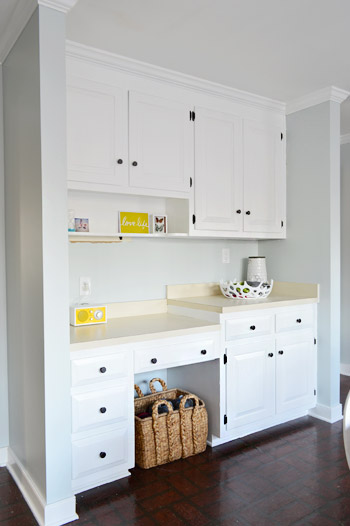
This is the desk area, where we also opted to paint the lowers. Both Sherry and I felt like this was all one unit (like a hutch in the eat-in area) unlike the peninsula-ed part of the kitchen, which we thought would look awesome with those dark lower cabinets. So over here we also painted the six drawer fronts by hand – since they didn’t detach from the drawers themselves. A lot of this cabinetry was surprisingly non-removable, for example the shelves inside don’t pop out (you’d literally need to demo out the frames to remove them). The picture below is after one coat of primer.
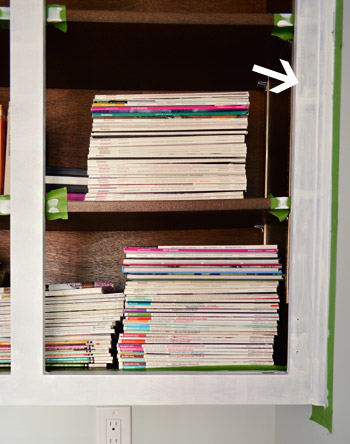
Note: much like our last kitchen, we opted to paint both sides of the doors, but to leave the inside of the cabinets unpainted (we think the contrast of wood inside + painted doors can actually be a nice combo when it’s done cleanly).
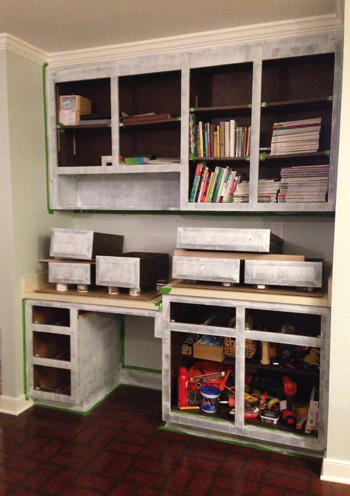
We opted to do two coats of primer based on what we learned when we painted the trim in this room. But you can see here that even that was still pretty spotty. You can also see where we used small pieces of painters tape to block paint from getting on the shelves for a nice clean look.
In the end, it took 2 coats of primer and 3 coats of paint in the areas that we did by hand (we used Benjamin Moore Advance in Simply White, which we love for the durability, the fact that it’s made for cabinets, the low-VOC non-oil formula, and the fact that it’s self leveling). Just for comparison, the doors that I sprayed in the garage only took one coat of primer on each side, and one coat of paint on each one (the coverage is a lot thicker, and you go through more paint, but it leaves you with a nice factory-like finish if you’re careful to avoid drips).
In short: spraying (even with that “cleaning the sprayer between coats” factor) is definitely faster – but I’m still not convinced it would’ve been a good choice for the frames since the entire room would have needed to be taped off for the entire process and a fine mist of paint and primer would have lingered in the air for a while.
All told this was a week-long update for us, which can roughly be summarized like this – day 1: sanding, deglossing, primer coat #1, day 2: primer coat #2, day 3: paint coat #1, day 4: paint coat #2, day 5: paint coat #3, day 6: another full day of drying, day 7: re-hanging doors and adding the new hardware).
We also updated the hinges and the hardware. The hinges were a worn brass color, so we went oil-brubbed bronze with them since we liked the idea of doing contrasting hardware this time around (we’ve done brushed nickel in our past two kitchens). To help the paint job hold up on the hinges, we sprayed them with some “clean metal primer” first too, since we’ve heard such good things about this particular product (we’ve seen others use it specifically on moving parts like hinges, with luck – so we’ll keep you posted about how it wears).

The ORB went on nice and smoothly when that coat of primer dried, and so far the hinges look great and have worked well (there’s no gumminess or grinding/peeling) so for about $11 it was well worth the update so far. Ultimately we’d like to have hidden hinges, but it’s not easy or cheap with these cabinets (these doors are half-sunk, and they don’t sell off-the-shelf hidden hinges for those type of doors) so we’ll save that dream for Phase 2.
We weren’t crazy about the shape and detail on the original brass and white knobs, so instead of spraying those we picked up a few boxes of the same Target octagon knobs that we used in our master bathroom, since they come in at under $2 each.
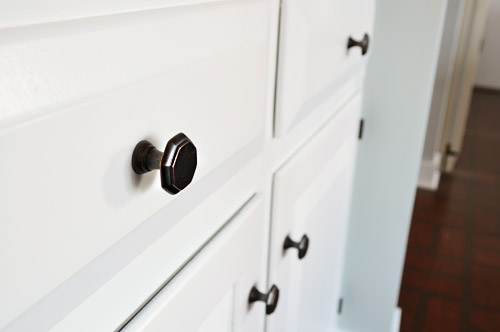
We like how high contrast they are against the white, which seems to be something we’re gravitating towards lately (think stair runner, our stenciled bathroom floor & dark vanity, etc).
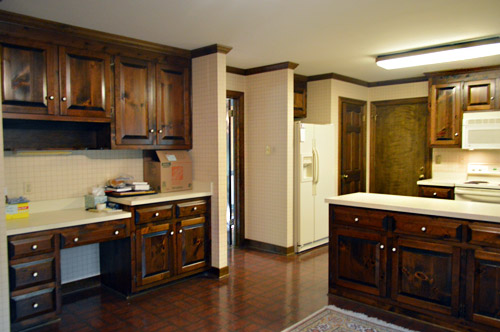
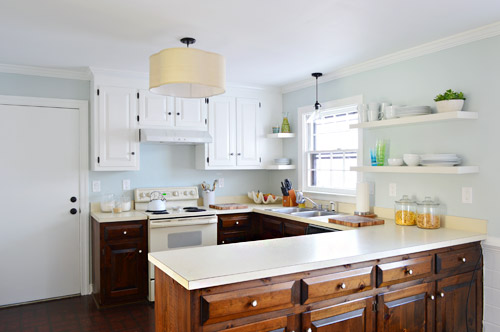
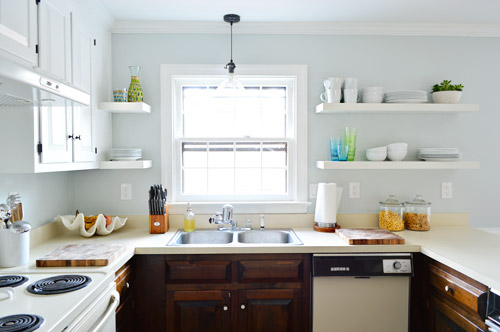
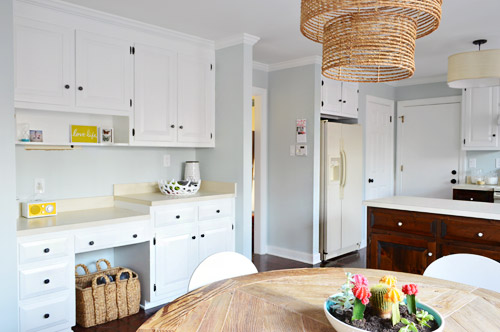
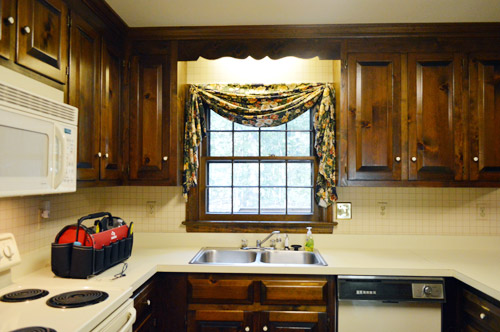
Ahhhhh, this feels a lot more like home. Just ignore the faux brick floor, those old counters, and those off-white appliances – we’ll get there eventually.
I think the before and afters from this POV really show the difference. This is what the sink area looked like on inspection day…
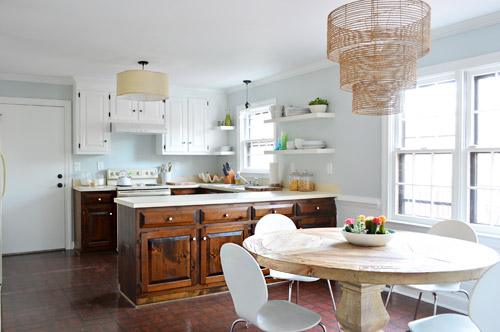
And here’s the same angle now.
We’re gonna tackle those lower cabinets this week – which is a place we’re again veering off course from the original plan. You’ll remember we said we liked the idea of a deep stone colored paint on them here, but then near the top of this post we mentioned stain. Now that the uppers are painted, we actually like how the wood tone is playing off of them, so we’re feeling less paint-y and more stain-y. Ah yes – THE PLOT THICKENS!
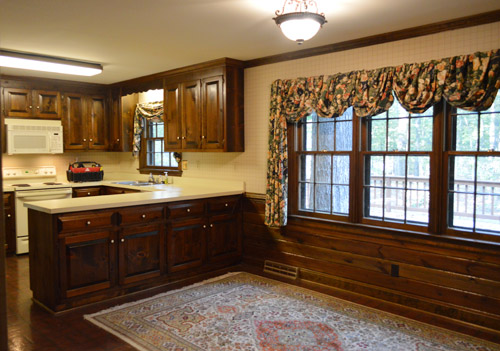
And just for fun, here’s one more throwback shot of our kitchen before we moved in. It’s pretty amazing what a series of affordable updates – like stripping wallpaper, removing a few cabinets, hanging shelves, and priming and painting the cabinets – can do.
Did anybody else tackle some big-ish projects over Christmas week? Or are you just gonna make us jealous and say you spent the week stuffing your face with cookies and watching Elf on repeat?
Psst- Sherry’s over on Young House Life chatting about New Kids On The Block and teacher gifts.

anna says
oh! i love it! there’s not much else i can say. it just looks so much happier.
i really like how the pendants are looking now – the white’s made a big difference for them too, i think. they play nicer together now (though i was not on team-change-the-quatrefoil-out anyway… ;) ).
Maria says
oooo – I hope you are going for a dark espresso gel stain finish on the lowers – I love that look!
Also, I wanted to give you a tip that could save you from waiting the day between painting the front & back of your doors (and the pain of cleaning the sprayer). Lightly tap 4 nails in the corners on the back of each door and spray the back of the doors first (with the nails). Flip them over so they are standing on the nails like a table (and not touching the ground), and then spray the fronts. You can touch up the 4 nail holes by hand or you can just ignore them since they are on the back of the doors.
YoungHouseLove says
So smart! We did little wood blocks for them to stand on, but still waited the full drying time to avoid little dents. Nails are so small they’d be easy to touch up!
xo
s
Bethany says
GENIUS.
Steph Nelson says
NOW I hear this tip, you know, when I am done painting cabinet doors!! :)
Stacey C says
Shocking! Looks beautiful and I love the transformation! Good luck with the rest of the cabinets.
Amy G says
Love Love this update!!! The power of paint is amazing. I can’t wait to see the budget breakdown of your kitchen remodel in phase 1 it looks amazing.
We currently moved in to our first house and everything in our kitchen is brand new. The cabinets are solid wood and I’m trying to convince my husband that if we paint them white they would open the room more and fit my taste better. It’s a struggle since the cabinets are brand new we are afraid painting them won’t necessarily look the greatest. It keeps me up a night thinking it could potentially be a total fail.
Kayla says
This looks so awesome. I am super jealous of the white cabinetry. I just know at my house, it would never stay clean.
My husband and I recently bought our first home, and spent 10 weeks remodeling and updating it (outdated and serious smoker smell). We used a rustoleum product called countertop transformations (available at HD and Lowe’s). We were able to do our whole kitchen countertops for about $225 and we are constantly getting comments about how great it looks. It might not be what you guys are going for, but definitely something to look into! Good luck!
YoungHouseLove says
Thanks for the tip Kayla!
xo
s
Alli says
You must love looking at the before and after pictures. Looks really good. Also I like that you didn’t feel the need to just go different. Just go with what you love. People reading will say, wow, look at that, amazing transformation with paint…phase one is going great.
Ashley says
I may have skimmed and missed this in the post, but – did you sand and degloss the frames of the cabinets too, or just the doors? Trying to gather the courage to do this myself…
YoungHouseLove says
Yes, sorry if that’s not in there! All of the wood we painted got sanded and deglossed :)
xo
s
Tiffany says
I love it! I am so happy that you went with white. I was excited to see what you had planned for the cabinets and I know you would make it lovely but I was uncertain in the idea of the white shelves and crown molding next to the beige cabinets. With the cabinets going to be stained (oh how I hope it will be like the ones in your master bath nook) are you going to leave them that way for the garage or are you going to paint them gray at that time? I remember that dark gray cabinets in garage that John was in love with in a house you had crashed that were former kitchen cabinets. Or are you going to move them out there as they are? I for one hope that you do concrete. I know that Jenny did them with success but I would not only like to see your take on them but I think that texture next to the texture of the shell you keep your fruit in would be really nice. Over the holiday we worked on a three foot by eight foot penny desk for the craft room. We are currently working on building an apparatus so that we can have even sides on. With the epoxy resin you get a wonderful finish on top and then it drips off the sides too fast to get a solid coat on there. Hopefully it will work out how we imagine it in our heads, if not there will be a lot of sanding in our future. Hopefully this project will get me back to posting on my blog. You two are wonderful. I cannot wait to see what you do next.
YoungHouseLove says
Aw thanks Tiffany! I think stain would be awesome in the garage, so we’re planning to leave them that way when we move them in there. We think it’ll be nice and durable and hide workshop wear that will definitely occur. Here’s hoping! And as for all of your progress, that’s awesome. Congrats! Hope that awesome apparatus plan works like a charm.
xo
s
heather says
It looks great and I just adore everything you both do! I’m excited to see the transformation every step of the way! Thanks for the motivation to get things done around the house, I truly need it. I have 2 weeks off and planned on accomplishing 3 goals (1 for family, 1 for work and 1 for the home), but I haven’t even made the goals yet….whoops! I better get on it! Thanks again guys!
YoungHouseLove says
You can do it! There are still two more days!
xo
s
@ESWTerry says
You continually impress me with your DIY talents. I’ve been contemplating paining my kitchen cabinets white for years, but a professional painter discouraged me since the oak wood has a high grain and would show through the paint. Do you have any tips for a primer or paint that might create a smoother finish to hide the oak grain? Or should I just go for it and embrace the grain? I love the idea of going white since my kitchen gets very little natural light. Happy New Year, kids!
YoungHouseLove says
We just embrace the grain, although with the sprayer and this Advance paint (it’s self leveling) there’s really ZERO on those doors that we sprayed. The frames have a very minimal appearance of grain here too (although our last kitchen showed it a bit more, but in a clean glossy white we didn’t mind it at all). Hope it helps!
xo
s
Julie says
I love that you went with the white! Looks so bright and cheery :)
My husband and I just finished a kitchen project (also considered Phase 1 in our house – someday, I will have new cabinets, but not this day). The story is that when we found a really nice GE dishwasher for a Black Friday price at a local appliance store after Thanksgiving, we decided not to pass it up, and also decided to install it before our Christmas guests arrived (!!!). The tricky part was that our 1951 kitchen didn’t HAVE a dishwasher that we could just replace. So we had to retrofit one side of our kitchen to fit that thing, which meant buying a narrower sink (Overstock!), which meant replacing the tile countertop (using $65 pack of hardwood oak flooring from Lowe’s), which led to painting the cabinets (holla for white cabinets!), and also replacing the backsplash tile when we realized the old stuff was loose (we found the new tile INSANELY marked down at Lowes), and of course running the new electrical and plumbing for the dishwasher…but we got it done all by ourselves (for under $1500!), and after 8 years of scrubbing every single dirty dish, we are beyond ecstatic.
We don’t have a blog or anything, but here is a link to the before/after photos, since we’re mega proud of it, haha:
http://www.flickr.com/photos/76248946@N00/sets/72157639193788236/
YoungHouseLove says
Looks awesome! Thanks for sharing the pics, Julie!
xo
s
Bonnie @ The Pin Junkie says
Your kitchen is looking great! The dark kitchen cabinets look so much better painted white. I noticed you painted the cabinets white in your previous two houses. I like the look of white cabinets in the kitchen and have them in my kitchen as well, but they’re so hard to keep clean. They show every crumb, every speck of dirt, and every kitchen mishap. How do you keep your white cabinets so clean?
YoungHouseLove says
We just wipe them down and don’t seem to have much trouble. Maybe it’s the finish on yours? If they’re matte or worn down the dust and dirt might cling to them more. Ours are usually shiny enough that it just comes right off with a wipe, and it allows us to see things like splatters right away, so nothing lingers very long and gets stuck on there.
xo
s
Kate says
Have y’all ever considered butcherblock countertops with white cabinets? I’m sure you (or a reader) have thought about it and there is a reason why it won’t work for you. BUT I thought I’d add a link to Taylor Swift’s kitchen where it looks gorgeous!
http://www.zillow.com/blog/2011-11-15/what-do-celebrities-do-in-those-glitzy-kitchens/
YoungHouseLove says
Oh yes, I love that idea for an island! Maybe for Phase 2 when we reconfigure things a little. I think we like wipeable stone (or some other solid surface) near the sink, but for an island it would be so much fun to bring that texture in.
xo
s
Morgan {Style Oyster} says
We went white with our kitchen cabinets too…was a hard job, but totally worth the end result. I love bright, light kitchens.
Cami says
So so excited to see what y’all do with the countertops. My husband and I just bought our first home and can’t decide what to do with ours! Our home isn’t really old, but everything is cheap builder-grade. I. Hate. It. We will probably end up doing a few “phase 1” fixes while we save money for “real” counters. Thanks for that idea!! Y’all are SUCH an inspiration and a help. Thanks for doing what you do!!
Tessa says
I love it! I’m picturing a white-uppers & walnut-lowers kitchen for my dream “Phase 2” kitchen. (à la http://www.pinterest.com/pin/124060164708627250/)
But I’m so glad we took the plunge for a Phase 1, nothing like painting dark cabinets white to refresh the entire space! We also used the countertop transformations kit – it was an easy weekend project and I’m really impressed with how well it has held up, but it was pretty fumey. I wouldn’t have even considered it, by my MIL used it in her kitchen first, and hers turned out great as well.
If you can forgive my terrible phone pics:
https://www.facebook.com/tariele/media_set?set=a.10100406403506050.3136261.13950871&type=3
YoungHouseLove says
What a great update! And I LOVE your inspiration kitchen. Me-ow.
xo
s
Carrie says
Looking good guys!
I was surprised that you don’t paint the inside of your cabinets. Is that how you’ve done it in the past? If so, I’m curious as to why?
YoungHouseLove says
Yup, we also made that choice in our last kitchen! In fact, in our first kitchen the new cabinets had wood drawer interiors with white fronts, so wood seems to hold up nicely inside of cabinets, even if they’re new. There’s a little italicized note about that in this post for ya – we just think it’s a nice clean look and then we don’t have to worry about stuff sticking or scuffing inside.
xo
s
Robin @ our semi organic life says
It’s all white!
Callye says
Everything looks so pretty and fresh! I can’t wait to see how the bottom cabinets turn out.
Thanks to reading your blog and feeling more inspired to decorate my apartment, I finally got my first (dainty) power drill… and it’s awesome! The boyfriend and I went to ikea and got a white lack shelf, which we put in our spare bedroom… but alas, it is leaning off of the wall a bit. Slight failure, but it works well enough.
On a non-decorating note, my parents were kind enough to get me a Shark vacuum this year, so I’ve pretty much been having WAY too much fun vacuuming our floors (something I would never have said before). Dog hair is my arch nemesis… but it’s a lot more fun/less horrible to deal with now that I’ve got my spiffy new vacuum! Every year that I get older, my Christmas wish list turns a lot more “domestic” it seems.
YoungHouseLove says
That’s so funny! I feel the same way! I keep actually getting excited about practical items. We’re grown ups, huh?
xo
s
Cathy says
Just curious as to whether you’re planning to go with stainless appliances or something else…? Looks like there are some new finishes on the market that actually look all right – like Slate and White Ice. :)
YoungHouseLove says
You’re speaking my language! I have been checking those out too! So much fun! We’re definitely not married to stainless, that’s for sure.
xo
s
kami says
looks great! question about sanding the frames: did you use an electric sander inside? noticed you left most items inside your cupboard (which keeps it simple!)but wondering how you kept the fine dust away? hoping to paint our cabinets in 2014 :)
YoungHouseLove says
We just used a sanding block inside, which didn’t make giant plumes of dust, it just roughed things up, and then when we wiped down with the deglosser, we nipped into the front of the shelves to grab any small dust particles that might have landed there (it wasn’t too bad, thankfully).
xo
s
Steph Nelson says
I just painted my kitchen cabinets (all white) and can’t get over how much paint makes a difference! Mine were dark like yours and underneath the sink, the doors were water damaged. I covered those water damaged ones with beadboard wallpaper, added the wallpaper to ends of the cabinets and painted the walls a gray color. I just love it. Time consuming but so worth it. It makes everything just feel cleaner!
YoungHouseLove says
Sounds awesome Steph!
xo
s
Jolene says
Love the kitchen update! So fresh and inviting! We spent our Christmas living in chaos while we replaced old carpet with hardwood. House feels brand new for the new year! New floors seem to be our Christmas tradition.
Meredith says
Absolutely loving this transformation!!
What were your thoughts about the decision to paint the lower cabinets white in the desk area, instead of matching those lowers with the others? During the process photos you showed it didn’t even occur to me that they were getting painted white until I saw it all finished with the hardware. I’m so curious!
YoungHouseLove says
That’s in the post for ya (sorry, with so many words it might have been burried) but we mentioned that it just read like a “built-in hutch” in that indented area so we wanted to do them all white like a dining hutch might be. Whereas the peninsula/cooking area felt like a good place for the tuxedo choice.
xo
s
Nicole @ Liberty Belles says
oil-brubbed bronze? sounds fancy :)
YoungHouseLove says
Oh yes, we probably need to be wearing three piece suits and carrying monacles now. Haha!
xo
s
Cathy says
WOW, what a difference! It looks absolutely amazing! You guys did a fantastic job. I can’t wait to see what you do with the lower cabinets!
Have a great New Year!!
Gilit @ Shoes Off Please says
I Luuuuuuurve it! And I just know you’ve been waiting for someone to say that they lurve it. And I do. In case I didn’t make that clear.
Also… those colorful succulents on the table- lurve those too, may I ask where you got them from and how long it’s going to take you to send them to me?
XOXO and Happy New Year!!!
YoungHouseLove says
Aw thanks Gilit! You’re so sweet! If you search weekly crafty ceramic paint in our sidebar that cactus project should come up. It was such a simple little update, and I can’t believe I haven’t killed them yet!
xo
s
Sara T. says
Do you notice a difference in texture between the sprayed cabinet doors and the rolled drawers? Just wondering if it would be noticeable…like the drawers might not be as smooth as the cabinets?
YoungHouseLove says
Nope, after the five coats (2 primer, 3 paint) on the frames they came out with the same coverage/texture as the sprayed doors, but it certainly was easier to get that coverage with the sprayer!
xo
s
Abby says
Beautiful! What a difference from when you bought the house! It’s really starting to look like a home! Great job!
Abby
http://thepreppycoxswain.blogspot.com/
Carrie says
Just curious on your thoughts between Advance cabinet paint vs. Sherwin William’s ProClassic paint. I have used SW on all of my trim and refinishing furniture pieces but keep seeing Advance come up more and more as THE paint choice for cabinets. I am looking to refinish my kitchen cabinets and don’t want to go wrong in the process. I really love how your redesign is shaping up and do love your idea with the contrast of paint/stain. Can’t wait to see the finished results!
YoungHouseLove says
We have never used SW (but generally hear good things about it). As for Advance, we used it years ago on the cabinets in our office and those held up so well the entire time (with a toddler banging trains on them) and then used it again in the kitchen on the cabinets there, so it was an easy choice to use it here as well. Hope it helps!
xo
s
Sara says
I just used SW ProClassic on my cabinets (I painted mine over Christmas too!) and they turned out great. I’ve never used BM, so I can’t compare, but the SW was awesome and has hardened really nicely. I also used a SW primer that worked great. Since I just painted the cabinets I cannot comment on long-term durability, but so far they have been great.
YoungHouseLove says
That sounds awesome!
xo
s
Liz says
For realz though, who needs Phase 2? This looks awesome.
YoungHouseLove says
Haha, thanks Liz!
xo
s
Emily @ Life on Food says
I know that must of been so much work but I love it. White was a good choice. I think the wall paint pops so much more now.
YoungHouseLove says
Thanks Emily!
xo
s
Karen says
WOW, how stunning! You guys have made a believer out of me – white paint (almost) everywhere!!! Love the desk area – all white is breathtaking. Looks like a customized built-in!
Ok, now it’s time for… Annoying-Questions-Who-Does-This-Chick-Think-She-Is?
Warning: The following statements/queries may sound judgy-ish, but I feel like you guys are like friends, so I feel I need to say this, (plus how else will I learn?):
1) If the upper cabinets are white, and the bottom ones are dark, what color are you thinking for the floor? Wouldn’t it have to be a very light color to balance it all out? Sherry you’re an artist/decorator so I’m very curious? Light floors get dirty!!
You already have a light color on the walls, and now the upper cabinets, (which are gorge!). It seems so light and airy on top and now so dark and heavy on the bottom. IMHO, I say make all cabs white! Look how beautiful that desk area is!!!
2) If you stay dark on the bottom, light up top, what color for the back-splash? Light grey would be bee-u-teeful. Great in-between! Maybe go grey-ish on the floor, too?
That wasn’t so bad!? Please don’t ban me from your site. Ha ha.
YoungHouseLove says
Haha! I actually have seen a lot of gorgeous rooms with big black tile (maybe herringbone pattern?) on the floor with wood lower cabinets and white uppers. The dark floors ground it and seem to tie into the wood lowers, and then the backsplash can be light and gleamy :)
xo
s
Kate says
Looking good guys!
Loving the contrast and that you went with the white upper cabinets instead.
Slowly, but surely it is all coming together. =)
Ellen Kelly says
Waited all weekend for your reveal. the kitchen looks great!!! I have cabinets one year old antique white with chocolate glaze. I would love love to do a dark shade on bottom cabinets, maybe black, but my husband thinks it would be a mortal sin!!! keep up the great work!! Love it, Ellen
Pamela T says
We were very busy starting the thursday before Christmas…our goal was to re-do the living/dining room.
our list was:
-paint all 20 panes on our huge 6 ft x 8 ft picture window (ok this was done prior to the week before)
-change out outlets from 1978 almond to fresh white
-install new trim in both rooms along with new window casings.
-paint ceilings
-fix walls (this was a huge set back, the house is a foreclosure and basically we had to take the hand sanders to the walls- they look beautifully smooth now!!!)
-paint walls
on Christmas eve we finished and had enough time to set a table for 16 for everyone that was coming over on Christmas!
We totally felt crazy for doing this, but it was so fun to finish in time and show our loved ones!
YoungHouseLove says
So awesome! Congrats on checking that stuff off!
xo
s
Elsa says
Hi sherry-
Do you paint and sand while pregnant? I’m currently pregnant and this is a repeated debate in our house. I feel fine with the idea of helping as long as we use no Voc paint!
Thanks!!
YoungHouseLove says
Yup I happily use no-voc primer/caulk/paint and sand and use low-voc stuff with a respirator (if I feel short of breath I stop and tag john and say “you’re it”).
xo
s
elsa says
Thanks Sherry! We just bought a brand new house and there isn’t a single area not in need of a paint job! I would like to tackle at least SOME of this before the baby arrives! And my poor husband can’t possibly do it all himself!
Isabel says
Simply amazing transformation. Cannot wait to see what you guys do for the counters and how the lowers turn out. Thanks for the inspiration to tackle my kitchen. I’m psyching myself out to conquer the wallpaper so we can get to the cabinets :) I tackled our upstairs hallway finally – it’s amazing the stuff you let go and when you finally tackle it you ask yourself, now why did that take 2 years?!? I also tackled a lot of little decor/organization/craft stuff and plan to keep going until I return to work on Thursday – love these stay-cations!
sarah @makingitmyhome.blogspot.com says
wow-what a drastic difference. it really lightens the whole place up!
I saved my massive project for this week too-removing the wallpaper and repainting the master bathroom! goodbye ugly kaleidoscope looking wallpaper
Meg says
What a transformation! I absolutely love it. So fresh and so clean, clean. :)
Hillary says
Tell me more about your desk area. We just moved into a house with a desk… but we also have an office. Right now we don’t have a chair for a desk and it is becoming a junk collection stop. I noticed the basket instead of a chair. Is that your final solution? What do you suggestion to make it useful and not too junky?
YoungHouseLove says
We just use the table so we didn’t find ourselves needing a desk area but we needed a shoe basket so it ended up there. Down the line our permanent solution will be to make that area more balanced (all built-ins and no desk I’d guess).
xo
s
Erin says
Love, love, love it!
Laura says
I love it! It IS amazing what those affordable updates can do.
Amber says
Hi guys!
I have a question. We remodeled our kitchen 2.5 years ago. We had raw custom cabinets installed. The cabinets are pine with birch cabinet doors. We hired a painter and it was awful. We didn’t know about you guys then so we hired out. Ok, so the cabinets were poorly caulked and painted in Kwal oil based paint with two coats. We want to recaulk and repaint them and redo the trim in the whole house but we don’t want to use an oil based paint. Can we use the same paint and process you used?
YoungHouseLove says
You’ll need to use an oil-based Kilz primer and then you can use the same Advance paint. Good luck!
xo
s
Nicki says
What an amazing transformation so far! It really is looking great! I love the light blue color of the walls.
Dina says
I love seeing all the changes. The kitchen is brightening up. We did a concrete layer over out formica counters. We initially thought we would do granite, but decided to do something different. We love them.
Jenn says
Wow, what a difference! For the counters, I painted mine using the Giani Countertop paint in White Diamond about a year ago and it has held up very well. Not a single scratch or ding to be seen. I was so nervous to paint the counters but the after had everyone fooled. So many people (including a realtor) asked when we got new counters.
I think the kit cost me about $80 and was super easy to use. The worst part was having ot live without counters for a couple days while everything firms up.
YoungHouseLove says
Thanks for the tip!
xo
s
Heather N says
Long time reader, but first time posting. I love how the kitchen is coming together. The cabinets look amazing so far!
My question is about your cutting boards that you keep out all the time. How do you use them daily? I’ve always liked the idea of keeping a nice cutting board or two out but then I find I never want to use them for anything but cutting bread/apples/cheese because they’ll get dirty. What do you use yours for? How do you clean them? Any other upkeep? Thanks!
YoungHouseLove says
Yes, we keep them out all the time and just rinse them as we go (we use plastic ones for things like meat and eggs that we can scrub).
xo
s
Mary McG says
We are working on painting a dresser and adding trim to it. Good luck! I love the white cabinets. I was thinking about the same hardware for my dresser.
Marlena says
Looks so amazing! Wow! The power of paint! And your hard work. I finally painted our downstairs bathroom this weekend (BM’s Simply White). Feels nice to have a fresh start in the new year, and that is part of our Phase 1 of the bathroom. Gotta save the pennies for Phase 2!