Let’s take some shelfies. You know, as opposed to selfies.
If only we had Beyonce around to photobomb them, they’d be the best shelfies ever…
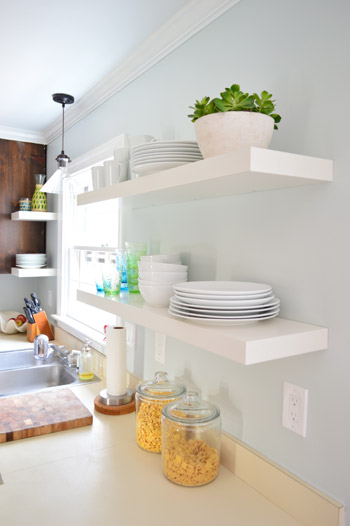
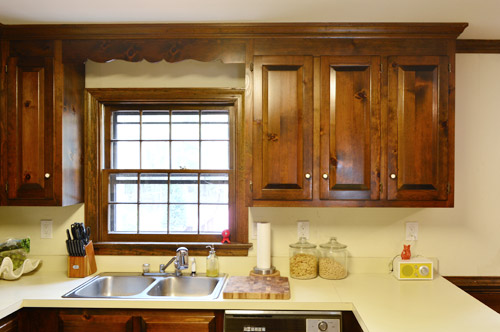
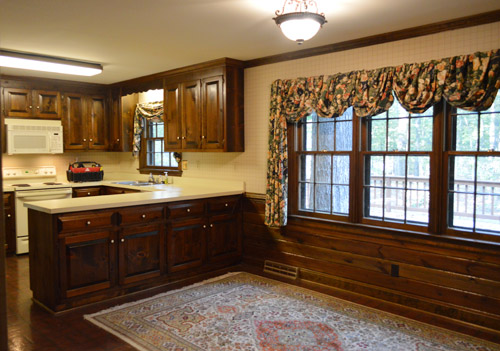
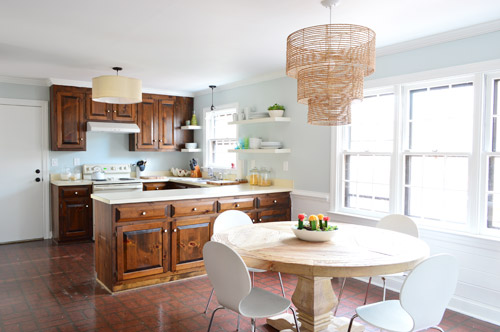
The no-Beyonce consolation prize is that we finally got the Ikea floating shelves up in the kitchen, and it suddenly feels like we’re turning a corner. We still have a few major things on the list (like painting those cabinets) but the shelves make such a gigantic difference as opposed to the dark cabinetry that used to hang on either side of that window. Here’s how it looked a few weeks ago after we removed the wallpaper.
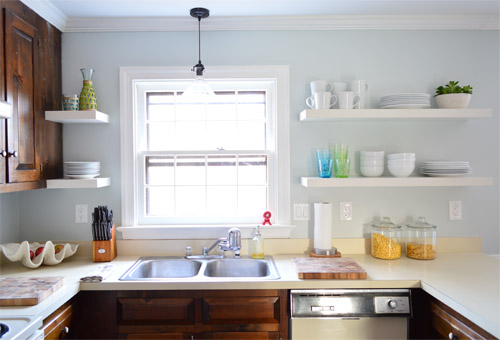
And here it is from the same POV now, after removing the cabinets, re-hanging the crown molding, patching/priming/painting the walls, trim, and ceilings, upgrading the lighting, and hanging those new shelves of ours. These pictures don’t even do it justice – it’s literally at least twice as bright and feels a lot bigger and more open as well.
When it comes to how we hung them (they’re lack shelves from Ikea), we decided to line the bottom shelf up with the cabinet on the left of the shot above (18″ above the counter) so that they all related to one another. The pre-made sizes allowed for a couple inches of breathing room around the window too, which we liked anyways. We just spaced the height of the second shelf by eye and chose 14″ above the other shelf, which gave us enough room to load up the bottom shelf without things feeling cramped, but also allows a shorty like me to easily reach items on that top shelf.
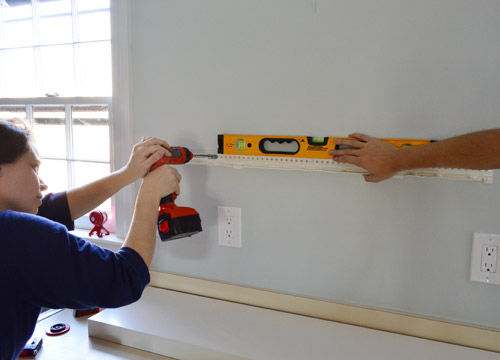
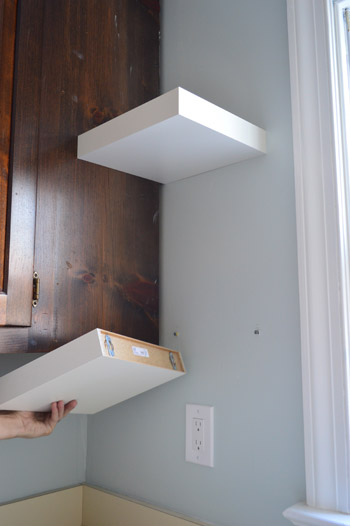
As for actually hanging them, we held up the bottom shelf in place and made sure it was level…
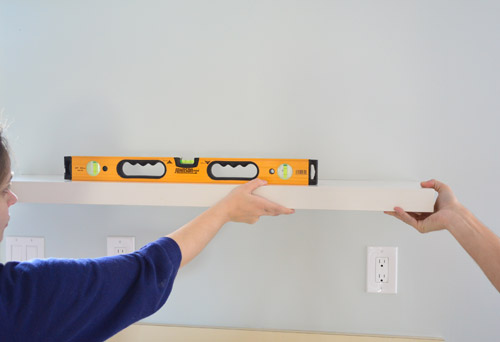
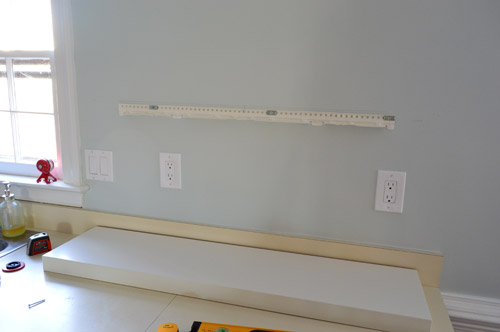
… before marking the top corners on each side and drawing a line across the top, like you see below.

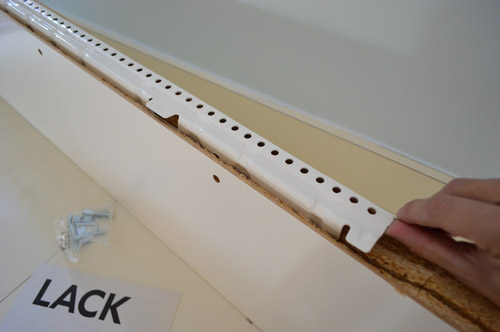
These longer shelves come with a metal hanging brace and screw, so when you open things up, this is what you’re dealing with.
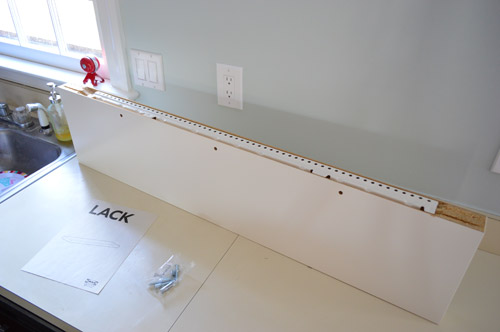
The metal brace is actually pretty smart. It has a bunch of holes all along it so you can just find a stud (we used a basic stud finder) and screw into at least two of those along the span of the shelf, so you know it’s extra secure. The instructions show a few recommended screw-to-stud placements.
Next I placed the brace along the horizontal area where we wanted to hang the shelf. I just measured in a few inches on each side from our little pencil corner guides since the metal brace doesn’t run as long as the shelves themselves) and I used one screw into the drywall right in the middle, just to hold the brace in place.
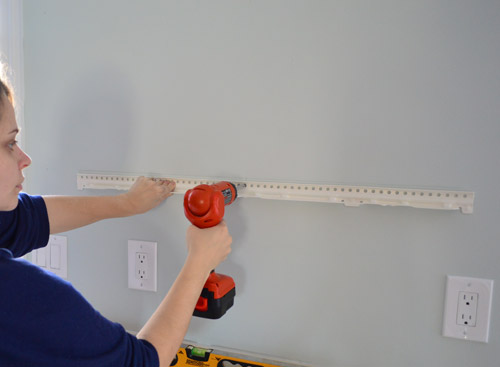
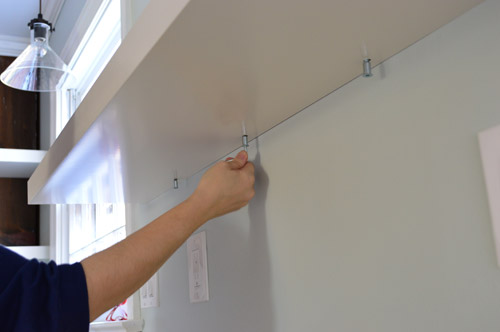
That freed up my hands so I could use the stud finder to find the actual studs, and drive two more nice long screws (provided with the shelves) into the studs on that wall, so it was held up really strongly (John aided me by holding the level to be sure it didn’t tweak up or down on a certain side as I went).
There are these little metal plates that you use when you drive the screw into the stud (they’re sort of like washers, they go under the screw and hold the brace even more firmly than a screw alone could), so those three metal rectangles that you see below are where two went into studs (we also added one more with an anchor for even more holding power).
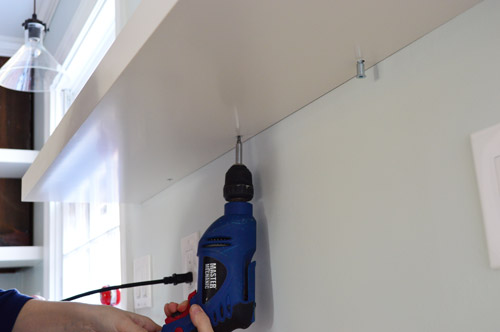
Then you just slide the shelf onto the brace and tighten the three provided screws that go into the three pre-drilled holes in the shelves. At first I did it by hand, all allen-wrench-style. That was for the birds (took a million years)…
… so I broke out the power drill to drive those in a lot faster.
We repeated that process for the higher shelf, and when it came to the little side shelves, those were really easy. We just used heavy duty anchors driven into the pre-selected spots on the wall that aligned with where we wanted to hang each shelf. As opposed to the longer shelves, which are screwed into place pretty firmly in three places each, these can also be popped on and off easily, which is awesome because we’ll temporarily remove these guys when it’s cabinet painting time.
They’ve been really sturdy so far. The stronger the anchor you use, the more stable your shelves will be – and of course if they’re not placed perfectly level into the wall, they might wobble. So be sure to measure at least twice and break out that level for the best result. I think as the room evolves, the items on each shelf will too (for example, I might hang a small framed photo above that stack of plates on the wall, or place something taller on that bottom shelf for some fun color/height).
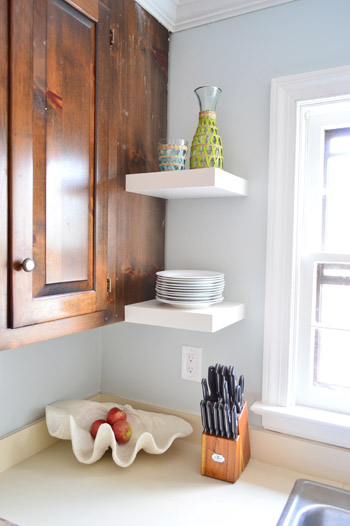
But for now they’re super functional – I just filled the bottom ones with the stuff we use all the time, and the top ones with items we just love to see. For example, things I might leave out on the counter to be decorative (like a potted plant or a pitcher-turned-vase) along with other items we use a lot that didn’t quite fit onto those bottom shelves (like more plates and mugs).
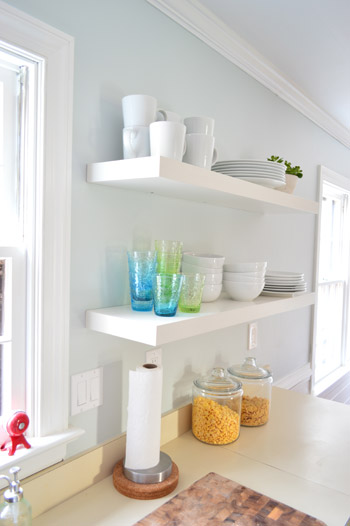
Here they are from the other angle. Oh man, it’s so much faster to unload the dishwasher again (we seriously missed that perk of open shelving from our last house) and we love that although they flank the window on each side, they don’t really block any light since they’re shiny and white (they bounce light around a lot themselves) and they’re not dark and solid like the old cabinets were.
Update: These longer shelves should each be able to hold 33 lbs according to Ikea if you go into studs (we went into two of them), and so far ours have been really strong no matter how much china we throw at them put on them. Giant upper cabinets full of dishes are held up the same way (screws into studs) so that definitely helps to ease our mind, along with the fact that we had good luck with the same type of Lack shelves in the dining area of our first house for 4+ years.
It’s certainly a far cry from the room that we started with around 6 months ago…
… and we’re crazy excited to lighten up those upper cabinets and go even deeper/richer with the lower cabinets. We’ve never had a tuxedo kitchen, but we’ve been such huge fans for a long time (just look at how gorgeous this one is). In fact we’re sanding and priming this week, so we hope to have a whole “new” kitchen for 2014!
Was anyone else doing last minute home projects this weekend in anticipation of the holidays? Do you have any big projects planned this week? We seem to have a tradition of doing something big and house-interrupting right in the middle of the Christmas craziness…
Psst- We’re taking more quizzes on Young House Life. And this one was crazy accurate!

Wendy @ New Moms Talk says
We thought we might have to sneak in another burn weekend, but thankfully we finished early last week in time to enjoy this…
http://www.newmomstalk.com/2013/12/23/beauty-burning/
As a result, we gave away a bunch of stuff via 2 Good 2 Toss (a site that is run by the county to reduce landfill waste). That meant I dug up over 100 pavers and 25 garden edging blocks in about 90 minutes.
YoungHouseLove says
That sounds awesome! I love hearing what you guys are up to, Wendy!
xo
s
beth says
Trying to get a guest bathroom finished before, well, the guests arrive! Just picked up the SW “tight spaces” paint brush you recommended – hoping it will help reach that tight space behind the toilet!!
YoungHouseLove says
Wahoo! Good luck Beth! I love that brush with a passion. Really, it’s weird how much I love it.
xo
s
Vanessa says
I love the way your kitchen is turning out. I cannot wait to see how the cabinets turn out. I love how open and bright this home is. I have loved all of your homes- but this is my favorite. Please do not ever leave it! :)
This just seems like the perfect home for your family. I hope you all have a very Merry Christmas.
YoungHouseLove says
Nevaaaahhh! You have to drag this house out of my cold dead hands. Haha! And Merry Christmas to you too!
xo
s
Sheila F. says
Beyonce is crazy jealous!!! It looks great. I love floating shelves. Merry Christmas!
Celia says
Wow, what a difference in the before and after. Those shelves look great. Good work and Merry Christmas.
YoungHouseLove says
Thanks Celia and Sheila! Merry Christmas to you guys too!
xo
s
VKS says
Ok, sorry, I have to call long-term durability card on this. We had one of these lack shelves at our house for awhile, we used it as the “mantle” over the flat screen, and after about a year, I could only put a very few light items up on it because it sagged. One side had a wall anchor and the other side was in a stud. We ended up putting brackets underneath the shelf to support it and make sure it didn’t crash down into the tv.
Maybe your plates are really light? But I don’t think I could keep a stack of dishes like that on a floating shelf and not expect it to rip out of the wall. What do you expect the lifespan of these shelves to be?
YoungHouseLove says
Oh no! We had three of these same Ikea shelves (the extra long 72″ ones!) in our first house’s dining area with plates/mugs/large frames for 4+ years and they never sagged! The new owners even used them to hold their TV & components up for the last few years, so they’re still going strong nearly seven years later (we saw them in the real estate listing when they were selling recently). The key is getting into the studs with those long screws to make them super strong (heavy things like giant cabinets full of plates are screwed into studs and don’t rip out of the wall, so that principle is at work when you hit those studs in a few places with the shelves). As for the lifespan, since the ones in our first house are on around 7 years of use, I hope at least for the same with these. Will keep you posted of course!
xo
s
Candice says
Ikea has gotten even cheaper… Heads up- the strength/ durability/design of the ‘current’ lack shelves are not the same of the ‘old’ lack shelves. Being in studs might gain back some of the ‘old’ quality but in anchors… I helped my sister turn her craft room into a nursery this summer. We bought ‘new’ lack shelves to match her ‘old’ long lack shelves for the room, just hung them above the each other. She noticed when buying them that they didn’t feel quite like she remembered the ‘old’ ones but we didn’t have them on hand to compare.
We started putting the ‘new’ ones up in the same way as the ‘old’… My sister went anchor overkill and bought 75lb anchors for shelves rated for 33lbs. We put a few knick knacks, mostly empty picture frames that were for future baby pictures, on the ‘new’ shelf, a couple stuffed animals…the ‘new’ lack shelf flipped off the wall, destroying itself and knocking down the lower, ‘old’ shelf in the process. The arms stayed attached to the wall via the anchors.
My sister, the architect, dismantled the shelves to figure out the problem could be. The short arms inside the shelf did not go all the way through to the front like they did in the ‘old’ shelf design.
I noticed a similar cost cutting in the desks/tables. I can’t remember the name but it’s the ones were you buy the table top in white for like $5 and the legs are each $3.50 in red/black/white/silver… Anyhow, bought a second desk for my son to match his brother in their shared room, the table top isn’t as thick, the legs aren’t as substantial or as tall, they’re adjustable via a peg you pull out to make it standard table height. Same price though, and I still had to build it. Basically, make sure you always push the plates and stuff back to the wall where the support is in the ‘new’ lack shelf.
YoungHouseLove says
Oh no! That stinks! So far these have been loaded up with dishes and plates, so it’ll certainly be a durability test! Their site says the weigh limit is 33lbs, and we probably have around 15-20 lbs on each one, so we’ll keep you posted for sure. And thanks for the push-stuff-back tip!
xo
s
lindsey says
They look great! I want to do this someday in my kitchen – thank you for the inspiration and tutorial, I love the look of floating shelves :)
Lisa K says
It looks beautiful! How did you decide to do shelves? I worry that things will get dusty quickly. What is the weight limit on the Ikea shelves that you used?
YoungHouseLove says
If you use screws into studs, these shelves should be super strong (that’s the same method used for hanging giant cabinets that people fill with tons of dishes/mugs/plates, etc) so we just made sure to go into those studs (anchors alone wouldn’t be as strong). Ikea.com lists the limit as 11-33 lbs depending on how you fasten them (going into two studs = mucho strong) so ours are nice and sturdy while full of dishes. We also had them in our first house’s dining area for years (the extra long ones) and had luck with those, and built open shelves in our last house’s kitchen, so we have found that we love them, but open shelves aren’t for everyone. We try to put stuff out that we use so often it doesn’t have time to get dusty, like everyday plates and cups and bowls along with other things that are out somewhere anyway, like potted plants – which are never in cabinets anyway (more on that here, with an update on how we liked living with them here).
xo
s
Jeanna B says
Love! Merry Christmas!
Ashley K says
Absolutely gorgeous! The transformation is already incredible! My husband and I spent yesterday working on our own version of the latch board you gave to Clara – we’re making 2 for some little kiddos in our life :) I’m excited to see how they turn out!
YoungHouseLove says
So cute! Good luck with that Ashley!
xo
s
Kay says
So bright! So white! So fresh and so clean clean! :)
Hope you have a wonderful holiday!
Mamaw says
Looking great, Petersiks!
Merry Christmas to you and your family.
GreenInOC says
I LOVE that they are floating, sans brackets; It’s a nice clean look!
So bright and purrty in there now.
Tara Menuchah says
Rita from Design Megillah (the kitchen you linked to at the bottom) is one of my best friends’ mom! She’s amazing… Love, love, love her kitchen. And yours is looking amazing too. :) Awesome.
Liz says
Looks great, as always. Question: why did you decide to hang the shelves before painting the cabinets? Are you going to take off the small shelves so you can roll the paint on or will you cut around them?
YoungHouseLove says
Oh yes, that’s in the post (those short ones pop right off for easy sanding/priming/painting). I just wanted the shelves hung for company that was coming this week!
xo
s
Dee Burn says
Looks so bright and clean looking! What are your plans for the floor?
YoungHouseLove says
So far we’re debating some peel & stick tile right over this for Phase 1 (we did that in our first kitchen before we even had a blog, just to make it more liveable, so that $100 and afternoon of work were worth it for us in that case). Still percolating though…
xo
s
Stephanie Phillips says
I was also wondering about the floor- looking at the room now, I can squint and almost see the finished product.
We have peel and stick in our kitchen and I really, really hate them. Like REALLY hate them. If you mop and scrub (as you should in a kitchen) they will slowly lift and peel at the corners. I imagine steaming the floors would lead to the same issue?
I would be OVER THE MOON excited if you wanted to experiment with a floor paint treatment so that I can let you figure that out before I copy it? No pressure! Ha.
I would actually prefer the heartache (and body ache) of removing the tiles we have now, getting all the residue up, and painting to leaving our peel and sticks down. I hate them that much.
YoungHouseLove says
Oh no! I wish we could paint the floor! We went into why it won’t work for us here. Womp-womp! We did install peel & stick tiles in our first kitchen and lived with them for all of Phase 1 without any issues, although we didn’t steam them (but I did mop/scrub them). Maybe yours weren’t glued well? Did you install them yourself?
xo,
s
Nikki says
I was going to ask the same thing! Everything else is so much improved that if you did the floors too I would think you could live with Phase 1 a lot longer. Things are really looking gorgeous!
Emily E says
Have you looked into a floating floor, like Allure at Home Depot? That’s what we’re planning to do this weekend in my daughter’s room to replace the carpet. It’s $1.79 a square foot, so it’s a little more expensive than peel and stick, but it might look better in the short term? Just a suggestion.
YoungHouseLove says
Will have to look into that too! Thanks Emily!
xo
s
Stephanie Phillips says
The initial install was done by the previous owners and we’ve replaced some of the worst tiles over the years. They just don’t seem to stick. Sigh.
Emily’s suggestion is a good one! We have laminate in our addition that is a huge floating sheet- it looks like wide-plank hardwood and most people think it is real. If my phase 1 (painted the pine cabinets, replaced countertops, added backsplash) looks like it is going to have to last much longer, I might break down and do that myself. I was trying to avoid throwing more money at temporary. We all know, though, that happiness > money so it might have to be done!
YoungHouseLove says
I’m so sorry Stephanie! Sounds like such a pain!
xo
s
Wendy says
We had a vinyl floor in the kitchen of an apartment we rented. I dropped a cookie sheet while taking it out of the oven and totally melted the floor in little spots!
YoungHouseLove says
Oh man that stinks!
xo
s
JG says
Question about the peel-and-stick tiles – all of the ones I’ve seen seem like they would horribly off-gas vinyl fumes (we’re pretty sensitive to fumes/smells here, especially with a 3.5 year-old) – have you found any that didn’t off-gas / smell badly?
YoungHouseLove says
That’s a good question! We haven’t used them for about 7 years (we did them in our first house’s kitchen and laundry area before we even had a blog) so I don’t remember that about them (it’s before I wised up about fumes and that stuff too) so it’s definitely something to consider when we weigh our options and see what’s out there. I definitely don’t want a slightly better looking floor that stinks! Haha!
xo
s
Isabel says
Wow, what a difference! Looks awesome, I can’t wait to see the painted cabinets! After the de-wallpapering marathon and finally getting the last curtains hung in the dining room last week (dining room = 100% complete for now!), the hubs and I are taking a break until after the New Year (although we’re planning on painting the upstairs hallway next weekend, you know the easy stuff). But looking at your kitchen I can’t wait to tackle our kitchen Phase 1 – cabinet painting and shelving are in the works. I think I might ask the hubs to make that his Xmas present for me :-) Do you guys plan on doing anything to the counter for this phase? Also, where will you paint the cabinets? Will you be using a VOC primer? I don’t have a totally separate area of the house I could tackle it other than the basement.
YoungHouseLove says
We are still researching options for the counter, so we’ll definitely keep you posted if/when we land on something!
xo
s
Amanda says
It’s looking very similar to House 2. I hope you try some new things in Phase 2!
YoungHouseLove says
I think it’ll start to look different from our last kitchen after we paint the cabinets (dark lowers is a whole new groove for us). And in Phase 2 we’ll definitely have fun with a new counter choice and backsplash pick as well as different flooring entirely (heated tile instead of cork), etc! Just have to save our pennies for big stuff like that…
xo
s
Ryan Hart says
Thanks for the hints about what’s coming in Phase 2. Can’t wait to hear about your thought process on choosing counter and backsplash materials.
Jessica says
Two questions:
1. How do you guys deal with hanging these by electrical boxes? I am so afraid of hitting a wire whenever I hang something above a light switch.
2. Doesn’t the placement of the dishwasher directly under the shelves make unloading the dishwasher difficult? I actually moved my dishes cabinet because I would have to unload the dishes onto the cabinet, then close the dishwasher, and then put them in the cabinet. I can’t imagine Sherry can reach easily. I’m 5’2″, so I know I couldn’t.
The shelves look beautiful and if we didn’t have an especially dusty house due to golden retrievers, I would also love to that in my kitchen!
YoungHouseLove says
1. Eeks, that would scare me if you’re sharing a wall with an electrical box or something (that’s not the case in here). Although, if you’re next to a box, the wires are usually run along the ceiling or floor and then come up in a “home run” to the box, so it’s usually very scary to drill above or below an electrical box, but if you’re just near one but a few feet away I don’t think there should be masses of wires just running everywhere behind the wall or anything. Of course I can’t be sure of your situation, so maybe get an electrician out there to check out what you’re dealing with?
2. It’s so easy for me now! I can reach that bottom shelf without issue when the dishwasher is open, which is where the majority of the stuff in the dishwasher comes out and lands, so the upper shelf is only for backup plates (usually the ones we use with company, and a few mugs). So those few things go on the counter, I swing the dishwasher door closed, and then I just load them up there. It’s much faster than opening and closing various cabinets for me!
xo
s
Jessica says
Oh, maybe I didn’t phrase my question correctly – your shelves are hung above a light switch and two outlet boxes. That’s what I meant by electrical boxes. I get nervous that I will hit a wire by accident, especially nailing into the studs that the boxes are attached to, which it looks like one of your screws is. Electricians never can seem to answer this for me either! haha!
YoungHouseLove says
Oh gotcha! Those wires usually drop down from the ceiling or come up from the floor directly above them, so we wouldn’t drill right above or below one on that same alignment, but when you drill directly into studs, you wouldn’t be likely to hit a wire (you’re drilling into a solid hunk of wood, whereas the wires usually run between the studs) so hopefully that helps!
xo
s
Wendy says
We were replacing some shoe rail and repainting those and the baseboards this weekend (in addition to cleaning. There’s something about freshly painted baseboards that gets me all excited for some reason haha
Are you going to use your paint sprayer on the cabinets?
YoungHouseLove says
Yes! We hope to get the doors done faster that way (since they can be removed) but the frames will be done by hand since we don’t want to get spray all over the kitchen in the middle of holiday craziness.
xo
s
Eilene says
I internally screamed when I saw the first photo of this post. Are you kidding me? You rock phase 1!
Michelle | Birds of Berwick says
It’s looking so good! Can’t wait to see the cabinets all painted and perked up!
Merry Christmas!
Janelle says
This looks so bright and airy. I can’t wait to see how the kitchen will look once the cabinets are painted. Great job and Happy Holidays!
YoungHouseLove says
Thanks so much! Happy holidays to you guys too!
xo
s
Paula W says
Awesome! I love the look of floating shelves (though never will want them myself, simply more surfaces to clean in a kitchen that gets a lot of stovetop cooking use) but sure looks good.
The kitchen you link to is really fabulous, i can see it in your house now (in your variation of course). The tuxedo paint scheme really comes across almost as ‘open’ as a kitchen with no upper cabinets, at least in the photos. Cannnot wait to see yours!!
YoungHouseLove says
Thanks Paula!
xo
s
Jen_nifer says
The tight shot looks great, but the wide shot calls so much more focus on the floor. I can’t recall, were you keeping the floor as is until phase two?
YoungHouseLove says
Ah yes, that floor makes us twitch! We’re debating some peel & stick tile right over this for Phase 1 (we did that in our first kitchen before we even had a blog, just to make it more liveable, so that $100 and afternoon of work were worth it for us in that case). Still percolating, but we’ll keep you posted for sure!
xo
s
Paula says
Just a thought with your dishwasher – you probably have different color panels behind the ivory color one that is showing. You simpliy remove the silver trim and the other colors might be back there. Ours had the option of ivory, beige, white, black, olive, and goldenrod. We actually took our panel to a local machine shop and they cut a new piece of stainless steel for us to fit and slipped that in for a major update without breaking the bank of a new dishwasher. The kitchen update is looking great!
YoungHouseLove says
AMAZING IDEA!!! Will have to check that out!!
xo
s
Stephanie Phillips says
GENIUS!
Wendy says
Ooh…please do a follow up post on this if you find something fun back there!
YoungHouseLove says
Definitely will!
xo
s
Kelly says
Installed new appliances this past weekend except for the dishwasher which is on backorder. LOVE them!!!!!
YoungHouseLove says
That sounds awesome! Congrats Kelly!
xo
s
Ruben says
Looking good!
It has been a while since I commented on your posts, but I have been following religiously. I even got a few of our neighbors to follow your website. They love it!
Congratulations on the new bun! Have a happy and healthy pregnancy! We just ended our 9 month journey last week with another baby girl!
Merry Christmas !!!
YoungHouseLove says
Thanks so much Ruben! And Merry Christmas to you too!
xo
s
Kylee T says
I love it! I also love the two butcher blocks on the counter. We are looking for some affordable blocks for our kitchen. Where did you get them??
YoungHouseLove says
HomeGoods!
xo
s
Megan @ Rappsody in Rooms says
Wow! It looks great! I’m so excited for the cabinets now since those shelves are just like a teaser of what beautiful cabinets are to come. I’m shocked out how much bigger your kitchen looks now!
Abby says
I love those floating shelves! So clean and organized!
Abby
http://thepreppycoxswain.blogspot.com/
Anele @ Success Along the Weigh says
Wow, those last 2 pics really tell the tale! It is really coming along and I can’t wait to see those dark cabinets get a lighter treatment!
Evan Beck says
LOVE the shelves!
I must have missed where you got them from though?
I have to get some!
YoungHouseLove says
Sorry, they’re from Ikea!
xo
s
rachael says
We’re sanding and priming our cabinets this week too! And our cabinets have NEVER had hardware or even a hole for them so we’re adding those after all the painting is done! SO EXCITED!
YoungHouseLove says
Ahhh! So exciting! Good luck Rachael!
xo
s
Jocelyn says
Can we talk about cats and open shelving? I know you have Burger, but my husband always nay-says the open shelving concept because of our cat. Our cat is all up in our grill/countertop/mantle, etc. Wondering if you’ve heard any cat vs. open shelving and its contents horror stories…
YoungHouseLove says
Anyone have any good/bad cat stories for Jocelyn?
xo
s
thedogsma says
Your husband is right. Been there, done that, broken dishes to prove it. If you have an athletic cat (mine are both rescue Siamese) who likes to be high up, open shelves are perches & dishes are obstructions to be pushed out of the way. I really like the look, but I like my dishes & love my cats.
I do have 1 shelf for big pots, but it is the ikea grundal–5 steel rods between brackets–which is not comfortable for them, & also placed where it’s hard for them to access it.
J & S–really attractive.
Happy Christmas!
Maria says
I can’t imagine that your cat wouldn’t want to explore the awesome new cat shelf. Lol. I know mine would. We have a vaulted ceiling in our kitchen, so there is a lot of space above our upper cabinets. I find the kitties up there at least once a week.
Diana Buchanan says
I love the idea of open shelves! They are obviously a testament to how much you liked them at the old house. I’m thinking of putting some up in the corner of my kitchen, I just have to bite the bullet!
I just posted the reveal of my new kitchen today!
http://fromragstonorthrich.blogspot.com/2013/12/our-new-kitchen.html
Merry Christmas!!!
YoungHouseLove says
HOLY COW, that looks awesome! I LOVE the tile!!
xo
s
Jordan says
I LOVE the open shelving in the kitchen! When we moved into our new (first) house, we thought it was a fantastic perk that it was recently, almost fully renovated. All we did was redo the shower in the master bath and lay wood floors in the master, replacing the new but already tired carpeting. Having become a huge fan of your blog, I’m wishing we had maybe gone for something with some projects, but it’s just really hard to convince yourself to start changing things when they are both new and functional, even if they aren’t exactly your taste.
I also have to say, I was blown away when you shared before and after photos of the newly painted trim in the kitchen. I hadn’t even noticed that fantastic horizontal trim below the windows in the breakfast room. Having grown up in a 100 year old house, I’m a big woodwork enthusiast. Things are coming along beautifully!
YoungHouseLove says
Aw, thanks so much Jordan! Your house sounds awesome, and I love that you went for wood floors in the master over the old carpet!
xo
s
Bonnie C says
haha we always end up doing a project right before the holidays, too (only if we’re hosting, naturally). This year it was wainscot & paint in the bathroom – done. The worst year was when he decided to rip up the carpet in the entry before realizing the tile would not be delivered until January. Yup, plywood entry that year.
YoungHouseLove says
Oh man! We have learned that our guests find it par for the course whenever they come over to see what the heck we’re up to (aka: find the mess), so here’s hoping your guests thought the plywood entry was a novelty! Haha!
xo
s
Kenan says
Love! Love! Love! This is great!! I am hoping for a kitchen redo this year and I think floating shelves would be a great touch of modern to our little abode! Also, I love the color! It looks so clean!! Much love and Merry Christmas from balmy SC!
YoungHouseLove says
Thanks Kenan! Merry Christmas to you too!
xo
s
dana828 says
Love the new shelves! I’m tho ping to put some open shelving in our kitchen soon. Thankfully we’ll be making an IKEA stop (4 hrs away) in the middle of a trip next month.
We’re right there with you in the Christmas project department. We’re currently in the home stretch of installing cork floors throughout our entire main floor. Just the center of the kitchen left to do today, so we can finally get the new appliances in…hopefully in time to bake a batch of cookies for Christmas, and get the tree up! We also relocated the fridge, which involved removing our pantry cabinets, so we need to get a new cabinet to go where the fridge used to be, and frame out the new fridge in it’s new home. So much left to do!
YoungHouseLove says
Good luck Dana!
xo
s
Emily E says
No home improvement projects until after Christmas, but we are going full throttle starting on Thursday! We’ve got two rooms to paint (one with dark wood paneling, eek!), one wood floor to refinish, trim to hang, and new flooring to lay. All before January 2!
About the wood paneling. The stuff we have is dark solid wood. It is covered in a layer of shellac. Should we use liquid deglosser or sandpaper, or both? We will use oil-based primer afterwards for sure, just not sure where to start!
YoungHouseLove says
I’d sand that, degloss it, and then prime (with a stainblocking primer) and paint it! Good luck Emily!
xo
s
Katie says
They look beautiful! Can you still open the cabinet to the left of the window fully?
YoungHouseLove says
Yup! There used to be a solid cabinet in the same place those floating shelves were added (see that in the before pic?) so we have the same amount of access as before!
xo
s
Sina says
It is AMAZING the difference that a couple coats (or 20) and taking down the cabinets has made in the house! We have been talking about doing some renovations in our kitchen too, like taking the cabinets over the island down to open up the space between it and the dining room. You, as always, inspire me!
Can I ask where you got the succulents? Are they real? I want to make a faux succulent pot for our kitchen table, but I cannot find any good not cheap looking ones.
Keep up the good work! And Happy holidays!
YoungHouseLove says
Fake! That was a HomeGoods find! I love it so much I got two of them!
xo
s
Meredith says
Looks so freaking awesome!! I can’t imagine wanting to redo the kitchen after you finish this phase!
I have one quick question. Do you remember the finish you got for your shelves? I remember being slightly overwhelmed by the white Lack options at IKEA. Is it just white, or are they high gloss white? In person, does that go well with the painted white trim of the window or is there a sheen/color difference? I’ve been wanting to get 3 of this (like in your old house) for the eat-in area of my kitchen, but have been unable to pull the trigger because of indecisiveness. Thanks!!
YoungHouseLove says
These are just “white” since we thought that might hide smudgy fingers and all that more than the high gloss ones.
xo
s
Ashley says
I love the shelves and the wall color. Question about the lighting in the kitchen, though. Is this your long-term solution? There just seems to be so much going on with three styles of ceiling fixtures in such a small space. Have you considered replacing the drum shade in the middle of the room with recessed lighting down the road? I think that would look really great and open the space up even more. Just a thought!
YoungHouseLove says
Yeah, we’re sort of wavering on that too. We might end up putting that quatrefoil shade in a bedroom (like our master) and getting cans in that area of the kitchen or something. Not sure yet, so we’re waiting to paint the cabinets before we really judge things…
xo
s
Ashley says
Gotcha. Excited to see that! It really does look great though. I am also excited to see if your dishwasher has some of these magical hidden panels your other reader mentioned! The idea reminds me of a Barbie dream house or something, where you just slap on whatever stickers you want! ;)
Jessie says
The shelving is certainly an improvement! I like it better than the shelving in your last house, too. Looks cleaner without the brackets. However, I just can’t get on board with the quatrefoil light. It really draws the eye and doesn’t look like it belongs.
Can’t wait to see the painted cabinets!
YoungHouseLove says
Yeah, we’re sort of wavering on that too. We might end up putting it in a bedroom (like our master) and getting cans in that area of the kitchen or something. Not sure yet, so we’re waiting to paint the cabinets before we really judge things…
xo
s
Theresa says
We just finished hanging those shelves in our kitchen. Can’t stress enough about grabbing that good old stud finder!! What do you use to cover the screw holes under the shelf? I can’t help but notice every time I walk into the room.
Wishing you a very Merry Christmas!
YoungHouseLove says
Ours are still lurking under there, but some white paint would obscure those three metal screw heads I think!
xo
s
Minru H says
Was browsing the Anthropologie site and saw these super cute whale bookends keeping your book upright!
http://www.anthropologie.com/anthro/product/home-room/27210285.jsp?cm_sp=Fluid-_-27210285-_-Large_3
YoungHouseLove says
Isn’t that awesome?! I keep telling John that we might need those for the Barnacle’s room! Haha!
xo
s
MG says
Those little shelves on the side….I’m wondering how they look in person. They look a little misplaced in the pictures. Did you space them with an even amount if space on each side or were they placed according to where the other was in relation to the window? Trying to get a judge on how they would be in person. I LOVE the color and how it’s coming along! I chose a bluish for our kitchen and it’s not so great. I love your choice.
YoungHouseLove says
Thanks MG! The space on either side of the window is the same for each of the shelves – so the window is sort of centered between the shelves with the same breathing room on all sides if that makes sense!
xo
s
Jennifer S. says
WOW. That looks awesome. Makes me eager to get going with our desperately needed kitchen reno. Last week the door fell off the broom closet. I think our “phase one” has reached its limit…. ;)
YoungHouseLove says
Oh man! Good luck Jennifer!
xo
s