Hood, there it is. Well actually, for the last couple of weeks it has been more of a “hood… there it isn’t” situation in our kitchen.
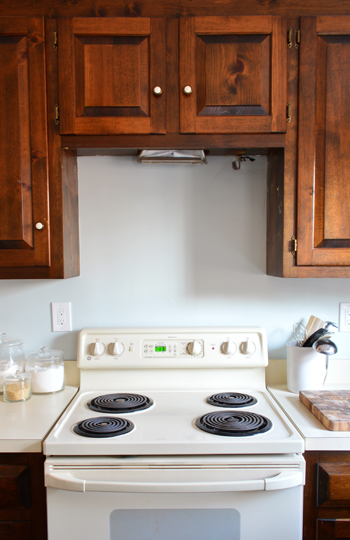
You may remember that we removed our over-the-range microwave before painting the kitchen and were thinking to get a 30 inch gas cooktop. Microwave’s the only appliance we’ve planned to replace as part of our Phase 1 kitchen makeover, since it was so front & center in the room, it crowded our stove, and we always seem to prefer range hoods over microwaves with vents when it comes to performance. So we replaced it with a stainless countertop microwave (more on that here) which we’ll eventually get “installed” into our pantry for the long haul (even into Phase 2) – we just need an outlet to be added in there so we can plug it in. But that still left us lacking in the over-the-stove ventilation department.
We knew whatever hood we bought would be just a temporary solution – since we’ll probably ultimately go with an exposed hood or something in Phase 2 – so we didn’t want to spend lots of money, but we had seen a bunch of options pop up on craigslist over the last few months for under $30, which is exactly the right range for us (we figure we can just resell it for around the same amount when we’re onto Phase 2 if we keep it nice and clean). So when this $25 option popped up, we were ready to make the move.
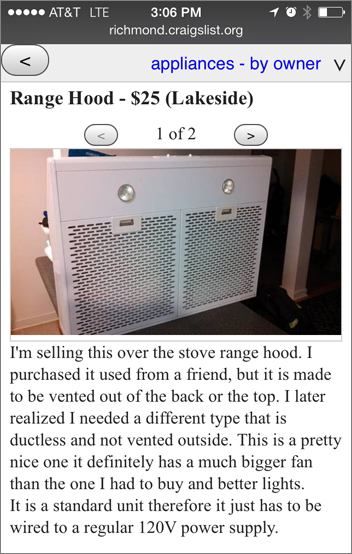
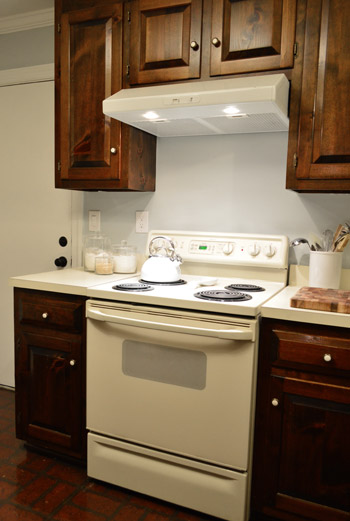
We liked that it was a crisp white color, that it was the right size for our stove, and that it also had the right type of top-ventilation setup that we needed. The only issue was that it was giving me flashbacks of the last hood we bought off Craigslist (apparently it’s our go-to source) and how much work went into hanging that one. Since it didn’t come with any of the mounting hardware that’s usually sold with the hood – and was meant to hang under a cabinet – we had to engineer our own solution.
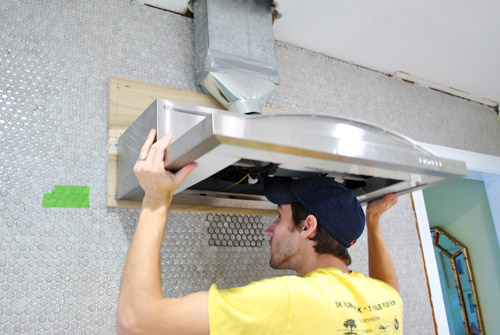
But guess what guys? This time around it was so much easier! I’m way too excited about it, but I’m just so relieved that I want to shout it from the rooftops – especially to anyone who’s nervous about making their own hood swap at home. We were lucky in that most of the stars aligned. And by stars, I mostly mean the duct work and the electrical. The hood we bought could be vented out the top or the back, and the existing rectangular opening on top lined right up with the rectangular vent already in our cabinet. So I just used silver duct tape (note: not the Duck brand tape that’s more common, since that’s not meant for actual ductwork) to seal up the second-option opening in the back.
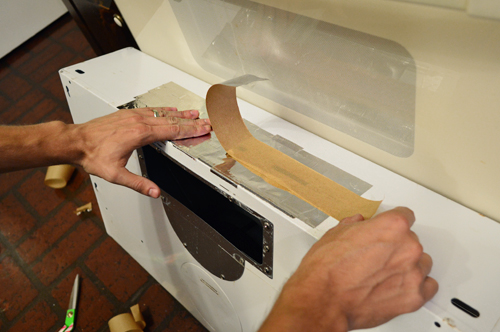
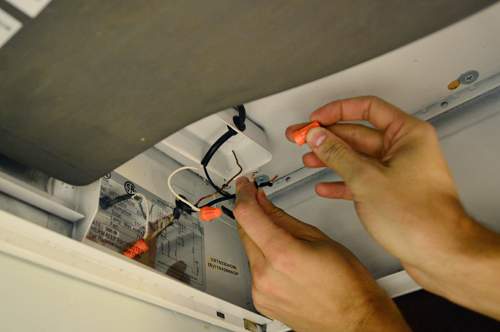
There were already wires in our wall right where they’d need to snake through to connect within the hood itself. So we didn’t need to call an electrician, I just had to pop out this metal tab with a screwdriver to create access for those wires to be pulled into the hood and connected.
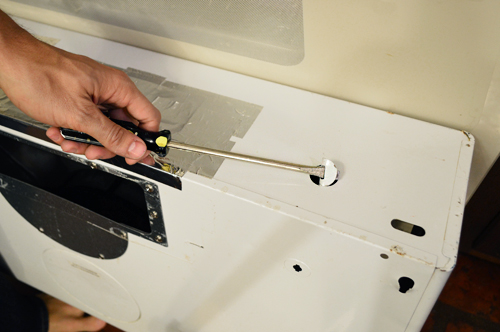
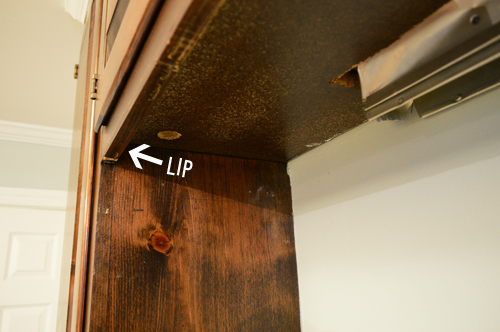
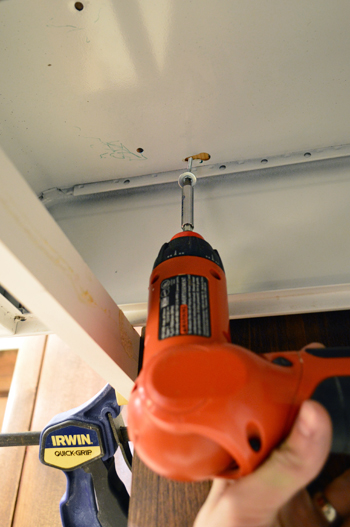
The only slight complication was that there was a lip under the cabinet, which got in the way of me screwing the hood directly into the bottom of the cabinet.
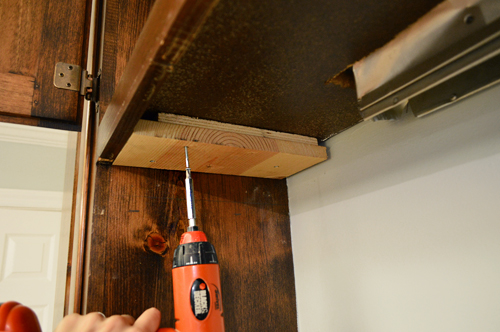
But thanks to a little scrap wood sandwich that I put together, I was able to screw blocks into either side of the cabinet so that the hood could be attached firmly while still being flush looking from the front.
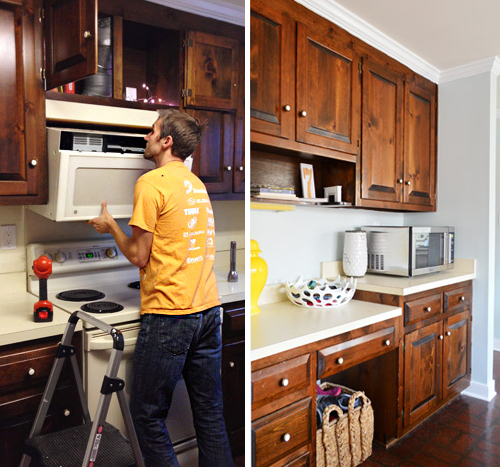
The part I actually feared most was holding the hood in place while trying to perform tasks like screwing it in and wiring it together. I pictured some comical Cirque du Soleil style contortions between me and a certain pregnant lady as one of us hoisted it up and the other tried to screw it in. This dream sequence involved a lot of sweat and more than a couple curse words. And then I discovered this how-to video with an ingenious trick. Maybe everyone else would’ve thought of this on their own, but for me it was DIY gold. I clamped a thin 1 x 2″ scrap board across the opening so that it could help support the weight of the hood while I worked. It involved taking off one cabinet door temporarily, but it was soooo worth it.
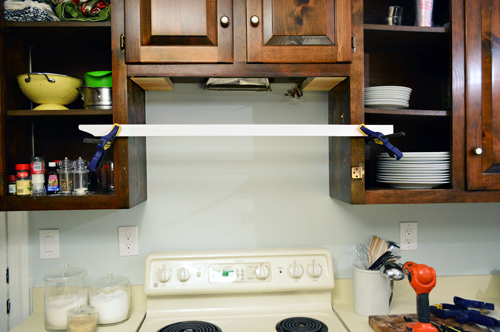
The man in the video also temporarily screws a brace into the back wall to support the hood, but mine seemed to rest in place without it (which saved me from making a few unnecessary screw holes).
So not only were Sherry and I spared my hypothetical sweaty-tangled-curse-fest, I didn’t even have to steal her away from the stuff she was working on in Clara’s room (I believe we’ve dubbed it The Wall O’ Fun, which she hopes to share with you guys tomorrow).
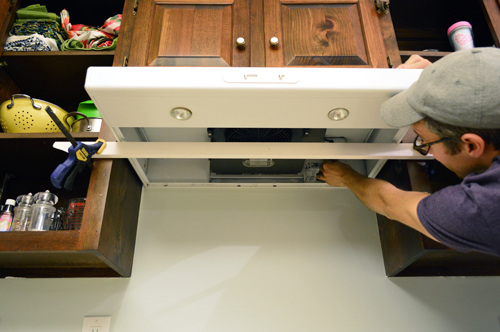
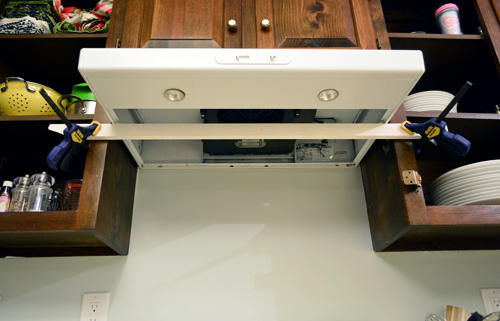
With the hood resting in place, I was able to shimmy the clamps up until the top of the hood sat flush against the wood blocks – and I checked within the upper cabinet to make sure the duct settled nicely into the open exhaust hole on the hood (it did, but later I sealed it up with some more duct tape to be sure). Then I was able to screw them tightly together using a screw + washer through the keyhole opening in the hood. All of this was accessible from within the hood itself just by removing the two filter screens.
With all four screws in place (front & back on each side) I could attach the wiring into the electrical box within the hood itself.
The whole process (minus picture taking time) was probably 45 minutes total, and most of that was finding and cutting scrap wood to make my mounting blocks. It’s not the prettiest solution the Internet has ever seen – but for $25 and less than an hour of work, we’re just happy to have ventilation back above our stove. And a lot less of a cramped feeling now that our hulking microwave has been replaced. Plus we’re planning to craigslist that for at least the cost of this hood, so this little Phase 1 switch won’t be breaking any budgets.
Both Sherry and I have declared the cool little halogen lights our favorite part. Until we have a kitchen with under cabinet lighting, these throw off a nice shiny glow in the meantime.
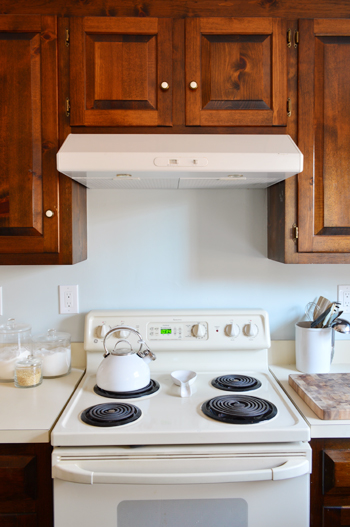
In summary, it’s a welcome change for this sliver of the kitchen to go from this…
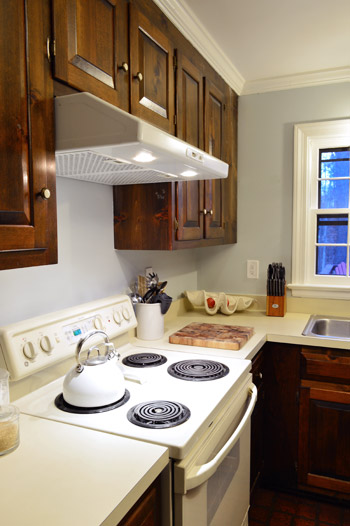
… to this.
Next up on our to-do list in here is to hang our floating shelves along the sink wall, and then we’re diving into cabinet painting. We thought that could be a good project to tackle over the holiday break, and maybe we’ll get to ring in the new year with some new looking cabinets!
Has anyone else switched out a vented microwave for a hood? Was it crazy complicated or blissfully uneventful? Don’t you love when you worry about something being full of challenges and then it ends up being fairly straightforward? It sure beats those “this should be easy” projects that somehow implode mid-way through…

Anele @ Success Along the Weigh says
So glad it was an uneventful process for you and dang, look at the light that baby puts out! Great deal!
Can’t wait to see the cabinets all painted.
Amanda says
I CAN NOT wait to see what a HUGE difference painting those cabinets is going to make. It will be like my belated Christmas present when that post pops up!
Leah says
Hey, is this the first Christmas you’re not working on a major reno/gut job? Or was last year the first one? I’m not sure last year counts, since you were on crazy book tour duty.
YoungHouseLove says
Yeah, last year was book tour craziness + hosting the holidays at our house for the first time. I think a few years ago we were repainting the kitchen cabinets, and we’re planning to do that again, so it feels like we’re back in the habit! Haha!
xo
s
AnnMarie says
I had to do a double take at the “from this…to this” photos – I thought you removed a tile back splash but nope, just the graph paper haha.
Lauren says
Such a vast improvement! Can’t wait for the paint.
Laura says
That trick is DIY gold. We never figured that out and we had to contort ourselves into various positions to install our range hood.
Mary | Lemon Grove Blog says
That looks so much more spacious now! A good vent makes such a difference in the kitchen.
Are you guys going to go with white vs. stainless appliances for this house?
YoungHouseLove says
I don’t think we’re sure what we’ll do for Phase 2 yet since John’s sister has white glass fronted appliances by Whirlpool that are so cool! We also hear a new line of stuff is coming out in white by another maker, but with a modern feeling, so we’re going to see what’s out there in a year or two when we’re onto Phase 2 and then make the call!
xo
s
Laura @ Rather Square says
Great switch! I’m bookmarking this for sure, especially the Craigslist tips. Our kitchen also has an over-the-stove microwave, and we don’t really like it (it came with the house and is so old that it doesn’t even rotate the food – I’m afraid we’re nuking ourselves every time we use it!). We may go the vent hood-countertop microwave route when we re-do our kitchen down the line.
http://www.rathersquare.com/2013/06/kitchen-updates/
megan says
I keep debating about getting rid of our vent and using a microwave over range with the vent. We have such a narrow galley kitchen I feel like it would open it up and give us more counter space. I’m so torn now.
YoungHouseLove says
Is there a cabinet that you could vent and build your microwave into? We did that in our last kitchen. And in our first kitchen we had it hanging under some shorter cabinets, but not above the stove (so that still had a nice open feeling without anything hanging too low above it).
-John
Jess says
We have a galley kitchen too and I love my microhood. It was the best decision for my kitchen layout and I don’t regret it one second. For me function won out over form, and I also happen to think my microhood looks nice which is a pleasant perk. Good luck with your decision, I think this is just like every other home improvement decision – it all comes down to personal preferences!
YoungHouseLove says
Amen! Gotta do what works best for you!
xo
s
Sarah says
I think it all comes down to the amount of clearance you will have after it’s installed! I’ve seen ones that look and function great and ones that are just plain wonky…it looks like the one J&S just got rid of was installed way too close to the range and as a person who cooks a lot that would drive me bonkers – but my grandparents have one that was installed correctly when they renovated their kitchen a few years ago and it’s a dream – works well, frees up valuable counter and cupboard space and you can fit any sized pot underneath it.
robin @ our semi organic life says
I love watching this phase I of your journey! It’s so practical and creative.
YoungHouseLove says
Thanks Robin!
-John
Laura says
This looks so great! I find this change can really update the look of a kitchen quickly. I love it the lights with also add that extra bit of sparkle over the stove!
http://www.oomphlove.blogspot.ca
JennP says
We are scheming up a kitchen reno – for next year hopefully. We already have the appliances and are pricing some cabinets and countertops now. I CANNOT WAIT to ditch the over the range microwave! I cook too much to have to duck and reach just to get to the back burners. Really annoying!!
Maureen says
We recently replaced a bulky over the range microwave with a range hood but it was not quite as simple. The previous owners had hidden a pretty nice size hole behind the microwave, so when we took it down, we had that to deal with and we also had to run our own wiring because the microwave was a “plug in” and not hard wired. Totally worth it though – much less claustrophobic at the stove now and I can actually use the back burners! Seems like you guys are doing almost the same renovations that I have been doing. I too, have a peninsula kitchen where I removed the cabinets over the peninsula and added open shelving. I moved our cabinet over the refrigerator forward as well. Once everything is complete (in the decorating phase now), I will share some photos!
YoungHouseLove says
Would love to see photos Maureen! That sounds awesome!
xo
s
Sara says
We are replacing our old range hood this weekend! (New stove arrives tomorrow. Thanks, Santa!) So we needed a new range hood (ours is horrible). Ours isn’t ducted though so it shouldn’t be too hard to install…and truth be told, I’ve only ever used the light on our old one…(we have a ceiling fan right by our range).
Laurie says
I really like the low profile of that hood. It sits pretty unobtrusively there. Are you guys going to do a backsplash? I’m asking for purely selfish reasons – I have to do my backsplash in the next few months.
YoungHouseLove says
We’ll definitely do a backsplash in Phase 2, but until then I think we’re leaning towards just leaving it painted (the walls of our first kitchen even after a full gut job were painted and held up really well, even above the stove).
-John
Julianne says
So much more open & fresh…
Thanks, BTW, for always sharing this kind of stuff. Since we started following blogs like your’s, we’ve attempted to do things that we would have never done before. You are our brave leader! ;O)
YoungHouseLove says
I don’t know about that, but I’m happy to share. And finding tip online to cut down on sweating and swearing definitely helped!
-John
mary | millay vintage says
Oh I so appreciate when you guys share these little in-between steps of practical improvements // And so smart to acknowledge that you can basically sell it for the same price when you do make the big upgrades later. Such a benefit of buying used or CL items!
YoungHouseLove says
Thanks Mary!
-John
Krista says
Great job guys! It looks so much better in there now. Extra light in the kitchen makes a HUGE difference. One question, how difficult do you think it would be to add a vent for a kitchen without? Our kitchen had an over-the-range microwave, which died a few months ago. I’d love to add a new range hood, but we don’t have any type of ductwork to the outside. Just curious if you’ve heard of anyone adding that and how difficult it would be.
YoungHouseLove says
I think that would really depend on many factors. For example, our kitchen stove backs up to the garage, so venting things up and out of the kitchen and into the garage would have been a lot easier than if it backs up to a powder room or living room for example. Also if you live in a one level ranch, it’s easier to vent up and out into the attic but if there are rooms upstairs the ductwork can be trickier. Anyone have tips for Krista?
-John
Jessica says
The Bowers added the ductwork!
http://www.bowerpowerblog.com/2012/09/hoodrats/
http://www.bowerpowerblog.com/2013/06/venting-a-vent-finally/
Maureen says
A recirculating range hood would work. They suck air in, filter it through a carbon filter and the then blow it back out into the kitchen. I don’t think they are as powerful as the ducted counterpart but it would eliminate the extra cost of adding ductwork, etc. – especially if the range is on an interior wall. I think there is a brand, “vent-a-hood”, which are fairly well reviewed.
Ali says
We HATE our recirculating range hood… it looks like it’s doing a little something (definitely much less “sucking” than a normal vented hood) but in all honesty it just sucks up the air from below and spits it back out the top right onto our upper cabinets. We’ve replaced the filter a few times and honestly don’t see a difference between an older filter and a brand new one. To top it all off, because it redirects the “filtered” air directly onto our upper cabinets, it’s starting to ruin the finish and they always look oily and gross. :(
Megan @ Rappsody in Rooms says
I’m so glad it went easily! And what a steal for the hood! It’s nice it is kind of like an even steven with the hood costing about as much as you want to sell the microwave for!
Meg says
I know you have mentioned it before, but what craigslist app do you guys use? Thanks! Can’t wait to see how the rest of phase 1 turns out!
YoungHouseLove says
I’m a huge fan of this one (I have it on my phone for free, and it even alerts me if things pop up in a category, for example, I had mine set to ping me every time someone listed a “range hood” or “vent hood”) : http://craigslist.mokriya.com/
xo
s
Lauren (in PA) says
OMG…I’ve literally had an oven hood sitting in my dining room for over a year because I’ve been afraid to do it!
You’ve toally inspired me to give it a go!
I’m fairly sure I’ll run into disaster though!
YoungHouseLove says
Ahh! Good luck Lauren! May the force be with you!
xo
s
Tania @ Run To Radiance says
Yay! It looks awesome. I love crossing stuff off our kitchen to-do list- I’m a list maker like you guys! :) We just hung our pendant lights, installed cabinet hardware and grouted the backsplash! Feels so good! :) We are almost done with “phase two!”
Taya says
What a difference! It definitely makes it feel more open! Love it as a phase one fix!
Heather P. says
Well done! I’ve always hated microwaves over the stove – it always made me feel like I was cooking with a microwave 2 inches from my forehead (aka I bash my head on them all the time).
I also think it’s great that you guys find ways to save on the temporary fixes! I know a lot of people who would have gone out and bought a brand new one – but who needs that if you know it’s going to be replaced down the line? Not me, that’s for sure!
Have a great day!
Rose says
Haha. I kept thinking “I wonder why some people don’t like the microwave above the stove thing?” And then reading your comment it hit me – I’m barely over 5′ tall and the microwave is above my head. I never think about it unless I’m using it! It’s not the most beautiful look either, but for functionality and keeping things off my counters, I’ll take it. Thanks for the insight!
Steph says
That looks great.
I’m super jealous of your vented range hood. I have one above my stove but it’s non-vented. They’re not very helpful.
Leslie says
Great work! That new hood makes a world of difference. I’m currently in an apartment with a microwave over the stove and I’m tired of it. In January I’m moving into my first home and I can’t wait for the new setup. The stove is in the island with a downdraft vent. Can’t wait!
Kaija says
That looks great! What a deal on CL! Can’t wait for the floating shelves! I love the look of them.
I wish I had known about the brace when I installed mine a bunch of years ago. Initially I had contracted Lowe’s guys to do it for $100, but when they arrived, it turned out that ducting for venting out and cutting through a cabinet would be extra. I swiftly escorted them out and decided to try it myself.
Electrical and ducting were both very straightforward, as well as cutting the hole on the bottom of the cabinet with a jig saw. But… I was alone so hanging the darn thing was challenging. Luckily it had those keyhole holes yours has too, so I decided to just mark the screw locations and hang it, as opposed to hold it up and screw it in place.
Well, I wish there would be a DIY video of that… I ended up holding it up with my HEAD whilst marking the holes on the bottom of the cabinet.
Maybe making a paper template and transferring the locations would have been easier… but who has time for that? I guess I would have said the same of the bracing, had I thought of that. :)
YoungHouseLove says
Oh man, that sounds like quite the feat of superhuman strength! So glad it worked out though!
xo
s
Sarah R says
Hi guys! That looks great! Would you mind adding in a shot from far away to see how it looks? I hope that you guys are excited for Xmas! I will be in Thailand of all places! My sister is there right now and got a 6 dollar mani pedi and $12.50 1 hour massage… so yeah I’m pretty excited :)
Can wait to see the painted cabinets! It will look so much more open. Well and then there’s the floors…
xo,
Sarah
Random side note- What is your/ Clara’s fav Christmas movie? Just wondering!
YoungHouseLove says
Yes, our kitchen was a mess (school project for Clara, gift wrapping, etc), so we didn’t do a panned out shot, but when we hang the shelves we’ll share lots of wider room shots! And as for our favorite Christmas movie, she loves certain parts of Home Alone and all of The Sound Of Music (she knows all the kids’ names and songs by heart).
xo
s
Sara says
Is The Sound of Music really considered a Christmas movie? I have never realized that- I always think of it as a spring time movie since it seems to take place in the spring/summer. hmm…interesting!
YoungHouseLove says
You’re totally right! They always show it around the holidays so I guess my brain just grouped it with those. She also loves The Grinch!
xo
s
Jenny Bailey says
We did the same – chucked the old microwave and put in a hood. It looks so much better and more spacious. It was really simple. We didn’t even bother with a countertop microwave since we never use it anyway, it would just be a big old eyesore for us.
Hanna says
I love that trick! I am always looking for good ways to help me do things on my own rather than trying to schedule someone to come help — that one is great!
And I know you like to know about these — I am getting a popup survey on your site. Not sure if it is from your site, or something terrible got onto my PC and is following me around the internet, but I thought I’d let you know just in case. :D
http://i90.photobucket.com/albums/k243/vorpaks/survey.png
YoungHouseLove says
Thanks for the tip and the screenshot Hanna! Will look into it asap! So sorry about that!
xo
s
Jennifer says
Wow, looks so much more open now! And the bracing bar is one of those simple genius things I never would have thought of!
We’re thinking about doing a similar Phase 1 approach to the kitchen in the house we’re trying to buy (it’s a short sale, so we’re in that long waiting process at the moment, cross your fingers!). We completely renovated the kitchen in our current house (down to the studs and knocking down walls and everything) and I’m completely spoiled by our brand new cabinets and under cabinet lights and all sorts of upgrades like that, but what I’ll miss the most are the quartz counter tops! The new house has laminate, and we’re thinking about getting one of the kits to paint them to update them before we can afford Phase 2, which would be new cabinets and counter tops – have you guys ever attempted painting counter tops?
YoungHouseLove says
We haven’t tried that but we have heard from folks who have liked using those kits by Rustoleum and also have heard of people using Ardex concrete to cover the counters so they look like solid concrete!
xo
s
jaclyn says
When we moved into our house, the existing range hood was so low to the stove top that you couldn’t even flip an omelette in a pan and lifting pasta out of a pot was comical to say the least. There was about 20″ of clearance but a huge full size cabinet above.
We tore down the upper cabinet, swapped it with a shorter one and got a low profile hood. It feels like the space grew 10 times! And yes there was some Cirque du Soleil style acrobatics between my husband and I as well as LOTS of cursing. We don’t have kiddos, and I like to tell myself the cats don’t understand swear words.
Sadly, our dreams of having a vented hood were squashed when we realized in the ceiling above the hood were a mish mash of intersecting, load-bearing joists all supporting our kitchen ceiling, upstairs bathroom wall and a section of our roof so there was no way we were cutting or notching into them!
YoungHouseLove says
It’s true, cats don’t understand swear words! Haha! As for the vented hood impossibility, that stinks, but the new low profile hood sounds like an amazing improvement!
xo
s
Amelia says
Holiday break? What, do you people think that you have an employer that gives you time off? ;) Get back to work, slackers.
YoungHouseLove says
Haha! Santa said we could take a break next week to paint the cabinets. Really, he did!
xo
s
Rachel says
Yay for uneventful projects! Love those! And that’s a great Stage 1 fix!
We didn’t swap out a microwave for a hood – we simply replaced one hood with another, which should have been easy. And actually it was. Except after we installed the hood we went to switch it on and it made a HORRIBLE screeching sound and then turned off completely. Turned out the fan was jammed. So we had to return it, and of course it was the last one in the store, so then they had to order a new one! Always something.
YoungHouseLove says
Oh man, that totally sounds like something that would happen to us!
xo
s
Chari says
Have you considered not hanging open shelving around the window? I think it looks so nice and open right now with just the view out the window. Plus, you guys are the experts at keeping minimal objects, that I bet you could live without the extra storage? Just curious.
Btw, I absolutely LOVE how you reuse what you’ve got and just finnagle it a bit to make things for functional for yourselves (a la the cabinet above the refrigerator, etc).
YoungHouseLove says
We have considered that but I think we love the function of open shelves so much (we miss how fast we were at unloading the dishwasher with them) and have an idea for how we could not block much of the window at all. Plus I love just seeing pretty things (my green and blue glass cups, a potted plant or some art, etc) so I can’t wait to get those into the mix (the walls are really bare right now).
xo
s
Gretchen Brown says
What a difference!! And I echo everyone else in the comments – painting those cabinets is going to make that kitchen GLOW! I can’t wait to see it. I painted mine many years ago and have always been so glad I did! I’m in phase 2 right now…..9 (NINE!!!) years after I completed phase one I have finally replaced the laminate countertops with granite and put in the glass blacksplash. I don’t care for my blah ceramic tile floors (with black grout!), but they are in good shape and I hate to spend the money to replace them so I painted the grout and WOW! Huge improvement! I love easy and cheap DIY projects! Thanks for all of the amazing inspiration!
Happy holidays!!
YoungHouseLove says
That sounds awesome Gretchen!
xo
s
Renee says
Just to let you know, there is an explicit ad for “League of Angels” just above your Google search bar.
YoungHouseLove says
So sorry about that! Grrr. We blocked that in another box, and now it’s popping up above the search bar?! Off to block them again. So sorry for the trouble!
xo
s
Amy E. says
when we swapped out our over-the-range microwave for a range hood, it was not NEARLY so simple. we wanted one that vented outdoors, but we have open space (instead of a soffet or low ceiling) above the cabinets, so it had to vent through our cinderblock exterior walls. that involved a jack-hammer-like powertool and LOTS of dust.
long story short, we couldn’t be happier and can’t understand why microwaves started appearing over ranges and cooktops in the first place. our teensy (smallest one sold at target) microwave sits on the counter. the only thing we regularly use it for is warming up water to warm up our daughter’s milk each morning and evening. we hardly ever use it for actual food re-heating.
YoungHouseLove says
Woah! That’s some varsity hood accommodating! I love that there was a jackhammer in the mix. And I love that you couldn’t be happier with the result!
xo
s
Randi says
I love that you break things up in Phases, it’s nice for some of us folks that will only plan to do a Phase I, due to budget/time constraints, it provides more options.
I really want to do this in my kitchen, the microwave/hood we have looks identical. Thanks for the inspiration and making things look easy!
YoungHouseLove says
Of course! Good luck Randi!
-John
Jane says
Totally random. But did you guys hear the new rihanna and eminem song ‘friends with the monster’? I am constantly thinking about Sherry’s interview with eminem everytime I hear that on the radio ! Love that song btw.
YoungHouseLove says
Oh yeah, that’s a favorite of Clara’s. She thinks the whole thing about monsters under the bed is about Monsters Inc. It’s hilarious. It comes on the radio and she says “Eminem and Monsters Inc!”
xo
s
SamanthaJoy says
We just repainted our old school oak kitchen cabinets with Cabinet Coat which I now consider a miracle in a can. We cleaned them really well, barely sanded them, and they look fantastic! We’ve redone all of the bathroom vanities as well. The paint dries really quickly so we only had to wait an hour in between coats. Home Depot now sells the paint online and at $44.97/gal its a definitely steal. Good luck with your project!
YoungHouseLove says
That’s so awesome!!
xo
s
Rose says
Nice. I enjoy the built in microwave-above-the-stove in our new home, because I hate things on the counters, but the venting sucks. It just vents through the top of the microwave and onto the ceiling. I would love to be able to upgrade someday to something more ducty that could vent out of the house, but that is a long way off. Anyway, looking good in there guys!
Pam the Goatherd says
My hubby is an appliance service tech/installer and I’ve assisted him with dozens of OTR Microwave installs and repairs but have never seen that clamp/board tip before. I could be rendered obsolete by that! lol
The range hood in my kitchen also has halogen lights. I LOVE the light they provide. But when one of them burns out be ready to break the bank to replace it! They are EXPENSIVE!
YoungHouseLove says
Eeks, thanks Pam! I’m so in love with the extra light. We are now 100% sold on under cabinet lighting, just because of how awesome these babies are!
xo
s
betty says
we got under cabinet lights that are motion activated from costco. I love how bright it is under the counters! but with 4 dogs walking around the house all day, the batteries die out quick!
YoungHouseLove says
Ooh those sound fun!
xo
s
Sarah R says
Oh, and also please don’t name the new lad North West.
Ha.
xo,
Sarah
YoungHouseLove says
Deal!
xo
s
Sarah says
We have the same oven/stove/microwave combo! It was nice to see how easy it was for you to remove the microwave and replace it with a hood… I might have to share this with my husband! :) Thanks for sharing!
Nikki says
1. I’ve been waiting for you to paint those babies since day 1! I can’t wait! I’m hoping to stain mine a dark cherry color over the break.
2. I’m INstalling a recirculating otr microhood/convection oven combo over the break. I have a tiny galley kitchen & I’m excited to have more space. the vent on my new hood combo is 3x’s more powerful than my current builders-came-with-the-house hood.
YoungHouseLove says
That’s awesome! One with that much power is sure to be a game-changer!
xo
s
Lauren says
I think your cabinets are gorgeous as is … love that stain color! BUT I know I’ll eat my words when I see your finished project. You always do great work.
Happy Holidays to your family!
Ls — sixteensunbuckles.blogspot.com
YoungHouseLove says
Aw thanks Lauren! You can see some up close shots in this post that show how they’re gouged and dinged and even gnawed on in a few spots, but from far away they do look deceptively nice! Haha!
xo
s
mp says
So glad to hear about this update! Consumer Reports has warned for years that over-the-stove microwaves don’t do a good job exhausting kitchen fumes. A friend of mine installed one and was sorely disappointed.
Lil says
Nice! makes me want to take down our over the stove micro.
What are your plans for a holiday break from the blog? I need to prepare myself. ;)
YoungHouseLove says
We usually just don’t post on Christmas day or the day after, so I think we’ll post on Monday, Tuesday, and Friday of next week and then be back at it again!
xo
s
Bernie says
I don’t understand how people cook under these microwaves?! If you cook something in a higher pot you can’t even stir it because microwave is in the way.
It looks much better now, and I’m sure it’s more practical too.
Hoods are really important in eat-in-kitchens