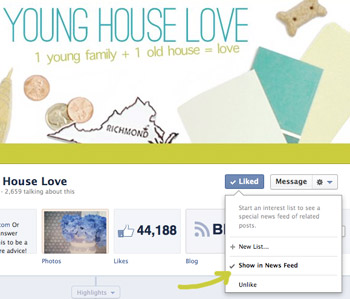
First a little Facebook diatribe: we’ve been hearing from folks who no longer see our posts or Instagram pics hitting their Facebook feed and have learned that FB made a few changes, so if you’d still like to see our posts in your feed again, just take a second to do this:
- Click over to our Facebook page
- Hover over the button that says “Liked”
- Make sure the box next to “show in news feed” is checked. If it isn’t, just check it. Then everything should permanently show up in your feed again. Sorry for the trouble!
And now back to our regularly scheduled blogging…
In case you missed the post where the tale of “removing the dated tree border that makes us sing that song from The Lion King in our bathroom” began (more on that here), we thought we’d share a few refresher pics. Exhibit A: the aforementioned tree-tile border that encircles the entire room, on all four walls – over and over again.
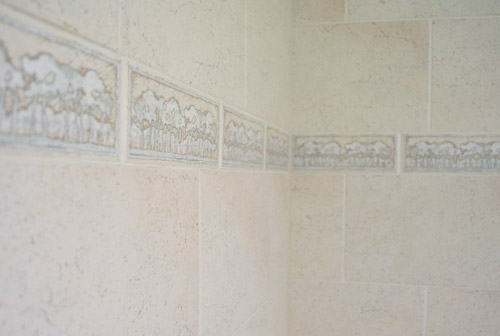
Exhibit B: The scene after a bit of Dremel-ing and prying with a screwdriver.
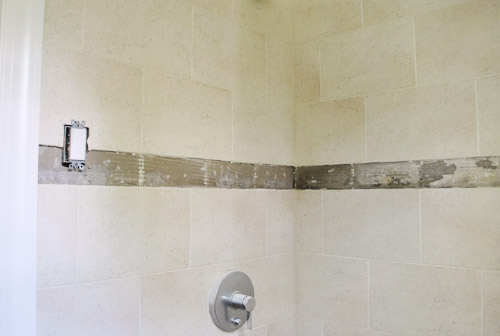
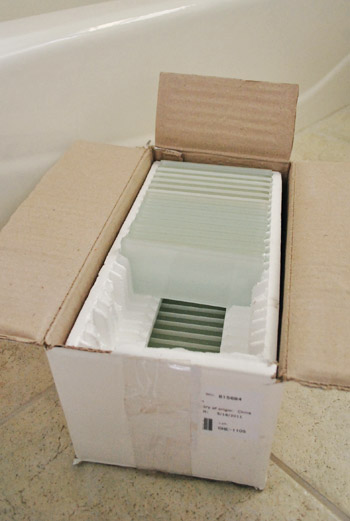
Exhibit C: The $50-ish box of clear glass subway tiles (called “Glass Snow” from The Tile Shop) that we’ll be installing in its place. You can read more about the tile we chose, and how Clara enjoyed lying on the floor of the store here.
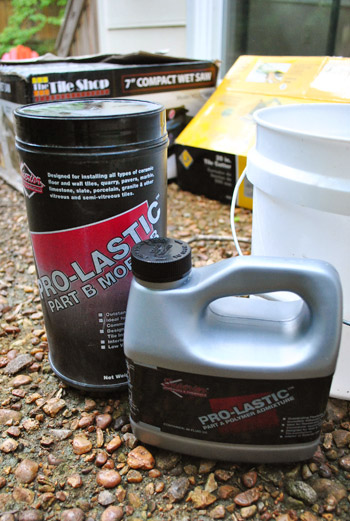
This isn’t our first trip to the tile rodeo, so this task promised to be pretty straightforward. Plus, by now we’ve accrued a pretty complete collection of tiling accessories, so one of our only purchases for this task was a new container of thinset mortar (the adhesive that keeps tiles stuck to the wall) and thinset admixture (the liquid that turns the thinset powder into its final cake-batter-y form). We got both of these at The Tile Shop for about $28 along with our tile.
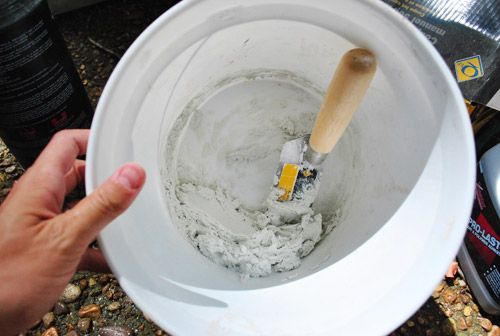
We mixed a small amount of mortar and admixture in a bucket using a trowel until we got it to the right consistency. Looking back at this photo, it appears a bit thicker than we usually like it (we snapped the photo prematurely, but kept mixing things to get it to the right consistency). In the end we like it to be spackle-like – like thick pancake batter.
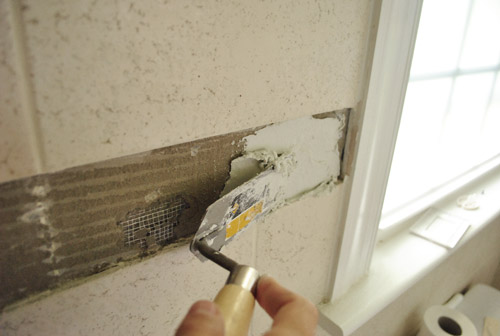
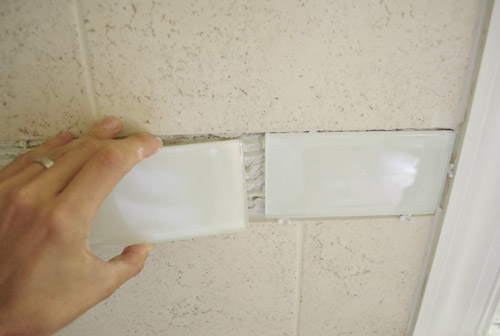
Since our to-be-tiled area was so narrow, we actually used the same trowel that we used to mix it all to spread the thinset on the wall.
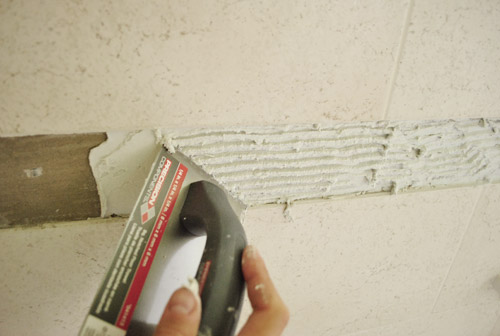
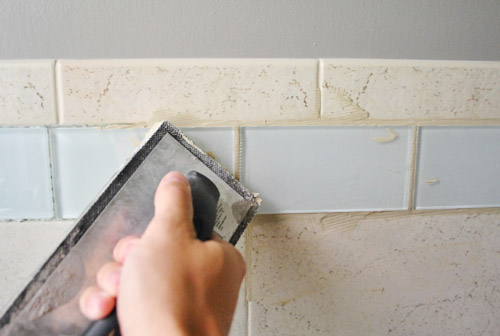
Then we went back over it with the grooved end of a small notched trowel that we picked up (the smallest one that Home Depot sold, for about $3) so we got that ridged surface that’s ideal for sticking tiles to the wall.
Actually placing the tiles was a cinch, since there was no leveling or anything needed. We just sort of plopped them in place (using some 1/8″ rubber spacers to maintain a gap for the grout). Some glass tile is completely translucent, so you have to be careful because your thinset lines can show right through it. Thankfully our glass tile is actually backed with an opaque film so you don’t see the thinset through it but it still looks completely glassy and clear (not frosted or anything).
We just repeated that process around all four walls, mixing up more thinset as needed.
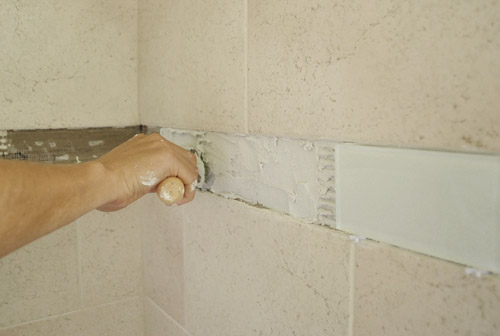
Here you can see the first section tiled (on the wall to the right) and the next side all thinsetted and ready for tiling.

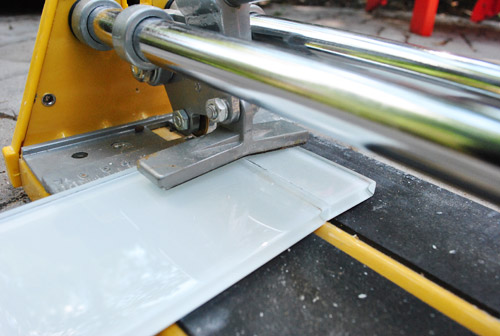
We did run into a few spots that required cutting (in a couple of the corners) so for that we broke out this tile cutter that we used back when we did the subway tile in our last bathroom. It’s a pretty cool tool (which sadly didn’t work when cutting our penny tile backsplash). You place your tile with your cut line aligned with the small raised ridge on its platform (the yellow stripe between the black rubber). Then with light pressure, you score your line by rolling the blade back and forth a few times. You can actually see my score line in the glass below.

Once scored, you move the angled metal pad atop the tile and press down until it snaps right along your score line (if all goes well). For us it’s the fastest, cleanest, and easiest way to get a straight cut on tiles like these.
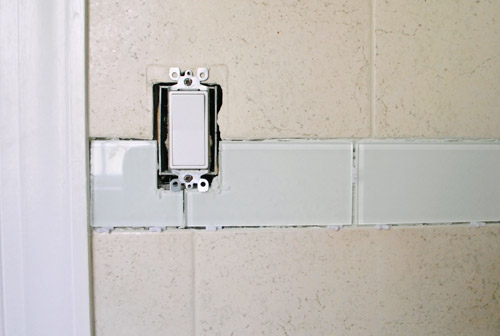
Unfortunately we did have one spot where we needed to notch out just the corner of a tile (around the light switch) which meant we had to use a wet saw. It stunk that we had to set up the saw for such small cuts, but it just had to be done.
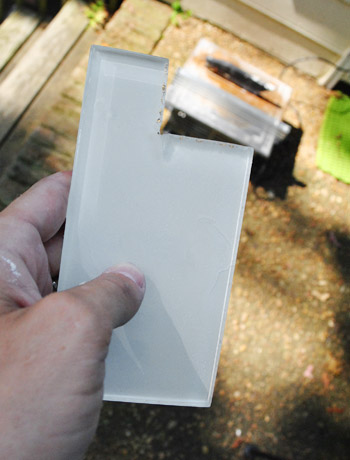
Here you can see the two tiles that got the wet saw treatment. The cuts aren’t 100% perfect, but the light switch cover will hide the imperfections at the corners.
All in all the whole process – from getting all of our supplies out to tiling and finally cleaning everything up again – took us all of Clara’s two hour nap. Not bad at all. One nap for demo. And another for re-tiling. This is our kind of project.
Of course, we weren’t completely done yet. Our new tiles still needed to be grouted and sealed, but all of that would have to wait for another day since we needed the thinset to cure completely.
But the next day came before we knew what hit us, and it was time to grout. At first we debated what color grout to do in order to try to get the best match to what we already had in there, but then we discovered that the previous owners had left us some of the grout they had used in the basement. It’s “Antique White” colored, which wouldn’t be our first choice against sleek glass tiles (we’d probably go with pure white or soft gray), but in this instance it was more important to match the grout in the rest of the room, so we sucked it up and proceeded.
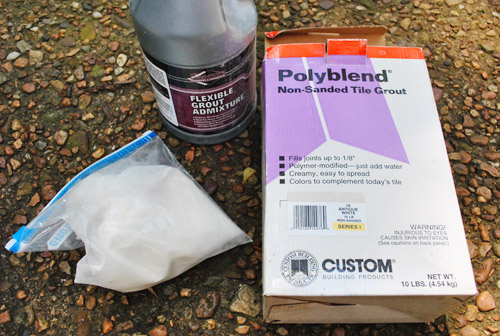
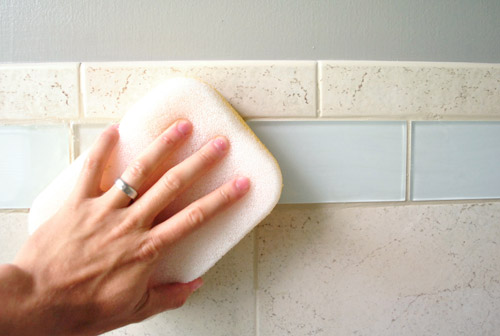
Having mixed up our free leftover grout with some free leftover grout admixture (a bottle we didn’t quite use up during our kitchen project), we went to town spreading the toothpaste-y stuff onto the tile surface using a grout float.
Once we had worked the grout into all of the grooves, we gave it a couple of minutes to set and then used a damp sponge to wipe away all of the excess from the surface of the tiles. The whole grouting process took just about 45 minutes. We’ll call that 1/3rd of a Clara nap.
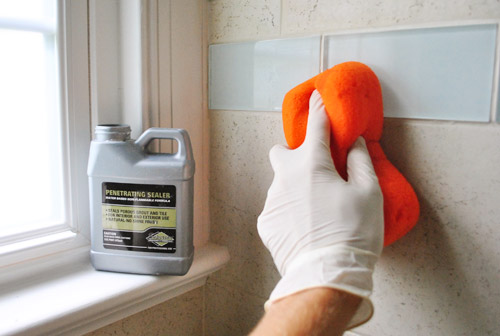
The last step – which we did the day after grouting so it all had time to dry – was sealing the grout lines so that they’ll stand up better to moisture and stain less easily. We had some sealer leftover from the kitchen, so we followed the instructions on the back and applied it generously with a sponge – then wiped off any excess a few moments later. This step took so little time that I did it while Clara was awake and playing in the other room. I know, I truly live life on the edge.
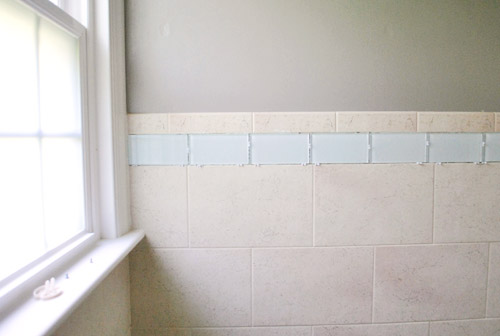
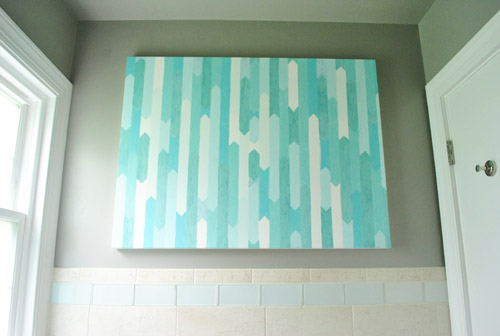
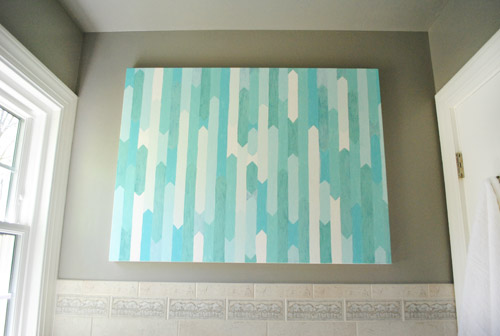
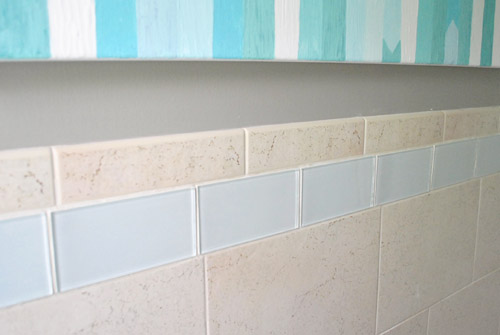
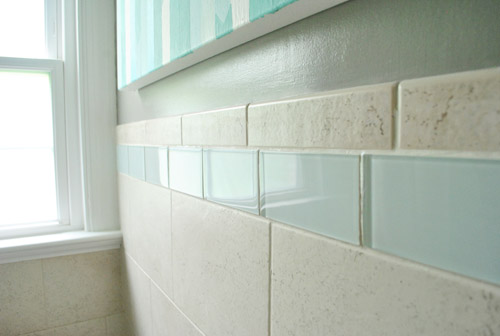
Sealing (plus putting a bit of caulk in the corners of the shower) was our last step to this whole project, meaning it took us just about 2.5 Clara naps (aka 6 hours-ish) to demo, tile, grout, and seal it. Not too bad at all. You can see in this picture below (on the left of the border) how the glass tile gleams as it reflects light around the room. It really makes the room feel fresher and more updated.
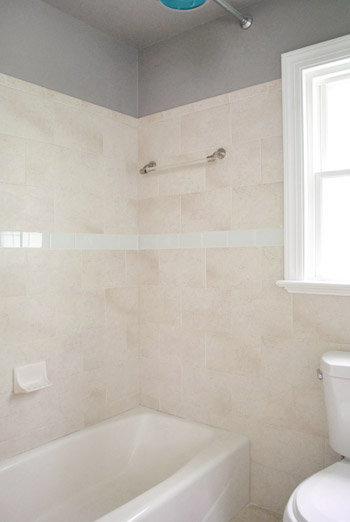
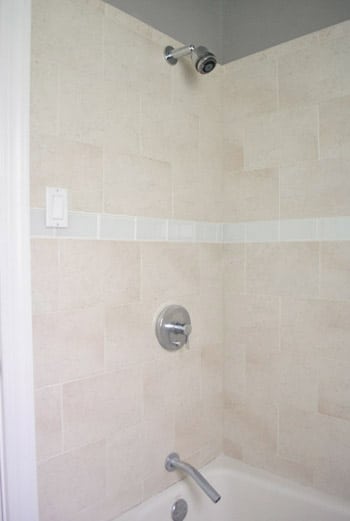
Admittedly we’re not always border-tile people, but the modern glass tile is a definite improvement from the trees, and for $50 in tile, it was an update worth making (we’ll get to the full budget breakdown in a minute). Reminder: that light switch isn’t really in our shower, this is just a really weird angle without the shower curtain in place – but it’s actually located outside of the shower curtain (so it doesn’t get wet).
It’s definitely one of those annoying these-photos-don’t-do-it-justice projects, so feel free to come over and use our bathroom to really see these guys in all of their glory.
It just feels simpler and less busy than the tree-drawings that used to encircle the room:
It definitely has come a long way from this shot that we took of the room before we started any updates (you can see links to all of our bathroom updates in order at the bottom of this post):
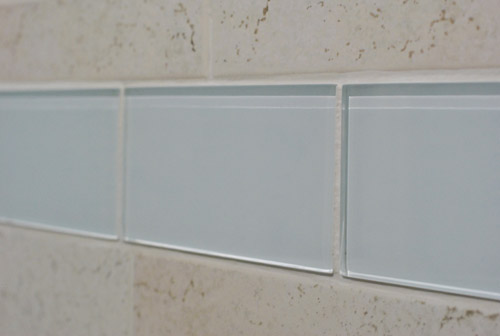
And although the tile is completely clear and shiny, it picks up the subtle tones in the art and the blue glass pendant light, so it brings sort of a cool tone to a previously very warm and beigey room. So even though those beige tiles certainly wouldn’t have been our first pick, they feel kind of balanced out by the new border tile.
We’re so glad we were able to use the same grout that the previous owners used to install everything originally – it really looks like this border has always been here, which is a lot better of an outcome than a new-border-installed-with-old-tiles look. Whew.
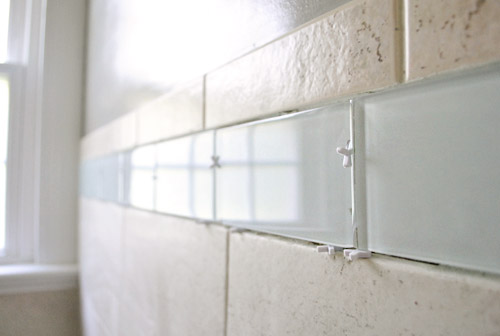
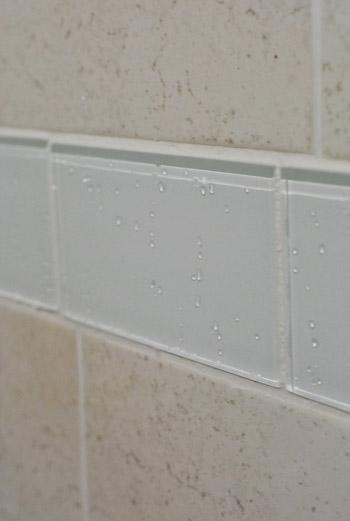
It looks especially glassy and sleek when it’s wet. We love how little drops of water collect on the glass surface and sort of reflect through the tile since it’s clear.
Here’s a shot that shows how it picks up some of the tones in the room even though it’s a clear glass tile – see how in this shot they look a little blue-green just because they’re picking up the art above them?
As for a budget breakdown, here we go:
- Clear glass subway tile (called Glass Snow) from The Tile Shop: $50
- Thinset mortar and Thinset Admixture from The Tile Shop: $28
- Small trowel and tile spacers from Home Depot: $6
- TOTAL COST: $84
Well, technically we also bought a Dremel Multimax (more on that here) which was $130 with the special grout head that we used, so the real total for this project is $214 if you count that, but our new Dremel has already come in handy for a bunch of other projects (we’ve used it on the deck and plan to use it on another project in the bedroom) so it’s definitely handy to have in our tool arsenal.
Oh and some folks seemed surprised that we were taking on another semi-big project like this along with our slow-going deck, but because we can only work on the deck one or two days a week (and it really demands full days of time, or at least chunks of 4+ hours) it could literally be a month or two until it’s completed. And this project was something we could tackle during Clara-naps, so we were excited to get ‘er done. So that’s what we’ve been up to in the bathroom. Wait, that sounded weird. Any bathroom projects going on at your house? Or are some tiling endeavors going on in another room, like the kitchen?
Psst- To follow this bathroom sprucing project from the start, check out this planning post, this painting post, this light-swapping post, this art and trim-painting post, this toilet-updating post, this window frosting and shampoo wrangling post, this toilet selling/buying and door-cutting-down post, and this pre-tiling post.

Vidya @ Whats Ur Home Story says
From the earlier post for some reason I was under the impression that tiles were a lot more bluer. They do update the look. The star of the room is definitely the pendant though. Can’t stop drooling over it.
We finished our landscaping project too. Hurray! Here is the reveal.
http://whatsurhomestory.com/new-landscaping-reveal/
YoungHouseLove says
Looks awesome Vidya!
xo,
s
Vidya @ Whats Ur Home Story says
Woohoo…didn’t realize I’m the first one. Yay! You guys are awesome. Really….you’ve been such a huge inspiration to me. Thank you!
Vidya
Julia @Chris Loves Julia says
Pretty, Pretty! What a transformation!
Amanda @ Our Humble A{Bowe}d says
I love the sleek glossy tile. It definitely modernizes the beige tile.
We’re slowly picking away at our bathroom. New lights and a little painting happened over the weekend: http://ourhumbleabowedblog.com/2012/06/12/you-light-up-my-life/ Almost to the good parts.
YoungHouseLove says
Wahoo!
xo,
s
annabelvita says
It looks so lovely and spa like! Good job!
Kristen @ Popcorn on the Stove says
Definitely an improvement over those tree tiles! I’m glad it was a short project for you two (and that there weren’t any issues that could drag it out), esp. with the deck project.
Kelley says
Looks great! I love glass tiles. Nice work :)
PS – Doesn’t your light switch in the shower freak you out just a wittle bit?? Yikes!
YoungHouseLove says
It’s just a really weird angle- that’s actually outside the shower curtain when it’s closed, right next to the door when you enter.
xo,
s
Emily R says
I know that the light switch isn’t in the shower, but I know where I live (Boston) the switch and outlets need to be three feet from water. This forces my switches to the outside of the room. Not sure what the requirements are where you live.
YoungHouseLove says
Yes, I’m sure those code things vary a lot by location!
xo,
s
Kristen says
I can’t be the first commenter (right? right?) but I just wanted to say I love the clear glass tile. Thanks for showing us (as always) sometimes you can just tweak what you have and make it look as amazing as ever! :-)
Bethany says
Its amazing what a difference the glass tile makes! It makes the room look so much fresher and modern. I never would have thought to do something like that, I probably just would have lived with the weird trees and given them the stink eye everytime I saw them, haha. I’m always so impressed by what you guys come up with!
debbie c says
Looks great! Um…is that a light switch IN the shower?
YoungHouseLove says
It’s just a really weird angle- that’s actually outside the shower curtain when it’s closed, right next to the door when you enter.
xo,
s
Amanda G. says
I think its time for an updated to-do list! :)
Melanie@MJ says
I agree with this! :)
& how is the playroom clean-out coming along?
YoungHouseLove says
Oh man, it’s slow-going in there because all of the secret book projects that we can’t reveal until this fall are stashed in there! Will keep you guys posted and share an updated to-do list soon hopefully!
xo,
s
Bethindc says
So much better! I thought from your post yesterday that they would be clear glass in a turquiosy shade. Did you consider that? These look clean and subtle.
YoungHouseLove says
They only had really green or really blue glass options (nothing very subtle) so we like that this is timeless since it’s clear glass, yet looks subtly tinted since it picks up other colors in the room. And this way if we change the accent colors it’ll pick up whatever new tones we bring in!
xo,
s
Jess @ Little House. Big Heart. says
I thought the same thing. I think it looks 1000% better, but definitely thought it had a subtle turquoise-ness to it from the previous post. This looks great though and should you decide that turquoise and gray aren’t for you you can still change it up.
Krystle @ ColorTransformedFamily says
I like it and don’t think that color grout looks bad with it. It does freshen up the room quite a bit.
yadira batres says
The room looks awesome guys.
I really like how simple but silk it looks
good job.
you make it look so easy, I would like to do that to the back splash in my kitchen.
Anyways great job.
<3
Yadi B.
Wendy says
We’re currently working on our master bathroom too. Unfortuantely we’re not to the “fun” stuff yet like tiling, painting or accessorizing. We’re still working on behind the walls stuff like exhaust fans. Sexy? I think not. http://www.oldtownhome.com/2012/6/13/A-Quiet-Inline-Bathroom-Exhaust-Fan/index.aspx
I can’t wait until the day I can take a bath in our salvaged claw foot tub!! :-)
YoungHouseLove says
Haha, it can still be sexy to have a quiet exhaust fan! Haha.
xo,
s
Alex - Old Town Home says
Sherry, this is exactly what I keep telling her! Not hearing your bathroom fan is so totally sexy that its sexiness is often lost on most people. :-)
YoungHouseLove says
Haha, good call. I agree wholeheartedly. Haha.
xo,
s
Krys72599 says
I can vouch for Sherry’s reply – we have a new bathroom and a new exhaust fan and for some reason, after the initial installation and QUIET test drive, NOW it’s loud and noisy! It’s at our lake house and we aren’t there 24/7 so repairing/replacing isn’t even on our radar, UNTIL one of us takes a shower!!!
Kim says
Amazing that such a small improvement makes such a big difference!
bridget b. @623Designs says
It’s nice how such a small switch makes a big difference.
Quick question: do you guys have a grout cleaner that you can recommend before sealing for grout that is already dirty? I don’t want to believe that we would have to scrape out all the existing grout in our shower and start from square one.
Thanks!
YoungHouseLove says
We have had luck using some sort of peroxide to clean the grout at our first house. Here’s that post for ya: https://www.younghouselove.com/2008/03/bathroom-breakthrough/
xo,
s
Madeline Kronfeld says
Great update! The Exhibit C picture looks eerily like Dexter slides – minus the red spot of course :)
YoungHouseLove says
Hahaha, I love it.
xo,
s
Kate says
Lovely! Did the ease of this project convince you to go ahead and re-do the floors soon too, or is that still on your “one day” list?
YoungHouseLove says
We’d love to tackle those within the year, but we’re not sure we’ll be doing them this month or anything! Will keep you posted though! You never know what could change! Haha.
xo,
s
Mrs M says
Love it. Just wish there were more “after pics” — maybe one of the whole room. I would love to see the tile in a shot with the hanging blue light!
YoungHouseLove says
Oh yes, we still have a few more finishing touches we want to do in there and then we’ll post lots more photos of the whole room!
xo,
s
sps says
that looks 1,000 times better. amazing what a difference a small change can make. great job!!
Ginny @ goofymonkeys says
The new tile looks GREAT! The glass is definitely more up to date than the tree border did.
Hannah says
This was such a small change with a BIG impact in your bathroom! We have builder beige ceramic tile in our guest bath and I’m thinking of borrowing a drimmel and adding an accent border in there! We are currently re-tiling our master bath floor (with a staggered brick pattern)and just finished our guest bath floor! So my husband might not appreciate me wanting to rip out some of the wall tiles right now :) I LOVE your blog!
Katherine says
Wow, I had no idea that you could take a line of boring tile trim out and add something new. The glass tile is perfect – simple, sophisticated and timeless.
Your installation skills are to be commended – this is spotless.
YoungHouseLove says
Aw thanks Katherine!
xo,
s
Amanda says
those tiles really do update the room… a small change for a big difference!
the hubs was actually doing some work in our bathroom over the weekend too… http://amidawn.blogspot.com/2012/06/fan-tastic.html
YoungHouseLove says
Wahoo! It’s looking good in there!
xo,
s
Megan D says
Interesting how different people like different things. I love trees and I bet those tree tiles would have been one of my favorite features of that house.
YoungHouseLove says
Oh yes, it’s totally a personal preference thing when you make your house your home! We always assume that there’s probably not one person out there who would make all of the same changes we’d make and vice versa!
xo,
s
Sarah in Indiana says
I liked the tree tiles, too! And I thought after you painted, they looked especially great. But I can see how these fit in more with your style, and this was a really neat project to see, for sure. I never would have guessed it would be so easy to switch out tile.
YoungHouseLove says
Aw, thanks Sarah!
xo,
s
ruthy says
such a small change makes a big difference! Looks really good…especially with that painting!
Deb says
love that you used the same grout! that way it just seems like it has always been there. great job guys!!!
YoungHouseLove says
Thanks Deb!
xo,
s
Karen J says
Now that’s what I call a treefeat (a.k.a. tree tile defeat)!
Maureen says
Looks awesome! I love how it takes on the blue-ish color.
On a side note, I have never seen a tub spout that looks like that!
YoungHouseLove says
Oh yes, we call it The Lead Pipe From The Conservatory (Clue reference anyone)?
xo,
s
Maureen says
Hahahaaaa! That is EXACTLY what it looks like. Tres chic. :)
Emma says
I was wondering the same thing about that spout! Great job guys. Keep up the great work.
Cristina S. says
Being a loyal reader for years (omg years?!?) it’s projects like these I like most. Small upgrades, anyone-can-do-this approach, major difference :) Love!
YoungHouseLove says
Thanks Cristina!
xo,
s
Alicia M says
Ditto! Love the small budget/big impact improvements!
Donna says
Now you have a throne fit for a king!
YoungHouseLove says
Haha, thanks Donna!
xo,
s
Traci says
Great way to update the room without having to redo everything. Bravo for the creativity.
Danielle says
Wow, what an improvement! Like some other people, I, too, thought the tiles were a pale blue at first and wondered how they’d work. I should’ve known to trust you guys! Great job, like always! :)
Allyn says
Way to go! This looks much more like you guys now.
We were wandering around our new Habitat for Humanity Restore yesterday and thought of you!
YoungHouseLove says
Aw, that sounds like fun!
xo,
s
Bianca C. says
Seriously has made a HUGE difference! It looks sleek modern and matches perfectly to the rest of te makeover you’ve done to the bathroom do far. Really guys, the tile looks awesome :)
YoungHouseLove says
Thanks Bianca!
xo,
s
Jen says
You make changing out some tiles look so easy!
Erin @ One Project at a Time says
That looks great you guys! I’m not usually a border tile person either, but we found adding this light green recycled glass tile to our wall of white subway made a huge impact on the space, and gave it that natural/organic feel we were looking for. http://oneprojectatatime.blogspot.com/2012/04/lets-take-closer-look.html
YoungHouseLove says
So pretty!
xo,
s
mribaro says
Although I love the clean white tile YHL chose for their new bathroom, that greyish penny tile border Erin used clicked immediately to me like the perfect solution for the YHL bathroom, ’cause that would avoid the vertical lines that are now not aligned in any way with either the top beige border nor the lower beige tiles. Plus I’m sure you still have some leftovers from the kitchen. Grey penny tile would tie in nicely with the grey walls above too. On the second thought, it might be a bit too much pattern, because the beige tile is a bit splattery-marbley. Maybe white penny tile… Anyways, it doesn’t matter as I’m sure you’ll enjoy your newly put white tiles for some time now :)
YoungHouseLove says
Oh yes, we looked at some leftover penny tile in there at first (even before going tile shopping) but it was too much. They looked really small and sort of busy in comparison to the larger wall tiles, so we opted for something simpler (this glass tile) that we liked a lot better in there!
xo,
s
Mel says
wow. i am amazed that you were able to get clean cuts with a tile cutter like that. we did a glass subway tile backsplash in our kitchen and destroyed so many tile$ with our various attempts to make clean cuts. The “all purpose” blade on the wetsaw rental from HD didn’t work either (since the tile gets its color from a thin layer of paint on the back, the wetsaw just butchered the paint and caused raggedy colored edges) – we ended up having to purchase a $75 blade specificall for glass, online.
YoungHouseLove says
Wow- that sounds so frustrating! So glad you got it done in the end!
xo
s
Sarah M says
Oh man, oh man! I LOVE it!!! It looks so good!!!
YoungHouseLove says
Thanks Sarah!
xo,
s
Lindsey @ arkadian belle woods says
This tile looks so awesome! Great choice! Very sleek!
Nicole @ Post Grad says
Yay! I love how great it looks. I was really worried that the yellow-ish tan tile wouldn’t go well with the new blue-ish glass blocks, but it’s really gorgeous! And yes, we’re definitely working on our bathroom as well. After the fiasco with the mold and the cops getting called about us in our hazmat suits, we’ve finally laid the new flooring and grouted. We’ll be posting about it all week – it’s such a huge transformation in that little room. I’ll definitely be referring back to this post when we start our tub/shower surround tiling project next month. Thanks for sharing!
YoungHouseLove says
So excited to see how it comes along!
xo,
s
Ruthie says
The tiles def look blue in yesterday’s post! And don’t you ever wonder what the previous owners thought when they picked out the tile?
YoungHouseLove says
I think in both of our houses we wondered why the previous owners made certain decisions (our first house had CARPET in the bathroom!) but we totally get how someone could fall in love with something like tree tile even though it wouldn’t be our first choice! I love that they went with what they love and not something safe that they didn’t like as much. Gotta make a house yours while you’re there!
xo,
s
Alison says
I definitely like that look much better! Definitely seems like more of you guys. Hopefully in a few years, you’ll be able to start all over with the tiles. Not feeling the beige as much.
Jen@The Decor Scene says
Love it! Perfect tile to choose. Now if you want to change the blues in the room down the road, you don’t have to worry that you had blue tile in there and have to work with that. Smart to stay neutral. ;)
LavandulaLady says
Looks good. But 1 question; weren’t the new tiles the same size as the old ones? It looked like they were (in the other post) when you held 1 up against the tree tiles. There were 7 of those and now there are 9.5 of the glass tiles (along the opposite wall of the tub.) Just wondering.
YoungHouseLove says
They were the same exact height but a different length (the tree ones were longer).
xo,
s
Andrea says
Love the new changes! The clear glass tiles are beautiful, and I really appreciate that you guys work with what you have.
PS– Will you have a discount on your new book for your readers or would you recommend ordering off of Amazon, Barnes & Noble, Powell’s, etc.. instead? Thanks!
YoungHouseLove says
I think the lest expensive place you might ever find will be Amazon.com right now since it’s something like $15 to preorder it! The book price isn’t something we have much control over (other than the fact that we started our partnership with a certain publisher based on them saying they agreed to make an inexpensive book so our readers could afford it while other publishers wanted to make a $50 coffee table book!) so we’re thrilled about a $15 preorder price tag! Hope it helps.
xo,
s
Lee says
I just ordered mine, and noticed the cover is up on Amazon now. Congratulations, it looks great!
YoungHouseLove says
Thanks Lee!
xo,
s
graduate.living says
This looks fantastic! It’s amazing what such a small change can do to the feel of a room.
Regina says
How did you get all the old mortar off the wall before you laid the new tiles? Were you just that lucky and it all pulled off with the tiles themselves? I’m not having that kind of luck in my kitchen. :P
YoungHouseLove says
It seemed to come off enough when we chipped out the tiles for us to just mortar the new ones over that, but we totally know how hard it is to get mortar out when it doesn’t come out as easily. We feel your pain! Good luck Regina!
xo,
s
Jane says
Wow..looks so cool! It looks so modern now!
Our big Karl is being delivered today and I definitely want to update the legs like you did. But , since am pregnant , I cant spray paint , my husband is going to do it..cant lie ..but am scared that we may spoil the legs…Did you ever spray paint when you were pregnant ? Rustoleaum has some pretty scary warnings on the back !!
YoungHouseLove says
Don’t do it!! I left all of that to John when I was prego! It’s just not worth the risk. I guess if you had a super strong gas mask (not a paper mask, but one that lets nothing in) you could do it, but I’m sure your hubby will do awesome.
xo,
s
Jane says
Yeah..I will make sure I wont be in the vicinity when that happens..But I will be sure to send you a picture of how ours look like..just cos I feel like we are Karl Buddies :P
YoungHouseLove says
Haha, I’d love that!
xo,
s
Teri says
Looks great. Before my eyes went right to the trees, now they go to that great canvas you painted. I have all white tiles in my older bathroom except for a blue and beige border that somewhat resembles waves. ughh…I hate it. Maybe I’ll have to pull out my dremel and give it a try too!
YoungHouseLove says
Thanks Teri! I think you articulated something we couldn’t. Now the focus isn’t on those repeating trees, it’s on other things in the room that we like more than all that beige tile!
xo,
s