Since Photoshop is our go-to tool around here for blog picture editing (and we get asked for a post with tips, tricks, or pointers pretty regularly) here it goes. But first, you should know a few things…
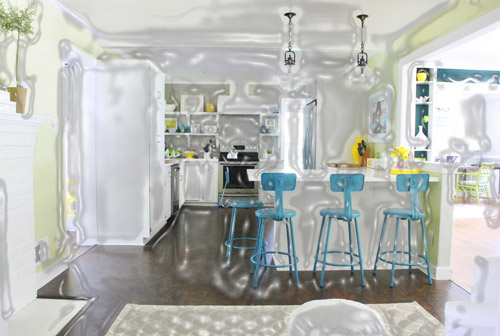
1. We’re not Photoshop experts: I took a digital photography course in college (in 2003) that taught me some basics and a few tricks, but it was by no means exhaustive. Sherry has a similar background, having used it a bit in art classes in high school and college. But both of us consider most of our skills to be self-taught. Basically just playing around and seeing what button created what effect on our photos. Sherry was a big fan of the “plastic wrap” filter back in the day. Seriously, she made a CD cover with her and Eminem on it with this filter to “cool things up” back in high school. Thank goodness she has matured, or else all of our blog photos would look like this:
2. We’re not photography experts either: Besides some of the basic classes we both took back in school, most of our photography is self taught as well (Sherry took a photo class in college but claims only to remember how to develop film and nothing about actually taking photos). We’re still not that great at it – or at least not as good as we’d like to be – which is partially why we’re grateful to have Photoshop, which helps photos that might not really capture how something looks in real life, look more like they do in person. Since we’ve yet to find a camera with a “capture this shot just like my eye sees it” function, we mainly use Photoshop to fix that (so you guys get an accurate picture of what a certain project/room looks like instead of being limited by our not-always-stellar photography skillz). Maybe someday we’ll be able to post photos straight out of camera (SOOC as the cool kids say), but we’re not stressing about that since just about all of the pro photogs that we’ve encountered do some degree of picture editing.
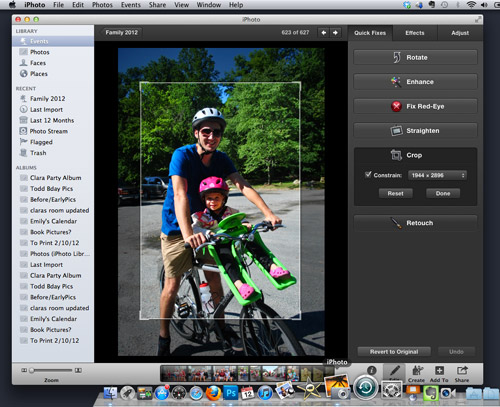
3. Photoshop is not the only photo editing option: We use Photoshop because it’s what we’re both comfortable with and by general standards, it’s the most comprehensive and professional-grade photo editing tool out there. However, it’s not cheap (aka $700-not-cheap). It was a business expense for us (and it was something we used for years beforehand and knew we liked) but there are definitely cheaper alternatives for those who aren’t ready to fully commit. Adobe sells “lighter” versions of it, like Photoshop Elements ($100), and there are other options like iPhoto ($15) or Picasa (free) that can do some basic adjustments too. We’ve also heard recommendations for free software like GIMP and Picnik, which is now apparently part of Google+. We haven’t used those others (except for iPhoto, which we rely on to organize our pictures and do basic functions like straighten and crop – see below) so I won’t provide advice on those.
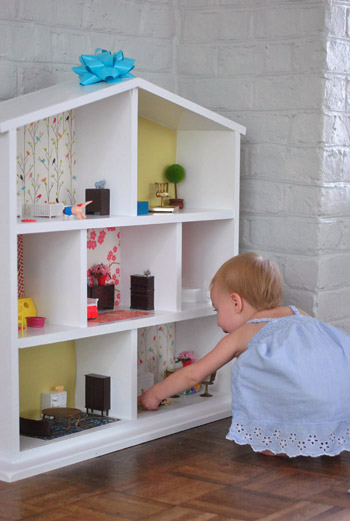
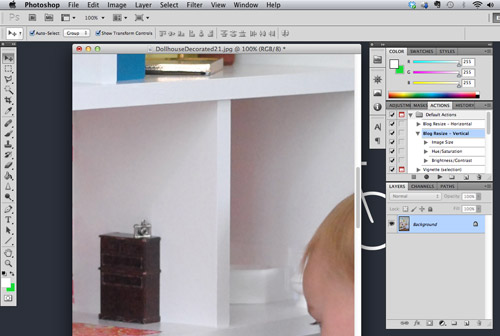
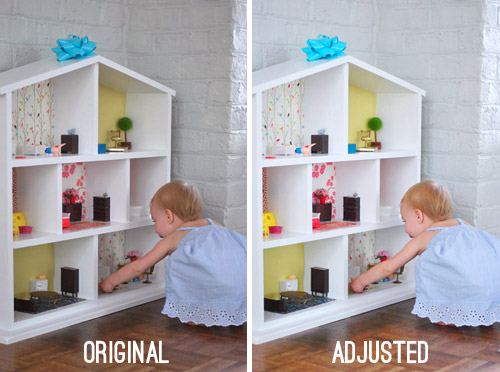
Now, on to the meat of this post. I thought I’d start off by showing you the basic editing adjustments that we use on just about every photo you see. Again, these aren’t major things like changing a wall color or removing Sherry’s sixth finger – they’re just the tweaks we make to what you see on screen look closer to what we actually see in real life. Let’s use Clara and her dollhouse as our subject. Here’s the SOOC shot:
It’s not actually all that bad since our living room gets a fair amount of natural light and we remembered to white balance the camera before snapping the picture. But there’s still room for improvement so we open it in Photoshop.
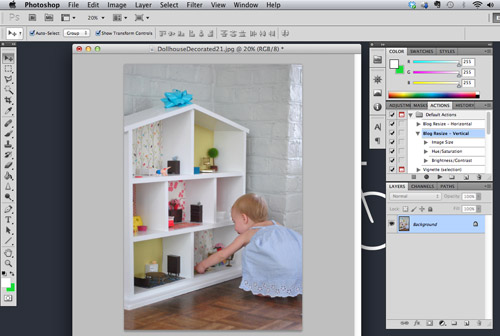
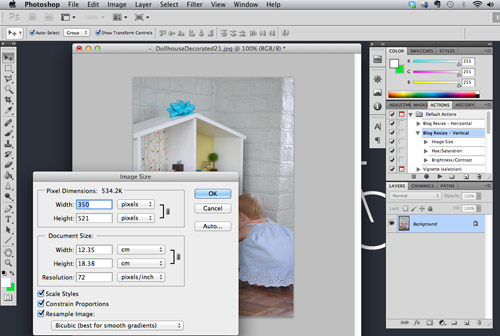
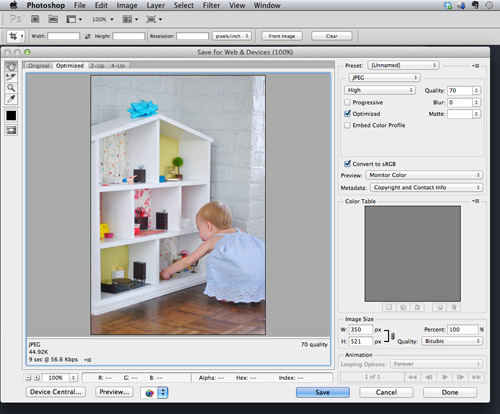
The first thing we have to do is resize the image, since what you see above is only 20% of the actual size. If we were to post pictures at 100% they’d look something like this and our blog would be slower than molasses.
So we IMAGE > IMAGE RESIZE… (or Command+Option+I on a Mac) to resize it to 72 dpi (which is standard web resolution) and 350 pixels wide (which is the standard size we’ve chosen for vertical images on our site – horizontals are 500px). Be sure the “Constrain Proportions” box is checked so that Photoshop automatically adjusts both dimensions and you don’t end up with a weirdly stretched photo.
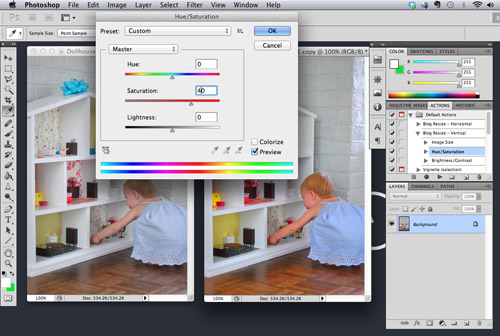
The next thing we do is up the color saturation a bit. This just makes the colors a bit more vibrant (they usually are flatter in photos and more vibrant in real life) and it can be found under IMAGE > ADJUSTMENTS > HUE / SATURATION… (or Command+Option+U). The adjustment shown below (+40) is more than we usually do (which is usually just +10) to help illustrate the difference. You can see the original picture at the left and the more saturated version on the right. But that’s way too saturated to look real, so we usually just do +10.
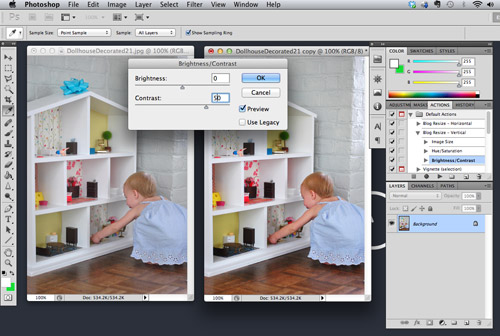
To keep the picture from looking too washed out, we also up the contrast which is found under IMAGE > ADJUSTMENTS > BRIGHTNESS / CONTRAST… (much to my annoyance, there’s no keyboard shortcut for this sucker). Again, we only do a +10 but I’ve shown a +50 below to make the effect more apparent. If you go too high the whites get washed out and corners get dark so again, just do what it takes to make the shot look more realistic, and don’t overdo it to make it look like crazyville.
We found that these two steps help counteract some of the washing out that seems to happen when we reduce the file size for the web (more on that later) so we do them to every single photo we post. To make our lives easier we’ve created a custom Photoshop Action to do it all (plus the resize) with the click of a button. So for every photo we open, we either click “Blog Resize – Horizontal” or “Blog Resize – Vertical” (depending if it’s a horizontal or vertical pic) and these adjustments happen on autopilot.
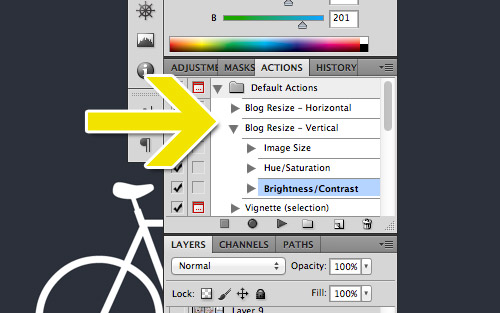
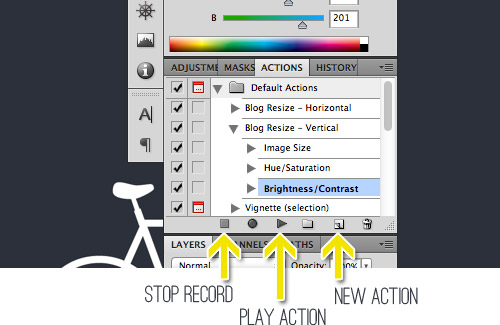
To make a custom action, find your ACTIONS window (make sure it’s checked under the WINDOW menu if you don’t see it). Click the New Action button, give it a name, and then hit the record button in the window that will pop up. Now proceed with the actions you’d like to record. It will record just about everything (even if you switch windows) so be sure to make sure you’re only performing the actions you want to perform. When you’re done, just hit the Stop button and your action will be saved (you can add new steps to your action by hitting the round Record button again). Then when it comes time to apply your action to a particular photo, just hit the “Play Action” button and watch it happen.
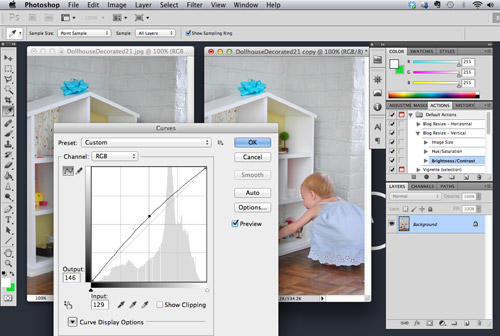
For about half of our photos, that’s all we need to do to make them web ready. Of course if we do an action and it looks less like real life we’ll just undo it and manually adjust, but most of the time it does the trick. We also might perform a couple of extra steps if the photo still doesn’t look as bright/balanced as it does in real life. The first thing we might do is adjust the exposure using the Curves function found under IMAGE > ADJUSTMENTS > CURVES… (or Command+Option+M). We just click and hold our cursor right in the middle of the diagonal line and drag it up a smidge (turning the line into a gently bowed curve). This adjusts the brightness of the photo while still keeping the darkest spots dark, which prevents it from washing out. That’s why we don’t use the Brightness function shown within the Contrast box mentioned above. Once again, you can overdo this if you pull too far, so we just go up a smidge and use “what it looks like in real life” as our guide.
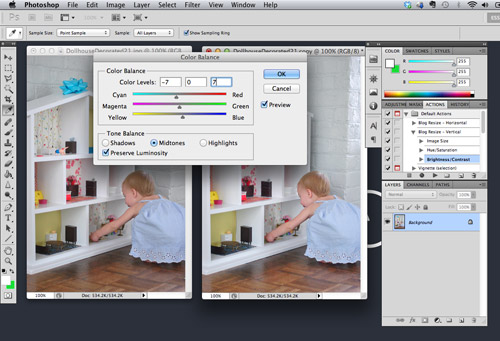
The other thing we like to do to some photos is balance the color slightly. As we mentioned in this post, I’m a bit of a stickler for a photo’s color “temperature.” I prefer a picture to look as natural as possible, so I don’t like when it looks too warm (yellow-y red) or too cool (blue-y green). White balancing within our camera takes care of a lot of this, but it’s not a perfect system. So instead, I use the Color Balance tool (IMAGE > ADJUSTMENTS > COLOR BALANCE… or Command+Option+B) to even things out. This particular photo was looking a bit warmer than I liked (although it might be hard to see see the pinkish undertone of the white dollhouse at this size) so I slid the dial a smidge closer to the cooler colors (cyan & blue). It’s definitely a very slight adjustment and it’s not perfect, so when we have a couple dozen photos per post I’m not always a stickler or getting things ready for a post could take all day.
So here’s a side-by-side comparison of what all of those adjustments achieved. In this case it’s pretty slight, but sometimes we upload a photo that’s way too underexposed / way too washed out / way too warm / way too cool and we have to make some more dramatic attempts at getting it closer to reality. For those who don’t see much of a difference, try looking at the top right corner of the dollhouse. See how it’s bright white and not gray or sort of pinkish? Also see how that bright yellow/green paper in that corner looks vibrant (like it does in real life) and less muddy? And see how Clara’s hair looks more blonde with some red undertones and some brown undertones instead of flat light brown? It’s just a bit more like real lift in the picture on the right.
Oh, and the other thing that happens to all of our photos is saving it in a compressed format so that they’re small enough to load quickly. We use Photoshop’s built in function (FILE > SAVE FOR WEB & DEVICES… or Shift+Command+Option+S) to save them as a compressed JPEG. This step tends to reduce the color contrast on a picture, which is why we make some of the above changes in the first place.
The steps above are by no means a perfect system – but they’re the system that we’ve developed to easily and comfortably get photos that we’re generally happy with. If you prefer your photos to have a different “feel” to them (maybe a warmer vintage look? maybe a more vibrant, high-contrast look?) then you’ll have to find the settings and adjustments that work better for you. Just play around and see what you like.
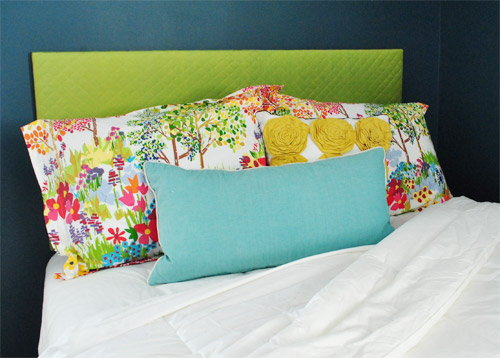
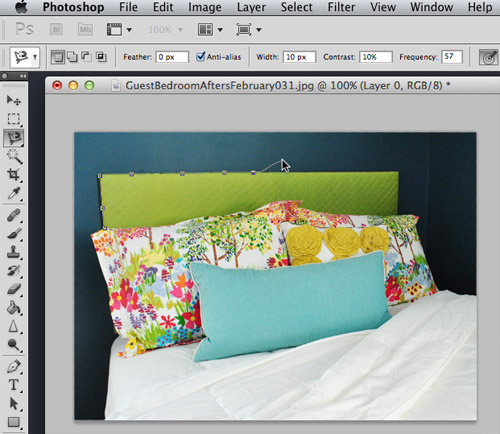
Now that you’ve seen the basic tweaks we make to just about every photo, let’s cover a couple of the more intricate things that we have to pull out of our bag of tricks on occasion too. The first is using Photoshop to help make design decisions. Let’s say, just for kicks, that we were contemplating a new headboard for our guest bedroom. We’d open a picture in Photoshop like the one below and start to futz around with it.
The first step is to highlight the area that you want to change. There are a few selection tools with Photoshop to do this, so I’ll start with the most basic lasso tool. This one is called the “Polygonal Lasso” because it draws straight lines between points you designate by clicking. It works well for the top part of this headboard because it’s simple straight lines. The goal is just to click to turn corners and sketch the line around the entire headboard perimeter so it meets up with itself (when it connects to itself on that last click it’ll flash and the area within it will be selected.
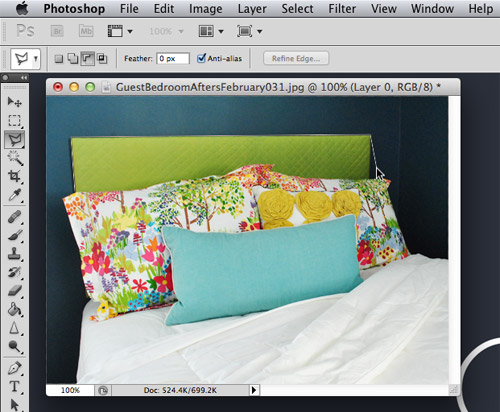
The Polygonal Lasso might get a bit tricky once you get down to the rocky edge of the pillows, which is why sometimes we rely on the Magnetic Lasso (which can be accessed in a drop down by clicking and holding over the same lasso icon on your toolbar). The “magnet” in this lasso is usually nice and smart about finding edges in your photo, so as you roughly trace the outline of your object it will snap to the edge. It’s not a perfect tool (especially in low-contrast areas) but I find it to usually be better and faster than free-handing it. So I’d just go around the whole perimeter, and meet up with my first point to select the entire headboard.
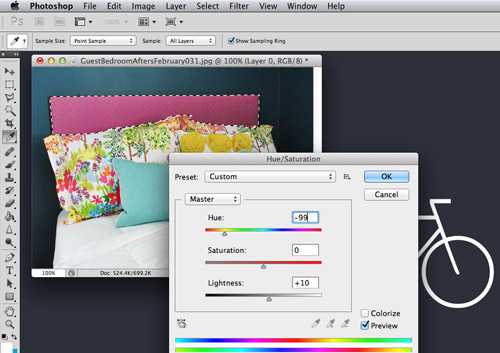
To demonstrate another tool, since our existing headboard is pretty much monochromatic, I can also use the “Magic Wand” tool to make my selection. It allows you to select an area of similar color (you adjust exactly how “similar” by moving the Tolerance number up or down). I kept it restricted to Contiguous color only, so it wouldn’t add greens from the pillows to my selected areas. One selection didn’t get it all in this case so I held down SHIFT and added the rest of my headboard with another click of the mouse in that area.

With the area selected, the fun can really begin! If we were debating a new color, we’d probably turn to the Hue/Saturation menu that was mentioned above (IMAGE > ADJUSTMENTS > HUE / SATURATION… or Command+Option+U). By dragging the cursor along the Hue bar you can shift the color to anywhere on the color spectrum. You can also use the Saturation bar to make the color brighter or duller and use the Lightness bar to make it darker or lighter.
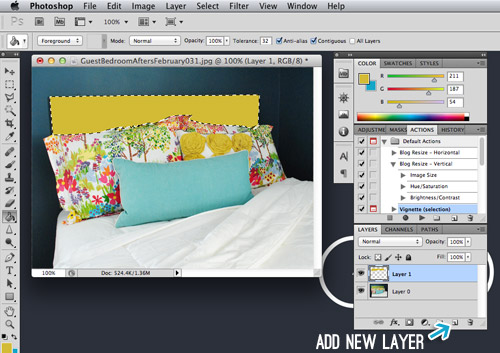
Another option is to create a new layer of color atop the existing headboard. This would make sense if our existing headboard was a crazy pattern or if we didn’t have any headboard at all. To do this I clicked the “Add New” button in the Layers tab (see bottom right below) and then used the Paint Bucket fill tool to add my new color. You want to do this in a new layer because if you tried to fill over the layer with your photo, you’d just end up filling any nearby pixels that matched the pixel you happened to click – instead of your full headboard area.
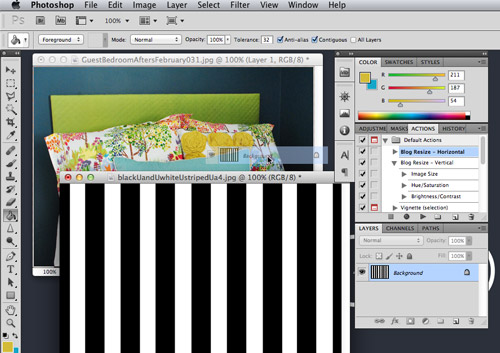
Now let’s say we wanted to add a pattern instead of just a solid color. I opened this photo of black and white stripes and dragged it into my headboard photo by clicking on the striped layer, holding my click and dragging it into the window with my headboard photo (you can see the ghosted icon of the stripe layer in the screen shot below, which shows until I release my click).
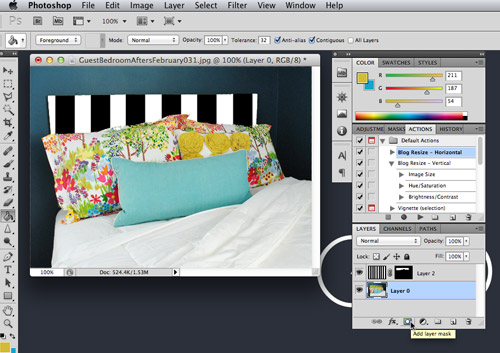
Doing the action above would just fill my entire photo with stripes. So to isolate it to the headboard area, we like using what’s called a Layer Mask. With my headboard area still selected, we just click the Add Layer Mask button (see the bottom right again) while having the striped layer active (sorry my screen capture shows the wrong layer highlighted). The Layer Mask basically hides all of the unselected areas and only shows the stripes in the area I had selected (aka the headboard). See the mostly black thumbnail added to the right of my stripes thumbnail in the bottom of the image below? That’s my Layer Mask – the black area is what’s hidden (or masked) and the white area is what’s visible to create the headboard shape.
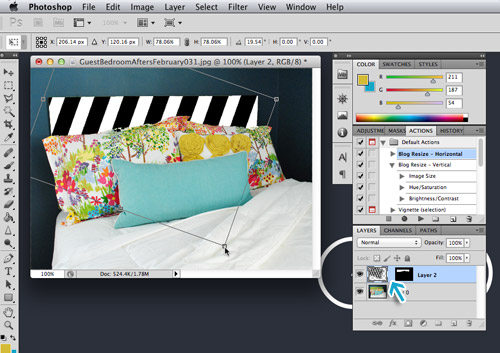
If you want to play with your pattern – shrink it, twist it, whatever – just “unlink” your image layer from the layer mask. You can do this by clicking the chain icon between the two layer thumbnails (where the blue arrow is pointing below). This allows you to transform your image while keeping only the headboard area visible.
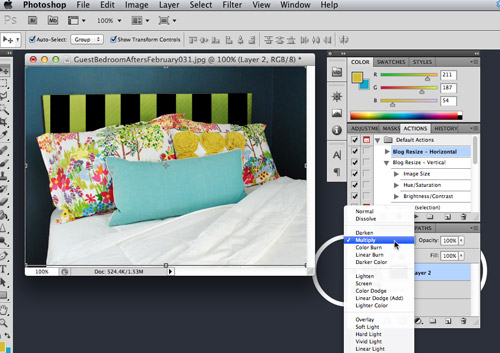
The last trick we use when mocking up design decisions is to sometimes mess with the layer’s “Blending Mode.” There are a bunch of options that will appear in a drop-down at the top of your Layers menu. We just try a few to see if anything gives us an effect that we like. We find the “Multiply” tool to be most helpful because it tends to help your top layer blend with the bottom layer more naturally (for example, when doing Clara’s monthly photos we set the text layer to Multiply so numbers and the word “months” seems to be printed on the texture of her shirt more realistically than it does when it’s just placed on top).
I’m not sure any of that exercise was really helpful in coming to a better headboard solution (we’re kinda cringing for the green and black guy above), but hopefully you get the idea of how you might be able to visualize different options within Photoshop.
This post has already been waaaaaay longer than I originally envisioned it, yet I feel like I’ve barely scratched the surface of what can be done within Photoshop. So perhaps if you guys have specific questions within the comments we’ll do a follow-up post with some additional information (probably can’t realistically explain much in the comments without visuals, etc). We probably won’t know the answer to everything though, so feel free to chime in to help each other (and us) out too. We’re always game to learn new things!

Meghan, UK says
Woah, that first picture is weird – it looks like there are little people wandering around in your kitchen!
YoungHouseLove says
Haha, beware of the aliens!
xo,
s
Heidi S. says
I also recommend the shadow/highlight tool in Photoshop. It is especially useful when there is a dark background in your photo. You can adjust the % and I never use it above about 7%. It often take an useable photo and makes it workable. Otherwise I use almost the same tools as you do, although I haven’t set up a Custom Action. I will have to look into doing that!
Barb says
Love you two….but this was a yawner!!! I mean really!!
B.
YoungHouseLove says
Did you read it? We just posted it 30 seconds ago! Haha. John actually spent a lot of time on this to explain a lot of tools for those who have asked us to share our tricks. I’m sure every post write won’t make every reader take to the streets screaming “most amazing post ever!” but that’s an impossible goal. When we read blogs we just scroll on by the posts that don’t call our name and read the ones we love!
xo,
s
kristen says
We can always rely on barb for some AM snark. Admire her speed-reading skilz.
Ashleigh says
I REALLY appreciated this post, and I did skim at the end since I am at work (ahem), BUT I am sure I will be referencing it in the future. The old addage “If you don’t have anything nice to say, then don’t say anything at all” should definitely be applied in some instances. :-)
Megan says
So rude! I’m glad you guys aren’t phased.
Leanne says
I’ve noticed Barb is getting increasingly mean-spirited in her comments. Maybe she’s the new Bob?
Amanda @ Our Humble A{Bowe}d says
Really? I use Photoshop on a daily basis and I learned a thing or two. Great post, guys! :)
YoungHouseLove says
Aw thanks guys!
xo,
s
Jessica says
I thought this was a GREAT post! I was actually sad when it ended because I would love to hear more!!! :) Maybe Barb isn’t the photography type….can’t please everyone, I suppose. But I do agree that if you don’t have anything nice to say….don’t say anything at all :)Thanks for the info YHL!
Barb says
Did not mean to be snarky, rude or mean-spirited. Apologies S&J.
YoungHouseLove says
Aw thanks Barb!
xo,
s
Kaitlyn says
I, for one, REALLY appreciated this post because I’ve been crossing my fingers that you’d do a “Photoshop for design decisions” tutorial. I’ve wanted to test paint colors on my walls but could not figure out how you guys accomplished it (seriously one of the best Photoshop tweaks was when you changed your kitchen floor to show the cork color). Thank you for taking the time to do this!
Lindsey @ arkadian belle woods says
I’m still considering biting the bullet on photoshop but that tag is pretty hefty but you can do so much in photoshop I feel like it might be worth the splurge. Thanks for sharing your ‘tricks’ :-)
Melissa Breau says
If you have a student email address / id / know someone who is a student and will let you use theirs, you can get it a bit cheaper. It’s also helpful to know that Adobe lets you download a trial version for 30 days with most of their products, so if you’re considering it, maybe do the trial, see how comfortable you feel and then decide if you want to pull the trigger.
YoungHouseLove says
The free trial version is a great idea for anyone who’s on the edge!
xo,
s
Krystle @ ColorTransformedFamily says
Wow! This was really helpful. Like you I used photoshop in college but it’s been a while. I can’t wait to try some of these tricks out with my pics. I would love for you to share more in another post. Thanks so much!
YoungHouseLove says
Thanks Krystle!
xo
s
Kristen @ Popcorn on the Stove says
Fun tips! I’m a self-taught photoshopper, too. :)
Rebecca @ the lil house that could says
So interesting to see how different people edit pictures for their blogs! I’m a total Photoshop rookie and I only started using it for my blog. I try to use it for design decisions, but it takes me forever to make a crappy looking, usually crooked mock up. Then my husband comes along and does what I was trying to do in about 30 seconds… and better than me….So I leave most of the Photoshopping to him. :)
YoungHouseLove says
Haha, I love that he’s such a quickie-editor! I’m like you. I play around for way too long. Haha.
xo,
s
tab K says
Awesome Post!! As a blogger just starting out this is very helpful. Also you can now get a photoshop subscription for $30 / month on a month to month basis. I just looked into it last night.
YoungHouseLove says
That’s cool!
xo,
s
Jess @ Little House. Big Heart. says
I use GIMP. I’m still learning both to use it and my camera, so my photos are hit-and-miss (especially since we do most of our DIYing at home after work… which means less than stellar lighting).
I’d love to have Photoshop to play around with, but I’d rather put that dinero towards our bathroom remodel.
Jess @ Little House. Big Heart. says
PS. Just tried a few of these tips on GIMP (which apparently has at least the same basic functions as Photoshop) and they’re awesome! They’re making my Europe trip photos much better!
YoungHouseLove says
So glad!!!
xo,
s
Jen B. says
That was super helpful. Thank you.
YoungHouseLove says
So glad Jen!
xo,
s
Michele says
You might also want to try “open as” and select Camera Raw as the format. I’m not sure if this works in Photoshop, but I use it in Elements all the time for quick photo fixes.
YoungHouseLove says
Cool tip! We’ll have to try it!
xo,
s
Lori says
This is a great tutorial John! I learned most of these things back in the day as well, but you explained things really clearly.
YoungHouseLove says
Thanks Lori! Glad to help.
-John
Amanda @ Our Humble A{Bowe}d says
A super quick edit trick is this:
Go to ‘Layer’ at the top of the screen, click and go down to ‘New Adjustment Layer’. Click ‘Levels’ hit enter and select auto then OK. This automatically adjusts white balance issues and some contrast. All with one simple step. I do like the idea of making an action for resizing and basic functions.
YoungHouseLove says
Love that tip!
xo,
s
Colleen in MA says
That levels trick is something I can’t live without as well, Amanda! Sometimes for more control, I hit command+l (lowercase letter “el” on the Mac) and a window pops up in which you can move the sliders in and out to adjust manually.
After a vacation etc I open my batch of photos in Photoshop and the first things I do is straighten them (I can’t take a straight picture to save my life) and adjust the contrast. What a difference just those two actions make.
Ashleigh says
I REALLY appreciated this post. Our little girl is due next Wednesday, and I have all of my fabric ready, and I have been re-reading the post you did on how to do the numbers on the onesies, so this was an added help as I attempt to learn Photoshop. Great write-up, and I am sure I will be referencing it often.
YoungHouseLove says
So glad!
xo,
s
Mandy says
Very cool, you really make it seem MUCH easier than what I thought!! I have a trial version that I want to activate, so this may give me the push I need to get some photos edited!
Also, if anyone could explain those shortcuts for a PC, that would be awesome :)
YoungHouseLove says
Anyone have shortcuts for a PC for Mandy?
xo,
s
Amanda @ Our Humble A{Bowe}d says
Yep, here are the basics for PC:
Image Resize: Alt + Control + I
Hue Saturation: Control + U
Curves: Control + M
Color Balance: Control + B
Save for Web and Devices: Alt + Shift + Control + S
Kali DeBoer says
Shortcut for PC: Buy a Mac. :) J/K
Usually you just swap the Command key for the Control key.
Carli says
Haha that bubble wrap photo was absolutely awesome! Way to start the post of right :) And thanks SO MUCH for writing this post! I’m sure it took a long time. All those screen shots. I can only imagine. I am really trying to get the hang of photoshop and your tips make so much sense. I am just borrowing a friends photoshop for a little while to decide whether I want to purchase it. But have been overwhelmed with where to even start. This post will definitely help me finally roll up my sleeves and get going on tackling my little photography Everest that is photoshop. Thanks again for the info!
YoungHouseLove says
Aw you’re welcome Carli, glad to help!
xo,
s
Alison says
I love Photoshop Elements. And I look that you can download tools that will do the steps for you like the pioneer woman actions.
YoungHouseLove says
That’s awesome! She has the best actions!
xo,
s
The Mrs @ Success Along the Weigh says
I love Photoshop but I feel like I’ve barely scratched the surface of its (rather MY) potential.
A good free site for pic editing is PicMonkey. Picnik recommended it when they closed and I LOVE it! My pics in my post today were edited with it because I was feeling lazy.
YoungHouseLove says
Thanks for the tip!
xo,
s
Lea says
awww, I made a real life sad face when I saw Barb’s comment. I’ve played around with photoshop before and it would have been nice to have easy to follow guides like this for the basics. I don’t have it anymore but if I get it again I’ll be sure to remember this post to use as a refresher.
YoungHouseLove says
Thanks Lea!
xo,
s
Gina says
Thanks guys…not yawning over here. HA HA. I was one of the ones who suggested a post of this nature and asked for some tips and tricks. Thanks for taking the time to put this together!
YoungHouseLove says
Aw, so glad Gina!
xo,
s
Michelle says
It’s times like these that I’m so glad my dad’s a graphic designer – he always has an extra photoshop license lying around somewhere :)
YoungHouseLove says
Lucky!!!
xo,
s
katherine tuttle says
Thanks for all the info. I am a novice when it comes to photoshop and I appreciate all the work that went into this post. Can’t wait to re-read it thoroughly!
YoungHouseLove says
Thanks Katherine!
xo,
s
Brittany says
I don’t mean to be didact-y in the sliiightest, but for a lot of that basic color correcting and color popping, you two should check out Adobe Lightroom. Lots of pros (I’m one of them!) use it for all basic edits, and it runs seamlessly into Photoshop to take your photos further if need be.
Shooting in RAW, using Lightroom, and pulling out Photoshop only for big things has streamlined, rather than complicated, my photography business.
I love your photos, just thought I’d share! xoxoBKM
YoungHouseLove says
Thanks so much! We have heard great things about lightroom and have yet to try it! Sounds like fun!
xo,
s
Ainsley says
I cannot agree more!! Once you edit photos in Lightroom you’ll hate that you didn’t give up photoshop sooner! Definitely something you guys should check out!
YoungHouseLove says
Thanks for the tips guys! We hear you can’t do the effect stuff we do in Lightroom though. You can’t change the color of stools or change headboards, can you? Or do we just not understand it well enough?
xo,
s
Wrenaria says
Late to the game here, but I’ve been out of town so I’m catching up!
Lightroom is the best editing tool I’ve used for photography. For your daily blog photos, it’s perfect. You can do all your editing in one place and export them at whatever size, quality, and file type you want in one fell swoop. None of the one-image-at-a-time business that Photoshop requires. It does allow for some controlled color alterations in pics, but not as controlled as Photoshop.
For photomanipulation, Photoshop is still king – which is why Adobe has both programs! They ultimately have different purposes. So really, having both is ideal – especially for the type of stuff you guys post. It has a built-in metadata and rating system too, so sorting your images with keywords and stars/flags is a breeze.
Seriously, Lightroom changed my life, and it’s not an expensive program. It’s such a time saver, it pays for itself. Especially if you shoot raw, which will give you the most control over the photos. It’s a non-destructive program, so the original raw retains all its original properties and you can jump back in your history of changes at will.
Okay, I’m done pushing Lightroom. I swear I’m just a big fan of the program, not a company advertiser, hahaha.
YoungHouseLove says
Love the tips Wrenaria!
xo,
s
Monika says
The plastic wrap filter on DYI house photos = hilarious. I think you should throw it in every now again, just for fun. Hee hee
YoungHouseLove says
Haha, just to keep it fancy.
xo,
s
LaMarie412 says
Do you know if these “tricks” you outlined above can all be completed in Photoshop Elements? I can’t spring for a $700 price tag, but $100 seems right up my alley!
YoungHouseLove says
I believe they all should be- anyone know for sure? Maybe check what tools they have in that (maybe those are listed on their site) and look for terms we mentioned here like curves and actions and contrast and saturation?
xo,
s
Erin says
Yes I believe all the basics you mentioned are on there! Elements is quite handy, you can do a lot with it, actually. The big downside that I found was the lack of layer masks, so none of the fun changing-the-headboard stuff :(
Aly says
Yes everything mentioned in this is one of the basic Photoshop tools that’s been in every program since I started using Photoshop in 2002.
Aly says
Even withot layer masking you can select the area you want and just copy and paste it onto a new layer and mess with it. A bit harder than layer masking but still can be done!
YoungHouseLove says
Great tip Aly!
xo,
s
Melissa Breau says
The easiest way to accomplish the same effect without the layer mask is to use “select > inverse” — it’ll select anything you didn’t have selected before. Then you can hit delete and it’ll leave a pattern or design only where you wanted it.
YoungHouseLove says
Thanks for the tip Melissa!
xo,
s
Lisa says
Wow, that was a lot of helpful info. Photoshop is amazing!But i think I need a class on it and on how to take good pictures. Thanks guys
Emily says
Thank you!!! I have been playing with Photoshop to get photos ready for some photo books, but seem to do more harm than good so far!
Ashley says
Very confused…. Sherry has an extra finger?
YoungHouseLove says
Haha, John’s a funny guy. He was just being weird.
xo,
s
Julia says
I was going to ask the same thing! :)
Colleen in MA says
John’s just checking to see if we’re all really paying attention, right? LOL.
I admit I enjoy using Photoshop to zip random zits, stray strands of hair, and for fixing up my bangs while I’m editing the rest of the pic. If only there was something like that in Real Life. sigh
Dina says
Colleen – hah! I was using Photoshop to fix a zit on my sister’s chin in a bunch of photos a few weeks ago. A couple days later one popped up on my own chin, and my first thought was “oh, I’ll just Photoshop that out… ” before I realized I can’t do that in real life. Darn it.
YoungHouseLove says
Hahahahah, we have totally thought the same thing!
xo,
s
Janelle D says
I am considering taking a Photoshop course/finally breaking down and buying it. I’ll definitely come back and use your guide, so thank you!! In the meantime, does anyone know of a free/cheap program I can use (PC) to add text to photos? I used to use picnik…
YoungHouseLove says
Anyone have a tip for Janelle?
xo,
s
ginger says
Picasa!
Monica says
I took a basic photoshop class at my local community college (online) last fall. Also, if you do decide to do that, you can get a HUGE student discount on your photoshop. I believe I bought my student version from Amazon for $168. Check out Photo Monkey to use in place of picnic.
YoungHouseLove says
So smart!!
xo,
s
Amanda Herzberger says
Haven’t read through the comments so don’t know if anyone else has addressed this but you might try using Adobe Lightroom for batch editing. You can make adjustments (in terms of exposure, etc.) on one photo and then automatically apply them to as many photos as you want – makes it much speedier! Photoshop is still great for changing colors of things and many other smaller adjustments but Ligthroom is relatively inexpensive and could save you a ton of time!
YoungHouseLove says
Oh yes we hear it’s awesome but have yet to try it!
xo,
s
lori says
Hey! You can also batch edit in Photoshop. :)
It’s under the File menu. If you select Automate, it’s in there. And from there, you can choose from any of your saved actions to apply to your photos.
YoungHouseLove says
Thanks Lori! Great reminder. I used to do that all of the time but have fallen out of the habit lately for some reason.
-John
Amanda says
Thank you SO MUCH for this post!!! I’ve been dying to know your editing process and this is just wonderful. I’ve always loved the simple and clean look to your photos. Thank you!
YoungHouseLove says
You’re welcome Amanda! Glad to help!
xo,
s
Lindy says
I really appreciated the post, thanks John for taking the time to write it! We have a decent camera, it’s the same Canon that you guys use to have, but I still struggle with getting my photos to look more like real life and it drives me nuts! I have photoshop and it seems like no matter what I do they always end up really far off so I appreciate you telling us what adjustments yous guys make to your own family photos. I’m going to try the adjustments you suggested and see how they look.
YoungHouseLove says
Good luck Lindy!
xo,
s
ruthy says
i really want to learn photoshop…but it’s not in the budget…so i use the free editing software from picmonkey…its not bad, but i definitely wish there were more options!
Elaine says
This is great John! I use photoshop all day (I’m a Graphic Designer) and loved reading this. You explained it very well and I’m sure the visuals will really help all your readers. What a great service :). It’s fun that people can come to your blog for awesome home ideas and some great tech tools too. That’s why you guys are the best! I use pretty much everything you just said on my blog too. Aren’t ‘actions’ the BEST!? genius. And you’re right, Photoshop is crazy elaborate but you managed to hone in on what are some of the key tools – and the most useful in my opinion. Great post (as always).
YoungHouseLove says
Thanks Elaine! That’s awesome to hear, coming from a Graphic Designer. I’m blushing. Haha.
-John
Kelly says
I don’t comment a ton, but I wanted to today (even before I read the not-so-nice comment) :)I just wanted to let you know that you guys are awesome. I just really admire how passionate you are about your job and what a FANTASTIC job you do. Thank you for being so meticulous and always trying to help others. You guys rock…it never ceases to amaze me how you make it feel like you have a small readership (like a blog family of sorts) when in reality you have more readers than most blogs. Well done! Even in posts that don’t apply to me I love reading. Thank you for all you do!
YoungHouseLove says
Aw thanks Kelly, you’re so sweet!
xo,
s
Hemma says
Same here. I don’t plan on ever building a deck and yet found myself reading every bit of the blogpost and again this one. Not using Photoshop but intrigued and pulled in by the great writing/editing! Bravo and Brava!! And thanks so much for sharing Clara with all of us. She is too precious for words. I will never have a grandchild but can enjoy her vicariously through your blog. Gorilla Glue Rocks!
YoungHouseLove says
Aw thanks Hemma! You guys are so sweet!
xo,
s
Kate says
I think you should have named this post “I’ll take you to the Photo Shop”, to the tune of 50 Cent’s Candy Shop. At least, that’s what I always sing to myself when I use it! But then of course you’d probably link to the song, and it just gets kind of dirty after that line.
YoungHouseLove says
Hahahahahaha, I love that idea. And now I’m singing it.
xo,
s
Nadine says
I’ll understand if you don’t publish my comment, no need for viewers to start bickering back and forth, but how rude for someone to say this post was a yawner! It may not be someone’s cup of tea, but a lot of effort went into it and I am sure a lot of people will benefit from this post! I was raised that “if you have nothing nice to say, then don’t say anything at all” – kudos to Flower <3
I love you guys, and I have been reading for almost 2 years!
Emily says
Good post! I’m trying to decide which editing software to go with. I would love to see a post about how you use Photoshop (or whatever you use) for fun graphic design projects like Clara’s bday invites.
Adam says
I use Adobe Lightroom for both editing and storing. More oomph than iPhoto but not as powerful as Photoshop but it can tie in easily with it (has an edit in Photoshop option) but it also does a lot of good organizational/workflow stuff for photos and, like iPhoto, has auto-uploaders to things like Facebook and Flickr (and others). Better pricetag too ($150).
And it wasn’t a yawnfest (in fact, I wouldn’t even mind a post somewhere about how you all settled on a photo organization process).
YoungHouseLove says
Thanks Adam! We have had a lot of requests for something like that too, so we might touch on that in a future post!
xo,
s
Nate says
How do you handle edits for your personal collection? For instance, in the Clara picture you talked about, the end result is a web-optimized format. Do you go back and also save the picture full sized so the original picture looks better too?
YoungHouseLove says
Usually we will just keep the raw file of personal pics, and then once we choose the ones we’ll save and put in an album (we do that all at once sometimes, so it helps keep us from keeping ten photos of the same thing) we’ll edit the one or two of that event that we choose to keep!
xo,
s
Emily A says
I find tutorials are the most time consuming to write COMPLICATED even more when your tutorial is on a computer program and having to grab all those screen shots and clicking between ‘the process’ and ‘the writing of’. That said… Great job, John! Really helpful and I am just starting to use GIMP. Very similar to Photoshop. Thanks and have a great, color balanced day :)
YoungHouseLove says
Haha, thanks Emily! You too.
-John
Kristin C. says
Oh wow, these are awesome tips! I had no idea about the action you could use to record! And I desperately needed your advice on resizing =) I’m like hastily handwriting all your tips (while at work, ahem ;) Thanks for sharing!
Jessica says
Off-topic question: When I view your Benjamin Moore paint selections, the Sesame chip looks nothing like your kitchen. It looks like a beige-y brown on the BM site. The Hibiscus looks more like the shade of your kitchen. I don’t think my monitor is that far off. Do they have the names swapped? It’s been bugging me every time I go reference your paint choices (which I love, btw), so I thought I would ask. : )
YoungHouseLove says
Isn’t that funny? Sesame, even in our kitchen looked that color (sort of beige with a hint of green), but we knew on the wall it would amplify (usually we pick colors that look really dull on the chip because once they’re on the wall they’re a lot brighter). Hope it helps!
xo,
s
Suzie says
I recently did a 31 day series on my blog about the basics of Photoshop…it was essentially one simple lesson a day for 31 days and I geared it towards blogging. I tried to make it to where the tutorials could be done in Elements as well. I feel like Photoshop is a never ending learning project!
YoungHouseLove says
That’s awesome!
xo,
s
Brenda says
This is really helpful for those of us who are total amateurs. Thanks for taking the time to post about editing!
Karla@{TheClassyWoman} says
These are great tips! I’m just about to buy PS Elements for the first time soon. Our library has a 4-part course for free on how to use it. Since I’m a learn by doing kind of gal, I’m looking forward to it.
For anyone who is looking for a free program for basic editing, there are a million free tools online but the easiest I’ve found so far for adding text to photos is Paint and by right clicking on a photo and choosing open with and then “Microsoft Office” you can crop, adjust lighting, color and re-size the image. It’s great for the basics and really quick too. :)
YoungHouseLove says
That’s good to know too! Thanks Karla!
xo,
s
Jessica says
Hey guys! I don’t have photoshop, yet….but I purchased an SD card reader for my ipad and I use all kinds of fun apps on there to edit. Some just have filters (the easy way out) and some are more extensive like photoshop. That iphoto you guys use is actually also an app for the ipad…I think it was either 4.99 or 9.99…can’t remember, but it’s completely awesome! I love the convenience of using my ipad to edit and I crack up when people ask me what my secrets are. I usually leave facebook comment requests for that info unanswered because it’s almost embarrassing how easy these apps make photo editing. Anyhow, thought you or some of the other readers who don’t want to spend a lot of time editing might find that useful. My fave apps for editing: Camera+, iPhoto, Instagram (obviously haha), and PS Express (a mini photoshop) :) My fave app for photos that requires a little thought before shooting is Hipstamatic….you actually have to choose your lens, flash, and film before you take the pic because it doesn’t give you post-photo editing options. Very cool pics though!
YoungHouseLove says
Great tips Jessica!
xo,
s
Tiffany says
I am self-taught in Photoshop myself and proud!! When ever I don’t know how to do something I just “youtube it” its amazing all of the resources online. great tips!!!
YoungHouseLove says
That’s awesome! I love that.
xo,
s
Jessica says
I don’t have photoshop, but I think your tips about adjusting the saturation and contrast will be really helpful regardless. Right now I just use the “I’m feeling lucky” button in Picasa! Ha
YoungHouseLove says
Haha, that’s such a funny button. I love it.
xo,
s
Susan (Between Naps on the Porch) says
Thanks for all these awesome tips! Looking forward to trying them out. :)