We did it. Holy cats, we did it.
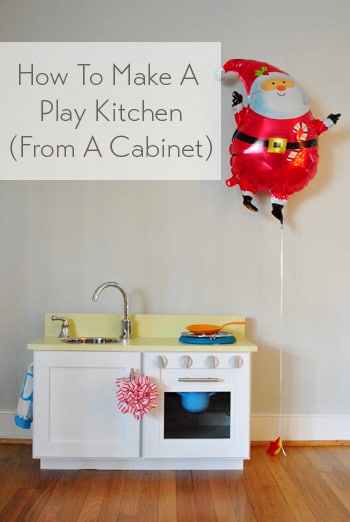
Just a few days before Christmas we started Clara’s homemade play-kitchen (in secret of course, since she thinks Santa brought it)… and we actually finished it on Christmas Eve! Yes folks, it was a Christmas miracle. We went into it with a goal of spending under $99 since this basic play-kitchen from Ikea is that price – but we wanted to add a bit more detail like oven knobs that actually turn, an oven light that goes on and off, a wire baking rack inside the oven instead of a shelf, and a real faucet (not plumbed of course, but movable!). So here’s how we made our own little Clara version in the last 72 hours before Christmas, for what ended up being $74.
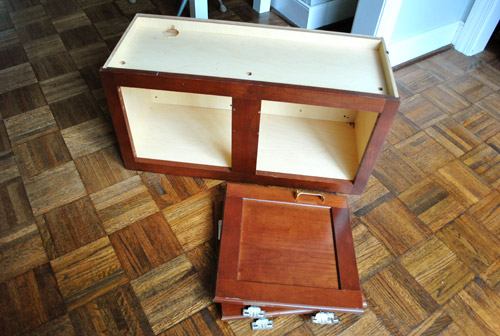
More pics in a moment (lots more!), but first the dirty details. The core of our homemade kitchen was initially going to be a real kitchen cabinet, so we had it around already (yessss!). It was actually the one we bought for $14 from the Habitat For Humanity ReStore when we intended to hang a big microwave next to our pantry. Heck, we even hung it temporarily when determining where we wanted the electrician to add our microwave plug a while back.

But in the end it never got used (since we opted for a smaller microwave – more on that here) so we hung onto it in preparation for its eventual rebirth as a play kitchen.
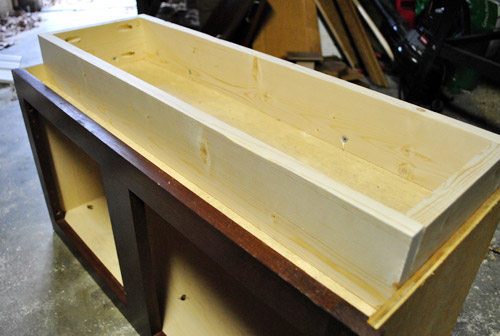
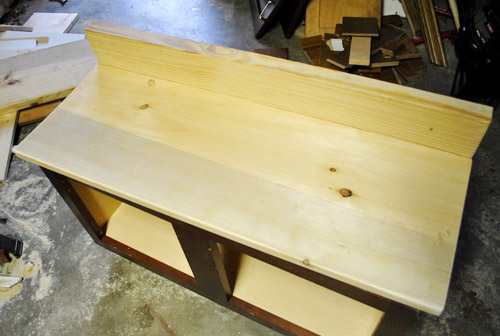
It was a little low (only 15″) so we began by building it up on the bottom with a quick box made out of a 1 x 4″ remnant that we had in the basement. We offset it from the front a bit so it would even look like a real base cabinet in a kitchen (toekick and all).
John also had a spare 1 x 12″ board in his scrap wood pile that, when paired with a leftover plank from our desk-building project, fit perfectly as a counter and low backsplash. Well, perfectly once they were cut down a bit.
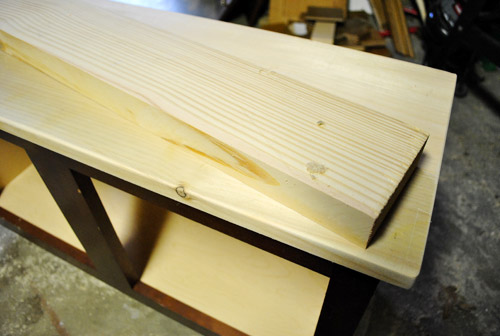
Picture me rubbing my hands together maniacally and saying things like “it’s all going according to plan!”
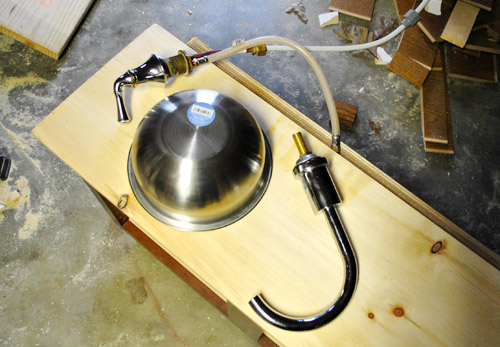
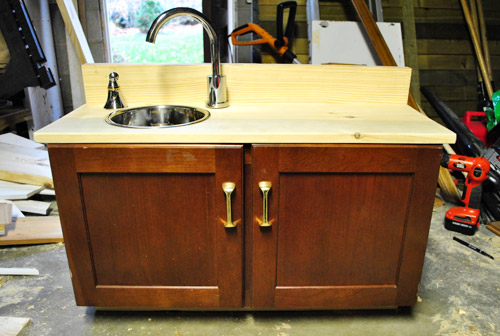
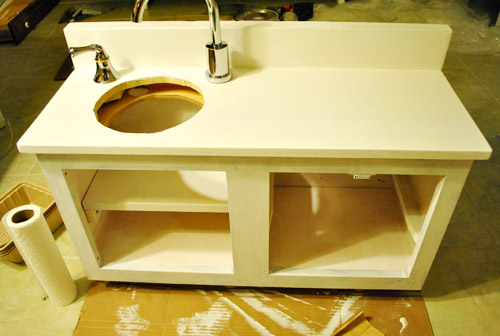
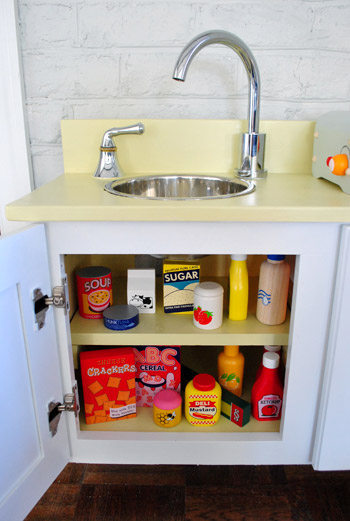
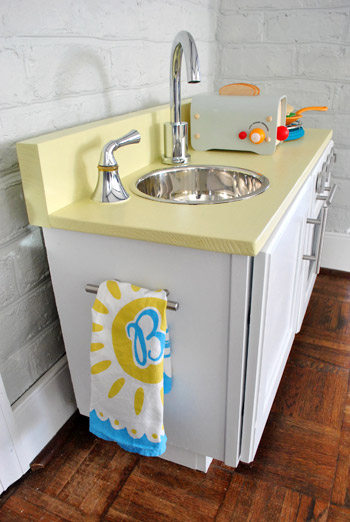
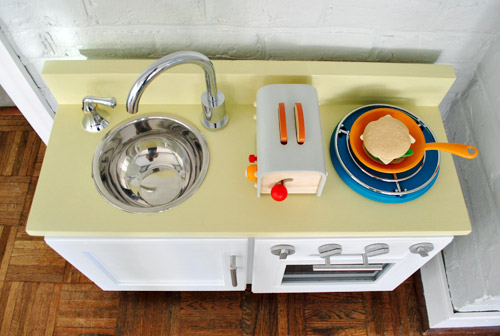
But before attaching all that, we had to build our sink area. We hit up the ReStore again and snagged a real faucet and handle for $10 (and inadvertently crashed their company Christmas party in the process – sorry ReStorians, thanks for letting us quickly grab that faucet!). We thought those two real kitchen features paired with a metal bowl (found at Target for $7) would make for a purty chrome and stainless steel kitchen sink area. Only the best for our girl. Haha.
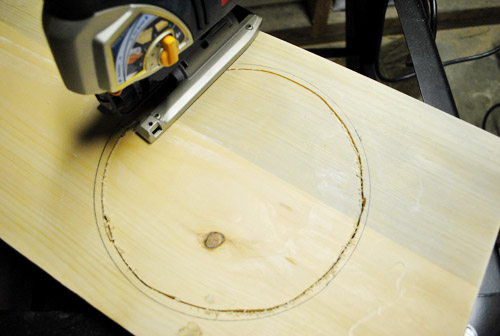
After tracing around the lip of the bowl, John jigsawed a hole just inside the line (so the edge of the bowl had something to rest on). It didn’t have to be perfect since the bowl would be covering it.
After cutting matching holes in both the counter and the cabinet top (and sanding them both smooth), the bowl was officially transformed into a sink – just by dropping it in.
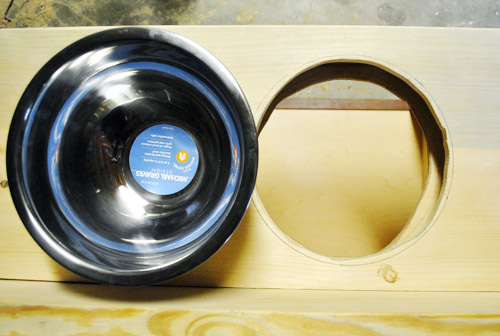
I wish I had peeled that sticker off for this pic, but you get the idea.

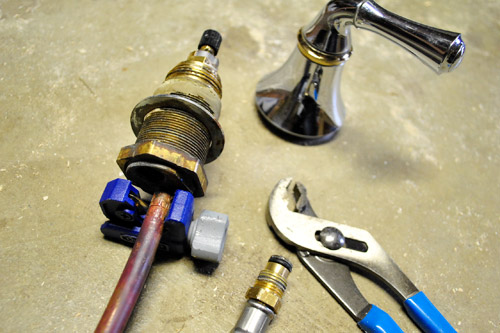
Adapting the sink hardware was also pretty straightforward. The faucet was pretty much ready to go, but the handle had lots of tubing that was just going to be in the way under the counter.
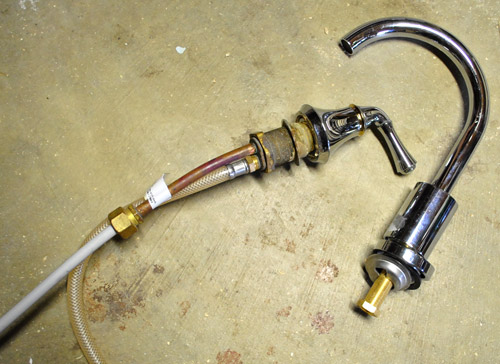
Luckily, with a wrench and a copper pipe cutter we removed the excess mumbo jumbo. Oh, and since the bottom of the fixture will be concealed between the top of the cabinet and the counter we don’t have to worry about Clara messing with it.
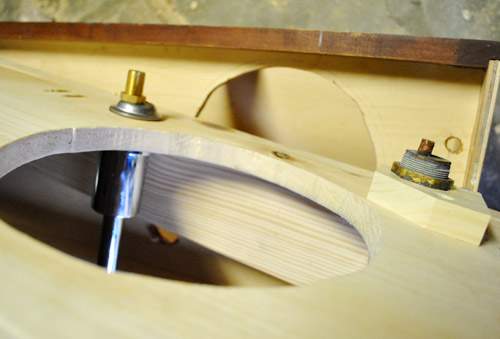
Then it just took drilling some holes…
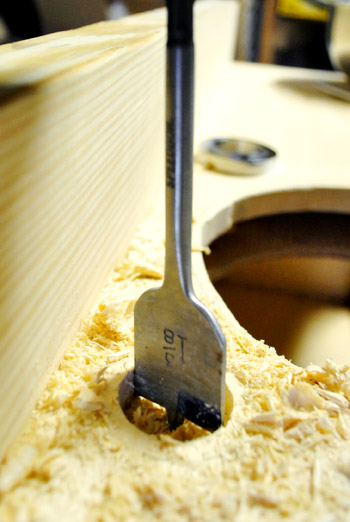
…and securing both fixtures to the underside of the counter (though the handle was so thick it required an extra block of wood to keep it secured).
Now that we could finally secure the counter to the cabinet, it was starting to look like a play kitchen! So yes, this is where we got all weird / annoying / giddy / hyper.
But just wait, there’s more excitement in store. Check this out…
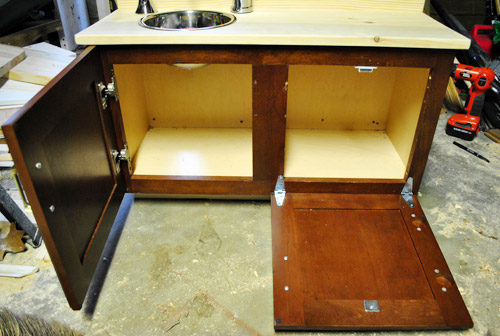
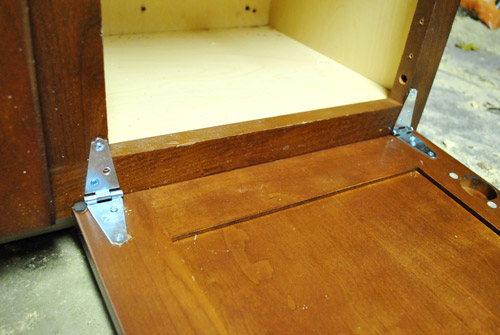
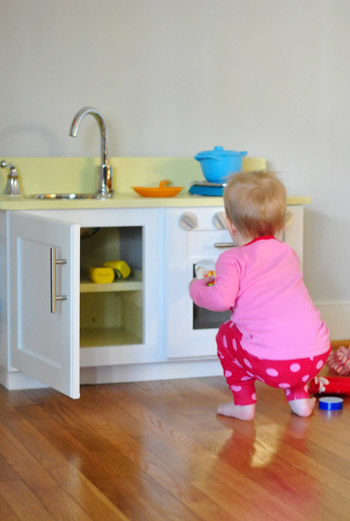
Every play kitchen needs an oven right? So we bought some $3 fence hinges to convert one door to open downwards.
And we also snagged a piece of pre-cut plexi from Home Depot (for just $3!) so that we could give Clara’s oven a proper window (the girl’s gotta check on her souffles). We completely lucked out that this pre-cut pane was the perfect size.
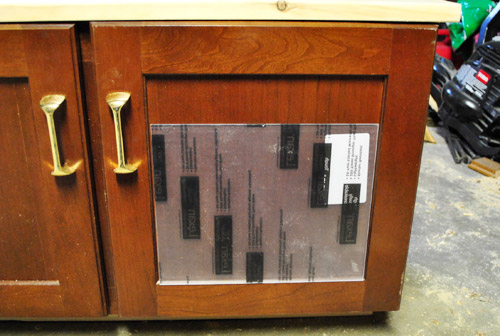
We weren’t so lucky when cutting the hole for the plexi though. John can’t figure out if it’s him or his Dremel Trio, but he has trouble getting straight cuts sometimes (his words, not mine). It looked okay from a distance…
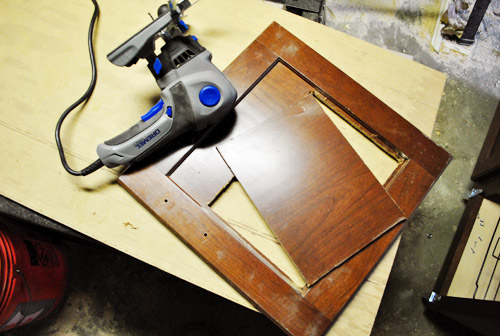
…but up close he was less than happy with it. Yes, there may have even been some hushed cursing.
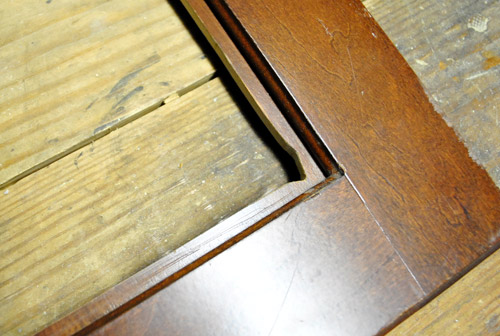
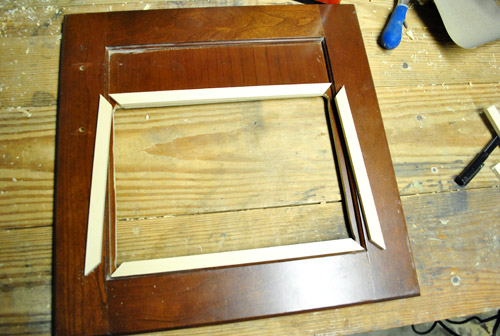
So after a dash to the craft store (we had to buy materials for some oven knobs anyway) we grabbed some thin pieces of craft wood and cut a miniature frame to trim out the imperfect opening. Huzzah for Plan B!
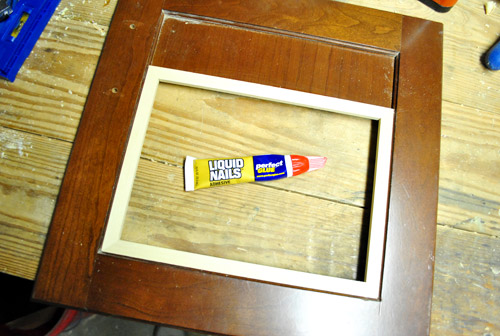
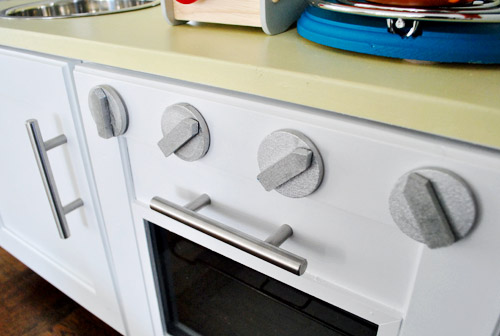
We didn’t want to actually attach the plexi until we were done priming and painting, so it was onto making some knobs for the oven. I guess knobs are usually for a stove, but we figured it wouldn’t hurt to have something for Clara to spin and interact with. So we took some small wood discs from Ben Franklin (for $2) and drilled a hole in the center for a washer and bolt.
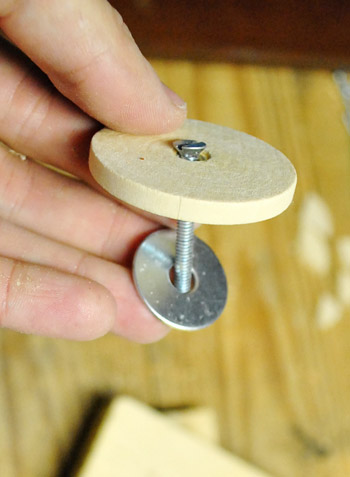
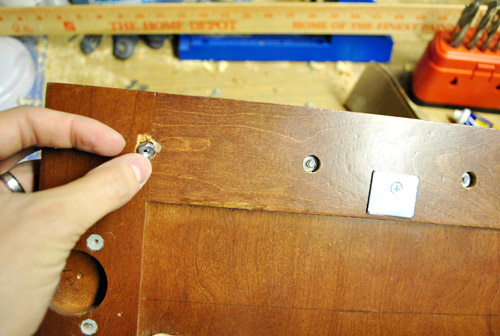
Luck was back in our favor when it came to drilling holes for the nut on the back of the oven door. The Kreg Jig drillbit (which has a small pilot drill on the tip before becoming larger) made the perfect sized holes for not only sinking the nut into the door (since our oven wouldn’t close if they weren’t flush) but also kept the nuts from spinning too, which made attaching everything really easy.
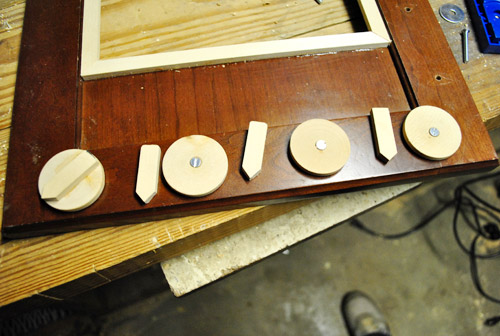
Final attachment of the knobs wouldn’t happen ’til after painting, but here’s a preview (check out the assembled one on the left). John used some of the leftover craft wood (that he had from the Plan B oven window frame) to cut some little arrows that would later get glued over the bolt head on each knob. But back to these in a minute.
Now that everything was constructed, we snuck it upstairs to the sunroom after Clara was asleep and primed the whole darn thing (after patching some holes with wood putty). It was actually not that bad since we were in priming and painting mode for our real kitchen too. Then it was painting time, and we did all those finishing touches like gluing in the oven plexiglass and adding hardware over the next 48 hours.
The rest of the finishing touches are easier to explain while looking at the “after” kitchen, so through the magic of the Internet we’ll fast forward a bit:
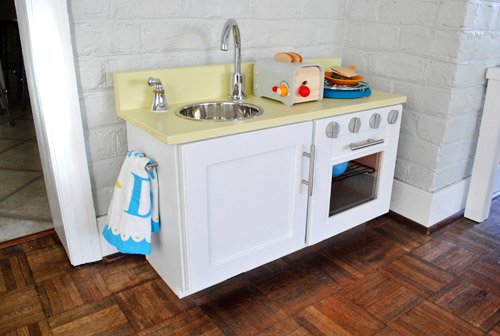
We primed and painted it using leftover paint that we already had. The top is our kitchen wall color (Sesame by Benjamin Moore) and the base is the same stuff we used for our office cabinets (Benjamin Moore’s Advance paint in Decorator’s White in a satin finish). We painted the inside of the pantry Sesame also, but did the oven in a medium grey thanks to a test pot of paint that we had leftover from grey-washing our living room beams (in Benjamin Moore’s Shaker Gray). It’s sort of hard to see in the pics, but in person the gray oven and the grellow cabinet are fun little details to help each side feel more defined.
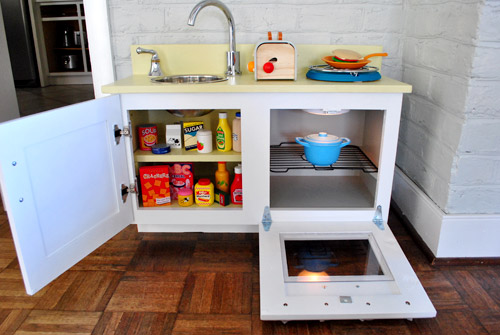
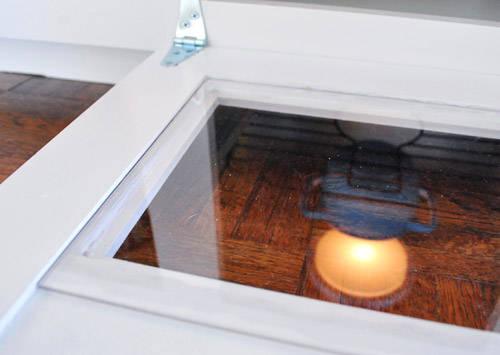
To dress up the inside of the oven we used heavy duty velcro to hold up a simple tap light, so Clara can actually “turn the oven on” just by pushing it. We also found this black wire shelf (it’s actually one of those bottom-of-the-sink drying trays) at Target for $5. It definitely helps things feel more oven-ish in there.

Oh, and here’s what the plexi-glass looks like from the back. We just used some clear silicone caulk to adhere it to the backside. That keeps it in place, but is totally invisible from the front thanks to the blessing-in-disguise frame that John had to add. Three cheers for happy accidents along the way.
We also whipped up a last-minute shelf on the sink side when we realized that most of the play food Clara was getting from her grandparents (they sweetly offered to give play-kitchen-themed Christmas gifts, knowing what we had up our sleeves) would be dwarfed by one big open cabinet. She’s got the basics covered… soup, cereal, crackers, pasta, tuna, sugar, milk (oh wait, maybe this girl needs a fridge someday…).
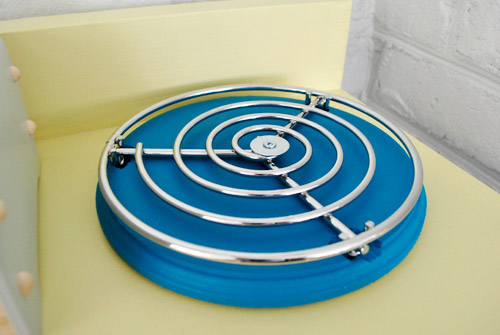
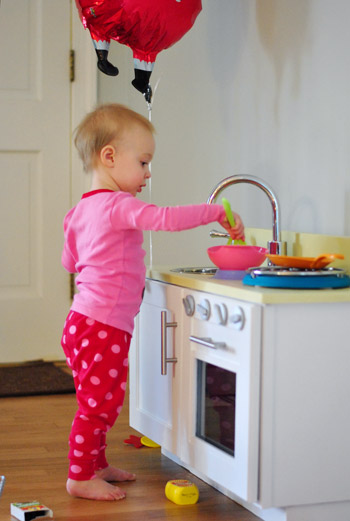
We opted not to add a stovetop so that she’d have more flexible-to-use-for-other-stuff-too counter space (you know, for mixing and setting out dishes, etc). It has already been a handy choice because there’s room to house the play toaster her Grammy and Tom-Tom bought her for Christmas (yes, it’s kind of the cutest thing we’ve ever seen). But I did make her a makeshift hot plate of sorts, so she has one burner to play with (instead of four space-hogging circles). What does she use it for? To fry sandwiches, apparently.
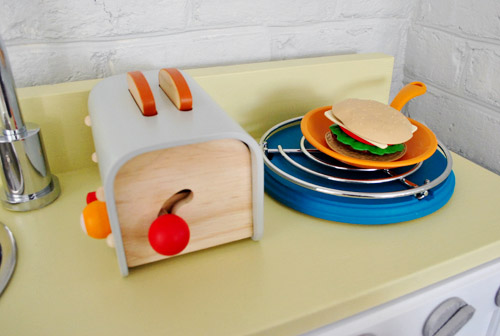
All that little DIY hot plate entailed was buying a $5 trivet from Bed Bath & Beyond and a $4 round of wood from Michael’s (which I painted teal with leftover paint from this project) and then drilled into it in three spots (to allow the feet of the trivet to “sink” inside the wood round so it was nice and solid). Then I used a flat washer and a screw to hold the trivet into the round of wood from the center. Voila: instant burner.
Oh and I used little felt furniture feet on the bottom of my burner (to lift it up ever so slightly to keep it from scratching the counter) which you can sort of see in the picture below.
Here’s a closer look at the final oven knobs too. I sprayed them with leftover spray paint (Rustoleum’s Titanium Silver that we bought to test on our old kitchen hardware). It’s not a perfect match to the new shiny chrome door hardware ($5 each from Home Depot) and our sleek sink and faucet, but it’s close enough. And it sort of glitters, which is semi-adorable (new rule: every play kitchen should have at least one glittering element).
We actually bought three of those Home Depot door handles so that one could act as a towel bar on the side of the sink. Little details like that were kind of my favorite part. As for hatching this whole kitchen plan, John and I took Clara and Burger for a nice long walk and chatted about things we could add to “our kitchen” (didn’t want to spoil the play-kitchen surprise for Clara) which is how we came up with things like the towel bar, the wire rack, the oven tap light, all the other little details like those spinning knobs that we thought would make it Clara’s favorite thing ever. The brainstorming part of a project is always my favorite. So much possibility…
So now I think you’ve see just about every nook and cranny of this puppy (can you tell we’re proud of it?)…
So how about a budget breakdown?
- Secondhand cabinet (from the ReStore): $14
- Secondhand faucet & handle (also from the ReStore): $10
- Stainless sink bowl (from Target): $7
- Oven knobs and frame (from Ben Franklin craft store): $5
- Hinges for oven door (from Home Depot): $3
- Pre-cut plexiglass and wood trim for oven window (from Home Depot): $4
- Wire oven shelf (from Target): $5
- Tap light for the oven (from Home Depot): $2
- Wood counter, backsplash, and toe kick: $0 (already owned scrap lumber, but it might be $15 or so to buy it all)
- Trivet (from Bed Bath & beyond) and wood round (from Michael’s) for hot plate: $9
- Three hardware handles for oven, cabinet, and towel bar (from Home Depot): $15
- Primer and paint for counter, cabinets, and hot plate: $0 (already owned, but a few $4 paint testers would do the trick if you needed to buy it)
- Miscellaneous wood pantry items (by Plan Toys): $0 (Christmas gift from Grammy and Tom Tom, but they might cost around $15 if you were to buy them)
- Play toaster (also by Plan Toys): $0 (another super thoughtful gift from John’s parents!)
- Total project cost: $74
And as they say in the commercials, watching Clara play with what Santa brought her: priceless.
If only a certain larger kitchen were this easy to knock out. Oh well, I guess that’s the difference between one cabinet and 20 of them. But I gotta say that this little guy is getting a ton of action. Stuffed animals regularly get bathed in the sink, fake slices of lettuce and tomato get toasted, boxes of cereal and crackers get baked in the oven, and random cars, balls, and trains get stuffed into the pantry cabinet. It’s also really nice to have a little “Clara zone” shaping up along the living room wall right off of the kitchen (we moved it to the wall on the left side of her new desk after Christmas). Good stuff.
Oh and oddly enough, folks ask us all the time what we want to “parlay” this blog-thing into, and for the past few years we’ve never really known how to answer that question because we love blogging as-is (we don’t want a TV show or anything – ack, that makes us break out in hives – so, we’ve actually turned those opportunities down a few times). But I can honestly say that “designing” Clara’s desk and her play kitchen have been hugely amazing and fun projects for both of us. So for once I might have an answer the next time someone asks what sort of side projects we’d love to end up doing in a decade or two (right along with the blog of course, since YHL = our first baby). Designing cute and affordable kid furniture (which seems to be surprisingly hard to find for some reason) might just be the sweet spot. Ya never know, right? So I’m just putting that out there into the universe. Who knows where we’ll end up…

Ali says
Man, Clara’s play kitchen is nicer than my actual kitchen! I so desperately want to paint my ugly orangey wooden cabinets. I hate being a renter… grumble, grumble!
BUT, seeing Clara waltz around with a Santa balloon pretty much made my day, so thanks for that! I also would buy children’s furniture from y’all, since I am not a fan of the Fisher Price primary color palette. This play kitchen is lovely. =)
Elina says
This is just so much love for your little girl! How lucky she is. This is very inspiring and we are brainstorming our own for our little 1 yr. old guy. On our must list-a dishwasher and a microwave, he’s just too fascinated by our real ones. Thanks for the thorough instructions, we’ll be using this as a template.
Hedi says
I can´t believe how how this is! You guys really have some great skills and taste on making this!
Harinee says
Looks so cute! I’d love to have that instead of my own kitchen! Do you see a fridge in the future from one of the surplus office cabinets?? Seems like they would be the correct height..
Also it occured to me, could you add some sort of slidey (technical term) mechanism to the roof of the oven that would ‘tap’ the light when the door was closed? I don’t know how you’d do it but it would be unbelievably cool!
YoungHouseLove says
Oh yes, that would be amaaazing! Although Clara lives tapping that think both on and off so it might rob her of some joy. Haha. As for the fridge, I definitely had the same thought about another cabinet! Maybe for her birthday or next Christmas!
xo,
s
Robyn Williams says
Clara is just adorable, the conversation she is having with you is so precious!
Gayle says
So cute! I love to do one handmade item for my daughter and my sweetie. I know she’ll love this for years to come. My daughter (now 8) got a kitchen when she was about Clara’s age and she still plays with it. Of course I cook a lot so she comes by it naturally. Enjoying catching up on the blog. I live in Fredericksburg so maybe we’ll run into each other (and we can all be awkward) one day!
YoungHouseLove says
Wahoo! I bet we will!
xo,
s
Being a Mama says
Thanks for great inspirations- long time follower, first time commenter. I made a very basic play kitchen for my little man. he’s getting great enjoyment out of it. he’d adore clara’s one though!!
http://www.being-a-mama.blogspot.com/2012/01/diy-play-kitchen.html
YoungHouseLove says
So cute! I love it!
xo,
s
Heidi says
Okay – I don’t get all too excited by videos of strangers kids (e.g. “yawn!”), but your daughter is so stinikin’ cute in that video, I could hardly stand it. Well done, YHL, well done.
Vega says
Hi, Young Family!
When I see these items I thought in Clara’s kitchen. She need a fridge, dishwasher and washer, of course. I send you two beautiful ideas. Kisses!
http://www.amazon.com/Pretend-Play-Toy-Product-Refrigerator/dp/B0016PUQVG
http://www.elpaisdelosjuguetes.es/lavadora-de-madera-de-juguete.html
YoungHouseLove says
Haha, so cute! Love them both!
xo,
s
Deneige says
You two are AMAZING! I pop on your blog every morning for lil daily inspiration. Love that Clara has such thoughtful and inspired parents :)
Dorinda says
Hi there! I’ve been coming back to this older post to get ideas for a play kitchen for my own daughter. What is the depth of the original cabinet you used? My husband doesn’t think ~12″ is deep enough for a stove top and sink, but I think it will work. Thanks!
YoungHouseLove says
Ours is about 12″ deep. Hope it helps!
xo,
s
Sara says
I’m totally using your play kitchen as my guide while I try to make one for my son. Question, does the oven door just slam to the ground when she opens it? I keep envisioning this being a problem and I can’t figure out how to solve it. Any suggestions?
YoungHouseLove says
The hinges only open 90 degrees, so it just catches itself before it slams on the floor. Hope it helps!
xo,
s
Christiane says
Soooooo adorable!!!! Greetings from a Brazilian/Korean/American family, and crazy about your blog!
YoungHouseLove says
Aw thanks!
xo,
s
Shirlee says
My husband made something similar about 13 years ago for my daughter. After a year, she had moved on. We built everything from scratch. We added real knobs, this black stuff that goes on the end of pipes for a four burner stove, a wire rack, a little clock on the back–Built a fridge too with wire racks and a freezer compartment. Back then it cost 150.00, but we sold it when the military moved us for 100.00. A grandmother bought it for her grandchild.
I love yours, and I am glad you took pictures. I wish we had. You can tell you did it with love just like we did. I see your little girl playing with hers and it reminds me of my daughter (who is going to be a mother in a few months.) It makes me miss my baby, but who knows, maybe we will do it all over again for our new angel girl using your idea about the cabinet.
Donna says
This play kitchen is utterly adorable! What were the dimensions of the cabinet before you worked your magic?
YoungHouseLove says
Thanks Donna! It was around 29″ wide by 15″ tall but then we added the lift on the bottom to make it a bit taller. Hope it helps.
xo,
s
Kelly says
Thanks for your inspiration! We just made this for our daughter’s 3rd birthday :) http://kellyjbiwer.blogspot.com/2012/09/ellas-play-kitchen.html
YoungHouseLove says
It came out beautifully! Love it!
-John
Scott says
My wife is an avid reader/follower of your blog, (and now I am too!) – and we found this little kitchen so amazing, it inspired us to make one for our 2 yr old son! – Instead of using old cabinets, we found an actual play kitchen at Goodwill for $10, and it was in decent shape. We sanded, painted and added our old faucet and handle, new hinges, new handles, and an 8×8 cake pan as the sink! — thanks so much for the inspiration! Here are a few pictures of the project: https://plus.google.com/photos/116277629244472650333/albums/5793234456744181297?banner=pwa
YoungHouseLove says
That’s so cute! I love it!
xo
s
Brian Lake says
I noticed that you have a wooden divide between the oven and the pantry at what point did you put this in as it was not mentioned. Thanks Brian
YoungHouseLove says
That was just how the cabinet came.
xo,
s
Felie H says
My husband and I are thinking of tackling this project, for our daughter. I had a quick question What is the height of the inside part of Clara’s Play Kitchen, you know the oven? We have an upper cabinet but I think it’s to small in the inside for it to also have a shelf, then a pot and possibly a light.
Thank you!
Felie
YoungHouseLove says
The opening of the oven cabinet (from the base to the top) is 12″ – hope it helps!
xo
s
Mary says
Were you guys worried about Clara sitting or standing on the oven door and breaking it off by the hinges? My husband and I are working on one for our daughter for Christmas, and he brought that up. She’s a wild one, so it’s fairly high on our concern list…
Our only solution right now is to peruse the hinge aisle at Home Depot until we find something that looks like it will work.
YoungHouseLove says
Our door hinges basically to rest on the floor, so if she stands on it (which honestly happens sometimes) thanks to the knob under it, it’s sort of supported on the floor if that makes sense- like a ramp. After nearly a year of heavy play it hasn’t broken yet!
xo
s
Amy says
Love the kitchen! Adorable! How did you attach the countertop/backsplash to the cabinet? Thanks, Amy
YoungHouseLove says
We just screwed them on from below (inside of the cabinet).
xo
s
Nancy Brown says
This is so adorable, I hope I can find or make something like this for our granddaughter when we get moved into our house that’s being remodeled. So well made. I had one years ago with our 3 boys, but somehow it didn’t survive. I meant to have it to use with the grandchildren. It was also handmade. Maybe I can find something on Craig’s list or get my hubby to try making this one. I love the pictures of Clara playing with it. So much fun at this age!
A friend just sent me this blog today, having fun looking at all the ideas.
YoungHouseLove says
Thanks for stopping by Nancy!
xo
s
Make and Do Girl says
This kitchen makes me so happy that I just had a baby! (Well, lots of things make me happy about that.) This kitchen is pinned and just waiting for my little one to be a little less jello-y. Thanks for the thorough tutorial.
YoungHouseLove says
Aw, that’s so sweet! Congrats on your little one!
xo
s
Craig says
So cool. I will be using many of these ideas for my girls kitchen.
Brigitte says
This is amazing! Exactly what I was looking for! Can you tell us what the final dimensions are?
Thanks!!!
YoungHouseLove says
It’s about 32″ wide by 18″ tall but 13″ deep. Hope it helps!
xo
s
Jackie says
I found you by Pinterest – thanks for the idea for the hotplate. I’m in the midst of making something similar for my kids, and didn’t really want to dedicate all that ‘bench’ space for a hot plate. Will be re-pinning it so I don’t forget (I don’t have a Christmas/Birthday deadline so the painting stage is taking an absolute age!)
YoungHouseLove says
Aw thanks Jackie! Good luck with your kitchen!
xo
s
Carrie Jahnke says
Just finding your blog/site – and I’m hooked! Love it!!! One question: what are the dimensions of the cabinet you used for Clara’s kitchen?
Carrie Jahnke says
I’m so sorry…I should read the comments before I type. Thanks so much for sharing all you do. You inspire me :)
Andrea says
Hi John & Sherry,
I know you wrote this post forever ago but I’ve always kept it in mind, knowing that some day I’d want to reference it (and the post about Clara’s fridge) while tackling a play kitchen for my own kiddo. Well, we recently DIYed a play kitchen for our daughter and and used magnetic paint on her fridge and a single “hot plate” instead of the original plan of four burners, all ideas that came from you. I figured I’d pop in to say thanks for the inspiration! All of us out here in the interwebs sure do appreciate you sharing so many great projects, big and small!
PS I’ve shared pics here, if you’d care to sneak a peek. :)
http://www.andreajennisoninteriors.com/2013/08/diy-play-kitchen/
YoungHouseLove says
Thanks so much Andrea! It’s so cute!
xo
s
Christina {The Murrayed Life} says
Was just looking through for DIY play kitchen inspiration, and oh my GOODNESS she is so tiny!! I feel like you just posted this yesterday but she is such a big girl now. wow, wow, wow. Goes so fast!
Devin says
I Love, love, love this idea!! I want to do something like this for my daughter, but I’m afraid she’s too you right now. How old was your daughter when you gave it to her?
YoungHouseLove says
Let’s see, I think she was a few months away from 2? Now she’s 3.5 and still plays with it!
xo
s
Devin says
Did you guys use anything else besides the fencing hinges for the oven door- like a magnet or anything?
YoungHouseLove says
Yes there’s a magnet at the top to hold it shut.
xo
s
Tamara Callaway says
What are the measurements of the kitchen. I want to make one for my granddaughter!!!
YoungHouseLove says
It’s around 22″ tall (including the backsplash) by 13″ deep by 31″ wide. Good luck Tamara!
xo
s
Natalie says
How did you attach the wood for the counter top to the cabinet?
Natalie says
Never mind, you already answered my question. Going to attempt this for my little boy!
Arielle says
We just made a play kitchen for our little one for Christmas. Question, did you guys use a clear coat over the paint? If not, has the paint held up without scratching?? Thanks!!
YoungHouseLove says
I truly don’t remember but I think we would have mentioned it if we had in this post, so I’m inclined to guess that we didn’t! It’s holding up great though!
xo
s
karen says
I am SO happy that I stumbled across this (while googling ‘how to attach real cooker knobs to a toy kitchen’!)
I have zero experience of woodwork but have bought a large cabinet to turn into a kitchen for my 2 year old by Christmas.
Your photos and details are very much appreciated here in England!
Thank you!
YoungHouseLove says
So glad!
xo
s
Meg says
Hey Guys,
We are putting together a kitchen using your plans for our little girl for Christmas. She is 16 months but is ready for a dedicated play area. Plus her big brother will love it too. My father is helping out and his biggest concern is climbing on the oven door if we hinge it like you did. Instead, he wants to open it like normal. Did you ever have to worry about Clara climbing on the door? I am sure that we will anchor it to the wall so I am not worrying about tipping.
Thanks,
~Meg
YoungHouseLove says
Clara is about the least climb-y-est kid ever, so we have never had an issue with it, but I can see how other kids might think of other ways to try to get on top of it or something. I would follow your gut, and adapt it if you worry your child will try to scale it! Good luck with everything Meg!
xo
s
Julia says
My husband and I made the kitchen for our grand-daughter 2012 and thought you showed matching refrigerater but cannot find it. Can you tell me where to find this on your site. Thanks for the kitchen which turned out so well and is so well loved. Julia
YoungHouseLove says
Here you go!
https://www.younghouselove.com/2012/12/one-cool-christmas-present-for-clara/
xo
s
Cristina says
Very cute. My question is did you paint a protective coat? Like poly? If not how is the paint job holding up?