Archive for November, 2011
Redoing The Undone
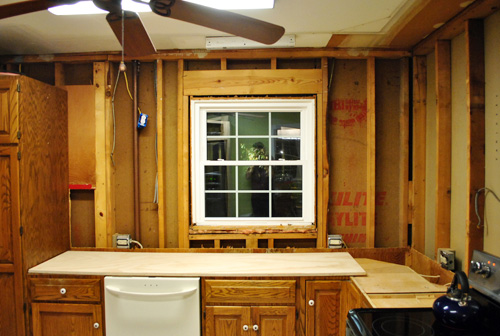
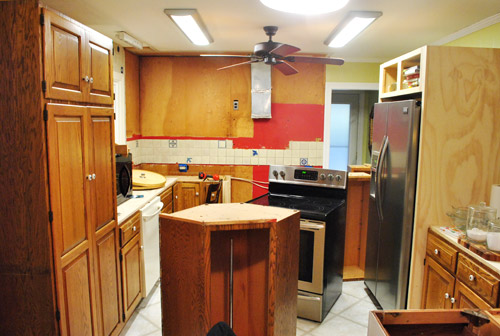
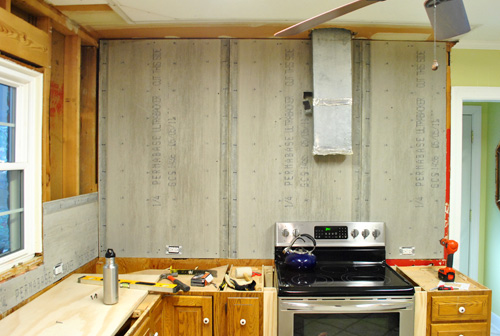
As exhilarating as demolition can be, there’s always that nagging voice in the back of your head reminding you that you’re going to have to replace whatever you’re demolishing.

Bummer, right?

Well, we didn’t let ourselves wallow in that realization too long and dove right into reconstructing the kitchen. Actually, between demoing the tiles and the plywood we actually snuck out to The Tile Shop (in my sister’s borrowed SUV) to buy cement board so we’d have all of our supplies ready as soon as demo was done.

The cement board (1/4″ thick Permabase Ultrabacker to be exact) was about $10 per 3ft x 5ft sheet after the 10% discount code that they offer everyone (YHL10) and I bought four of ‘em. Actually, I bought eight of them because of some gross miscalculations on my part but only used four. So once our extra board returns were made it was about $40 spent. We knew we’d be using them along the entire back wall above the stove (that’s going to be our focal wall with tile to the ceiling, a big range hood, and open shelves) as well as wherever else our standard 18″ backsplash would go on the other walls of the kitchen. I started with the 18″ backsplash boards first since they were smaller and more manageable. They just required some careful measuring to ensure that I cut accurately around the window and for the outlet holes.

To make my cuts I used my jigsaw, since it was convenient and I was good at controlling it. I also wore a gas mask (not a paper one, a real deal rubber one with filters) to avoid ingesting any of the nasty dust that flew. Though I’m pretty sure I wasn’t using the right blade for that material though. It cut just fine, but by the end of the job my blade looked like this:

Notice all of the missing teeth in the middle? Cutting literally sanded them off. So yeah… lesson learned. Maybe I was supposed to use a diamond blade since cement board is so coarse? Either way, I was happy to get ‘er done.
Setting the cut boards in place was pretty easy. I was able to balance them along the old plywood under them (they were the same thickness, which was really handy for a seamless result). Then I just made sure they were level and drove some screws in all by myself while Sherry kept Clara out of the danger zone (aka: our tore-up-from-the-floor-up kitchen).

So once I was sure that all of my screws were adequately sunk into the cement board (pokey screw heads are bad for flush-laying tile) I continued on my merry way around the room. This wasn’t so bad, actually! Especially since I dreaded it so much because we didn’t exactly have a great time with the same process while rebuilding our first house’s bathroom. Maybe absence makes the heart grow fonder?

The thing that made my life much easier was the fact that the 5ft tall boards fit just about perfectly in my 5ft tall wall behind the stove. That meant I didn’t have to do any cutting on those boards (except for the outlet holes). So the ease of cutting made up for the extra difficulty of maneuvering a bigger, heavier board. Luckily Clara was napping by this point so I was able to enlist Sherry’s help to hold them in place while I drilled. It certainly made this part of the day go much faster.

Oh, and as for the dangling outlet up by the vent – it’ll eventually be used to hook up our future range hood. Since we’re not 100% sure how /where that’ll be hooked up we just placed it somewhere temporarily that could (hopefully) work . If not, at least the hole will be hidden behind the vent cover we’re eventually going to build (and there’s some play in the wiring that connects to that junction box so we’ll be able to move it if we need to).
If you look at the photo above you’ll see that our future range hood won’t be perfectly centered on that wall of tile, but it will be perfectly centered on that back wall of the kitchen (when you include the space next to the cement board over the doorway). So once we add our penny tile to the ceiling and install our open shelves and our built-in range hood, we think the way that we “accessorize” the floating shelves will also help restore balance. We plan to use them to house everyday dishes that we’ll use so often they don’t have a chance to get dusty along with other items that are always stored out in the open like vases, some art, a plant or two, etc (more on the whole dust/open shelves thing here).
But just because cement board was done, didn’t mean we were done with our walls. After all, we still had this going on above the sink and pantry:

We briefly talked about doing more tile to the ceiling on that wall, but thought that one focal wall with open shelves and a big range hood with tile to the ceiling would be enough. So we decided that a regular old wall with a standard 18″ backsplash will better balance the other side of the kitchen which will also have that going on next to the fridge. Oh and we also thought tile over the pantry would just be super weird, and that would be the natural stop point for a rectangular effect like the other wall, so we’re happy we bailed on that idea.
But the walls of the kitchen aren’t drywall. Nope, remember they’re painted paneling (which we actually don’t mind for the soft texture and coziness it adds once it’s painted – we had some in our first home’s den too). So we did the unthinkable…

… we actually purchased a sheet of paneling. And oy how it pained us. We’re pretty sure everyone at the checkout was thinking “welcome to 2011, why the heck are you buying paneling?!” Luckily we had one leftover piece of painted paneling leftover from the doorway opening project that we were able to reuse to the right of the window above where the backsplash will go. So I just had to buy one sheet at Lowe’s.
So yes, that was a first. Never in my life did I think I’d be BUYING new wood paneling. And thank goodness it’ll get painted any second now (along with that rough looking ceiling), so we didn’t have to worry about matching color.

Luckily that one 4ft x 8ft piece o’ paneling covered all of the areas that we needed. We had the guy at Lowe’s cut the pieces to size so (a) they’d fit in our Altima and (b) we didn’t have to do it ourselves. But I did buy a new jigsaw blade while I was there (so I could cut the hole for our microwave outlet).

Oh yeah, and notice our moment of laziness above? Since a small-ish upper cabinet will be covering that section of wall we didn’t go through the trouble of cutting out that piece of plywood (it would’ve meant moving the pantry, and it won’t be seen once we install the cabinet with added crown molding around the top anyway). Gotta love one wall-hanging shortcut along the way.
As for the cement board seams, we’ll be taping them and then using thinset over them to set the tiles, which should hold everything in place for the long haul per The Tile Shop’s recommendation. But wait, let’s go back to this picture of that wall head on:

You might be wondering about that oddly placed window (it’s not centered on that expanse right now) but once we add the small-ish upper cabinet to the right of the pantry there will be exactly 14″ of wall space between the side of that cabinet and the window trim. There will also be 14″ of wall space between the right side of the window trim and the 12″ floating shelves that will be hanging on the focal wall (they’ll jut out 12″ to house all of our big dishes and stuff, which is nice because the window will eventually look perfectly balanced with 14″ of wall space on either side).
Anyways, here’s what the kitchen was looking like when we were all done. Still not great, but definitely better. And not only do we love how the room feels without upper cabinets crowding us, it’s also nice to start to see what it’ll look like once the tile backsplash is installed. I wish I had taken a wider shot so you could see the paneling on the other side of the room with the 18″ backsplash that will go over there (next to the fridge) since it really feels nice and balanced with one wall of tile and two standard backsplashes on each of the other two side walls.

Oh, and since lots of folks asked on our last kitchen post – these are both interior walls (that window looks into to our heavily insulated sunroom, not the outdoors) which is why they weren’t insulated before and why we didn’t opt to add any insulation during this step of the process. We lived here through last winter (which was colder and snowier than most) and we knew that the sunroom didn’t get very cold, so thankfully the kitchen never feels drafty or uninsulated (in our experience, brick ranches are great about maintaining a comfortable temperature in general since they’re so solidly built and aren’t usually drafty).
As for the timeline, this whole destruction/reconstruction process took us two days (one for demo/buying cement board, one for installing the new walls) so overall it wasn’t that bad. Though I was pretty darn sore by the end of it all. Thankfully Sherry pointed out that our next step was paint touch ups, which aren’t too bad (ceilings are my least favorite surface to paint, but we don’t have much of it to deal with). We’re actually kind of excited to get that done because the room will hopefully look less Frankenstein than it’s looking now (mismatched appliances + mismatched cabinetry + mismatched paneling = ca-razy). But still better than the before that we started with:

What about you guys. Have you ever hung cement board or actually had to (gasp) buy paneling? Any ceiling painting on your agenda?
Pssst- We’re over on BabyCenter chatting about the birthday time capsule that we finally completed for Clara to open on her 18th birthday.
Psssst- We’ve listed our black above-the-range microwave on craigslist if anyone is interested (it’s only a year old, works great, and is still sold by Sears). Here’s the link.
Nursery Art Expansion
Some nursery tweak-age has occurred. And because we’re currently working away on the kitchen (stay tuned for those deets tomorrow morning if all goes well), we figured that we owed you the whole gallery-frame-change rundown (along with some well overdue what’s-in-that-frame answers). We’ve always loved the idea of expanding Clara’s art wall as she grows with more and more frames, so here’s how it looked before:

And here’s what we have going on now that we’ve added a few more frames to the mix (and shifted the placement of a few of the existing ones):

And for those who have been wondering, here’s a quick rundown of the things that we’ve framed (you can find some other details here):
- John’s baby picture and my baby picture (for fun little comparisons)
- a hilarious doodle of Burger that a friend did on my Facebook wall using Graffiti (I just printed it out & framed it)
- this print of a girl and her dog from Etsy (it reminds us of C & B)
- a personalized canvas that says Clara Kenley from here
- a photo of Burger that I photoshopped to create a bright stylized picture of him in a field of flowers
- two faux butterflies in a small shadowbox that I backed with patterned paper
- a homemade silhouette of Clara that we cut out and placed on striped paper (more on that here)
- a giraffe print from here (Clara loves giraffes and pooches most of all)
- a cute Skinny Cow magazine ad with a giraffe that I tossed into a frame (framing ads from mags that you’ve purchased for your own personal enjoyment is totally fine – you just can’t profit off of those images or anything)
- a big letter P that we decoupaged with colorful paper for a more playful effect (more on that here)
- a print of peas in a pod purchased here made entirely of type (it’s the letter P, repeated over and over – which we love since we’re the Petersiks)
- a silhouette of Burger that John ordered me years ago (which we backed with fun patterned paper to nursery-fy it)
- Clara’s hospital bracelet (I just glued it to some pink construction paper and popped it into a chunky glass-less frame)
- a cute Sweet N Low magazine ad with an owl in it (once again, when you purchase a mag you can frame any pages you want, you just can’t use them for any reason other than personal enjoyment – ex: ya can’t sell them on Etsy)
And seven of the “art” pieces were actually completely free (our baby pics, the Burger doodle, the Burger in a field print, the Laughing Cow ad, the Sweet N Low ad, and Clara’s hospital bracelet) because we framed something that we already had or made/printed something of ours out on card stock. Gotta love no cost wall-candy, especially when it keeps Clara happy (read: not crazy-wiggly) during diaper changes.


The funny thing is that many of these frames hung in Clara’s first nursery (albeit in a slightly different arrangement with a few differences in what we framed):

One of my favorite things on the wall are our baby pictures. Clara loves looking at them and saying “Daddy baby!” and “Mommy baby!” and we love searching for characteristics in each photo that seem Clara-like. Here’s John’s a little closer:

And here’s mine:

First of all: we love that we both had our mouths wide open. But more importantly: who do you think she looks more like? Let’s have a good old fashioned vote.

Any Team Sherry peeps out there? Everyone in the family says she looks like John (even on my side) but John’s baby self was so sweetly chubby, so I personally think there’s a little bit of a mommy resemblance going on. Then again, I’m biased.
Psst- One of the five finalists for the Ikea Life Improvement Project is a reader of ours named Melissa Matthews! She found out about it back when we mentioned it during an Ikea giveaway, and entered… never thinking she’d end up in the finals (we were so excited to get an elated email from her all about it)! You can read more about her awesome cause and log a vote for her or any of the other finalists that you’re rooting for here (the other nominees are in the left column). Bonus: every time someone votes, Ikea donates $1 to Save The Children’s U.S. Programs.
And Now, A Much Awaited Book-Process Post…
We promised you guys a post all about the whole book-deal process back in March (when we spilled the beans about our upcoming book here). And the only reason I can think of that it has taken us this long to write is because we’ve been so busy actually writing our 260+ page book behind the scenes along with juggling the bambino and the blog and all of the projects that go along with those things. Haha. So forgive us for the delay. Many of you guys expressed an interest in how it all went down (a few years ago we never would have known how to navigate the waters of book proposals and agents and potential publishers to somehow “land” a book deal), so we’re happy to share. Here’s how it all happened, in bullet form (with photos of Burger acting out our emotions, naturally):
- About two years ago (after blogging for about two years) we were contacted by a few agents & independent publishers about a potential book deal.
- We went crazy for the idea (we love to write and share our projects). We basically did this.
- We chatted with John’s sister about the folks who contacted us (she works in NYC with a large magazine publisher – so although she doesn’t do books she knows who’s who for the most part).
- She gently explained that they were a bit less “legit” than some other folks that we could potentially work with if we held out, so we decided to just wait and see what happened.
- We sort of forgot about it.
- About six months later (a year and a half ago), we were contacted by a NY/Boston literary agency (Zachary Shuster Harmsworth) – so we asked John’s sister about them and she got really giddy and said they were highly recommended (their agency just emailed us out of the blue asking if we would like to pursue a book).
- Uh… yes! We got excited. And naturally, we dove right in.

- We immediately started working with an agent to put together a book proposal (this is what they send out to potential publishers to “shop” around a book idea and see who’s interested).
- A proposal is typically 70-150 pages, so it takes a while to put together. The process starts with a book outline and you write an intro and a conclusion and explain why your book would be different/fun/exciting. You basically plead your case.
- It took us a year to complete our book proposal. Not lying. It was a ton of work! And we kept tweaking things until we loved it (no sense in pitching a book that you’re only feeling so-so about, so we took our time developing something that we thought was fun and fresh and exciting).
- After a year of work on that 100-ish page document we got to a place where our agent thought it was time to send it out. So she did.
- Then she had a baby. So another agent took over after the “pitching” process. That was a little nerve-wracking but it was such an exciting time so we tried to just remember to breathe and eat and stuff. This was our nervous face:

- It turned out that after our literary agency pitched our proposal to about twenty publishing houses, seven of them were interested in bidding on our book. We were crossing our fingers for one or two (which we heard was typical – hey, you only need one!) so it was an insanely exciting and unbelievable reaction. We still get glassy-eyed when we think about that day.
- After publishers indicate that they’re interested, there’s an “auction” (yes, it’s sort of like ebay – haha) and they each extend a bid about what they want to do/pay (everything from a book advance to royalties is indicated in their bid along with where they “see” the book going – so one publishing house might indicate that they see a giant expensive coffee table book while another wants a smaller less expensive handbook).
- It was super helpful to learn which publishers wanted to do big expensive books and which ones were more of a small shop atmosphere who do a more customized look at a more affordable price point while believing in a lot of collaboration (obviously that type appealed to us a lot more).
- By the end of auction day our heads were spinning as we compared the offers and picked a publisher. Our pick? Artisan/Workman. Workman is a huge publisher who is known for all sorts of best-selling books (like What To Expect When You’re Expecting) – but Artisan is their smaller boutique agency that manages a much smaller volume of books per year in a real hands-on way that’s full of collaboration. They understood that we didn’t want to create a giant $50 coffee table book and that we just wanted something fresh, fun, and affordable – and full of great ideas and great photos.
- They actually offered us a two-book deal, which is especially encouraging because they were saying “we have faith even before your first book comes out that it’ll be great and we’ll want to do a second book with you” – so yeah, we were over the moon. We have no idea what the second book will be about (since we didn’t touch on that in the proposal) so it’s nice and open-ended now. Which we like (who knows what we’ll want to write about after the first book comes out).
- About eight months ago we all signed on the dotted line to make things official (which is actually when we shared the book deal news with you guys – we couldn’t wait!). Then we… you guessed it… dove right into writing the actual book.

- After about seven months of nearly nonstop writing (behind the scenes while we continued to blog and love on Clara), we handed in our 100+ page manuscript outline, which felt pretty darn good. Although it’s around 120 pages now, when the tutorials and photos are added it should hit the 260+ page mark. This momentous hand-in day was over a month ago. We’re currently gearing up for the photography stage (working on the book’s layout, fleshing out all the tutorials, and beginning to secretly complete and shoot hundreds of projects with a pro photographer).
- We’re also coordinating with a few other guest bloggers who we’d love to feature (you know we love to share the love slash eye candy).

- Let’s just say we completely understand why the title of “author” is a full time job. It has been kind of crazy being stay at home parents to Clara, keeping up with the blog and the projects that we share, all while writing a book and doing secret projects for the book behind the scenes. But we couldn’t be more excited to see how it all turns out! And when we’re done we’ll probably sleep for at least five days straight.

- The book is slated for release in the fall of 2012 (although there are occasional murmurings of the spring of 2013). Isn’t it amazing how much longer books take to make than blog posts? Especially since most of the content is already completed and the release date is still a year (or more!) away. All that pro photography and layout and production stuff takes time though, and we’re sure it’ll be well worth the wait!
As for what our book is about, the concept is that it’s an idea book. A giant compilation of over 250 ideas for showing your home some love (our tentative title is actually Spruce: 257 Ways To Show Your Home Some Love). The number might change as we continue to execute the projects that we have detailed in our manuscript (some might be awesome and lead to other ideas while some might fail – so it’s flexible). We just want it to be a fun book that you can flip through to see tons of numbered ideas, and then you can start on any page and do any project in the order that it appeals to you. Informal just felt right to us, and the idea that every project or suggestion could be altered a bit (so everyone can do their own spin to fit their house and their style) seems fitting.

A decorating bible with explanations about boxpleats and start-to-finish home staging, it’s not. It’s more of a spark. A starting point. A junkload of ideas to pick and choose from and adapt to fit your home. Some are more involved, some are super easy. Some are free, some might be something that you have to save up for a little to take on. Basically it’s the blog. Only a book. And instead of getting a post or two a day, you get 250+ ideas with photos and checklists and tutorials and illustrations (along with a lot of extra tips, sidebars, and commentary) and a little dorky humor a la us.

Oh and virtually all of the 250+ projects/photos/illustrations will be new for the book – so it’s nothing regurgitated from YHL or anything. Some of the ideas might be the same (ex: paint a piece of furniture or reupholster a bench) but those general concepts had to be included – so we decided we’d execute them in a fresh way (instead of seeing the same bench that I painted three years ago for the blog, you might see a dresser painted in a completely different way that we secretly completed this winter). Sure it’s extra work, but we really want the book to look fresh and be full of different “takes” on a ton of decorating ideas – both classic and unexpected (and pretty much everything in between).
So there it is. A big ol’ rundown of the book process, what we’ve been up to, and how it all went down. I would definitely encourage anyone who is looking to be published to work with an agent (if they don’t email you, I’d definitely try emailing them a proposal to see if they’d like to take on your project). Let’s just say that I can name fifty times that having an agent to help navigate the contractual terms, timeline, and general process came to the rescue – so it’s definitely something we probably couldn’t have gone without.
Does anyone else out there have publishing tips to share with others who are hoping to get into author-ship? Has anyone actually tried to author a book in the past? Any self publishing experiences to share (we were too scared to go that route, but hear it can work too). As for book ideas, waaaay before John and I were bloggers we tried to write a proposal for a hilarious pet naming book (say the people who named their dog Hamburger) but after realizing how much work it was… it just sort of fizzled out. Maybe someday we’ll give it another go. We owe it to Burger. Haha.
Fab Freebie: Moo Moo Moo!
***This giveaway is no longer accepting entries – see who won below!***
Our trio of winners this week (thanks as always to random.org for the selections) are… Lila @ sweet and lovely crafts (who wants triple the hours in a day), Molly (who wishes for 3 times the energy, time and money to take on more projects she reads about here) and Emily B (who’d like her yard & house tripled in size). Congrats you three!
We started doing giveaways just about 3 years ago, and our 3rd giveaway on December 1, 2008 was with a fun printing company called MOO. The prize was valued about $20 and fewer than 300 people entered.
Now MOO is back to celebrate a freebie-nniversary of sorts. This time they’ve tripled the prize value AND the number of winners. So a trio of you will have $60 to spend on their signature MiniCards, a set of colorful business cards, some photo stickers, or maybe even some personalized or pre-designed holiday cards. There are tons of fun uses for them – you can even see a couple of projects that we did with some MiniCards back in ’08.
- PRIZE: $60 gift certificate to moo.com
- TO ENTER: Comment on this post with the words “MOO ME!” and tell us…
- BONUS QUESTION: … what in your life you’d like to triple. Is it the amount of space in your house? The number of hours in the day? The amount of money in your bank account? The number of cats that you own?
- GIVEAWAY CLOSES: Wednesday, November 30th at 8pm EST or at 10,000 entries (whichever comes first)
- NUMBER OF WINNERS: Three
- PRIZE SHIPS: Anywhere in the world!
- USUAL STUFF: One entry per e-mail address is permitted. The winners will be selected using random.org and announced on Thursday as an update to this post. That’s right, come right back here on Thursday for the announcement of our winner. Good luck…
Note: We aren’t paid or perked for hosting these giveaways, we just do ‘em to thank you awesome folks for stopping in. See our Giveaway FAQ page for more info. Pics courtesy of moo.com.


