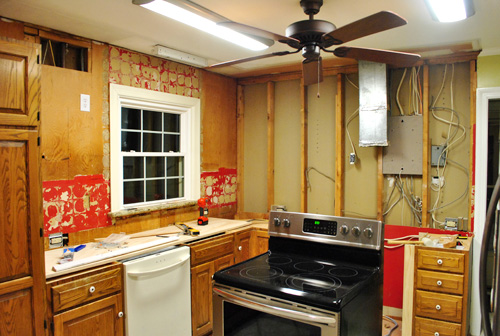
In case all of that turkey and stuffing made you forget, allow me to remind you that our kitchen was looking something this after the upper cabinets came down:
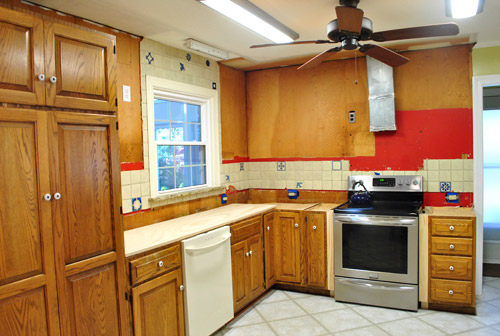
Since the clock was ticking on our new counters (in around 2 weeks we should no longer be sink-less and counter-less), we had to get the walls prepped for the new backsplash. Not that the backsplash would be going up before the counters (we’ll get a snugger fit if we install it afterwards, plus we don’t want it getting damaged during the whole counter install), but because wall prep = demo (aka: a mess) we didn’t want to worry about scratching our new counters if they were in during that step. So it was time to say adieu to the old “random blue things” backsplash:
We have a weird soft spot for this old backsplash. It’s kinda quirky, and feels very handmade. But it also feels all wrong for our idea of a dream kitchen – and the penny tile that we found had us at hello. We keep saying that the existing backsplash seems more suited to an adobe style home in the Southwest, but since we’re softies, we have an idea to keep a few of the accent tiles around for old time’s sake (more on that in a bit).
When it came to the whole removal process, it went ok. Some of it even came down in 3 or 4 (or 6!) tile chunks at a time. And all it took was a quick pry of the screwdriver.
But then again, most of it came out one-by-one… or in chipped pieces and broken chunks. Still, I can’t complain. It was maybe a 45 minute job from beginning to end? I did about 80% of it (Sherry loves demo too, but she was on Clara duty after she woke up from a wish-it-was-longer nap).
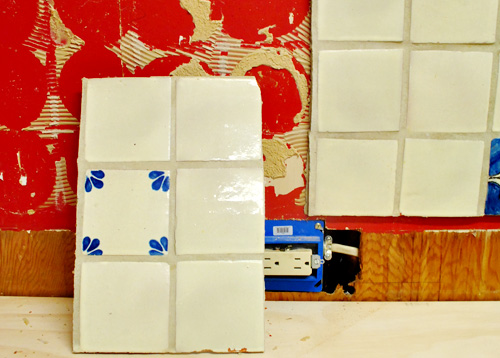
We wanted to save a bunch of the blue tiles for nostalgia’s sake, and actually came up with the idea of adding little felt feet to make them into coasters (could be fun to tell people about their past whenever we break them out), but these three were the only ones that survived in one piece:
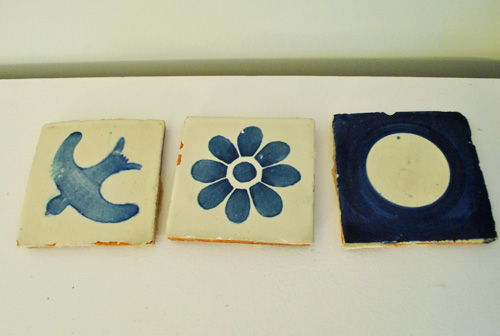
Kinda sad, but three coasters are better than none – so we’re thankful for these lucky three survivors. Still a little bummed that we couldn’t donate more whole tiles to the ReStore or give a few of the fun blue ones to friends of ours who requested ’em though. They were just so brittle (they were made from red clay) so they shattered and collapsed really easily. Our three survivors were kind of miraculous.
Oh, but to make sure that we never forget the other random blue tiles that graced our now-gone backsplash, we threw together this little tribute video. You may want to have a box of tissues handy…
Sorry. That was just us being weird. Sort of like this bow-chicka-bow-wow console video from a while back. Can’t help ourselves.
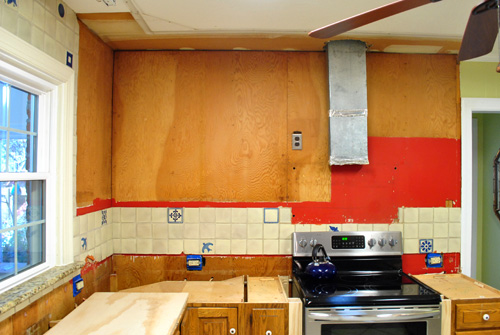
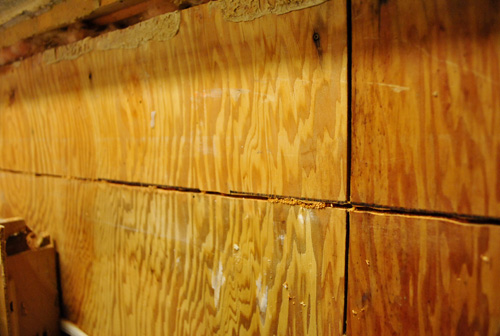
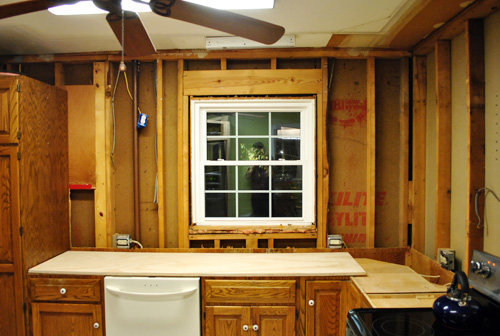
But back to the serious stuff: the rest of the kitchen demo. As you saw in the video, here’s what the room looked like sans tile. Pretty ugly and not exactly ready for the new backsplash.
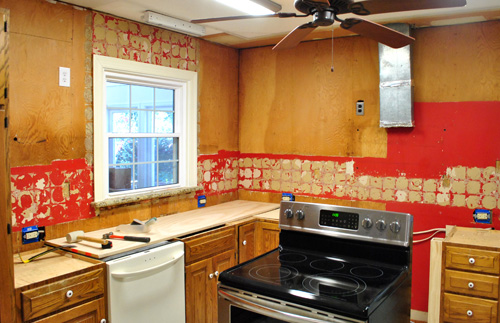
Between the plentiful bumpy leftover glue and the fact that plywood isn’t an ideal surface for holding tile in the first place (especially the weight of penny tile all the way to the ceiling along the stove wall) we resigned ourselves to the fact that we should probably demo it out and replace it with something more suitable. Sigh.
So we called The Tile Shop (they’ve pretty much been our go-to resource for tiling ever since we asked them a million questions while we gutted and retiled our bathroom a few years back) and they confirmed that we really ought to install cement board. We had a mild panic attack when we realized that the counter guys templated against the 1/4″ thick plywood walls (so if our cement board was any thicker or sat too low on the wall, our counters might not fit correctly). Thank goodness they actually sell 1/4″ cement board, so we can seamlessly sub out plywood for cement board without affecting the counters.
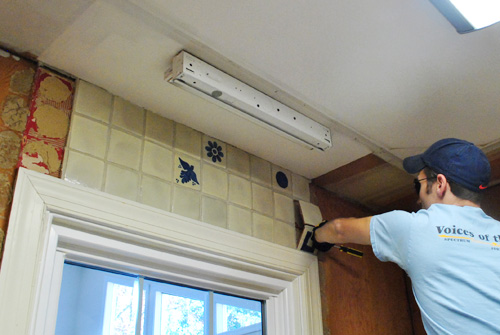
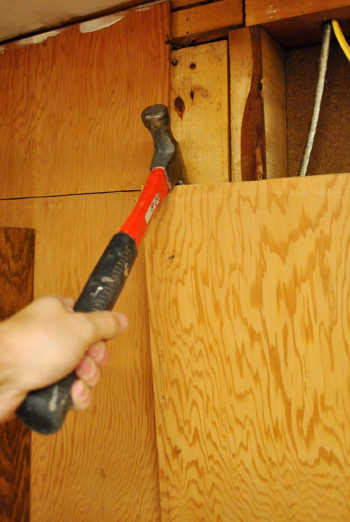
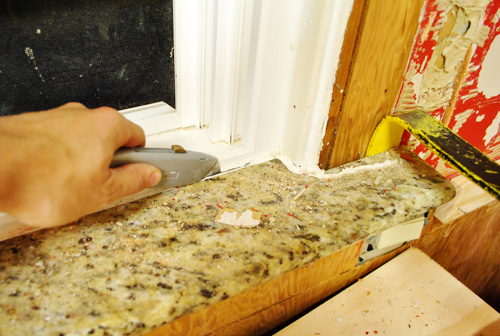
But I still had the challenge of cutting the plywood along a straight seam right above the lower cabinets, so it could be pried off the wall and replaced with cement board. I don’t really own a great tool for this, but I figured my Dremel Trio was my best shot since I could control the depth at which it cut (since I wanted to cut through the full depth of the 1/4″ plywood, but not the studs behind it) – which I’m demonstrating in the photo below:
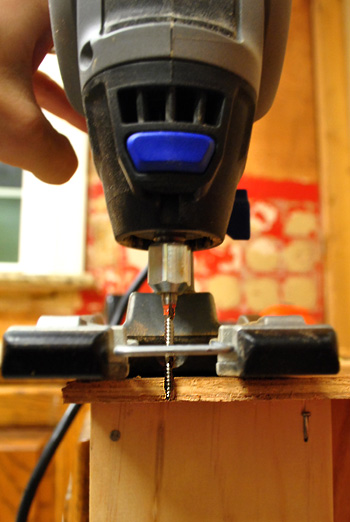
Though had I seen the commercial that I saw the very next night for this thing I probably would’ve bought it as an early Christmas present to myself. Oh well, you know we like to use what we have.
My main struggle with the Dremel Trio is that it’s not very steady when cutting. Since it cuts using a spinning motion, it constantly wants to spin off in different directions. So I fashioned a makeshift guide by loosely nailing a piece of scrap wood into the wall. This way I could press the Dremel against it as I pushed it along the wall, keeping my cut perfectly straight:
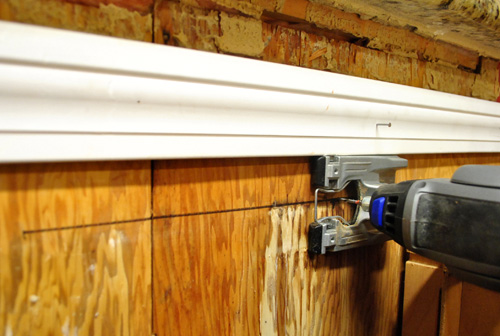
Well, straight enough. Oh and I turned off the power to the kitchen (and used an extension cord from another room to power my Dremel) even though I was only cutting the depth of the plywood – just in case there was a wire in my path. Luckily all wires were a lot deeper into the wall, so I didn’t come close to anything with my shallow cuts.
It took me a bit longer than I’d like to admit to make all of my cuts (maybe 90 minutes?) because of having to move (and double-check) my guide placement. But once I had sliced the plywood, it was easy to pry it off of the wall from there.
See? Look how fast I’m moving now. Oh wait, these photos aren’t time stamped…
I did hit one other speed bump when I realized that I needed to remove the trim from around the window (it was nailed in on top of the plywood).
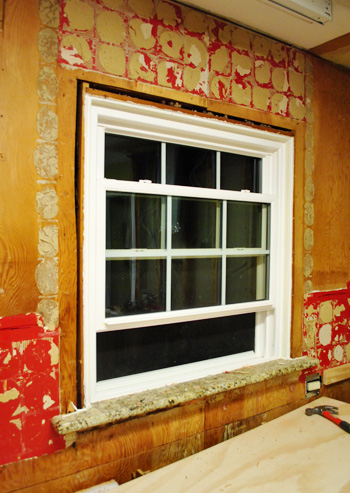
This also meant removing the last remaining piece of granite in our kitchen: the window sill. But like its granite-y brethren before it, we just had to slice its caulk seal and pry it away. Easy peasy. We’ll replace it with a regular old white wood sill like we had right above the sink in our first kitchen (white Corian would have been nice, but we’re too cheap for that, and semi-gloss paint on a wood sill holds up nicely in our experience).
Voila. So long granite. Sayonara plywood.
So there we have it: all of the demo’s officially done. And our kitchen is officially looking more disastrous than ever:
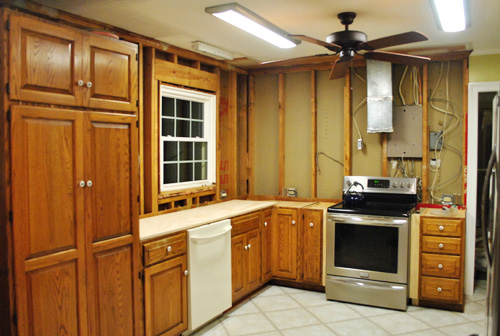
Not that where we started before demo was much to look at anyway:
Next up is the fun part. Okay, not really. Next up is hanging the new cement board walls along with some leftover paneling from the wall-opening project on either side of the window (since that wall won’t be tiled all the way to the ceiling and we want it to match the rest of the painted paneling in the room). And I’m going to be real here: this is not a process that I think we’ll particularly enjoy (at least we didn’t when my dad helped us do it in our old bathroom). But it must be done. And it also must be blogged about, so stay tuned for all the details as we go. In the meantime, I’d love to hear what you guys did around the house this weekend. Any tile stuff or demo going on? Does anyone have a fun demo story for us?

Janette@The2Seasons says
I have noticed that you keep a very clean/neat/clutter-free worksite. Well done.
gk says
i was just thinking the same thing! i’m so amazed (jealous) at the cleanliness here. is there a secret, un-pictured side of the room with all your tools, etc? we recently had old plaster ceilings torn out and replaced in our bedroom and guest room (and then had to paint, put up picture rail, etc). our entire top floor was a wreck for about 6 weeks.
YoungHouseLove says
The key is Clara! We can no longer keep a pile of tools in the corner of the room so we try to stay on top of things and clean as we go so she’s not living in a disaster zone!
xo,
s
Teresa says
ha! I was thinking the same thing!! It’s really coming along. You guys are so good at keeping your momentum going on these projects!
John@Our Home From Scratch says
You’re right, those would make great coasters. Felt works well and you could apply sone cork to the back too. Kitchen’s getting closer!!
YoungHouseLove says
Ooh cork is a really fun idea too!
xo,
s
heather says
I make and sell them on my Etsy site. Cork is awesome, but you can get a pack of felt feet at home depot for really cheap. They stick on and do NOT come off and are extra thick. It works awesome.
YoungHouseLove says
Love that tip!
xo,
s
mike @ the lil house that could says
I think I want to be John when I grow up.
Rebecca @ the lil house that could says
I thought you wanted to be Sherry!
Amanda @ Our Humble A{Bowe}d says
I’d love to say it’s looking good, but it’s looking bad, in a good way. :) You’re lucky that the backsplash tile came out easily, even if you couldn’t save more tile. When we pulled out our tile floor, it took about two days of man muscle to get everything out for the hardwood floors. http://ourhumbleabowed.wordpress.com/2011/10/25/after-the-dust-settles/ We’re done with our kitchen demo work, but we did start building our drawer fronts this weekend! Yahoo!
YoungHouseLove says
Oh man- that looked like a huge job!
xo,
s
Judith says
As your always saying: sometimes a room has to look even worse before it gets better. ;) I can’t wait to see your new backsplash and the finished kitchen. We just bought some really nice subway tile last friday and we were really lucky to find it because for some kind of reason it is very hard to get here in Germany.
annabelvita says
I think getting rid of the red is a massive improvement, even if it did mean going back to the studs. Go team YHL!
Maia says
So can relate! While our kitchen is slowly looking like an actual kitchen (yay for a working sink!)some rooms in the house resemble your kitchen a lot. It changes so fast!
If you care to take a look this is one of our demo-posts, big time demo: http://www.blackdoorontheleft.com/2011/09/she-says-all-in-all-its-just-another.html
and the mandatory cleanup post:
http://www.blackdoorontheleft.com/2011/10/she-says-narrow-trouble-and-delays.html
YoungHouseLove says
Wow, you’ve been busy!
xo,
s
Kristen says
Ummmmm …. Do you guys not insulate your walls down there like we do up here in Canada?? ;-)
YoungHouseLove says
We have a pretty warm climate in Richmond so I’ve heard that it’s only standard in our area to insulate exterior walls (that window looks into the sunroom so it’s an interior wall).
xo,
s
Chelsea in Richmond says
I was going to ask the same thing. We might have a “warm climate” but it gets pretty cold here still haha.
You all don’t heat the sunroom right? If it’s an unheated room, I would definitely insulate because if you don’t, then you are losing heat (and money) into a room you don’t heat at all. If you do insulate, make sure you use spray foam for all those gaps around the window too.
YoungHouseLove says
Thanks for the tips guys! The sunroom is very new (built in the 90s) and extremely well insulated. We hardly ever turn on the heat or air in there and it stays pretty steady (never gets super hot or cold or anything).
xo,
s
Claudia says
I was wondering the same exact thing!
lorie says
That’s the first thing I thought too! Canadians think a like. ;)
TheChangingHouse says
That sure does look intimidating now! Good luck! I can’t wait to see the final product! I’m getting really excited for you guys!
Anna says
Sometimes you have to make a mess before you can make things pretty!
nancyo says
hahaha.. I loved the tribute video.
When are you painting the bottom cabinets?
YoungHouseLove says
After counters go in since they can scrape things like the side of the fridge cab and the pantry when they go in. Can’t wait!
xo,
s
Kristen @ Popcorn on the Stove says
It’s insane watching this whole demolition process! It’s really coming along, though. I’m so glad you were able to save the 3 tiles. I love the idea of using them as coasters (although, if they’re fragile, it may be fun to frame them and maybe hang them in the kitchen or the gallery hallway).
YoungHouseLove says
That would be cute too!
xo,
s
Christina says
I was just thinking the same thing about framing the tiles! I think they would look great on your gallery wall. Everything is looking great! I’m really excited for you guys!
Emily@The Diligent One says
Apparently, I’m still several steps behind because I’m stuck on the fact that your walls were plywood.
Regan @ RenovatingRothenbergers says
I was hoping you were going to use a few tiles as coaster! So glad you kept a some as momentos :)
That video had me cracking up too! Love the dramatic music – thanks for the laughs.
Deb D. says
You guys crack me up with your remembrance video. Reminded me of the Oscars tribute every year…. Like the progress you’ve made — very impressive!
fd says
weirdly, the more stuff comes out, the more I can see where the kitchen is going. You are going to have a beautiful kitchen when this is done. Well done on all the hardwork!
Ellen says
LOL! That farewell to tile video is hilarious, and something I might do if I were attached to any old tile in my house… which I’m not…
I think making coasters out of the old tile is a great idea! Do you have to seal them at all?
YoungHouseLove says
I think I’ll give them a few costs of non toxic poly (safe cost Acrylaq). More deets as I go!
xo,
s
Christi says
We took down three walls in our first house and since our contractor was a friend we had a “Demo” party. Everyone got to help with the sledge hammer! Best stress relief ever!
Congrats on your progress!
YoungHouseLove says
Ooh sounds fun!
xo,
s
Kim says
I normally don’t comment. I know you’ve already figured everything out. But, if there is still any room for change… I vote for putting the penny tile up to the ceiling on the wall you’re putting back the paneling for a more cohesive and seamless look. Good luck!
YoungHouseLove says
Since the open shelves will just be on one wall (the oven wall) we like the idea of that wall becoming the feature wall with tile to the ceiling (so it becomes the focal point of the room instead of two walls of tile, which would also double our costs).
xo,
s
Karen says
Well… call me crazy, but I think the bare studs look better than that crazy tile and the tomato soup walls underneath. LOL
That made my eyes bleed.
Alli says
I totally agree!! I think the bare studs are so much more restful.
Julia @ Chris loves Julia says
It looks so raw and fresh. Hahahaha. We didn’t do any demo this weekend–we only dreamed of demoing.
Jeanne says
Great job! I love seeing every step. It makes me so excited to see it looking crappier and crappier because I know that soon the turn will be made and yall will be on the upswing!
Are their any plans for that window?
YoungHouseLove says
Someday we think it would be fun to remove it to make a pass through to the sunroom but since that’s on a separate heating/cooling system that we rarely use it stays for now.
xo,
s
Firesparx says
If the sunroom is on a separate heating/cooling system then you may want to consider insulating that wall while you’re at it.
YoungHouseLove says
Yeah, it probably wouldn’t hurt. We’ll have to think about it (since we lived here last winter and didn’t have any heating/cooling issues we’re not sure it’s worth the expense).
xo,
s
Clare says
I loved your tribute video. We’ll miss those tiles.
Jeri says
Loving the progress of your kitchen! We spent Sunday of the long weekend removing tile as well – but basement ceiling tile. And furring strips. And a dead mouse and mouse poo. Ewwwww.
YoungHouseLove says
Ewwww! You’re very brave.
xo,
s
Laura says
Loved the video!
Christine at Casa-de-Christine says
We removed the upper cabinets in our cheater ensuite/old laundry room to make way for the new shower. It’s going to be a big job too! Also not looking forward to adding cement board, etc.
Your kitchen is coming along though! Can’t wait to see it all finished!
tina says
I’m predicting a “New Years” reveal at this pace :)
YoungHouseLove says
Our goal is still sometime in January. Painting cabs and building doors and doing counters, backsplash, range hood, all new lighting, and new floors should take us a while!
xo,
s
Kate @ Bread & Chocolate says
It looks so different already! Can’t wait to see the finished product (I’m sure you feel the same way). The only DIY I’m doing these days is holiday decorations, but you’ve inspired me to take a second look at the thrift shops/craft stores and make this a homemade holiday.
Chris says
I’m a bit surprised that there isn’t any insulation on that exterior wall. Living in MN, I can’t imagine not having it!
YoungHouseLove says
That’s actually an interior wall (the sunroom is behind it). Maybe there was some before the addition though? So odd.
xo,
s
Hayley M. says
That video. Wow. I laughed my little booty off. I also hadn’t seen the console video. Not gonna lie, kids. It was a bit strange. But… I would expect nothing less from yall at this point. :) I can’t wait to see what the tiled wall is going to look like! Happy cement board hanging!
Jenna says
When my husband and I decided to gut and redo our bathroom, we thought we could just spackle in our textured walls (a quick fix), it didn’t work and about 2 weeks into the bathroom project, my husband decided to tear down the drywall and start over. I had a mild panic attach and wanted to cry (we originally thought our bathroom makeover would only be a 2 week project and here we were, 2 weeks in and the only thing done was new copper piping for our tub and now we are going to tear up drywall). In the end, so glad we did it but the whole drywall and joint compound process made us go crazy, especially the sanding part (hello dusty house). It may not be the most fun part but makes all the difference when it’s done (of course you know that).
Here’s our journey on our bathroom. http://thewhipps.blogspot.com/2011/08/bathroom-makeover-day-28.html
YoungHouseLove says
Love it! Thanks for the link!
xo,
s
keri says
I totally bought a Dremel Saw-Max this weekend. and went to Lowe’s at 5am for black friday sales – only lowe’s though. that’s the sign of an ambitious homeowner!
YoungHouseLove says
Haha, congrats!
xo,
s
Heather F. says
Loved.the.video! That had me laughing so hard!! Very creative and hilarious!! I almost needed a box of Kleenex to control the tears of laughter running down my face!
Ang says
Holy smokes that video was funny! LOL!
Amanda says
Great demo job- much cleaner than ours (in every room of our house we have sheet rock with layers and layers of wall paper and then plaster and lath underneath that before you get to the studs- alot of mess to remove)!!!
We have had to demo every exterior wall in our house as we have renovated (so far) because we found it did not have insulation….in upstate NY. File that under wish we knew before we bought the house- Doh.
Are you planning on adding insulation to the exterior wall of your kitchen? Not sure if it is needed in VA for the winter, but would help keep the house cool in the summer as well.
I am so excited to see your kitchen come together- I am living vicariously through you guys as we will not get to our kitchen until next summer! Keep up the great work!!
YoungHouseLove says
That’s actually an interior wall (the insulated sunroom is behind it). But it was an exterior wall before the addition so we thought we’d find insulation! Guess they removed it during that phase?
xo,
s
April says
Speaking from experience and because I could not tell for sure from your pics…..make sure that trim-less window is nailed in or supported and won’t fall in and shatter. When we demoed our living room down to studs we thought that our vinyl replacement windows were secured but a big gust of wind told us otherwise…..
YoungHouseLove says
Yikes! Thanks for the tip! Ours is thankfully nice and sturdy (old house = 500 nails and screws).
xo,
s
Stacy says
One step closer! Looking good.
My weekend involved tile, too. And a toothbrush :(. Not very glamorous but the difference makes me happy.
YoungHouseLove says
Oh yeah it makes all the difference! Congrats!
xo,
s
Lindsay says
Such exciting progress! Can we expect a Thanksgiving post on Young House Life today? Hope you guys had a great one!
YoungHouseLove says
Maybe tomorrow? Still haven’t updated all the pics and we have a teething baby on our hands!
xo,
s
Keely says
Clean slate ftw!
Shannon @ Bungalow960 says
I love the idea for the coasters! Right now I have stupid cardboard ones. I might just copy your idea.
Ashley@AttemptsAtDomestication says
You guys have to be anxious for the counters to go in, because I sure am!! And I can’t wait to see the penny-tile and open shelving. Despite the chaos I can picture that that wall more and more each post.
Kristy says
You have to frame one or all of those tiles for your hallway.
Lindsey @ arkadian belle woods says
Oh Snap! You guys are on a roll! The anticipation is killing me :-) I hope you all had an awesome Thanksgiving!
cc says
It doesn’t look more like a disaster– it looks like a clean slate! Unless you need to pull up the flooring, and then I’ll take that back. Getting closer!
YoungHouseLove says
We’ll be floating the cork floors over thee using tile since we have an asbestos liner under it (so the recommendation is never to remove it and just go over it). Can’t wait for that!
xo,
s
Julie @SavvyEats says
We took the weekend OFF from house projects, for the most part. Except for the whole “cutting back the jungle of raspberry bushes and cleaning up the garden” thing. But last weekend, we painted both our dining room and the office…just in time for Thanksgiving!
Loren says
Man I know it should look worse, but getting rid of the funky red & tile already makes the room look 10x cleaner. It’s silly how excited I am for your new kitchen. I’m still just a renter, but I really enjoy vicariously living through your demos.
Callie says
My mom posted today about how my Dad has finally figured out how to easily install cabinets with their recent kitchen makeover. His tips might save you some struggles!
http://www.theinspiredhousewife.com/2011/11/easy-cabinet-install/
YoungHouseLove says
Thanks!
xo,
s
Justine says
I love getting to follow your progress! My husband and I live in an apartment, and our projects are waaaay less involved. But seeing you tackle this big stuff makes me feel much more capable anyway ;)
~Stop Me if You’ve Heard This One
Rebecca @ the lil house that could says
Mike and I just saw the Dremel Max commercial ad we were both like “ooh want!” not that we have a specific need for it right now, just seems like the coolest tool ever.
Marilyn Wilder says
I was just wondering do you not need insulation in the walls where you live and why are all your walls wood and not drywall?
YoungHouseLove says
It’s standard for exterior walls to have insulation here in Richmond but those are interior walls (that window looks into the sunroom, which is insulated).
xo,
s