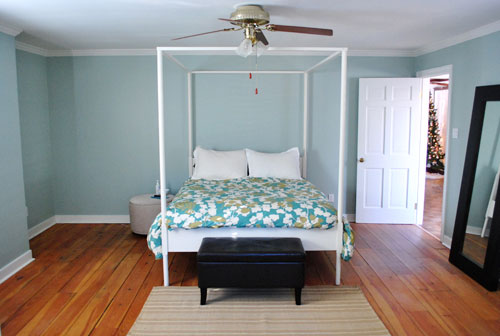
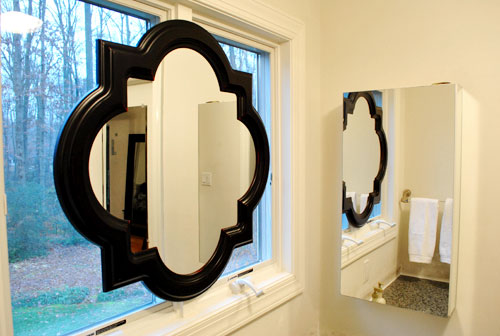
Archive for January, 2011

Sectional Hunting

This post would have been more entertaining if we channeled National Geographic and sprung for an Australian voice over artist to say things like “they wait in the brush, as the giant wildebeast sectional approaches” or “slowly and stealthily, the panthers Petersiks stalk their prey.” Oh well. The point is that we went sectional hunting. And we didn’t just look around these here parts (now I’m getting all southern on you). We took a road trip all the way up to DC (2 hours north) to drop in on the Mitchell Gold + Bob Williams store along with a huuuge Room & Board showroom (four levels and 3,600 square feet of furniture = heaven, at least if you’re me). Sadly the trip ended with us falling in love with a few gorgeous things that we couldn’t afford, namely this ginormous and oh so comfy sectional in a rich charcoal gray fabric:

But the ginormous and oh so scary price tag of $4,496 (before our “custom fabric choice” plus tax and delivery) scared me more than the scene where the mom dies in Bambi (and while we’re on that, isn’t that a little violent for a kids movie?).

We know that when it comes to a sectional, we definitely want something comfy that will last while holding up to all sorts of insane kid-antics (growing up we used to shoot our sofa at point-blank range with everything from nerf balls to rubber bands, and that’s only the beginning of the torture that thing endured). And we know that a high price tag from one of the two amazingly reputable companies mentioned above would surely factor in things like quality construction and premium materials. But after a lot of debate, we decided that with a pooch and a baby (who definitely both give our current slipcovered sofa what can best be described as a workout) something swanky and un-slipcovered (even in a dark color) might not be the best match for our family at this point in our lives. Especially with such a high cost attached. See, we want this house to be all about living. With an emphasis on large casual family gatherings. We don’t want to live in fear that a nephew of ours might pierce/stain/otherwise maim the 5K sofa every time we have people over. And we definitely don’t want to beat ourselves up every time the dog gets past us with muddy paws or the baby shows us her previously swallowed green beans after a rigorous dance interlude with daddy.

So off we went to two local sofa retailers (we’re very satisfied with our white slipcovered Rowe sofa and our green Rowe sleeper sofa, which were both purchased locally from a store called Sofa Designs). We figured we’d probably end up with a Rowe sectional that we’d love for years to come, and fell in love with this one in particular called the Townsend:

But the price tag (over $3,200 without tax and delivery) definitely caught us by surprise, especially given that our other two Rowe sofas were under 1K. I guess we expected to pay around 2K or even 2.5K (since a sectional is kind of like two sofas put together). But over 3 times the price still felt pretty high. And it left us wondering if a $3,200 sectional (also without removable slipcovers) would feel any less precious and “untouchable” than a 5K one. For cheap-os like us, that’s still a huge chunk of change.

And you guys know that we had been considering this sectional from Ikea as well (seen here in this mood board of yore)…

…so that was on the table when we made another pilgrimage to Ikea just to sit on things and check them out in person. Which is when we discovered that the sectional that we had been eyeing seemed a bit too small for our giant 25′ x 15′ room (and the last thing we wanted to do was buy a cheaper sectional to save money that ended up being wrong, which would still be a colossal waste of funds). But then we saw Karl – er, the Karlstad:

Pardon this picture of Karl, since the one we’d get would also have a chaise added on to create a big U-shaped place to flop down and watch TV, play games, hang out, etc (it would be shaped exactly like the Townsend by Rowe that we pictured above). And we’d do a little leg-sprucing since those raw birch ones don’t really do it for us. But anyway, Karl was everything that the other Ikea sectional wasn’t. He was large and in charge- the perfect oversized dimensions for our oversized room (and supersized family- when we get together for something casual there are at least 16 people in one place). Plus Karl is 100% slipcovered (which means nothing is nearly as scary since the cushions and even the arms and base can be laundered – or even replaced for a few hundred bucks if we want to switch colors down the line). It’s also funny how similar he is to the 5K Room & Board version that we loved.

And the price for this giant sectional plus add-on chaise lounge (which will create a huge family-friendly hangout zone in our cavernous living room) was just… wait for it… $1,248. Basically just a few hundred dollars more than we spent on our white Rowe sofa, but it’s three times the size. Literally. We had to tape off the outline of the sectional on the floor just to make sure it would fit. And once the tape went down on the floor we started getting excited. It would be giant and perfect for our huge family. And best of all- not too precious! Bring on the ice pops and fruit punch.

But we were still nervous that it would look bedraggled in a year or two, or might not hold up to the whole “dog + baby = mess” equation. So we did a good amount of googling around for reviews and write ups. We were thrilled to find that pretty much everyone had great things to say about Karl (although a few people didn’t like the sleeper version of him, since it was hard to operate, but that’s not an issue because that’s not the one we’d get). And then it happened, we remembered that Anna over at Door Sixteen actually purchased a Karlstad sofa after her pups had ruined her fancy Room & Board one (read all about that here).

It was all the affirmation that we needed to hear. Anna’s sofa is holding up really well over two years later, and she says she is very happy with her choice. Plus knowing that she’s a gal of style who lives with real-life wear and tear (thanks to her dogs) was the last “sign” we needed to pull the trigger.

So we went for it and put in our order a couple of weeks ago. We just hadn’t bothered to mention it since Ikea’s delivery schedule doesn’t have it arriving until Feb 4th (update: it might arrive a bit sooner than that- woot!). We’ll definitely share photos as soon as Big Karl (yes that’s a Cougartown reference) gets here. Oh and we got it in the same “sivik dark gray” fabric as Anna (we looked at all the potential swatches at Ikea in person and it felt nice and durable – and not too nubby, so Burger’s claws won’t be able to dig in and create little loops). So excited. Anyway, that ends the big sectional hunt. Australian announcer, take us out:

The antelopes dash into the jungle, grateful to have survived the harrowing lion attack (aka: The Petersiks happy dance into the living room, grateful to have survived the harrowing sectional hunt).

Fade to black.

  Leave a comment

Fab Freebie: This Land Is Your Land

***This giveaway is no longer accepting entries – scroll down to see who won!***

You know I love a good map and/or geography-related decor item, which is why I’m stoked about this week’s prize from Whispering Pines. Though their specialty is rustic decor for your cabin, we honed in on these two finishing touches that can add color, kitsch, and educational tidbits to any space.

This week’s winner will score any state or city pillow (which we’ve coveted ever since spotting them during Matt & Kristin’s house crashing):

And this retro 1950′s “Vacationland” tablecloth:

Charming? Check. Cheerful? Check. Cheeky? Check. Ok, enough words that start with c. Here’s how to enter:

******************************

Random.org has chosen our winner and it is… Lonely Wife Project (who is a California girl through and through, except for not being blonde). Congrats!

Note: We weren’t paid or perk’d for hosting this giveaway, we just take them on to reward our lovely readers! See our Giveaway FAQs page for more info. Pics from Whispering Pines.

  Leave a comment

Glad That’s Out Of The Way

Painting the trim was as long and tedious of a process as we expected. Maybe more-so actually, but it’s done! Wahoooo! And it feels pretty darn good. Seriously, there was more than one happy dance (one on Friday night when we finished, and another one in the morning when we saw the room in the light). What is it about certain annoying home improvement jobs that make you want to ugly-cry while doing them but happy-cry when you’re done? Talk about roller-coaster emotions. In the end, we never regret them, and we’re happy we got ‘er done. We’re just not ready to “do them all over again” the next day or anything. Haha. Anyway, it’s looking pretty good. Here’s the view in the living room now (ignore the beams, we’ll get to that later):

As far as the process went, experts recommend using oil-based primer to block potential bleed-through when it comes to painting wood trim (followed by latex paint). We threw caution into the wind and went straight to white semi-gloss latex no-VOC paint (Olympic Premium from Lowe’s). I had gotten some gray wall paint on the trim a few days back when we tackled that project, and it seemed to cover well without any signs of bleed through. So I went for it. Could have been a terrible plan. Could have resulted in having to go back and repaint all the trim with primer if I did see some bleed-through. And possibly pulling 60-80% of my hair out as a result. But it didn’t! Oh happy day.

So we saved the nastiness of working with oil-based primer and all the VOCs that come with it. Call it a baby-and-eco-friendly risk that happened to pay off. If it hadn’t we would have sought out the lowest VOC stainblocking primer that we could find, but it was pretty sweet that it didn’t come to that. That’s about where the words “pretty sweet” stop with regards to this project. We vowed to keep it real with you guys, so although we’re eternal optimists who generally love nearly every project that we tackle (even the ones that don’t work), we promised to tell you if something sucked. And painting the trim totally did.

It wasn’t that it was very hard (I used this brush, which I swear by for “staying in the lines” and going a lot faster that I used to move with a traditional long-handed brush). It was just that it took for.ever. I started at around 10am on Friday and went it alone until about 3pm (while Clara took her morning nap and then John watched her and tended the blog), then around 3, out of sheer desperation, I asked John to help while Clara was taking her afternoon nap (he traditionally rebuffs detail work since he’s the “big picture” guy who rolls while I cut in, so he claims he has less control when it comes to fine motor skills with a brush). At that point I was on coat #2 though, so I just asked him to go down the middle of the trim and baseboards with the second coat while I followed him and added a second coat to the top and bottom of the baseboards and trim (which requires a bit more control since that’s where the brush can meet the floor or the wall).

By coat number three it was around 7pm (thanks to a lot of blog, Clara, and food breaks among other things) and that’s when we realized that it wasn’t going to be a three-coat process like we thought. It was going to take four full coats to cover that dark dark trim. Boo to the hoo. There may have been a temper tantrum (not by Clara) but no actual tears were shed (which I consider to be a semi-mature response to such devastating news). But we pressed on. And it was actually past midnight when we finally finished (and snapped this victory shot of our paintbrushes “toasting” in front of the microwave clock). Klassy, right?

If we had used oil-based primer it definitely would have only been a 1-2 coat process (after the coat of primer was applied, which would add up to 2-3 total applications) so it may have taken us until 5 to 7pm instead of 12:30 in the morning. But those 1-2 extra coats were worth it to us in exchange for a completely zero VOC result. Even if it meant dragging a little bit the next day. So for those who are looking for the expert recommendation for tackling this project, use oil-based primer applied with a brush followed by 1-2 coats of latex gloss or semi-gloss paint also applied with a brush (and tape things off if you like to work that way). But if you wanna know how we did it, I used my trusty short handled brush and we applied 4 coats of semi-gloss latex paint (without taping off, since over time I’ve gotten nice and steady without tape). We actually painted all of the wood trim in our first house (including the stuff in the bathroom and kitchen) using this method (no sanding or primer) and we luckily didn’t have any chipping or bleed-through issues after 4+ years there. Fingers crossed for the same luck here!

As for the paint choice, we used the off-the-shelf white stuff that comes without any tint from Olympic Premium called “Base 2″ (since “Base 1″ is also known as “Ultra White,” and we wanted something crisp and white but not crazy white with a glowing blue tint to it). We love the color, and plan to use it for the rest of the trim in the house. When we finally work up the energy to tackle a project like that again in a few years. Har har.

Oh and the beams. We promised more details about those. We left them au naturale to be 100% sure that we don’t prefer them that way (we don’t). But now that the trim is all painted, we’ve decided that we definitely want to stain or paint them a deeper gray color for some richness and dimension. And of course those fans have to go. So for a vague idea of what that might look like, picture this…

… looking something like this:

They definitely would have looked gorgeous in white just like the trim, but we want to take a risk and do something a little unexpected. We love that it’ll hopefully be just the right amount of drama without looking too heavy (we have standard 8-foot tall ceilings so we didn’t want them to feel like they’re closing in on you). But we think it’ll have a nice not-too-top-heavy look in the end, especially since we’ll be bringing in a large charcoal sectional to ground the room and add balance. Then we can start layering in some bold colors in the curtains, art, rug, accessories, etc. Should be interesting.

And why not end with a nice little flash-back to what the space looked like a little over a month ago when we moved in?

Oh the memories. Change is good.

  Leave a comment

We Found A Note Hidden In Our House!

You know how we hid a secret note in our first house to hopefully be discovered in a few decades? Well, we found one in our new house! It doesn’t appear to be very old, so we’re guessing it’s from the previous owners (who lived here for 22 years, so it’s still pretty amazing). Where was it? Tucked behind the large wall mirror in the hall bathroom. See that tiny nub sticking out under that wonky orange arrow?

While John was giving Clara her bath I was hanging out with them slash standing-around-staring-at-things-I-can’t-wait-to-update when I looked up and saw it peeking out of the top of the mirror. So I tugged on the corner, revealing a nice little printed note.

In case you can’t make it out, it read:

May today bring you peace within. May you trust that you are exactly where you are meant to be. May you not forget the infinite possibilities that are both of faith in yourself and others. May you use the gifts that you have received, and pass on the love that has been given to you. May you be content with yourself just the way you are. Let this knowledge settle into your bones, and allow your soul the freedom to sing, dance, praise, and love. It is there for each and every one of us.

Isn’t that sweet? I dunno if it’s leftover pregnancy hormones or what, but it totally made me tear up. Because it’s exactly how we feel. Like we’re exactly where we’re meant to be. How cool are the past owners of our house for hiding this little gem? We think they’re the bee’s knees.

Have you guys ever found any messages in your home? Any initials with hearts scrawled in a kids closet, letters carved into concrete outside, or beer cans and old newspapers in the walls? Somebody tell me you found vintage “men’s magazines” somewhere. Scandalous.

  Leave a comment

House Crashing: It’s A Mod Mod World

Woot, it’s Friday! And we’re hard at work painting the trim in the living room at this. very. moment. So it seems like as good a time as any to go house crashing. We thought we’d share pics of this amazingly inspiring NYC pad that we virtually house crashed while we’re off getting our paint on. One thing’s for sure – Herman and Eduardo (the proud owners) definitely have made every last inch count. Speaking of size, their pad is just 500 square feet and it consists of a modestly sized kitchen, dining area, living area, bedroom, and bathroom. But it feels luxe and lovely, like it’s all anyone would ever need. It’s such a good example of living simply and making the smartest use of your space. Plus Herman and Eduardo did a ton of stuff themselves (from demo and floor planning to sewing their own pillows and curtains). But enough chitchat. Let’s start with the living area…

See that big black piece that they added to create a nice partition (from the bedroom) and tons of storage (accessible from all three sides)? It’s genius. An of course we love the art and those pillows and that gorgeous texture-rich rug from West Elm.

Speaking of that colorful art, we like that it doesn’t take itself too seriously (and it’s just begging to be DIYed for anyone out there in need of some wall interest). And there are some of those DIYed pillows that Eduardo made.

Here’s the TV that’s placed across from the sofa in front of a charming painted brick stripe (which was built out with drywall to include a little display nook- such a fun modern departure from the average wood mantel).

And see those Knoll Bertoia chairs over yonder? They’re like a celebrity crush. I know I’ll probably never be able to get my mitts on them, but oh how they make me weak in the knees (John says I’m allowed to look all I want, I just can’t touch. I know, I’m a lucky lady).

As you can see from the last picture, the living area is just a few feet away from this über chic dining zone complete with a gorgeous marble topped tulip table (get that look on the budget with this similar version from Ikea). Oh and speaking of budget, Eduardo made that gorgeous mirror himself.

And around the corner there’s a short hallway that leads to a dreamy bedroom. But I’m getting ahead of myself. We’ll get there in a minute (but check out those great built-in drawers for a second):

Before moving back to the bedroom we have the office, which is really just a corner of the same room that includes the kitchen, living area, and dining zone. And get this, they built the desk themselves. And then covered it with plexiglass for a slick look.

Speaking of the kitchen, here’s that corner (they raised it up a bit on a clean-lined pedestal to help define that zone in the room). It’s amazing how there’s room for everything and even a nice large span of countertop work space thanks to the peninsula packed with storage that was also added to subtly section off the area. Plus the counters and cabinets are from Ikea, so they didn’t break the bank. Even though they look like they did with that customized everything-fits-perfectly layout.

The time has come to revisit the bedroom that you saw a peek of from that second dining room shot. It’s gorgeous and dramatic yet super serene, complete with lovely metallic curtains along the back wall paired with a gleaming silver texture-rich headboard and a sunny yellow extra long bolster pillow. And in money-saving news, not only did Eduardo make that pillow, they actually got the coverlet from Bed Bath & Beyond. Sweet.

Next we have a peek at the bathroom (small rooms are hard to shoot- but we love this glimpse!):

So that’s Herman and Eduardo’s amazing home. Sometimes it’s the smallest spaces that force people to be the most creative- and we love soaking up all the eye candy and inspiration. We’re sending out a big thank you to H & E for sharing the virtual tour while we paint the day away. Oh and you can drop in on Eduardo’s blog here for more info and inspiration. Now let’s play the what’s-your-favorite-part game. I’m obsessed with the gorgeous metallic headboard and the punchy art in the living room. John’s digging the amazing three sided storage unit in the living room and the cool modern light fixture in the dining area. Your turn.

Psst- Check out more house crashing adventures here.

  Leave a comment