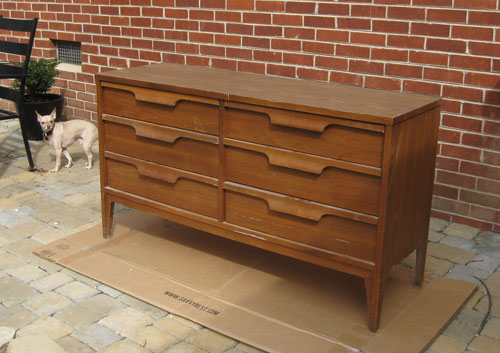
On Tuesday we shared how we refinished a Craigslist dresser for the nursery, taking it from this…
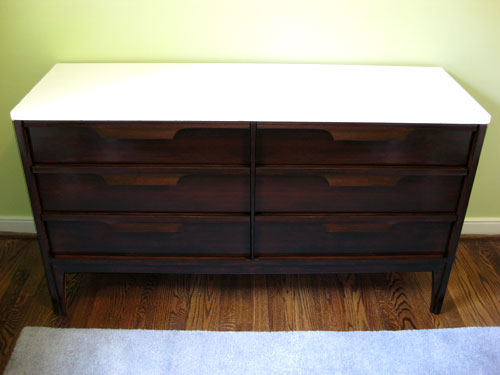
… to this:
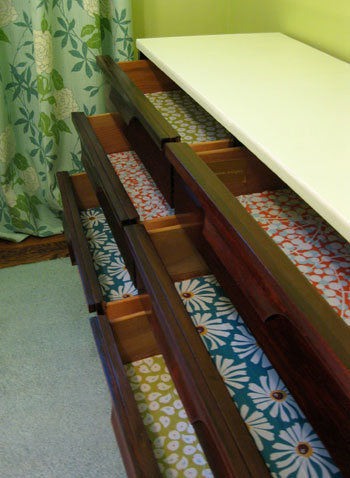
So now we’re back with all the dirty drawer lining details as promised. This project actually only set us back around $1.30 because we already had everything on hand that we needed except for two foam craft brushes which we picked up at Michael’s for around sixty-five cents a pop. Our other already-owned project materials were Mod Podge and six sheets of wrapping paper (given to us by friends who founded this awesome local paper shop called Ink + Paper). And just for fun we selected three different patterns to use inside of our six 50+ year old drawers to give them a totally fresh look and a nice clean texture (as opposed to the raw wood that they came with).
We were lucky that the drawers were pretty clean (nothing a wipe down with a moist rag couldn’t remedy) and there wasn’t any musty smell or sticky stain to be found. But if you’re dealing with a slightly grosser old drawer scenario (like mustiness and odor that slaps you in the face every time you open a drawer) we’ve heard that wiping them down with mineral spirits and letting them sit out in the sun or air out in the garage for a bit might do the trick. Murphy’s Oil Soap is also said to be one of the best ways to thoroughly clean wood drawers that are past their prime to rid them of any stains or smells. And as extra credit you can place bowl of fresh ground coffee inside of each drawer to absorb any lingering odor afterwards (we’ve also heard that bowls of untreated charcoal briquettes work the same way). Gotta love a cheap and natural solution like that.
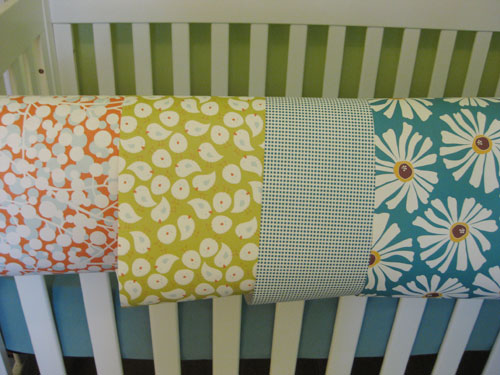
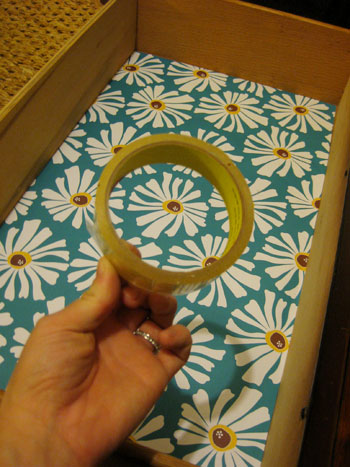
Anyway, here are four of our potential patterns that we laid out over the lip of our crib to evaluate as a group. We actually opted to use the three boldest ones twice (since we had six drawers to line) so each drawer would have a punchy little surprise inside. This meant that we had to eliminate one pattern so after a bit of deliberation we settled on two drawers with the orange bubble pattern, two with the green birdie design and two with the bright blue flowered paper. We figure that they’ll never all be open at the same time so it’ll hardly be overwhelming and we liked the idea of Baby P pulling open each drawer when she’s older to see something fun and graphic while she’s grabbing a pair of socks or putting away her crayons.
So after selecting our six sheets of wrapping paper (in three different patterns) it was time to cut each of our six sheets down to the size of the drawers (luckily they were all the same size so we cut one out and just used it as a template to quickly snip out the other five. Then we just had to decide how to adhere our “drawer liners.” Initially we debated using some simple double stick tape to hold the paper down around the edges, which probably would have worked just fine. But after a bit of thought we realized that we wanted something a little more heavy duty (that could take a bit of a beating for the next 15+ years and still look pretty good).
So that’s when we settled on Mod Podge. We recently used it to create “vintage” sign art for our bathroom, so we know how well it holds up to moisture and general wear & tear (thanks to the protective coating that you can apply right on top of any sort of paper to make it a lot more durable than it was before). The first step was not to Mod Podge over the paper though, it was to apply a thin and even coat of the stuff to the bottom of the drawer so that our pre-sized pieces of gift wrap could be securely adhered.
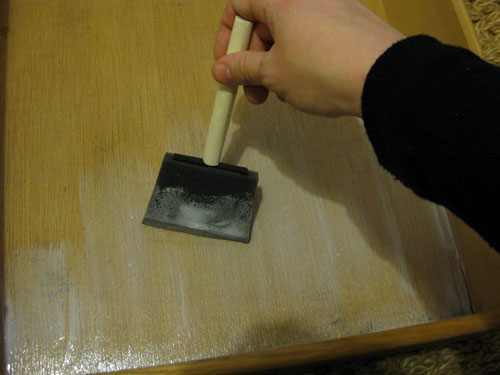
We always go for the “matte” kind of Mod Podge because we’ve found that it cures up more solidly and never feels tacky or sticky after it fully dries (usually within a few hours) so that should help keep the drawers from feeling grippy and tacky even in the warmer months. So after we slicked that onto the bottom of the dresser it was as easy as sticking down our already-cut-to-size gift wrap rectangle and pressing it along the center and out towards all of the corners to eliminate any bubbles or wrinkling. Note: we did not apply Mod Podge to the back of the paper, only to the bottom of the drawer.
I then worked my way around each of the other drawers, applying the Mod Podge to the base of the drawer and sticking down each pre-cut rectangle of gift wrap. Oh and the reason I didn’t go right to applying a layer of Mod Podge over the first wrapping paper swatch after it was stuck down was because I wanted to give it ample drying time before moistening the front of the paper and possibly causing bubbles or wrinkles. In fact, I gave all of the drawers about four hours to fully dry before applying that top coat of Mod Podge over the paper for added protection.
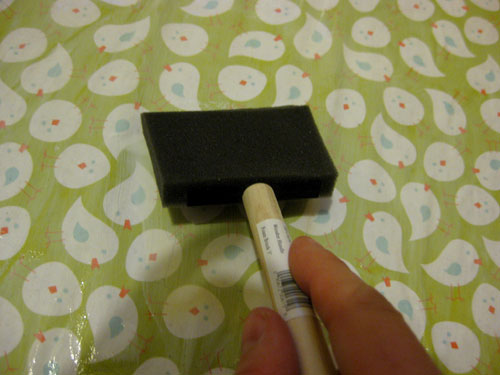
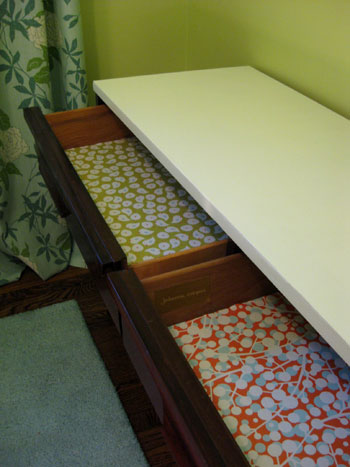
I was sure to apply the top coat evenly and thinly (not too gloppily so as to avoid wrinkles and bubbles). And after letting them dry overnight, we were left with durable and cheerful lined drawers that should last for the long haul (while providing a little dose of happy every time they’re opened). Oh and we love that Mod Podge is 100% water based and non-toxic so it’s not going to stink up our baby clothes or pollute the nursery like some other more chemical-ish sealers might. Good times.
So there you have our under-two-dollar drawer lining adventure. We’d definitely suggest looking around your house for anything from decorative scrapbooking paper and gift wrap (even tissue paper) to swatches of wallpaper or even flash cards or playing cards to create your very own custom drawer liners on the cheap. Mod Podge + pretty much anything that’s flat = interesting drawers that make you smile every time you slip them open. And you could even line drawers with old swatches of fabric, we would just use dots of fabric glue or even glue gun dabs on the back of each piece to hold them down as opposed to Mod Podge.
What about you guys? Have you lined any drawers with something that you already had around the house? Or even hit up Target or the dollar store for festive paper with just that purpose in mind? We’d love to know if you’ve added some unexpected personality to the inside of a dresser or cabinet so spill the drawer lining beans.
PS: Wanna see another cool way to spice up a thrift store find? Check out this cool paint pattern we applied to a secondhand desk.
Psst- Wanna see our nursery progress from the very beginning? Here’s our painting post, our big shopping spree, our crib hunting rundown, our curtain-making tutorial, our fun little chair search, our mirror-painting extravaganza, this DIY faux sheepskin project, and our big dresser makeover. Fun, fun, fun.

Brandi Ledesma says
LOVE it! That paper is adorable.
courtney says
i LOVE this idea so much. paper products are my weakness.
i brought home a newspaper from a recent trip to china and didn’t know what to do with it. i finally decided to line the drawers of an antique desk with it. rather than mod podging it directly to the drawer, i adhered it to a peice of cardboard cut to size and just dropped it in each drawer. i love opening those drawers….makes me smile and remember my trip.
YoungHouseLove says
That’s a great alternate suggestion! Thanks so much for sharing. Chinese newspaper is one of the coolest drawer liner ideas we’ve heard of so far!
xo,
s
Kate says
Very cute! I’ve never used Mod Podge, might have to give it a try sometime.
Shannah says
We just did this very project a couple of days ago (and posted a how-to on our blog). We wanted the durability you get from Modge Podge, but the flexibility to change our minds. The solution: wrapping paper (like you), covered with clear Con-Tact paper. It stays in place, is incredibly durable, but also removes easy as pie when you’re ready for a new look.
(Pretty cool to change the liners out for the season…imagine seeing Santa’s face smiling at you!)
YoungHouseLove says
Another great drawer lining alternative. Thanks for sharing!
xo,
s
Linds says
Shannah- that sounds like something I’m looking to do. Wrapping paper, but the flexibility to change it if we need to. How exactly did you do this? inspiredomesticity.wordpress.com
heather s. says
Looks great! I’ve used paper in almost all of my drawers and am planning on doing the same in the basement on some new dressers I bought. I’ve never used mod podge on drawers since I like to mix things up once in a while so I use double-sided tape.
Meredith says
Wow, this is so cute!!! That baby is going to have one chic nursery!!!!
Ashley @ Mutschler Family, Dallas Edition says
Brilliant and cute idea!
Randa says
This is a great, inexpensive idea — I’ve lined my drawers with pretty wrapping paper before but didn’t think of applying Mod-Podge. Question: Did you use the Matte Finish Mod-Podge? I’ve used that before for some craft projects involving collaging bits of magazine cut-outs on a basic wooden picture frame. I liked the results but maybe the shiny finish would be nicer?
YoungHouseLove says
We did use a matte finish since that was the Podge we had on hand. Either type would probably look great though (although we tend to think the matte kind dries more solidly and isn’t as potentially sticky as the glossy kind). Hope it helps!
xo,
s
Jessica @ How Sweet says
My mom has always been a nut about lining drawers. That is some of these cutest paper I’ve ever seen!
Kate says
Awesome dresser you guys! I sometimes find with mod-podge that even after a thorough drying time, if it gets warm things stick to it. I usually coat all my projects with a thin coat of polyurethane. It keeps if from getting sticky.
Kate
YoungHouseLove says
Thanks for the tip Kate! We’ll definitely keep an eye out for any stickage come warmer weather. We did use the matte finish over the glossy (which we think is a lot less sticky and has already cured up to be very solid) so hopefully that helps.
xo,
s
FullertonRegan says
I love Mod Podge! I’ve used it to decoupage a desk and a tray in my bathroom and it’s a dream. Thanks for linking to that paper store too!! They have gorgeous stuff and their prices are totally reasonable.
Molly says
And there’s more to this wonderful DIY dresser?! I love the papers you choose to line the drawers. I love how detailed you both are!
Emma says
It surprises me that you guys did this. I absolutely hate when people do that. It most be a cultural thing, as I am from another country. I just do that roll of anti-slippery stuff.
KimberlyH says
One question for you- I’ve used Modge-Podge before but when it dried it still had a sticky finish. Did you have the same problem? I would expect not if you are going to be putting clothes in the drawers, since you wouldn’t want everything sticking! Maybe I used a different type of MP?
YoungHouseLove says
Ours is actually the matte kind, which we always think dries a lot more crisply and never gets sticky. So far it’s super hard and shell-like without any grip or stickiness to it. It seems to have cured up really well for us, but perhaps also choosing the matte finish over the glossy will help with that?
xo,
s
Erin says
I just wanted to say I love the little touches you all take the time to do on projects like this. This looks incredible and adds so much fun pop! I did something similar to this to a bookcase in my baby’s room — I got some pretty scrapbooking paper and used it to give the plain white shelves a bit of fun.
stacey says
Great idea! Just a warning about the charcoal briquettes to soak up a musty smell—-make sure the briquettes are “untreated” i.e. not the stuff most people use in their grills. The regular old briquettes are treated with lighter fluid and are a fire hazard.
YoungHouseLove says
Great warning Stacey! Thanks so much for the tip!
xo,
s
Roseanna says
*Running out to buy Mod Podge and cool paper*
Gotta tell ya, this dresser re-do has been one of my favorite projects you guys have done, fo sho.
Amy says
wow, these look awesome. i’m planning on doing the same thing this summer! i’m giving my dressors a complete makeover. :)
Kim at EF eDesigns says
Very cute! I love making the insides of things a bit special – that’s why I always paint the insides of closets a pretty color rather than basic white.
Danielle@Newlyweds Paradise says
I love vintage looking prints! These are just too cute for a little girl!
Sally says
As you let the mod podge on the bottom of the drawer dry, does the paper liner not adhere to the drawer at all? Or does the mod podge applied to the top of the paper soak through somehow? In other words, are the drawer liners removable?
It looks magnificent by the way. :)
YoungHouseLove says
Hey Sally,
Mod Podge is a more heavy duty solution that will bond the paper to the base of the drawer (so it’s tear resistant and durable but also not easily removable like contact paper). If you’re looking for a method that’s easier to switch out, using double stick tape or actual contact paper is a much less permanent solution. Hope it helps!
xo,
s
Jennifer says
I love the dresser make-over! We did the same thing in our nursery last year, and now our little Stella is 9 months old. It goes by so quickly! We used 2 different rolls of wrapping paper and just laid them in the drawers. So far we haven’t had an slippage, and we’ll probably swap out the nursery themed paper as she gets older. Your little one is going to have a great nursery!!
Traci says
I bought about 10 rolls at Target the day after Christmas. Used plain silver to line the back of a TV cabinet because the doors broke. I also bought a pretty print that I am going to use as a modern matte to some sepia photographs I’m framing in 11×17 frames. Also, just wanted to say that I just bought my first house in December and have been mining your blog since to find inspiration for my own transformation. You guys rock. -Traci
Amy V says
Sherry and John–
This post couldn’t have come at a better time! I have two solid oak dressers (my hubby’s childhood furniture) that are in great shape but the light stain and heavy pulls are not necessarily the “look” I want. So, I planned on sanding them down and giving them a coat of paint and new handles to transform their look. However, I’ve been putting the project off because I have been left puzzled with what to do for the inside of the drawers. (After a couple of googles searches I realized that there wasn’t such a thing as “cool” contact paper.)
What to my wonderful surprise was this post that was waiting for me in my google reader! :)
Bring on the modge podge and fun paper! Thanks for the inspiration!
Sarah says
Burger looks caught in the act in the “before” photo.
Michelle says
Love it! =)
Claire says
My grandma always lined all of her cupboards with wallpaper. She didn’t attach them in anyway, but whenever they got dirty or spills she could just replace them. I still do that and my drawers and cupboards look great! Love it!
Stephanie says
Hi Sherry & John,
Thanks for putting our gift wrap to such good use! Your dresser turned out beautifully. Best of luck with the bean.
Stephanie at Ink & Paper
YoungHouseLove says
Your welcome Stephanie! Thanks so much for the gorgeous paper. We couldn’t wait to do something great with it (and we were too selfish to use it up on a bunch of random birthday gifts) so we hatched a plan to keep it all for ourselves by using it to line those drawers!
xo,
s
Stephanie B! says
I LOVE your idea for dressor liners! I want to do that too to our new craigslist items, but i had no idea what to use as adhesive! Does the top layer look glossy or no?? Just wondering!
YoungHouseLove says
It’s a bit more glossy looking than regular old paper, but we used matte Mod Podge so it’s not super shiny or anything. Hope it helps!
xo,
s
Katrina says
I’m loving this idea! So fresh and fun – i might have to do this in dresser I’m wokring on
Meg says
So cute! Love what you’ve done with the dresser! It looks fabulous. We picked up an old stereo cabinet at a garage sale for $10 and we’re going to turn that into our changing table. I’ll send pictures when we’ve completed the transformation. Hopefully it’ll turn out as cute as your dresser!
Mert says
We don’t have the infrerno cotdinions you do here in the PNW. But we NEVER know what to wear. Ugh.BTW I highlighted you today on Fundraising Fridays. I used the beautiful photo of Haley from your site with it. Hope you don’t mind. (I usually ask about photos first, but since you had it up here, I figured it’d be OK I can take it down, though, so let me know.)
JenWoodhouse.com says
So fun! Great job… the dresser looks so good!
Sherry, thanks for the email… I can’t tell you how relieved I am!
{brittany} says
I just stumbled upon your blog a few weeks ago and I had to tell you that I am in love with YHL. I look forward to every new blog post. I love all your inspiration and ideas on your website. Thank you for sharing all your wonderful ideas. I also love decorating, painting, discovering and creating new ways to interpret my home. Thank you for inspiring me and helping us all to realize that you don’t have to spend a ton of money to have an incredible home!
Leanne says
I was desperate to immediately unload my overstuffed closet into my awesome “new” craigslist dresser, so I scoured the house and found doublesided tape and baking parchment paper. The parchment paper was the PERFECT width for my drawers.
But I love the wrapping paper/modge podge idea…I smell a weekend project in my future! Thanks!
claire says
that looks great! your little bean is going to be so spoiled (having the most awesome room of all her friends)
i’m trying to think of all of the drawers i can now line!
Erica says
Is there anything Mod Podge can’t do? I knew it was coming before I got to that part of the post, used to use the stuff all the time for art projects and can’t wait to pull it out and use it again!
Can’t wait to see some full nursery pictures of all of the elements pulled together.
Holly says
I recently refinished a thrift store dresser and lined the drawers with maps from an old atlas! I just secured them with sticky glue dots from the scrapbooking section since modpodge is very hit and miss for me, but I love how your drawers came out! Here are some pics of my before and after: http://reidallaboutit.blogspot.com/2009/11/dresser-rehab-and-more.html
Abby says
Wow! That looks so good! I love the mix of old and new! But what I’m the most jealous of is how your trees have leaves already. That was the first thing I saw :) I’m stuck with winter for a little while longer. Lucky you!
Tatyana says
The paper is SO pretty! I’ve done something similar with a back of a cabinet, instead of the bottom of a drawer – but my paper wasn’t as pretty.
On a different subject – I was searching e-bay for Danish modern furniture the other day and came across these. I thought they looked familiar. :)
http://cgi.ebay.com/Mid-Century-Danish-Modern-Dresser-Credenza-Eames-Era_W0QQitemZ190376103673QQcmdZViewItemQQptZAntiques_Furniture?hash=item2c534ccef9
YoungHouseLove says
That’s hysterical! They’re totally the same model as our double dresser, only they’re the single versions! It’s such a small world.
xo,
s
jbhat says
Baby/Toddler/Little Girl/Teen P will love that you did this.
jbhat
Momma to be: Mrs. C says
I just finished a drawer liner project for our daughter’s nursery (due June 20th), but decided to go the double sided tape route. Once we found out we were having a girl, I wanted to add just a few pink details to our already finished green and tan room. So I bought a few rolls of wrapping paper from Paper Source and went to work. The paper was an amazing quality and added a perfect amount of pattern and pink-ness to the room. My husband was totally like “why are you doing that, no one will ever see it”. I had to laugh.
Jennifer F says
That is so stinkin cute…I love it for a little girls room! This is totally off topic…but I was flipping through the west elm catalog I got today, and noticed a bunch of those filing boxes (similar to the green ones you put in your basement). I think a great idea and question I’ve had is how to decorate book cases. I have an office with built in bookcases and we have tons of books, but I want it to look a little more stylish and less like a library. I think a look and learn would be great for this if you have ideas :-)
YoungHouseLove says
Hey Jennifer,
Here’s a post on just that subject: https://www.younghouselove.com/how-to-style-a-bookcase/
Hope it helps!
xo,
s
Megan says
I had no desire to bring a ton of furniture with me on my cross-state move in college. So I found an old dresser at the university swap ($2.00) and mod-podged the drawers with a collage of items from magazines.
The best part was, the next tenant loved the dresser and I didn’t have to carry it back down 5 flights of stairs!
Megan says
I think what you did is really cute, and I always love all your projects. But I thought the purpose of drawer liners was to protect the drawer. It seems like what you did is pretty irreversible. If the liner ever gets dirty or you want remove the liners it seem like you will be stuck with a modge podgey, sticky drawer.
YoungHouseLove says
If we ever wanted to switch things up we could just apply contact paper on top of them, add different paper with double stick tape or more Mod Podge or even use methods like cardboard covered in paper or fabric glued down over the original drawer lining project. We’re all about working with what we have and we’re sure we can make it work if we ever want to change things up in those drawers! In the meantime this method is bound to last for a while which is nice since we don’t have to worry about tearing the paper. Hope it helps!
xo,
s
Sara Hefty says
LOVE LOVE LOVE everything you’ve done to that dresser, especially the two-tone paint scheme. Here’s an inside-drawer shot of my hand-me-down dresser turned dining-room-sideboard – http://www.sarahefty.com/wp-content/uploads/2010/02/Feb-1-2010-SaraHeftyFeature.jpg. I actually used left-over fabric from a few Ikea panels and couldn’t be happier! But now I’m thinking that adding contact paper for some extra durability. Again, your blog has me completely inspired!
Jen Z. says
love it. what a cute idea. I would love to do that with some drawers in my house. Fun.
question, could you use wrapping paper like this to put around those magazine holders and then mod podge over to keep it from peeling off the box? Sorry to go off topic, but I have been looking for pretty magazine holders and I just figure if I buy cheap ones at Ikea that are cardboard, I could just cover them with some sort of pretty paper. Good idea or bad idea? Thanks.
YoungHouseLove says
Totally, that’s a great little project. Send us pics if you take it on!
xo,
s
Jean says
I love, love, love the paper you used for the liners. It’s gorgeous and fun. I recently wrote a blog post where I talked about lining our kitchen drawers with wrapping paper. I just used plain old tape to adhere the paper to the drawer because that’s what I had on hand. I don’t expect it to last forever, so when it gets ripped, I’ll have fun picking new paper — maybe I’ll check out Ink + Paper!
Actually, the blog post where I write about using wrapping paper to line drawers is more about how to fix wood drawers that stick. Our kitchen drawers are original to our 1950s house and they were sticking quite badly. Every time we opened the drawers, little wood shavings would fall into the cabinets beneath the drawers. A quick fix that might be helpful to you in case your 1950s dresser drawers start to stick: I rubbed paraffin wax on the drawers and now they slide beautifully.
kate says
Absolutely perfect! :)
Sheryl J says
These liners just made an awesome dresser even cooler. That is one lucky beanette!
Briel K. says
I love the paper you used. Such cute and bright patterns!