Archive for November, 2009

Dimmer Witted

Call it a baby step, but we’ve officially finished our first project in the nursery. And yes, that was a pun back there.

The room has always had a dimmer switch (back from its days as a dining room) but as long as we’ve lived here it hasn’t done a certain thing: dim. Yep, it went on and off, but did nothing in between. So as we brace ourselves for nights of sneaking into a sleeping baby’s room, we figured that being able to find some middle ground between blinded by darkness and blinded by light would be a totally useful thing.

And thanks to our spot on the True Value DIY Blog Squad, we were able to tackle this lighting issue no problem. All we needed was a $14 replacement slide dimmer from True Value and a little bit of electrical know-how. After all, it doesn’t take a degree in electrical engineering to replace a simple switch…

Our technique for most electrical projects is just to carefully watch what we’re undoing and then redo it with the new piece in place. Whether it’s a lighting fixture, ceiling fan or switch we just attentively observe which wires are connected to which wires and then recreate those pairings with the new wires which attach to the new fixture. And since we’re crazy paranoid about shocking ourselves (or worse) we ALWAYS turn off the main breaker to our entire house to be 100% sure that we won’t accidentally electrocute ourselves. You can’t be too careful when it comes to trying not to die.

From there the first step was removing the old switch, which just takes some quick turns of a screwdriver to release the switchplate cover- followed by gently pulling the actual switch box out from inside the wall (don’t pull too hard or you could dislodge something).

What we uncovered was an old switch that was way past its prime. It looked like all the connections were right, though some were so loosely made that they pulled apart when I lifted it away from the wall. Maybe that was why our old dimmer switch wasn’t fully functional. Oh and the only noticeably missing thing was a green grounding wire, but the nice thing about all new switches is that they usually come with those these days so that’s a bit of added security.

After untwisting the old caps to the connections that were still semi-secure-ish, we simply connected the new dimmer switch’s wires the same way. Granted this was all in the hope that the dimming issue was because of the old switch, not a greater wiring issue (which wouldn’t have been solved by a new $14 dimmer). But we crossed our fingers, twisted new wire nuts onto the new connections and even wrapped some black electrical tape around each one to ensure that there were no exposed stripped wires (the stripped parts of the wires are live, and those are connected beneath the nuts so electrical tape keeps them even more secure and safely out of reach).

Before testing it, we actually went ahead and screwed it back onto the wall just to be safe (we didn’t want to be holding the switch when we flipped the breaker and sent electricity surging through our house again).

Lucky for us – it worked! Not only did we have fully on and completely off capabilities, we had everything in between. Woo hoo! Plus our new slide dimmer features a faint red locator light that glows when the light is off. That way we don’t have to fumble for the baby OR the light switch in the middle of the night.

Now, had it not worked so seamlessly, the dimmer came with instructions to help us further diagnose the issue. Plus, there’s always our friend google to turn to for research. But fortunately this was an easy-as-pie start to our nursery transformation. It just took about 15 minutes, a $14 replacement dimmer from True Value and one very good reason to finally fix our broken switch!

But enough about us. What about you guys? Have you tackled any simple projects lately (electrical or otherwise)? Or is there something small that you’ve been putting off that might just make it to the top of your to-do (or honey-do) list this weekend? We of all people know that sometimes the littlest projects are the last to get done…

Psst- Beyond turning off the power to your entire house every time, electrical work definitely calls for extra safety precautions. It’s always smart to take on your first few electrical projects in the company of someone who’s well versed in this area (for us it was having John’s dad around for a couple of light-fixture-switchouts to learn the ropes). Because as good as a new pendant or switch looks, it’s not worth a trip to the ER. Safety first!

  Leave a comment

Blayne’s Third Design Dilemma

We were super excited when one of our favorite clients Blayne came back for another mood board with us (she should be your favorite too- she sent after pics for both of the rooms we already did for her: her bedroom and her living room). And this time she needs a nursery! Good thing we have babies on the brain these days. Here’s her letter:

It’s official… we need a GIRL nursery! My husband has pretty much said “whatever you want,” so that makes my life easy. I’d like to see a room that’s cute, modern, bold, and both kid and adult friendly. I don’t want it to be super baby-ish or theme-y, and I don’t want to see a ton of pink. Colors I would like to see are turquoise, lime green, and orange (pink is good too, just not too much!). I don’t want to give you too much direction, because I really want to see what you come up with, but there are three bedding sets we like (this one, this one, and this one). They’re all very different, and I’m open to other suggestions as well. We’re leaning towards this crib (it comes in a number of finishes). Of course, we’re on a budget, but we have some family helping us buy the furniture so we would like to get some good quality pieces that last. As for the items already in the room, anything can stay, and anything can go (except the carpet must stay). It’s pretty much a blank slate! We have the Poang chair from Ikea that I was thinking about getting recovered. I can’t wait to see what you come up with! – Blayne


This space is primed for a major pop of vibrant and modern fun- in fact it’ll be totally unrecognizable afterwards. Here’s the plan:

And now for the mood board breakdown.

Read the rest of this entry »

  Leave a comment

Tackling The Basement: Chapter Six

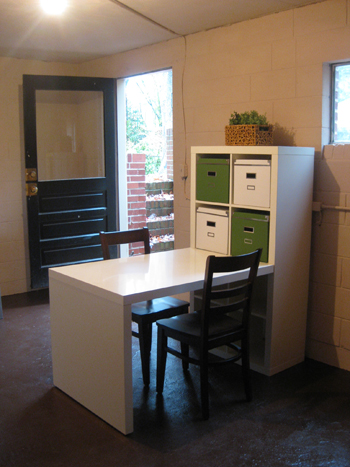
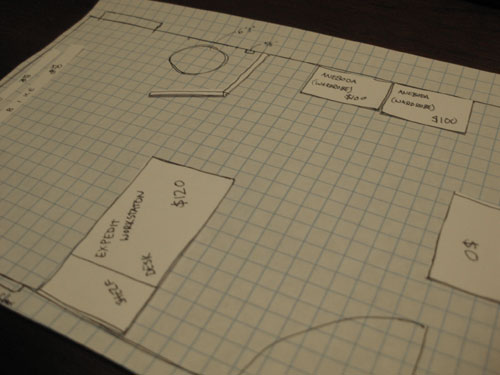
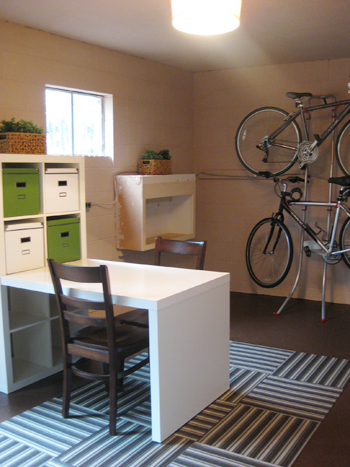
We’re back with our weekly basement update (here’s where we left off) and this week we painted the dingy built-in cabinet, added some art, obscured the semi-sheer doors to our armoires and brought in a bevy of bins to organize everything we have on hand (and everything we’re sure we’ll acquire down the line- now there’s lots of room to grow). Here’s just a taste of the latest updates:

But before we get to all the dirty details we owe a huuuuuge thank you to the wonderful peeps at True Value who made a lot of this week’s undertakings possible thanks to their generous gift card (which we’ve been using left and right these days). True Value was the source of the paint for the built-in and a slew of storage bins that we picked up to maximize both armoires and the space under the little Ikea table that we already owned near the door. Our basement never looked so good. Seriously the spiders who used to live down there wouldn’t even recognize the place. Thanks True Value!

But back to this week’s latest projects. First we grabbed some crisp white semi-gloss paint to clean up the built-in wall cabinet that we inherited with the house (we have big plans for what we’ll store there so stay tuned). Here’s what we started with, just to refresh your memory:

And here’s how it looks with a few coats of white paint. It honestly looks as new as our recently purchased Ikea desk to the left of it. Yay paint!

You also may have noticed that we dealt with the semi-sheer panels on the two wardrobes we recently picked up. See, after we filled one with our giant Christmas tree bag and added a few bins up top…

… and used the other armoire to house eight variously sized bins (only two of which we’ve filled- so we still have a lot of available real estate)…

… we were left with colors coming through the fronts of the doors, which looked a bit chaotic and unbalanced thanks mostly to the big red tree bag on the right.

So we snagged two rolls of green and white wrapping paper from Target and cut them each down the middle of the roll to create four nearly perfectly sized panels of paper that we trimmed down a bit more and double-stick-taped to the inside of each door.

Presto, fun color and pattern that comes right through the semi-sheer door panes and adds some textured interest to the entire room. And the total project cost was just $6 (with some paper left over to wrap a few presents). Can’t beat that with a stick.

And you might notice the art hanging above the armoire (along with the large black and white framed print leaning above the table near the window). Well, the print near the window was one that we already had laying around – and it was as if it was meant for the basement (the black frame and moody art looks great with the black stripes in our rug). And the long framed piece above the armoire was actually a recent groomsman gift for John (it’s our last name spelled out in photographs of objects that resemble letters) and it also worked perfectly with the newly spruced basement color scheme.

But how did we hang the print above the armoire when our cinder block walls are so famously difficult to screw into (everything we’ve attempted to secure into the wall pulls out seconds later with a puff of dust)? Well, we grabbed some Command Picture Hanging Strips… and they did the trick! They’re super strong sticky strips that act sort of like extra-strength velcro to hold things in place.

You just remove the protective backing and stick one side to the back of the frame…

… and remove the other side’s protective backing and stick that side of the strip to the wall. Then you apply some decent pressure to the frame against the wall to get things to stick well for about a minute and then separate the pseudo-velcro strips so the pieces on the wall can “cure” for an hour or two without the weight of the frame pulling down on them. Then it’s time to reattach the velcro-ish pieces on the back of the frame to the two pieces that are then completely secure on the wall. Voila: your art is officially hung in a totally screw-free manner. It was so much less frustrating than fighting with our temperamental cinder block!

And because we visually revealed what we were using the bins in both armoires to store (some Halloween decor, an air mattress, some family quilts, etc) we might as well share what those two green bins under the table by the window are currently housing:

They’re storing all of our Christmas decor, which is super amazing since it used to be strewn about the house in various kitchen cabinets, bins under the bed, and boxes in my closet.

It’s so nice to have everything reunited in those cheerful oversized green bins. This stuff shouldn’t excite us that much but for some strange reason it just rocks our world.

So that’s where we are as of this week. Of course we’re still not finished (we have to add some privacy to those windows, create a screen to hide the ugly water heater and share our fun little storage project for the newly painted built-in cabinet) so stay tuned. And speaking of not being finished, do you guys have any projects that are half done? We’d love to know what you’ve started but have yet to finish. Because we of all people can totally relate to how that feels…

Psst- Want to look back on our big basement makeover from start to almost-finished? Here’s the first post, the second post, the third post, the forth post, and the fifth post. Ah memories.

  Leave a comment

Fab Freebie: Outside In

***This giveaway is no longer accepting entries***

If you guys haven’t heard of papernstitch before, you’ve gotta check it out. It’s another great online source for handmade art (prints, photos, knits, etc) that’s curated monthly to exhibit a fresh crop of handpicked artists for you to shop and draw inspiration from. Might we suggest bookmarking it for your upcoming holiday gift shopping?

This week, papernstitch is giving away a set of four photographic prints from one of their favorite photographers: Allison Trentelman of Rocky Top Studio. Allison is a nature photographer whose snowy birds and forest floor photo collections almost feel like they were shot in some fairy tale world (actually the Maine coast – but we still wouldn’t be surprised to spot a nymph or two in the background). We love that they let you bring both a bit of nature and lighthearted whimsy to your walls.

So here’s how you can score a dose of outdoors for your indoors this week:

PS: Stay tuned for a generous discount from Rocky Top Studio when we announce our winner on Thursday. Let’s call it a little Thanksgiving present…

Get more info about our freebies on our Giveaway FAQs page. Images courtesy of papernstitch and Rocky Top Studio.

  Leave a comment

Pop Quiz: HomeGoods

Since we had so much fun a few weeks ago with this quiz from Ethan Allen, we thought we’d try another one on for size this week. This “StyleScope” quiz from HomeGoods (yes Sherry squealed when I revealed that it was created by her favorite accessory store) was actually shared by Stefanie on Twitter so we have her to thank for the fun.

But be sure to save some thanks for Deborah Needleman too. She created the quiz and you may recognize her as the founding editor-in-chief of Domino magazine (RIP). So you can imagine how high our hopes were for this analysis…

Unfortunately, I’d have to say it’s one of the more off-base results we’ve been given in a while. I was pegged as: Elegant Classic, which makes me picture someone serving tea in an evening gown (I can honestly say I’ve never experienced that, nor do I plan to). Some of the descriptions make a bit more sense (liking order, symmetry and timeless appeal) but most don’t sound very familiar at all (natural sense of drama, appreciation for family heirlooms – um, have you seen how much Ikea/Target/HomeGoods we own?). Maybe I got thrown off by all of the questions about entertaining (since that’s not something that we do a lot of- we’re too busy being blog nerds on nights and weekends).

Surprisingly (or perhaps not so surprisingly) Sherry also got the same Elegant Classic result. And she had the same initial hesitation that I did about the title. But her slightly altered description showed a bit more accuracy: valuing serenity, harmonious color palettes and respect for the environment. Her results continued to be different in some places (my design challenge: maximize; her challenge: organize) and exactly the same in others (we had the same “Happy Home” colors, which are somewhere near the neutral family that we both gravitate towards for the most part).

But enough about our results. Head over and take the HomeGoods StyleScope quiz yourself and let us know what you think of your results. Our fingers are crossed that they’re right on for you because we love HomeGoods a little too much around Casa Petersik and we’re hoping they nail it for someone, even if that lucky someone can’t be us (did I just hear Sherry sniffle from the other room?). Oh HomeGoods why have you forsaken mislabeled us?

Psst- Wanna take more fun (and possibly semi-accurate) decorating style quizzes? Here are a few oldie but goodies: Sproost, Ikea, Creative Youniverse.

  Leave a comment