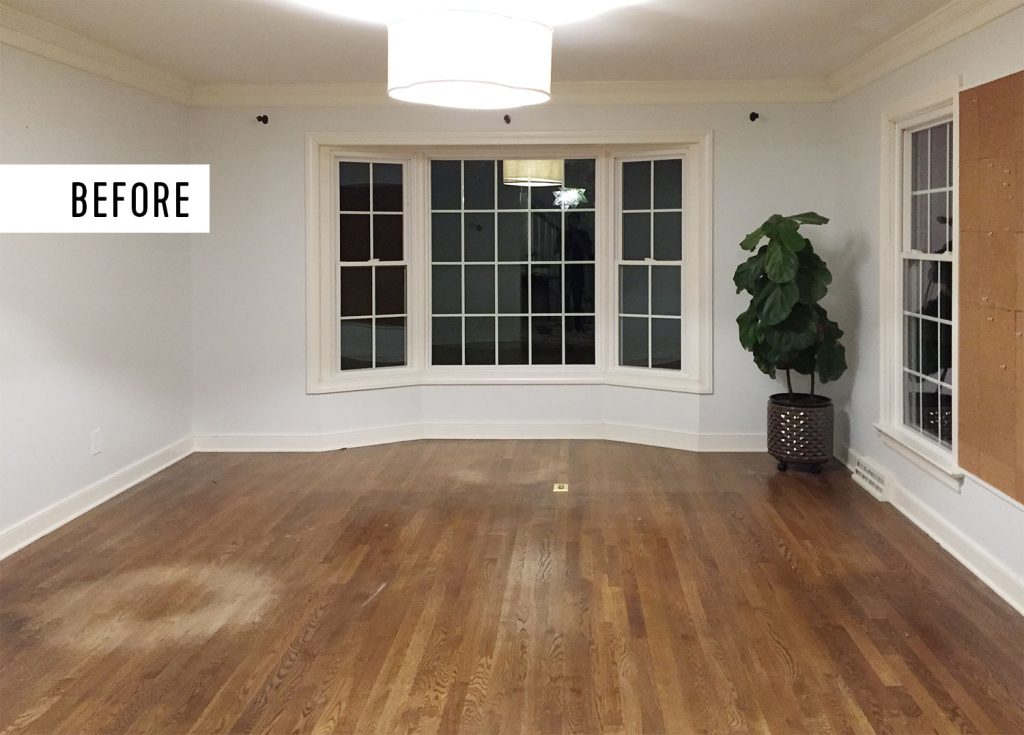
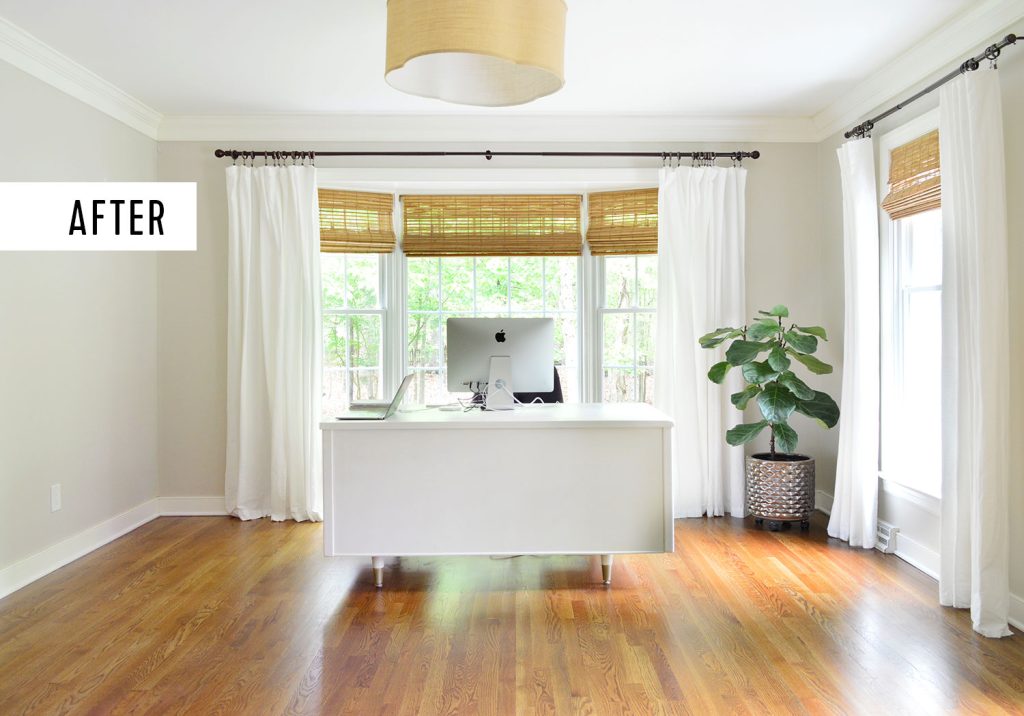
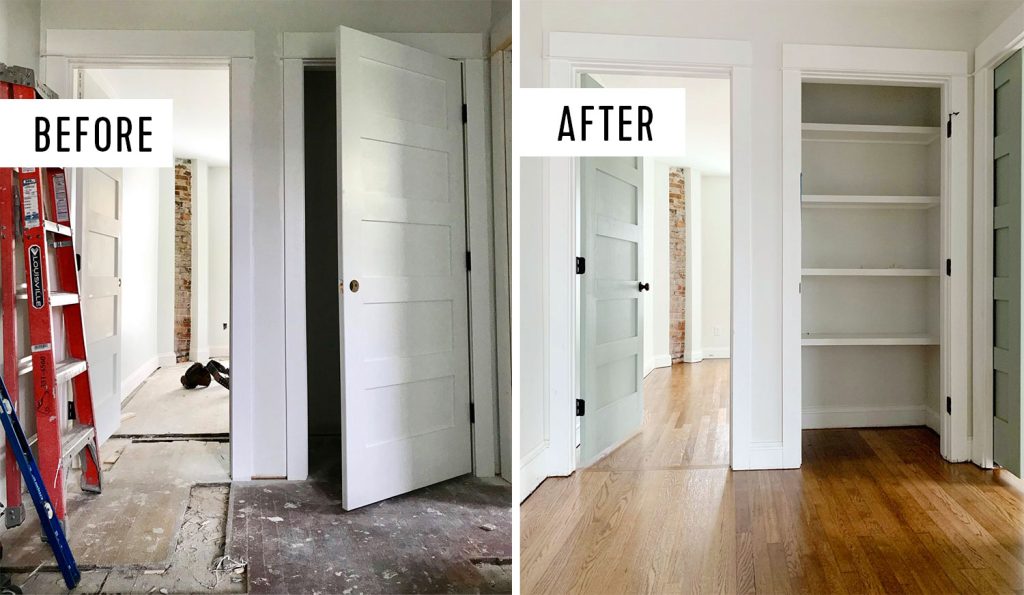
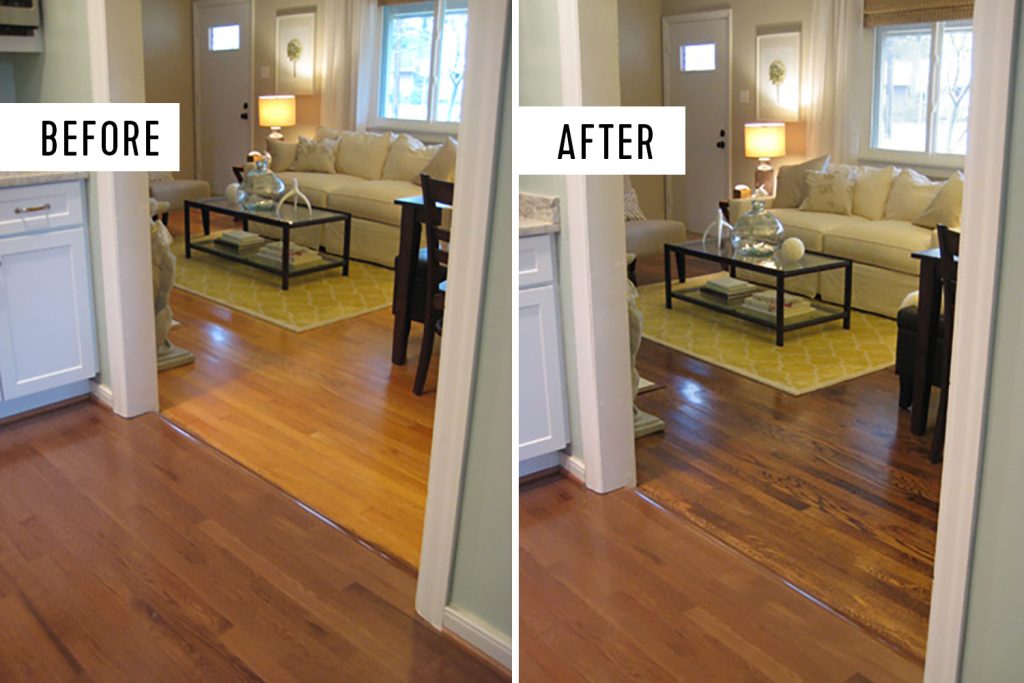
We’ve refinished hardwood floors in 5 of the 6 homes we’ve owned. That doesn’t make us professional floor refinishers, but as homeowners and DIYers, we’ve developed expertise for what to expect, what pitfalls to look out for, and how much refinishing your hardwood floors might cost. So in this post, we’ll answer all of your hardwood floor refinishing FAQs along with some before and after photos of our various projects!

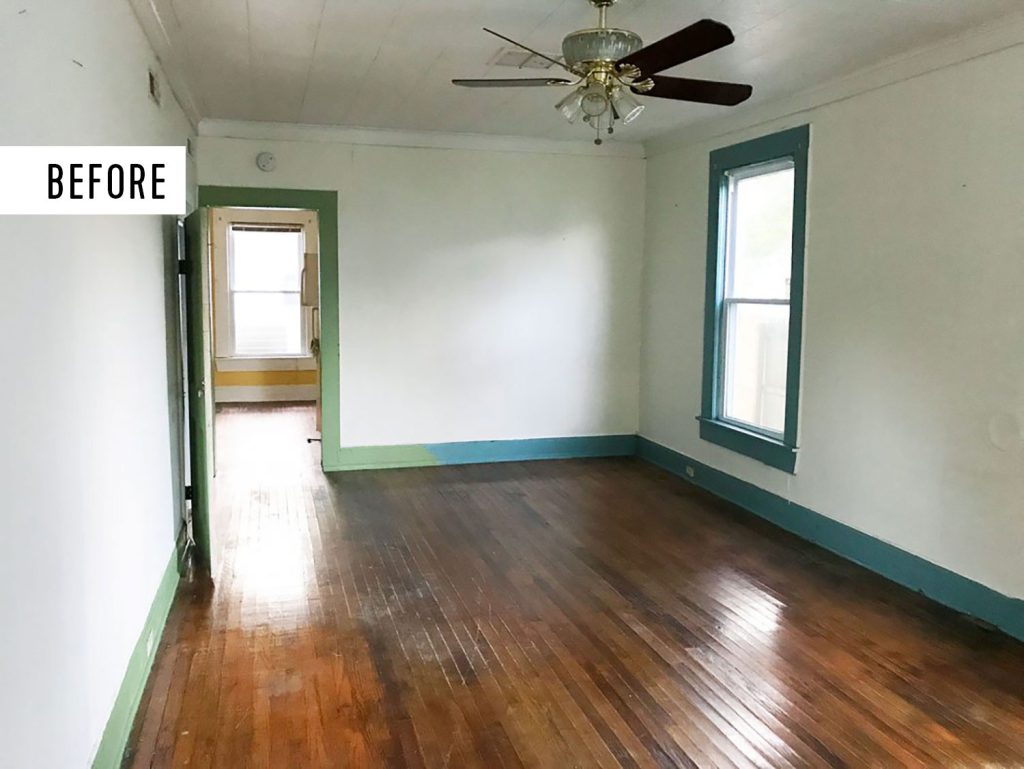
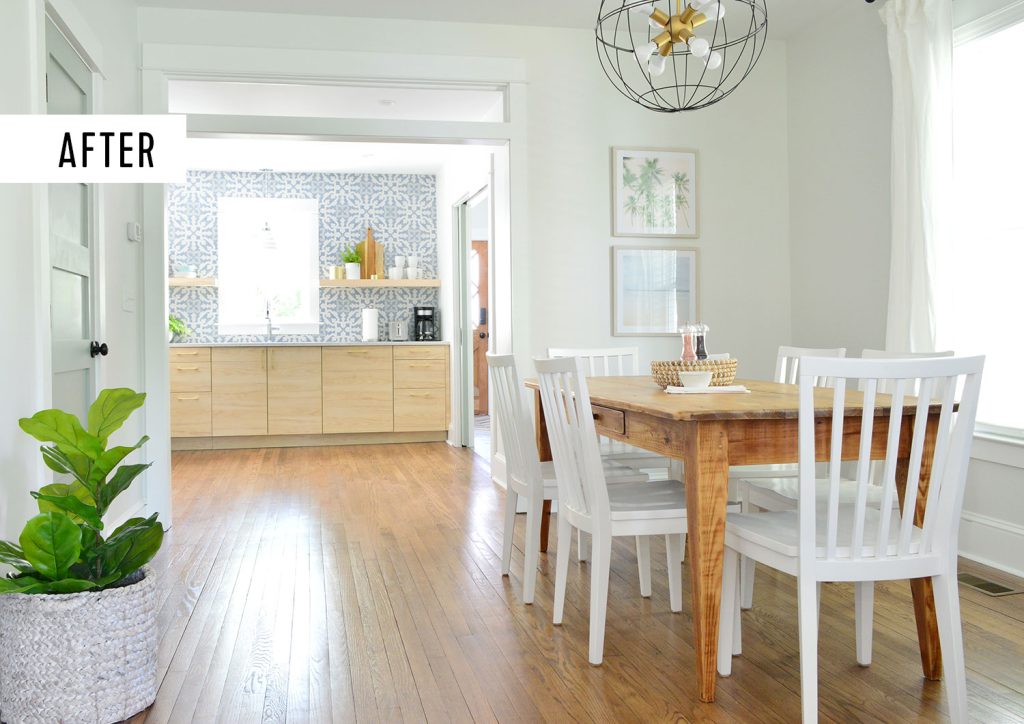
Refinishing hardwood floors can be a daunting and disruptive project, but it’s always been well worth the effort for us. You can eliminate scratches and discoloration, restore richness and shine, or even change the color entirely! We’re continuously surprised by how much of a difference a refinished floor makes to the whole space. Seriously, they can practically make your house look brand new! So let this post be a supportive-yet-realistic nudge towards taking the plunge.
Hardwood Floor Refinishing FAQS
Here are some of the specific questions we’ll answer in this post:
- Can I refinish my hardwood floor myself?
- How much does refinishing hardwood floors cost?
- Is refinishing your hardwood floors worth it?
- What is the process like?
- Do I have to move all of my furniture out?
- Can I stay in my home while getting my floor refinished?
- How long does refinishing hardwood floors take?
- What questions should I ask my floor refinisher?
Please note that the information in this post is based on our personal experience across 6 houses in 3 different cities, each of which presented slightly different scenarios.
Can I Refinish My Hardwood Floor Myself?
Refinishing hardwood floors is a project you can do yourself, however, we have done many many things ourselves (like building a deck, installing a paver patio, etc) and we like to leave our floor refinishing to the professionals. The actual refinishing process is not complicated – it’s basically sanding and staining! – but professionals bring special equipment, skills, and expertise that most DIYers won’t have – especially right off the bat. It’s also a task that can be tedious, tiring, and time-consuming, so a skilled refinisher can complete the project faster and more efficiently.
If the cost of using a pro prevents you from hiring out the job, here are some general steps to refinishing hardwood floors as a DIY project:
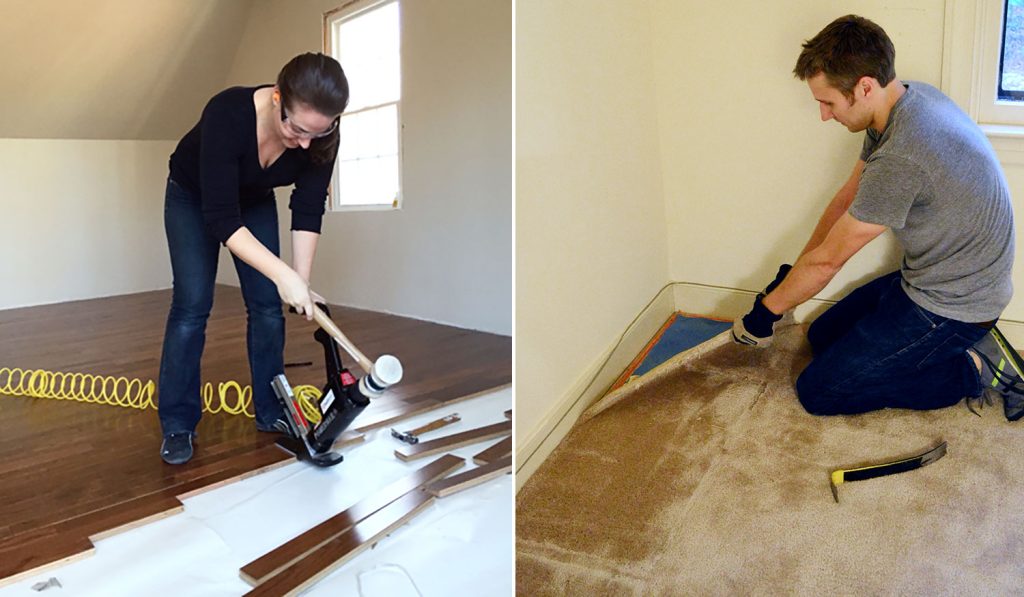
- Move all furnishings, decor, artwork, window treatments, etc
- Remove all quarter-round and/or baseboard molding using a pry bar
- Seal off doorways and air vents with plastic sheeting and painter’s tape
- Patch and repair any damaged spots with wood filler and/or new boards
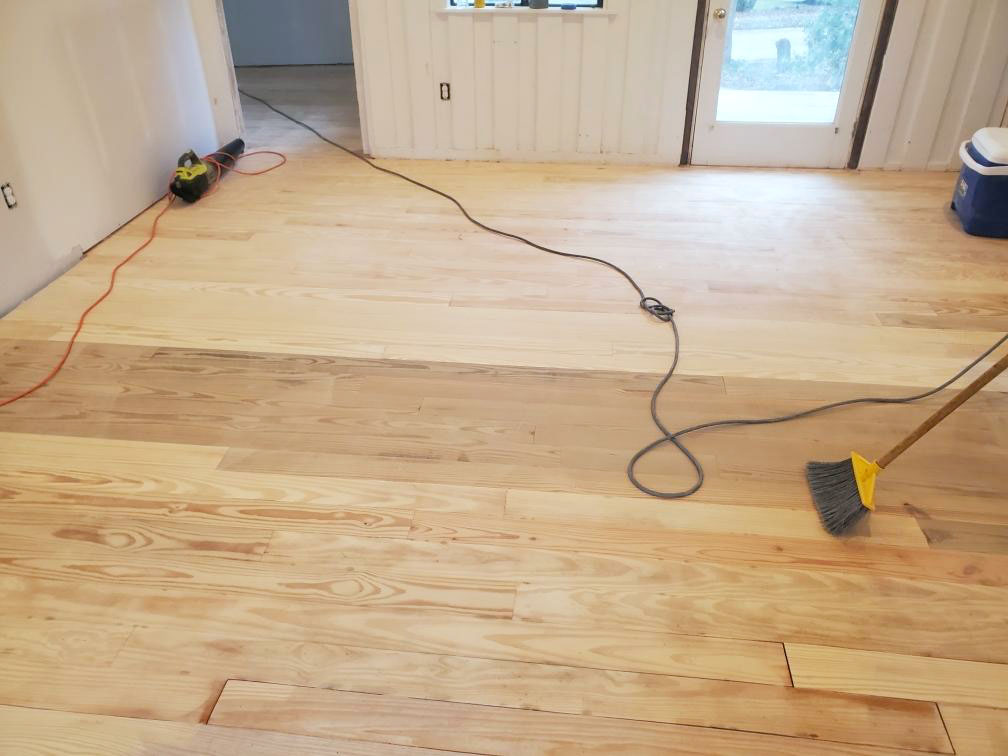
- Sand the floor, usually 3-4 times, using higher grit sandpaper with each pass. Use a belt sander or drum sander for the larger areas and a hand or edge sander to do the perimeter. Be sure to always sand in the direction of the wood grain.
- Do a final buff with a floor buffer or hand sander with high-grit sandpaper
- Vacuum up all dust
- Apply stain (optional) to achieve your desired color, following the manufacturer’s instructions. Allow 24 hours to dry between coats.
- Apply sealer to protect floors, following instructions. Allow 24 hours before walking and 72 hours before moving furniture or rugs back in.
- Reinstall molding. Caulk and paint as needed.
As you can see, this project involves a lot of detailed and repetitive work. Plus, tasks like operating floor sanders can be physically exhausting, especially if you are refinishing a large home. And if your project involves any special or difficult circumstances, an expert may be better equipped to handle them.
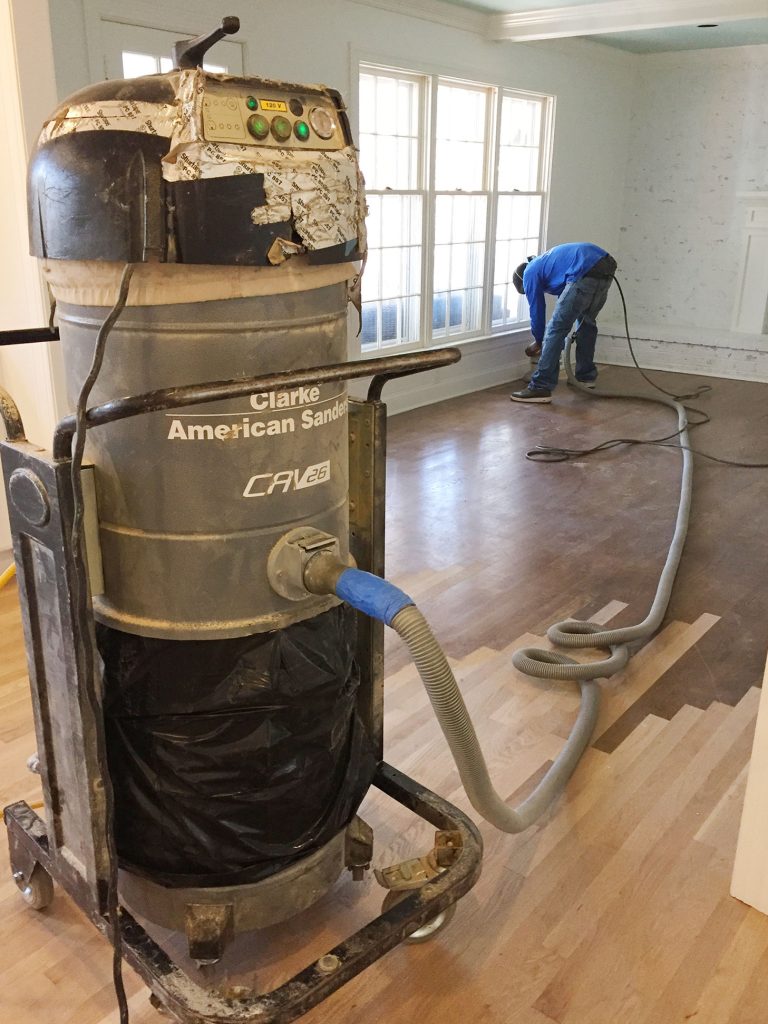
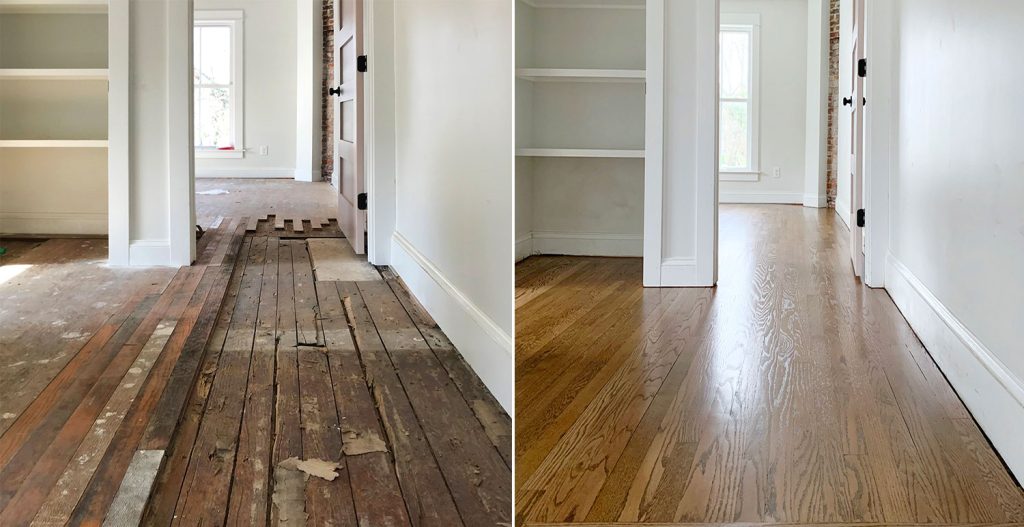
For example, we hired pros to refinish the entire first floor of our third home a few years ago. This involved tearing out the flooring for two rooms that didn’t already have hardwood floors and “feathering in” new boards to create a seamless look. The professional refinishers executed these tasks much faster and with greater success than we could’ve on our own.
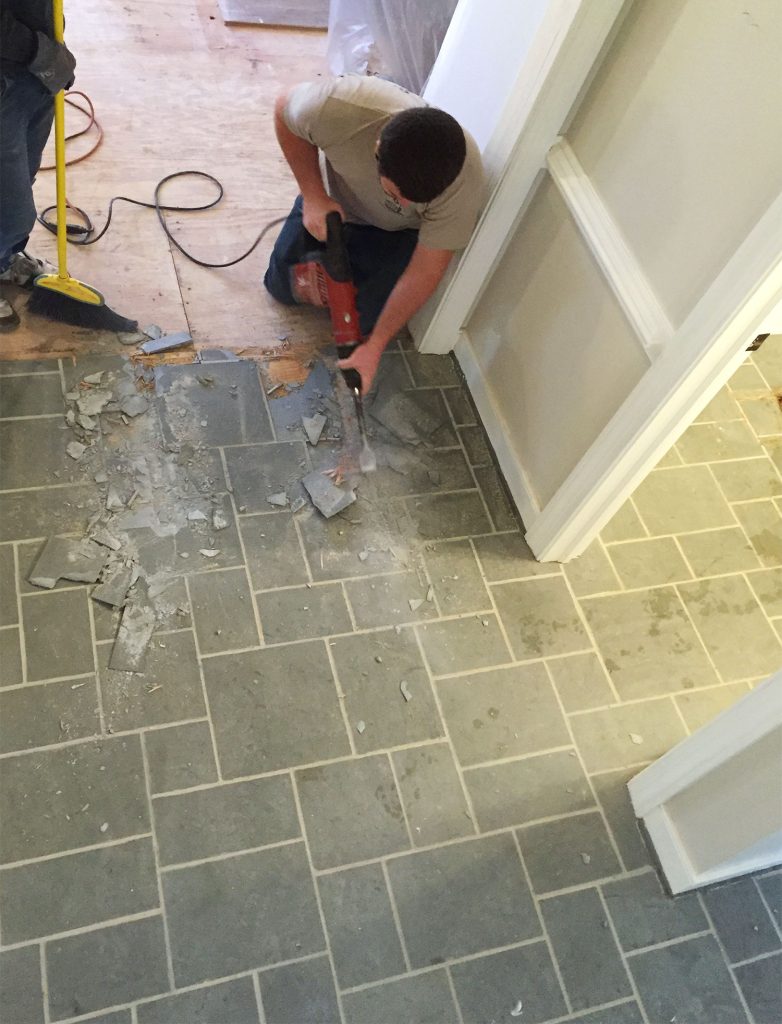
This project also involved removing slate tile in one room and laminate in another. It took three men a whole day to demo and prep these spaces using special demolition tools. I can only imagine how much time it would’ve taken us!
How much does refinishing hardwood floors cost?
Experts say floor refinishing typically costs between $3-$8 per square foot. That means a 200-square-foot room could cost anywhere from $600 to $1,600. These costs will vary depending on your area, the size of your space, and if there are any special circumstances to your project. For instance, some of our projects have involved extra demolition or patching of unsalvagable portions (like below).
Personally, we have paid anywhere from $900 to nearly $10,000 for our floor refinishing jobs. The cheapest was an outlier (about $1.50/square foot) because we agreed to do some of the prep and molding repair ourselves. Of course for the pricier jobs it was a lot more flooring (like an entire house – we redid the floors of the duplex and the pink house entirely). On average we have paid about $5/square foot.
Is Refinishing Hardwood Floor Worth It?
Yes and yes! Refinishing hardwood floors is a rewarding home improvement for both personal and financial reasons. In fact, according to a 2022 National Association of Realtors report, “Hardwood Floor Refinish” is the #1 interior remodeling project for resale cost recovery – even more than installing new wood flooring! The NAR estimates homeowners will earn back nearly 150% of the refinishing cost in increased home value.
Resale value aside, refinished floors are a high-impact way to update your home for your own enjoyment. In the same report, the NAR awards floor refinishing a perfect 10 on their “Joy Score” for homeowner satisfaction. It’s hard to articulate how shockingly good the transformation can be – and this is coming from people who have done it 5 times! People just don’t realize how much worn, faded, or outdated flooring can drag down the overall appearance of their home.
We know firsthand that the expense and inconvenience of refinishing your floors isn’t minor. But every time we’ve done it, we’ve wished we had done it sooner. Refinishing hardwoods can truly transform a whole room or house.
What is the process like?
So you’ve decided to have your wood floors professionally refinished? Great! Here’s what to expect as a homeowner during this project. Scroll up to the first question for our overview of the DIY steps to refinish your hardwood floors yourself (and why we don’t recommend it in most cases).
Finding a floor refinishing professional
We suggest asking friends, neighbors, or other home improvement contractors you’ve worked with for recommended floor refinishers. We have found all of our favorite floor refinishers this way. Message boards like Nextdoor or Angie’s List can also point you to reputable tradesmen.
Getting an estimate
Your contractor (or potential contractors) should visit to measure the space and discuss any questions with you first. This is an opportunity for you to get a feel for them and better understand their process. We have suggested questions for them further down in this post. We often will get 2 or 3 different estimates to pick the best (not necessarily cheapest!) person for our job.
Acclimating the wood
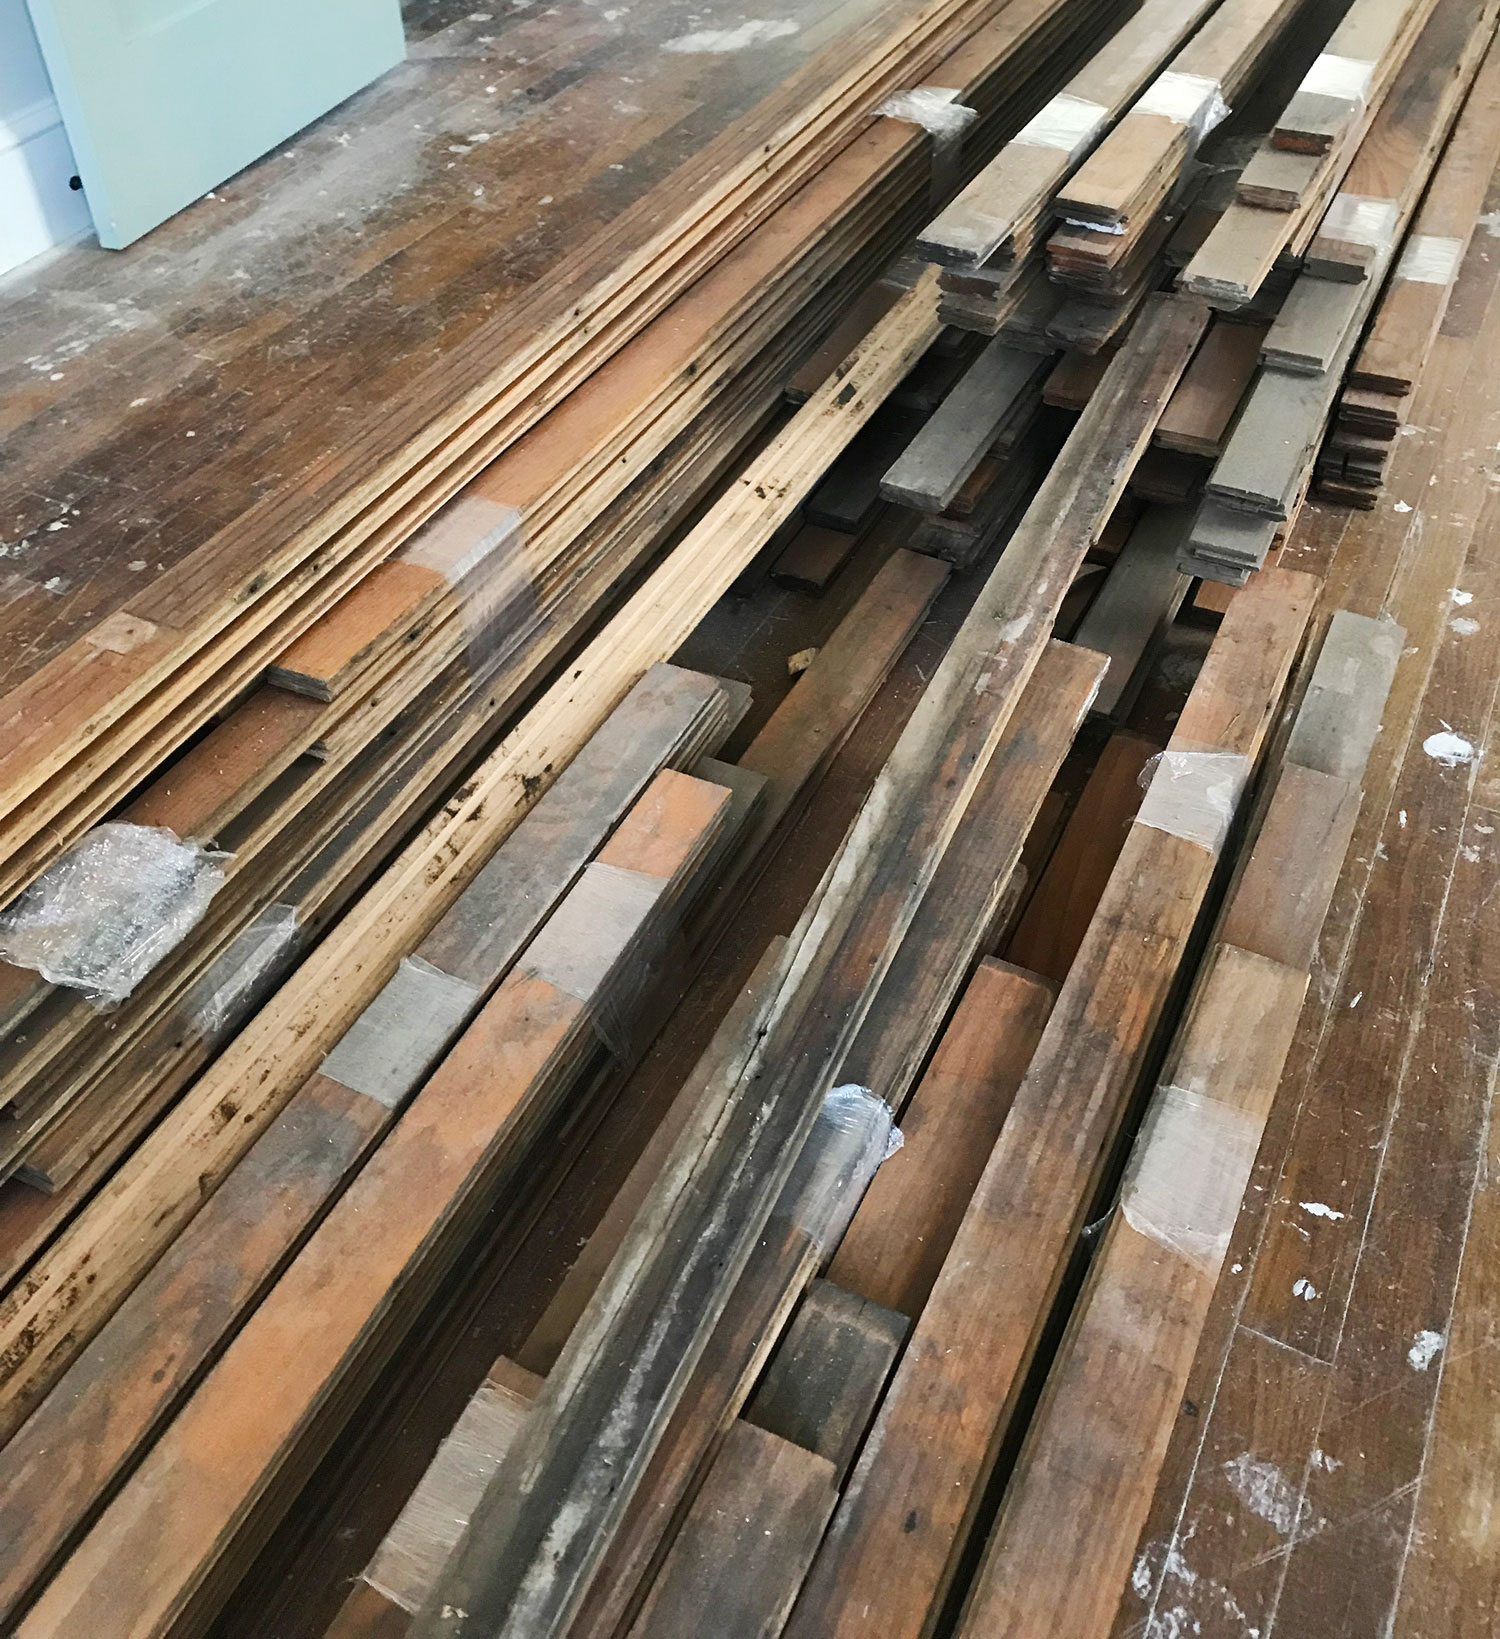
Several of our refinishing projects involved adding or replacing sections of our wood floors, which meant adding new boards (or reclaimed boards, shown above). New hardwood flooring should acclimate to the moisture levels in your home before installation to prevent swelling or contracting afterward. This means new flooring should be delivered and stored indoors at least 3 days before installation. Some installers recommend up to 2 weeks of acclimation. (Don’t leave the doors and windows open during this time).
Emptying your space

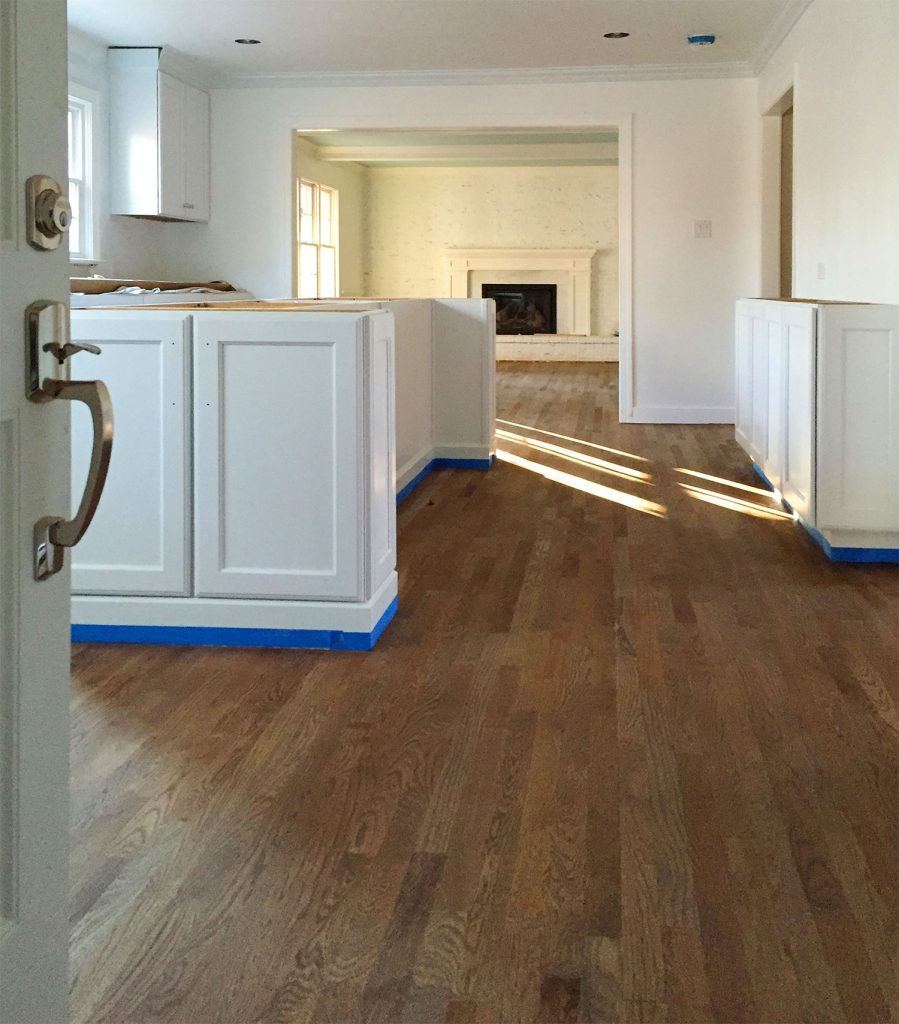
Remove all furnishing, rugs, appliances, and/or other items obstructing clear and open access to your floors. This could also involve uninstalling cabinetry or plumbing fixtures as well. You will also want to remove (or cover) artwork, window coverings, or other items you don’t want to get dusty. If you are only refinishing one room, you can usually move these items into a nearby room. If you are refinishing a whole house, you may need to move out almost entirely. We used a POD in our driveway when we refinished our first level. A storage unit also works. Some people may even hire a moving company.
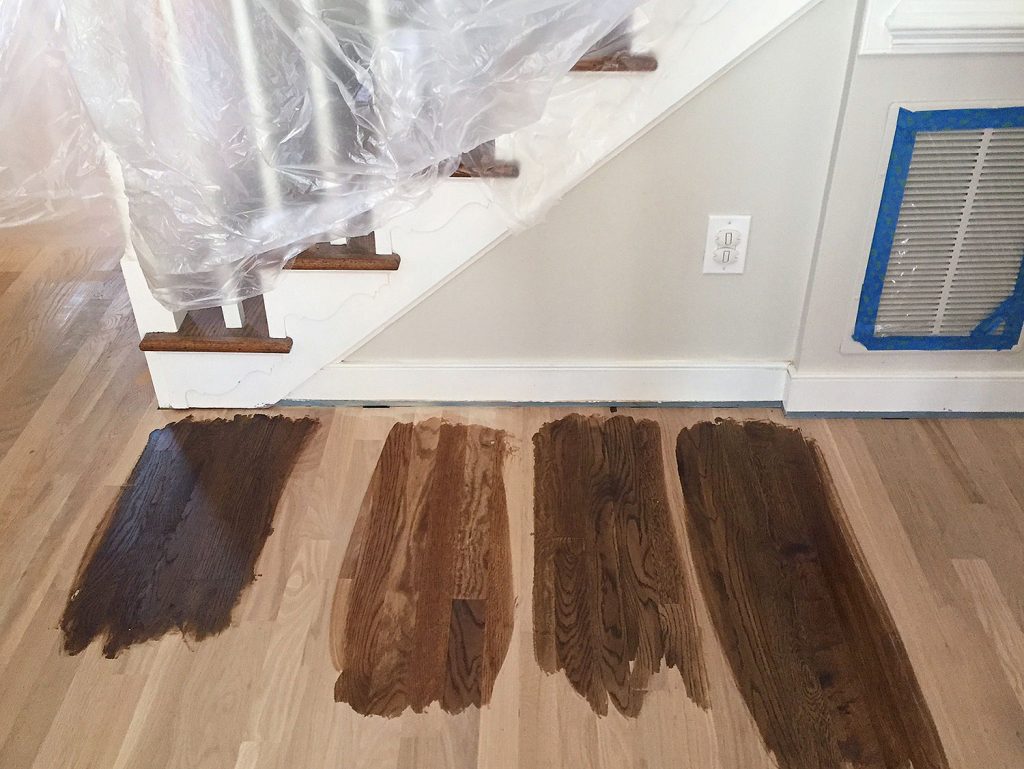
Picking a stain color
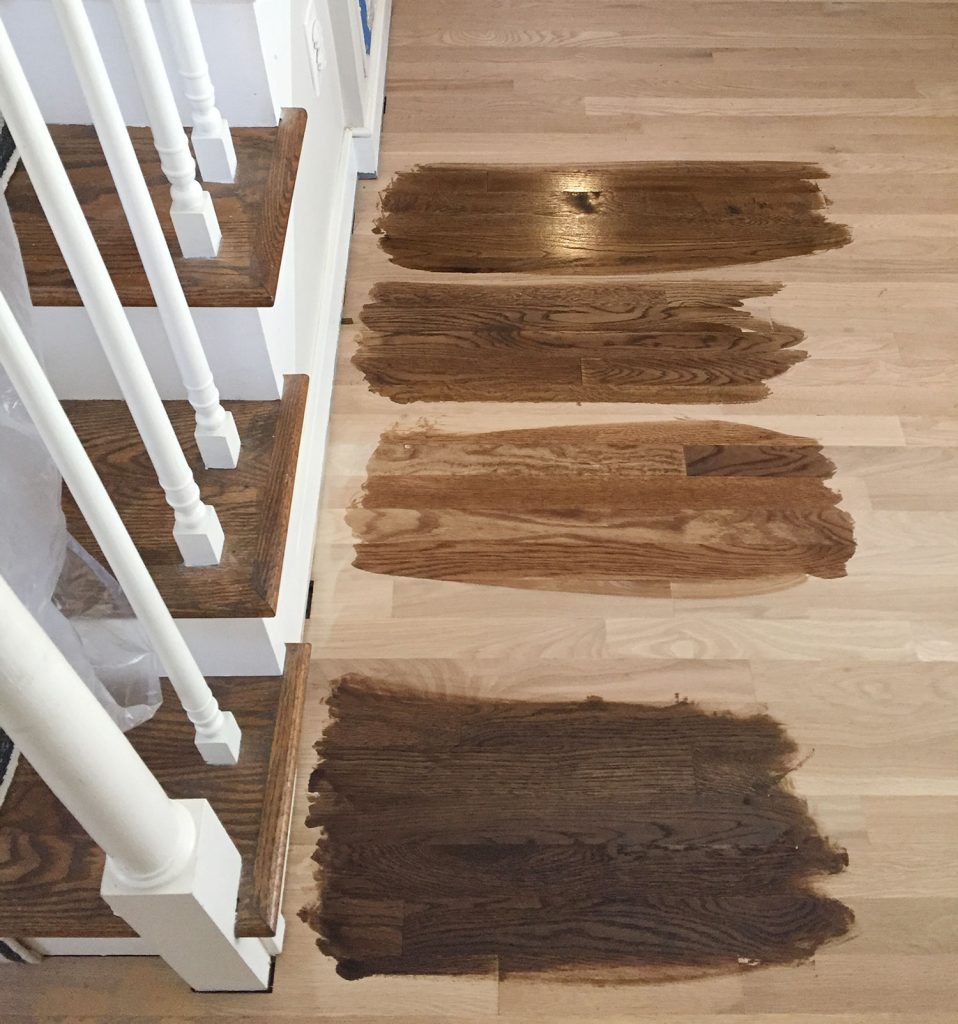
At some point during the process, you should work with your refinisher to select a stain color. You may be satisfied picking from a swatch book or trusting your professional to match a certain look. But we recommend having the floor refinisher stain small sample sections directly onto the floor (which can be sanded off afterward). This allows you to see large swatches in your space, helping you feel confident about your decision.
Waiting and more waiting
Floor refinishing is a multi-day process, no matter the size of your project. Stains and sealers need lots of drying time (usually at least 24 hours each) and it’s recommended that you wait several more days for them to cure (aka: harden) before moving heavy furniture back in. When our first floor was refinished, we slept out of the house for 6 nights and didn’t fully move our furniture back in for another 10 days.
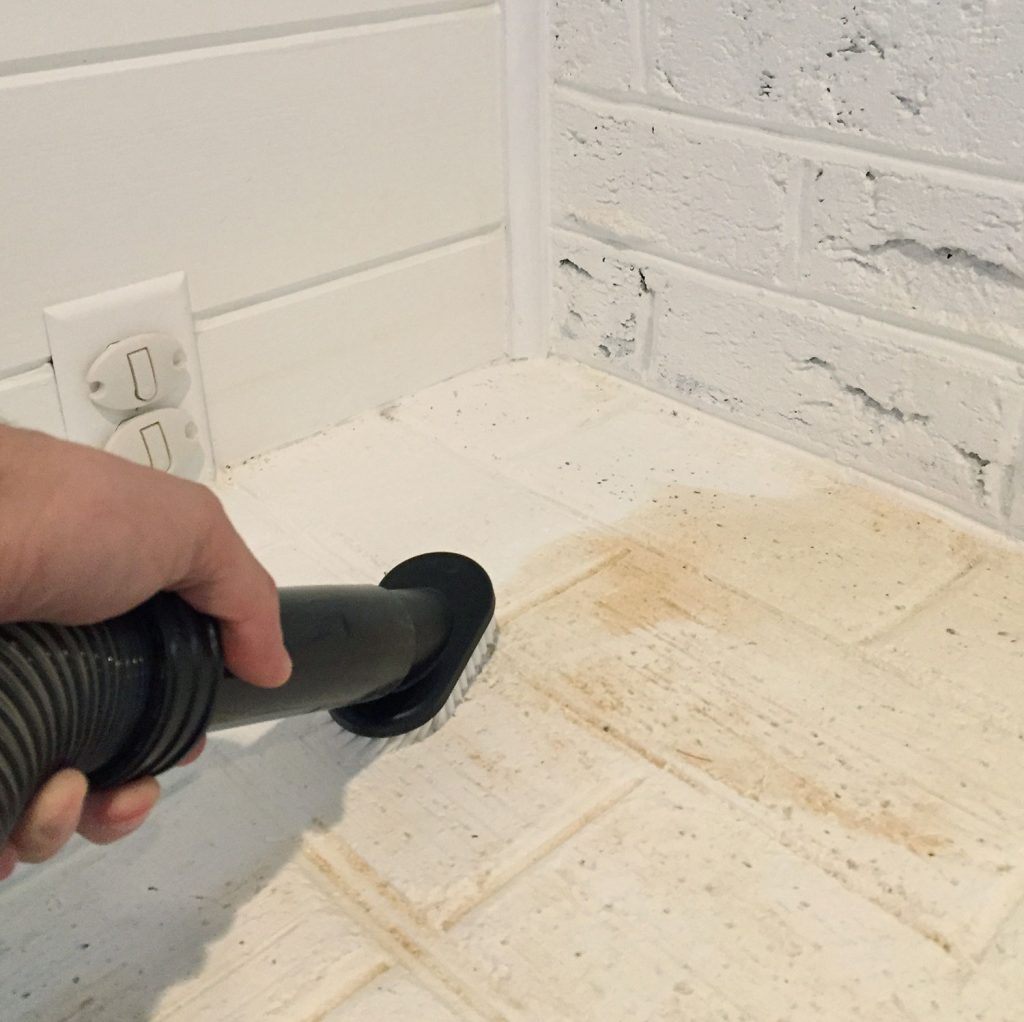
Cleaning & touch-ups
While our contractors have always done a good job of collecting as much dust through the process, we inevitably had dust left on some surfaces that we needed to clean ourselves. Additionally, you or your contractor may have to reinstall, caulk, and paint any baseboard or quarter round that was removed. We offered to do this ourselves in a couple of instances to save money. Same goes for appliances, cabinets, or plumbing fixtures that may have been removed.
Do I have to move all of my furniture out?
Yes, you will need to remove all obstructions from any rooms where you are refinishing the floors. This includes furniture, rugs, appliances, plumbing fixtures (toilets, sinks, etc), and maybe even cabinetry. We also recommend removing artwork, window coverings, and other decor you won’t want to worry about dusting later.
This is why it is best – if possible – to refinish your floors before moving into a home or as part of another renovation (like a kitchen remodel) where your home is already disrupted. If that’s not possible, treat it like you are moving out temporarily. If you can’t move your furniture into unaffected rooms or levels of your home, you may need to rent a storage unit or POD to hold your furniture.
Moving out of your space is not a small task, we know. It’s the main reason we put off refinishing floors in some of our houses. And unfortunately, unlike projects like painting, you can’t simply scoot things into the middle of the room and throw a tarp over them. There isn’t a shortcut here. To get the highest quality, most efficient result, it’s best to give your contract clear, unobstructed access to every area that needs refinishing.
How long does refinishing hardwood floors take?
Having your floors refinished typically takes 3 to 14 days or more, depending on the scope of your project. Here are some GENERAL time allotments you may need to account for.
- Prep (demo old flooring, remove quarter round, uninstall plumbing, etc): 0-2 days
- Repair, patching, or laying new sections of hardwood: 0-2 days
- Sanding: 1 – 2 days (about 1,000 square feet per day)
- Staining: 1 – 2 days (about 1,000 square feet per day)
- Sealing: 3 – 6 days (about 1,000 square feet per day, 1 coat per day)
- Curing: 1 day
Our shortest project only took 4 days for 600 square feet. Our refinisher was able to sand and stain on the first day, then spent the next 3 days applying one coat of oil-based polyurethane each day. We still waited another 3 days to move back in, allowing the finish to cure and the fumes to fully dissipate.
One way to speed up a refinishing project is to skip stain and just clear coat the natural color of the floor. You can also shorten the sealing process by choosing water-based finishes, which dries faster than oil-based finishes. That may allow your refinisher to apply multiple coasts in one day, versus oil-based polyurethane that typically requires 24 hours between coats.

It’s best to discuss the timeline with your contractor upfront and ask about the pros and cons of various options. The fastest result may not be best long-term outcome for you.
What questions should I ask my floor refinisher?
We’ve worked with 4 different floor refinishers across 5 different homes. Here are some things we recommend discussing with them up front to make sure you are on the same page before the project starts.
- Are my floors good candidates for refinishing?
- Do any areas need to be repaired or replaced with new wood?
- How long does any new wood need to acclimate before you begin?
- What needs to be removed from each room? Who is doing that, me or you?
- What needs to be covered, protected, or sealed off with plastic? Who is doing that, me or you?
- What other preparation do you suggest / expect me to take before you arrive?
- Are you removing & reinstalling any baseboard molding? If not, should I?
- Are there any tasks I could do to reduce the project cost?
- Are there any tasks I could pay you to do to increase the project speed?
- How long do you expect the project to take?
- Are there any options that could speed up the project?
- How much time will I need to be out of the house?
- How do I partake in the stain color selection? Can I see test spots in my home?
- What other decisions will you need me on site for during the project?
- What type of sealer do you recommend? What are the pros and cons of my options?
- How long until I’m able to walk on my new floors?
- How long until my pet can walk on them?
- How long until I can put furniture, rugs, or other heavy objects on them?
You can certainly Google some of the answers to these questions (some are in this post!) but we always recommend conferring with your on-site professional as well. This helps them know you are a thoughtful client and you will hopefully get reassurances that they are a knowledgeable refinisher. It also helps avoid confusion around timelines, budgets, and scope of work.
Our Hardwood Floor Refinishing Projects
If you would like to read more about our specific hardwood floor refinishing projects, please see the posts below. They range from matching original hardwoods to new prefinished flooring (below) to restoring 100-year-old pine floors!
- Refinishing Mid-Century Oak Floors in Our First House
- Matching New & Old Hardwood Floors In Our Third House
- Refinishing Historic Heart Pine Floors in Our Beach House
- Repairing Historic Oak & Pine Floors In Our Duplex
- Clear Sealing Our Refinished Floors In Our Florida House
More Flooring Projects
If you would like to read about other flooring projects we’ve done, please check out the posts below:
- How To Install Hardwood Flooring Yourself
- How To Select Hardwood Flooring
- How To Install Hardwood Floors Without Nails
- How To Install Click-And-Lock Cork Flooring
- How To Paint A Floor
- How To Stain A Concrete Floor
- How To Remove Carpet
NOTE: This guide was originally published in 2009 after our first refinishing experience. We updated it with additional information and photos to include a wider range of projects in 2024.

Blayne says
They look gorgeous. If I had not seen the mocha I would have thought the floors before were nice, but they mocha is WAY better!
Pamela says
Your floors came out absolutely stunning! Looks like it was well worth storing all your belonging, stinking up the house and leaving town for a few days!
Kristy says
I like the after a lot. But I gotta say I like the before too. I think floor color really is just a preference thing. I think it certainly matches the kitchen more so now than it did before and if that was just driving you bonkers I understand. I just can’t say that the before was horrific…it wasn’t. *shrugs*
sarah says
i gotta agree with kristy. your floors looked like they were in great condition before. they are similar to what we have in our house, and I think the lighter color is nice in a small house b/c it makes the room seem larger. however, i can def. see how the conflicting wood floor would bother you and hey, if you have the money and means, why not? they DO look great!
Marianne says
I recenlty discovered you blog (Homies 2008). I really love the way you floor turned out. It is beautiful. But then again I love wood. I have a french oak floor, I chose it because of the knots and veins.
Have a nice weekend!
Bye,
Marianne
Ryan says
Looks fantastic! Thanks for posting the before/after shots. Really great job on the floors.
Todd @ Home Construction Improvement says
Great job on the floors! Trying to match floor finishes is nearly impossible and I’d say you got it as close as you can. Your home is really looking great!
Fred @ One Project Closer says
Nice work. Looks like the grade of your flooring is different from one room to the next… Perhaps you used select grade in the kitchen while the adjacent room is builders grade? Todd’s right – matching stains perfectly is nearly impossible, and you guys did a fantastic job! Love the floors, love your blog… Keep it up.
Maryam in Marrakech says
ooooh, looks snazzy! We are grappling with cement floors here in Marrakech. Wood is a rare commodity in the desert!
TRS says
They look great.
I’m a little surprised by Fred’s comment – does he not understand that the livingroom floor was original to the house?
And that’s the difference between new wood and old wood.
50 years ago, the trees cut down for wood floors were old, accounting for beautiful variations, knots and veins. Today we’re cutting down young trees that don’t have the time develop the same character.
Your whole house looks beautiful.
corinna says
could you please share where you got your coffee table and storage cube? thank you for sharing your lovely home!
YoungHouseLove says
Hey Corinna,
We got our coffee table at a thrift store (an amazing $35 score) and the storage cube from Michael’s for 50% off (maybe $25?). But they do sell similar coffee tables at potterybarn.com. Hope it helps! Happy shopping…
xo,
Sherry
Kelly says
I’m so glad to have found your blog. Holly Mathis Interiors mentioned it in her blog and showed some pictures of your bedrooms she liked. Anyway, my husband is planning on refinishing our pine floors in our kitchen and foyer sometime this year. We’re probably going to do it ourselves, to save money. I’ll be sure to have him see your floor refinishing tutorial. I want him to see what to expect. Your floors look fantastic! I really like the darker color since you have so much light colored upholstery.
G&D says
I love seeing it all put back together. Looks beautiful!!
Peach @ Shouldabeenabelle says
Beautiful!!
beatriz says
hi kiddos!
i’m new to your blog and am trying to get up to speed (lot’s of info to cover!)
i have a couple of questions for you, number one, where did you get the sofa for your living room? i like it a LOT and found one somewhat similar (manchester) at ballard design (but i’m scared to death of purchasing a sofa online without the benefit of ‘trying it out’) and would you consider doing a segment on the direction to lay your hardwood floors? the reason i ask is we are getting ready to lay hardwood in our condo, and from what i’ve read, you are supposed to lay it perpendicular to your floor joists…i have living/dining combination room that is 33′ long and 12’…..perpendicular would be fine for the room itself, but the transition into the 2 bedrooms have 2 very small hallways that would need to be layed ‘crosswise’ (creating a ladder effect)….would love to hear your ideas about how to approach this…
TIA
and congrats on a superb design blog!
beatriz says
oh and one more thing…..where did you get the glass coffee table? having a long a narrow room (fireplace on one end) i think the glass table is probably the best option (and yes we have the flat screen (on a media stand) across from the sofa currently, which seems to be the only option.,
YoungHouseLove says
Hey Beatriz,
We actually have a huge list of where we got everywhere in our house located on the top of our “house tour” page. Here’s a direct link to make it easier. You’ll see where we got our sofa and our coffee table and everything else! Hope it helps!
As for how to lay flooring, we have also heard to lay it perpendicular to your joists (you can go up in the attic and see which direction the beams go and lay it in the opposite direction. Other than that, we don’t know much about it since we actually hired someone to help lay our hardwoods for us! Good luck with everything!
xo,
Sherry
Juliet Robinson says
Your floors look fantastic and were the inspiration for me choosing to stain my new oak floor “coffee brown”. Everyone – husband, mom, friends, etc questioned my choice to go DARK. It’s much more common in this area (Seattle) to see light/natural floors. It looks fantastic now, but I’m a bit confused as we start to furnish our house – what kinds of woods do you look for in furnishings? I see lots of white painted wood in your home, so that’s easy for me to look for, but then are you going with black painted wood as well? Or dark brown? I’m looking for a dining set right now and I’m a little afraid of choosing a wood that will “clash” with the coffee brown floors. But then I don’t want it to look too matchy either. Any advice on what to look for?
YoungHouseLove says
Hey Juliet,
We’re so excited to hear about your delicious new coffee brown floors. They sound amazing! As for wood tones, we’ve always been a fan of dark brown pieces mixed with a few white painted items and even some black iron (like our glass and metal coffee table in the living room). Selecting dark wood pieces for the most part, but peppering in some white painted items and even some moody metal tones, will really add effortless personality and avoid the dreaded matchy-matchy syndrome in your space.
And as for your dining table, you might want to bring in a rug to really make the room. The furnishings and the floors will definitely look lovely when they’re offset by something soft and stylish. Then again you might adore the bare look (we actually don’t have a rug under our dark wood dining table (since there’s an area rug a few feet away in the seating area) and it still looks great. Definitely feel free to let your decor evolve and to experiment by bringing in rugs, table runners and lighter upholstered pieces to cut all that wood if things start to feel dark. Hope it helps!
xoxo,
Sherry
Joan says
I found Floor refinishing 101 very informative. I do have a question. Is there a method to keep the oak floors a light color as shown in the picture that shows how the floor looks just after sanding? Thank you.
YoungHouseLove says
Hey Joan,
Good question. I believe it’s nearly impossible to keep the floors as light as they were right after sanding since applying a clear poly is the closest you’ll get but that still darkens the floor considerably while bringing out the variations in the wood. The best way to achieve the extremely blonde tone in the sanded pictures is actually to get new wood flooring laid that’s lighter than standard oak (maybe a light cork or a lighter exotic wood) so that even once it has some protective poly on it, it’s still a lot lighter than the average oak floor. Although that can definitely get more expensive than having the floor refinished, it’s a totally custom look.
Hope it helps!
xoxo,
Sherry
Kathryn Fitz-Gerald says
A coworker of mine suggested I check our your blog and now I am addicted! I love it. Thanks for all the great advice and how-tos.
My husband and I are planning to refinish our hardwood floors and were wondering if we had to remove the baseboards and door casings before doing so? Were yours accidently stained in the process? I just don’t want to replace them if I don’t have to.
YoungHouseLove says
Hey Kathryn,
We actually left the shoe molding and the baseboards in place to save time and money (the refinisher sanded and restained our shoe molding to match the floor instead of replacing it) which did mean that a bit of stain got on the baseboards but it only took us about an hour to touch everything up with white paint and get everything looking crisp and perfect again. Hope it helps!
xo,
s
Landry says
Hey Sherry,
I love your mocha floors! My husband and I are actually going to the same process right now and I’m trying to find a color of stain that I like! I want to go darker like yours (anything to get away from that golden honey color!!) Do you know what brand of stain your contractor used and which colors he mixed? I definitely don’t need to know the exact concoction but I’d love to try and find something similar!
Thanks!
Landry
YoungHouseLove says
Hey Landry,
Good question. We believe he used Minwax stains and mixed two (a dark mahogany tone and a deep brown one) to get the color we agreed upon. It certainly wasn’t a scientific mixing, more like around half of one bucket poured into the other. I wish I had more info for you but we actually made ourselves scarce while he did the work due to the fumes! Hope it helps!
xo,
s
lisa says
Floor looks great. just installed new solid red oak and had professional do the refinishing. we had him use our eco friendly waterbase. it has absolutely no fumes. problem was we did not hire an environmentally minded finisher and he did not take his time, bedroom looked great but liv/dining terrible. he resanded and insisted he use minwax. the odor in the house was terrible and is did not go away (as promised) with the coat of water based poly. So now we had him take the finish back off and we are putting down the finish ourselves. It is nice of you to warn people to be cautious about the fumes. Hopefully, companies like minwax be forced to change so people do not have to chose between a beautiful floor and their health.
thank you,
Lisa
Jody says
I love your woodfloors they all look great and match up awesome. My husband and I are actually wanting to install wood floors throughout our house but unsure which color or type to pick. Our house is really old and has tons of original wood work throughout thats pretty dark but is in excellent condition, we just can’t decide on which color of floors would look best up next to all the wood trim. What would be your suggestion?
YoungHouseLove says
Hey Jody,
We’d try to pick a tone that matches the dark wood trim as closely as possible and if that’s too difficult we’d suggest finding a tone or shade that complements it (a little lighter perhaps, but still with the same undertones so it looks like it’s a shade of the same color). Hope it helps!
xo,
s
Jody says
Thanks a bunch, the both of you give excellent advice and truly are an inspiration of what you can do with a little hard work. Thanks again
Erica says
Hi Youngsters,
My husband and I moved into a new old house the first of this month, and were lucky enough to be able to refinish the hardwood floors throughout the downstairs before we moved in. It’s been one month since they’ve been done, and while they look fabulous, they still are really smelly! We have lots of windows open all the time which, coupled with fans, I had really hoped would do the trick. We are crazy green about everything, to boot, so these lingering odors are irritating our eco-friendly personalities as well as our noses. Did you deal with any lingering smells and/or can you recommend something for helping clear the air??
Thanks!
YoungHouseLove says
We feel your pain! Nothing is worse than a fume filled house. We actually heard that refinishing floors in the winter can cut down on the smell since heat releases more odors and keeps them hanging around. Maybe things will get better when it cools down in the fall? Until then those fans and other forms of ventillatipn should help. Good luck!
xo,
s
Adrienne says
Hi there,
I am not sure if you are able to put the name of the company/gentleman who did your refinishing on your blog…but my husband and I live in Richmond and would love to use your recommendation and contact him to refinish our floors. FYI, we have heard about a new company called “Mr.Sandless” that uses non-toxic stains and finishes and, as you can maybe tell from the name, does not sand the floors and kick up all the dust. Might be worth readers looking into!
YoungHouseLove says
Here’s another post with our floor guy’s info: https://www.younghouselove.com/drumroll-please/
We also looked into the dust free refinishing you mentioned but they said it would need to be redone every ten years or so and might not hold up as well under little dog claws so the full resanding method seemed a lot more durable and smarter for us in the long run. Either way good luck with your floors!
xo,
s
megan says
Ok, so we finally closed on our house (YAY!)
We are ripping up the carpet today and tomorrow and the guys plan on starting the refinishing Monday morning. He said it would take about 5 days to do the whole project (ours is close to 1000 square feet). But now I am worried we may not be able to move in next weekend due to fumes, 48 hour dry time, etc. and I was really hoping to get to use Labor Day weekend to move in all the furniture completely.
a) what about a water-based poly?
b) other than heat on, windows open, etc, how can we speed up dry time?
Thanks!
megan
YoungHouseLove says
Hey Megan,
We did all we could to speed up our drying time so all we know of is the heat-on windows-open method. We even googled it a bit and that’s all we could come up with. Perhaps since it’s the summer (we had ours done in the winter) the natural warmth in the air might help things cure faster. The most important thing is that you don’t want to ruin the floors if they’re too wet to be walked on, but if they’re already dry but still very stinky when it comes time to move stuff in, you could always move everything in over Labor Day and just leave the house a lot to get meals and maybe even sleep at a friend or family member’s house to avoid the fumes as much as possible. You might also have a less airtight house than we do (with our new windows and brick facade our house is extremely good at holding heat- and everything else- in for a long time). Hope it helps!
xo,
s
sabrina says
Love your floors. We’re getting ours done tomorrow morning but we can’t decide on a stain color. Do you know exactly what colors you guys mixed? I have to buy the stain later today.
Thanks
S
YoungHouseLove says
Our floor guy actually mixed two stains (a dark walnut and a lighter honey tone) but we’re not sure those are the exact names. Hope it helps!
xo,
s
kyley says
We moved into our new house 2 weeks ago – and immediately ripped up all the carpeting to find hardwood floors underneath. Sadly only one of the rooms was “finished hardwood” so we knew we’d have to refinish all of them. Also we uncovered a large stain in the master bedroom. Looks as if there was some sort of plumbing leak that badly stained the floor. (and yes we are sleeping on the dining room floor during this process…can’t wait to get things normal again).
So last weekend we rented a sander and sanded all the floors – but couldn’t get all of the water stain up. I was reading you might be able to remove it with something called Oxalic acid crystals. I saw your guy got a stain up too. Have you heard of anything that might get this up?
Also we’re planning to stain the wood ourselves. The hardware stores only seem to carry minwax – are there better brands? Do you know why your floor guy chose minwax?
I know you had someone do the dirty job for you (jealous!) but thought I’d try to pick your brain anyway.
YoungHouseLove says
I’m so sorry that we can’t be of more help but we would recommend visiting your local hardware or paint store and asking the pros there what they recommend (since they have more experience on the subject). Googling around a bit might shed more light on things too. Hope it helps!
xo,
s
Magda says
Hello,
I’ve been following your blog for a while now. We just bought a house and refinished the hardwood floor prior to moving in- dark chocolate colour. I used to clean my floors with water and vinegar before, but the floor guy told us that that will ruin the hardwood. he recommended a product called Bona. Just wondering what you use to clean your hardwood floor?
YoungHouseLove says
We just use a moist cloth with a bit of Mrs. Meyers soap on it. It’s super mild and smells great (like lemon). Our floor guy actually recommended it. The key is just not to let a lot of water stand on the floor, so just use something moist to wipe them down, nothing soaking wet. Hope it helps!
xo,
s
Household Commodity Mould says
AOTONG is specialized in designing and manufacturing of mould such as plastic mould, injection mould, blow moulding, mold design, high quality mould, China mould, China mould manufacturer, China mould supplier, China mould factory.
Totty vB says
Hey it’s Totty from bootsandtotty.com. Quick Question.. We are weighing the options of refinishing our original hardwood floors or replacing them with a more eco friendly option. Can you shoot me the info of the floor guy you used? Would love to get a quote from him. Thanks!!
YoungHouseLove says
Hey Totty,
His name is (fittingly) Mr. Sanders and he came highly recommended from more than a few people. He did a great job and we loved working with him! Here’s that number for ya: 804.921.6916. Hope it helps!
xo,
s
Elle says
The floors really do look fabulous! We are experiencing a mini-crisis with our HW floor at the moment. Apparently, there was a leak behind the dishwasher, which caused mold to grow and water to seep under the floor and into the crawl space below. Good times. As I type this, we have a ginormous heater thingy in our kitchen/living room/dining room in an attempt to dry out the wood floor(the floor with the hardwood is all one open space- the main level, if you will). Our insurance company wrote us a check for $1,500.00, since we are going to have to refinish the HW floor once everything is dried out. The agent that came to the house claimed that this is the going rate (approx.) around here to refinish floors. But, I see that you paid only $900 for 600 sq. feet of flooring! We have A LOT LESS floor space to refinish, so I am just wondering why there’s such a price difference? Any thoughts or advice?
YoungHouseLove says
We just hunted around for a great deal and got many many estimates to end up far below the “going rate” so if you put in the time you’ll hopefully score a great deal too. Of course it might have to do with your area (my mom lives in NY and could never get the estimates that we get here in VA). Hope it helps!
xo,
s
Elle says
Thanks Sherry! I dug up the summarized price quote given to us by our insurance agent, and it mentioned SEVERAL things that needed to be done in order to actually refinish the floors, which is probably why the check was for so much $$. One thing stuck out: He said that all of the baseboards/trim need to be removed (from walls and the kitchen island) before laying the stain down. Then, they need to be painted and re-installed. Does this sound right?! It seems like a LOT of work to just refinish floors, and I’m actually getting pretty nervous about the whole process. He also figured in costs for labor to remove/relocate our furniture temporarily, and many other “little” things that actually my hubby and I can do ourselves. I guess I am just overwhelmed by the whole process, and since you’ve done this before, I wanted to know your thoughts. Thanks!
YoungHouseLove says
Nope! We didn’t even have our shoe molding removed let alone our baseboards. He sanded and restained the shoe molding while it was in place and explained that a bit of stain could get on the bottom of the baseboards but we did a smidge of touching up and it was a fabulous way to save hundreds of dollars (and hours of labor). We just recommend getting a number of estimates (you’ll learn so much from experts in your house to tell you what the options are). Hope it helps!
xo,
s
Bobbie says
First let me say.. I LOVE your blog!! My husband and I are remodeling a little lakehouse and have jumped onto your blog many times for advice..:)
Question about your floors, we are planning to stain and seal our floors ourselves, 700 square feet to be exact – we have laid down the raw knotty pine and are getting ready to start the sanding process (wish us luck..:)) but was wondering if your floor guy used a satin, semi-gloss or high-gloss poly on the floors.. we dont want alot of shine… so we are thinking satin… can you help??
YoungHouseLove says
Definitely go for the satin if you don’t want a lot of shine. We used the semi-gloss since we liked some shine and thought it was a really nice wipe-able finish but all three will work… it’s just up to personal preference. Hope it helps!
xo,
s
Fara Wilson says
I just LOVE your house! You guys have such an awesome design flair: fresh, modern (but not too modern), a little urban and eclectic. I’m getting a lot of inspiration from your site especially as my husband and I are in the process of purchasing our very own brick rambler.
Abbie Watkins says
You guys are a great inspiration! Can you tell me the stain you ended up using to refinish your existing wood floor? I have a similar floor to yours that I’m getting bids on now, and I’d like a place to start with the stain. I want all of the yellow/orange out and more mocha/walnut in. Thanks in advance!
YoungHouseLove says
Hey Abbie,
Unfortunately since he actually mixed two cans of stain we’re unsure what we ended up with, but one color was a deep walnut and one was a type of mahogany color. It really was sort of a trial and error process and he mixed them right on the floor for us until we landed on something we liked. Hope it helps!
xo,
s
Erin says
Thanks for such a great piece, it is so incredibly helpful. My husband and I are closing on our new home next week, and first thing we are doing is refinishing the wood floors (they need it!). How did you guys decide on the darker finish. I am drawn to the darker finish too, but our new place doesn’t get a lot of light so I’m thinking light may be the way to go. Do you have any insight on this? Keep the great info. coming, you guys are inspiring us into making our new house a home!
YoungHouseLove says
It’s really just all about personal preference. We suggest ripping out rooms that you love in magazines and looking at what floor colors you’re drawn to. We definitely have a small house without much light and as long as the furnishings and walls are light and airy it doesn’t seem to close things in.
xo,
s
Doug Carter says
Your results are nice, but not everyone can move out for a week. Our floors needed refinishing, but I couldn’t tolerate the fumes and dust, so I used a sandless process from a company called Mr. Sandless. My floors were refinished in a day with no odor and no dust. We went shopping for the day and came home to great floors. My wife was so happy! I highly recommend this great alternative to traditional sanding. They did the whole house for $999 – a real deal.
Christina G says
Help! Your floors are soooo beautiful. My husband and I are buying our dream house in the greater Seattle area on 6/14, but the floors def need a little love before we move all our stuff in. I’ve called for 3 quotes and all are coming in around $3.50+ per square foot….which, based on the 850 sq ft we need to refinish….is alot of money! I asked the same three companies what it would cost to just have them sand the floors (thinking I could do the stain and finish myself) – 2 said they would charge $1100 just to sand, another wouldn’t consider the job. How did you find such a good deal?? Christina
YoungHouseLove says
We always ask around for suggestions from friends (a buddy of ours actually recommended our floor guy to us) and when we’re blindly looking for estimates we always call the smaller unbolded names in the phone book since the guys with the big ads are usually a lot larger companies that therefore usually come in with higher estimates. Good luck!
xo,
s
Steph H. says
I’m so excited, we are finally refinishing our hardwood floors. Our home was built in the 20’s and all the trim is a rich brown stain. I’m wondering if you’ve ever “house crashed” any homes or seen any homes where the owners had dark trim and stained the floors lighter? I think the contrast of a honey stain may be nice and will help lighten the rooms. I’m worried if I choose a darker stain to match the trim that the rooms will seem too dark. Love your blog and your design tips. You have such a cute family!
YoungHouseLove says
We’ve seen floors of all colors (light and dark) look great with rich dark trim. Either way you can’t go wrong!
xo,
s
Liz says
What color did you use on your walls? Trim?
You are indeed an inspiration
YoungHouseLove says
Here’s a post all about the colors we used in our house: https://www.younghouselove.com/our-homes-recently-expanded-color-palette/
xo,
s
megan says
We too have a 60-year-old home…took out the carpet and refinished the hardwood floors, nice and dark like yours.
Our den/living room is an add-on step-down from the old living room that we converted into a dining room…we removed the old carpet there and painted the concrete floors (kind of like your sunroom), but it feels unfinished to me and I think we want a more finished look.
Have you loved wood floors in your kitchen (vs tile)? We are debating…We also want to do the same floors in the den/living room and kitchen/laundry room…these two rooms are separated by one room of carpet. Thanks for any input!
YoungHouseLove says
Oh yeah we LOVE our hardwood floors in the kitchen and everywhere else. They’re less hard on the knees (and falling plates) than tile and we adore the seamless look (which makes our house feel a lot bigger and less interrupted). Hope it helps!
xo,
s
Sophie says
Hi! We just bought our first home and are faced with a hardwood issue. This question isn’t specifically about refinishing, although it could be, depending on the solution we find.
Our kitchen/eat in area has a dark, cherry coloured hardwood (not sure exactly what kind of wood) that we don’t want to remove, however we do want to lay hardwood in the living/dining area (that connects to our kitchen/eat in through two different entryways). We haven’t been able to find the exact same wood, and when we find one that seems to be the right (or almost right) shade, the grain is completely different.
Is there a “rule” about side-by-side hardwood rooms needing to match? Would two completely different hardwoods look better than a failed attempt at matching? Would it be easier to pick a new hardwood for the living room and try to stain the existing hardwood to match? Or try to stain new hardwood to match the existing hardwood? Am I making sense? lol
Thanks!
YoungHouseLove says
We had the exact same issue! It’s really all about personal preference, so there are no rules, but we opted to go with something completely different since we couldn’t find a match. We ended up hating the effect though (it just looked mismatched and chopped up the space) so we later had the floors refinished to match the color of the darker hardwood that we installed for a seamless look. We love it! So it really depends what you like but if you have the means to get the floors refinished to match it will look the most expansive and uninterrupted. Although if you find a close color match the difference in the grain should be barely noticeable once everything is installed. Hope it helps!
xo,
s
annette says
why didn’t you refinish yourself?
YoungHouseLove says
Hey Annette,
We toyed with the idea but in the end we got such a good deal (and got it done while we were away so we didn’t have to breathe in all those fumes). We might tackle it in the future though- you know we love a good DIY project!
xo,
s
Amy says
Hello! My husband and I will be closing on a victorian home from the era of 1850. This is our first home and we will be refinishing the hardwood floors ourselves…do you know how to sand close/next to the wall? This issue has me a bit stumped… Also, any resources that you would recommend on decorating a victorian home would be GREATLY appreciated! Thank you so much for your tips and great ideas–reading your blog is one of my favorite things to do in my spare time :) amy
YoungHouseLove says
Hey Amy,
We believe there’s a special tool that you can use to sand near that wall that’s manual (or even an attachment for the electric sanding machine) so everything can be sanded evenly for an even result. Just ask around at your local home improvement store or even at a specialty floor refinishing place (like Lumber Liquidators). As for the victorian tips, we’ve never decorated one (we’re ranch people) but perhaps searching architectural salvage places and stores like the Habitat For Humanity ReStore will turn up some great ornate items you can add to your house (like corbels, old shelf brackets, detailed molding, etc). Good luck!
xo,
s
xo,
s
Corey says
Hi Guys!
First off, all the information that you guys provide has been very helpful in brewing up some great ideas for my new home. The question I really have is… Im curious about the width of the hardwood floors you installed. They look to be a pretty close in size to the original floors. I want to add hardwood to our existing floors, but am not sure of the exact width. I am fairly certain they are similar to the width of your old “yellow” floors.
Thanks
YoungHouseLove says
We went with the smaller width to match our original flooring (which was 2 1/4″) – hope it helps!
xo,
s
Crystal says
Our short sale home left us with stained carpet, which we’d like to replace with laminate flooring since we are on such a tight budget. Can you lend me any advice on how to decide which color to buy? We have a big (more like long) room with our kitchen, dining and living room together with 10′ ceilings. I like cherry, amaretto and espresso woods. Any advice would be great!
YoungHouseLove says
We’d recommend bringing home some laminate flooring samples and laying them all out in the space to see which ones you prefer. It’s really all about preference so there’s no right answer. Good luck!
xo,
s
eddie says
Hi, just purchased a dutch colonel home that was built in 1920, with beautiful hardwood floors. They need to be refinished just not sure of way to go ? Oil base or water base ? Help !
YoungHouseLove says
We did oil-based and it smelled for a while. In the future we’d use water based eco stains. Maybe google around or visit a local place to see what non-oil options are out there? Good luck!
xo,
s
the sassy kathy says
We moved into an apartment last july – the landlord had just refinished the wood floors a few months before we moved in. The floors STILL smell over a year later… we’re thinking that something is not right. (Well, we actually know he must have refinished incorrectly, because huge flakes come up off the floor…). Just curious if anyone else has ever experienced the polyurethane smell lasting for a year plus….. Help :(
YoungHouseLove says
Moving forward we’re doing to go with an eco water-based stain and sealant because ours (when it got very very hot and the house was closed up) still had a bit of an odor around 6 months later, and we still go whiffs of it sometimes up to a year later. It sounds like there was a problem with the application of yours if large flakes come up, but maybe using lower VOC options that are water-based (and don’t smell as much) is a good plan next time?
xo,
s
Donna says
I just discovered your blog while researching my problem. I had my floors professionally done in the beginning of July. This included 2 bedrooms, hall, living and dining rooms. They used an oil based poly from Bona, which my refinisher said was the best brand, 3 coats. While it was being done over the 3 days, the smell was so bad we could only be in the house for less then 30min at a time because it caused our eyes to water. 24 hours after, I opened the windows, turned on the fans to air the house. (It has been hot, humid, and rainier then normal in Minneapolis.) The smell got a little less over time, but I still get the smell every time I walk in the house and it has been over a month now. My refinisher said he has never hear of the problem of the smell lating this long before. He’s been doing this for 20 years, and he agreed it did smell. After being in the house I don’t smell it after a few minutes, but I do every time I come back in. The worse problem is that I now have a “funny chemical” smell when I dry clothes. The gas service man told me the smell has “burned” into the dryer.
My research yielded something called “outgassing”, similiar to the smell when new carpet is laid. since I also remodeled my bathroom and with the removal of all the furniture from all the rooms, I haven’t been living in my house for over 2 months now. I have to go over to my mom’s to wash and dry all my towels, sheets, and clothes before i can out them back. I am in desparate need of help. Does anyone know of anything to help with the smell? I’ve tried turning up the heat as high as I could to help cure, changing furnace filters, had the ducts cleaned out, put box fans in the window to draw out the air. But as soon as I close the windows and come back to the house, the smell is back. My sister who has asthma said it really bothered her just to walk into the house. I don’t want to bring my child back into this, but school will be starting in about 3 wweeks.
YoungHouseLove says
Oh my gosh that sounds like a nightmare! I’m so sorry! We don’t have any suggestions, but here’s hoping someone will see this who does. Good luck!
xo,
s
Inga says
Donna, I have the exact same problem with the wood floor fumes… and severe asthma. Did you ever find a solution? Thank you.
Rachel says
Donna– I too am having this EXACT same problem with bona oil based poly. Would you mind telling me what came of your issue?