But first, who framed Roger Rabbit? I dunno. I can’t remember how that movie ended. But as for who framed out our hall bathroom mirror? We did.

Putting a dressed up frame around a plain builder mirror is one of the easiest ways to upgrade a bathroom, especially if you’re working with the tile and not doing a total gut job (which we thankfully are in this room since the classic b&w tile is in great shape). It’s actually kind of crazy that we haven’t really tackled this yet (well, we sorta did it here I guess, but this mirror has been naked for the last two years since we moved in).
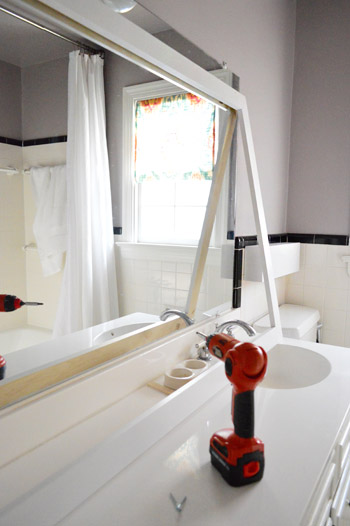
There are companies out there, like Mirror Mate, who can make it super easy for you – but like the true DIY addicts that we are, we opted to try our hand at making this guy from scratch. It seemed like a pretty straight-forward task, despite the challenge of not having much space around our mirror to actually attach anything. But we’ll get to that later…
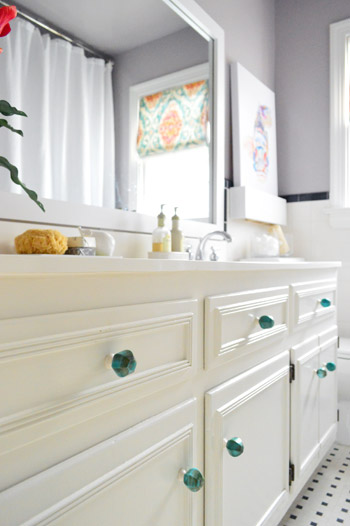
We opted for a super simple frame. After considering some more ornate moldings or window trim, we decided a flat chunky piece of wood would be best (and it’d match the chunky shelf nearby without competing too much with other more interesting items like our patterned window shade or the new vanity knobs). So first we picked up some 1 x 3″ pieces of pine in the lengths that we needed (I believe our total cost was $14). I was too distracted by the cutie in the cart to save my receipt.

I used my miter saw to cut my corners on an angle, but if you are miter-saw-less you can also do a simpler frame that’s kind of like this chalkboard frame that we built instead.
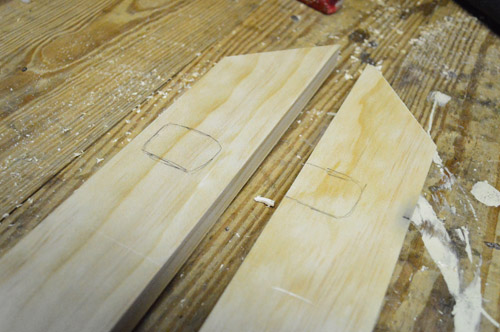
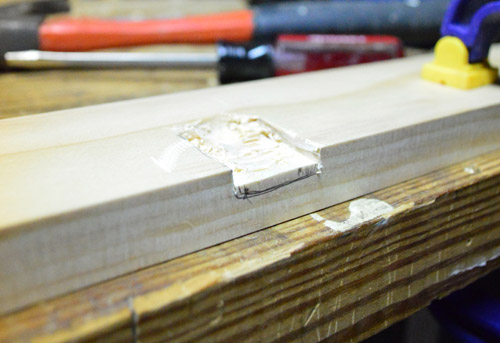
Another challenge of this project was to make the frame rest over the plastic clips that hold the mirror to the wall. No challenge that a little routing couldn’t handle, right? So first I marked where I need to notch out the wood so that the clips would rest inside and the wood could lay flush against the mirror. I decided to be generous with my notches so I’d have some wiggle room when placing the mirror, which is why they’re about twice as tall and twice as wide as the clips themselves.
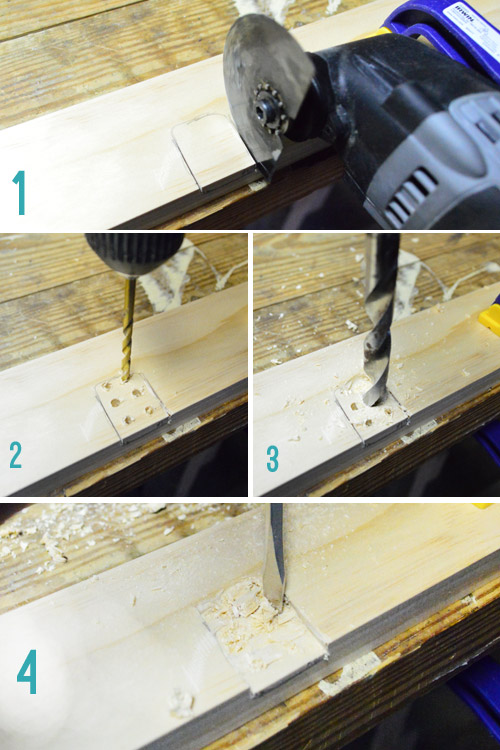
If you rolled your eyes at the word “router” and said “well great, I don’t own no stinkin’ router” – you’re in luck. My router broke so I didn’t have one at my disposal either. So here’s the really simple (but not quite as pretty) way to get those notches:
- I used a Dremel to make small grooves on all sides of my marked notch, just so I’d get a relatively clean edge. This step is TOTALLY OPTIONAL. I only did it because I’m particular. So if you don’t have a router OR a Dremel you’re still ok.
- Use a small drill bit to make some not-too-deep pilot holes, fairly close together (see, if all you have is a drill you’re cool).
- Follow up by going into each pilot hole with a much bigger bit so the holes begin to run into one another.
- Use a flathead screwdriver and hammer to gently chip or pry away any chunks the drill didn’t get.
Again, not the prettiest result. But for a simple shallow notch like this (which won’t be seen by anyone but the plastic clip itself) it does the job. Oh, and this one goes along the bottom of the frame which is why my notch won’t be seen even though it goes all the way to the edge of the wood.
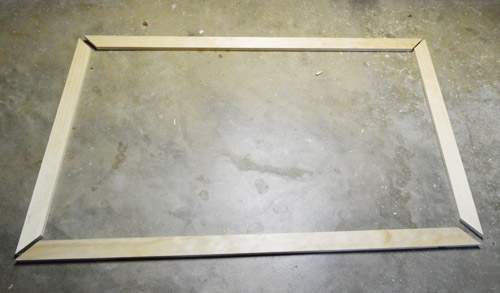
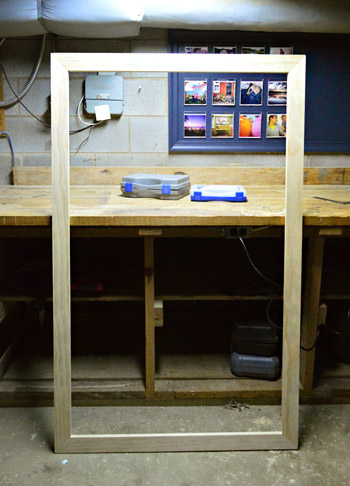
Once all of my notches (four in total) were made, I used my Kreg Jig to make pocket holes and then join my corners together.

And ta-dah, my constructed frame:
Before painting it, we brought it inside to make sure it fit and looked square and everything. This picture below gives you a better sense of how my unpretty notches will fit up against the clips (while still not being visible to anyone once the frame is in place).
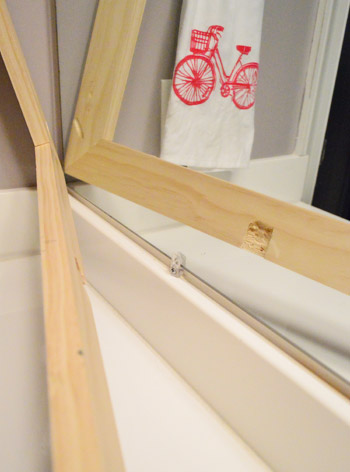
It fits!
Fast forward about a day and I primed and painted the frame white (Decorator’s White by Benjamin Moore in semi-gloss, using a small foam roller for a smooth result). While we were at it, we also painted the previously-grey-washed shelf in the background so everything would match (which Sherry mentioned in this post).
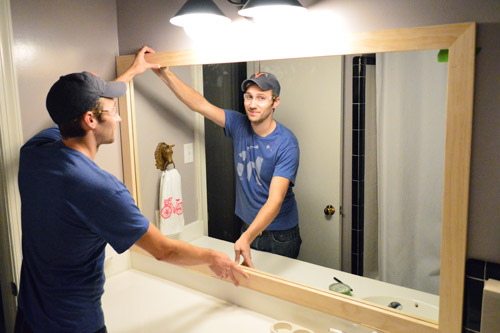
I’ve seen other folks do this project where they simply use some heavy duty caulk or construction adhesive to straight up stick their frame to the mirror itself. But since my last attempt at gluing something to a mirror made me wary of that trick, I wanted to rely on a few strong & secure screws instead. So when we measured and cut our frame we made sure it overlapped the top edge of the mirror (the only edge without a wall, the counter, or some tile in its way). That meant I could drive a couple of screws through the frame and into the wall without being anywhere near the mirror to make sure the frame wouldn’t come crashing down on us. The whole contraption was pretty light, so it didn’t have to be too heavy duty.
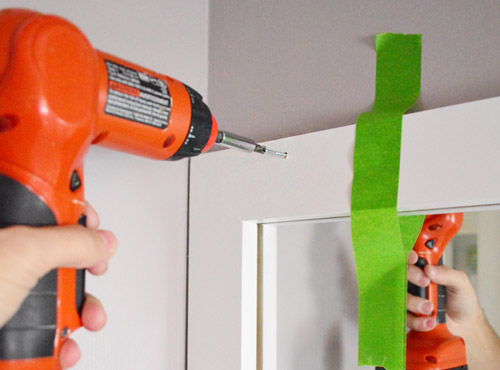
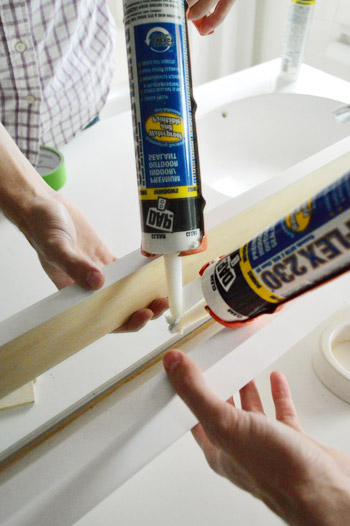
And then just to make sure the bottom of the frame didn’t flap out or anything, we put a couple of dots of silicone caulk between the frame and the mirror just to hold it in place (we taped the frame down along the bottom until the caulk dried so it would hold it firmly for the long haul).
That was a few days ago and we’ve since removed the tape and even given Clara a few baths in there and it’s still holding strong. Whew.
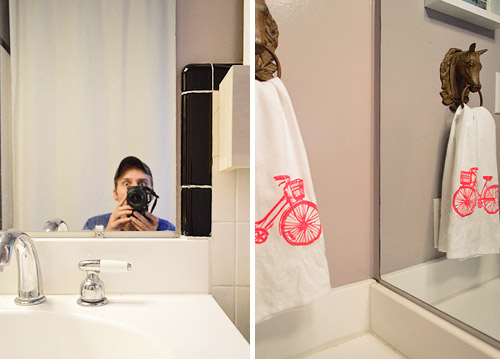
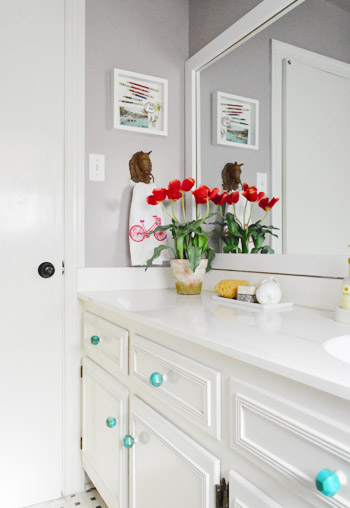
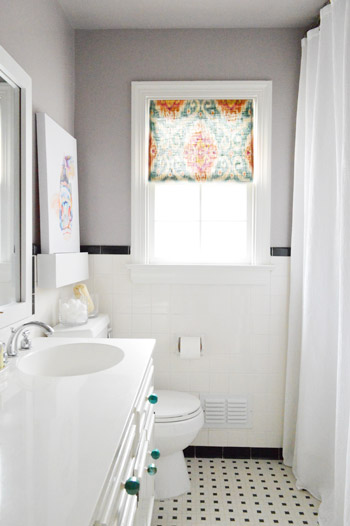
When all was said and done caulked and dried, we just filled those two screw holes with wood putty and painted them so they weren’t obvious. Then it looked a little something like this.
Isn’t it such a cleaner and more finished look than this before-the-frame shot?
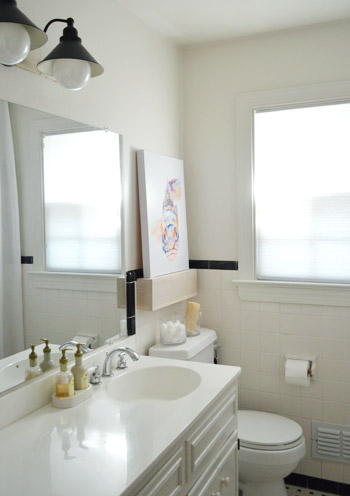
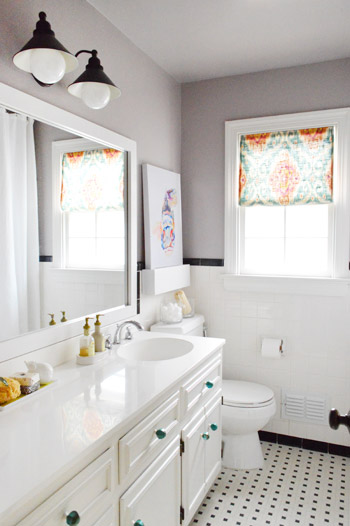
Even for a not-very-fancy frame, we’re pretty darn pleased with how it polished off that big unpolished beast in the room. And weirdly enough, in person it makes the room feel taller since it somehow draws your eye up more than the frameless mirror used to. Which is a nice balanced look since we have an extra tall shower curtain on the other side of the room.
So blammo. New mirror frame for a total of $14 and about three hours of time if you count all the building, chipping out notches, priming, and painting.
And since that officially wraps up the last project on this portion of our bathroom upgrade, shall we do a quick budget breakdown? I think we shall.
The total mini-update came in well under our mental budget of $200 (which is mainly just a random low number that we throw out when we don’t feel like calculating a specific budget and we’re not doing anything major like replacing tile).
- New light fixture: $61 (from Joss & Main)
- Shelf: $6
- Paint (a quart of Elephant Gray by Benjamin Moore): $24
- Fish art: $30 (from Joss & Main)
- Knobs: $17 (from Hobby Lobby)
- Window shade: $16 for yard of the fabric we used from Mary Jo’s (although we only used $8 worth, so Sherry has leftovers)
- Window frosting: $0 (leftover from other project)
- Mirror frame: $14
- Shadowbox: Already made
- Accessories: Already owned
- TOTAL: $168
*(if you didn’t already have a shadowbox, window frosting, and some accessories, you might spend an additional $30-40 for a total of 200-ish beans)
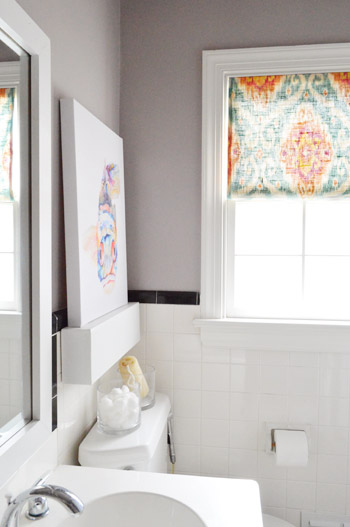
If we had to pick the stars of the room, though, it’d totally be the window fabric paired with the fish art. Both just wake things up and made us feel good about going pretty neutral on everything else.
So there you have it. We can officially close the books on this bathroom for now. Although there’s still another untouched bathroom on the to-do list (I’m talking ’bout you, guest bathroom).
And now, much like The Talking Dead takes a fond look back at each zombie who is killed (please tell me you guys watch that), we shall take a fond look back at the bathroom that greeted us when we moved in back in 2010 (sorry about the bad lighting, Sherry grabbed the picture right as we pulled up in the moving truck before we carried in about five million boxes).
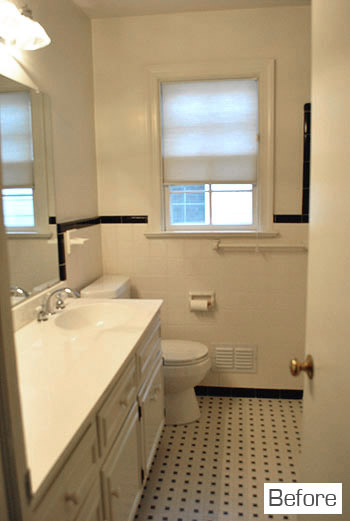
I have to say, I think this room’s $168 upgrade is one of my favorite inexpensive room redos that we’ve done here. Doesn’t the after shot almost feel like it could be a completely new bathroom even though we worked with the original 1960’s tile?
What under-$200 upgrades are you guys doing around the house? Is anyone else making mirror frames or floating shelves or other semi-straightforward projects for the loo? Sidenote: I think Sherry’s favorite line in our entire book was “who doesn’t enjoy a gussied loo?.” So there you have it, a window into my quirky wife’s soul and a post about framing our bathroom mirror.
Update – Wanna know where we got something in our house or what paint colors we used? Just click on this button:


Jenn says
That frame makes such a difference!
Emily says
We’ve had the wood (baseboards I think actually) to do this to our mirror for like a year now. We’d planned on using screws at the top too but didn’t think about caulking the bottom- seriously great idea. The bathroom looks fantastic!!
heyruthie says
love it.
and now i’m dying for a thin turquoise (or orange? or both?) stripe near (but not ON) the bottom of the white shower curtain. maybe a strip of turqoise ribbon just loosely basted on there, so it’s removeable if/when you change the decor??? That would ring in under $10, and bring some turqoise over to that side.
YoungHouseLove says
That would be fun! I was thinking about dip dying it, but I’m too nervous I’ll ruin it. Maybe I’ll get the guts in a month or two…
xo
s
Karyn says
I am totally gonna (make my husband) do this! I’ve been wanting to change out our mirrors in our new house, but it’s way at the bottom of a long list!
Ami Fleischaker says
I just want to say thank you, thank you, thank you, thank you, thank you!!!! For this post! I have wanted to frame out our mirrors forever and couldn’t figure out how to do it bc “Won’t those stupid clips get in the way?!” And now I know the secret and how easy it is to do! Awesome!!!
YoungHouseLove says
So glad! Good luck Ami!
xo
s
Kelly says
As far as command strips, they can work great for this kind of application – the mirror is already held to the wall and the frame doesn’t weigh all that much. You’ll want to use several all around the frame so it sits flush but I’ve done this with a floating frame around a large, canvas and it worked perfectly.
Kristin says
Shoot John, you need a set of chisels. And my husband needs a Kregs jig. I LOVE this project and you can bet my husband is going to have to read this post because we are doing this in at least 2 bathrooms!
YoungHouseLove says
Maybe Santa will get me and your husband those items in a few weeks. Here’s hoping!
-John
ruben says
John,
you do good work!
:)
Bathroom looks awesome!
p.s. I am really hoping Santa brings me your book :)
keri says
i’ve been waiting for you to post this so I can do it – question, is the frame flush to the edge on the sides and top? if so, what does it look like from the outer-side view – can you post a pic? (as if you were standing next to the toilet looking toward the door, looking down the wall) – can you see that it is a frame over a mirror??
YoungHouseLove says
The frame is larger than the mirror on all sides, so you never see the thin plane of the mirror from the side at all. Just the frame which is very close to the wall since the mirror is so thin. Hope it helps! You can’t tell there’s a frame over the mirror, it looks like the mirror might be inset or something from the side (there’s just no evidence of it if that makes sense).
xo
s
Krystle @ Color Transformed Family says
This is what I have been wanting to do to our mirrors. Right now we are leaning towards Mirror Mate but I might have to reconsider after seeing the low cost of DIYing the whole thing. It really completes the bathroom.
Kerrie says
The previous owners did something similar on the one wall in our dining room. I assume it allowed them to get a huge mirror for relatively cheap and with the molding it looks finished and mirror really makes the room seem so much larger.
Kai says
Great job (as always!) – and perfectly timed for me. I want to do a chunky, West Elm inspired frame for my bathroom mirror and totally stalled out with trying to figure out how to make it flush with the mirror and wall. Thanks for the great tips!
Malisa says
This is serendipitous because I want to do the exact same thing to our mirror and wasn’t sure how to go about framing the bottom of the mirror, which goes all the way down to the tile. Perfect timing for this post!
Michonne says
I love your blog, although I’ve never commented. I just had to comment today because you made the reference to The Walking Dead! I love that show, and I’ve become a bigger fan since they introduced a character with my name!! It’s awesome. (Although I pronounce mine differently, it’s still amazing because my name is so unusual.)
And your mirror frame looks fantastic. I love everything you guys do! Keep up the great work!
YoungHouseLove says
Ohemgee, Michonne is the coolest bada$$ with a sword ever. I’m in love with her.
xo
s
Chris from VA Beach says
I am so happy you showed how you chiseled out the space for the plastic holders. My husband and I have been wanting to do this to our master bathroom mirror for so long and that was the part that was holding us back. We may just give it a shot now, THANKS!
YoungHouseLove says
Sure! Good luck Chris!
-John
Madonna says
I created my own mirror “frame” using glass tiles (think kitchen backsplash size) and silicone glue. Worked like a charm and gave me a lot of color options.
John the “In Memorium” segment of Talking Dead is a highlight of the show. I love me some Chris Hardwick!
YoungHouseLove says
Ooh that glass tile frame sounds awesome! And Chris Hardwick = hilarious 4 eva.
xo
s
Mary H says
Good job!
ummm Walking Dead? OF COURSE!
Maria @ Inspiration Affirmation says
This looks amazing — it totally looks like a new room. I love how bright everything is in there now, and the little pops of color make it so happy. I’m really glad you kept with the original tile, too — it’s so cool and has awesome character. I love it!
Lynn @ Our Useful Hands says
Yeah John you totally lost that race to the finish between this project and Sherry’s. :) I finally cut all of our border pieces for our chalkboard in the kitchen and we went to put them up against the chalkpainted wall and guess what? The edges scratched the chalk paint in a few places. And then after conditioning it, some of the chalk still pulls up some of the paint in a few spots. Arrgh!! Has this happened to you? I love the frame for the mirror. It makes the room look more inviting and warm. More hotel less hostel… (not saying that it looked like a hostel. That came out wrong?…ay, ay, ay….What a mess…) :D
My best, Lynn
YoungHouseLove says
Oh no! That didn’t happen to us. Did you use the same chalkboard paint? Was it new? Freshly shaken? If it was old or not shaken well maybe that’s why? Not sure!
xo
s
Lynn @ Our Useful Hands says
True story. I bought the paint like 2 years ago (*for the house I will someday have!*) like a maniac (lol) and then used it for the first time for this project a month ago. It’s Krylon Indoor Chalkboard Paint. What kind did you use? Nevermind. I’ll look it up. I know you were just thinking “Hello? Archives? Ever heard of it?”
My best, Lynn
YoungHouseLove says
Haha, no worries Lynn! Good luck!
xo
s
Koliti says
HaHa! Love how you totally McGyvered the “well-great-I-don’t-own-no-stinkin’-router” chisel-effect!
This is something that I’ve fondly thought of doing to my master bath mirror. But I have to figure out how to allow for the “who-were-the-drunken-fools-who-didn’t-have-any-sqaure-or-plumb-skills-when-they-constructed-my-house” factor. My mirror is between a wall on the right and a tall cabinet on the left.
I think your “chalkboard frame” approach would be best in my situation. And then I have to figure out how to cut off an angled portion on the left side of the frame – I don’t have a circular saw, hmmm. But hey, well-great-I-don’t-own-no-stinkin’-Kreg-jig” either!
Love your bathroom update – very refreshing with a touch of FUN! The pic of Clara & John at Home Depot = HAPPINESS! (or TROUBLE!)
Nicole {Life's Tidbits} says
That small changes makes such a big difference in the look/feel of the bathroom. I love the framing on the mirror! Bathroom looks great!!
Rachel says
Firstly, the bathroom looks great.
Secondly, my hubs and I are superfans of TWD and are so grateful for TTD because we are always all white knuckled and shakey after each episode and need Chris Hardwick to help us calm the BEEEP down! Whew.
How will we survive ’till February???
YoungHouseLove says
I know, right?!
xo
s
Ashley says
It looks ah-mazing!! This has been on our to-do list for ever, and now that yours is right in front of me it’s that much more motivation to get-er-done!
P.S.I just picked up your book today and love it :D Right off the bat I noticed I have the same 005 bar cart!! I penny tiled the top just last week. When I get a chance ill share it on today’s post:)
Ashley says
P.s.s. <3 The Walking Dead and Talking Dead !!
YoungHouseLove says
Love that! Can’t wait to see it!
xo
s
Megan L says
Amazing as usual! You guys rock.
Callie says
You guys, thanks for such a GREAT tutorial!! I did our mirror a while ago, but could. not. figure out how to work around the clips. (My husband was similarly v. dubious of putting up a mirror with only glue.) I ended up putting extra molding around the edge to bump out the wood enough to go over the clips, but then my glue job on the molding didn’t work so well and now we have little nails holding up the trim all the way around the edge. Haha. I’m totally reinspired to go back and fix it in my bathroom with your great tip about chiseling out spots for the clips!!
Ryan says
Doing your own framing for the first time can be tough at first but once or twice through and you should be good to go. It saves a TON of money!
Elizabeth says
The mirror (and the bathroom) looks great!!! A fun trick I’ve learned when framing mirrors, paint the back side of the frame black so you don’t see the reflection of the back of the frame in the mirror.
YoungHouseLove says
Great tip!
xo
s
Jenna Sue says
Nice writeup guys. I’ve never really found a mirror frame tutorial that felt super easy to me but this one is my favorite and I’m bookmarking it in case I need to use it in the future. I love the clip hiding trick (especially since I only own a drill!). The frame makes such a difference in that room!
Margaret says
Holy Cow, that girls legs are getting loooong!
Ally says
What a timely post – I have three of those bad boys in my house in the bathrooms and they need some love. The white frame is simple, but it looks fantastic!
PS – I somehow JUST found your blog like a month ago (apparently I’ve been living under a rock?) and literally just finished reading every.single.post. You guys are inspirational! Thanks for keeping it real!
YoungHouseLove says
Aw thanks so much Ally! So glad you found us!
xo
s
Selina@CreativeJuicesDecor says
That is CRAZY what a difference it makes. I did it the wimpy non DIYer way and bought a really long large mirror at Ross….at least I did it the “less expensive” way then paying extra when they were building our house! (at least I hope it was less!) oh and I did hang it with my hubby- that is a good DIYer :-)
http://www.creativejuicesdecor.com/2012/07/our-tuscan-themed-master-bathroom.html
YoungHouseLove says
That’s awesome! What a great find from Ross!
xo
s
John @ Our Home from Scratch says
Looks brilliant!! “I don’t own no stinkin’ router”
Please tell me you’ve seen UHF.. “Badgers? We don’t need no stinking badgers!”
YoungHouseLove says
Haha, actually I haven’t – but I think I need to add it to the to-do list. Sounds intriguing. Who doesn’t like badgers?
-John
Jen says
Ooo, good timing! We’re about to do this in our powder room, and I must confess that it’s always so much easier after you two do it before we go for it. ;) Thanks for posting!
Heather says
Thank you, thank you, THANK YOU!!! I was just brainstorming stuff we want to do around the house, and I mentioned to my Mister that I had seen you guys and some other folks talking about framing out the mirror. We have a similarly-sized and -shaped mirror in our bathroom, with a similar amount (lack) of space around it, and I was so looking forward to seeing how you made it work. Unfortunately it’s pointless to do before we sand and re-stain or paint the wooden vanity, and of course the walls, but at least I know when we get there it will be do-able. Huzzah!
Kaitie says
That looks great! I was skeptical of the fabric with the wall colour, but with the fish painting to tie it together, it looks fantastic. I’m doing an itty bitty freshening up of my itty bitty bathroom within the next couple of weeks, your projects definitely help me feel inspired. :)
Maya says
What if you just painted, say, the raised parts of the vanity a dark gray? I think the vanity looks a little builder-basic and would be awesome gussied up a bit. The room as a whole looks wonderful– amazing what adding the frame accomplishes!
YoungHouseLove says
We thought about that but with the checkered floor and the busy fabric on the windows as well as the bright art we thought it might be too “compete-y” with that stuff, so leaving the vanity white like the tile around the perimeter of the room was a nice balanced/neutral look.
xo
s
drew says
John…..spend a few dollars and buy a good old fashioned wood chisel.
YoungHouseLove says
Hoping Santa will bring me one…
-John
Shelly says
We did this in every bath in our house a couple of years ago, and the neighbors as well. One is a standard frame and the other two are a little more fancy. In the powder room one my husband incorporated the lights and crown molding. Everyone who visits is amazed at what we’ve done with a builder mirror. Lots of bang for little buck!
Holly says
I’m so glad you posted this! We have 2 bathrooms with the contractor mirrors and I’ve been wanting to fix them forever! And we don’t have a router, so I’m glad you did it without one (sorry yours is busted though!)
Ashlee says
The mirror looks great! I want to get my husband a Kreg Jig for Christmas so we can start making things! Do you have the regular one or the “master system”? Do you recommend one over the other? Thanks!
YoungHouseLove says
We just have the regular one and we got a few clamps and the special screws. That system has worked for a few years – we love it!
xo
s
Ashlee says
Thanks for responding! I am so excited to get it for him!
Amanda B says
I feel so proud, we did almost the exact same project a few months ago! Built our frame out of the same 1×3, but stained it dark instead of painting, and I love the slightly-aged look in my cream-and-tan bathroom. We don’t have a mitre saw, so it took a little more time getting the corners to fit well (we cut with a mitre box and hand saw), but we used the Dremel method (with a chisel) to cut recesses in the back for the mirror clips.
We actually mounted ours with those sliding metal clips, attached to the back of the frame. They slide over the edges of the mirror on the top and sides, so the frame is totally removable if future DIYers want to switch it out.
YoungHouseLove says
That’s awesome Amanda!
xo
s
Angie says
I have been wanting to frame my mirror for a while now but I can’t decide what color. The mirror is next to a large window that has chunky white trim. The cabinetry below is a very dark wood. Would the frame look better white to match the window or dark to match the cabinetry?
YoungHouseLove says
Hmm, sounds like you can’t go wrong either way, so if you love contrast go dark and if you want it to just fit in and have art or other accessories and fabrics be the star than I’d go white :)
xo
s
Dana says
Looks so great! I did the same thing to my mirror last year and it made such a difference.
(Actually, in my excitement at your DC signing last week, I forgot to mention it, but I had you sign a piece of scrap wood that I used for that exact project!)
YoungHouseLove says
No way! That was so much fun!
xo
s
bethany bryant says
A picture framer’s tip: Color the lip of the frame with black marker so the mirror doesn’t reflect the color of the wood!
YoungHouseLove says
Great tip!
xo,
s
Chris says
AMAZING! I mean really…the difference that frame makes is just incredible. And the whole room is night and day with just those couple little changes! Awesome job.
Bonnie @ the pin junkie says
I’ve been wanting to frame my bathroom mirror like this. I wish I was good with tools!
Vs says
Thanks for the great post! I’ve been waiting to do our mirrors, which should be fairly striaghtforward because they don’t have clips. I love the white frame with the white vanity, but unfortunately my vanity is wood with a granite countertop. D’you reckon you can mix and match the frame and vanity? Just curious about your opinion. Loved the tutorial!
YoungHouseLove says
Oh yes, if you have white trim (around doorways and windows for example) it might tie right into that! Or you can go with the same wood tone as the vanity or even pick a tone out of the granite top (like charcoal if that’s in there). Hope it helps!
xo
s
June says
My dear hubby would love a Dremel for Christmas. What kind do you recommend?
YoungHouseLove says
Hmm, we like the Dremel MultiMax. Anyone else have one to recommend? There are tons of them! The Dremel Trio didn’t do much for us.
xo
s
June says
You two should write a post about tools. Which ones you like and why.
YoungHouseLove says
Done! Here ya go: https://www.younghouselove.com/2011/12/a-handy-little-holiday-gift-list/
xo
s
katie says
one of the best diy mirror frame blog posts i’ve read! one question: how did you attach the top to the wall without making it jut out at the bottom?
YoungHouseLove says
We just used those two screws at the top to hold it in place as close to the wall as possible (since the mirror is so thin and we routed out the back for the clips it sits very close). Then we just used silicone caulk on the bottom (which we taped down until it dried) to hold that in. Hope it helps!
xo
s