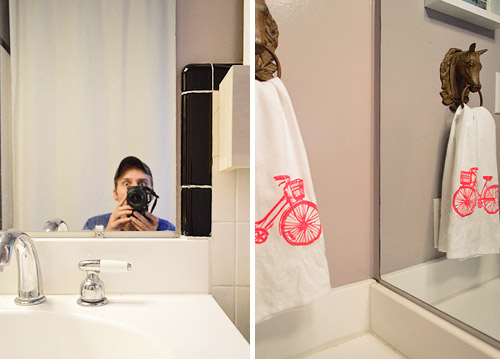
But first, who framed Roger Rabbit? I dunno. I can’t remember how that movie ended. But as for who framed out our hall bathroom mirror? We did.

Putting a dressed up frame around a plain builder mirror is one of the easiest ways to upgrade a bathroom, especially if you’re working with the tile and not doing a total gut job (which we thankfully are in this room since the classic b&w tile is in great shape). It’s actually kind of crazy that we haven’t really tackled this yet (well, we sorta did it here I guess, but this mirror has been naked for the last two years since we moved in).
There are companies out there, like Mirror Mate, who can make it super easy for you – but like the true DIY addicts that we are, we opted to try our hand at making this guy from scratch. It seemed like a pretty straight-forward task, despite the challenge of not having much space around our mirror to actually attach anything. But we’ll get to that later…
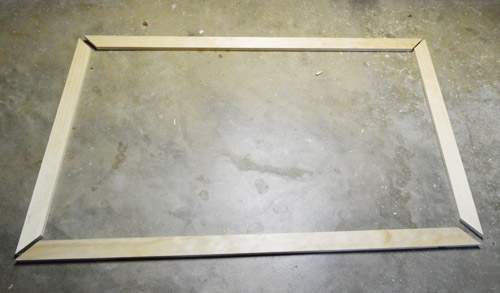
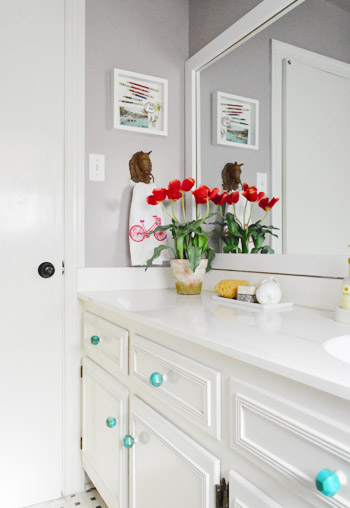
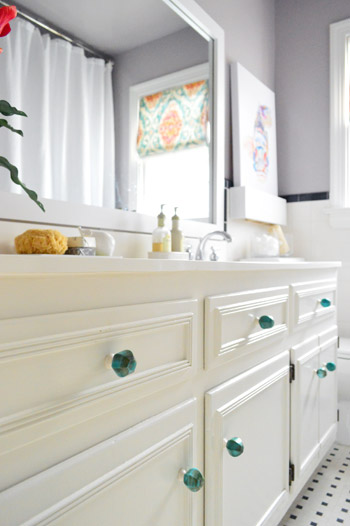
We opted for a super simple frame. After considering some more ornate moldings or window trim, we decided a flat chunky piece of wood would be best (and it’d match the chunky shelf nearby without competing too much with other more interesting items like our patterned window shade or the new vanity knobs). So first we picked up some 1 x 3″ pieces of pine in the lengths that we needed (I believe our total cost was $14). I was too distracted by the cutie in the cart to save my receipt.

I used my miter saw to cut my corners on an angle, but if you are miter-saw-less you can also do a simpler frame that’s kind of like this chalkboard frame that we built instead.
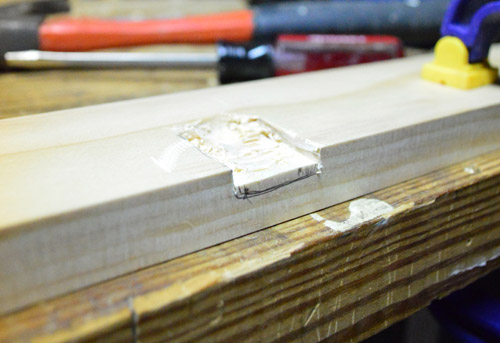
Another challenge of this project was to make the frame rest over the plastic clips that hold the mirror to the wall. No challenge that a little routing couldn’t handle, right? So first I marked where I need to notch out the wood so that the clips would rest inside and the wood could lay flush against the mirror. I decided to be generous with my notches so I’d have some wiggle room when placing the mirror, which is why they’re about twice as tall and twice as wide as the clips themselves.
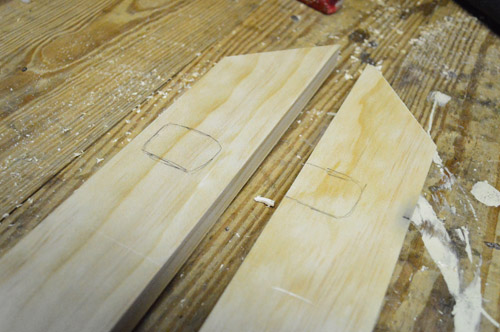
If you rolled your eyes at the word “router” and said “well great, I don’t own no stinkin’ router” – you’re in luck. My router broke so I didn’t have one at my disposal either. So here’s the really simple (but not quite as pretty) way to get those notches:
- I used a Dremel to make small grooves on all sides of my marked notch, just so I’d get a relatively clean edge. This step is TOTALLY OPTIONAL. I only did it because I’m particular. So if you don’t have a router OR a Dremel you’re still ok.
- Use a small drill bit to make some not-too-deep pilot holes, fairly close together (see, if all you have is a drill you’re cool).
- Follow up by going into each pilot hole with a much bigger bit so the holes begin to run into one another.
- Use a flathead screwdriver and hammer to gently chip or pry away any chunks the drill didn’t get.
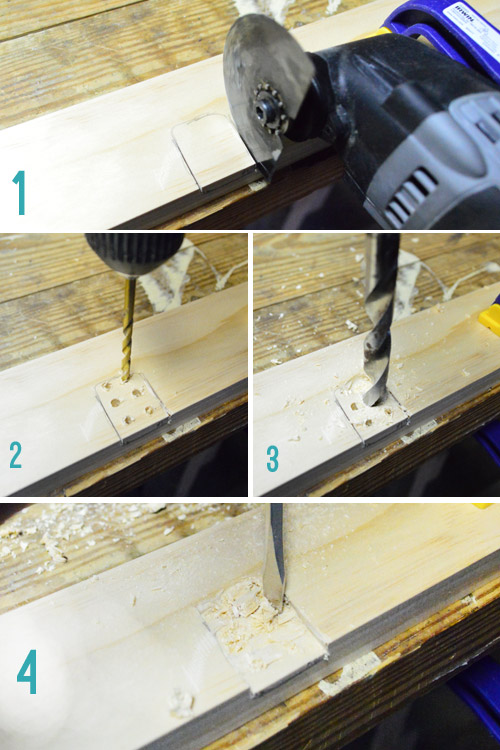
Again, not the prettiest result. But for a simple shallow notch like this (which won’t be seen by anyone but the plastic clip itself) it does the job. Oh, and this one goes along the bottom of the frame which is why my notch won’t be seen even though it goes all the way to the edge of the wood.
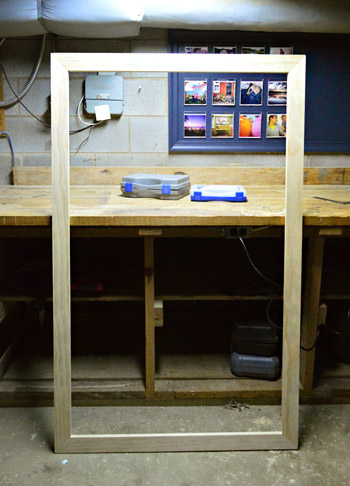
Once all of my notches (four in total) were made, I used my Kreg Jig to make pocket holes and then join my corners together.

And ta-dah, my constructed frame:
Before painting it, we brought it inside to make sure it fit and looked square and everything. This picture below gives you a better sense of how my unpretty notches will fit up against the clips (while still not being visible to anyone once the frame is in place).
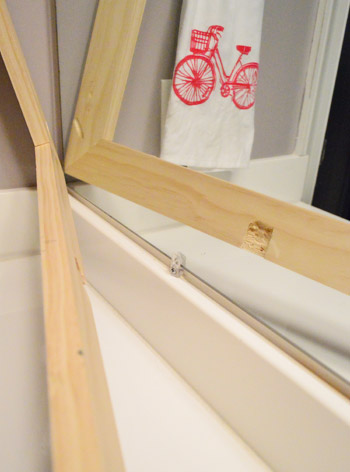
It fits!
Fast forward about a day and I primed and painted the frame white (Decorator’s White by Benjamin Moore in semi-gloss, using a small foam roller for a smooth result). While we were at it, we also painted the previously-grey-washed shelf in the background so everything would match (which Sherry mentioned in this post).
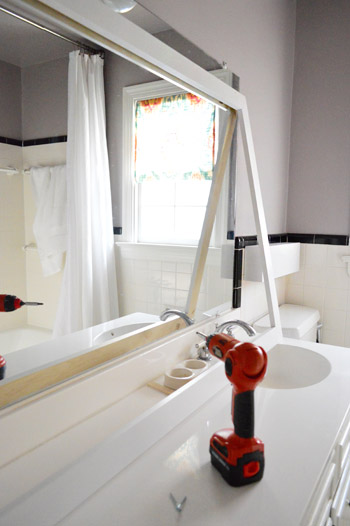
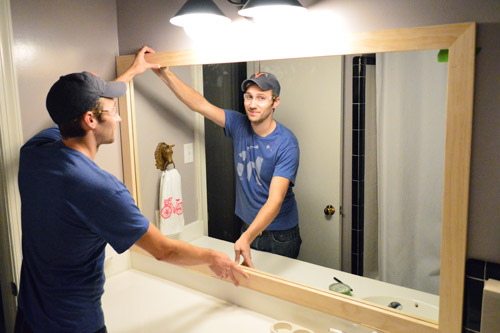
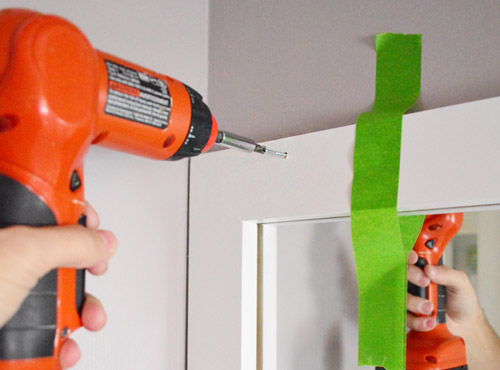
I’ve seen other folks do this project where they simply use some heavy duty caulk or construction adhesive to straight up stick their frame to the mirror itself. But since my last attempt at gluing something to a mirror made me wary of that trick, I wanted to rely on a few strong & secure screws instead. So when we measured and cut our frame we made sure it overlapped the top edge of the mirror (the only edge without a wall, the counter, or some tile in its way). That meant I could drive a couple of screws through the frame and into the wall without being anywhere near the mirror to make sure the frame wouldn’t come crashing down on us. The whole contraption was pretty light, so it didn’t have to be too heavy duty.
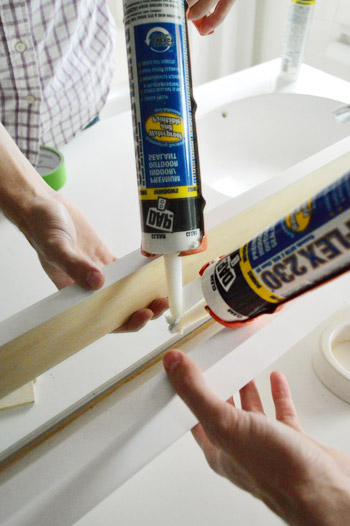
And then just to make sure the bottom of the frame didn’t flap out or anything, we put a couple of dots of silicone caulk between the frame and the mirror just to hold it in place (we taped the frame down along the bottom until the caulk dried so it would hold it firmly for the long haul).
That was a few days ago and we’ve since removed the tape and even given Clara a few baths in there and it’s still holding strong. Whew.
When all was said and done caulked and dried, we just filled those two screw holes with wood putty and painted them so they weren’t obvious. Then it looked a little something like this.
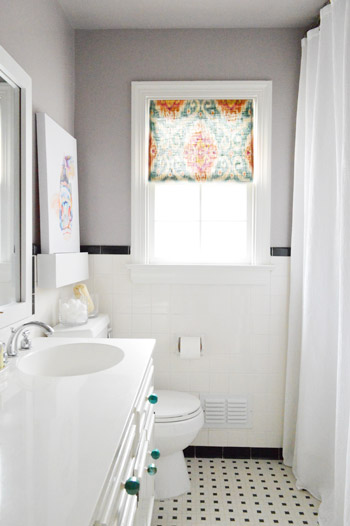
Isn’t it such a cleaner and more finished look than this before-the-frame shot?
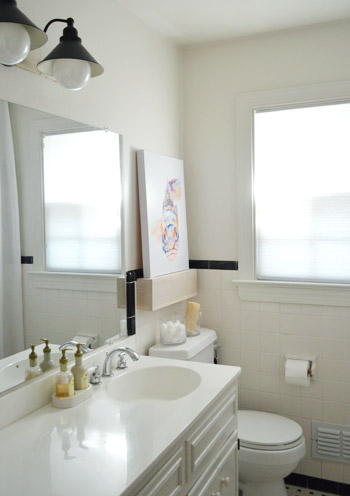
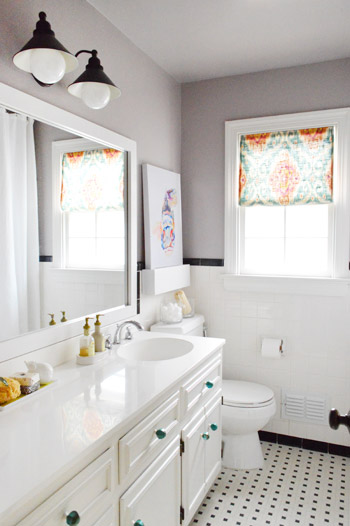
Even for a not-very-fancy frame, we’re pretty darn pleased with how it polished off that big unpolished beast in the room. And weirdly enough, in person it makes the room feel taller since it somehow draws your eye up more than the frameless mirror used to. Which is a nice balanced look since we have an extra tall shower curtain on the other side of the room.
So blammo. New mirror frame for a total of $14 and about three hours of time if you count all the building, chipping out notches, priming, and painting.
And since that officially wraps up the last project on this portion of our bathroom upgrade, shall we do a quick budget breakdown? I think we shall.
The total mini-update came in well under our mental budget of $200 (which is mainly just a random low number that we throw out when we don’t feel like calculating a specific budget and we’re not doing anything major like replacing tile).
- New light fixture: $61 (from Joss & Main)
- Shelf: $6
- Paint (a quart of Elephant Gray by Benjamin Moore): $24
- Fish art: $30 (from Joss & Main)
- Knobs: $17 (from Hobby Lobby)
- Window shade: $16 for yard of the fabric we used from Mary Jo’s (although we only used $8 worth, so Sherry has leftovers)
- Window frosting: $0 (leftover from other project)
- Mirror frame: $14
- Shadowbox: Already made
- Accessories: Already owned
- TOTAL: $168
*(if you didn’t already have a shadowbox, window frosting, and some accessories, you might spend an additional $30-40 for a total of 200-ish beans)
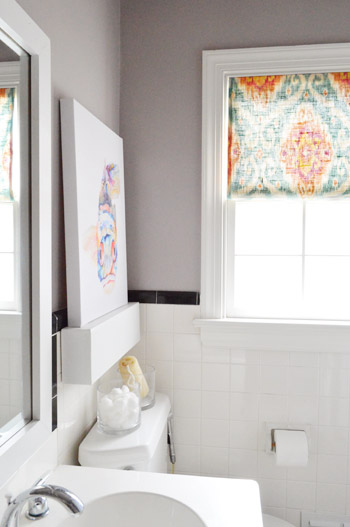
If we had to pick the stars of the room, though, it’d totally be the window fabric paired with the fish art. Both just wake things up and made us feel good about going pretty neutral on everything else.
So there you have it. We can officially close the books on this bathroom for now. Although there’s still another untouched bathroom on the to-do list (I’m talking ’bout you, guest bathroom).
And now, much like The Talking Dead takes a fond look back at each zombie who is killed (please tell me you guys watch that), we shall take a fond look back at the bathroom that greeted us when we moved in back in 2010 (sorry about the bad lighting, Sherry grabbed the picture right as we pulled up in the moving truck before we carried in about five million boxes).
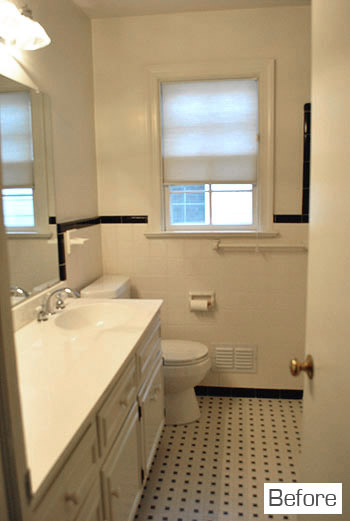
I have to say, I think this room’s $168 upgrade is one of my favorite inexpensive room redos that we’ve done here. Doesn’t the after shot almost feel like it could be a completely new bathroom even though we worked with the original 1960’s tile?
What under-$200 upgrades are you guys doing around the house? Is anyone else making mirror frames or floating shelves or other semi-straightforward projects for the loo? Sidenote: I think Sherry’s favorite line in our entire book was “who doesn’t enjoy a gussied loo?.” So there you have it, a window into my quirky wife’s soul and a post about framing our bathroom mirror.
Update – Wanna know where we got something in our house or what paint colors we used? Just click on this button:


Amanda Villarreal says
What a difference! It looks so great for under $200! Btw did you mean the walking dead? The text reads the talking dead lol. Or maybe since I haven’t watched the show I’m missing the joke?? Hmm…
YoungHouseLove says
There’s actually a talk show after The Walking Dead called The Talking Dead! Haha! So we watch both!
xo
s
Annelies says
This is such a big difference! I think the paint does a lot to make the difference as are the other things that bring in colour such as the curtain and the knobs. Funny that so many people ask about the bath mat as I was wondering too :-) And good that you painted the shelf again, it looks much better now. Good job, again !
YoungHouseLove says
Aw thanks Annelies!
xo
s
Lindsey d. says
Word of warning… Never get rid of that cute Cucina soap holder because ceramic soap/lotion duo with a ceramic base are darn near impossible to find. Cucina apparently doesn’t make that one anymore. I’m actually considering paying $20 to buy a used one on EBay… Ugh…
YoungHouseLove says
Oh no!!! Hope you find one soon!
xo
s
cporoski says
For YEARS, I have been wondering how people framed those mirrors with those little brackets. This is like figuring out the riddle of the Sphinx. Geez. so cleaver.
YoungHouseLove says
Hah! Happy to help.
-John
RLR says
We’ve been in our house nearly 9 years, and the place that needs the most help (the master suite) is – of course – one of the only rooms that hasn’t been touched. The other? The guest room (that has also been a playroom and a storage room and for about 6 months our kids shared a bedroom in there). I would LOVE to frame that mirror (and perhaps the one in the kids’ bathroom) as part of our eventual master suite overhaul – but always wondered how we’d manage without much room for attaching a frame. THANKS for the tips – it can be done! This is getting pinned for sure!
Stephanie H says
Your new bathroom looks great! It’s inspring me to tackle our master bath, although it needs a lot more than what you’ve done here. Sigh.
This week, I painted the hall and bedroom trim a nice bright white (from the faded white/yellow/pukey colour) and changed out all of the old brass door knobs and nasty painted over brass hinges on all the doors in our condo to new brushed nickle ones. It didn’t cost much or take too much effort, but what a difference! I feel like we just moved from the early eighties into the present. Everytime I walk down the hallway, I’m all, “is this still our place?” haha. Funny how little changes make a huge difference!
YoungHouseLove says
Isn’t the “walk by double take” the best?! I love it!
xo
s
Caitlyn says
I saw this today and thought of you all. http://fab.com/sale/12816/product/5833/?hs=395
(Congratulations on the book’s success!)
YoungHouseLove says
Aw thanks Caitlyn! Love it!
xo
s
Emily says
Amazing! I love it…I think this might now be my favorite room in your house!! Great job!
Mary says
I’m wondering about the choice to paint the frame white. With the white tiles, white counter tops, white cabinets, etc… the frame just kind of blends in. It definitely looks better than no frame at all, but it just seems bland in comparison to some of the other things you do. Was there any thought to painting the frame a different color to make it stand out more? Maybe an antiqued silver or a nice ORB?
YoungHouseLove says
We did consider other colors but with the checkered floor, the pops of color in the vanity knob, the colorful art, and the patterned window treatment we wanted the frame to hang back and be nice and classic and neutral so it didn’t compete with the “busier” choices we made in the room. Hope it helps!
xo
s
Amelia R. says
The frame + the whole bathroom look clean and classic. I love the simple updates!
And yes, we watch the Walking Dead + Talking Dead. The past few episodes have been amazingly stressful! Somebody just tell Andrea what’s going on, for pete’s sake!
YoungHouseLove says
Haha! Poor clueless Andrea! I died when she said “I saw them” and then only saw the one guy she wouldn’t recognize! Hahaah!
xo
s
Amelia R. says
I was yelling and waving my hands at the t.v. during that part. It was probably hilarious to watch, but my hubby didn’t mock me for it. Proof he’s a good guy. :)
YoungHouseLove says
Haha, total proof!
xo
s
Ellen says
…and yet again they killed off the token black guy and promptly replaced him with another one. What’s up with that?
Christine says
I am SO sending a link to this page to my husband. A bathroom mirror frame is the #1 hey get on that already project in our house. Ours might have to be different on all four sides, though— the top goes against a light fixture, the left goes against the wall, the bottom goes against a long metal clip thing that runs the length of the mirror, and the right side is just… plain. Any hints? Were all your sides different?
YoungHouseLove says
Ours butted up against tile on one side and the backsplash of the vanity on the bottom, so we just measured the borders to be sure it would fit in there and double checked again before we painted and hung it! Wasn’t too bad!
xo
s
Heidi P. says
HALLELUJAH! John, there are no words. Picture me on my knees, raising and lowering my arms in speechless gratitude.
YoungHouseLove says
Haha, thanks Heidi!
-John
Danny @ House and Ten says
Yes, we’ve got two big mirrors we plan to frame out; one 4′ and one 5′. I don’t have a Kreg, so I think I’ll try those flat metal fasteners and we’ll probably nail it to the wall. Does the gap between the trim and the wall look weird or did you just take the trim to the edge of the mirror and not past it? I was thinking about chiseling a ledge so the trim would sit closer to the wall.
YoungHouseLove says
Our frame edge sits past the mirror on all sides and the mirror is crazy thing so it basically looks like it’s touching the wall on all sides. Hope it helps!
xo
s
Sarah says
What an amazing difference! I love how this turned out & the budget is pretty good too!
Sarah
foobella designs says
Love it. I don’t know what it is about bathroom makeovers, but I love them so much and they have the biggest impact!
All me to be contrary on one thing, though. I keep looking at the fishy picture and just want to see it hung on the wall above (and I like someone’s post above about painting the sides of the canvas) and then you’d have room to put some other cuteness on the shelf. See, I’d totally be knocking that fishy picture over with it leaning like that. I am just a klutz. ;)
foobella designs says
d’oh! “Allow” me, not “All” me.
YoungHouseLove says
Haha, I knew what you meant ;)
xo
s
YoungHouseLove says
Haha, surprisingly we haven’t knocked the fish yet! I worry that things on the shelf would get knocked over (and a light canvas is probably the safest thing there- haha!). We haven’t even bumped the shelf yet though, so who knows where we’ll end up (it’s shallower than the toilet tank so we’d really have to lean back!). It also matches the height of the mirror so if we hung it on the wall it would ride high on that side. But who knows where we’ll end up!
xo
s
foobella designs says
First, You don’t have a reply button under your replies, so if this reply ends up above your replies, then this will be weird reading for others. That all made sense, right?
Second, in reply to your reply, I get ya. I didn’t even think of little cute things falling, which would not be good to have little cute things fall into the toilet. But, in regard to the fishy, I would just have to enter the room and it somehow would fall over. I have that kind of power. ;)
YoungHouseLove says
Oh yes, for some reason this plug in makes you click “reply” to the original comment but it’ll nest your comment under the original one where you intend for it to pop up! and hilarious about your fishy-dropping power. I somehow can make things fall off shelves when I’m across the room- seriously, I’ll walk in and bam, a crashing sound in the opposite corner :)
xo
s
Tamara says
It really looks great!
I wish we were so lucky about tile in our 60’s house (in New England). Seriously, who thought that blue and white floor tile, a blue tub, and a blue toilet (since replaced with beige) went with beige wall tile with gold flecks and a beige sink/countertop?!
Mary @ Ms Redo says
I am sending my husband to this blog the minute he walks through the door tonight – I have four, count ’em four, mirrors in two bathrooms just awaiting such framing. Thanks for the tutorial!
YoungHouseLove says
Haha, good luck!
xo
s
Carli says
Wow! What a difference that frame makes! Love this. And for such an affordable little mini reno budget!
JennCfrGA says
I love how you somehow mentioned The Walking/Talking Dead in your diy posts :) Oh, and yes, I do watch Talking Dead too. Gosh, did you see when IronE was on it after he was killed off the show? Man, I got all teary-eyed…haha! btw, The Walking Dead is filmed in my town and county too! I saw Norman Reedus and the lady that plays Maggie in our local Target! At the time, I didn’t know who they were though…
YoungHouseLove says
Yes, he was the best! Only surpassed by Shane in my mind (he’s the most missed character for me, and I was actually happy when Lori was gone – even though that sounds terrible her character always put everyone in danger all the time). And that’s amazing that you saw Maggie at Target. I would have LOST MY MIND.
xo
s
{plum} says
love it! one other easy upgrade might be a stainless/vintage grate on the wall. Resto Hardware or Van Dyke’s have lots!
what a nice little bathroom
YoungHouseLove says
Love that idea!
xo
s
Mia says
Such a big improvement over the “before”! Glad you kept the vintage tile intact. It gives your loo a classic but modern character! We’ll be getting on that project as soon as I am home from the hospital! Thanks for the constant inspiration. You guys rock!
YoungHouseLove says
Aw, thanks Mia! Feel better soon!
xo
s
Erin G. says
An article I was reading-you are in it ;)
http://www.slate.com/articles/arts/books/2012/11/best_books_2012_slate_staff_picks_their_favorites.html
YoungHouseLove says
Ahhhhhhh! It’s such a nice write up- we’re so flattered!
xo
s
Amanda S. says
Wow, such a simple move but makes the bathroom look SO much better!!!
Elizabeth says
Love it! Do you think you might hang the fish painting? I think it would look great hung up with some sort of bud vases, rubber duckies( or a striped wooden duckie!) or other meaningful tchotkes on the shelf.
YoungHouseLove says
So far we like the leaning canvas since it’s the same height as the mirror (we worry hanging it above the tile will make it ride awkwardly high in the room) but you never know where we’ll end up!
xo
s
Margee Krebs says
This looks GREAT! Thanks for the inspiration, especially for those of us who don’t have fancy tools. I think I can actually accomplish this! Hope it looks as terrific as yours!
Michelle N says
This looks great!
I’ve wanted to try one of those mirror kits (or DIY) but my mirror is annoying in that it has 3 pieces and are angled! I’ll tackle it one day. I also want to do a backsplash in my kitchen. I’ve been talking about that for a long time too!
heather says
We don’t have a $200 dollar fix, but we did just find out we may be scoring a handmade solid cherry shaker style kitchen for nada. We wanted one so bad, but the cost of cherry alone for hub to build it would be around $10,000. In comes an opportunity (potentially) to disassemble someone else’s they don’t want, with plenty of cabinets to reconfigure in our house the way we want with minimal extra material needed to make it fit our space.
$10,000+ kitchen (just materials, not labor) for free? Keep your fingers crossed.
YoungHouseLove says
Um that is amazing! Fingers are firmly crossed!!
xo
s
Karen T says
Thanks so much! I’ve been waiting to see how you guys did this project, as we have builder boring mirrors in two of our bathrooms. Now we don’t have to figure it out ourselves, we can just follow your instructions! :-)
Wrenaria says
The frame and knobs really bring polish the room. Everything looks great. Good job, guys.
YoungHouseLove says
Thanks Wrenaria!
xo
s
LisaOK says
Is there a slight gap between the wall and the frame at the very top (since the rest of the frame rests on the mirror)? Is there anything you have to do to be careful you don’t drill all the way through the frame?
YoungHouseLove says
There might be a slightly smaller crack where the mirror meets the wall along the top but since no one is taller than the frame to look down on it, it’s completely invisible to anyone in the room. As for drilling into the frame, just go slow and MAKE SURE YOU’RE NOT DRILLING THROUGH THE MIRROR. If you avoid that you’re golden. And use self sinking screws. They’ll sink into the wood but won’t go through (the head stops them).
xo
s
Lauren says
Looks awesome, I am so impressed all of that only cost $168.
Caitlin @ Desert Domicile says
The frame makes the room look so much more polished!
Teresa says
I noticed in your close up pics that your frame needed one more tweak to look completely polished…I only say this because I needed to do the same thing but never got around to it; it always bothers me that you can see the unpainted underside of the frame reflected in the mirror. I quick swipe with the paint around the underneath edge corrects this for those do-it-yourselfers who are a tad OCD…but then again, aren’t we all?!
YoungHouseLove says
Oddly enough once we screwed it in it’s super close to the mirror (and some of the paint got around the back edge, which is really blonde wood anyway) so you don’t see any wood grain in that small reflection/crack (it actually looks painted). But in some of the install pics it’s not secured yet so it’s not as tight, so you see some wood. That’s a great tip for anyone working with darker wood or who can’t get the frame so tight on the mirror that wood shows in the reflection though!
xo
s
Megan B says
I’m not sure my husband will become a fan of your blog because I’m now adding this project to his to-do list.
YoungHouseLove says
Haha, John is constantly apologizing to husbands at book events. It’s kind of hilarious.
xo
s
Jen says
Looks great! Big improvement for such a small budget. I’ve just added this project to the hubs honey-do list.
Chelsea @ Chelsea Eats Treats says
Did you guys wind up painting the door knob?
YoungHouseLove says
We photoshopped that last week since the brass bugged me like crazy in the pics (and I called it out there) but stay tuned in the next few days for a hardware makeover post!
xo
s
wendy says
Love it!! I’ve been wanting to frame up my bathroom mirror, but couldn’t figure out how to work around the plastic clips. Can’t believe I didn’t think of just carving out a hole for them. Duh!
You’re so clever!
kc says
looks great!
and *thank you* for fewer hashtags in your posts! #toomuchofagoodthing)
Kim W Rily says
Oh, man. Now I’m gonna have to do this for our bathroom! (And maybe some new paint too. And I know hubs is going to want to redo the floor.) Hmm… maybe after Christmas.
Cathleen Pearson says
Ah, great job John! We did the same thing to our mirror! http://www.peahenpad.com/2011/11/framing-existing-bathroom-mirror.html
YoungHouseLove says
That looks great.
-John
Cara says
Wow! The bathroom looks great! The frame makes such a difference. I really love the pop of color with the black and white.
And the last episode of the walking dead was intense. I hate that it won’t be on until february.
YoungHouseLove says
I know, right?! Way to leave us hanging like the mayor’s eyeball.
xo
s
Cara says
I know, that was crazy. They are completely setting them up too, the Governor acting like he is turning on Merle. He is just trying to get him into the prison! Should be interesting.
YoungHouseLove says
Oh man I can’t wait! I didn’t realize until watching The Talking Dead that by Michone returning (and doing what she did to Penny) make Merle look like a huge traitor since he said they killed her. So maybe the Governor can’t trust him?! So excited to see how it plays out.
xo
s
Cara says
Oh wow! I completely forgot about him saying that about Michon! I need to start watching the Talking Dead too!
YoungHouseLove says
Yes, it totally fills in the gaps! I feel like it’s an “advanced class” after watching it! HAha.
xo
s
Beth A. says
I love it! Serene and cheerful at the same time.
Kristen @ LoveK says
The bathroom looks great!! I have question about the mirror frame. If for some reason you wanted to remove it later on, would the caulk allow for that?
YoungHouseLove says
Yup, just unscrew the two screws at the top, hinge the frame back since it’s freed up at the top, and this will expose the caulk which can be cut with an exacto and then peeled off the mirror!
xo
s
Marcie says
I can’t believe how well you made the existing tile, etc work. It looks like you picked the tile to go in there. It looks awesome!
Where did you find your extra-long shower curtain and liner? I’ve been wanting a master bath reno for awhile but looks like it is going to pushed off a ways further. A longer shower curtain may help tie me over (and keep me warmer) until the reno in a few years.
Thanks.
YoungHouseLove says
Those were from amazon.com! Hope it helps.
xo
s
amelia says
This looks great! Framing a bathroom mirror has been on my to-do list for a while, so I’ve been waiting for this post :)
Question – I’m having trouble telling from the photos whether the frame is about flush with the backsplash (on the axis coming out from the wall)..? My backsplash is fairly thin and very close to the bottom of the mirror. I don’t know if it will look funny with the mirror frame sticking out a lot farther, overhanging the backsplash, or if I should try to find thin enough wood / trim to make it about flush.
Thanks!
ps. Walking Dead has been sooo intense lately!
YoungHouseLove says
Good question! It’s almost the exact thickness of the backsplash but maybe an eighth of an inch thicker? It fits right in so it doesn’t look like an overbite or anything. I had to actually get up from the computer to stare at it because I didn’t even remember what it looked like- so it definitely doesn’t shout “bad overlap” or anything! Hope it helps!
xo
s
Carla says
I love the simple frame. It looks very clean and fresh. Your roman blind gave me the idea of converting some thrift store denim curtains I bought a few months ago into insulating blinds. Mine would need to be functional. I bought the heavy weight curtains (four tabbed panels) for a total of $12. Somewhere someone used frog tape and a diluted bleach solution in a spray bottle and custom “printed” pillow fabric. I might do the same with this material.
Anyway, I do have a question for you. I’m working on my website and can’t decide which plugin to use for recent posts (small images with post titles at the bottom of each post) and for social media below that. Since your website always displays well (no glitches whatsoever), I thought I would ask for a recommendation on a Wordpress plugin. I’d be so grateful!
Thanks!
YoungHouseLove says
Thanks Carla! We use NRelate to serve those related posts (four of them link within our site and the last one goes to another site as some sort of sharing program). Hope it helps!
xo
s
Gretchen says
Great job! I can’t wait to try this in our master bathroom.
Also wanted to ask if there is any update on when the NYC book event will be rescheduled… and are there any other NY metro area events in the works??
YoungHouseLove says
We’re still waiting on that to be finalized! The second they finalize it we’ll share it!
xo
s
Ashley @ Yeah. We Bake. says
Oh my goodness! I’m seriously blown away by how much difference framing out your mirror made. The paint color was gorgeous before but now, WOW. I’m so in love.
xo,
Ashley
Gabby says
Jessica Rabbit – ‘I’m not bad, I’m just drawn that way’. Love that movie!
Okay first, that pic of Clara and John made me go back and watch the video of Clara working on her Halloween pumpkin where she mentions going to Home Depot. Second, you have GOT to get her that little Home Depot apron. It will be an adorable overload! Third, I love how the bathroom turned out. It’s so clean and fresh looking and looks way bigger than before. The pops of color are just perfect.(And I agree that the shelf looks better painted white) :) Great job guys!
YoungHouseLove says
Agreed! She totally needs an HD apron for Christmas!
xo
s
Tirsa says
Thanks sooo much for this post! Framing the mirror in the kids bathroom is at the top of my to-do list. This is so helpful. Love how your bathroom turned out too.