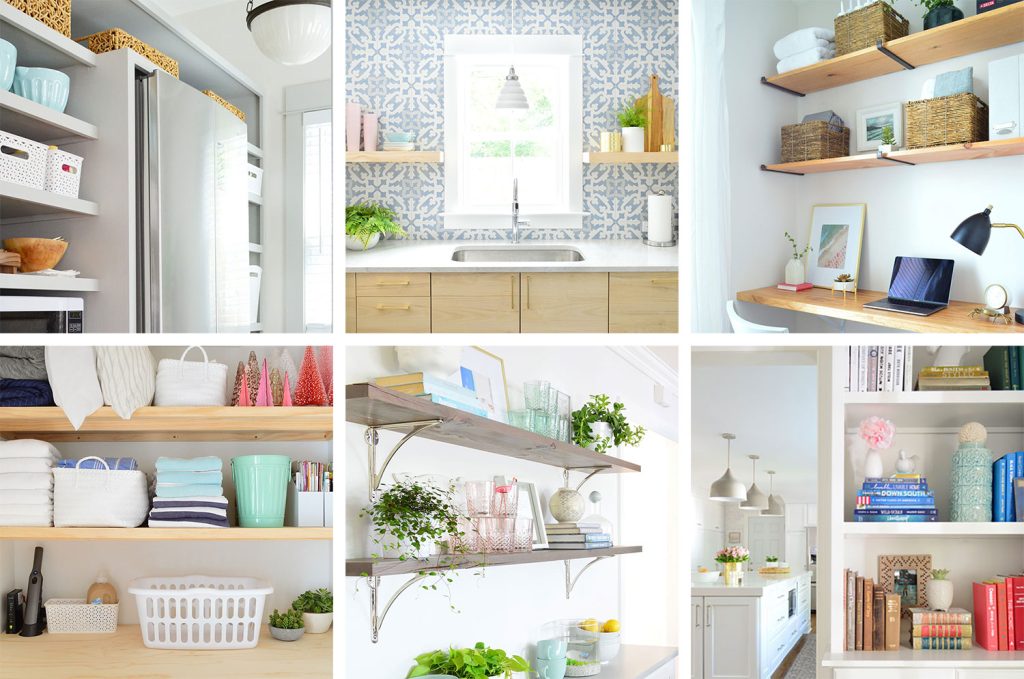
Today we’re going to show you how we built the bookshelves in our son’s room. It’s an easy project that we’ve since used to create custom shelving everywhere from our living room to our beach house pantry. But these bedroom shelves were our very first attempt at them and we absolutely loved how they turned out.
This tutorial specifically focuses on building the actual shelves, aka the top portion of these built-ins. You can separately read about how we first built-in the cabinet bases (it’s an Ikea hack!) and later finished them off with crown molding. But since not every bookshelf needs those features, we’re talking just about the shelving today.

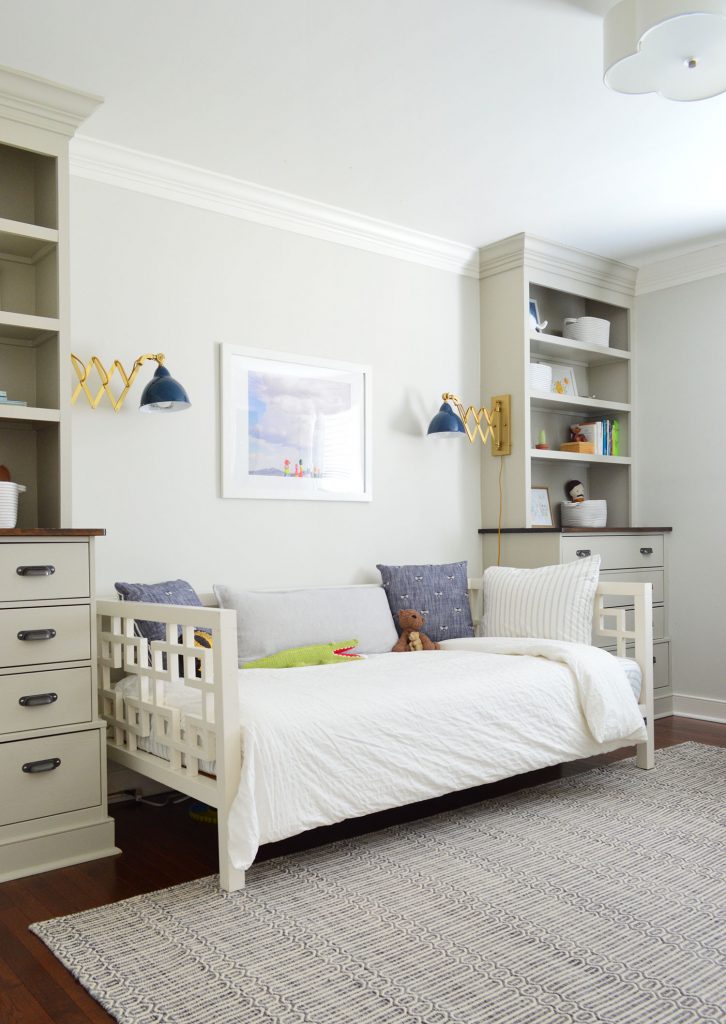
You also can take a tour of the finished room both in it’s initial version as our son’s nursery and then later when we updated it with a big boy bed.
Tools & Materials To Build A Bookshelf
Here are the supplies and tools you’ll need to build your bookshelf. If you don’t have a table saw or circular saw, try renting one from your local home improvement store. Some stores will also cut your wood for you, but this is a project where you’ll really like having one around.
- 1/2″ MDF or plywood for the shelves
- 1×3″ pine (ripped in half) for support pieces
- 1×2″ pine for face pieces
- 1×4″ or 1×6″ pine for top brace
- Measuring tape
- Stud finder
- 24″ level
- Clamps
- Nail gun with finish nails
- Miter saw
- Table saw
- Circular saw
- Power drill/driver
- Wood glue
- Paintable caulk
- Primer & paint
- Painting supplies
The exact amount of wood you’ll need depends on the specs of your bookshelf build. That’s why the first step is so important!
Step 1: Plan Your Build
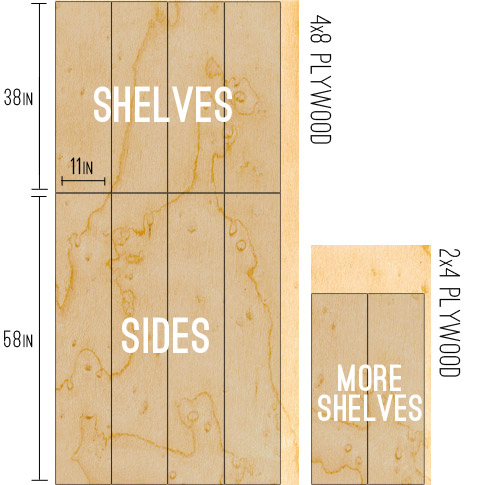
Start by measuring your space and sketching out your bookshelf on paper. This will help you figure out how material you may need. You can still adjust as you build (like you might change your shelf spacing as you go) but always take time upfront to make a plan. For us, this made sure we bought enough – but not too much! – plywood for our shelving. You can see below how figuring out exactly how to maximize a 4×8′ sheet of plywood was almost like a puzzle.
NOTE: We used plywood for this build to better match the subtle wood grain in the base cabinets. However, for a smooth, painted finish we recommend using MDF instead.
Step 2: Cut Your Shelf Pieces
The first building step is to cut your plywood or MDF into the big shelves and side pieces. You can do this with a table saw or circular saw, like you see below. That photo is actually from our pantry shelf project because we got our plywood cut in-store for these bedroom bookshelves. The Home Depot guy ripped my plywood into 11″ strips after seeing my sketch, which was a huge help. He was able to lock his big saw into place to ensure I got equal and even cuts on all of my shelves.

If you are cutting at home, I recommend careful measuring and taking your time. You can also see above that I had clamped two pieces of MDF together so that I could make two cuts at once to ensure the shelves matched.
Step 3: Prime & Paint Your Shelves
We find it easier to paint all of our big pieces BEFORE installing them. It’s typically easier to paint flat surfaces with a roller when you don’t have to worry about edging against walls or cutting in to corners. You will still need to do some touch-ups after building, but this saved us a lot of time.
Just be sure to prime the pieces first, especially if you’re starting with raw plywood or MDF. The color we used was Benjamin Moore Senora Gray.
Step 4: Build Your Bookshelf Frame
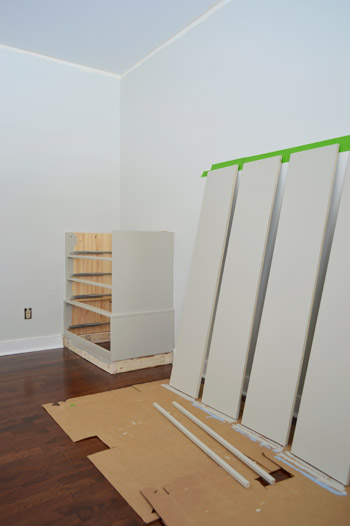
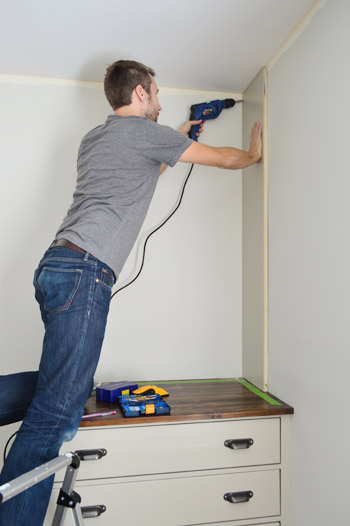
One our paint was fully dry, we began construction by securing one of the tall side pieces directly into the wall. We used a stud finder to locate studs and attached the piece with countersinking screws that we could putty over later.
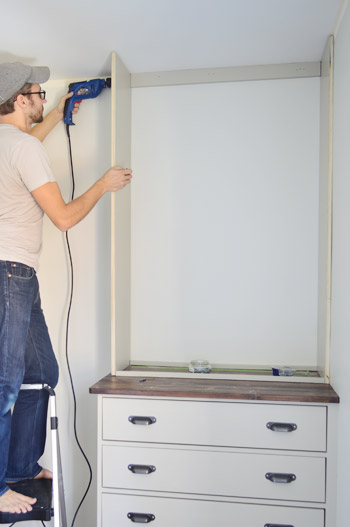
Attaching the next side piece was a bit more involved since I wasn’t screwing directly into a wall. I knew it would become sturdy once I added my shelving, so the challenge was to keep it in place in the meantime.
To do that, I attached a 1×3″ brace piece along the top of the back wall into a couple of studs. This piece wouldn’t be visible in the final bookshelf, but it gave me a place to screw the vertical side piece into. An alternative plan would’ve been to purchase a large piece of MDF or plywood to act as a solid back behind the bookshelf. We opted to just use the wall itself instead, mostly to cut down on cost.
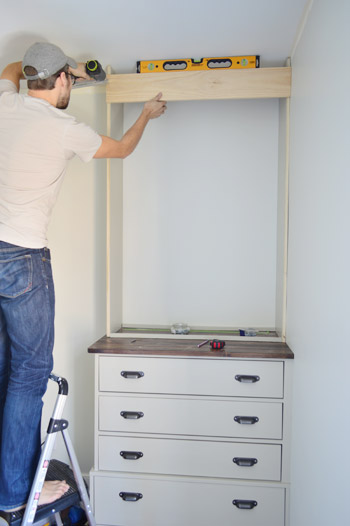
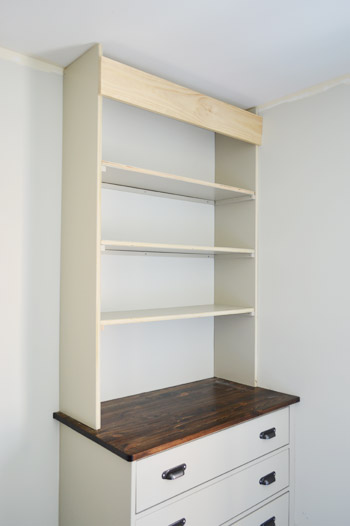
I also add a 1×6″ brace piece across the front of the bookshelves to help keep things square. I hadn’t planned on this piece originally, which is why it’s not painted.
You can also see some pieces at the bottom helping to keep things square down by the base of the bookcase. These were cut to the same length as the eventual shelves just laid there temporarily.
Step 5: Add Your Shelves
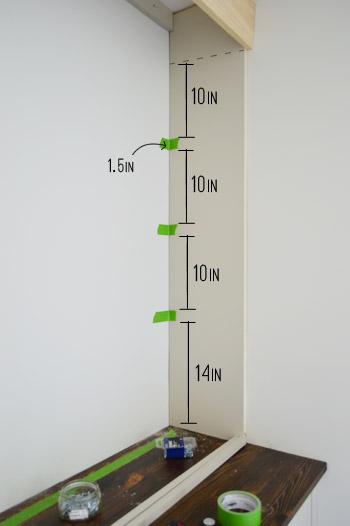
With the sides in place, we turned our attention to the shelves. First we needed to finalize our shelf spacing, so we broke out a ruler and some painter’s tape to help visualize spacing options. Ultimately we ended up with evenly spaced 10″ shelves with a little bit of extra room at the bottom. Just be sure to account for the 1.5″ width of the shelves themselves, as represented by our painter’s tape.
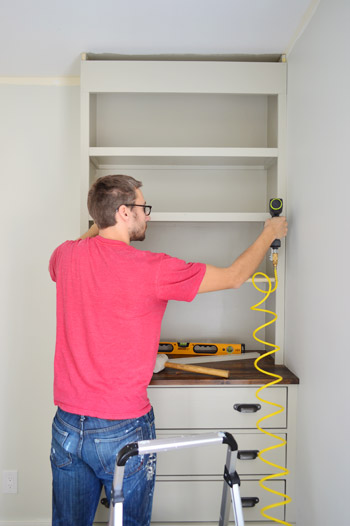
Next it was time to attach the shelf supports. These are thin strips of wood under each shelf on 3 sides. I cut these pieces by ripping a 1 x 3″ along my table saw into .75″ wide pieces. This will make more sense in a moment, but any thicker than that and the supports would be visible below the face pieces added later to the front of each shelf.
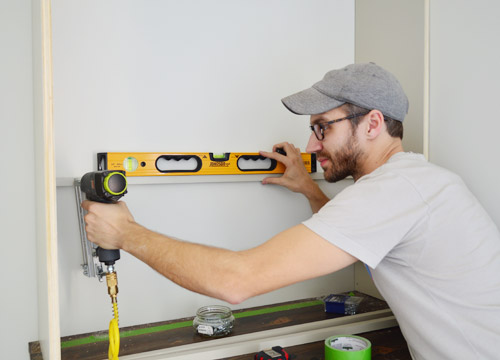
I first nailed the braces into the wall and the sides being sure to keep things level as I went. This was just a speedy way to get everything in the right place. Then I went back and screwed each piece more securely into a stud (along the back) and into the wood (along the sides). This enables the shelves to bear more weight over time.
Once all of the support pieces were screwed in, it was easy to pop the plywood shelf pieces into place. After all, we’d already cut, primed, and painted them!
I also nailed each shelf down into the brace piece so they won’t pop out or jiggle or anything.
Step 6: Finish With Face Pieces
The next step is my favorite because it makes the bookshelf look way more finished. We cut and nailed in 1×2″ pine pieces (already primed and painted) to cover all the exposed edges along the front of the shelves. This not only hides the raw edges, but also makes your shelves look thicker than they actually are! This is also why you want those support pieces cut thinner in the previous step.
You can also see before this step I had done some painting – both the back wall and the brace piece at the top. I also had done some caulking, but you can do this as a final step as well.
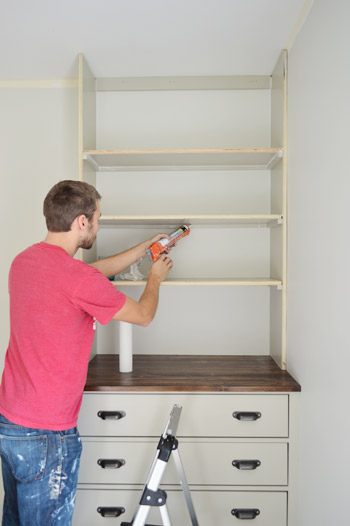
Step 7: Caulk & Touch-Up Paint
Once everything is constructed, you’ll want to caulk your seams, fill any nail holes, and do any necessary touch-up paint. The caulking will take some time, since you’ll want to caulk any place two surfaces meet: shelf meets wall, wall meets support piece, support piece meets shelf, etc. We did a little bit of this as we went, especially to fill gaps where our wall wasn’t very flat.
Once your caulk is dry, you’ll need to do touch-up paint over it. This may feel tedious because you already painted, but I promise you this is much faster to do quick touch-ups than be painting from scratch at this point.
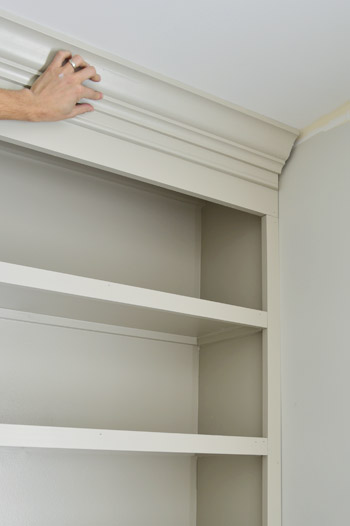
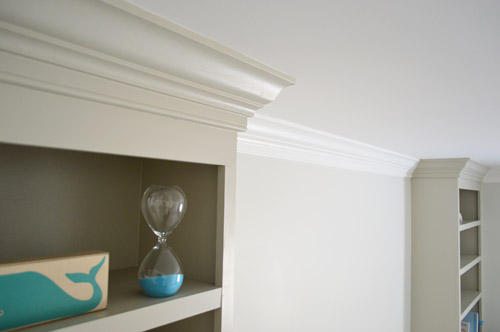
Step 8: Add Crown Molding (Optional)
For our bookshelves, we decided to finish off the top with crown molding that integrated with the crown we’d put installing around the whole room. We would be using a “beefy crown” method we’d tried first in our daughter’s room. It’s involved putting a piece of baseboard around the top of the room first, to make the crown look thicker.
You can read more about the process of installing crown molding in this room.
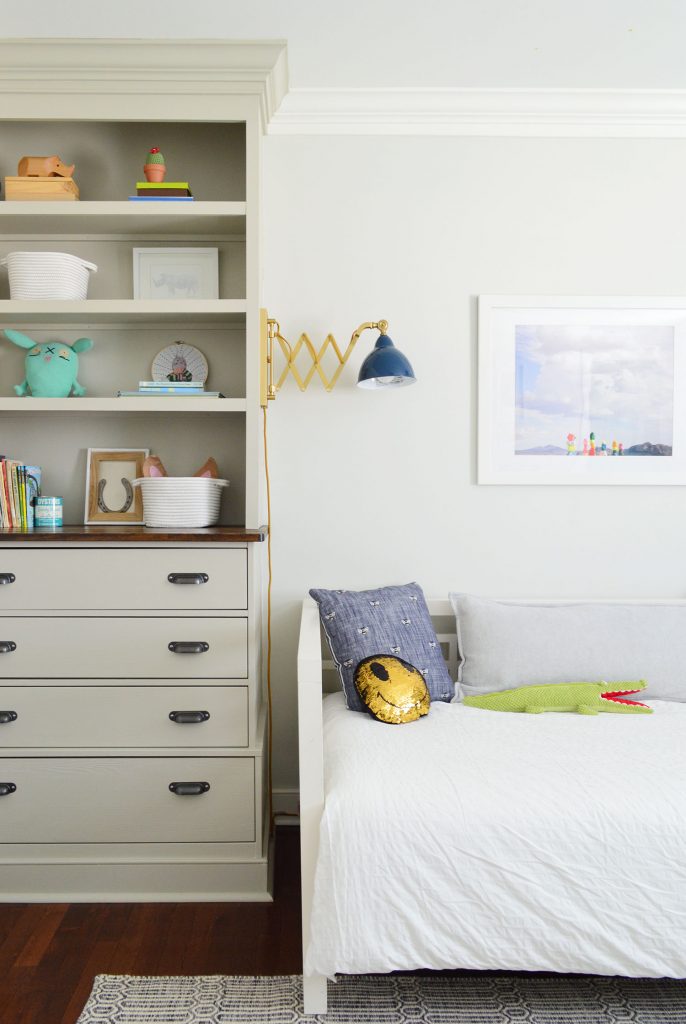
We love how these bookshelves turned out, especially how easy and affordable they were to create – they were about $60 each. And that includes all of the material for the bottoms too! They’ve also been great for both functional storage and cute display items.
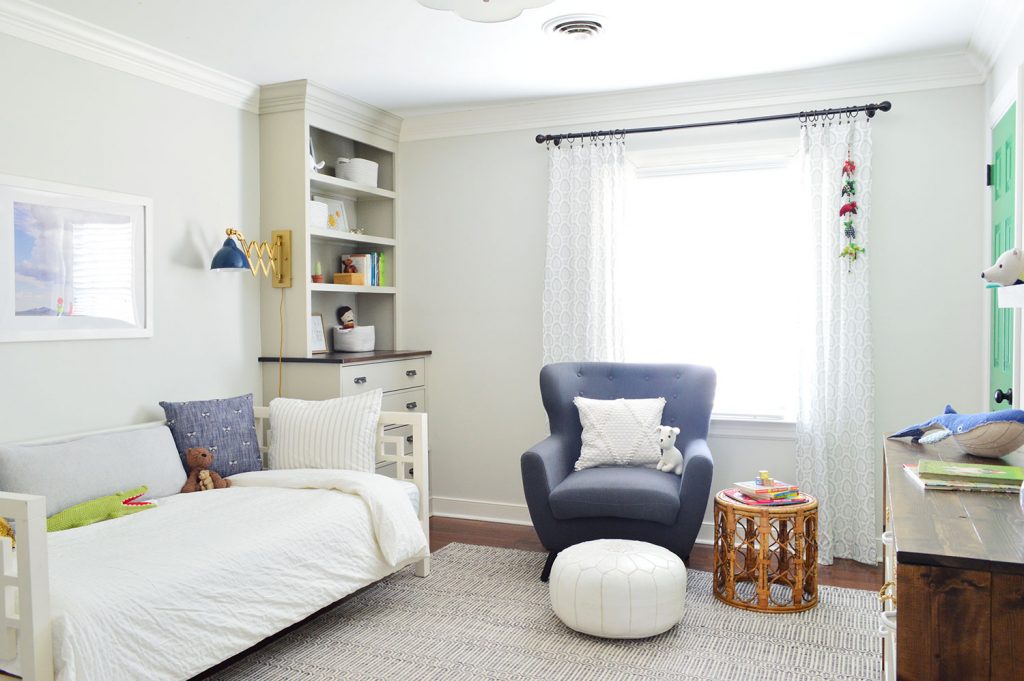
Again, you can read more about how we finished this room in its first iteration as his nursery, and then a few years later as a big boy room.
More DIY Shelving Projects
If you’d like more DIY shelving ideas, we wrote a roundup of 15+ shelf projects you can build yourself. You can even see how we used a similar technique shown here to create kitchen pantry shelving!
P.S. And when it comes to the items in our house, we hear “where’d you get that?!” a lot – so here’s a page full of our home’s paint colors & stuff we’ve bought/loved.
*This post contains affiliate links*

Larissa says
You make this look way too easy, John.
Jenn says
Looks great, guys!
I am not going to let my bun in the oven read this post so he does not get jealous.!!!
Nicole L says
Wow, those look fantastic! I’d actually attempt something like this thanks to your step-by-step on this project!
Kristin says
Um, John. The beard. YES. Loving it.
Also, the built-ins are okay, too. :)
YoungHouseLove says
Ha!
-John
Sarah @ The Simple Home says
OH MY GOD. That look incredible! So jealous or your handiness! Wish you could build something like that in my room…
Can’t WAIT to see you at the home and gardens show! Been counting the seconds!!
Sarah
http://www.thesimplehomeblog.blogspot.com
YoungHouseLove says
Ahh! We’re so excited to see you Sarah! Can’t wait!
xo
s
Ashley M says
Those are so awesome!! Y’all did such a good job! And I’m sorry people ask such dumb questions, storage overkill for a baby really?! I mean is there such a thing as too much storage?! No way! Can’t wait to see how the rest of the room comes together it will no doubt be amazing!!
Jenny says
Wow, these look amazing! I was having a hard time seeing it at first, especially with the wider base drawer on the Ikea units, but you’ve done a super job with these — great vision! I love the idea of that much storage, and built in. And am eager to see how the decorating rounds things out. Nice work!
YoungHouseLove says
Thanks Jenny!
– John
Blair R says
Did you have to do any sanding to the wood before painting and installing? We bought a piece of plywood (not the same one you did) for our laundry counter, and I hate it. Despite sanding it FOREVER it’s still not smooth. I think we bought the wrong kind. So, I was wondering if a lot of sanding if any was involved with this brand of plywood?
YoungHouseLove says
This plywood was really smooth, so the fronts and backs were ready to prime/paint and I just sanded some of the edges if they were especially splintery after being cut, (John then faced those edges with wood trim anyway, so it looks nice and smooth now).
xo
s
Laura says
I am loving the built-ins….the color of them is so rich and with the stained tops and dark hardware…awesome! I don’t think you can ever have too much storage for kids! It’s not like all of the drawers have to be clothing….it could be extra blankets or burp rags or even books and toys! (etc) And, lastly but definitely not most importantly….after reading that whole post about your awesome built-ins….people are commenting on John not wearing shoes?! I didn’t even notice. Sheesh.
Cat says
Magnificent! They are so much better than even expected. You guys are so inspirational. Can’t wait to see this room evolve.
YoungHouseLove says
Thanks so much Cat!
-John
Heidi P. says
“Hi, I’m John Petersik.” (extends hand) “I make custom furniture.” No biggie. Ain’t no thang.
Oh, “And I look reeeeeeally good in a beard and glasses.”
I kept thinking, Is he gonna say anything about his beard? No?? Sherry, have you seen the “beards make men hotter” pin? http://www.pinterest.com/pin/398709373230972774/
:)
YoungHouseLove says
Haha! That they DO!
xo
s
Shannon says
I’m freaking out here! I love the built-ins!So much!!
OK now…what are your thoughts for a light fixture? I’m just dying to know.
YoungHouseLove says
Haven’t found anything yet but I CAN’T WAIT! I’m so excited I CAN’T STOP TALKING IN ALL CAPS!
xo
s
Elena says
You guys never cease to amaze me. Like a boss John! Great job!!
Teri says
LOVE, LOVE, LOVE it! Love the color and the crown moulding! All of it! You guys come up with the coolest stuff! We have unfinished small IKEA dressers in our master bedroom that we are using as nightstands. I was just going to paint them, but I think I might try staining the top and painting the bottom. Thanks for the constant inspiration!!!
YoungHouseLove says
You’re so sweet Teri! Good luck!
xo
s
Kristen @ LoveK Blog says
The built-ins look fabulous! I’m always impressed with your ability to just build things when you can’t find what you’re looking for; it’s really inspiring!
Diane says
I just have to add my voice to all the compliments for the bookcases. They are really wonderful. John what a great piece of furniture you created. How great to share this with the new little guy…all the love that went into his room is something to be proud of.
YoungHouseLove says
Thanks so much Diane, that’s really sweet of you to say. I’m grateful to have been able to make him something that I hope he will use for a nice long time. My grandfather (and father) both built stuff growing up and I never could have guessed I’d learn how to someday.
-John
melissa says
Who in their right mind would ever ask if something provided “too much storage?” There is no such thing! These look amazing — I can’t wait to see the whole room come together!
Michelle | Birds of Berwick says
Nicely done! Looks great!
Evelina says
Just wanted to drop in on the comment section to say that I LOVE the title of this post. Ok, now I will carry on with reading the rest of the post! Thanks!
YoungHouseLove says
Ha! Thanks Evelina.
-John
Isabel says
Looks fantastic, hats off to you John! I know you guys said that this color scheme here for a white ceiling but since the color of the built-ins came out lighter than expected (which I think works really nicely btw) have you reconsidered painting the ceiling? I’m sure once you paint the closet door and add all the decor elements it may not even need it, but since my husband is anti-ceiling painting (I’m working on it as hard as I can!), I live my painted-ceiling-life vicariously through you :)
YoungHouseLove says
Never even thought about that! I definitely think if the room comes together and we think a light tone or even a soft accent color on the ceiling would make sense we could add that into the mix. I think I’m most excited about the colorful closet door and some art on those walls, so we’ll have to see if those add enough punch to make the white ceiling just fine with the white molding and trim (so it all sort of falls back and lets other things be the star).
xo
s
Cindy says
I love the built-ins and can’t wait to see how you style them. You mentioned maybe painting the crib drawer becasue it clashes (and I agree), but I’m wondering why or if you even need it?
YoungHouseLove says
That has been awesome for tucking bedding stuff in it, so it’s right there with the crib. If we took it out we’d just have drawer slides and a random space so I’m not sure it would look finished, but I can check it out! Definitely another option. Thanks for the idea!
xo
s
Kimberly | Turning It Home says
$60 is an insane price for a beautiful bookshelf, well done! Also major props to thinking for the future with the width between the built-ins. My mind has a hard time functioning like that which makes me want to say, “I can’t think in terms of time and stuff…” (even more kudos if you guys know about the #rooftopbreakup).
Kelli says
So gorgeous!!! They are indeed studly and I have a major crush! Whoever says the curse words ‘storage overload’ clearly doesn’t have kids! Lol
The crib drawer painted green has my vote!
I think this nursery is gonna be so nice :)
Sara Rose says
I am in love! Those look AMAZING! You guys are just rock stars! Everything you do, I want to do! …only, I don’t have the skills! :P But you definitely inspire me to develop them! :)
Kelli says
I have to comment in the beard!! Each time I’ve been pregnant (just had our second also a boy and he’s almost 3 months) my husband wants to grow a beard and walk around grunting as if saying, “I am man, I am fertile and manly!” Haha
YoungHouseLove says
HAHAHAH! Maybe that’s the thought behind his. He’s calling it his “winter look.” Ha!
xo
s
Kim a says
“Too much storage” ?!?! Who says such a thing when talking about little ones!? There is no such thing and they have turned out fantastic!! Good work!
Bill in NH says
Nice job on the built-ins, John.
Ever consider getting your own pick-up? I find my four door Tacoma family friendly and very convenient. Actually it’s really not my truck, it belongs to my Rat Terrier, Biscuit.
Bill
PS I am on the edge of my chair waiting to hear about the replacement washer.
YoungHouseLove says
We have definitely thought about it! Right now it doesn’t make sense financially (we’d spend far more buying and insuring a truck than we do on $19 rentals, which we might use 6 times a year for a grand total of $120) but we’d love to eventually sell our current car for something slightly larger with a hitch. That way we can get a trailer and have lots of haul power :)
xo
s
Jessie G. says
looooove it!
You rock, John.
GreenInOC says
I’m a little confused (I know, not surprising!), about the color of the crown molding.
With the picture of the crown matching the bookcases, “…we just pictured a white stripe at the top and bottom of them looking funny…”
Then toward the end under Sherry’s Random Thoughts, ““The white of the crib looks pretty out of place right now, but I think once we add white crown around the room…”
I’m truly astounded by their cost – they look like they could have easily each cost 10x that! They were a lot of work (all the cutting out of the baseboards), and so thoughtful too – amazing job for Little Barnie!
YoungHouseLove says
So sorry! The white crown will go around the rest of the room, just like the white baseboards and trim that go around the rest of the room already! So just the crown on the built-ins will be the color of those, and the rest will be white :)
xo
s
GreenInOC says
Oh! It doesn’t take much to confuse me!!
Kathy says
I was a little worried until I saw the dimensions that the Barnacle would never be able to put binder-sized things on his shelves! Yay for the spacious bottom shelf.
YoungHouseLove says
WOOT!
xo
s
Julie says
Storage overkill! Ha! There can never be too much of that. These look really great. I liked having a little night light in with my baby’s room so I could change their diapers and feed them in the low light and not freak his or my eyes out in the dark of the night. I kept it on the changing table. I loved it so much and it came in handy with several children! Sherry would have loved it, it was a glossy white ceramic mouse.
YoungHouseLove says
SO CUTE! Now I want one…
xo
s
Roo // NEON FRESH says
John, you’re a beast. These look dope.
YoungHouseLove says
Thanks Roo!
-John
bella says
Fabulous.
Renee says
Love them!!!!
Barbarea says
Apparently I missed the “John Grows a Beard” episode! Sherry, I need to borrow him for a while – I have shelving needs of my own!
YoungHouseLove says
Haha! He has been shy about it (I think it has popped up once or twice in Instagram). I have to say that a bearded man = pretty dang awesome.
xo
s
Kate C says
In my opinion, there’s no such thing as over abundant storage in a baby room. There’s decorations and toys for the shelves, blankets, clothes, bedding, diapers,and maybe even more toys that will end up in the drawers. Having this much storage space is just plain smart.
Brittany says
The built-ins look great! I’m so excited to follow along as you two put this room together!
We’re having our first baby (yippee!) and I was looking at the same crib you have. I really appreciated your post about finding the right crib so was wondering if you could give a quick update on how you’ve liked it? Is having the storage drawer useful? Quality after use from one kiddo? Would you recommend it? Thank you!
YoungHouseLove says
Oh yes, we have been really happy with our crib! It’s still going strong (and Clara used it much longer than the average kiddo, and it moved with us and wore well). The drawer’s definitely handy too (we kept crib bedding and snowsuits in there, how’s that for random?).
xo
s
Karla says
We have the same crib and we love it!!! Our son is 2 and we are considering converting it to a toddler bed soon. I love the drawer. It has a divider in it, which is nice. We have extra sheets and unopened wipes on one side, and we just lined up his shoes on the other side. I love the look of it and it is holding up incredibly well. We actually got it at Walmart.com. Good luck and Congrats on your little one! We’re hoping to adopt again soon, so hopefully we will have experience passing our crib down before we convert it! :)
Alyssa says
These look great! Can’t wait to see the room come together more. I love how you prioritize the kiddos’ rooms so they can feel at home.
YoungHouseLove says
Thanks Alyssa! We think kid-spaces are the most fun by far!
xo
s
Angela says
Love how the nursery is coming together!
One comment on your moodboard though: I know the little pull toy crocodile is super cute BUT…it is super loud. My son is in Kindergarden and they had that particular toy there. In a room full of 15 screaming/laughing/talking toddlers, you could still hear the crocodile clacking away drowning out all the other noises. That should give you an idea how loud it is. They eventually removed the toy because they couldn’t take it anymore.
I know that the new baby won’t stroll around the house with the crocodile in tow anytime soon, but once he starts you’ll regret ever buying that thing. I think HAPE has a pull toy in the shape of a crocodile that is not as loud. You might want to check that out.
Greetings from Vienna, Austria
YoungHouseLove says
Thanks for the tip Angela! We actually have the alligator (he’s Clara’s) and you’re right! He does make quite a racket! Might have to keep him up on the shelf for a while…
xo
s
Cassie says
Is there such a thing as too much storage?! I think you guys are smart to think ahead! Who cares if some of those drawers are empty for a little while? These look SO SO good! Awesome work!
Ashley says
Gorgeous!!! It always cracks me up that you have to rent a truck! We live in the sticks and have 4-5 trucks. Between farming and snow, you have to have a truck here! Have you thought about trading for a small truck? We had an 08 Tacoma that got great gas mileage and was very comfortable for our family of 4. :)
YoungHouseLove says
We have definitely thought about it! Right now it doesn’t make sense financially (we’d spend far more buying and insuring a truck than we do on $19 rentals, which we might use 6 times a year for a grand total of $120) but we’d love to eventually sell our current car for something slightly larger with a hitch. That way we can get a trailer and have lots of haul power :)
xo
s
Whitney says
I love these. I’m also amused by John’s nerdy look. Math + glasses. :)
My cousin (aka my southern sister) just had a little boy 6 weeks early so we are all in nursery overdrive now while he is incubating in the NICU. These posts have been extremely helpful.
YoungHouseLove says
Oh my goodness Whitney! Congrats on your little one! Hope he’s home soon!
xo
s
Brandyn | Southern Distinctions says
They look wonderful! Appreciate that you’re sharing investment ideas. The internet is flood with ‘Quick & Easy’ ideas and that’s nice, but sometimes we need to see those built to last posts as well.
Katy C says
These are amazing!!! You guys should be proud! I want these in every room of my house :) oh and there is no such thing as too much storage in a child’s room!
Carla says
Very handsome looking. Re: place to change diapers… I never had a changing table. When the baby was little the mattress was high; I just put the cribside down, plopped a felt changing pad on the mattress and changed there. It had the added benefit of the baby facing an easier direction with their feet closest to you (I’ve never understood changing stations where you have to change the baby sideways). If you chose to do this you could put changing supplies on/in one of the built-ins. I also found that once babies were mobile all diaper changes happened on the floor and I just threw a receiving blanket on the floor.
YoungHouseLove says
That’s a great tip! John’s sister did that a lot too!
xo
s
Nicole says
Gorgeous! I love how Junior can just grow with them and they’ll still be useful when he’s 16 years old!
julianna says
Congrats on crossing another big item off your to-do list. I’m a little confused — I had assumed you’d do the wiring for the sconces before installing the built-ins. Won’t it be messier and more complicated to fish the wires through the walls with the built-ins already in place? Or have you changed your minds about installing sconces?
p.s. I tried to post this earlier, but got an error message. If this is a duplicate, please delete!
YoungHouseLove says
Good question! Now we’re thinking of adding them to the back wall (above where the eventual twin sized bed will go, like reading sconces that you see above beds) so the wiring will just drop down from the attic and pop out for those two sconces without interfering with the cabinet :)
xo
s
JessicaL says
Love it! And yes, the first thing I thought when I saw the drawer under the crib was “paint that green!!!” Good job…hahaha, too funny about all of the shoe scolding posts, you guys can’t get away with anything!
Kira K. says
I love how well this room is coming together, it looks truly amazing so far. I always look forward to your posts to catch up on the latest progress. I am so impressed with the built ins, they look fabulous. Great job!
We close on our first house next week and you have totally inspired my hubby and I to get started sprucing up the place. Can’t wait to get the keys in hand!!
YoungHouseLove says
Wahoo! Congrats!
xo
s
Wrenaria says
Looking pretty! Beautiful work on those built ins, John! Like Sherry, I am excited to bring in the color, and green is one of my favorites.
I have that striped basket in your mood board image. I bought it to carry clean laundry from the dryer to my room. It’s pretty enough that I don’t mind it sitting on our dresser empty during the week, which is a plus since my rental is short on storage. It’s a good quality basket. :)
YoungHouseLove says
Love that!
xo
s