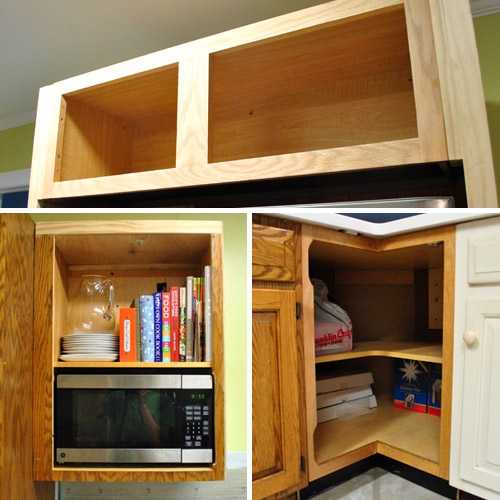
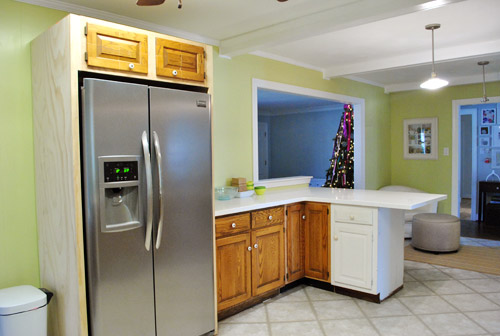
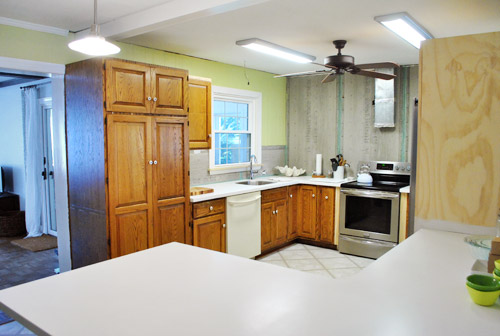
We knew from the moment that we decided to add new (secondhand) cabinets to our kitchen that the doors could be a challenge. Even though we only ended up with 5 missing doors, it was important that we get those to match with the rest of the kitchen for a seamless look (aka: so no one would look around and guess we had some mismatched thrift store cabinets among us). Here are the five doorless cabinets that we had to address:
We knew we had a few options to result in a kitchen full of matching doors, so one of them was bound to work. Here they are (in order of expense from most to least):
- Getting all new doors and drawer faces for the entire kitchen
- Ordering custom-made matching doors for just the few cabinets missing them
- Try to cut-down/repurpose leftover doors from the old cabinets that we’re no longer using (remember we took a bunch down here)
We actually investigated Option #1 first, because we do love a shaker style door (like the ones we chose for our last kitchen below):
But as we started adding up the cost (best on a few different sources, from Home Depot to online door-making warehouses) and it started to look like it’d be upward of $2,000-3,000. So yeah…. next option?
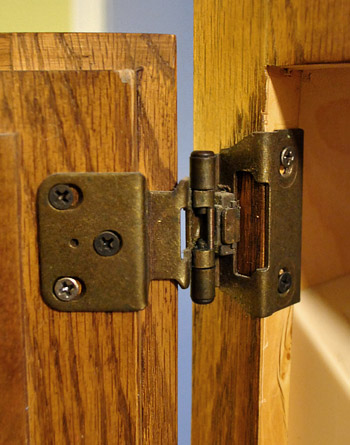
Happily, option #2 was substantially less expensive. Our challenge here is that we have a very specific cabinet style. They’re extremely solid well-built custom oak cabinets and doors (which is nice – and we’re happy to have them)… but being custom means they’re a bit unusual (aka: haaard to find). They’re actually framed cabinets (i.e. there’s a small lip on the front of the cabinet box) and are partial inset doors (meaning part of them sit within the frame, part sit on top of the frame). This makes for an awesome seal that fits together amazingly (like one big puzzle) but it also makes hoping to somehow “find” matching doors in our custom style/size/depth virtually impossible.
As for buying new ones “to order” in specific sizes that we request, no one that we dropped in on sold partial inset doors with the same detailing on the front (and we couldn’t use non-partial-inset doors because those would stick out about a half-inch more from the cabinet when closed, so they’d be really obvious and weird looking among the rest).
So next we called up the original manufacturer of the cabinets (a private company out of Pennsylvania called “Quaker Made” who specializes in custom cabinetry). They patched me through to an independent repair guy who makes new doors, so I gave him rough measurements and he quoted me about $800 to make new doors. Not bad, but a bit more than we were hoping to spend… especially when we had so many extra doors laying around. Including these five that were perfect candidates for being re-fitted.
It kinda seemed stupid of us not to at least try to make these work first. If our attempt failed, we could always go to Option #2 as a back-up. And you know we like to work with what we have. So yeah, cue the power tools.
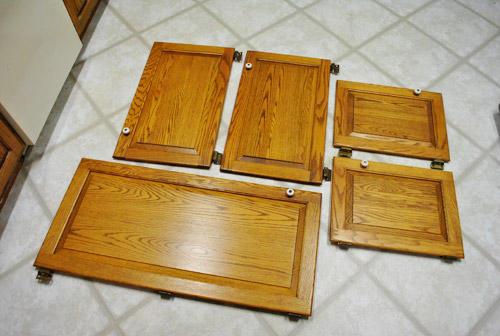
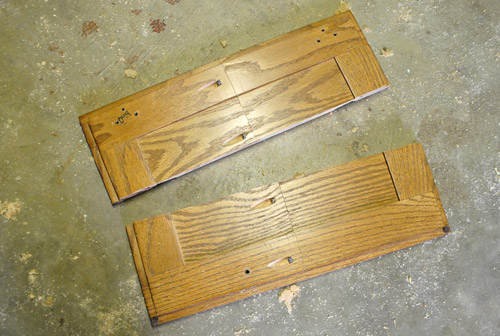
All of the doors were too big for their new cabinet-y homes, so we knew we had to cut them down. Cutting them down wasn’t going to be as straightforward as just slicing off the extra inches since I needed to maintain the raised border and the raised inner panel on each door (along with the inset edge around the perimeter). That meant I need to shave off the extra inches from the middle of the doors. Yikes.
To get super straight cuts, I used my table saw. For anyone wondering, our table saw of choice is this Skil one for $150, which we really like… maybe a little too much).
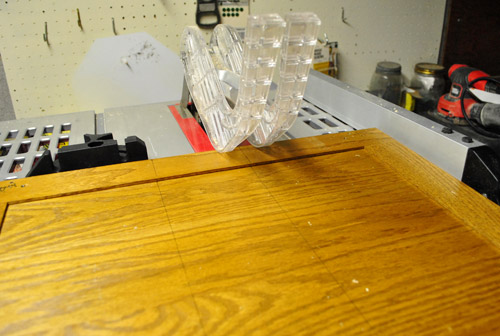
Two cuts later, I had removed a section from the middle and was left with two halves that would create the perfect door length.
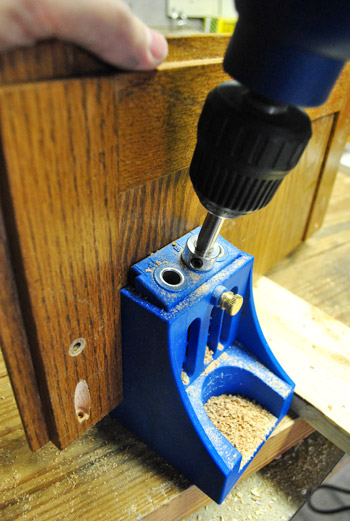
To secure the halves together, I made some pocket holes with one of my other BFF tools (my Kreg jig)…
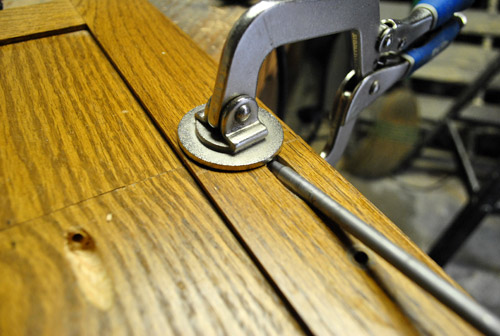
…then I carefully clamped them together before screwing everything tightly to secure them. I also use wood glue for the strongest possible hold, but I wipe the excess right away with a rag to keep things looking neat, which is why you don’t see it gushing out from the seam in this pic:
Now, for the doors above the fridge I had to repeat this cut-jig-screw step the other direction too, since the spare door was both too tall and too wide. Yup, I totally Frankensteined those babies.
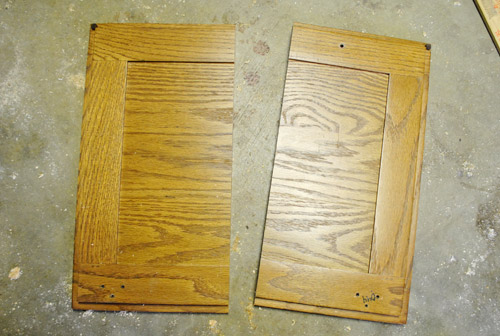
But once it was all screwed together again (and the hinges were reattached), things were actually fitting together much better than I expected (full disclosure: I completely thought this method would flop, but it was still worth a try just in case it ended up saving us $800).
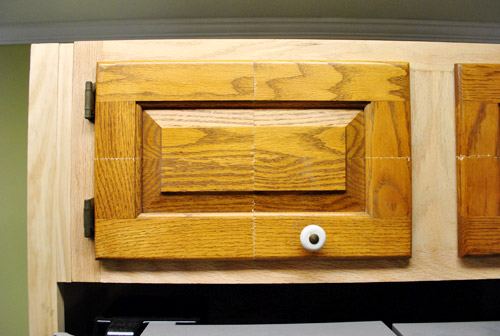
Now I know what some of you are thinking – because I was thinking the same thing: this isn’t looking so hot. But I reminded myself that once we add in some wood putty and sand those babies ’til they’re seamless we should be in ok shape. And once we use nice thick self leveling primer and paint, even things like the wood grain – and hopefully those hairline cracks should be undetectable (we used self leveling paint on the oak office cabinets that we painted and the wood grain doesn’t show through at all). Oh yeah, and we’re definitely moving the knob to a less awkward place (replacing it with new hardware actually)….
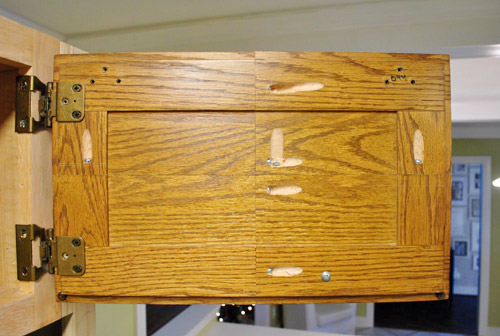
…and we’ll use wood putty to fill the screw holes in the back (it’s looking pretty treacherous back there).
I probably made this process seem faster and easier than it really was. It took me all morning to do these two doors (and a third test door that I messed around with first to see what worked and what didn’t before moving on to a door that matters). And there weren’t just two cuts per door – there were definitely a few trims and recuts along the way to make sure things fit snugly, but not too snugly thanks to that inset-back edge.
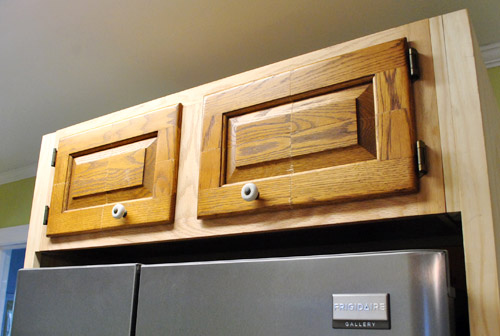
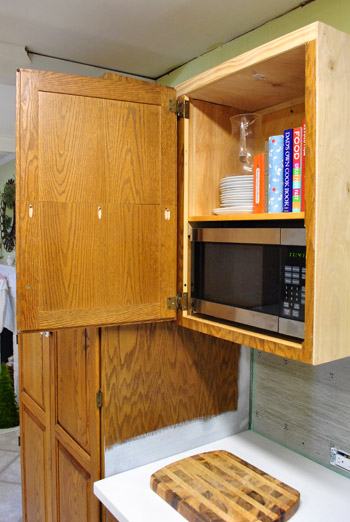
The microwave cabinet door was easier, since I was reusing the door that originally went on that once-taller cabinet. So it just took cutting a few inches out of the middle to make this door work.
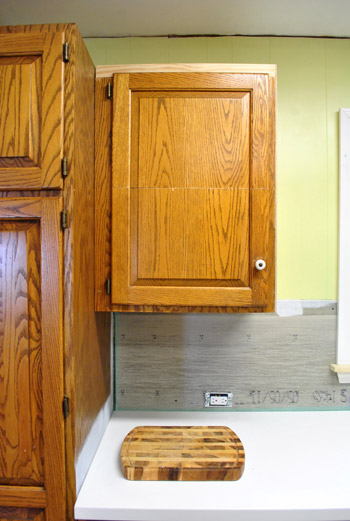
This one only took me an hour-ish to do. Progress! The reason even one cut takes so long is that I measure and remeasure and very nervously make my cuts on the conservative side (since you can always shave more off but it’s a lot harder to add stuff back in).
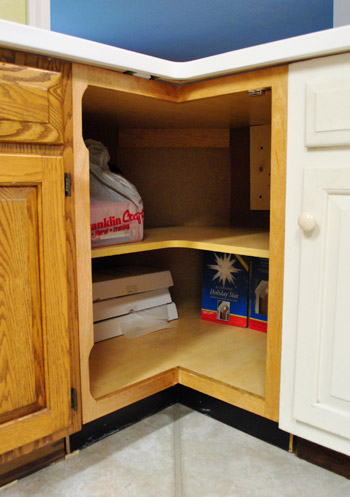
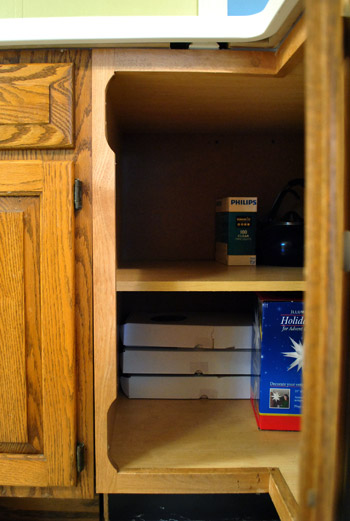
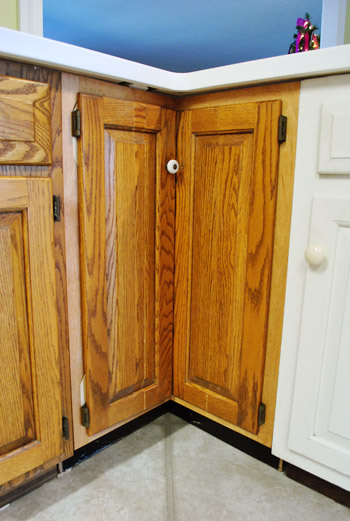
That progress got derailed a bit when I faced the corner cabinet. This secondhand cabinet came with bi-fold doors, but those hidden hinges wouldn’t work for our partial inset doors (which meant if we tried to use them those doors would stick out at least a half-inch more from the frame than the rest of the doors in our kitchen – which would look terrible). So we debated installing a pie-cut lazy susan and just affixing the doors directly to that (kinda like the one in our other corner cabinet across the way), but nixed that idea because after a bit of thought we decided one base cabinet with a lazy susan was enough for us – and we were actually enjoying all of the wide open space for bigger items (which would be lost if we sliced things up by adding a lazy susan).
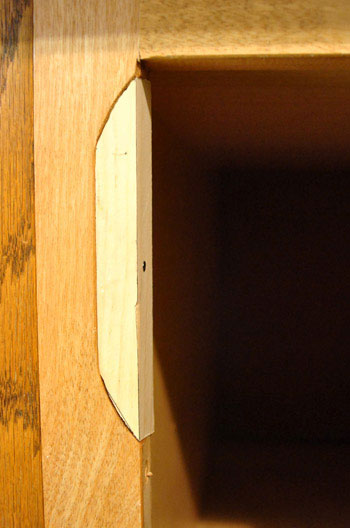
But before I could even start dealing with the doors, I had to fix these notches that were cut out of the frame to accommodate the old hinges.
After a few tries, I finally was able to jigsaw a couple of pieces that fit into the notches (not perfectly, but wood putty thankfully covers a multitude of sins when you’re painting your cabinets). I just screwed them into place and was happy to finally have a place to attach my hinges (which will all be removed again for our wood-puttying and sanding step down the road – and most likely sprayed a new color to match our new hardware).
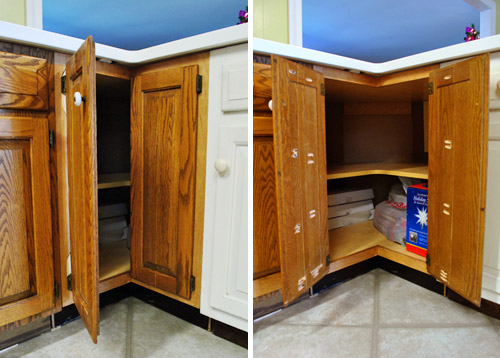
What we ended up doing with the door was the simplest solution that we could come up with using what we had: two separate doors, hinged on opposite sides.
It took me the rest of the afternoon (plus part of the next morning) to get these to finally fit right, but you can see how they open below. The left door has a knob (that’s very awkwardly placed – which we’ll move) to open that side first. And once that door is open we can easily pull the other one open afterwards. We love that they still give us complete access to the wide shelves inside. Makes us very happy we didn’t go the lazy susan route since we already have one of those in another corner.
In the end, it definitely took longer than I hoped it would (mostly because of lots of noodling and trimming) but I think it came out pretty good. Everything fits. Everything closes nicely. And, once it’s all wood puttied / sanded / primed / painted, everything should look pretty much as good as new.
And, of course, if we don’t like how they look once they’re painted we can always call up the guy who’ll make us new doors for 800 beans if we have to (it’s not worth having a semi-ugly door situation to feast our eyes on every day in our new kitchen to save $800, so if it comes to that we’ll get ‘er done).
As for durability, joining solid oak doors with nails or glue alone would be a recipe for disaster – but making pocket holes and using heavy duty metal screws meant for the job along with wood glue is the permanent, strong, professional way to go (I like to do my research so things don’t fall apart later, which only adds up to more work for us). So there’s zero flex in the newly joined doors – they don’t close oddly or feel wiggly. They’re solid – and should function exactly the same way that our other solid oak doors do for the long haul.
As you can imagine, now we’re even more excited to get these suckers painted. Especially now that I’ve got all these ugly cuts that I want to hide going on. If only I didn’t have to do stuff like add toe-kick molding and other miscellaneous trim first. Although I did already add a new window sill and window trim (more on that later).
If we’re being realistic, it’s unlikely that we’ll get a painted cabinet update to you before Christmas in ten days (puttying and sanding and drying times for primer/paint would make that kinda impossible). But maybe we’ll recruit Santa to help us sand and prime when he drops down that chimney in 10 days. Sigh. If only these things could happen while we slept. Can you imagine how sweet that would be?

meghan s says
John, I’ve been following since the near beginning, and I just have to say, while you two have always been handy, you are really getting becoming quite the carpenter!! I don’t think I would ever attempt what you did, b/c I just don’t think I have the patience (or skill). Looks great!
YoungHouseLove says
Isn’t he amazing? It’s crazy to think that before Clara was born John hadn’t built anything! And he started slow with some floating shelves and worked his way up to bigger things like console tables and fridge built-ins. My hero!
xo,
s
Michelle Szumsky says
You two are DIY gods! Both your attitude and can-do spirit are infectious. I’m am continually so inspired that I actually bought my first power tool. Thanks for all that “house love.” And, education! Keep on keeping on.
purejuice says
i linked to this, with love and thanks for your spirit and inspiration.
http://purejuice.livejournal.com/1878573.html
Amy says
Those cabinet doors are amazing. I bow down to you. That’s all I can think to say.
I’m going to be painting my kitchen cabinets black in a week or so. I’ve been trying to read as many blog posts as possible on the topic. I’ve considering going out and buying a can of ben moore even though I’ve already purchased paint from Home Depot.
Kristin H. says
Hey guys! Sorry to be so annoying.. Ive been wanting to buy my hubby a table saw forever and I remember you reccomending one and I always thought “I’ll be able to find it when I need it!” but now the Skil site changed the link you guys have here :( Stupid me. Would you mind sharing which one you guys use? If there’s a link to amazon where you could any way benefit from it (I know you have the amazon affiliates but I don’t know how that all works) I will buy it right up thru the link!
YoungHouseLove says
You’re so sweet Kristin! John just looked and all it says on the saw is Skil Saw and he believes he got it from Lowe’s. So sorry we don’t have more info than that. It was one of the cheapest models they had, if that helps!
xo
s
Kristin H. says
Oh perfect thank you sososo much Sherry! You guys are just the best :)