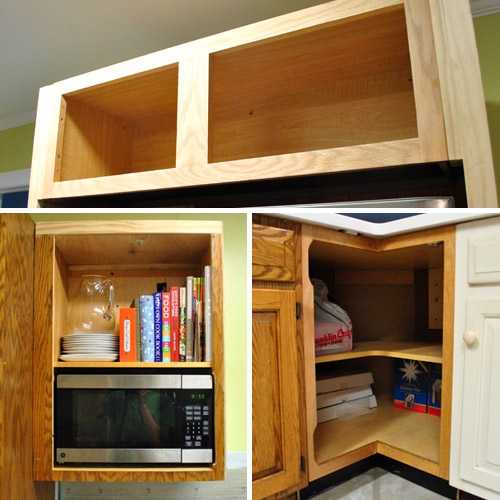
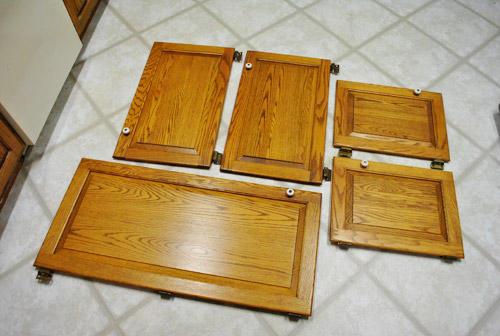
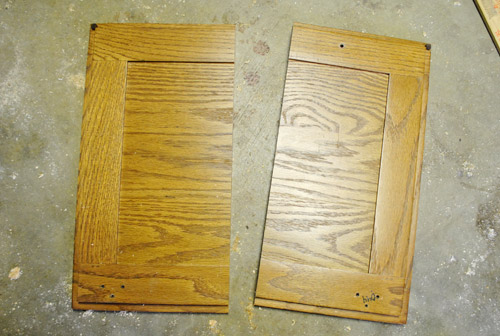
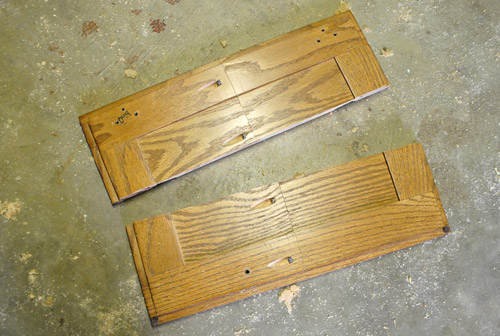
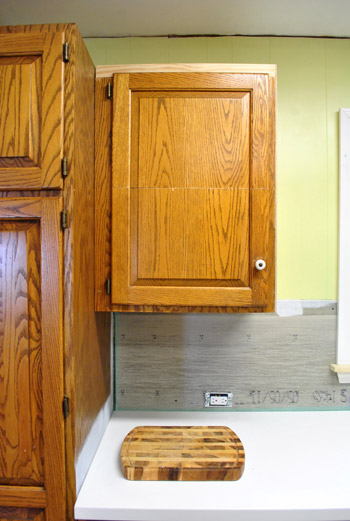
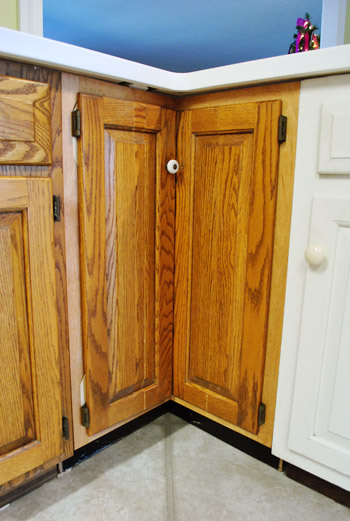
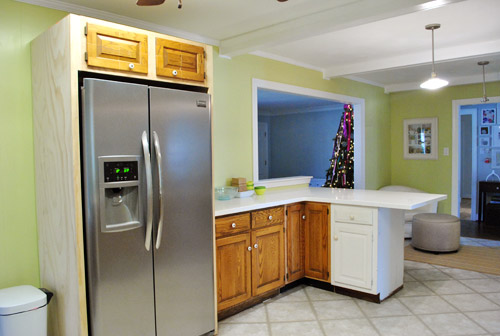
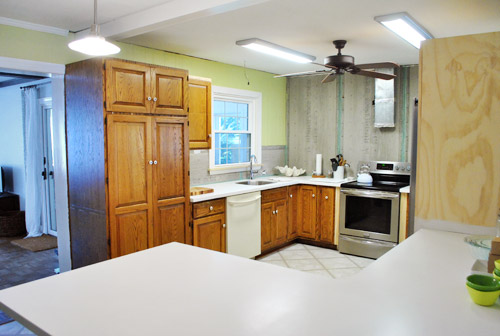
We knew from the moment that we decided to add new (secondhand) cabinets to our kitchen that the doors could be a challenge. Even though we only ended up with 5 missing doors, it was important that we get those to match with the rest of the kitchen for a seamless look (aka: so no one would look around and guess we had some mismatched thrift store cabinets among us). Here are the five doorless cabinets that we had to address:
We knew we had a few options to result in a kitchen full of matching doors, so one of them was bound to work. Here they are (in order of expense from most to least):
- Getting all new doors and drawer faces for the entire kitchen
- Ordering custom-made matching doors for just the few cabinets missing them
- Try to cut-down/repurpose leftover doors from the old cabinets that we’re no longer using (remember we took a bunch down here)
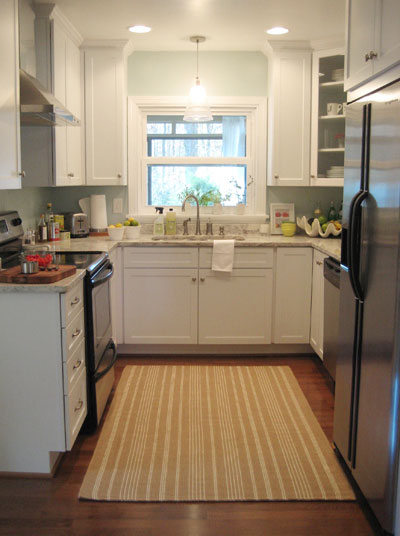
We actually investigated Option #1 first, because we do love a shaker style door (like the ones we chose for our last kitchen below):
But as we started adding up the cost (best on a few different sources, from Home Depot to online door-making warehouses) and it started to look like it’d be upward of $2,000-3,000. So yeah…. next option?
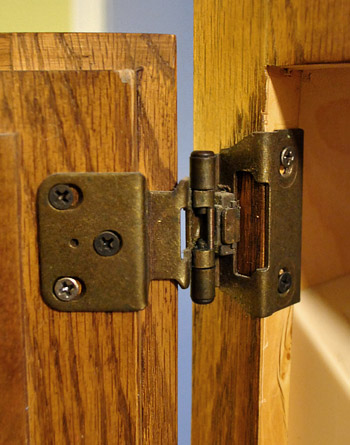
Happily, option #2 was substantially less expensive. Our challenge here is that we have a very specific cabinet style. They’re extremely solid well-built custom oak cabinets and doors (which is nice – and we’re happy to have them)… but being custom means they’re a bit unusual (aka: haaard to find). They’re actually framed cabinets (i.e. there’s a small lip on the front of the cabinet box) and are partial inset doors (meaning part of them sit within the frame, part sit on top of the frame). This makes for an awesome seal that fits together amazingly (like one big puzzle) but it also makes hoping to somehow “find” matching doors in our custom style/size/depth virtually impossible.
As for buying new ones “to order” in specific sizes that we request, no one that we dropped in on sold partial inset doors with the same detailing on the front (and we couldn’t use non-partial-inset doors because those would stick out about a half-inch more from the cabinet when closed, so they’d be really obvious and weird looking among the rest).
So next we called up the original manufacturer of the cabinets (a private company out of Pennsylvania called “Quaker Made” who specializes in custom cabinetry). They patched me through to an independent repair guy who makes new doors, so I gave him rough measurements and he quoted me about $800 to make new doors. Not bad, but a bit more than we were hoping to spend… especially when we had so many extra doors laying around. Including these five that were perfect candidates for being re-fitted.
It kinda seemed stupid of us not to at least try to make these work first. If our attempt failed, we could always go to Option #2 as a back-up. And you know we like to work with what we have. So yeah, cue the power tools.
All of the doors were too big for their new cabinet-y homes, so we knew we had to cut them down. Cutting them down wasn’t going to be as straightforward as just slicing off the extra inches since I needed to maintain the raised border and the raised inner panel on each door (along with the inset edge around the perimeter). That meant I need to shave off the extra inches from the middle of the doors. Yikes.
To get super straight cuts, I used my table saw. For anyone wondering, our table saw of choice is this Skil one for $150, which we really like… maybe a little too much).
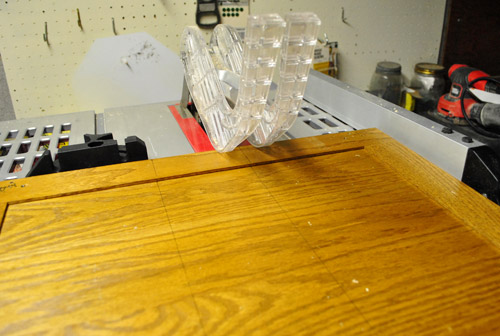
Two cuts later, I had removed a section from the middle and was left with two halves that would create the perfect door length.
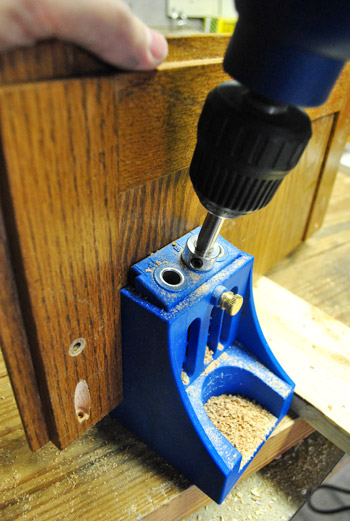
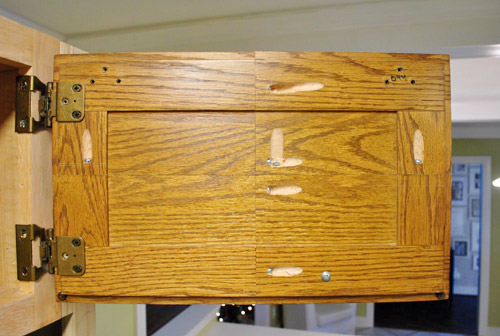
To secure the halves together, I made some pocket holes with one of my other BFF tools (my Kreg jig)…
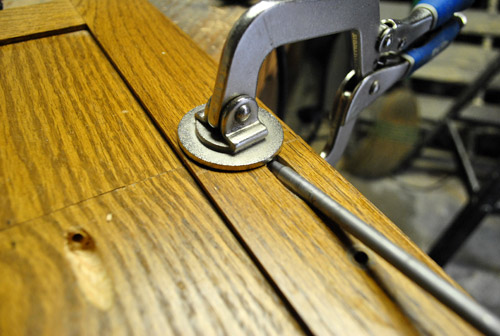
…then I carefully clamped them together before screwing everything tightly to secure them. I also use wood glue for the strongest possible hold, but I wipe the excess right away with a rag to keep things looking neat, which is why you don’t see it gushing out from the seam in this pic:
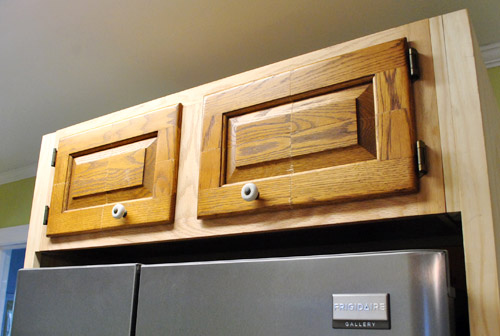
Now, for the doors above the fridge I had to repeat this cut-jig-screw step the other direction too, since the spare door was both too tall and too wide. Yup, I totally Frankensteined those babies.
But once it was all screwed together again (and the hinges were reattached), things were actually fitting together much better than I expected (full disclosure: I completely thought this method would flop, but it was still worth a try just in case it ended up saving us $800).
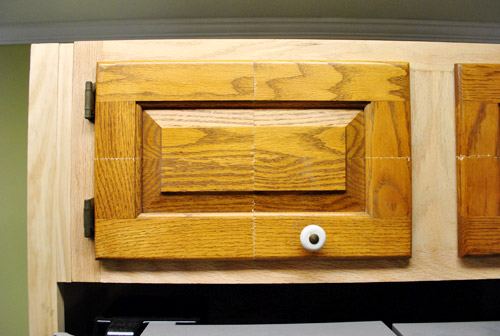
Now I know what some of you are thinking – because I was thinking the same thing: this isn’t looking so hot. But I reminded myself that once we add in some wood putty and sand those babies ’til they’re seamless we should be in ok shape. And once we use nice thick self leveling primer and paint, even things like the wood grain – and hopefully those hairline cracks should be undetectable (we used self leveling paint on the oak office cabinets that we painted and the wood grain doesn’t show through at all). Oh yeah, and we’re definitely moving the knob to a less awkward place (replacing it with new hardware actually)….
…and we’ll use wood putty to fill the screw holes in the back (it’s looking pretty treacherous back there).
I probably made this process seem faster and easier than it really was. It took me all morning to do these two doors (and a third test door that I messed around with first to see what worked and what didn’t before moving on to a door that matters). And there weren’t just two cuts per door – there were definitely a few trims and recuts along the way to make sure things fit snugly, but not too snugly thanks to that inset-back edge.
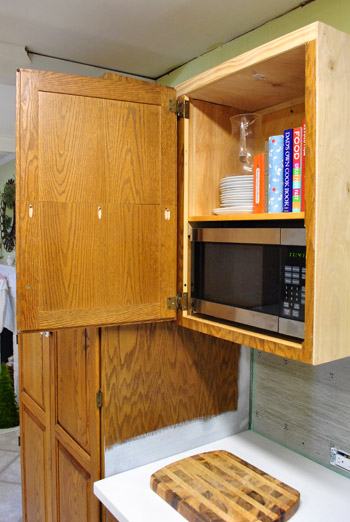
The microwave cabinet door was easier, since I was reusing the door that originally went on that once-taller cabinet. So it just took cutting a few inches out of the middle to make this door work.
This one only took me an hour-ish to do. Progress! The reason even one cut takes so long is that I measure and remeasure and very nervously make my cuts on the conservative side (since you can always shave more off but it’s a lot harder to add stuff back in).
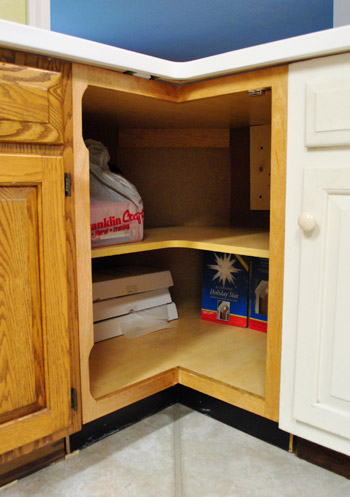
That progress got derailed a bit when I faced the corner cabinet. This secondhand cabinet came with bi-fold doors, but those hidden hinges wouldn’t work for our partial inset doors (which meant if we tried to use them those doors would stick out at least a half-inch more from the frame than the rest of the doors in our kitchen – which would look terrible). So we debated installing a pie-cut lazy susan and just affixing the doors directly to that (kinda like the one in our other corner cabinet across the way), but nixed that idea because after a bit of thought we decided one base cabinet with a lazy susan was enough for us – and we were actually enjoying all of the wide open space for bigger items (which would be lost if we sliced things up by adding a lazy susan).
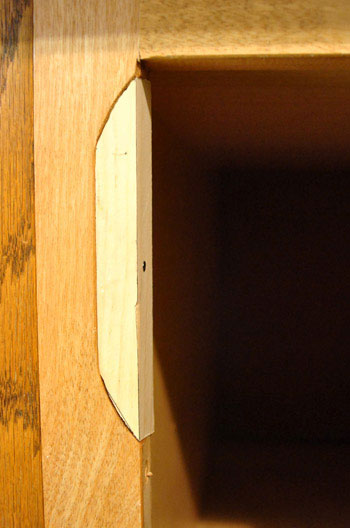
But before I could even start dealing with the doors, I had to fix these notches that were cut out of the frame to accommodate the old hinges.
After a few tries, I finally was able to jigsaw a couple of pieces that fit into the notches (not perfectly, but wood putty thankfully covers a multitude of sins when you’re painting your cabinets). I just screwed them into place and was happy to finally have a place to attach my hinges (which will all be removed again for our wood-puttying and sanding step down the road – and most likely sprayed a new color to match our new hardware).
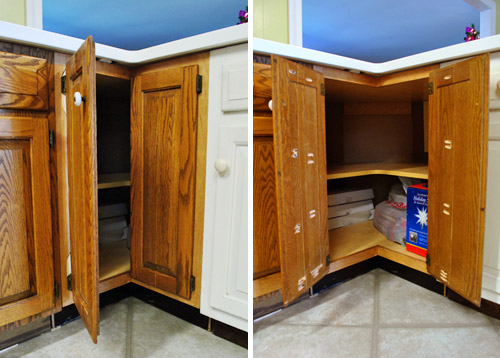
What we ended up doing with the door was the simplest solution that we could come up with using what we had: two separate doors, hinged on opposite sides.
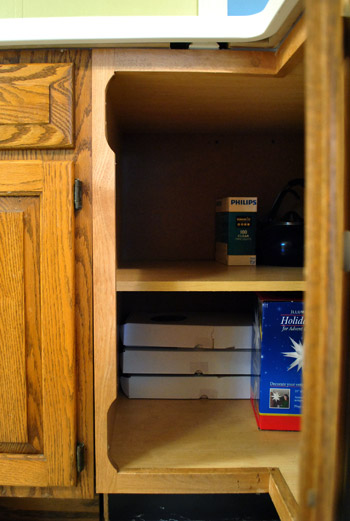
It took me the rest of the afternoon (plus part of the next morning) to get these to finally fit right, but you can see how they open below. The left door has a knob (that’s very awkwardly placed – which we’ll move) to open that side first. And once that door is open we can easily pull the other one open afterwards. We love that they still give us complete access to the wide shelves inside. Makes us very happy we didn’t go the lazy susan route since we already have one of those in another corner.
In the end, it definitely took longer than I hoped it would (mostly because of lots of noodling and trimming) but I think it came out pretty good. Everything fits. Everything closes nicely. And, once it’s all wood puttied / sanded / primed / painted, everything should look pretty much as good as new.
And, of course, if we don’t like how they look once they’re painted we can always call up the guy who’ll make us new doors for 800 beans if we have to (it’s not worth having a semi-ugly door situation to feast our eyes on every day in our new kitchen to save $800, so if it comes to that we’ll get ‘er done).
As for durability, joining solid oak doors with nails or glue alone would be a recipe for disaster – but making pocket holes and using heavy duty metal screws meant for the job along with wood glue is the permanent, strong, professional way to go (I like to do my research so things don’t fall apart later, which only adds up to more work for us). So there’s zero flex in the newly joined doors – they don’t close oddly or feel wiggly. They’re solid – and should function exactly the same way that our other solid oak doors do for the long haul.
As you can imagine, now we’re even more excited to get these suckers painted. Especially now that I’ve got all these ugly cuts that I want to hide going on. If only I didn’t have to do stuff like add toe-kick molding and other miscellaneous trim first. Although I did already add a new window sill and window trim (more on that later).
If we’re being realistic, it’s unlikely that we’ll get a painted cabinet update to you before Christmas in ten days (puttying and sanding and drying times for primer/paint would make that kinda impossible). But maybe we’ll recruit Santa to help us sand and prime when he drops down that chimney in 10 days. Sigh. If only these things could happen while we slept. Can you imagine how sweet that would be?

Lisha says
yay for getting the doors on your microwave and other cabinets! That would be awesome if Santa stopped by to help you guys paint the cabinets (especially if he brought his elves!). For some reason I think they might be kinda busy this time if year though! Here’s to hoping!
~Lisha
YoungHouseLove says
I know right? Maybe they have more free time in January… hmm.
xo,
s
Ashley @ House on Pender says
You guys amaze me. You are so creative when it comes to reusing what you already have!! Kudos to you. I can’t wait to see the finished product. My the sanding/paint gods be with you!
Tiffany says
That’s incredible! Definitely worth the attempt – especially if you can save 800 big ones. One question though, would it be possible at all to sort of hinge those two doors together for that base corner cabinet? We had a corner cabinet similar to that before we switched them all out, and it had that set-up. That way you guys wouldn’t have to open the doors seperately to access all of the space.
YoungHouseLove says
We looked into that but all the hinges we found were either sunk (had to be routed in – and our cabinets were too thin for that) or had to have a flat end for the flat hinge to lay on (ours is stepped so it looks like a stair). If we could find a stepped hinge it could work, but it’s hard to hunt those down!
xo,
s
Svenni says
I want to make a few suggestions for you. If you want the seams to blend in so you wont see them, you should make a shallow v-groove in the seams, and then fill it with body filler (the kind they use on cars) instead of wood putty. It’s much much stronger. You can do this in many ways (router, angle grinder, or just a plain old knife). That way the seams are bridged and the filler has something to bind to.
I have a friend that worked as a car painter and he has spray painted mdf furniture in the past after using this method. He says there is no way to hide the seams without making the v-grooves.
But have in mind that wood moves, so there is no guarantee that this will hold up for many years. But in my own experience, I’ve filled a few big holes and dents in a few panel doors of my own a few years ago with body-filler, and that has holden up just fine.
I hope I made myself understandable with my poor english.
Svenni from Iceland :)
YoungHouseLove says
Thanks so much for the tip! We’ll have to look into that! Although with the Kreg Jig’s pocket holes + wood glue + heavy duty screws, the wood shouldn’t move at all – especially since we’ll prime and paint after we putty to “seal” everything in place! Of course we’ll post all about whatever method we go with and share updates if anything catastrophic happens down the road!
xo,
s
mp says
Every time I think John can’t impress me more, he does.
If I had tried this, I’d have botched it AND ended up in the emergency room.
Jen @ The Decor Scene says
OMG you guys are super skilled!!! I would have never thought about cutting doors in half and putting them back together. Bravo you crazy DIYers!!! I can’t wait to see them painted now. Santa won’t you please help the Youngsters primer & paint their cabinets for Christmas!!! ;)
Jenny says
I priced out shaker doors in MDF from a online store. For my whole kitchen it was less than $400. It was an extra $200 or 300 for shipping. That was about 14 doors. Just to give you an idea. They would need painting.
We had custom solid oak cabinets too that were a little weird. We also took off the the standard old hinges and replaced with European hinges for $1.50 a piece (great quality ones). Looks so much better
Can’t wait to see your kitchen cupboards painted.
YoungHouseLove says
Thanks! We have looked at MDF doors too but things like our super long pantry doors were around $200 on their own (without shipping)! We also really like sticking to solid oak since we think it’s a great durable solution, it’s eco friendly (no off-gasing & we’re using what we have) plus it’s good for resale to be able to say “solid oak cabinets and doors.” But I bet your new doors look amazing in your kitchen – and you’re lucky to have snagged such a steal!
xo,
s
mp says
Jenny, I asked a few cabinet makers about cutting MDF doors for the cabinets in my previous home, and all of them (four) were against it because MDF absorbs water a lot more readily than plywood, even after painting. I ended up paying $600 for new cabinet doors, new drawers (with up-to-date side rollers) and a new counter, but that kitchen only had nine-foot stretch of cabinets/countertop.
Pamela says
I’m cringing at the use of the kreg here. Totally the wrong tool. YOu definitely need to make friends with a bisuit joiner. About $100 and a much neater solution to things like this where you want a clean seam on a thin frame. No massive amounts of wood filler to potentially crack and far less potential of splitting the thin boards with the drill/screws.
YoungHouseLove says
We’ve heard great things about the biscuit joiner! I guess it’s a case of using the $99 tool that we already have – and we’re certain once we putty, sand, prime, and paint they’ll be seamless!
xo,
s
Alison M says
I love how you guys are always able to be creative and mindful of not creating waste in your projects/redesigns. In a culture where people smash perfectly good cabinets that just goes to the landfill; it’s refreshing to see how things can be repurposed and also saves some coinage! Great job with the kitchen- can’t wait to see how it all turns out.
Rachel says
Holy lands! That is crazy talent.
Anne says
Way to go, John! You just upped the ante in diy-ville. They are going to look great painted.
Jessica F. says
Wow!!
I never would have thought of cutting down a cabinet to make a new one. That’s a brilliant idea!
Do you ever wonder/think/concern about selling your home and the new homeowners thinking “what! They just cut a cabinet down! How could do they do that?!”
YoungHouseLove says
Once they’re puttied, primed, and painted we don’t think it’ll even be something anyone can tell by just looking at them! They’re still solid oak doors and we joined them the professional way (with pocket holes, glue, and heavy duty metal screws) so they should last just as long as the cabinets! We generally hope that someone who buys this house after us would love finding that out (ex: reading this post and trying to figure out which cabinets were cut down, since it should be really hard to tell). We’d probably make a game out of it if it were us (and would love quizzing others to see if they could find the cut down ones). I guess our dream is that someone who has an appreciation for DIY would be attracted to our house in the first place (which is what seemed to happen when we sold our first house). Here’s hoping…
xo,
s
Kelly says
I’m in awe of your skills, John. Seriously. I would never have the guts to try that. Kudos that it turned out so well! Reeeeeally looking forward to the finished results!
Joy Franks says
John: You’re a genius!! Doors look great. How very brave of you to attempt such an undertaking. Looks like you got the fit spot on!
Caryn says
YES!!! Thank you so much for this timely post! I have a few doors from the kitchen of our 1970 ranch that I have been wondering how to adjust to fit into new places. I was thinking of taking a door to the store with me so I could find a router bit that matched the edges so I could trim them from two sides. But oh boy oh boy I think this will be SO much easier for me!! I have been putting off this project for quite a while but am getting tired of looking at two open cabinets under the wall oven :) I cannot thank y’all enough, this will probably save many hours of my life that I can be doing other fun home projects!!!
eileen marie says
What a creative solution! I am SO impressed!
Jenn W. says
wow, that’s impressive! i’m about to tackle painting my kitchen cabinets for the first time soon and am looking forward to your upcoming posts :) i’m debating whether to buy the non-sanding kitchen cabinet “kit” that’s recently come out or just go with the traditional sand/prime method…have a feeling the traditional way is more cost effective but am not so interested in sanding! we’ll see :)
Devon @ Green House, Good Life says
Evil genius!
Sheela says
How resourceful of you guys! Great work John. I have no doubt that copious amounts of wood putty, primer, and paint will have all of those doors and cabinets looking fantastic! What a great way to save money, materials, and the planet (less stuff for the landfill)! Way to go!
Allison says
Seriously impressive! My fiance has a habit of rushing through projects and I always feel like our projects end up with ghetto rigged, poorly put together pieces. I know that sounds awful to say about him, but I am seriously envious of John’s ability to look at a project, give it some thought and time and make it work beautifully! And your right, it does just lead to more work down the road if you don’t just take your time and carefully do it right the first time!
Autumn @ iNet Flavour says
Alright, you get major props for this for sure. Way to be creative! You saved $800 from using your skills that you obtained from your own home improvements and turned them into perfection.
PS. As plan C if your website every flops, I think you could qualify as a custom cabinet maker. :)
arianna says
I notice you said you did a lot of research before embarking on this project. Where are your go to sites for information when you don’t know what to do or how to handle a particular job? Or if you know you want to do something how do you figure out how to do it?
YoungHouseLove says
We always like to read the info that comes with tools (often they’ll tell you what glue/screws/materials they’ll work best with) and also look to certain sites like ana-white.com for awesome woodworking tips and tricks. We also have a contractor friend that we like to call up or email occasionally – just to get his take on an approach. And we aren’t strangers to asking the paint pros at places like Ben Moore if we’re dealing with a primer/paint question since they really know their stuff. Here’s another post with a bit more on that whole figure-it-out-as-you-go method: https://www.younghouselove.com/2009/12/email-answer-diy-damage/
xo,
s
Mollie says
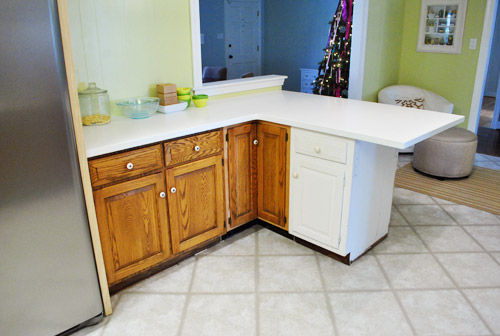
In the picture that shows the fridge and peninsula, if you take your hand and cover everything but the white cabinet, you totally get a feel for the new vibe of the room. Pretty! :D
YoungHouseLove says
Haha- that was fun. Maybe too much fun. Can’t. Stop. Doing. It.
xo,
s
Amanda says
I’m BLOWN. AWAY. The doors look fantastic and I’m so impressed with the fact that you guys even thought of trying this! I love it and I’m so excited about how your kitchen is coming together! :)
Sarah says
Ohh…. waiting to see these babies painted is as exciting as, well, waiting for Santa!!!
Caity says
Um, this might be the most impressed I’ve ever been with your tool skills, John! Way to go! I definitely would’ve taken one look at the doors and saws and shelled out $800 for the other guy to do the work ;)
Karen @bellacarina.com says
That’s pretty incredible! Nice job, John!
Heidi P. says
:O *speechless*
And thanks for pointing out the window trim! I probably wouldn’t have noticed on my own. It was exciting to see :)
Simon says
Have you thought about filling the kreg holes with kreg plugs?
http://www.kregtool.com/pockethole-screws-and-plugs-prodlist.html
And I second the biscuit joiner :)
YoungHouseLove says
Oh yes we hear those are awesome! It’ll just come down to whether we’d rather go the free route and use what we have a save a run to the store (we figure since we’re painting the doors and not staining them that solid oak plugs might be less important). But those look fun to have around so if we come across them before we start to putty they’d be awesome to use instead!
xo,
s
Joy says
You guys are so freaking amazing.. I love what you did.. and i love love the corner doors opening up like they do.. I hate that corner shelf it drives me crazy.. GREAT JOB.. cant wait to see the completed kitchen.
Karen says
I have to say that what you’ve done with the cabinet doors is extremely impressive. It’s worth it to save $800 and I think they will look fine once they’re painted. If the over-the-fridge cabinet doors bug you that much in the end, you could always remove them, make it one whole open area and use valances or fabric on a tension bar to conceal the space. (the way you would do to conceal a closet without a door.) Perhaps you are wincing as you read that suggestion, but it could add some color and interest and save money.
YoungHouseLove says
It’s definitely another possibility!
xo,
s
Karen says
Amazing! What a great idea! I have some built-ins in our office that have a very similar door style. They were custom built by the previous owner in the 80’s. I am planning an office makeover in 2012 that will include painting them white. Your kitchen and office ideas are always an inspiration!
Thank you!
Georgia says
I prostrate myself at your feet and bow to your rockin’ awesomeness. This is so clever!!!! You guys seriously rock. I love how you have been able to transform this kitchen without spending megabucks. But out of everything you’ve done, this is my favourite from sheer inginuity.
shelleyk says
I love everything that is happening in your house! It’s my favorite thing to check out everyday. Question about the floors–are you planning on taking your new kitchen flooring and going into the dining room with it? Or expanding it into your great room? Just curious what your long term plans were for those other rooms.
YoungHouseLove says
The new flooring will go throughout the kitchen and the laundry room (the only two rooms in the house with vinyl flooring instead of hardwood). Since the living room and dining room and all other bedrooms/hallways are hardwood we eventually plan to refinish them in a tone very similar to the cork floor that will be in the kitchen/laundry room so everything should look seamless and have better flow! Someday…
xo,
s
Susan Reeves says
I’m amazed you were able to reuse those doors. Just one thing bothers me… Why are you enclosing the microwave inside a door? That would drive me crazy in out kitchen to open two doors to heat up my mug of coffee. Maybe I missed something.
YoungHouseLove says
Here’s a post about that for ya – we just very rarely use it. Maybe once a week. I make my tea on the stove! Haha. So we don’t mind opening two doors once a week instead of having it take up valuable counter space or sit out in the open (you would see it from the front door if we didn’t add that cabinet door). Hope it helps!
xo,
s
Paige says
Couldn’t stop thinking about this project and had to come back for a second look – ahhhh-mazing!!!!
Catie says
I follow your blog daily and usually really like your entries…but I have to say that I’m not crazy about this one. I’m worried that the seams are going to show through the paint and that the cabinet doors are no longer strong enough. You guys usually have great ideas but I’m not digging this one at all.
YoungHouseLove says
No worries Catie! Didja see the paragraph at the end that says: “And of course if we don’t like how they look once they’re painted we can always call up the guy who’ll make us new doors for 800 beans if we have to (it’s not worth having a semi-ugly door situation to feast our eyes on every day in our new kitchen to save $800, so if it comes to that we’ll get ‘er done).”
We’re confident the seams won’t show & know they’re super strong (they’re solid oak doors reinforced with pocket holes and heavy duty metal screws – so they’re just as strong as the rest of the cabinet doors). But if we paint them and they look bad or somehow start to feel shoddy they’re dead to us – and we’ll spring for new ones and blog all about it! Just trying to work with what we have first.
xo,
s
Karen says
Hi J and S!
A tip for you, in case you are interested– my husband and I were planning on doing what you are doing–remodeling our kitchen and puzzling our existing cabinets back together in different places.
We had exposed hinges like you do. Our cabinet guy said it was pretty easy (for him) to re-router the holes to fit euro (hidden) hinges. SO if you aren’t crazy about that dated, exposed-hinge look, that’s an option for you! If you don’t mind the hinges, forget I said anything! It’s coming along BEAUTIFULLY either way!!
YoungHouseLove says
Thanks for the tip! Since our doors step down (they have this odd-half-sunk edge that’s already routed down pretty thinly around the outside edge) we were nervous to router them out anymore (for fear they’re just too thin to take it) so we have decided to embrace the exposed hinge look! Congrats for finding a way around it for your doors though!
xo,
s
Karen says
Also– I love your hidden microwave solution! I saw it on your blog and had an “aha!” moment for our own remodel (it’s been so fun reading your blog while we are in the depths of a largely DIY kitchen remodel ourselves–and our kitchen will have many similarities to yours!).
So we are now going to enclose our micro as well, with a horizontal door with a hinge that has struts in it, so that it stays lifted up when you close it (from Ikea).
Thanks for the great idea!
YoungHouseLove says
Love that! Good luck and send pics when you’re done!
xo,
s
Lisa says
Genius! Very impressive. You have me hankering for a Kreig Jig.
You could try taking some Ambien and getting the rest of the work done in your sleep ;).
YoungHouseLove says
Haha, might not be too safe with the power tools…
xo,
s
Val says
Wow! I’m very impressed! Way to go John! :-)
rayr77 says
Looks like it is going to turn out great, cant wait to see finished kitchen.
Susan Akers says
Wonderful job!
Ellie says
I’m so impressed! I love checking in on your progress and have come to expect DIY greatness from the two of you, but this project actually made me take the time to comment! :) Can’t wait to see the doors painted!
YoungHouseLove says
Aw thanks Ellie!
xo,
s
Maria says
Great Job!
One question for ya. When you paint the doors, do you remove all the hinges and paint them separately from the doors?
I have the same cabinets and hinges that I want to paint. But I don’t know if the latex paint will cover the metal ok and still look good. Can’t wait for the paint to dry!
-Maria
YoungHouseLove says
Metal hinges take super thin and even costs of a spray paint (with spray primer) so we will be taking that route (and priming and painting the cabs with different stuff in a different way). More details as we go!
xo,
s
Herta says
It has all been said…that is really some great work! Good-on-you!!!
marissa says
That’s just pretty darn awesome! Impressive handiwork :)
Lynn @ SafeBeauty says
Too thweet guys! You now have a cabinet with suicide doors. I think you should dub thee the Honda Element corner. Thanks for painting such a great visual picture with your words. It helps my brain to fast forward to the end result and then smile.
My best, Lynn
YoungHouseLove says
Haha- I love it. We now have an honorary Honda Element corner in our kitchen.
xo,
s
Rain says
We had the same hinge issue with our original 1950’s kitchen.
I took a liquid silver pen, it gave a brushed finish look, and colored the hinges.
The pen was like a sharpie that has a ball inside and you have to shake, not sure what this style of pen is called.
I have also done the same for french doors, before brass was back.
YoungHouseLove says
Wow- never heard of that method! Did it last a long time? How long have you been using those hinges? Any sign of wear?
xo,
s
Sarah says
So, this might really push John over the edge, but are you considering switching out the cabinet hinges for concealed? We have the IDENTICAL cabinets in our kitchen (ahhhh, honey oak….) and are planning our own makeover, and I think that would really be the icing on top. I know Home Depot sells a special tool to cut into the backside of the cabinets to set in the hinge- of course I DID have a tutorial bookmarked to pass along and now I can’t seem to find it anywhere… I’ll keep hunting.
Wondering your plans, because you loved the look of your previous kitchen’s cabinets so much.
Great job so far!
YoungHouseLove says
We looked into that but actually because of the bevel around the door, it’s actually too thin to be routed out for invisible hinges (the middle of the door is thick enough but that edge just ruins it for us). But we did consider spraying the hinges that we have (they’re very rare since there’s that double bevel due to the half-sunk door) or trying to find some new ones in a fresher finish. Thankfully there are tons of clean, gorgeous, modern kitchens with exposed hinges on Pinterest, which definitely have me inspired!
xo,
s