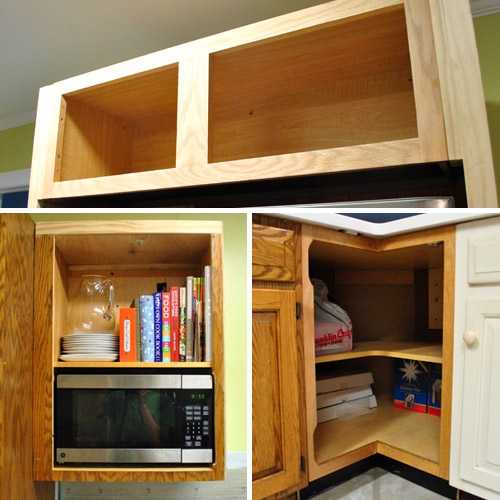
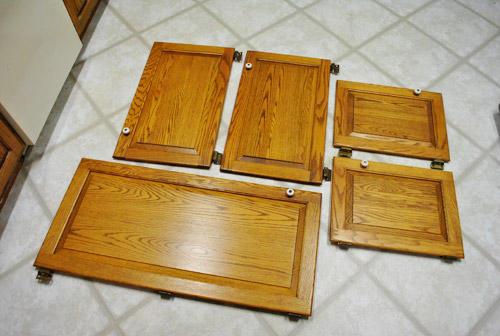
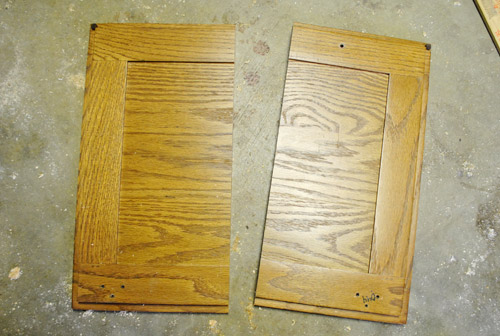
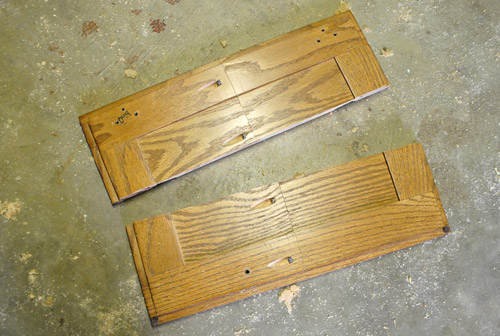
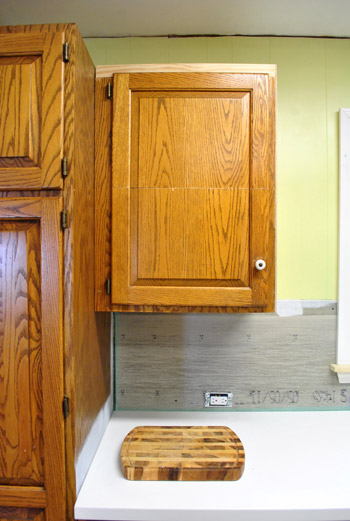
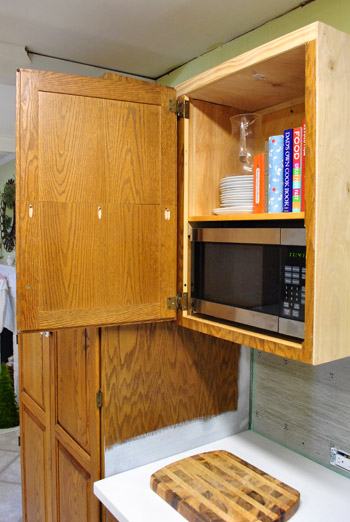
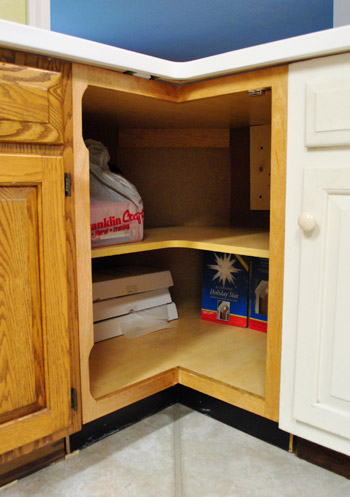
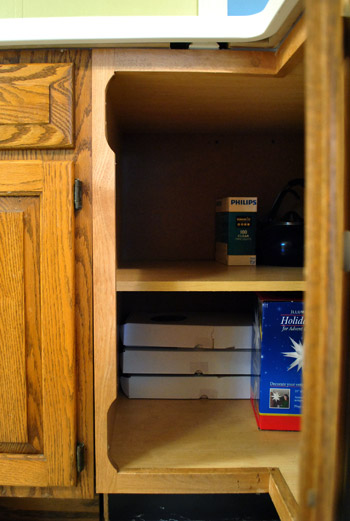
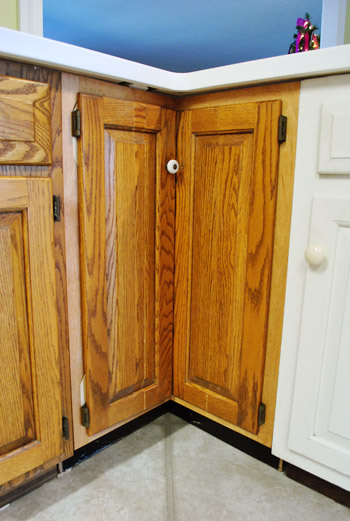
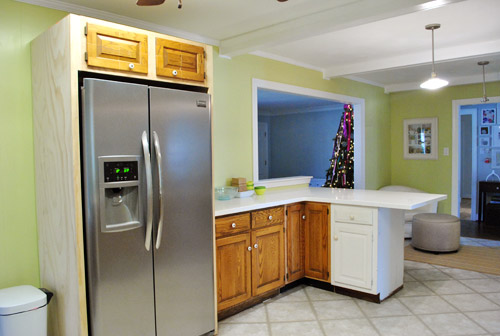
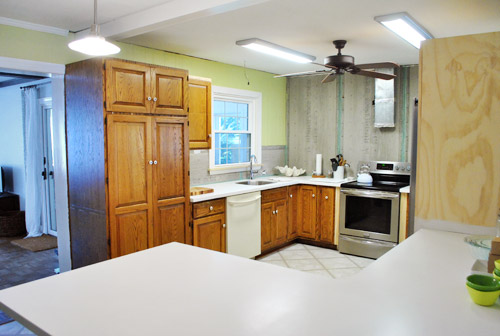
We knew from the moment that we decided to add new (secondhand) cabinets to our kitchen that the doors could be a challenge. Even though we only ended up with 5 missing doors, it was important that we get those to match with the rest of the kitchen for a seamless look (aka: so no one would look around and guess we had some mismatched thrift store cabinets among us). Here are the five doorless cabinets that we had to address:
We knew we had a few options to result in a kitchen full of matching doors, so one of them was bound to work. Here they are (in order of expense from most to least):
- Getting all new doors and drawer faces for the entire kitchen
- Ordering custom-made matching doors for just the few cabinets missing them
- Try to cut-down/repurpose leftover doors from the old cabinets that we’re no longer using (remember we took a bunch down here)
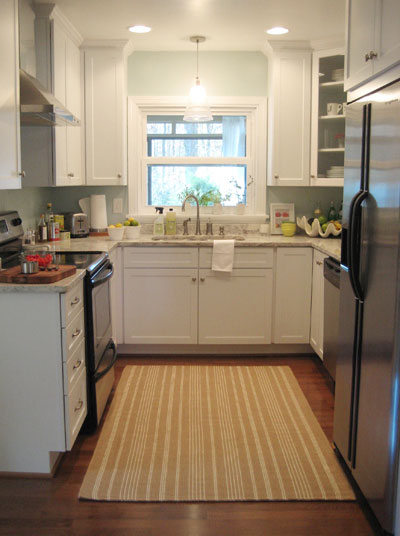
We actually investigated Option #1 first, because we do love a shaker style door (like the ones we chose for our last kitchen below):
But as we started adding up the cost (best on a few different sources, from Home Depot to online door-making warehouses) and it started to look like it’d be upward of $2,000-3,000. So yeah…. next option?
Happily, option #2 was substantially less expensive. Our challenge here is that we have a very specific cabinet style. They’re extremely solid well-built custom oak cabinets and doors (which is nice – and we’re happy to have them)… but being custom means they’re a bit unusual (aka: haaard to find). They’re actually framed cabinets (i.e. there’s a small lip on the front of the cabinet box) and are partial inset doors (meaning part of them sit within the frame, part sit on top of the frame). This makes for an awesome seal that fits together amazingly (like one big puzzle) but it also makes hoping to somehow “find” matching doors in our custom style/size/depth virtually impossible.
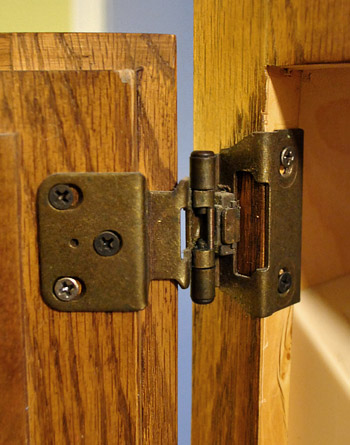
As for buying new ones “to order” in specific sizes that we request, no one that we dropped in on sold partial inset doors with the same detailing on the front (and we couldn’t use non-partial-inset doors because those would stick out about a half-inch more from the cabinet when closed, so they’d be really obvious and weird looking among the rest).
So next we called up the original manufacturer of the cabinets (a private company out of Pennsylvania called “Quaker Made” who specializes in custom cabinetry). They patched me through to an independent repair guy who makes new doors, so I gave him rough measurements and he quoted me about $800 to make new doors. Not bad, but a bit more than we were hoping to spend… especially when we had so many extra doors laying around. Including these five that were perfect candidates for being re-fitted.
It kinda seemed stupid of us not to at least try to make these work first. If our attempt failed, we could always go to Option #2 as a back-up. And you know we like to work with what we have. So yeah, cue the power tools.
All of the doors were too big for their new cabinet-y homes, so we knew we had to cut them down. Cutting them down wasn’t going to be as straightforward as just slicing off the extra inches since I needed to maintain the raised border and the raised inner panel on each door (along with the inset edge around the perimeter). That meant I need to shave off the extra inches from the middle of the doors. Yikes.
To get super straight cuts, I used my table saw. For anyone wondering, our table saw of choice is this Skil one for $150, which we really like… maybe a little too much).
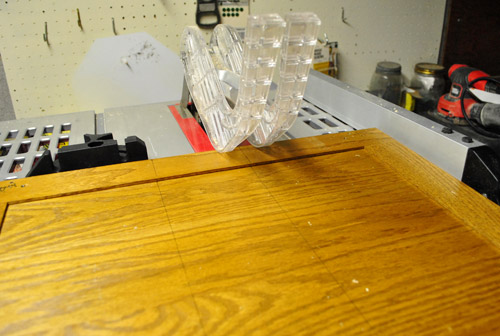
Two cuts later, I had removed a section from the middle and was left with two halves that would create the perfect door length.
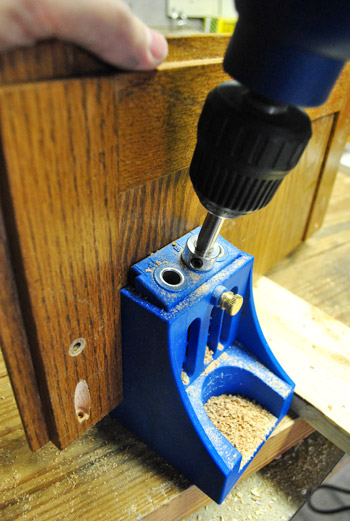
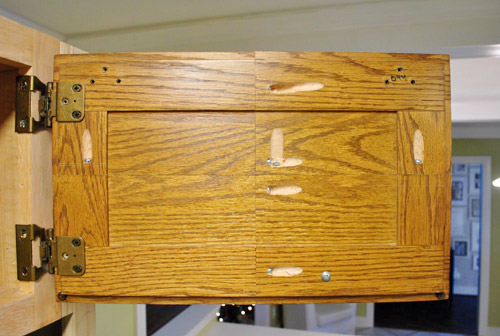
To secure the halves together, I made some pocket holes with one of my other BFF tools (my Kreg jig)…
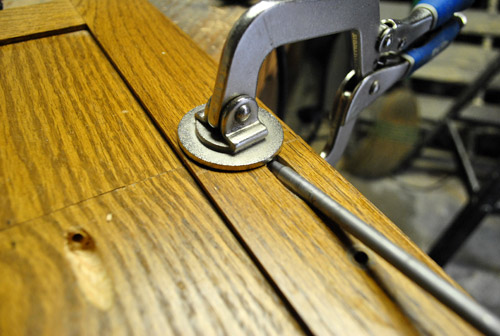
…then I carefully clamped them together before screwing everything tightly to secure them. I also use wood glue for the strongest possible hold, but I wipe the excess right away with a rag to keep things looking neat, which is why you don’t see it gushing out from the seam in this pic:
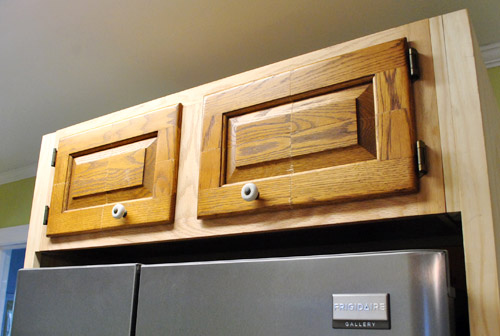
Now, for the doors above the fridge I had to repeat this cut-jig-screw step the other direction too, since the spare door was both too tall and too wide. Yup, I totally Frankensteined those babies.
But once it was all screwed together again (and the hinges were reattached), things were actually fitting together much better than I expected (full disclosure: I completely thought this method would flop, but it was still worth a try just in case it ended up saving us $800).
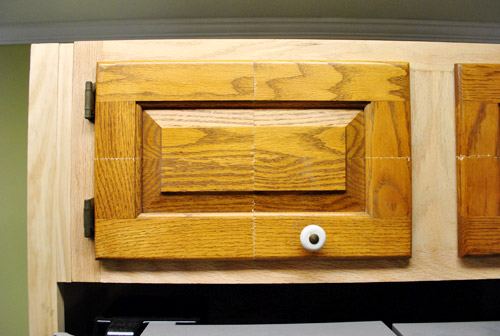
Now I know what some of you are thinking – because I was thinking the same thing: this isn’t looking so hot. But I reminded myself that once we add in some wood putty and sand those babies ’til they’re seamless we should be in ok shape. And once we use nice thick self leveling primer and paint, even things like the wood grain – and hopefully those hairline cracks should be undetectable (we used self leveling paint on the oak office cabinets that we painted and the wood grain doesn’t show through at all). Oh yeah, and we’re definitely moving the knob to a less awkward place (replacing it with new hardware actually)….
…and we’ll use wood putty to fill the screw holes in the back (it’s looking pretty treacherous back there).
I probably made this process seem faster and easier than it really was. It took me all morning to do these two doors (and a third test door that I messed around with first to see what worked and what didn’t before moving on to a door that matters). And there weren’t just two cuts per door – there were definitely a few trims and recuts along the way to make sure things fit snugly, but not too snugly thanks to that inset-back edge.
The microwave cabinet door was easier, since I was reusing the door that originally went on that once-taller cabinet. So it just took cutting a few inches out of the middle to make this door work.
This one only took me an hour-ish to do. Progress! The reason even one cut takes so long is that I measure and remeasure and very nervously make my cuts on the conservative side (since you can always shave more off but it’s a lot harder to add stuff back in).
That progress got derailed a bit when I faced the corner cabinet. This secondhand cabinet came with bi-fold doors, but those hidden hinges wouldn’t work for our partial inset doors (which meant if we tried to use them those doors would stick out at least a half-inch more from the frame than the rest of the doors in our kitchen – which would look terrible). So we debated installing a pie-cut lazy susan and just affixing the doors directly to that (kinda like the one in our other corner cabinet across the way), but nixed that idea because after a bit of thought we decided one base cabinet with a lazy susan was enough for us – and we were actually enjoying all of the wide open space for bigger items (which would be lost if we sliced things up by adding a lazy susan).
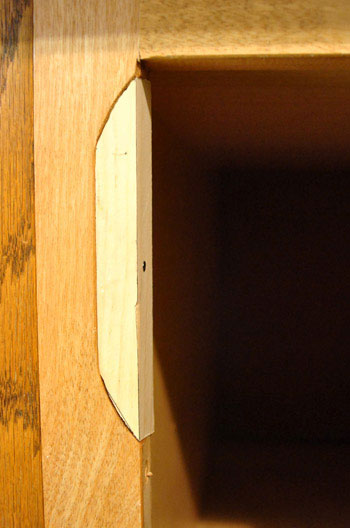
But before I could even start dealing with the doors, I had to fix these notches that were cut out of the frame to accommodate the old hinges.
After a few tries, I finally was able to jigsaw a couple of pieces that fit into the notches (not perfectly, but wood putty thankfully covers a multitude of sins when you’re painting your cabinets). I just screwed them into place and was happy to finally have a place to attach my hinges (which will all be removed again for our wood-puttying and sanding step down the road – and most likely sprayed a new color to match our new hardware).
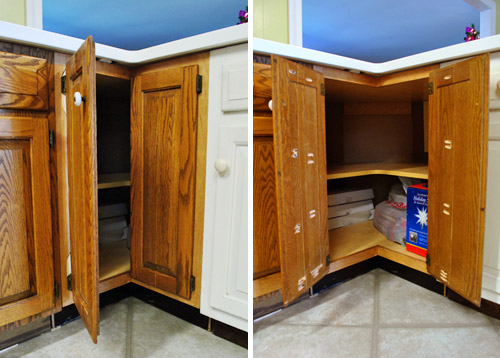
What we ended up doing with the door was the simplest solution that we could come up with using what we had: two separate doors, hinged on opposite sides.
It took me the rest of the afternoon (plus part of the next morning) to get these to finally fit right, but you can see how they open below. The left door has a knob (that’s very awkwardly placed – which we’ll move) to open that side first. And once that door is open we can easily pull the other one open afterwards. We love that they still give us complete access to the wide shelves inside. Makes us very happy we didn’t go the lazy susan route since we already have one of those in another corner.
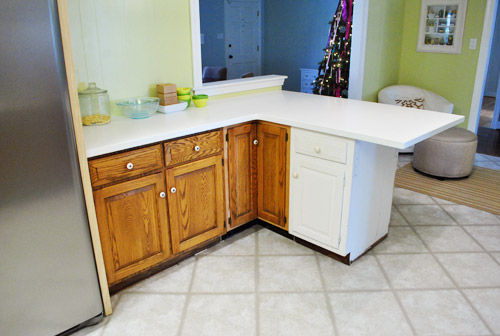
In the end, it definitely took longer than I hoped it would (mostly because of lots of noodling and trimming) but I think it came out pretty good. Everything fits. Everything closes nicely. And, once it’s all wood puttied / sanded / primed / painted, everything should look pretty much as good as new.
And, of course, if we don’t like how they look once they’re painted we can always call up the guy who’ll make us new doors for 800 beans if we have to (it’s not worth having a semi-ugly door situation to feast our eyes on every day in our new kitchen to save $800, so if it comes to that we’ll get ‘er done).
As for durability, joining solid oak doors with nails or glue alone would be a recipe for disaster – but making pocket holes and using heavy duty metal screws meant for the job along with wood glue is the permanent, strong, professional way to go (I like to do my research so things don’t fall apart later, which only adds up to more work for us). So there’s zero flex in the newly joined doors – they don’t close oddly or feel wiggly. They’re solid – and should function exactly the same way that our other solid oak doors do for the long haul.
As you can imagine, now we’re even more excited to get these suckers painted. Especially now that I’ve got all these ugly cuts that I want to hide going on. If only I didn’t have to do stuff like add toe-kick molding and other miscellaneous trim first. Although I did already add a new window sill and window trim (more on that later).
If we’re being realistic, it’s unlikely that we’ll get a painted cabinet update to you before Christmas in ten days (puttying and sanding and drying times for primer/paint would make that kinda impossible). But maybe we’ll recruit Santa to help us sand and prime when he drops down that chimney in 10 days. Sigh. If only these things could happen while we slept. Can you imagine how sweet that would be?

Holly says
Now THAT is resourceful! WOW!
Jessi says
It’s looking Ah-Mazing!!! I wish I lived closer so you guys could teach me how to use power tools! Maybe if you go on a book signing tour and come to Washington state I’ll at least get to see you in real life! :)
YoungHouseLove says
Aw shucks, Jessi. We hope we get to meet you too!
xo,
s
Hayley says
Man! You two always blow my mind with your fixes, I’m so glad you take the time to share them with the Interwebs!
Jenelle says
Not a door related comment (but nice work on the doors)…
Did you know that MyPublisher put pages from your Clara’s First Year book up on Facebook? I always see them posting pages from people’s books (and Christmas cards), and I wonder if they get permission first.
Anyway, just thought you should know in case you didn’t already.
YoungHouseLove says
Haah- that’s so funny! We didn’t know that! They use Will’s photos (from bowerpowerblog.com) and I always felt a pang of jealousy that my gal didn’t make the cut. So silly. Anyway, I guess she did!
xo,
s
Cara says
If I may make a suggestion! My husband just spent 9 months redoing our kitchen. He built all new doors by hand, painted the cabinets a light gray, put in butcher block countertops and subway tiled the backsplash. He even made custom crown molding. It looks amazing! I just wish I could stage it properly.
We had that black toe kick as well. He attempted to sand it and paint it gray. Well, the paint completely peeled off. We were going to buy new toekick and paint that, but the price was outrageous! Instead he bought a sheet of MDF, and cut it to size. Saved us over 75%!
YoungHouseLove says
So smart! I love it!
xo,
s
Chrystal says
Ok now you guys are just getting ridiculous. :) So amazing. Awesome job.
Shelley says
This post is an example of why you guys are so inspiring. You work within your means and still end up with a beautiful end product. Keeps me in reality and also gives me hope that I can create a space I love with my own limited funds. Love watching your house unfold every day.
Jessica says
All I want for Christmas is for you guys to decide to paint the cabinets WHITE and not a grey/taupe color….everytime I see that one WHITE cabinet on the new peninsula, it makes me want them ALL to be white so much!!! lol
amanda says
So where do you do your research when you’re trying to find out what to use on your projects (nails, screws, type, size, etc)? Sometimes I wanna try some wood projects, but I never know what to use or the proper way to angle things in so they don’t fall apart. Are there any sources you trust most?
YoungHouseLove says
We usually google around and find reputable articles on woodworking sites or message board or ask pros that we know (like a contractor friend of ours or the pros at the paint store) depending on the project (carpentry or paint related, for example). Ana-white.com also has some awesome basic carpentry stuff, and sometimes the tools themselves will tell you what the correct screws or nails are to use with their product. Hope it helps!
xo,
s
Penny says
Daaaang, John! You really took those babies to the market!
YoungHouseLove says
Hahahahahahha. Yesssss. Thanks Penny.
xo,
s
Kasey March says
Did I miss the we had our counters installed post? They look fantastic! When did they arrive?
YoungHouseLove says
Oh yes, here ya go: https://www.younghouselove.com/2011/12/merry-countermas-to-us/
xo,
s
jbhat says
You guys are bonafide geniuses in the Make it Work category (among others). I think your new cabinet doors look like simply amazing–even before their makeovers. I wish your can-do attitude could be bottled. I’d ask Santa to bring me several gallons of it for Christmas.
jbhat
Maura says
Oh, your kitchen is going to look SO GREAT! I’m glad to see that this method worked. I almost did it in my kitchen but decided to demo the bulk head and make upper cabinets that went full height. My dad helped me make new shaker style doors and drawer fronts. Yall could totally handle that if you need to in the future. Promise. But I looks like this method will work out great. Well done!
Emily L. says
This is the ultimate in DIY…you should win some kind of award! And, I’m so thrilled that you’ve finally started the kitchen – I’ve been looking forward to it since you moved in!
Ally says
I have never been more impressed with you YHLers! Seriously. Genius solution, and I’m sure they’ll look great once painted. I mean, heck, they look good now! If I did this, I’d be all, “The doors are staying unpainted to forever remind me that I am a hardworking, creative-solution-finding genius.” Nice work!
Christina says
I’m a relatively new reader. Well, I started reading your blog about a year ago, right before you both decided to move. Anyway, I just wanted to say that you two make an amazing team. While I missed all of your first house renovations in “real” time, I can appreciate all the hard work you did in that house, especially in your last kitchen. The before-and-after photos are really stunning. Anyway, I just wanted to say that I have no doubt that this kitchen’s before-and-after will be equally stunning. Keep up the good work, and Merry Christmas!
YoungHouseLove says
Aw thanks Christina! And Merry Christmas to you too!
xo,
s
Kacie says
I can’t wait to see the finished kitchen. We are enjoying ours so much. It’s such a great house-change.
Kacie
http://www.acollectionofpassions.com/
LARY says
Super John wins again! How cool! Looking forward to see them all painted! You guys are amazing! :)
Kara says
The corner cabinet doors you created look a bit odd to me with the adjacent raised borders on both doors. Is this cabinet identical on the outside to your lazy susan corner cabinet on the otherside of the room?
YoungHouseLove says
Yes, oddly enough that’s exactly how the other corner cab is made- so we’re just mimicking that one to keep them balanced.
xo,
s
Christine says
I’m impressed by your cleverness.
Meg@Keeping up with the Jenks' says
when I saw the picture of the completed above-the-fridge doors my jaw dropped and I immediately said, “holy crap, it worked”.
and I could totally envision John stepping back after hanging them and saying the same thing.
congrats on a job well done!
Criss says
You guys always amaze me. Some days I think “If they learned, I could learn to do it, too.”
YoungHouseLove says
You totally can! We have no experience and 99% of the time our method is just trial and error (with some googling and some finger crossing). You can totally do it!
xo,
s
IKDO says
Your kitchen is coming around quite nicely. Congrats! That was a real clever fix for the doors
Terri says
We have the EXACT same Quaker Made cabinets, they’re from 1969.
I let one precious door go to the cabinet maker in St. Louis – so they could replicate the same proportions for additional, glass fronted cabinets. They LOST it…auggghh. It didn’t seem to bother them much, until they realized how well made the original door was – at least $800 to replace one door.
Can’t wait to see your finished kitchen!!
1916home.net says
I must say that is PRETTY AWESOME!
kathleen says
Simply amazing! You did a fantastic job John! That was really good thinking, you will save many people loads of money if they ever have this same problem.
Marla says
nice work! my hubby does tricky stuff like this – making magic with wood, putty, and paint. Does the door size to styles width ratio on the cabinet above the fridge bug you? I’m curious to see how it will look when painted – might be fine then. Or maybe no doors at all since it kind of has that beefy built-in look? Either way, awesome work on your progressing woodworking skills :)
YoungHouseLove says
We’re hoping once it’s all the same color (painted with new hardware) it’ll be ok. But if it looks wonky we’ll definitely tweak it somehow and blog all about it! Haha.
xo,
s
Tyleet says
Wow! This post comes across as totally nonchalant, but I am HELLA impressed!
jess hogue says
holy heimlich maneuver!
you guys are so frickin’ frackin’ whacked out BRILLIANT that i just choked a little bit on my lunch when i saw this post.
you are boldy going where no diy’er has gone before, and with beautiful results. congrats, you guys. this kitch is goin’ to be tha bomb!
Candis says
Okay, this just needs to be said…
YOU GUYS ARE AWESOME! I cannot believe that you pulled that off–it is going to be fantastic!!
I love your blog, by the way. Every day I scroll to the very bottom of my reader and *hope* that you have posted! You are my fave :) Keep up the great work!
Abby says
One of the most amazing things about the two of you is how simple you make your brilliance look. I love it.
Katrina says
Such a good idea!! :) OK were going to need to buy that tool you always use!
karen says
what the?!?!? amazing!
Jackie Toye says
Super WoW!!!
I wish I would have saved my cabinets … 1961 home had custom real wood cabinets with flat panel doors. All I needed was better hinges like he ones you have. Lacking confidence and creativity is Costly, I say. moving on, moving on, moving on – what I tell myself when I want to kick myself, again)
Great Job Guys!!
Carla says
Things are coming along nicely, but two things bother me with the layout: the massive floor to ceiling cabinetry near a door opening really blocks off the flow of your kitchen and feels very restricted; and the mantel on the wall cutout, which doesn’t seem to serve any purpose and looks awkward. That little wall would blend better if the counter top had been more seamless and extended over the top of the wall instead of sticking a mantel on there. the wall extends just a few inches above the counter.
YoungHouseLove says
Yup, that’s definitely personal preference stuff! We tried the pantry in a few other places and that was the winner for us. As for the half wall, we actually laid things out on Google Sketchup with the counter extending instead of adding the ledge and we liked it better with the ledge (the peninsula felt more “kitchen-relegated and grounded” instead of “floating oddly between two rooms”). We also didn’t want it to feel like the dining table was on top of the peninsula, and it’s amazing what that little ledge does for defining those spaces. But we can definitely understand that it’s not the same choice that everyone else would make!
xo,
s
Heather says
It made me giggle to think that you cupboard doors were hard to find. They are in EVERY pre 1990’s house in Utah and line each land fill and thrift store here.
YoungHouseLove says
Really? We have practically lived at the thrift store for the past four months and have only seen them once (in the wrong size). That’s so funny!
xo,
s
karen says
oh i just saw this on my pinterest board… http://pinterest.com/pin/284993482639176389/
if the doors above the fridge don’t work out…this could work too.
YoungHouseLove says
Fun! I think with all the open shelves on the wall above the stove we might like a door or two to hide stuff, but it’s a great back up plan!
xo,
s
Teresa says
And the medal for fearlessness in a DIY project goes too…. John! :) Great work!!!
Shelley says
I’m having so much fun watching this transformation!
Vanessa says
I really admire you guys for just going for things yourself. You can honestly sit back once your house is exactly the way you want it and know you put in the work and effort and can be proud of it. Plus you save money just by trying and being patient! Good luck to you and I hope you get to enjoy some time off during the holidays! We all cannot wait to see the end result! :)
Sheena says
GENIUS! How did I not think of this?? The hubs & I are contemplating a kitchen switcheroo very similar to what you guys have done here (nixing our double wall oven for a stove/oven combo + sliding the fridge over & creating some extra counter space)–the whole “what do we do with the cabs” question was dauntingly pricey, but this is brilliant! Thank you!!! :)
Jodi says
I am assuming that you will paint your cabinets white??? If so, have you picked out a color yet? Do you favor a particular shade of white for woodwork?
YoungHouseLove says
Not sure if we’ll go white or a soft shade of gray-beige. Once we quit being wishy-washy and make a decision we’ll share it though! Hopefully soon!
xo,
s
holly says
oooooh, i really hope once filled, sanded, self-level primed and painted this turns out to be amazing and there’s no need to spend the $800—but, i am biting my nails just a *little* bit! that said, i am blown away by your vision, innovation and optimism. being along for the ride is so super fun. i cannot wait to see how it all turns out!!
Ana Silva says
Wow you guys never seize to amaze me. Nicely done!
Sarah says
Brilliant solution there.
By the way, this week I started reading your blog from the beginning and I’m around Dec ’07 when you were buying your kitchen cabinets for your first house. It’s really striking how spendy you guys used to be and how far you’ll go to stay frugal now. It would be really neat for us readers if you could do a post about the real wisdom you’ve picked up over the years, and what you advice would give your younger selves. I guess I’m genuinely curious if you would still spring the extra cash for the different cabinet door style and stuff like that. Obviously your lifestyle changed a lot and when you work a 9-to-5 you end up paying more for convenience and all since you’re limited on time, and there’s no right or wrong. Just curious.
YoungHouseLove says
That’s actually a really interesting question! I think we’re generally a “no regrets, don’t look back but look forward” type of family (just to keep our momentum and enthusiasm up it’s nice to say “we loved that house and everything we chose at that time made sense for us” – but I know that spending 17K on a kitchen this time around (which didn’t even include appliances in our last kitchen, since we had purchased them prior to the makeover) definitely isn’t something we’d do now! We also went from making “advertising money” (it was a pretty nicely paid career) to “self-employed money” (we both took major pay cuts to make this blogging thing work) – so I think we look at money a bit more frugally. And thanks to all the other blogs out there full of inspiration, we truly do have much more open minds when it comes to how much you can actually do yourself if you put your mind to it!
xo,
s
Holiday says
Hmm, I think the ones above the fridge look too small. All the other doors are bigger/have less visible frame around them. Maybe it’s just me…maybe open the holes bigger and put in bigger doors. If you have any left to mess with that is. Great result so far!
And, John, you need a biscuit joiner for this kind of project. Seeing how much you love your Kreg, I think its right up your alley!
YoungHouseLove says
Yup, we’re thinking when we paint it’ll be less noticeable, but if they bug us we’ll change things then (and blog all about it of course). As for a biscuit joiner, you’re the second person to recommend that for John. He might never leave the basement if I got him one of those. Hmm…
xo,
s
dj sherry says
simply outstanding!!!!!
elizabeth says
What Kreg Jig set up do you have/recommend getting? There are so many price points on them with so many different things included in the various kits it is hard to figure out what you would really NEED!
YoungHouseLove says
We have the basic $99 one and got a few extra clamps (which really help!). Hope it helps!
xo,
s
jeannette says
upcycling. it will rule the world. i’m thrilled.
jeannette says
and, p.s., y’all are so polite to people who criticize taupe what i think is totally awesome. whether you paint it taupe or white or, as previously taupe mentioned, dirty diaper green, isn’t really taupe any of my taupe business. It’s all good. merry taupechristmas.
YoungHouseLove says
Haha, merry taupemas to you too Jeannette!
xo,
s
kristen f davis says
i have to say – i am totally impressed. genius, john, genius. can’t wait to see them painted. i wonder if that woodgrain will be totally undetectable. i use aura paint (by ben moore) for all my cabinet projects because of how wonderfully it holds up, but if you have something that truly truly hides woodgrain (i’m talkin’ nothing at all showing) i would really love to know! i hate for it to show through on oak cabinets, but it always seems to be a least a little noticeable!
YoungHouseLove says
We used Benjamin Moore Advance paint to paint our oak office cabinets and there’s no grain texture at all showing through (it’s a bit thicker and more self leveling than Aura I think- but still low VOC which is awesome!). We also did a lot of sanding beforehand (to get things nice and flat) with a mouse sander, so that might have helped too. We’ll have to let you know if we get any grain showing through this time in the kitchen!
xo,
s