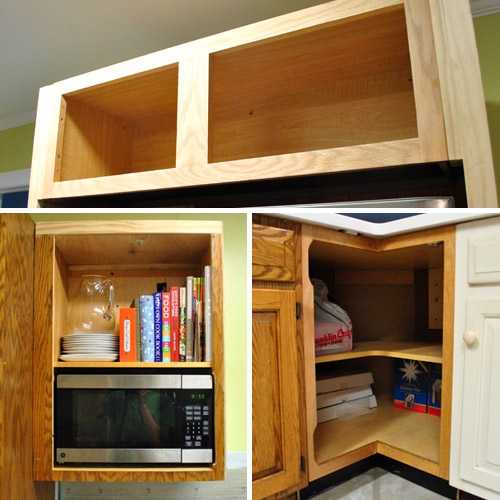
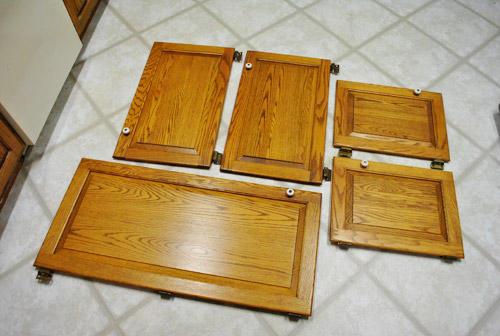
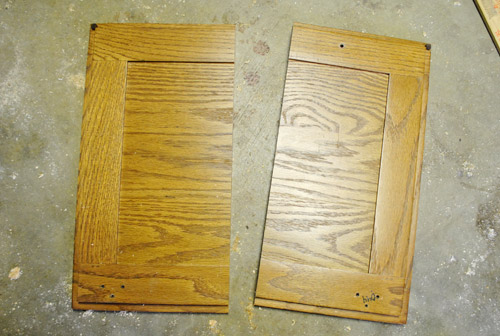
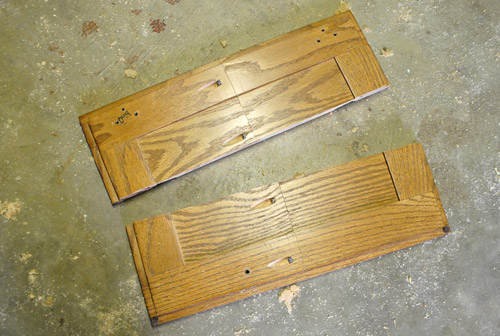
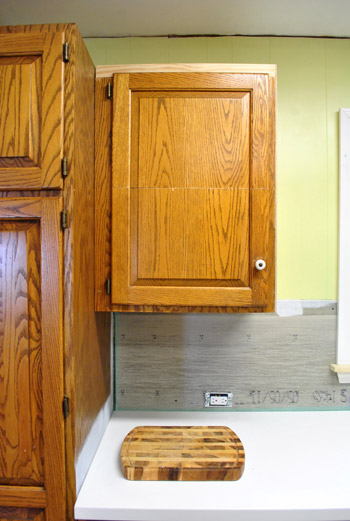
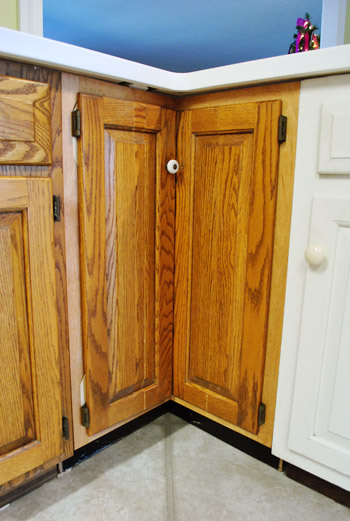
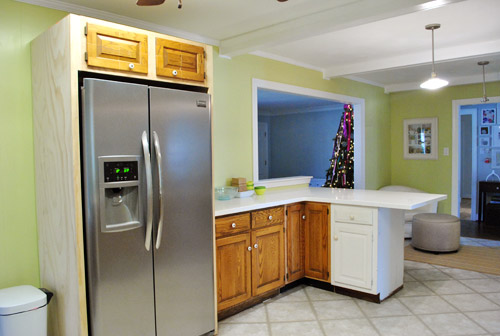
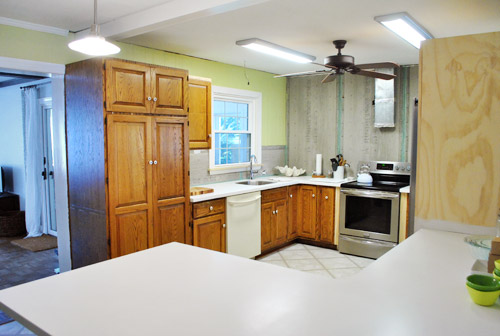
We knew from the moment that we decided to add new (secondhand) cabinets to our kitchen that the doors could be a challenge. Even though we only ended up with 5 missing doors, it was important that we get those to match with the rest of the kitchen for a seamless look (aka: so no one would look around and guess we had some mismatched thrift store cabinets among us). Here are the five doorless cabinets that we had to address:
We knew we had a few options to result in a kitchen full of matching doors, so one of them was bound to work. Here they are (in order of expense from most to least):
- Getting all new doors and drawer faces for the entire kitchen
- Ordering custom-made matching doors for just the few cabinets missing them
- Try to cut-down/repurpose leftover doors from the old cabinets that we’re no longer using (remember we took a bunch down here)
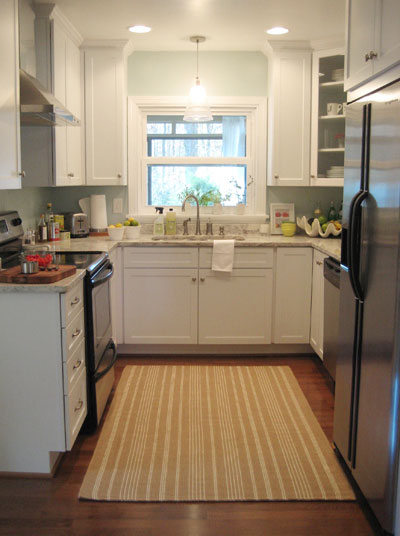
We actually investigated Option #1 first, because we do love a shaker style door (like the ones we chose for our last kitchen below):
But as we started adding up the cost (best on a few different sources, from Home Depot to online door-making warehouses) and it started to look like it’d be upward of $2,000-3,000. So yeah…. next option?
Happily, option #2 was substantially less expensive. Our challenge here is that we have a very specific cabinet style. They’re extremely solid well-built custom oak cabinets and doors (which is nice – and we’re happy to have them)… but being custom means they’re a bit unusual (aka: haaard to find). They’re actually framed cabinets (i.e. there’s a small lip on the front of the cabinet box) and are partial inset doors (meaning part of them sit within the frame, part sit on top of the frame). This makes for an awesome seal that fits together amazingly (like one big puzzle) but it also makes hoping to somehow “find” matching doors in our custom style/size/depth virtually impossible.
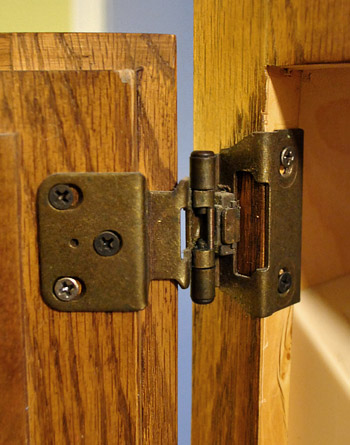
As for buying new ones “to order” in specific sizes that we request, no one that we dropped in on sold partial inset doors with the same detailing on the front (and we couldn’t use non-partial-inset doors because those would stick out about a half-inch more from the cabinet when closed, so they’d be really obvious and weird looking among the rest).
So next we called up the original manufacturer of the cabinets (a private company out of Pennsylvania called “Quaker Made” who specializes in custom cabinetry). They patched me through to an independent repair guy who makes new doors, so I gave him rough measurements and he quoted me about $800 to make new doors. Not bad, but a bit more than we were hoping to spend… especially when we had so many extra doors laying around. Including these five that were perfect candidates for being re-fitted.
It kinda seemed stupid of us not to at least try to make these work first. If our attempt failed, we could always go to Option #2 as a back-up. And you know we like to work with what we have. So yeah, cue the power tools.
All of the doors were too big for their new cabinet-y homes, so we knew we had to cut them down. Cutting them down wasn’t going to be as straightforward as just slicing off the extra inches since I needed to maintain the raised border and the raised inner panel on each door (along with the inset edge around the perimeter). That meant I need to shave off the extra inches from the middle of the doors. Yikes.
To get super straight cuts, I used my table saw. For anyone wondering, our table saw of choice is this Skil one for $150, which we really like… maybe a little too much).
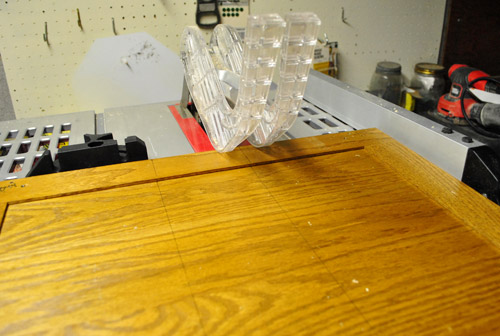
Two cuts later, I had removed a section from the middle and was left with two halves that would create the perfect door length.
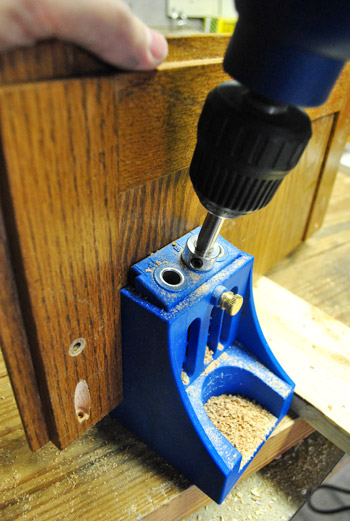
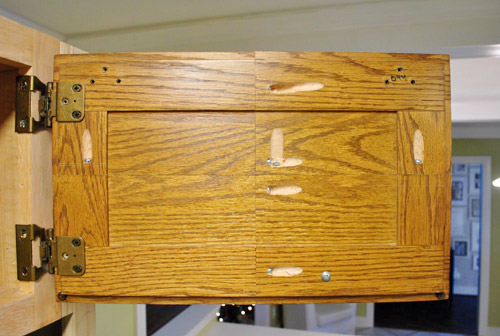
To secure the halves together, I made some pocket holes with one of my other BFF tools (my Kreg jig)…
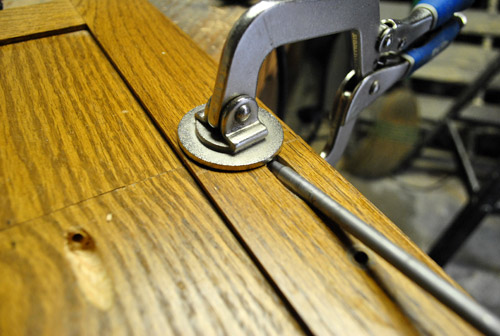
…then I carefully clamped them together before screwing everything tightly to secure them. I also use wood glue for the strongest possible hold, but I wipe the excess right away with a rag to keep things looking neat, which is why you don’t see it gushing out from the seam in this pic:
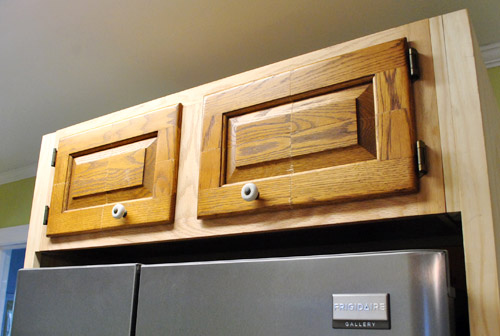
Now, for the doors above the fridge I had to repeat this cut-jig-screw step the other direction too, since the spare door was both too tall and too wide. Yup, I totally Frankensteined those babies.
But once it was all screwed together again (and the hinges were reattached), things were actually fitting together much better than I expected (full disclosure: I completely thought this method would flop, but it was still worth a try just in case it ended up saving us $800).
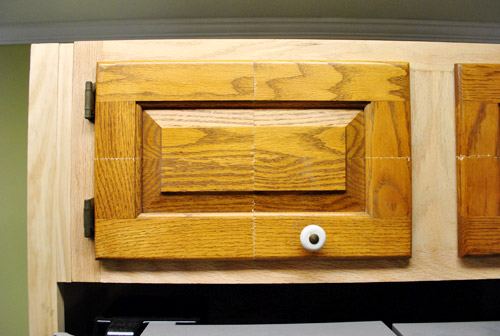
Now I know what some of you are thinking – because I was thinking the same thing: this isn’t looking so hot. But I reminded myself that once we add in some wood putty and sand those babies ’til they’re seamless we should be in ok shape. And once we use nice thick self leveling primer and paint, even things like the wood grain – and hopefully those hairline cracks should be undetectable (we used self leveling paint on the oak office cabinets that we painted and the wood grain doesn’t show through at all). Oh yeah, and we’re definitely moving the knob to a less awkward place (replacing it with new hardware actually)….
…and we’ll use wood putty to fill the screw holes in the back (it’s looking pretty treacherous back there).
I probably made this process seem faster and easier than it really was. It took me all morning to do these two doors (and a third test door that I messed around with first to see what worked and what didn’t before moving on to a door that matters). And there weren’t just two cuts per door – there were definitely a few trims and recuts along the way to make sure things fit snugly, but not too snugly thanks to that inset-back edge.
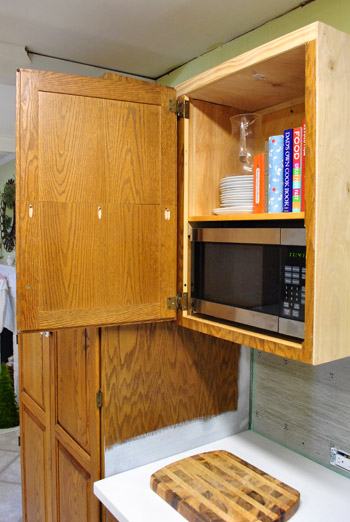
The microwave cabinet door was easier, since I was reusing the door that originally went on that once-taller cabinet. So it just took cutting a few inches out of the middle to make this door work.
This one only took me an hour-ish to do. Progress! The reason even one cut takes so long is that I measure and remeasure and very nervously make my cuts on the conservative side (since you can always shave more off but it’s a lot harder to add stuff back in).
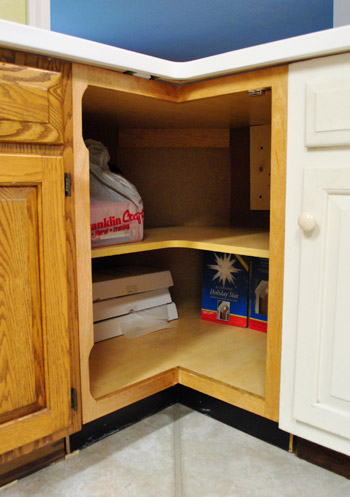
That progress got derailed a bit when I faced the corner cabinet. This secondhand cabinet came with bi-fold doors, but those hidden hinges wouldn’t work for our partial inset doors (which meant if we tried to use them those doors would stick out at least a half-inch more from the frame than the rest of the doors in our kitchen – which would look terrible). So we debated installing a pie-cut lazy susan and just affixing the doors directly to that (kinda like the one in our other corner cabinet across the way), but nixed that idea because after a bit of thought we decided one base cabinet with a lazy susan was enough for us – and we were actually enjoying all of the wide open space for bigger items (which would be lost if we sliced things up by adding a lazy susan).
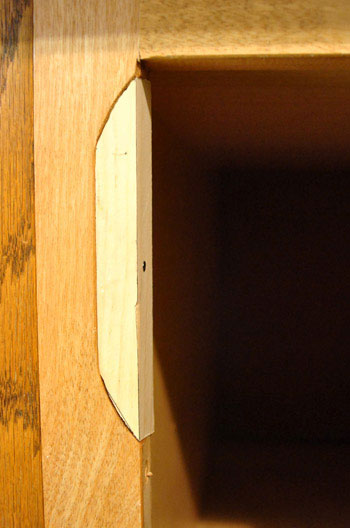
But before I could even start dealing with the doors, I had to fix these notches that were cut out of the frame to accommodate the old hinges.
After a few tries, I finally was able to jigsaw a couple of pieces that fit into the notches (not perfectly, but wood putty thankfully covers a multitude of sins when you’re painting your cabinets). I just screwed them into place and was happy to finally have a place to attach my hinges (which will all be removed again for our wood-puttying and sanding step down the road – and most likely sprayed a new color to match our new hardware).
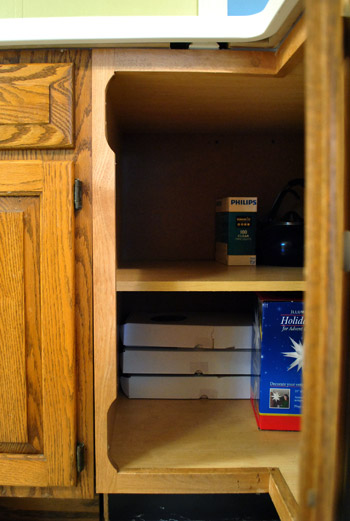
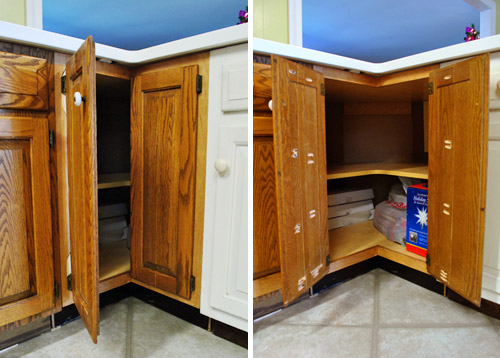
What we ended up doing with the door was the simplest solution that we could come up with using what we had: two separate doors, hinged on opposite sides.
It took me the rest of the afternoon (plus part of the next morning) to get these to finally fit right, but you can see how they open below. The left door has a knob (that’s very awkwardly placed – which we’ll move) to open that side first. And once that door is open we can easily pull the other one open afterwards. We love that they still give us complete access to the wide shelves inside. Makes us very happy we didn’t go the lazy susan route since we already have one of those in another corner.
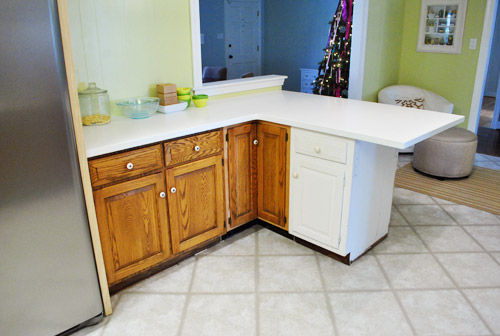
In the end, it definitely took longer than I hoped it would (mostly because of lots of noodling and trimming) but I think it came out pretty good. Everything fits. Everything closes nicely. And, once it’s all wood puttied / sanded / primed / painted, everything should look pretty much as good as new.
And, of course, if we don’t like how they look once they’re painted we can always call up the guy who’ll make us new doors for 800 beans if we have to (it’s not worth having a semi-ugly door situation to feast our eyes on every day in our new kitchen to save $800, so if it comes to that we’ll get ‘er done).
As for durability, joining solid oak doors with nails or glue alone would be a recipe for disaster – but making pocket holes and using heavy duty metal screws meant for the job along with wood glue is the permanent, strong, professional way to go (I like to do my research so things don’t fall apart later, which only adds up to more work for us). So there’s zero flex in the newly joined doors – they don’t close oddly or feel wiggly. They’re solid – and should function exactly the same way that our other solid oak doors do for the long haul.
As you can imagine, now we’re even more excited to get these suckers painted. Especially now that I’ve got all these ugly cuts that I want to hide going on. If only I didn’t have to do stuff like add toe-kick molding and other miscellaneous trim first. Although I did already add a new window sill and window trim (more on that later).
If we’re being realistic, it’s unlikely that we’ll get a painted cabinet update to you before Christmas in ten days (puttying and sanding and drying times for primer/paint would make that kinda impossible). But maybe we’ll recruit Santa to help us sand and prime when he drops down that chimney in 10 days. Sigh. If only these things could happen while we slept. Can you imagine how sweet that would be?

Ashley says
Woah. You guys are beyond creative and talented! And it makes me want to buy power tools.
Brooke says
I am SERIOUSLY impressed! Bravo! And I definitely think once you putty/sand/paint nobody will be able to tell. :)
Andrea H Ross says
I’m normally a huge fan of everything you do but this one just rubs me the wrong way unfortunately. I feel that if/when you go to sell the house the new home owners may not completely realize you have done this (just bc you cant notice everything when going through the house) and be quite disappointed/upset especially when the screws loosen or the shrink/swell you get overtime shows the cracks more.
Its very creative and you did a good job with it, I just feel like the $800 would have been worth it for the future.
Good luck finishing up, I will be anxious to see how they truly turn out.
heather says
As much as the creativity is totally awesome and I applaud out of the box thinking – I’m kind if with you Andrea. We found “creative fixes” in our house now that were completely not okay. We like to say the person to had our house before us built things wrong, and he built them to last. Thankfully the stuff we found doesn’t matter since we’re gutting the entire house eventually. It has been frustrating to fix some of it though that needed to be done ahead of time. If I had seen something like this in a move in ready house, after we moved in, I probably wouldn’t laugh like I do when we find the stuff in our house now.
Then again, I’m absolutely 100% positive not everyone (including Sherry & John) would like everything we choose for our home too and the way we do it and it’s totally okay. No matter what I still enjoy this blog and will continue to read. I’m with them all the way on this one – even if a few aspects make me cock my head to the side.
YoungHouseLove says
It’s just one of those choices that everyone makes as they renovate! We always fully (and expensively) pay to replace electrical, plumbing, and things that could be dangerous/terrible if there are any shortcuts. But when it came to five kitchen cabinet doors, we opted to make them because it was within our skill set and we knew they would be solid and just as strong as buying new solid oak doors (scroll back through the comments to see how joining things with pocket holes and heavy duty metal screws is the professional way that lasts, so nothing is wiggly or compromised)!
We’re freaks about doing a solid job on stuff because we plan to live here a nice long time, so we want everything to be durable and long-lasting for us (or we’ll be the ones re-doing it!). But as for future owners, this choice could even be viewed as beneficial to them because we’ll most likely be putting the $800 that we saved on those five doors into another update for the kitchen (like a better range hood) which might be sorely appreciated! So it’s just one of those do-what’s-right-for-you-and-your-situation things! Quick temporary fixes aren’t good, but sometimes long-term DIY solutions are just as good as paying someone else to do something!
xo,
s
Riva says
Shut the front door! Amazing. When I realized what you were about to do I had no doubt you guys would pull it off. I thought to myself, “Self, is there any way that at the end of this post they go off to hire out door-making for $800? NO WAY!” I love how you guys are so successful with repurposing what you have.
I’m puzzled by commenters who think your thrifty ways are somehow going to compromise the integrity of your home for future buyers. Seems to me like everything you are doing is making your home super nice without upgrading it beyond the value of other homes nearby. I am assuming the next owners of your home are going to be razzle-dazzled by the YHL touch and when they find out how you redid your kitchen they will be impressed and can see for themselves what a rock-star job you did.
Awesome, awesome, awesome. Way to go guys!!!!
heather says
Oh my gosh! No hard feeling at. all. I’m 110% positive I’ll do some upgrade and link to show you someday and you and John will be like “ahhgg that’s horrible” haha.
I definitely agree with a lot of what you said. I feel, like you said, it just comes down to choosing where to put your money and that’s obviously totally personal, and there are clearly plenty of readers who love this.
I am admittedly biased when it comes to millwork and woodworking in general. I come from a family with uncles and grandfathers who are carpenters, and married into a family of builders and carpenters so my viewpoint is drastically different than most peoples, and I know this. I can understand why you didn’t want to spend $800 though. When you don’t have a stocked woodshop and can make them from scratch for a lot less than retail it’s a lot of money. The nice thing about this (unlike electrical plumbing, etc.) is that if down the line something happens, or if after painting you don’t like it – there is still the $800 dollar option. For 5 solid oak custom dimension handmade doors for $800, it’s a great deal.
Like I said, I totally applaud the creativity on it, and your happiness with the project is ALL that matters – at all, ever. I definitely meant no harm with my comment.
Hey, at least you didn’t use an eye bolt to hold your closet hanging system in, and rebar in your wood deck. Yes, we have found these things. Haha. Yikes.
Jen says
Another way to look at it is that this is a completely reversible decision, with no money invested in these altered doors. If a year from now the doors are shrinking/swelling or otherwise look bad, at that time they can have the custom doors made or find some other solution.
And I’m sure they will blog all about it for us if that ever happens :)
YoungHouseLove says
Oh yes! You know we’re all about over-sharing everything… from the successes to the failures! If anything crazy happens (now or ten years from now) we’ll definitely keep you posted and share our solutions as we go!
xo,
s
Andrea H Ross says
I finally got a chance to go back through and look at your reply, sorry I was out of town. I see your point and completely appreciate your choice. I personally would just be upset, but I suppose you could always inform them of who could make the new ones for them too, in case they don’t care for it! (Obviously not in the listing though!).
Also I somewhat figured due to the content of your blog you would likely move again in another few years therefore not necessarily seeing the long term holds of things, but if you are staying put then hopefully in a few years you can do a recap of how those doors are holding up and if they are sitting tight or need replacing! It will be interesting to see!
YoungHouseLove says
Oh yes, we were at our last house almost five years and hope to be here a nice long time! I’d love to give you an update on things (all things!) as we go! You know we love tweaking anything that doesn’t work for us and updating folks about stuff that’s still hanging in there (Clara’s still wearing the same 12 cloth diapers we got for her 20 months ago!).
xo,
s
Merideth says
This is probably my most favorite post of yours ever. When I saw that you were going to try to refashion the cabinet doors you already had, I was like, “What? How?”. Then when I saw what you were up to, I was amazed. Oh, John – how clever you are!
Kristin ~ Bien Living Design says
That is pretty awesome – good for you! I would love all new doors for our kitchen, but it would be waaaay too spendy.
Amy says
I saw that someone else already mentioned this, but I also think the doors above the fridge look spaced weird. I think one big door might look better? Plus it would be easier to get things in and out of that cabinet. GREAT job on making the other doors fit! I would have been way to lazy to even attempt that…
YoungHouseLove says
Always a possibility if we paint things and don’t like how it looks! We’re definitely doing the whole see-how-we-feel-as-we-go thing in phases. So if after painting it looks weird we’ll tweak things and blog all about it!
xo,
s
Nora says
Great job guys!
I couldn’t help but notice that the corner cabinet looks to have more space from the floor to the bottom of the cabinet than the other two cabinets on each side. The bottom of those two cabinets look a little closer to the ground. Do you guys have a plan for that or are you hoping if won’t be as noticeable once its all painted?
YoungHouseLove says
Oh yes, that’s the trim stuff we’ll be attending to. We’ll build all the cabinets up from the bottom so they’re the same height and add toe kicks to unify them all.
xo,
s
Andrea says
Chiming in to add congratulations… you guys are such a good model for the terrified among us. One of these days I’ll follow in your footsteps, DIY-wise.
Anna says
My future (very handy) father-in-law did the EXACT same thing to 2 of our kitchen cabinet doors over a year and a half ago (we got a larger fridge than the opening would allow and had to cut the cabinet and doors down 5 inches to fit). They’re still holding strong 17+ months later! After you’re done prepping and painting, I doubt you will notice any marks on them!
YoungHouseLove says
That’s awesome to hear!
xo,
s
Melanie says
If this were boy scouts, you earned like 50 patches for this! A true DIYer and it looks professional! These kitchen updates are exciting!
YoungHouseLove says
I totally need to make/snag on ebay a Boy Scouts woodworking patch for John for Christmas. Shh, don’t tell him.
xo,
s
Joanne F says
You guys are amazing!
P.S. If you need more personal time 2 blog posts a day every day aren’t REALLY necessary (although I love them). One would work most days. Not that I don’t appreciate it, but I selfishly want you around for a loonnng time – don’t want you to burn out!
YoungHouseLove says
Aw thanks Joanne! We usually do one on Wednesdays and one on Friday which buys us enough time to keep things going behind the scenes (baby/book/projects/eating/sleeping/etc). Haha.
xo,
s
Jenny says
Hey guys,
First time commenter here…just wanted to tell you the kitchen is looking faboosh! Exactly one year ago today, the Great Short Pump, VA Flood of 2010 occurred in my kitchen. I had a horrific water leak that literally destroyed the entire kitchen…water damage and mold caused us to have no choice but to remove EVERYTHING…appliances, cabinets…even drywall down to the studs and floor down to the subfloor. I went 3 months without a kitchen…no sink, no stove, no fridge…no nothin’…I’m simply amazed at how quickly you guys are redoing your kitchen and totally in awe of your skills and bravery at taking this on. Bravo to you! Next time my kitchen is destroyed, I’mma gonna call you! Happy Holidays!
YoungHouseLove says
Aw, so sorry to hear about the great flood! But I love that you have such a great sense of humor about it! Thanks so much for the kind words. Just call us and we’ll be right over if you need us! Haha.
xo,
s
Chrissy Henry says
That’s impressive!!
I love watching your kitchen project progress, and am super excited to see those penny tiles go up on the wall. That project is probably a ways off I know, but I have been excited about them since the day you introduced them! Also, I am secretly hopping that you are going to surprise us and pick a fun or unorthodox color for those cabinets. ;)
Alyssa says
That resourcefulness is beyond impressive! Nice work. You guys are killing me though. I just want to see the end result! But trust me I understand it takes time…I’ve been meaning to refinish a table and chairs my parents gave me three years ago. If it ever happens I’ll send a pic.
Paige says
I think they’re going to look great. The powers of sandpaper and wood putty are amazing, as you already know. :-)
sharon says
amazing job, really. my father is the king of jerryrigging things that turn out amazing & it’s definitely a skill that has improved over his many years. he’s of the similar mindset to use what you have & figures what’s there to lose if it goes bad since there’s plenty to gain if it goes great.
do you have any tips for those who might be expanding their carpentry skills? did you have someone show you the ropes or has all of the skillset been developed through your own trial & error with the console table & the like?
YoungHouseLove says
I just started out small (building shelves for Clara’s nursery before she was born) after I got a Kreg Jig (that tool started it all). Then we slowly worked up to larger things and eventually did things like the console table here (probably our most intricate build yet). So my advice would be to take your time and start small so you can build up your experience and confidence!
-John
NYer says
Amazing work!!! just wondering which Kreg Jig you have so I could gift a certain someone. On Amazon, there’s a Kreg Jig K4 and a K4MS. (I did go back to the tool post, but it only said Kreg Jig.) Thanks so much, for your help and inspiration!
YoungHouseLove says
We just have the basic $99 Kreg Jig and got some extra clamps for it. Hope it helps!
xo,
s
Reenie says
WOW!!!! You are goooood!! :)
heather s. says
It looks amazing! Okay – it looks wonky but it will look amazing once puttied, primed and painted! Great work, John!
YoungHouseLove says
Haha – agreed! Can’t wait to get ‘er done!
xo,
s
Marla says
I always read your blog, but rarely comment. This cut and paste job is the tops. I’m amazed how you remodel with such little bucks and big results.
YoungHouseLove says
Aw thanks Marla!
xo,
s
Ashley @ Lewis in Love says
Holy moly! My jaw literally dropped that you did that. I think I’m too lazy because some of the stuff you guys come up with wouldn’t even cross my mind!!
Erika says
Nice work!
For your corner cabinet with the new doors, maybe you could go without hardware/handles and put a notch in the top for something to hold onto when opening and closing them.
YoungHouseLove says
Oh yeah – that’s another possibility! The corner cabinet on the other side of the room has a knob so I think we thought by having hardware on this one it would tie it in more. We’ll have to see where we end up!
xo,
s
Hannah says
Wow, I never cease to be amazed by you guys! They look wonderful! Can’t WAIT to see them painted
Alisa says
Amazed by your ingenuity!
Lindsay says
I’m in complete awe right now……..the fact that you guys have the guts to tackle stuff like this is fantastic and inspiring. But the fact that it more often than not actually WORKS……is pure freaking awesomeness. Great job on those DIY doors, you guys are good
YoungHouseLove says
Aw thanks Lindsay! John gets all the credit! Although he came in from playing around with the first door and said “this will not work” and I said “let’s talk about it- what if we did …..” and somehow after that terrible test door we talked it out and it turned around for us by the time we got to the real doors we needed to use. Thank goodness!
xo,
s
Pip says
How terrified are those ‘eyeball’ knobs now? :)
YoungHouseLove says
Haha- seriously. They are sweating bullets.
xo,
s
Kristen says
We did this exact thing on a recent bathroom remodel. We took out an existing vanity and added a corner built in cabinet. After the wood filler, sanding and paint it looked great and you would never know that it’s been cut down! You’re right wood filler and sanding cover a multitude of sins!
Terri says
Well done! Seriously–it is such painstaking work to make doors fit properly. Hoping along with you that when it’s all painted it will look amazing and you can use that $800 for something fun and wonderful.
You’re a daily bright spot and encouragement…love reading your blog!
Bethany says
I keep seeing your cool beams in the kitchen pics. Any plans to gussy those bad boys up, or are you sticking with pure white?
YoungHouseLove says
They’ll stay white since the gray beams in the living room run the opposite direction and are visible from the kitchen – so we like the crisp architecture they add but didn’t want dark dueling beams in different directions like a criss crossed ceiling effect from room to room!
xo,
s
Gwenalyn says
Nice work, John! At this point I would be too tired to try what you did. Amazing work. I’m sure it will look great once it’s painted. Put that $800 into a vacation fund, you guys are going to need one when you’re done with your kitchen!
YoungHouseLove says
Amen! I need to give my carpenter a nice break – preferably with sand and warm weather – when this whole thing is done!
xo,
s
athomeinva says
Nice work! I have an upper corner cabinet that opens the same way and have been really happy with it. Cannot wait to see your finished kitchen!
Sandra T says
Wow, this is crazy great! So glad you worked it out this way!
Sunnie says
You’ve mad skillz Mr. Young House. Mad!
Latoya says
Seriously, you guys are genious! I would have never thought of doing it this way but ya’ll make it work. Go on with ya bad self lol:)
Eli says
I just realized something funny. It turns out I think we have the exact same cabinet fronts that you do. As I was looking at the photos above I thought to myself – that looks very familiar. Then I realized why – they match mine.
Although I love how sturdy and well built they are – my only complaint is the small groves around the front. I do a lot of baking in my home and I’m not always the neatest baker. So the little grooves on my lower cabinet doors tend to be covered in flour and powdered sugar. I have to take a toothbrush to them to scrub the grooves clean. I think I would prefer a more simple cabinet front.
YoungHouseLove says
That’s so funny! We don’t do much baking- haha. I wish I did! I’m going to learn one of these days… when I’m not painting or framing something! Haha.
xo,
s
MB says
I am very impressed!
Meg says
Wow! You two never cease to amaze me! Great handiwork there!
Karen F says
holy cow, major kudos, John! Seriously impressive.
You guys are making great progress, and it’s going to look amazing when it all comes together!
Go Team YHL!
Emily @ NewlyWife says
Looks like you’re on your way to a beautiful kitchen! I admire your willingness to try something new to save some money. And as for Santa, I’m more upset that those dish washing elves miss our house every night. ;)
YoungHouseLove says
Seriously! Talk about unreliable!
xo,
s
Melly says
John, they look amazing! Congratulations on being brave enough to try this.
Samantha says
Amazing!
Kelley says
Very nice, John! I continue to be mucho impressed with your troubleshooting skills! I’m sure it was quite satisfying to be able to make those doors work!
Jennifer says
I can’t remember if you meantioned this in a different post, but are those real drawers in the cabinet next to the fridge? (the one that used to be where the stove is now?) Didn’t know if they were false drawers or real ones, since the cook top used to be on top of them??
YoungHouseLove says
Yes! They were real since the cooktop was really shallow. This kitchen was the bomb back in the day! All of the custom choices and appliances were the thing back in the day.
xo,
s
Erin @ The Impatient Gardener says
I’m always impressed by your creative fixes, but this one has me floored. Never in a million years would I have thought to do that. Amazing, well done and holy smokes.
William L says
impressive thinking out of the box. kudos!
Kim says
Wow, I am impressed. I would never have the patience for this. But patience is worth 2-3k, so good job!
Marion says
This transformation is so exciting.
We bought a house and the kitchen will be our first project. It is stuck in the 50s and the cabinets are lime/avocado green, including the “vintage” refrigerator. We will likely have to take down a wall, install new appliances and new countertops, move around some of the cabinets which will definitely get painted… Sound familiar?
Anyway, thank you for sharing your makeover step-by-step.
Erin @ One Project at a Time says
I never would have thought of that… I can’t wait to see how it all comes together with the primer and paint. Good work!
S. Thompson says
Love it! Curious, what are you doing with the ceiling lighting? Are you leaving those big lights on either side of the fan?
YoungHouseLove says
Oh yes, whole new lighting plan!
xo,
s
elaine says
This genius! Well done! So resourceful and one can picture how it will look when sanded, filled, primed etc. Perfect! What an awesome job!
LMN says
if you already have the $800 in the budget, i vote you use it on yourselves for being completely awesome. so very cool. like, ridiculous, really. :-)