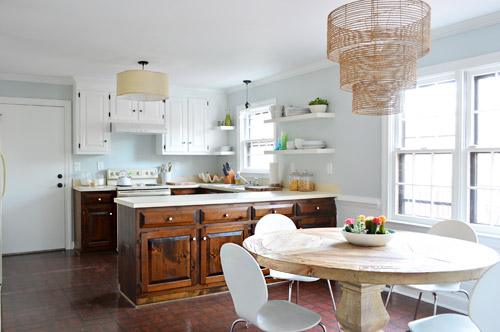
The stain on our kitchen cabinets was too orange and dated-looking. We loved the wood grain, but just wanted a darker, more contemporary color. We just didn’t love the idea of sanding or stripping off the old finish. Luckily, we found a product that would let us skip that messy and tiring step while still giving us the end results we wanted.
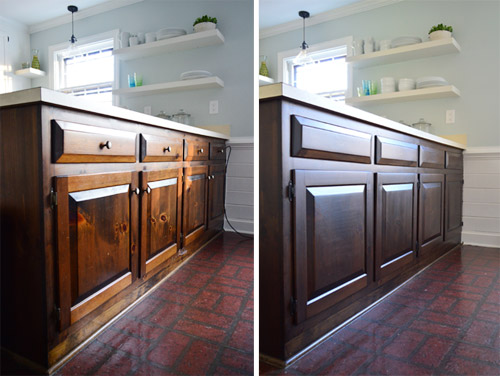
You can see our results above, and read below for how we got there!
What Stain Product Did You Use?
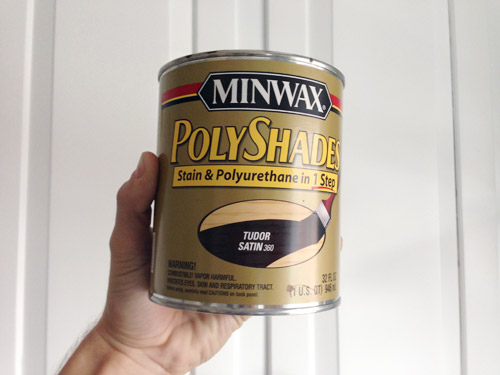
We used Minwax Polyshades for this project, which is similar to a gel stain. Unlike traditional wood stains, which have to soak into the wood to work, a PolyShades coat or gel stain product sits on top of the existing stain, much like a paint application would. Like paint, you need to take a bit more care when applying PolyShades to avoid drips or brushstrokes – but we’ll cover that in more detail below (even on video)!
These products come in lots of colors, but we chose one called Tudor in a satin finish. We had previously used a darker PolyShades color on our bathroom vanity (Espresso) but wanted something slightly lighter in the kitchen. Keep in mind that your final color will be impacted by the color you are staining over, so you may want to test a few colors in an inconspicuous spot (like the back of a door) before starting. And you should always go darker – so from light to medium, or medium to dark.
These products are also oil-based, which means you can skip the usual last step of sealing the stained surface with a coat of polyurethane sealer (like you have to do with water-based stains).
Can You Stain Your Cabinets Darker Without Sanding?
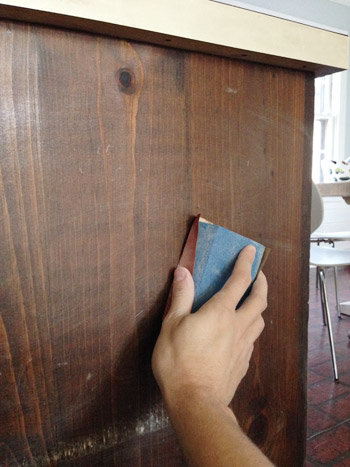
While yes, you can avoid completely sanding and stripping an old stain finish off of your kitchen cabinets, you will need to do some light sanding as part of this project. So be wary of any tutorials that suggest otherwise. But don’t fret – this is the type of sanding you can easily do by hand with a simple sanding block or sheet of sandpaper. Lightly roughing up the surface will help your new stain adhere for longer-lasting results.
What Materials Do You Need?
The best part of this project is probably what you DON’T need. You don’t need any polyurethane sealers or varnish. You also don’t need any chemical strippers, power sanders, or other heavy-duty products to get your already stained cabinets down to their raw wood. Still, you will want to have these supplies on hand:
- Minwax PolyShades or similar gel stain product (we only needed 1 quart for two coats)
- 2 or 3 stain-grade paint brushes (small enough to fit in mouth of stain can)
- 220-grit sandpaper or sanding block
- Extra fine steel wool (#000 grade)
- Screwdriver or drill
- Dropcloth or old cardboard
- Nitrile gloves (optional)
- Wood filler & putty knife (optional)
- Painter stands (optional)
- Degreaser or liquid deglosser (optional)
You will also need a space – like a garage or maybe a basement – to lay out your cabinet doors while staining and drying.
How Long Does It Take To Stain Your Cabinets Darker?
The process is very straightforward as DIY projects go (if you can paint a room, you can do this) but it does take a bit of time, mainly due to the drying process. Ours took about five days total, but yours may vary depending on the size of your kitchen or the amount of cabinetry you’re staining (we were only doing our lowers).
- Prep day
- First staining day
- Second staining day
- Drying & curing
- Reassembly
Step 1: Remove Cabinet Doors & Hardware
Before beginning, you’ll want use your screwdriver to remove your door, drawers, and any hardware (knobs, pulls, hinges, etc) so you’ll have unobstructed surfaces to apply stain too. You also want to spread out your doors and drawers apart from the cabinet frames so that those two surfaces don’t accidentally come in contact during the process (which could make things stick together).
We propped all of our doors up on old paint sample cans, but you could also use a set of painter tripods if you’re fancier than us.
Step 2: Patch Any Hardware Holes
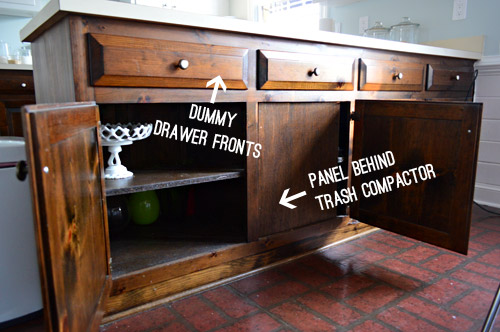
If you are changing any hardware (like using a different pull size or hinge style) you’ll want to fill any useless hardware holes now. We chose to eliminate all of the knobs on the backside of our kitchen peninsula for a cleaner look. The drawers were just dummies anyways (they pulled out on the other side) and doors were just secondary/less used access points to the front cabinets.
So Sherry wood puttied the holes, let them dry, sanded, and repeated. We always like two coats of wood putty on big holes like this to account for any shrinking or dips. In retrospect, we should’ve used a darker wood filler that was closer to the original cabinet color.
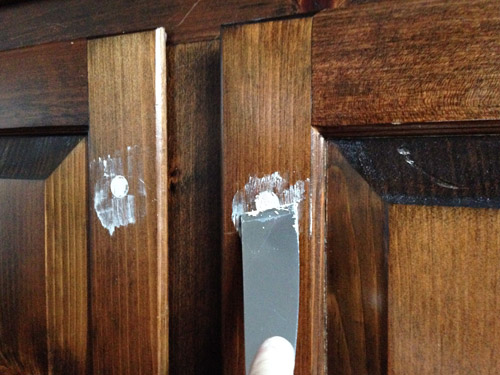
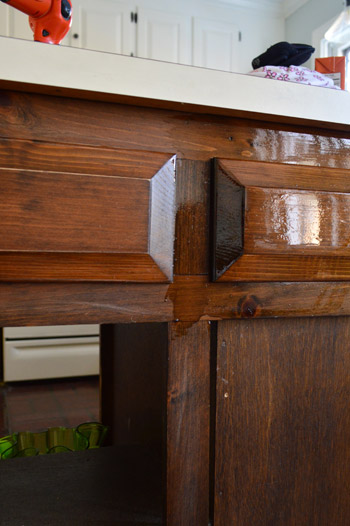
This lighter wood filler is what we had on hand and we made it work by dabbing a little more stain on the puttied parts with each coat of PolyShades.
Step 3: Give Your Cabinets A Light Sand
To prepare for staining, you’ll want to sand everything – drawer, doors, and frames – lightly with a high grit sanding block. Again, you’re not trying to remove the old stain. You just want to rough up the surface slightly so that the new stain can adhere.
After sanding, be sure to wipe everything down with a damp rag or paper towel to remove any sanding dust or dirt. Also, if you have any spots that are coated with grease or grime, you may need to use a spray degreaser to make sure the surface is fully clean. We wiped everything down with a liquid deglosser just to be safe before beginning.
Step 4: Apply Your First Coat of Stain
PolyShades is best applied with a paintbrush and you’ll want to systematically do your frames, drawer fronts, and both sides of any cabinet doors. We actually chose to not stain the backs of our cabinet doors (shhh!) but if you do, be sure to not flip them over until your stain is fully dry.
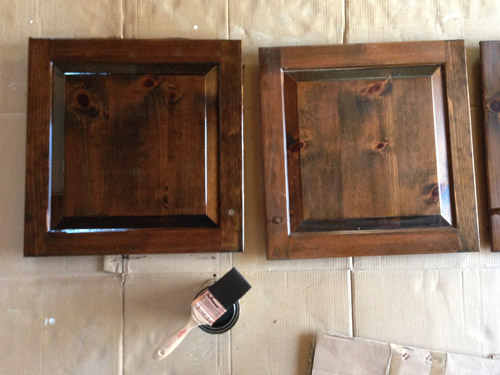
Also, don’t be alarmed if your first coat doesn’t look much darker going on. It will dry darker and you can always do additional coats until it’s dark enough for you. We ultimately did two coats.
Note: These are dummy drawer fronts that are screwed in place, which is why we didn’t remove them.
Tip: Applying PolyShades For A Smooth Finish
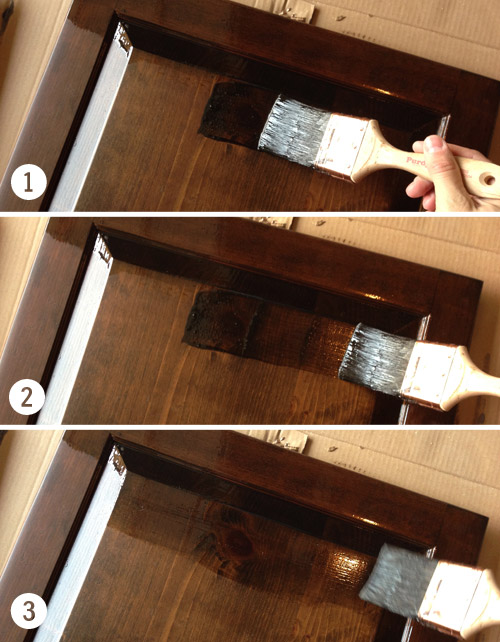
We had learned from our first project using PolyShades that applying it is pretty straightforward, but it can be a little challenging to keep it from looking drippy or streaky. We came up with a simple method of dragging the brush along everything after it’s applied to smooth it out. I filmed this quick video of myself putting one coat on a door so you could see it in action:
Note: You can also view this video on YouTube
In case you can’t watch the video, here’s the gist:
- The stain goes on pretty thick, which is exciting if you’re going for a darker color. Resist the urge to leave it thick because that excess stain will create drips.
- Don’t worry too much about brush marks at first. Focus first on covering the area that you’re working on.
- Once you’ve got the whole area covered, go back over the whole surface with long, even strokes. This will thin everything out and make your brush lines more even.
Although do as I show in the video (not in the pics below – oops) and brush in the direction of the wood grain. This will help any lingering brush lines blend with the wood grain better.
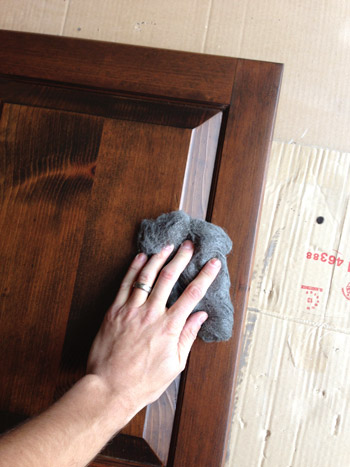
Step 5: Let Dry, Buff, & Recoat
After our first coat fully dried (we gave it 24 hours) it was substantially darker than it looked when wet – phew! If you’re happy with the color, you can be done here. We wanted our slightly darker so we chose to apply a second coat of PolyShades.
Before beginning the second coat, we followed the manufacturer’s instructions and buffed the first coat with some very fine steel wood (000 grade). This doesn’t visibly damage the finish, it just roughs it up enough for the second coat to hold nice and firmly.
You can see below how these coats “build” and gradually get darker. Also, you can tell how the “wet look” wasn’t a good predictor of how it’d dry.
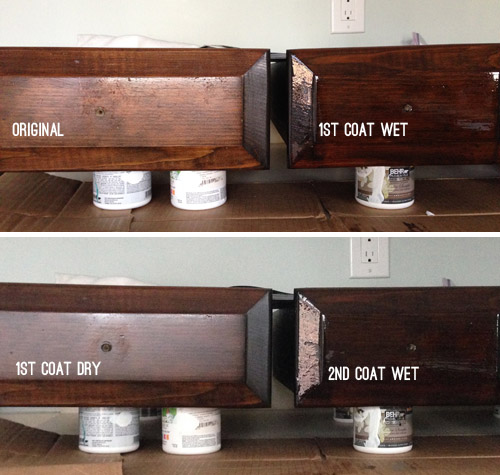
Step 6: Let Second Coat Dry
The next day, as our second coat was almost fully dry, we could finally see the results of our efforts (thanks to not staining the backs of the cabinet doors!). You can see in the side-by-side below that we definitely achieved the darker and more contemporary, less orange and dated look we were hoping for. And we loved that you could still the wood grain coming through!
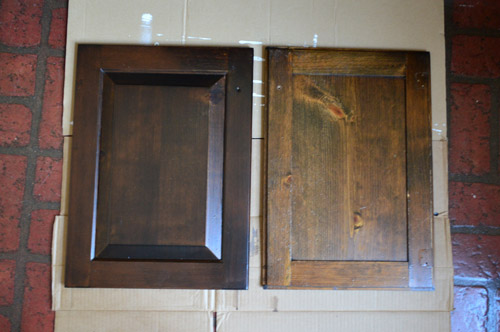
Again, this is the part with a traditional stain you would need to seal your wood cabinets with varnish or polyurethane. But since PolyShades is an oil-based stain and poly in one, you can skip it!
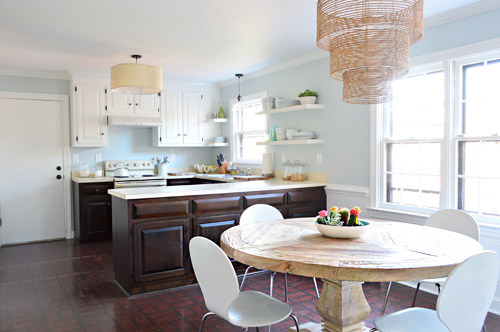
Step 7: Reassemble Your Kitchen
With everything done, you can reattach your drawers, doors, and hardware. If you’re installing new hardware, we’ve got a fully tutorial on how to easily (and quickly!) make new holes for cabinet knobs and pulls. For us, we just used the existing holes and added darker knobs that almost disappeared against the dark stain. So here’s our final look!
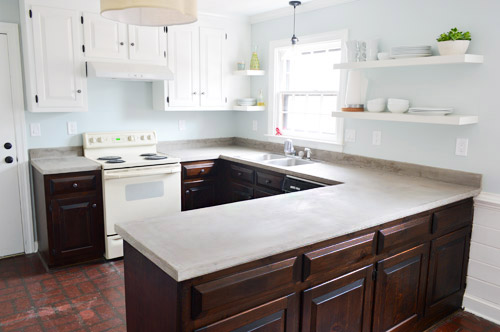
As a reminder, this is where we were last week with those redder and more knotty lowers. Although, this is after we had painted the upper cabinets white.
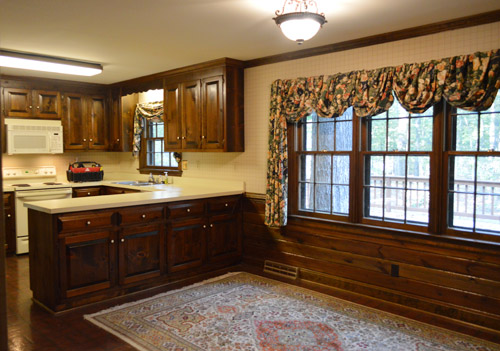
And it’s a far cry from where we started when we bought the house!
UPDATE: Since originally completing this project in 2014 we soon updated the laminate countertops by applying a faux concrete finish to them using Ardex.
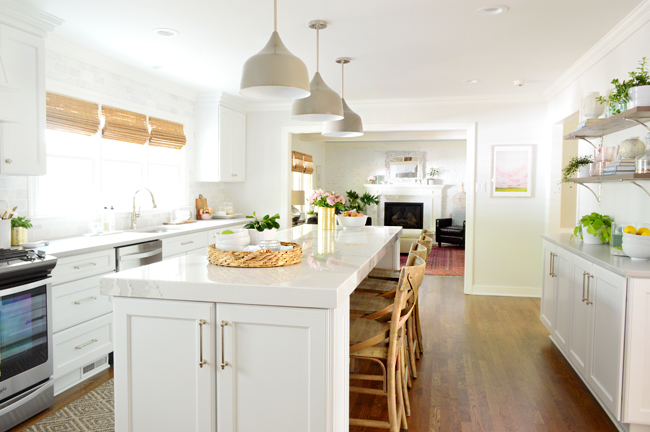
And two years later, we fully remodeled this kitchen with a completely new layout. But the old cabinets held up great for two years while we waited to begin the remodel. You can read all about that in these posts:
- Choosing A New Layout
- Gutting & Rebuilding
- The Big Reveal <– You can find all of the sources for the room right here!
- A Video Tour Of How We Organized Our Cabinets & Drawers
*This post contains affiliate links*
PS: Wanna know where we got something in our house or what paint colors we used? Just click on this button:


Christine says
Love the new stained cabinets!! I don’t know if anyone has mentioned this already, but have you considered updating your appliances with stainless steel contact paper? Check out this link for more info: http://www.apartmenttherapy.com/before-after-appliance-makeove-138376
YoungHouseLove says
Such an awesome idea!
xo
s
YoungHouseLove says
Such an awesome idea! Thanks so much for sharing the link!
xo
s
Shannon D. says
I have been looking all over on how to fill in holes on wooden cabinets! I really would like to refinish the cabinets in our kitchen, but the previous owners did a horrible job putting in new hardware and left a third awkward hole in the cabinets and the hardware doesn’t even go well with the cabinets. I really wanted to put new hardware in, but couldn’t figure out how to fill the holes without painting the cabinets. I really don’t want to paint them either because they are actually really nice cabinets and would look good with a slightly darker finish. I have also heard that if you are planning on renting out a property that you shouldn’t paint the cabinets as it is harder to maintain. It looks like you guys are pretty satisfied with the results. Any chance you could include a close of pic of what it looks like after, and any tips such as brand of putty/filler you used? (Sorry such a long comment just so excited to see this on your blog!)
YoungHouseLove says
How about that first picture that compares the cabinets side-by-side? We took that really close up, and you can see how the areas we puttied blend right in. Hope it helps!
xo
s
Kelly says
Just curious, what is the benefit of using a brush for staining vs using a rag? It seems using a rag would eliminate brush strokes? Clearly, you can have beautiful results with a brush!
YoungHouseLove says
We’re just rule-followers, so because the can said to use a brush for the best results, we went with that. Maybe the pressure you apply with a rag could vary so you’d end up with dark spots and light spots? Not sure!
xo
s
Katherine says
Looks Gorgeous!
And, THANK YOU for bringing The Darkness back into my life. I had totally forgotten about them! I had the album, too, and it was completely awesome, fun glam rock. Sigh, 2003. Wow.
Laura says
The cabinents look beautiful! I think staining them was a great decision! Now, do you have any plans to stain the kitchen table by any chance? Or will you do any thing to tie in the table with the rest of the kitchen (or vice versa)? Don’t get me wrong, I love the table, and I love the cabinents, but do you think it all “goes together” ? I am no expert by any means, more than anything I am just very interested to hear your thoughts/opinions. Thank you!!
YoungHouseLove says
I think once the room comes together more the table will be a nice lighter wood tone that’s layered in with the deeper wood cabinets. Many rooms I love have two tones of wood going on, they just tie them together with other elements so they make sense. For example, some dark ORB curtain rods to go with the dark lower cabinets + some rustic light toned wood items on the counters and maybe some art with those hues = layered wood that looks intentional and not mismatched).
xo
s
Bree Palmer says
The cabinets look amazing !! … I really appreciated the staining tips as people are always asking me these questions and I don’t really know the answer (love reading your blog for this reason & more)
We finally !!! got shelves up in my bf’s boys room – they have star wars lego ships and they were all on the floor now they are displayed and look really great! It only took like a year and a half to convince boyfriend to do it :)
YoungHouseLove says
Wahoo! Congrats Bree!
xo
s
Carolyn says
Sorry if this has already been asked elsewhere, but do you consider redoing the floor with your dream flooring now and then waiting on upgrading the other things? I ask mostly because we hate our kitchen floor and plan down the road (like you) to redo our entire kitchen. However, we are considering redoing the kitchen floor now (since we can live with the rest, but not the floor…). We are not experienced in renovating and would pay someone to do the floor, but I am wondering if there is a downside to redoing the floor now? Would it potentially be more difficult then to update the cabinets/counters/appliances around it later?
YoungHouseLove says
Good question! We need to save our pennies for an investment like that since we’d like to carry the flooring into the foyer and the half bathroom as well, and we also would want to run the flooring under these cabinets since we’ll be changing the configuration in here (for example, when we redo the kitchen in Phase 2, we don’t think we’ll have a peninsula, so if we did it now around the peninsula, we’d have a slice of missing flooring when that comes up later). If you’re keeping the same configuration and can afford new floors now though, I say go for it!
xo
s
Kristen says
Besides working on memorizing every line of your book, I’ve been working on small projects. This weekend, I painted an ikea serving tray into a chalkboard serving tray – even made the chalkboard paint from scratch (before/after – http://i41.tinypic.com/24m6v5u.jpg) booyah!
Love love love the tuxedo look :) It amazes me how such small changes can make such a big difference. Yesterday, I saw a picture I took of my bedroom two years ago and everything in it is different now! I never realized how much I changed in there slowly piece by piece – from the shades and curtains to the duvet cover. It’s like a whole different room. :)
YoungHouseLove says
Love your chalkboard serving tray idea!
xo
s
anorexic_rhino says
Have you ever thought of painting the fake cabinet/trash compactor backing a chalk board, or magnetic or dry erase or something fun for Clara, and soon barnacle, to play with when you’re working in the kitchen and then easily hide… like a fun little secret
YoungHouseLove says
A few others mentioned that! Such a fun idea!
xo
s
Adina says
I was wondering what brush you used to apply the stain? And does it ruin the brush? We just bought dark chairs and I was hoping to fix up and stain my light blond ikea (wood veneer, but damaged) table. The thought of buying another table for my kids to destroy is out of the question for now. Thanks
YoungHouseLove says
We just used 2″ angled brushes (one each). We washed them thoroughly (with water, not even mineral spirits) and they came out ok (we reuse them for stain projects, but wouldn’t use them again to paint or anything).
xo
s
Necole@seriouslysassymama says
When I see your kitchen, I see all white and funky dark floors. Such a great space. I love the white cabinets.
Leanne says
Looks beautiful. I always thought you had to strip all the old finish off before re-staining, which is why I’ve always stayed away from a project like this. Good to know.
YoungHouseLove says
Most stains do require that, but we have had a lot of luck with this PolyShades stuff (the selling point is the easier prep).
xo
s
ktv says
We rent our apartment in NYC (but are pending realtor negotiations on our first house offer – fingers crossed!!!)
The appliances in our rental are not my cup of tea but I saw this temporary chalkboard coverup for a fridge so you don’t have to paint the actual appliance. Basically you make a framed out chalkboard and then attach it to the Fridge with Magnets…I thought it would be a good option for a rental – maybe also Phase 1.
http://www.pinterest.com/pin/286471226270859193/
Looking great guys – can’t wait to own my own home (and tools and paintbrushes to get started with all your great ideas!)
YoungHouseLove says
Such a cool idea!
xo
s
Kristina says
Hi guys!!! I love the look of the lower cabinets and can’t wait to try this product out but I’m hoping you can help with a few questions I have. One, Sherry did you use this product or did John do all the staining? I am also pregnant and don’t want to do anything to harm my little bean, but have been painting throughout my pregnancy. Also, a bigger dilema for question two. I will be using this product to re-do a crib. However, I thought that I wanted the crub to be white so I bought Gripper primer and have already primed and painted one coat of white on one piece (the other 3 pieces have the original stain). Do you think it would be okay to sand off the paint/primer on one piece and proceed with the PolyShades? Any help would be great.
I love, love, love reading your blog posts everyday! :-)
YoungHouseLove says
Aw thanks Kristina! I did help with the staining, but since it’s low-VOC I wore a respirator and we aired out the room a ton (open windows and doors). This stuff dries pretty fast (says 6 hours on the can) and then is odorless, so it’s really only stinky when it goes on (and not nearly as stinky as other MinWax stuff, which I tend to hate) so the low-VOC option of this is awesome. As for your crib, I would sand it all outside in the open air with a respirator on just to be sure. Good luck!
xo
s
Erika says
Just a question about all the ORB. will you guys keep a stainless steel or nickel finish faucet? or try and find an ORB one?
YoungHouseLove says
I think we’d be down with either (we have a stainless sink and stainless spoons and stuff on the counter in a cup, so I don’t mind mixing metals). Might just be whatever we find that’s a good deal!
xo
s
Christy Niebaum says
Can’t wait to see where you guys land on a phase 1 flooring update. I’d probably lean toward peel and stick like Sherry is. We’re planning to do some peel and stick in our entryway and master bath to spruce up the house a little before we sell later this year. Real tile would be nice, but not worth it for a house we’re not planning to stay in.
A friend of mine is restoring a 100 year old home in an older neighborhood in town and they chalkboard painted their fridge as part of their kitchen makeover. It’s the green chalkboard paint though. Super quaint and cute. I think she talks about chalkboard painting tips for fridges somewhere on here: http://keepsmilinghome.blogspot.com/2012/07/accidental-kitchen-remodel-price-tag.html
YoungHouseLove says
So sweet! I love that!
xo
s
Arika says
This looks SO AMAZING! I would love to do something like this in my kitchen! You guys have done an amazing job! I wish I trusted myself to just dive in and do it!
Paula says
I have “harvest gold” oven doors and range hood in my house. Both were perfectly good but I didn’t want the 70’s look. So I spray painted both with white appliance paint more than 5 years ago and they both have held up extremely well…so go with the spray paint…
YoungHouseLove says
Wahoo! I love hearing that!
xo
s
Julia says
Maybe for the floor (so that you don’t have to spend any money or effort on paint or peel-n-stick…especially since you plan on ripping it all up later), consider just using a few kitchen rugs to add color and pull the eye away from the floor itself.
:) LOVE how the cabinets turned out though! I might have to do something similar with my dining room table. I’ve been trying to find a way to make it look less grainy, but still see some of the wood grain.
YoungHouseLove says
Yeah, I thought about rugs as well, but I’m not sure getting a few rugs wouldn’t be more money than peel and stick would be (and it would definitely be more than painting). We’ll have to see what we can come up with!
xo
s
Jillian says
I love the cabinets. I can’t wait to see your countertop choices! I think butcher block would look incredible with those color choices.
Katie Kivett says
I can not wait for the concrete countertops! my husband and i (a preschool teacher) are looking to update our kitchen on a low budget and that sounds like just the ticket for us! we LOVE you guys! stay warm!
Mary b says
Love it that you guys quoted the darkness. Loved that song, and my husband just informed me that they had put on one of the best shows ever at 9:30 club in DC. He said he had three wardrobe changes and he has no idea how he got into any of his suits be cause they were all skin tight with a tiny tie at the top by the neck. Awesome band though!
Kitchen looks awesome, am thinking of painting my upstairs the blue you used in the kitchen. Love it!
YoungHouseLove says
Hilarious about those wardrobe changes! Sounds like an awesome show!
xo
s
YoungHouseLove says
Hilarious about those wardrobe changes! Sounds like an awesome show!
xo,
s
Rebie says
It’s looking great! I’m with Sherry on the peel and stick tile. I just moved out of a rental that had painted kitchen floors and I would not wish those on my worst enemy. The floors were so hard to keep clean and looked cheap if they weren’t sparkling clean.
Sonya says
I hope you paint the floor – the opportunities for creativity are endless, and it can be research for the rest of us. I’ve had this floor in a 2007 Cottage Living bookmarked since, well, 2007: http://efedesigns.files.wordpress.com/2010/02/cottage-living-2.jpg In a later issue one of the staffers recreated the floor in her office. It was just as fab.
YoungHouseLove says
Amazing!
xo
s
Paula M. says
For some interim floor help, this’d be a lazy way out, but what about either Flor stick-on carpet tiles to cover the whole shebang *or* score some inexpensive area rugs to scatter around and cover large expanses of the floor?
You two are such go-getters, you’ll probably take a higher road interim makeovers for the kitchen floor, but I thought I’d throw those ideas out there anyway, LOL.
(‘Scuse if someone else has already suggested these things; I haven’t scrolled through all the comments)
YoungHouseLove says
Aw thanks Paula! Those would actually both be substantially more money (Flor is usually $10 a square foot, and a few rugs would be a few hundred bucks) so that’s why we’re leaning towards more affordable fixes since they won’t be forever :)
xo
s
Bobbie Brown says
This looks incredible!!!! looove!
Carolyn L says
Hey guys!! Looks so bright and clean!
A tip with concrete counters (we just DIY’d ours!):
I’m not sure if it goes with all sealers, but ours was ruined with LEMON JUICE just weeks after our final seal (we had bad luck with glossy sealer and had to strip/peel/re-do several times; now we have matte finish). I had been juicing lemons since life gave them to me… and a sloppy ring with drops left our black counter … blotchy. Boohoo!
We’re sort of over it and just rolling on with our nursery (more important surprises are on the way) but its definitely a blemish!
Beware!
YoungHouseLove says
Oh no! Thanks for the tip!
xo
s
Kristen says
Just some reno ideas for you to think about ;)
http://www.buzzfeed.com/peggy/insanely-clever-remodeling-ideas-for-your-new-home
YoungHouseLove says
So many fun (and wacky) ideas! Thanks for the link!
xo
s
Rachel Greiner says
The Sears in Stafford, VA (probably about an hour or so from yall) is having an amazing liquidation sale if you’re ready for the appliances to go! Our friends just replaced all their kitchen appliances for a fraction of the original cost.
YoungHouseLove says
That sounds awesome! I’m not sure we have the funds yet, and we’re not 100% sure what we’d like (gas stove? wall oven?) so I think we’ll live with the room a little longer to see what configuration and appliance features we’re most excited to get in Phase 2!
xo
s
Jackie says
Super impressed (and kinda shocked) that you guys didn’t go with an all white kitchen. I’m excited. Although, I never wanted a white kitchen, I really took inspiration from your blog when I painted our original to the house 1970s kitchen cabinets when my husband and I bought our house. White was the easiest quick fix to lighten up our super dark kitchen.
I know that the complete remodel is why off, but I can’t wait to see how it turns out. Maybe all stained cabinets?
YoungHouseLove says
Aw thanks Jackie! Every day we fall in love with different kitchen options for the final makeover, so it’s a good thing it’s going to take us years to save up because we’re nowhere near sure what we’d like to do for the long haul! Haha!
xo
s
lisa truesdell says
i love this look! how would you compare it to painting cabinets – is it easier? we have some rocking orange-y oak from a 1980s kitchen update to our 90 year old house, and it needs help.
YoungHouseLove says
It took less time and fewer steps/coats (instead of 5 coats of primer and paint it was just two of stain) but the outcome depends on doing things thoroughly (stain can be more finicky than paint). I think if you watch John’s video about applying the stain it should really help, and then it should be pretty straightforward. Good luck Lisa!
xp
s
Karla@{TheClassyWoman} says
The staining, sanding, and removal of the knobs was totally worth it. It makes such a big difference and looks much more updated and modern. You guys really impress me with how much you get down in a short period of time (while prego and with a toddler nonetheless). You’re definitely an inspiration. My hubby hates DIY projects and anything house-related so I’m on my own with it but even small changes really add up over time. :)
YoungHouseLove says
Thanks so much Karla!
xo
s
Vanessa @ Love This Crazy Life says
They look amazing! I’m just wondering about your technique of brushing against the wood grain… I’ve always been told it’s a big no-no but yours still came out great. Was that intentional or no? I’m going to be staining cabinet doors in my kitchen next month. Trying to prep myself mentally for the task at hand :)
YoungHouseLove says
Oh yes, just check out the bulleted copy above those pics. John was rushing to take photos and was brushing the wrong way, but we always love to go with the grain (like he did in the video). Thankfully that was just the first coat on one of the doors so it was ok once the second coat went on in the right direction :)
xo
s
P says
Love the stained cabinets – yay for wood tones!! Are you guys finding that you are having to stretch for inspiration in different places now that you are in a more expensive, larger, traditional home? Many of the changes (ikea shelves instead of cabinets, plastic(?) kitchen chairs, white painted cabinets, fabric lighting, no window treatments) have a certain look that is more suited for a small starter home, but not necessarily “home #3”. Would be really interesting for readers who have been with you from the beginning to hear how you have challenged your initial style in this home, and are growing to make different choices. I’m not saying it has to = more $$, just a more quality driven style, if that makes sense. And I understand that this is “phase 1”, but I wouldn’t think you’d spend all this $$ on lighting & furniture only to chuck them in a couple of years.
YoungHouseLove says
Good question! We’ve purchased two big pieces of furniture since moving into this house, and both have been a lot more (and of a lot higher quality) than the pieces we bought for house #1 & 2 (a West Elm wood inlay dresser for our bedroom and a Restoration Hardware table for our kitchen). Things like missing window treatments and placeholder chairs at the kitchen table (those are from my apartment in NY!) will definitely be upgraded as we go, we just have to save our pennies since we can’t do it all at once, and we want to hold out for things that we’ll love for the long haul (you can read more about our Phase 1 and Phase 2 approaches here).
Another “strategic splurge” example would be our sunroom updates (instead of painting the concrete floor, we bought slate-like tile, and instead of leaving the ceiling alone we lofted it, added two fans, and installed solid wood planking overhead). We also spent more than usual on the kitchen lighting (more on that in this post) because we plan to use it for Phase 2 as well, so it won’t be chucked in a couple of years :)
xo
s
Heather says
Sorry if this is a total repeat! But for the chalkboard paint idea for the fridge, since the majority of the sides are hidden, have you considered chalkboard contact paper for a temporary fix so you wouldn’t have to worry about ruining it’s resale value down the road? ;)
YoungHouseLove says
Love that idea!
xo
s
Stacey says
LOVE the song reference! One of my favorite ridiculous songs and a big inside joke with friends.
Jacqui Bee says
It’s as really looking great! My five cents worth are, I’m sure you can buy (in the US) Chalkboard contact paper you could use on the fridge and I say paint the floor you could use garage floor/ patio paint that must be tougher. I can’t wait to see what you do. Happy New Year.
YoungHouseLove says
Thanks Jacqui!
xo
s
Valerie says
Gorgeous! I’m not sure if someone already said this, but you’re lower cabinets remind me of a chocolate candy bar, especially the side with no hardware. Now I want chocolate!
YoungHouseLove says
Oh man, now I want chocolate too! Haha!
xo
s
Susan says
I painted my oven/stove with appliance paint a few years ago and haven’t had great results. The scrubbing I have done to the top of the stove has resulted in the paint peeling and coming up so that now my white stove top has the previous almond color peeking through in splotchy places. I don’t know if it was the type of appliance paint I used, the technique or both. We’re replacing the whole thing soon, so I’m not that worried about it, but for you guys….I hope you guys have better luck!
YoungHouseLove says
Oh no! Thanks for the tip! So sorry Susan!
xo
s
Sarah says
Hey guys! The update looks great so far! One thing that pops out at me more than it did before are the dark hinges on the uppers. They seem to detract a little from the “tuxedo” look (maybe they’re the shirt buttons??). Have y’all noticed that too/would you consider a lighter color, or do you love it?
YoungHouseLove says
I noticed that too in these pics! I think it’s one of those photo illusions – you know how sometimes graphic things stick out a lot in print (ex: a classic looking black and white striped rug might look crazy high contrast and even “vibrate” in a photo). They seem to do that. So in person they seem fine to us, although in some wide room shots they do look way more “look at me! I’m a hinge!”
xo
s
Meagan says
Cabinets look great! We were all primed and ready to do DIY projects last weekend, including painting our cabinets, but discovered (joyfully!) that I am expecting! We are hesitant to continue or start any projects until we know what is and isn’t safe for me and the baby. Sorry if you’ve already answered this, but I’d love it if you could share your best resource for knowing what is and isn’t safe, especially with paints, stains, chemicals, etc.?
YoungHouseLove says
That’s so exciting Meagan! Congrats! As for what I do (and don’t do) while prego, this post has the rundown for ya: https://www.younghouselove.com/2013/10/the-411-on-baby-2/
xo
s
Mandy says
waaaaait a minute…is this blog title a Chapelle reference? If someone already called this out, I did not see it and blame the cocaine. It’s a helluva drug.
YoungHouseLove says
It’s an album reference (John linked in the first paragraph). So funny that it’s a Chapelle reference too!
xo
s
Suzette says
I feel like removing the pulls modernizes it just as much as the color. Great job!
Hanna says
I love it! Looks gorgeous :)
Heather S says
Did you consider any other colors for the bottom cabinets? Just wondering with it being a phase 1, if you thought about trying something more out of the box since you would be changing it anyways.
YoungHouseLove says
Yes, we thought about other colors for those bottom cabinets but ultimately thought wood stain was a totally different approach for us since we’ve painted cabinets in each of our last two houses as well. We think they’ll look awesome with concrete counters, and we’re going to use these cabinets in the garage after Phase 2 commences, so we thought they’d hold up nicely this way as well.
xo
s
Andrea says
Cabinets look a thousand percent better. You guys are awesome.
I’m curious to see what you end up doing with the floors. My unsolicited advice is DON’T paint them. The kitchen is such a high traffic area, unlike, say, your master bathroom. Even if you three (soon to be four) walk around in socks all day, think about how many guests will be traipsing through your kitchen in the next couple years.
Do a vinyl floor, or peel and stick tiles. It’ll cost more than painting but it’ll buy you time to save up.
I personally don’t like the look of peel & stick tiles (and they’re a little pricey at the big box stores…) but I’ve seen some great vinyl flooring for super cheap at places like Lumber Liquidators. If it were me, I would go for the faux wood in the closest match possible to the real wood floors in your house. My brother had this in his house years ago, and it actually looked really nice.
The floors, I think, are going to be the big WOW change. I think you’ll end up being happy with the kitchen for longer than you think.
Can’t wait to see what you’ve got brewing for your little boy’s room!!
YoungHouseLove says
Thanks so much for the tips Andrea!
xo
s
M.C.@ ThousandStoryKitchen says
Dude. That countertop idea is going to look SO good. You guys will have no need for phase 2! Also, I’m voting peel and stick with grout for the floors…
Mindy says
Ohhhh soooo pretty!!! I can’t even believe that is the same kitchen as before! Seriously – you guys can make magic happen ANYWHERE!! :)
We finished a pretty BIG project on our living room wall! We created a map wall out of material (using the iron on method). Isn’t it funny that once one project is finished, you just can’t wait to do other things to make the room feel more complete?
http://haneyhousediaries.blogspot.com/2014/01/murica-christmas.html
YoungHouseLove says
That’s SO COOL! Thanks so much for sharing the link Mindy!
xo
s
Tali says
This looks really good! I am always impressed by how you guys make these improvements! I got your book for xmas and I can’t wait to read it :)
https://www.chloeandisabel.com/boutique/tali
http://www.typicallytali.com/
YoungHouseLove says
Thanks so much Tali!
xo
s
Agnes says
What would you do if the sides if cabinets and inside was veneer and doors only out if solid wood? I love the stained look! Is painting the only option then?
YoungHouseLove says
Painting would be the easiest option, but in the comments today we’ve heard from some folks who used some sort of thin wood veneer to add to the sides of their cabinets so they could stain them all for a seamless look. Good luck!
xo
s