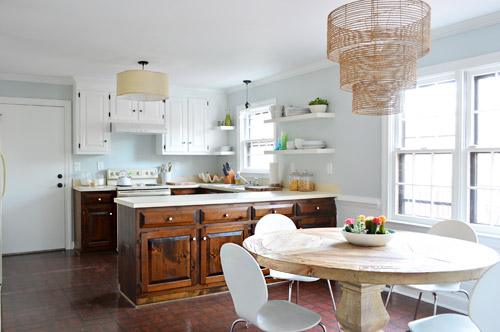
The stain on our kitchen cabinets was too orange and dated-looking. We loved the wood grain, but just wanted a darker, more contemporary color. We just didn’t love the idea of sanding or stripping off the old finish. Luckily, we found a product that would let us skip that messy and tiring step while still giving us the end results we wanted.
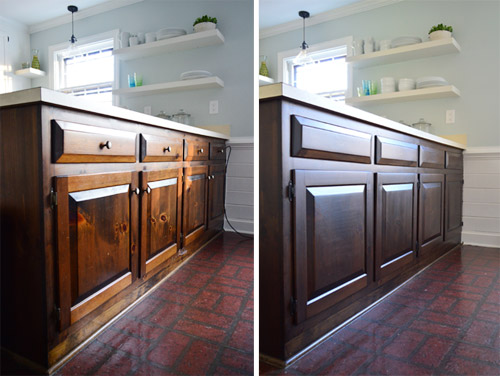
You can see our results above, and read below for how we got there!
What Stain Product Did You Use?
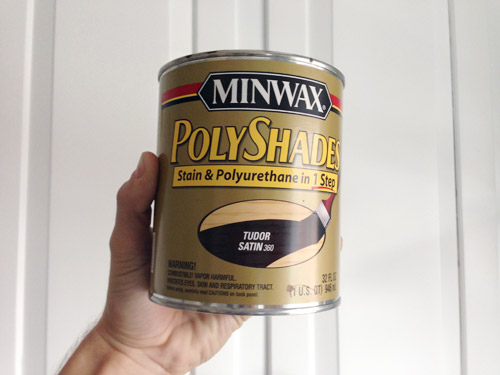
We used Minwax Polyshades for this project, which is similar to a gel stain. Unlike traditional wood stains, which have to soak into the wood to work, a PolyShades coat or gel stain product sits on top of the existing stain, much like a paint application would. Like paint, you need to take a bit more care when applying PolyShades to avoid drips or brushstrokes – but we’ll cover that in more detail below (even on video)!
These products come in lots of colors, but we chose one called Tudor in a satin finish. We had previously used a darker PolyShades color on our bathroom vanity (Espresso) but wanted something slightly lighter in the kitchen. Keep in mind that your final color will be impacted by the color you are staining over, so you may want to test a few colors in an inconspicuous spot (like the back of a door) before starting. And you should always go darker – so from light to medium, or medium to dark.
These products are also oil-based, which means you can skip the usual last step of sealing the stained surface with a coat of polyurethane sealer (like you have to do with water-based stains).
Can You Stain Your Cabinets Darker Without Sanding?
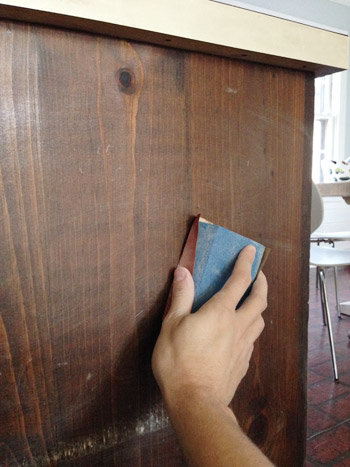
While yes, you can avoid completely sanding and stripping an old stain finish off of your kitchen cabinets, you will need to do some light sanding as part of this project. So be wary of any tutorials that suggest otherwise. But don’t fret – this is the type of sanding you can easily do by hand with a simple sanding block or sheet of sandpaper. Lightly roughing up the surface will help your new stain adhere for longer-lasting results.
What Materials Do You Need?
The best part of this project is probably what you DON’T need. You don’t need any polyurethane sealers or varnish. You also don’t need any chemical strippers, power sanders, or other heavy-duty products to get your already stained cabinets down to their raw wood. Still, you will want to have these supplies on hand:
- Minwax PolyShades or similar gel stain product (we only needed 1 quart for two coats)
- 2 or 3 stain-grade paint brushes (small enough to fit in mouth of stain can)
- 220-grit sandpaper or sanding block
- Extra fine steel wool (#000 grade)
- Screwdriver or drill
- Dropcloth or old cardboard
- Nitrile gloves (optional)
- Wood filler & putty knife (optional)
- Painter stands (optional)
- Degreaser or liquid deglosser (optional)
You will also need a space – like a garage or maybe a basement – to lay out your cabinet doors while staining and drying.
How Long Does It Take To Stain Your Cabinets Darker?
The process is very straightforward as DIY projects go (if you can paint a room, you can do this) but it does take a bit of time, mainly due to the drying process. Ours took about five days total, but yours may vary depending on the size of your kitchen or the amount of cabinetry you’re staining (we were only doing our lowers).
- Prep day
- First staining day
- Second staining day
- Drying & curing
- Reassembly
Step 1: Remove Cabinet Doors & Hardware
Before beginning, you’ll want use your screwdriver to remove your door, drawers, and any hardware (knobs, pulls, hinges, etc) so you’ll have unobstructed surfaces to apply stain too. You also want to spread out your doors and drawers apart from the cabinet frames so that those two surfaces don’t accidentally come in contact during the process (which could make things stick together).
We propped all of our doors up on old paint sample cans, but you could also use a set of painter tripods if you’re fancier than us.
Step 2: Patch Any Hardware Holes
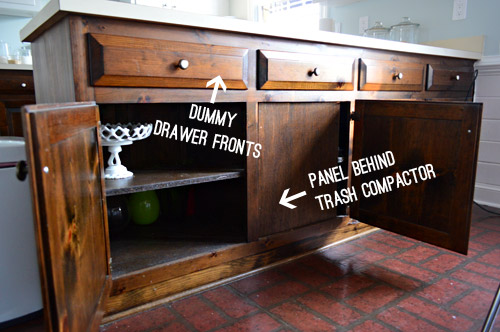
If you are changing any hardware (like using a different pull size or hinge style) you’ll want to fill any useless hardware holes now. We chose to eliminate all of the knobs on the backside of our kitchen peninsula for a cleaner look. The drawers were just dummies anyways (they pulled out on the other side) and doors were just secondary/less used access points to the front cabinets.
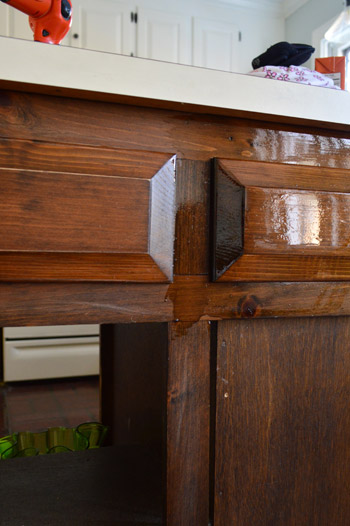
So Sherry wood puttied the holes, let them dry, sanded, and repeated. We always like two coats of wood putty on big holes like this to account for any shrinking or dips. In retrospect, we should’ve used a darker wood filler that was closer to the original cabinet color.
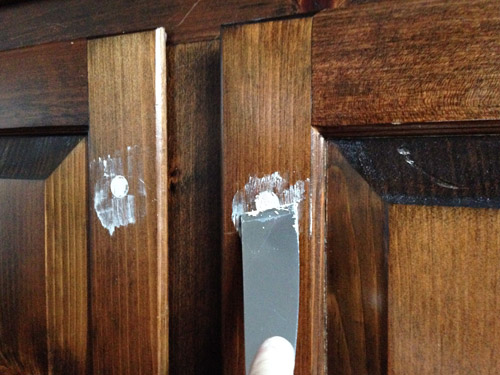
This lighter wood filler is what we had on hand and we made it work by dabbing a little more stain on the puttied parts with each coat of PolyShades.
Step 3: Give Your Cabinets A Light Sand
To prepare for staining, you’ll want to sand everything – drawer, doors, and frames – lightly with a high grit sanding block. Again, you’re not trying to remove the old stain. You just want to rough up the surface slightly so that the new stain can adhere.
After sanding, be sure to wipe everything down with a damp rag or paper towel to remove any sanding dust or dirt. Also, if you have any spots that are coated with grease or grime, you may need to use a spray degreaser to make sure the surface is fully clean. We wiped everything down with a liquid deglosser just to be safe before beginning.
Step 4: Apply Your First Coat of Stain
PolyShades is best applied with a paintbrush and you’ll want to systematically do your frames, drawer fronts, and both sides of any cabinet doors. We actually chose to not stain the backs of our cabinet doors (shhh!) but if you do, be sure to not flip them over until your stain is fully dry.
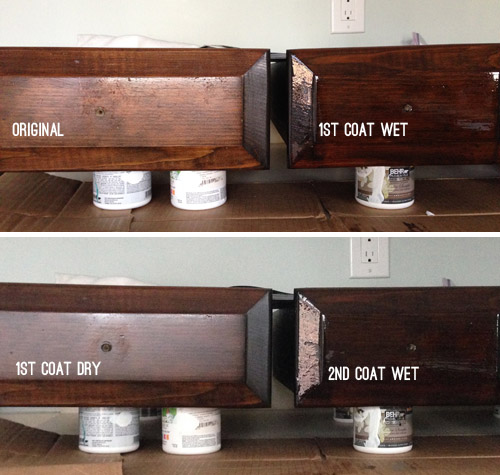
Also, don’t be alarmed if your first coat doesn’t look much darker going on. It will dry darker and you can always do additional coats until it’s dark enough for you. We ultimately did two coats.
Note: These are dummy drawer fronts that are screwed in place, which is why we didn’t remove them.
Tip: Applying PolyShades For A Smooth Finish
We had learned from our first project using PolyShades that applying it is pretty straightforward, but it can be a little challenging to keep it from looking drippy or streaky. We came up with a simple method of dragging the brush along everything after it’s applied to smooth it out. I filmed this quick video of myself putting one coat on a door so you could see it in action:
Note: You can also view this video on YouTube
In case you can’t watch the video, here’s the gist:
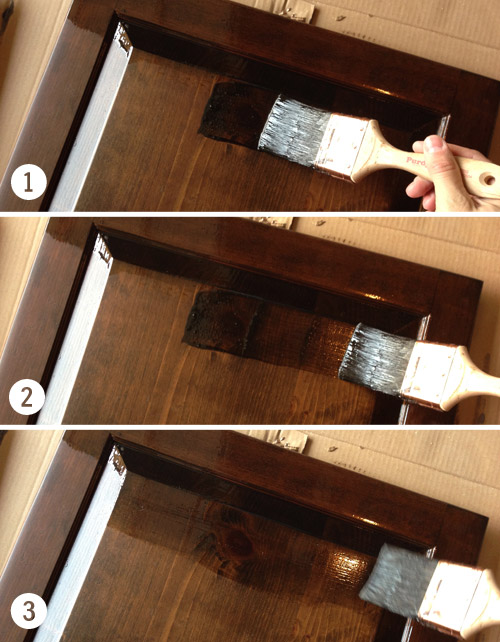
- The stain goes on pretty thick, which is exciting if you’re going for a darker color. Resist the urge to leave it thick because that excess stain will create drips.
- Don’t worry too much about brush marks at first. Focus first on covering the area that you’re working on.
- Once you’ve got the whole area covered, go back over the whole surface with long, even strokes. This will thin everything out and make your brush lines more even.
Although do as I show in the video (not in the pics below – oops) and brush in the direction of the wood grain. This will help any lingering brush lines blend with the wood grain better.
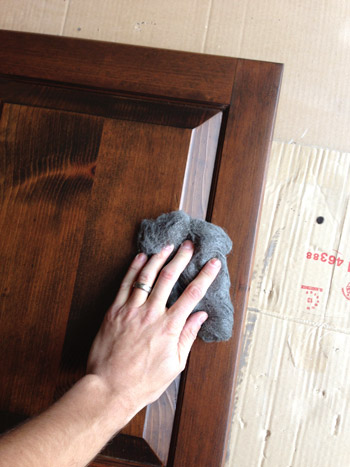
Step 5: Let Dry, Buff, & Recoat
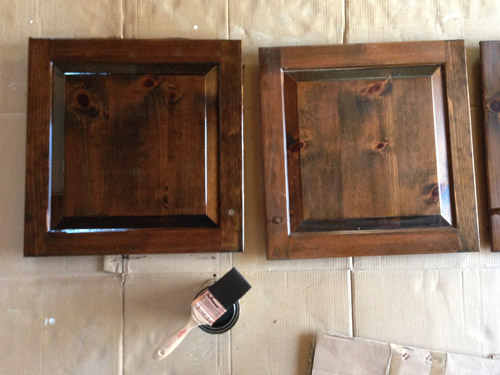
After our first coat fully dried (we gave it 24 hours) it was substantially darker than it looked when wet – phew! If you’re happy with the color, you can be done here. We wanted our slightly darker so we chose to apply a second coat of PolyShades.
Before beginning the second coat, we followed the manufacturer’s instructions and buffed the first coat with some very fine steel wood (000 grade). This doesn’t visibly damage the finish, it just roughs it up enough for the second coat to hold nice and firmly.
You can see below how these coats “build” and gradually get darker. Also, you can tell how the “wet look” wasn’t a good predictor of how it’d dry.
Step 6: Let Second Coat Dry
The next day, as our second coat was almost fully dry, we could finally see the results of our efforts (thanks to not staining the backs of the cabinet doors!). You can see in the side-by-side below that we definitely achieved the darker and more contemporary, less orange and dated look we were hoping for. And we loved that you could still the wood grain coming through!
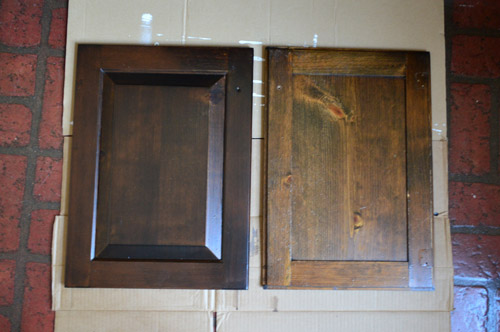
Again, this is the part with a traditional stain you would need to seal your wood cabinets with varnish or polyurethane. But since PolyShades is an oil-based stain and poly in one, you can skip it!
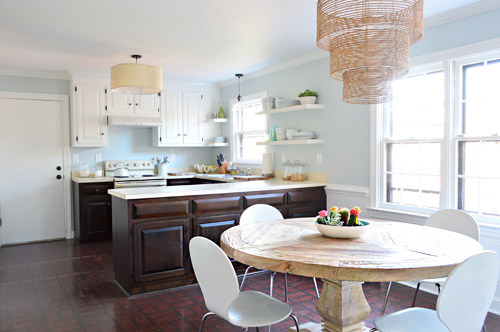
Step 7: Reassemble Your Kitchen
With everything done, you can reattach your drawers, doors, and hardware. If you’re installing new hardware, we’ve got a fully tutorial on how to easily (and quickly!) make new holes for cabinet knobs and pulls. For us, we just used the existing holes and added darker knobs that almost disappeared against the dark stain. So here’s our final look!
As a reminder, this is where we were last week with those redder and more knotty lowers. Although, this is after we had painted the upper cabinets white.
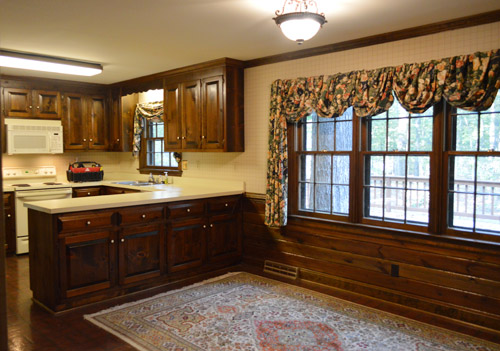
And it’s a far cry from where we started when we bought the house!
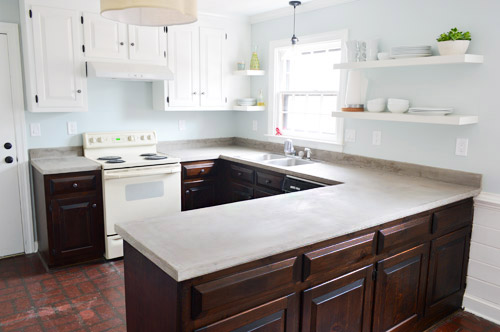
UPDATE: Since originally completing this project in 2014 we soon updated the laminate countertops by applying a faux concrete finish to them using Ardex.
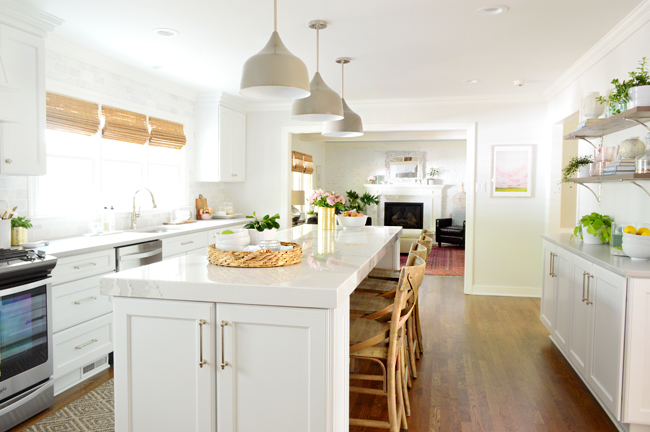
And two years later, we fully remodeled this kitchen with a completely new layout. But the old cabinets held up great for two years while we waited to begin the remodel. You can read all about that in these posts:
- Choosing A New Layout
- Gutting & Rebuilding
- The Big Reveal <– You can find all of the sources for the room right here!
- A Video Tour Of How We Organized Our Cabinets & Drawers
*This post contains affiliate links*
PS: Wanna know where we got something in our house or what paint colors we used? Just click on this button:


Beth says
We did chalkboard paint on our last fridge and we LOVED it! It was white, so I wasn’t sure how it would cover, but it turned out just like we hoped. We even spray painted the handles black, and it lasted fine. It might have needed another coat after a year, but unfortunately, the fridge died. I hated the fridge (it had a plastic spoon taped inside the door to keep the light off) after the paint job, I was super attached to it. We followed the directions from the handmade home blog. The magnetic primer was nasty, but the results were great.
Beth says
I didn’t mean the fridge needed another coat, just the handles. I really miss it, so I am definitely voting for you guys to do it, too.
YoungHouseLove says
Aw, so sorry it died! Thanks for the info, Beth! So glad you loved it!
xo
s
Beth C says
Lookin’ great! Just sent this to my gal-pal who is going to be doing the same project.
Stephanie @ Housewife Mama says
I plan on doing something similar with my bathroom cabinets. Have you heard of gel stain? Tried it? Recommend it? Also- omgoose, when you guys replace the floors (no rush) it’s going to be like BOOM, SHAKE, SHAKE, SHAKE THE ROOM!
YoungHouseLove says
I think this is technically gel-stain, although it’s called PolyShades (it can be used without fully stripping cabinets/stain like we did here). Stain is confusing! Haha! And as for the floors, wahoo! I can’t wait. I’m going to be changing “book, shake, shake shake!”
xo
s
KathyG says
this looks great! and a great alternative for someone whose husband hates the idea of painted cabinets! this would fresh up any tired old kitchen (wood that is). looks really good. i like it.
re floor, have you considered rubber flooring laid (is it laid or layed) over the top? it might be a little more than peel and stick, but it would be warmer for feet and babies, and it could be reused in the garage or the playroom upstairs since it doesn’t get stuck down. rubberflooring.com. (no I don’t work for them)
gel stain is really thick and not runny like the poly shades. its designed to work on vertical surfaces. it actually says “gel stain” on the label. it should be right next to where you got this at HD.
I am going to stain my exterior doors dark next week. Can’t wait!
YoungHouseLove says
Didn’t even think of rubber flooring! Will have to look into that! And thanks for the gel stain tip! Stain is so confusing to me! Haha!
xo
s
Amy says
Loved seeing your process and the beautiful outcome. In our house in Connecticut I took the wood panels off the jetted tub surround that were exactly like your cabinets. I flipped the boards around so the inset side was face out. Sanded, filled holes and stained. Put back up. Was an inexpensive fix that then more closely matched our new shaker style vanity. Seeing the inside of your cabinet doors reminded me of that. :) We are on the cusp of finishing a 7 month renovation of our home in Richmond. Love your blog and all the wonderful work you do on your homes.
YoungHouseLove says
Sounds awesome Amy!
xo
s
Nicole says
I am loving your kitchen! I am still debating on either re-staining my cabinets (wood similar to your original) or having them painted. My only concern with both methods is the ‘ends’ or sides of our cabinets. Our cabinets are all wood, but the sides (where there are no doors, like the tip of your peninsula) are in a matching laminate. Did you have to deal with that in your kitchen? I’m concerned how the sides would appear after attempting to paint or stain them in contrast to the actual wood.
And thank you for all of your how-to’s! They make me much more confident in doing things myself!
YoungHouseLove says
Ours were all wood so we have never tackled that but someone else said their mom tried to stain something with laminate sides and it didn’t work and she had to save it with paint, so painting might be the better choice off the bat. Good luck!
xo
s
Julia says
Love The Darkness! I had the first two albums :-)
Meg says
I’m so inspired by the progress on your kitchen! I recently decided to put off my kitchen renovation, which is a big load off my mind. I’m feeling good about it, because I realized that there are a lot of little things I could do to improve the kitchen in the mean time without fully gutting the room. I’m planning to paint my lower cabinets black, since I also love the tuxedo look. Seems like a cheap way to try out the look without committing, especially since my uppers are already white!
Hannah H. says
When you say paint the appliances, do you just mean paint them a clean white? We are researching stainless steel appliance paint and just wondering if there will be a post about that or if this is going a different direction. Our oven broke over Christmas so we replaced that and the microwave with stainless steel ones (we figured those would be hard to fake with paint) and then are going to paint our old fridge and dishwasher with the stainless steel paint. I’m excited to see what you decide (ahem – so I can shamelessly copy you if need be).
YoungHouseLove says
Yes, I lean towards white just because I’ve seen some photos of the stainless spray that look nice and others that look pretty frosted/fake to me, so it seems like it might not be as convincing as going with white (like the hood over the stove).
xo
s
Hannah H. says
Makes sense! I think I’ll just hold my breath and try painting our appliances with one of the higher quality stainless paints until we can afford the real thing for our fridge and dishwasher.
eeep – I’m nervous!
YoungHouseLove says
Tell me how it goes!!
xo
s
Steph says
This looks SO amazing.
I can’t wait to see what you do with those counters. I have incredibly ugly counters. There’s even a few random chips. I would love to try and paint them so I could make them look nicer.
Danielle Ferretti in Miami says
Happy New Year, Petersik’s !
I spent my 1st weekend of the new year painting and redecorating our guest suite, which is where my Mom stays when she is here with us for 6 months out of the year.
I must confess, I used your 2″ angled brush tip for trimming, and it made SUCH a difference over the previous brush I had ! SO easy ! It even got me now with the “painting bug” where I want to repaint our entire house. We have lived here for 7 years and this is the 3rd room we paint (first was Zoe’s nursery, then her big girl room and our Master)… Crazy, huh ? But we have a complete open floor plan, with 12 feet tall ceilings… and I am not a ladder fan. So, yes, this has kinda hindered my desire to paint…
But let 2014 bring on some painting ! xo
YoungHouseLove says
Wahoo! So glad you got that brush! It’s amazing, right?! Happy paointing!
xo
s
sarina says
With the peel and stick.. do you need to remove the existing floor covering or will you just go straight over it? We used peel @ stick straight onto some subfloor.. and it didn’t wear particularly well.. edges would “unstick” and poke up and a few tiles have broken corners now.. I really liked the look of thosse concrete counters.. looks like something completely doable. I may go that route in our cabin since I added a new counter with cabinets later and they didn’t sell the same pattern any more so now I have two different ones going on.
YoungHouseLove says
We’d go right over our existing flooring since we did that in our last kitchen and had some good luck with it. Perhaps your unsticking edges were due to grease on the floor (cleaning them really well and even roughing them up before adding new tile can help them grab on for the long haul)?
xo
s
Sarah says
The cabinets look gorgeous! I’m so impressed!
YoungHouseLove says
Thanks so much Sarah!
xo
s
Crystal says
We had an old creamy colored fridge that works just fine and don’t have the budget to replace it so I chalkboard painted it. It’s definitely not perfect but it’s oh so charming and much better than the color is used to be! It’s fun to create our own temporary art there and people love it when they come over too.
Your cabinets look great!! This phase 1 has improved your kitchen like whoa!
YoungHouseLove says
We could go right over it, which is what we did in our first kitchen. It made such a nice for-now difference, but John hates that it would be another layer to strip down the road when we redo the floors permanently, so we’ll have to see!
xo
s
Ari says
My husband and I danced to I Believe in a Thing Called Love by the Darkness for our first dance. We had to take lessons because it’s fast. One of my favorite moments of the night was looking at how happy he was dancing to the song he picked.
I love the DIY painted laminate floors at A Home Full of Color. I was debating about trying something similar in our upstairs bathroom after seeing your post and Shavonda’s: http://www.ahomefullofcolor.com/2013/11/diy-painted-stenciled-floors-part-2.html.
YoungHouseLove says
Ahh, I love that first dance song! It sounds like a FUN wedding! And I love that post, thanks so much for sharing the link! SO INSPIRING!
xo
s
Dmorgan says
Oh please do the concrete countertops!!!! I want to try it on my awful laminate countertops in the kitchen but would love to see a tutorial and recommendations from you first before I try it :)
Jennifer @ Brave New Home says
Wow, I would have never thought that you could restain those kind of cabinets! They look so seamless, especially with the knobs taken out. Very inspiring. Looking forward to seeing which floors you go with—I’m in the market for some new kitchen floors, too.
Lynn says
I am waiting anxiously to see what you do with your floors. Beautiful job and it looks AWESOME! …but your floors make me cringe…lol…and I mean that in the nicest possible way…I can only imagine how YOU feel! :)
YoungHouseLove says
Haha, I know what you mean! I have this smile on my face when I’m looking up at the shelves or cabinets and then my gaze drops and there’s a scowl…
xo
s
Shea @ The Fogue Abode says
Kitchen is lookin’ good! I just love your blog, it is so inspiring! My 2014 project is moving into our first house. Just reading through all of your previous posts have calmed my “project overload” brain. Thanks for all the great tips and can’t wait to try some out myself this year.
YoungHouseLove says
Aw, good luck Shea! Such an exciting time for you!
xo
s
Dena J says
Oh please do the concrete countertops!!!! I want to redo my laminate kitchen countertops and this approaches looks cool and economical, my favorite! Would love to see your tutorial and advice before tackling it on my own.
caroline [the diy nurse] says
It looks fantastic! I can’t wait to see some concrete! I’ve wanted to do that but am resisting since we’re moving and I’m not sure if others would like it as much as I would.
Wrenaria says
Such an improvement! The room is coming along nicely. Glad you choose to do stain instead of paint.
YoungHouseLove says
Thanks Wrenaria!
xo
s
Noelle says
What about laminate wood floors for phase 1? A floating floor is exceptionally easy to remove for down the road demo. We put Ikea floor in our old house at 1.19 a sq ft. After 6 months we hated it because it scratched so easily, and then replaced it with some beautiful floor from Costco on sale ($1.50 a square foot!) that was extremely durable and beautiful. I think it helped sell our house because people thought it was real wood floor. It was called Sunset Acacia and they still sell it. I see it go on sale every so often.
YoungHouseLove says
Thanks so much for the tip Noelle! I love that!
xo
s
tasha roe says
looks great!! love that as an option instead of painting the base cabinets. Have you thought of doing the Artex featherlight on the counters for a faux concrete finish? I love that look
YoungHouseLove says
Yes, we actually mentioned that in this post! We love that idea best I think!
xo
s
Becky Horst says
Maybe this was already addressed but what was behind your decision to paint some of the bottom cabinets white vs the rest stained?
YoungHouseLove says
You can check out this post for more on that, but we just thought the area of cabinets in that nook in the eat-in part of the kitchen was sort of like a hutch, so we thought all white over there would be more like how built-ins or hutches in an eat-it kitchen would look (they’re usually all one color).
xo
s
anne marie says
Let sherry win the floor debate. I think she has it right, besides she’s pregnant. She should get whatever she wants :o). The kitchen is looking fantastic.
YoungHouseLove says
Hahaha!
xo
s
Angela R says
LOVE IT!!! Such a great transformation!! You forgot to include the before before pic :)
So whenever I do stain I use a foam brush- would that not work with this product to help eliminate brush strokes?
YoungHouseLove says
The can recommended a bristle brush, so we worked with that recommendation and it seemed to go on well!
xo
s
Ana says
Looks great! I can’t wait for you to add a big pop of color with some curtains or something. I am always so scared of color until I see you guys do it and then I’m in love!
YoungHouseLove says
Oh yeah, momma’s craving some art and fabric in there!
xo
s
Erika says
This looks great! We have been searching high and low for those knobs from Target because they would match perfectly in our new kitchen. Our local store didn’t carry them. Did you find them online by any chance? I’d love to know where to get them. Thanks!
YoungHouseLove says
Ours are in store only, but they come in a pack (they’re $2 a knob, but I think there are 8 in a pack for $16?). Hope it helps!
xo
s
MayDaySTL says
Chalkboard contact paper works great on fridges! Mine has been up for over 5 years and still looks great.
http://www.amazon.com/Con-Tact-Self-Adhesive-Chalkboard-18-Inch-6-Feet/dp/B000KKMO90
YoungHouseLove says
Thanks for the tip!
xo
s
Lexie says
I just read your post about the uppers…question for you: what, in a nutshell, does it take to convert your hinges to be hidden? We have too-thin cabinets also (with exposed hinges) and my husband is CONVINCED he can convert them. While he is very handy, I don’t want to end up ruining the doors. Any advice you can share? Can you tell I’m planning to use you to talk him out of it? lol
YoungHouseLove says
If your cabinet doors are either completely in front of the frames (they are wider than the cabinet opening and sit in front of it), or completely recessed (meaning they slide into the opening exactly), there are hinges they sell at Home Depot (and everywhere else). So you’d literally just buy new hinges and boom, hidden hinges. Our doors are half sunk, meaning half of them is recessed and slides into the cabinet frame and half of them is stepped out and wider to sit in front of the fronts. Those are rare, and a lot harder to convert to hidden hinges (we even tried specialty stores, but they don’t have hidden hinges for those).
xo
s
Lexie says
Thanks for the info! Ours are wider than the frame but I think our problem has to do with the door thickness and they need to be beefed up to support hidden hinges? I thought maybe you had the same issue and was wondering what insight you may have.
Kitchen looks great! Really coming along!
YoungHouseLove says
Oh yes, I bet if your doors are too thin it would be hard to recess the hinges in the back, but if you grabbed one from Home Depot and brought it home and held it up you might be able to see if they’d work. Good luck Lexie!
xo
s
Emily @ Life on Food says
We are thinking about concrete counter tops too. The new year brought us a broken dishwasher. Not sure what to do since it is a tight spot in the kitchen. We weren’t planning on doing in reno work in there for another year or so. It might come a lot sooner now.
YoungHouseLove says
Oh man! Good luck Emily!
xo
s
Sarah @ The Ugly Duckling House says
Two things:
I thought my false drawer fronts were stuck/glued in place too, until I learned that they have a nifty twist-off thing in the back usually to take them on/off. The downside to mine is that the plastic doodad in the back wasn’t put in the right place, so it was a beast getting them off the first time (wedged next to the sink). Maybe yours has it too?
The other thing is that song. I know it well and it’s STILL on my workout playlist. Reminds me of Spring Break every time I hear it (long story).
YoungHouseLove says
Thanks for the tip, Sarah! Our cabinets are oddly un-take-apart-able (the shelves in each cabinet can’t even be removed – we’d need to demo out the whole frame to get them out) so I think it’s just one of those “we built these in and they’re not going anywhere” things. Will double check for a plastic doodad, though! That sounds awesome!
xo
s
Michele says
Paint the floor and then put 3 coats of varathane over it. Seen is done in an old farm house once. You can even paint designs around the edge or at a door to look like a rug. Should last more than a few years.
YoungHouseLove says
Love that idea! Thanks for the tip Michele!
xo
s
Frances says
Looks awesome, love the two-toned effect and the tudor colour! I’m thinking about using polyshades to darken our red-toned oak banister and spindles… nervous about managing drips on the vertical spindles – haven’t got up my nerve yet!!!
YoungHouseLove says
Good luck Frances! It’s pretty runny, but if you go slow and smooth it out as you move along it’ll hopefully work nicely!
xo
s
Tanya Hayes says
Have you looked into marine paint for the floors? I hear it holds up well in kitchen and bath areas.
YoungHouseLove says
Love that idea! Never thought of that!
xo
s
Jamie D says
Marine stuff is the way to go! We are planning to seal our wood patio furniture and since it will be outside, we bought the marine grade poly for the best moisture repellant. Seems like that would make sense in a kitchen (or bath!).
YoungHouseLove says
Thanks Jamie!
xo
s
priscilla says
Yes, marine paint is pretty indestructible. But, you will likely need to spend the next few nights after applying it a relative’s home or somewhere. “Marine” means able to take salt water, so it is very strong and harsh. Once it is dry it can be sealed and no problems. We used it on boats in the salt water and it is awesome!
YoungHouseLove says
Eeks, thanks for the tip! Will have to see how fumey it is since I’m avoiding chemicals that are dangerous for pregos!
xo
s
Amber says
Quick question…
When y’all painted the cabinets this time around, did you use Satin or Semi-Gloss Advance paint?
Just curious, cause I read that you used satin in the old house, but you used semi-gloss on the trim here.
We’re adding a bunch of molding to our kitchen, painting the cabinets here hopefully in a few weeks and was curious.
Thanks!
YoungHouseLove says
We did the satin on the cabinets in Advance just because that’s what we used in our last house (on the office built-ins and the cabinets) since the guy at the store seemed to favor it a little (hides more imperfections). We have been really happy with it in all three applications. For trim and doors we love semi-gloss though, since we’re not using Advance and just using Natura in those cases.
xo,
s
Kate says
Since you guys referenced Jenny’s concrete counters (which, btw, my brother cast concrete counters for his kitchen re-do, and they look amazing!!), I’m wondering if you saw her laundry room floor?? http://littlegreennotebook.blogspot.com/2013/07/the-laundry-room-redo-and-5000-laundry.html I didn’t even realize she had painted the floor – I thought she had laid new floor! What she does with the colors over the faux brick really makes it look completely transformed! Not sure what the VOC situation is like on alkyd paint, but it looks like she got some great results by using it!
YoungHouseLove says
Yes, it was so awesome! The only difference is that our floor is a sheet of vinyl, and hers are actually grouted faux bricks, so they’re stone. Our sheet flooring has just been really flakey and scratchy, so I worry about it holding up, but some folks have commented to say that certain sealers might save us! Painting would definitely be easier than peel & stick!
xo
s
Katie @ On the Banks of Squaw Creek says
I did the same thing to my orange-y 100 year old bathroom door and it worked wonders! I wish I would have done it on all the trim instead of refinishing it to a darker color. Oh well, live and learn!
The kitchen looks great!
Jenny D says
Will this method work on our basement’s knotty pine paneling?
YoungHouseLove says
I would think that it would! Maybe test it on a small spot?
xo
s
cassie says
Sorry totally off topic, but I noticed that you guys updated your “Our Wedding” section because I’m weird like that and have read it over 10 times because I love it. But I’ve always wondered what you guys did dancing wise? and how you saved money music wise??
YoungHouseLove says
Aw thanks Cassie! We just played a pre-made playlist on an iPod with little hidden speakers in the sunroom, so it wasn’t loud like a dj/dancefloor, but it was there for ambiance. Our family isn’t too dance-y for the most part, so the photo-booth and the clothesline of pictures and the food and s’mores were more of the “activities” instead of dancing.
xo
s
Melissa Maris says
My husband and I painted our countertops (Rustoleum makes a roll-on paint for this – although the fumes definitely killed some of our brain cells) and we painted our old 1960s linoleum floor. The floor required a layer of poly over the top but has held up pretty darn well over the last year. Depending on how long you’re going to keep your phase one, I would say the painting might be an ok option for you!
YoungHouseLove says
Thanks for the tip Melissa!
xo
s
Stephanie says
paint, paint, paint, paint. . .the crowd chanted ever louder. I just think it would be cool! Maybe a pattern?
YoungHouseLove says
Haha! It’s funny because peel & stick would be way more work than paint on those floors – just worried it’ll crack and peel. Some folks gave tips for types of sealers that might work though!
xo
s
Jennah says
My mom spraypainted their original to the house 1973 HARVEST GOLD dishwasher off white with appliance paint (bc my mom is anti-white, no matter how hard I try). It held up great for probably over 15 years until they finally got a new dishwasher when I was in college (they uhhh….make stuff last).
Not sure how you’d deal with the ice/water area, though.
YoungHouseLove says
That’s awesome to hear Jennah! Thanks so much!
xo
s
Julia Tudor says
I simply love this! I’m so glad you stuck with the Tudor stain ;)
YoungHouseLove says
Thanks Julia Tudor! It does have a nice ring to it ;)
xo
s
holly says
This turned out great. You should totally add a chalkboard behind that dummy door behind the trash compactor for Clara!
YoungHouseLove says
That would be fun!
xo
s
Lynn @ Our Useful Hands says
I also had (still have!) that CD. Love it! I can’t watch the video though because I was able to love them without subjecting myself to looking AT them – lol. They were dubbed my modern day Queen. Your cabinets look sooo beautiful. This Phase is turning out to be so drastic already and thankfully livable without losing use of all your kitchen for weeks or months. Take care guys…fresh ginger tea all day every day until you get all the yuck out of your systems.
My best, Lynn
YoungHouseLove says
Aw, thanks Lynn! I have been sipping decaf chai and it’s heavenly! Will have to break out the ginger tea too (I tried that for nausea and it didn’t work, but it was good!).
xo
s
Charlotte Claypole says
Hey Sherry and John,
I love the look of the stained lower cabinets, it did turn out after all. I have been busy pinning kitchen ideas for the day when we can renovate ours. I check your blog daily and look forward to seeing what you have done.
When on your list is a home office makeover? Do you miss the old home office from your previous house? Where are you keeping all of the post card art that was created for your previous office? I look forward to seeing what you do in this house for a home office space.
Thanks so much for sharing.
p.s first day back to school after Christmas holidays and it’s a SNOW DAY!
YoungHouseLove says
Aw, thanks Charlotte! And we’re so jealous of your snow day! Sounds like FUN! We are definitely starting to think about the office (and miss the last one a lot! I’m here working at the kitchen table right now, haha) so we hope to tackle that soon! We’re just tying up some kitchen stuff and planning the nursery as well, so maybe a good estimation on the office is that we’ll get started by spring? We want to do fairly involved things (adding built-ins and a big island-like workspace in the middle) so it might take some time and some penny saving. We still have all of those postcards though, and love them!
xo
s
Shannon says
Hi guys! Things are looking amazing! I’m now a total believer in doing things in phases, and so is my husband! I’m eager to hear more about the concrete counter tops. Have you guys considered the Rustoleum kit you can buy to make the counters look like granite? I’ve never seen it in person, but it sounds straight forward and very durable.
YoungHouseLove says
We have heard great things about that, it’s just that it’s fumey so probably not the best since I’m prego. But I’d love to try it out someday somewhere!
xo
s
Brandyn | Southern Distinctions says
Looks fantastic! You’ve made incredible progress. Night and day difference!
RLR says
Check out http://amwalk21.blogspot.com/ – she did her fridge with chalkboard paint, and I think she’s still happy with it.
Love the work you’ve done to the cabinets. I may have to add the same thing to my “wish list” of home projects. We are itching for darker cabinetry and hardware!
YoungHouseLove says
Thanks RLR! Will check it out!
xo
s