The transformation of $6 hotel nightstands into a built-in-wall-to-wall-desk-for-two continues. If you recall, we last removed the hardware, sanded, and primed them all in preparation for painting them white.
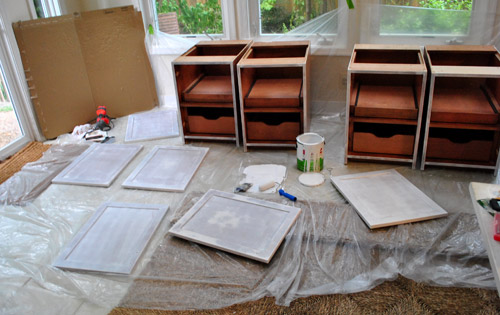
But before painting, we had to do a bit of construction (we needed to attach them in pairs and built them up about four inches so they’d be desk-height). And before doing any construction we decided we ought to look at them in the space first…
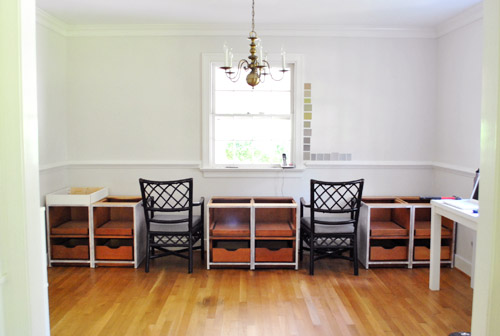
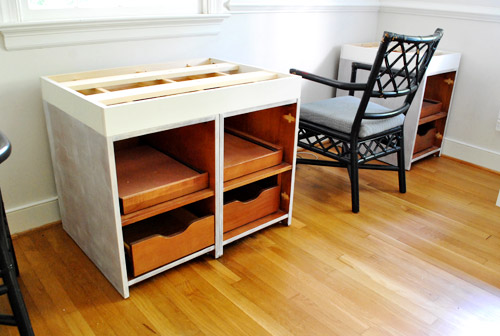
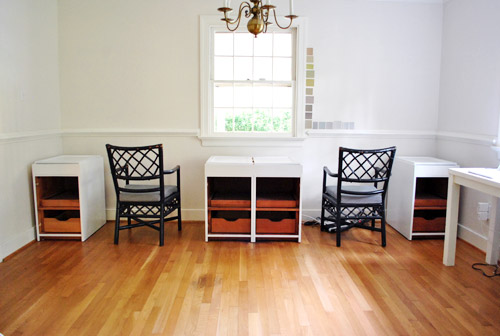
… which is clearly something that we should’ve done sooner (but they’re darn heavy, so moving them back-and-forth isn’t fun – which is why we plopped them down in the sunroom and moved on to sanding and priming). Oh well, better late than never. Once we had them in place we realized that it was a bit more cramped than we expected; the three pairs of two cabinets left hardly any wiggle room for our chairs. And things just looked, well, a bit tight. (Ignore the beginnings of construction on the cabinet on the far left. Our original photo of this got deleted by accident so we had to retake after I had already altered a cabinet. And while you’re ignoring things, pay no attention to the paint swatches on the wall. Not sure we like any of ’em so we’re still at square one with that).
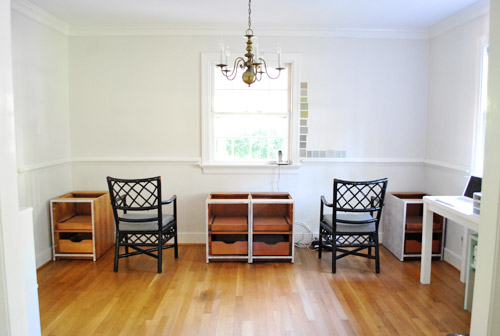
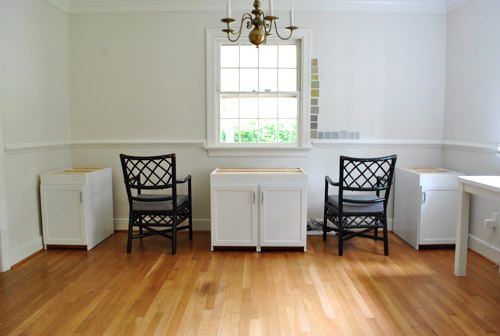
This little space planning exercise inspired us to take out two of the cabinets and look at the wall with four of them instead (two in the middle and two on each side). MUCH better. We loved this configuration a lot more, because not only would it look less crowded, we’d actually feel like we were sitting at desks (which usually have more breathing room than a few inches on each side of the chair). And there’s still more than enough storage space between the four remaining cabinets and our double wide two-tier file cabinet on the other side of the room.
Had we spent more than $6.30 on all six cabinets, it might’ve been a harder decision to ditch two of them, but I think we can handle eating the $2 (and the wasted time spent priming and sanding the extras). And who knows, maybe we’ll even figure out how to repurpose them (Sherry has been yacking about making a play kitchen for Clara for a while, so I’m sure she’ll fill you in if that happens).
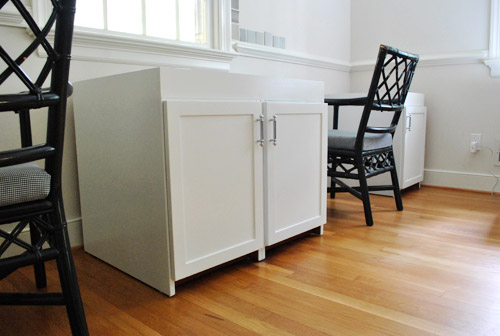
Now on to the construction part of this process. The goal was to (1) visually connect the two cabinets in the middle so they’d look like one large two-doored cabinet instead of two cabinets randomly parked next to each other and (2) build the cabinets up four inches so that they’d be standard desk height (around 30″ tall with a counter) so our existing chairs could easily slide under the counter. I debated all sorts of fancy versions of this process, like:
- “I’ll build a drawer!… which would be about 2″ thick… and therefore totally not worth the trouble/expense… so never mind“
- “I’ll build them up from the base so the things in the cabinets are easier to access… by a few inches… wait, it’s a lot easier to build up the top since the bottoms have legs and a few inches won’t make a difference… never mind”
Finally I opted for a simple budget-friendly solution: I just picked up a bunch of 1 x 4″ boards at Home Depot (including some that were pre-primed, hooray for convenience) and cut them to size to create a nice little built-on frame to raise them up four inches.
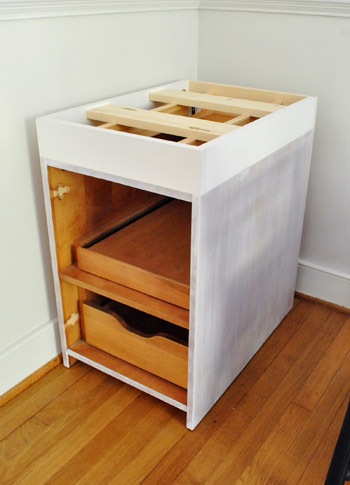
Then using my Kreg jig I drilled some pocket holes to attach the front and side together, and then screwed them into the top of the cabinet. You can see it more easily on one of the single side cabinets in this shot:

Then I attached the back piece which is where I used an un-primed 1 x 4″ (because it won’t be visible at all against the wall and under the countertop). Why? Because an 8ft piece of primed 1 x 4″ was about $1 more, so using unprimed boards wherever they weren’t visible saved me a few bucks. Sure, I could have saved $3.50 more by just using unprimed wood everywhere and priming the visible parts afterwards, but since we already primed all the cabinets we lazily decided that it was worth spending $3.50 for primed wood in the visible spots so we wouldn’t have to break out the primer and do all that clean-up again. We figure finding six dollar cabinets makes small luxuries like an extra $3.50 spent on pre-primed wood ok in our cheapskate hearts.

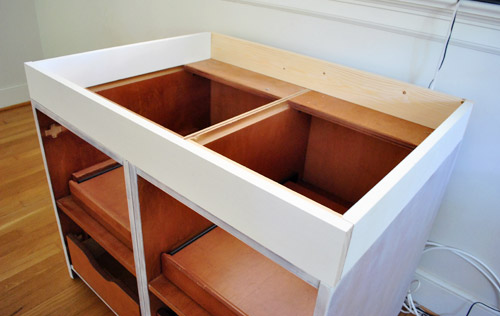
That simple frame accomplished exactly what I needed in terms of building things up and connecting the two center pieces, but the cabinets weren’t thoroughly prepared to handle a counter top quite yet. That’s where some 1 x 3″ boards came into play. I cut a few pieces that would span the inside of my new frame and drilled them into the top of the cabinet. This added even more strength/stability, just because I’m Captain Careful.
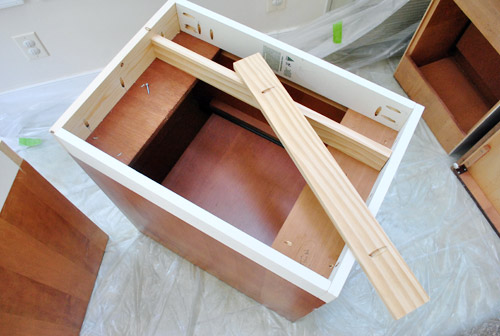
Then I topped that with some leftover 1 x 4″ slats that lay flat – which created a platform for me to screw the counter top into when it comes time. They’re not attached in this pic below, so you can see that they don’t sit level with the frame at this point – but I’m going to add some washers to raise them up a smidge when it comes time to actually screw them in (so it’s all one big level plane):
With that, the construction portion of the project was largely over – well except for the counter of course, which we’re still working on and will cover in a few days. We’re doing something similar to the top of our living room console table… sort of (more details as soon as we’re a little further along). Once that’s all said and done, we’re also planning to add some baseboard trim around the bottom of the cabinets (where they meet the floor on the sides and front) to make them look even more “built in.” So yeah, I guess maybe the construction portion isn’t completely over. But we’re good for now.
So let’s move on to painting the cabinets. As we’ve mentioned, we’re painting them white for a nice clean look (which will tie into the white built-ins that are visible in the adjoining dining room, don’t wanna get to crazy with colored built-ins near white ones- we just want these to look like they’ve always been here).
We decided this was a perfect opportunity to try Benjamin Moore Advance paint, which a number of you guys have raved about recently. It’s self-leveling, which means it helps coat more evenly for a smoother finish (something that’s perfect for a cabinet project) and it’s a high quality alkyd formula (so it should be nice and durable) and it’s also water based and extremely low-VOC (even after the colorants are added) which is always a plus for us – and is extremely rare for cabinet paint.
The only drawback is that it’s expensive, at least for cheap-os like us (it’s around $45 a can). But as a thrifty reader named Heather suggested, Sherry told the Benjamin Moore guy about a 30% off sale at Sherwin Williams and asked if he could match it. He said he couldn’t do 30%, but offered 10% off on the spot – without so much as a coupon. So she saved around $5 by asking a quick question at the register.
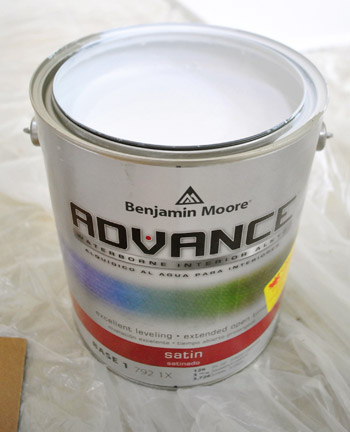
We got the paint in Decorators White (a bestselling color by Benjamin Moore), which is pretty much the perfect white tone according to the lady wife. You could hold fifteen swatches of white paint up and they’d all look the same to me, but apparently Sherry can see all sorts of variations and likes Decorators White the best. Oh and we got it in a satin finish because they only offered that or high-gloss (which I worried would show more imperfections).
Interesting side note – the pic above is taken after we were done painting all of our cabinets. So you can see the insanely small amount of paint we used for this project (it was nice and thick, so it covered really well). This means we definitely could have gotten by with a quart (for around $25) but we’re glad we got a gallon since we plan to use the rest of the gallon to paint the cabinets in the kitchen down the road. Which might further take the burn out of a $40 gallon of paint. Haha.
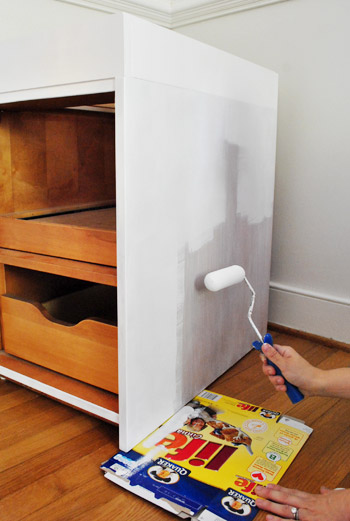
Sherry’s tools for the painting task were both a brush (to get in cracks and corners) and a small foam roller (for a quick, smooth brushstroke-free finish on large surfaces).
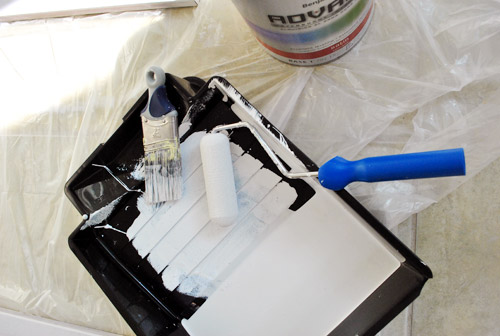
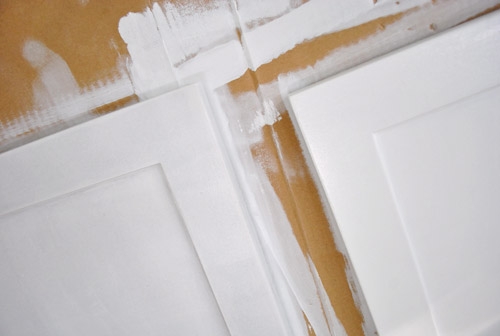
You can (hopefully, although it depends on your monitor) see the slight difference between one coat (on the door on the left) and two (on the door on the right). Two coats probably would’ve been fine, but we did a third just to be safe – and to make sure there wasn’t a difference between the areas that we primed and painted and the pre-primed 1 x 4″ boards that we only painted (which were much lighter than anything else to begin with). Three thin and even coats (remember, this is Sherry’s mantra) definitely did the trick, and as seen from the photo of the paint can above, we hardly used any paint. Which is nice since we initially wondered how far it would go.
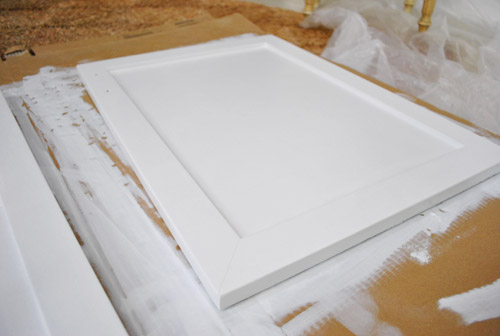
Here’s a finished door after three full coats. Each coat took Sherry about 30 minutes, which wasn’t bad at all. Except that the can called for over 16 hours of drying time between coats, so instead of finishing this process in an afternoon it was a bit more drawn out over the course of a few days. But everything cured up nice and strong and looks great. As for Sherry’s review of the Advance paint: “I want to marry it.” So yeah, she loves it.
And of course, a few consecutive days of painting is made much easier when you’ve got a fan club watching you intently (as some of you already saw on Young House Life). Here’s the wife in the sealed sunroom sporting her inside-out painting clothes with the bean looking on. You can see that we just used some leftover cardboard (from old Ikea purchases like the file cabinet) to paint on.
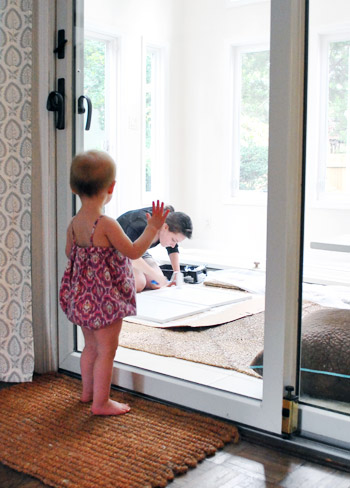
Even though the Benjamin Moore Advance paint is low-VOC, it’s not no-VOC. Which is why Sherry painted all of the doors in the much-ventilated / Clara-and Burger-free sunroom (also to avoid baby hand-print and puppy paw-print mishaps). We had to paint the cabinet bases in place in the office (the big middle section was too heavy to lift once the two cabinets were built up and connected), so we just kept Clara out of the room and opened all of the windows and ran some fans (Sherry painted during her nap, so by the time she woke up things were aired out and then we just kept her out of the room so we didn’t get little fingerprints going on). Thanks to a little flat-cereal-box-under-the-spot-being-painted trick (to keep paint off the floor), we got to avoid putting down drop cloths. Oh yeah, we’re rebels.
Oh and the shot above demonstrates how nice the BM Advance paint coverage was for us. This is just the first coat going on over the coat of primer that Sherry added a few days ago. That’s a really good showing for a first coat according to my paints-everything wife.
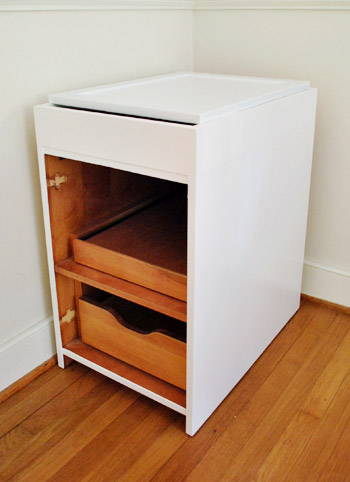
So here’s the finished piece all painted (and with the cabinet door just laying on top – we later moved that out of the sunroom to make way for countertop progress).
Oh and as for why we didn’t paint the inside of the cabinets, here’s an excerpt from our initial post about that for anyone who missed it:
As for the backs of the doors and the cabinet interiors, from day one we decided that we wanted a nice clean glossy front for our wall to wall built-ins, but to keep the backs and the interiors (and slide out interior fittings) of the cabinets the same natural wood tone that they were to begin with. We certainly know that not everyone would go that route, but the new KraftMaid drawers that we installed in our first house’s kitchen renovation had wood interiors and we really liked them (you can actually see some of them here full of tools):
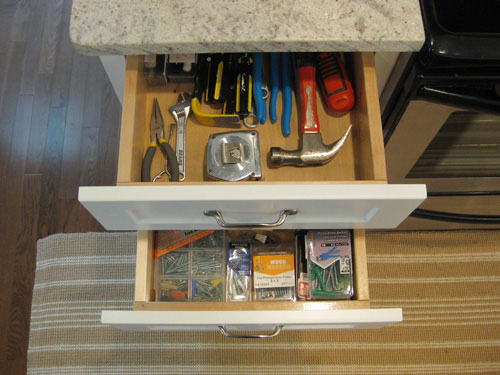
They had glossy white drawer fronts, but inside they held up a lot better to natural wear and tear than anything painted (since we’re weirdos who will stash hammers and screwdrivers almost anywhere). And we actually don’t mind the whole wood + white look (sort of like the dresser we refinished for Clara). Although in this case we decided from the outside that the cabinets would look entirely crisp and white (no contrasting color in the door front or anything), and only when you swing them open will you see the wood tone.
But back to our freshly painted cabinets. The white paint was a big help in making the middle pair seem like one piece. We contemplated adding some caulk or wood putty in the slight crack down the center, but we held off since we thought it might be less obvious once the doors were reattached.
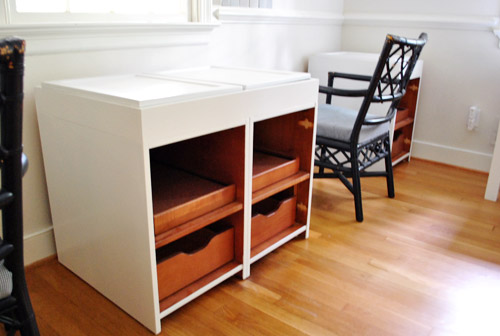
And sure enough, they were. So here’s everything built up four inches and fully painted. We just needed to wait a few days to attach the cabinet doors…
… which looked pretty darn good once we added those:
Of course we still have to add molding around the base of them all (so they look even more built-in), which will hide any areas down by the legs that still appear to be wood toned. And we’re going to trim out the sides as well (so they appear to attach to the walls on either end). We’ll hopefully be back with those details soon. But in the meantime, you know we love a budget breakdown, so here’s the wall-to-wall desk tally so far:
- Cabinets (from Habitat For Humanity ReStore): $6.30
- Kilz Clean Start No-VOC Primer$0 (leftover from painting the kitchen paneling, but it would be around $20 to buy for those wondering)
- Electric sander & sandpaper: $0 (already owned, but would be around $25 to buy)
- Benjamin Moore Advance paint (in Decorators White, satin): $40 (thanks to 10% off haggling/begging)
- Pre-primed & unprimed wood to build up cabinets (from Home Depot): $51
- TOTAL: $97.50 (which was about the cost of one unfinished base cabinet at Home Depot or Lowe’s)
We’ll also be back with all of our countertop details soon- just gotta make enough progress to snap some pics and share that stuff. One thing is for sure: we can’t wait to use our new double desk. And yes, Sherry has been walking around saying “double desk” like Robert DeNiro says “double dose” in the Little Fockers trailer (not sure how I feel about this weird club mix of it below though):
What did you guys do over the long weekend? Any building? Painting? DeNiro impersonating?
Psst- To follow our cabinet makeover process from the beginning, here’s the post about finding our $6 cabinets, the one about other places we looked, and the post about sanding and priming the cabinets to prep them for paint.
Pssssst- I just shared one of the coolest dresser makeovers we’ve ever seen on BabyCenter (and it’s not just for kids).

Allison K says
We poured our own concrete countertops this weekend! We’re building a house and I was shocked at how expensive even formica countertops were. So, with inspiration from Kelly Moore and others, we decided to make our own. Can’t wait to take them out of their forms and see how they turn out!
YoungHouseLove says
That’s so exciting!!
xo,
s
heather says
Allison – Jealous! We are debating on doing that in our kitchen. Not sure I’m down with O.P.P. that it takes 3 weeks to a month to cure fully though. If the Hubsterama is willing to do it though I think I’d still go for it. I love the look and functionality of them.
Molly says
wow, wow! When you guys scored those six dollar cabinets, I knew they had major potential for awesomeness. And now, at this stage in the game I am completely jealous! Great space planning, great re-purposing, and well, great job! Thanks so much for the constant inspiration.
Rachei says
Nice job! I was hoping for this post like this after the weekend! Excited to see the end result!
katalina says
I was wondering if you did not have the leftover paint from Ben Moore to paint your kitchen cabinets…
would you still use Ben Moore Advance for the end results to paint your kitchen cabinets( keep in mind I do not have cereal box superhuman sherry painting skills…)
do you have to strip kitchen cabinets of any finish—maybe I should wait till you tackle your kitchen cabinets and be a copy-cat!
do you recommend painting kitchen walls before cabinets?
thanks!!!
YoungHouseLove says
Oh yes, having used it I’d definitely buy a whole new gallon for the kitchen if I didn’t have this one leftover. I also would recommend painting the walls first if you can. That way you can just touch up any areas that you get cabinet paint on the walls but don’t have to worry about getting wall paint on the cabinets. As for cabinet painting, I would use the same method we used to paint these cabinets (sanding them, priming them with a high quality primer and giving them thin and even coats of paint with lots of drying time between them).
xo,
s
Kelly says
Great progress on the office. Can’t WAIT for the finished product. You guys are nothing short of 100% awesome!
Love the photo of Clara looking into the sunroom. It looks like something out of a cool movie with Sherry working in a “clean room”, possibly helping scientists find the cure for cancer with one of her DIY projects after stumbling upon a unique mix of low VOC paint fumes!!
;-)
Donita says
The cabinets look great. I can hardly wait to see the counter top. We did not know that ANYONE could shop at Habitat for Humanity, *until reading about your buys here*. We will be shopping there very soon.
We took our two oldest granddaughters to yard sales, all day on Saturday. Every year, over Memorial Day and Labor Day weekends, there are MANY yard sales for many miles. At the end are TWO huge flea markets. We only made it to the first Flea Market, as the traffic was backed up for miles at the second one.
SHERRY, I found GREAT THINGS at one yard sale. THREE, yes THREE animals to paint glossy white. An OWL on a perch, a RHINO, and a HIPPO. I’m SO EXCITED. My daughter is so envious, told me I have to make sure I do a good job painting her inheritance *several thin coats. LOL per Sherry*, AND that I have to put her name on the bottom. I also found in mint condition, a metal cart on wheels, with three shelves. It is original from the 50’s, painted lemon yellow. I found a much needed great lamp, for my sewing desk, $2.00. My total cost of the day was around $40.00. The cart came in at $15.00, well worth it. I tried to get her to go down, but she knew what she had. :-P
YoungHouseLove says
Oh my gosh, an owl and a rhino and a hippo sound amazing. I don’t even have a hippo yet. Jealous. Haha.
xo,
s
Donita says
HEE HEE YES all three. The rhino, looks like he is laying down. They are not HUGE, but oh so perfect. My daughter is just dying. LOL The owl is about a foot tall though. They are all made from FINE wood. LOL my husband thought that they are so great just plain. I let him know, right away, that they WOULD be glossy white. LOL Men just have a thing for raw wood, don’t they? Well the ones I know anyway. ;-)
Mollie says
my friend and i went to the alexandria restore this weekend to look for materials for her smaller scale desk project. no cigar, but we ended up stopping by the crate and barrel outlet and they were having a labor day weekend “sidewalk sale” and we ended up snagging the butcher block top of a big kitchen island (the base had been busted and was destroyed) for $10!! so exciting!!
YoungHouseLove says
That’s so exciting! What a steal!
xo,
s
Sara says
No weekend is complete without some spac caked in and around my engagement ring, which I always forget to take off before starting a project with spac…thank goodness for hot water and old toothbrushes.
Barbara says
Those look seriously fantastic. Nice work :-)
Faye Roohi says
First of all, I have to say I LOVE your blog!
Second, y’all are a fabulous inspiration to make my home better looking at low costs!
Third, I stole your white frame wall idea, and finally finished it this weekend! Thanks for the (p)inspiration!!
YoungHouseLove says
Haha, love it! Congrats on your new frame wall.
xo,
s
em says
The cabinets look great. But, I wanted to chime in and say get cracking on the toy kitchen for Clara. We bought ours for my daughter when she turned 2. She’s four and still plays with it every day. And our son, who is Clara’s age, now plays with it as well. At this age, they just like opening oven doors and throwing play food into the the sink, etc. But, as the get older, it’s fun to watch them “cook.” I know you will make Clara an adorable play kitchen out of those cabinets. My suggestion is keep it gender-neutral as it will get years of play and some day she may have a little brother sous chef.
YoungHouseLove says
Can’t wait! It’s definitely at the top of my list.
xo,
s
Lindsay says
Looks great, of course! Are you going to include a shot from the dining room in the next post about them? I’d like to see how they look with the dining room built ins too!
YoungHouseLove says
Sure! Once we get the counters in there we’ll go crazy with after pics for ya. Haha.
xo,
s
Cindy says
They look great; what a wonderful work space! Just a thought. I have a similar set up at work. The center cabinets open exactly as yours do, and I find it extremely frustrating. Even though I have the cabinet to the left opening to me… I find it very inconvenient that the cabinet on my right opens from the center, making it difficult to get to anything when I’m at my space.
You may want to reconsider the center cabinets and have the handles to the outside so each opens to a desk position. It doesn’t look as good, in my opinion, but now being on the working end of things, it would be so much more convenient.
Just a thought.
YoungHouseLove says
Yeah, we thought about that and don’t mind the set up for now (since our chairs have arms we figure we’ll get out of them to open the cabinets, much like we use the lower cabinets in the kitchen) but if it gets on our nerves we’ll definitely consider switching the hinges so they open out.
xo,
s
Linda says
The project looks wonderful! And I’m a fan of Benjamin Moore…the designers specified Benjamin Moore for our multi-floor office when we moved last year, and I used Aura for my bathroom last Thanksgiving. Couldn’t have been happier. Costs a little more, but well worth it.
blake says
What about using the two cabinets where the Ikea file thingy is, which surely could find a home somewhere else in the house? I love Ikea, but hardwood cabinets seems like it would be an upgrade for files, printer, etc. — plus, it would relate to the desk, which might look a a little more swank, especially with a matching countertop.
YoungHouseLove says
We thought about that but decided it would be too matchy matchy and kind of kitchen looking to have more of the same cabinetry on another wall. We’d love for the office to have more of a mixed and matched feeling with a plush arm chair and ottoman and the file cabinet to round things out. But I’m sure we’ll find a place for those two cabs!
xo,
s
Maureen says
So impressed, as usual, guys! Love it! I did a little painting and caulking myself this weekend on our front door and side door trim. Painting the actual doors sometime this week! Also, I have a question… if anyone can answer. Is Satin finish glossy looking? I noticed you used it in your hall and bedrooms and was wondering why that instead of an eggshell finish. Thanks!
YoungHouseLove says
We just like the wipeability of the satin stuff (it’s a bit less flat than eggshell, but I don’t think anyone could distinguish the difference with the naked eye). Hope it helps!
xo,
s
Caitlin @ Desert Domicile says
Looks great!!!
This weekend was spent priming and painting three thin and even coats on my kitchen cabinets as well as spray painting all of the old brass hardware brushed nickel and taking a 6 hour trip to IKEA to buy some handles to (hopefully) complete the project once the doors get hung back up tonight!
Rebecca says
Our big weekend project was finishing the install on a new mosaic counter top I made for the bathroom. It all went really well installing the vessel sink, and faucet —- until we went to turn on the valve underneath!! Leaking!! Ugh ugh ugh! No we’re on hold to either pay a plumber to replace the valve or think of something to fix it!
Any ideas!?
YoungHouseLove says
Hmm, did you use plumber’s tape when you installed it? That’s usually something we try to do!
xo,
s
Lisa says
My boyfriend just bought a fixer-upper house, so we spent the weekend cleaning, removing old carpet and tile, prepping the house for new flooring and paint and a thousand other things. The amount of work that can be accomplished in 72 hours just blew our minds! And it was so rewarding to have done it all ourselves!
YoungHouseLove says
Wow- that sounds like so much work! We totally love that feeling of exhaustion/accomplishment!
xo,
s
Ashley says
What a tease! I can’t wait to see the top! I was hoping you were gonna steal inspiration from your console table!
jacki says
Are you going to put cute paper liners on the drawers too? Just like Clara’s dresser? Just curious!
YoungHouseLove says
Haha- I would love to!
xo,
s
Elizabeth says
Will the extra 2 cabinets fit in the corner of the ofice where you just put the ikea cabinet? That way you’d have a matched set in the office and could use the ikea cabinet elsewhere.
Elizabeth says
Doh! Just saw your answer to a previous poster with the same thought.
YoungHouseLove says
Yeah, we definitely thought about it but liked the file cabinet to keep things more varied- but we’ll definitely find a spot for those extra cabs!
xo,
s
Corrie says
Good work so far you guys! Depending upon how fancy you feel like getting, you could even make ‘faux drawers’ over the area where you added the 1x4s to cover the empty, flat space between the cabinet and future countertop. It would be pretty simple with a piece of wood, some molding strips or narrower woods strips for around the edges(to give that raised look to match the doors)and a matching handle. But maybe the space doesn’t bother you, or the overlap from the future countertop could cover some of it. And then there’s the whole matching hardware issue…But just a thought :o)
YoungHouseLove says
That’s so funny because John mentioned that too. We’re going to wait to see how things look with the counter (since we figure if there’s an inch or two overhang it might change how things look).
xo,
s
susan says
Looking good. Can’t wait to see the counter top. I have to admit I just scanned the blog post because there is no way I will be doing a project like that any time soon:) susan
Jen says
I am so excited to see how you do the top! The whole thing is going to be just fabulous! And the cabinets look PERFECT!
We found some furniture that is need of painting this weekend, now I am having a debate on the color. Sherry, since you are seriously amazing at picking colors, I would love to know your opinion. The walls right now are a gray blue and the rest of the room is a giant blank slate:
http://iheartorganizing.blogspot.com/2011/09/great-dresser-debate.html
Thanks!!
xoxo,
Jen
YoungHouseLove says
Oh my gosh, I’m kind of obsessed with hot pink and yellow, so either of those are my picks. Love them!!! And your laundry room is beyond adorable. I still dream about it.
xo,
s
Jen says
Thanks so much Sherry!! I am SO tempted on the pink, it was never a contender in the beginning, but the more I think about it… :)
xoxo!
YoungHouseLove says
You could even go with a softer gray-pink tone if you’re scared of the hot pink. But that would be super fun too!
xo,
s
Allison says
Was reading your blog earlier and then saw this on Lowe’s Creative Ideas… http://www.lowescreativeideas.com/idea-library/projects/Childs_Kitchen_Set_0609.aspx
The kitchen set looks a lot like cabinets!
YoungHouseLove says
LOVE IT!!
xo,
s
kerri says
I wondered if you could put two cabinets on the ends and one in the middle. Also, why didn’t you leave the front off of the “build up” you added to the cabinet? Could you have put a small basket or even used it as a shelf? Maybe a utensil holder would fit and give you easy access to pens, etc. just my two cents. :)
YoungHouseLove says
We tried that layout too (didn’t take pics though, boo!) but just liked this one best because the two cabs under the window felt the most balanced and we like that spacing of our chairs. As for leaving the front off the built-up portion, we just didn’t think we could find a use for baskets that were more shallow than 3″ (which they would need to be to slide in there) so we opted to just be happy with the storage we got in the main parts of the cabinets. Also, open baskets like that are like magnets for the bean, who loves to pull them out and dump the contents on the floor. Haha.
xo,
s
Stefanie says
We took our labor day a little too literal and went a little nutso painting our whole 1600 sq. foot house over the course of three days. It’s a little sad because we’ve actually had the paint for 1.5 years in our garage waiting all forlornly for us to pick up the paintbrush (or hire out, because we can be a little lazy-ish sometimes).
So yes, two adults, two kids, and TWO dogs in our little house and we painted like crazy people. And I’m in love… like total geeky love with my newly painted walls.
And bonus! Now there’s more room in the garage!
YoungHouseLove says
Aw, I love that you’re in love with your freshly painted walls. A girl after my own heart!
xo,
s
Elizabeth says
The cabinets look way better now that you’ve removed two of them! When I saw the first picture I was also thinking it was too crowded. You need that extra room to slide around on the desks! Can’t wait to see what you decide on for the counter tops.
Lauryn says
All I can think of with this title is: “When twoooo become onnneeeee.” Oh, Spice Girls.
Tabitha says
hahaha… Oh they were my FAV.
Jaime says
Was it just luck that the doors on the end cabinets open toward your chairs?
YoungHouseLove says
We actually placed them that way since we had six of them (three that opened each way) to choose from.
xo,
s
Sharee A. says
Becomming quite the carpenter! Can hardley wait for the “finished” photos. Planning a drawer or cabinet in your office just for Clara or Burger’s stuff, that would tie into the same “look” these cabinets?
YoungHouseLove says
We’re planning to add a big armchair in the other corner so we can have reading time with Clara (and Burger can lounge in it and look out the window).
xo
s
krissy says
I am still in awe of your awesome cabinet find and even more with the future plans.
But anywho, I have pressing question (slightly off topic) and you two DIY experts seem like the best place to ask. I am planning on painting our wood kitchen tabletop with chalkboard paint and plan on doing all the proper prep (sanding, primer, more sanding-allll that) but do you think *spray* chalkboard paint will hold up to the demands of a table surface? I think I remember that Sherry used ORB spray paint for the rocker-redo, so I was just wondering how you two make the decision between spray paint and “brush/roller” paint? Thanks
YoungHouseLove says
I would actually use thin even coats of paint rolled on if you can. I don’t mind using spray paint on legs and arms of things, but big surfaces that will get lots of use (like tabletops) are where I always use paint in a can applied in thin even coats with a small foam roller. Hope it helps!
xo,
s
Wendy says
Wow, looking great John and Sherry! The white is so crisp.
I too spent some quality time with a paint brush this weekend. I identified some of the normally overlooked areas of our home (back door, kitchen cabinets, area behind the dog food bowls, etc.) that needed a little TLC. It’s amazing what a fresh coat of paint can do!
Tabitha says
The cabinets look great, it’s coming together nicely! Any idea what direction the wall color will go? I went fabric shopping this weekend for my dining room chairs, and thought of you when I found your rocking chair fabric (for $4.00 a yard!!!).
YoungHouseLove says
Wahoo! Four bucks a yard is awesome! Can you believe Ballard sells it for $32 a yard?! As for the wall color, we have no earthly idea. But we’ll keep you posted!
xo,
s
Theresa says
Any thought to joining those two remaining cabinets together vertically to create some taller storage in the room? Might be nice to have something in the room that isn’t counter height like everything else. I love the new desk layout.
YoungHouseLove says
We did think about that for a little while but decided with the ceiling height built-ins in the dining room (which you look past to see the office setup) we didn’t think we needed extra tall cabinetry in the office for fear that it would be too much of a good thing). We’ll definitely planning to add some height to the room with window treatments and art and all that good stuff though!
xo,
s
Valerie says
A color two or three shades lighter than the blue in your built-ins would be really pretty and would tie the two rooms together nicely.
YoungHouseLove says
Yeah, we held up a bunch of blue tones but it kind of felt… safe or somehow repetitive of the blue tone in the bedroom. Still playing around with stuff though! Who knows where we’ll end up…
xo,
s
kelly v says
To comment on one little nugget in this post of yours…We DIY’s a toy kitchen this weekend for our daughter we are adopting this winter. It was such a fun labor of love. I highly recommend it! I’ll send you a photo soon.
Kelly
YoungHouseLove says
I’d love to see a picture!
xo,
s
Lindsey says
I can’t wait to see the finished product! I’m working on my home office now. We are relocating it from our upstairs to our downstairs – planning = no fun but I’ll be happy once order is back and seeing your office updates motivates me!
I have to say my fav part of the post was little Clara gazing out the sliding glass door at mommy! So cute!
Melanie says
If nothing else, I’m sure the extra cabinets could eventually be worked into your basement lair.
That Advance paint is looking lovely on the cabinets. I’ll have to keep it in mind for whenever I decide to take on the big task of sanding and repainting my kitchen cabinets. They’re great cabs – solid wood, original to my 1950s house – but whoever painted them last (white) did not give a hoot about brush strokes or paint blobs. -_- It doesn’t look terrible to the casual observer, but when you stare at it several times a day every day… ARG!
Ami says
Wow Wow WOW guys!! Amazing progress! It looks SO good! I’m really jealous right now. :)
All I managed this weekend was installing my new $4 vanity light fixture I scored from a local thrift store! (http://ilikesparklyobjects.blogspot.com/2011/09/master-bathroom-light-fixture.html)
I still need to do the hall bath fixture (oh heck yes, matching fixtures that I LOVE for 4 bucks EACH. ROCK ON. *ahem* Sorry. That keeps happening for some odd reason).
I know they might be a little blah for the more daring but I’m all about the clean classic lines on stuff I’m gonna have to stare at for years. I’d rather get wild w/ my throw pillows or something cheaper and easier to change out than w/ a semi-permanent fixture ya know?
Cara D says
I just used BM paint for the first time on an old rocker and it looks very nice. I am planning on doing a similar desk when we finish our basement. I will have to keep an eye out for cabinets at our habitiat store although I really doubt I can score any that nice for a buck each!
Rachael says
You guys are so awesome!I absolutely LOVE your blog! Keep up the good work!
Celise says
I sanded cedar wood we will use as rafters above our doorway in our house we are building. It smelled so nice!! The weather is finally becoming bearable here in down south (Houston, TX).
Tara says
Wow these look amazing! Great choice to stick with 4 cabinets instead of the original 6 ….but then when have you two not made great choices! I think I love everything that you do….you;re my heroes.
I did have a painting question. We are thinking of getting our interior hollow core oak doors professionally spray painted. Do you have a recommendation for low or No Voc primer and paint that we can ask the paint sprayer guys to use? Will regular latex wall paint do the job or will this require some other kind of paint. Please help …else the sprayers will just end up using whatever high VOC stuff they normally do!!
YoungHouseLove says
I would definitely request that he use some high quality paint like Benjamin Moore’s low or no VOC stuff (like Aura or Natura). He should even be able to use Advance in the sprayer, which is what I used and loved on this project. Hope it helps!
xo,
s
Lydia says
Wow!! Those look AWESOME! Great job!
Nicole says
STEAM ME UP!
I love the colors, the cool weather, and the big “Forest Festival” in my home town!
t says
Looks great! When I saw the first pic I thought ‘oh no–they’re going to be so cramped!’ I am sure you’ll put the two cupboards to good use somewhere else.
megan says
cannot wait to see the finished product!! any hints on what you will be using for the top???
always inspiring! and the little babe is getting WAY too cute!
YoungHouseLove says
Wood! And lots of it. Haha. Still in the beginning of the building stages, but we hope to share an update in a few days!
xo,
s
Kim says
I’d love to hear more and more about the Advance paint you used! I’m about one step into about a 483 step project with painting trim and eventually kitchen cabinets in our house. I’ve been using Olympics white trim paint and its doing a nice job, but I’m loving the coverage you got on your cabinets and the self-leveling aspect. I’ve got 2 coats of Olympic on the window right now and I’m wondering if it would be stupid to do the third coat with the BM Advance? Also did you prime with oil base for this project. Thanks for your help. Inspired as always! : )
YoungHouseLove says
I love it. So I would definitely recommend it. As for primer, we used Kilz Clean Start (since its no-VOC but nice and durable).
xo,
s