The transformation of $6 hotel nightstands into a built-in-wall-to-wall-desk-for-two continues. If you recall, we last removed the hardware, sanded, and primed them all in preparation for painting them white.
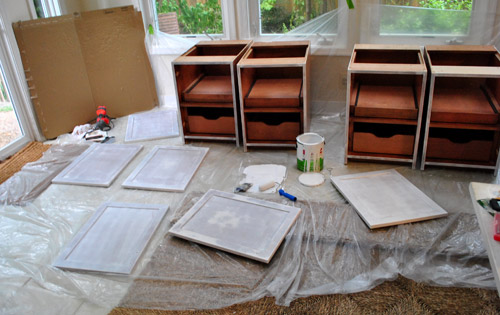
But before painting, we had to do a bit of construction (we needed to attach them in pairs and built them up about four inches so they’d be desk-height). And before doing any construction we decided we ought to look at them in the space first…
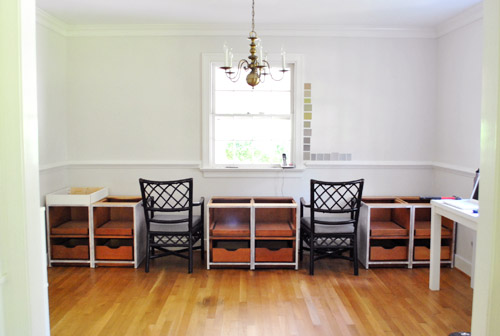
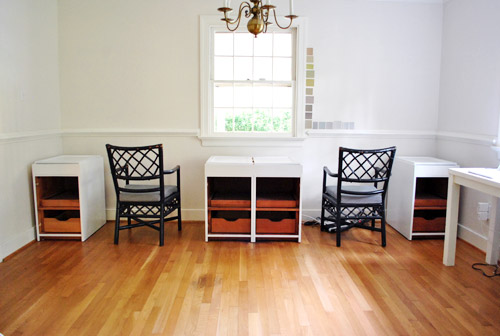
… which is clearly something that we should’ve done sooner (but they’re darn heavy, so moving them back-and-forth isn’t fun – which is why we plopped them down in the sunroom and moved on to sanding and priming). Oh well, better late than never. Once we had them in place we realized that it was a bit more cramped than we expected; the three pairs of two cabinets left hardly any wiggle room for our chairs. And things just looked, well, a bit tight. (Ignore the beginnings of construction on the cabinet on the far left. Our original photo of this got deleted by accident so we had to retake after I had already altered a cabinet. And while you’re ignoring things, pay no attention to the paint swatches on the wall. Not sure we like any of ’em so we’re still at square one with that).
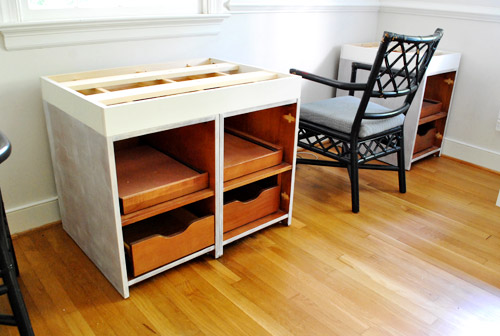
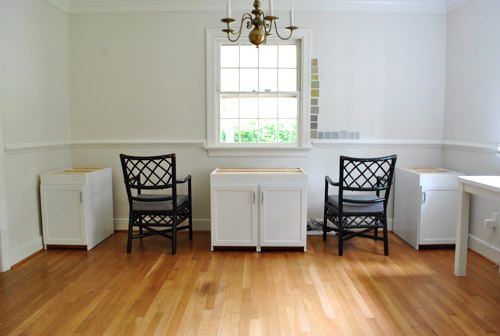
This little space planning exercise inspired us to take out two of the cabinets and look at the wall with four of them instead (two in the middle and two on each side). MUCH better. We loved this configuration a lot more, because not only would it look less crowded, we’d actually feel like we were sitting at desks (which usually have more breathing room than a few inches on each side of the chair). And there’s still more than enough storage space between the four remaining cabinets and our double wide two-tier file cabinet on the other side of the room.
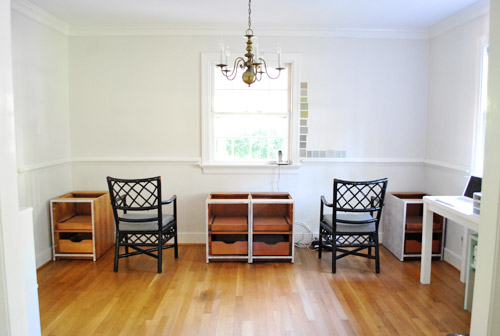
Had we spent more than $6.30 on all six cabinets, it might’ve been a harder decision to ditch two of them, but I think we can handle eating the $2 (and the wasted time spent priming and sanding the extras). And who knows, maybe we’ll even figure out how to repurpose them (Sherry has been yacking about making a play kitchen for Clara for a while, so I’m sure she’ll fill you in if that happens).
Now on to the construction part of this process. The goal was to (1) visually connect the two cabinets in the middle so they’d look like one large two-doored cabinet instead of two cabinets randomly parked next to each other and (2) build the cabinets up four inches so that they’d be standard desk height (around 30″ tall with a counter) so our existing chairs could easily slide under the counter. I debated all sorts of fancy versions of this process, like:
- “I’ll build a drawer!… which would be about 2″ thick… and therefore totally not worth the trouble/expense… so never mind“
- “I’ll build them up from the base so the things in the cabinets are easier to access… by a few inches… wait, it’s a lot easier to build up the top since the bottoms have legs and a few inches won’t make a difference… never mind”
Finally I opted for a simple budget-friendly solution: I just picked up a bunch of 1 x 4″ boards at Home Depot (including some that were pre-primed, hooray for convenience) and cut them to size to create a nice little built-on frame to raise them up four inches.
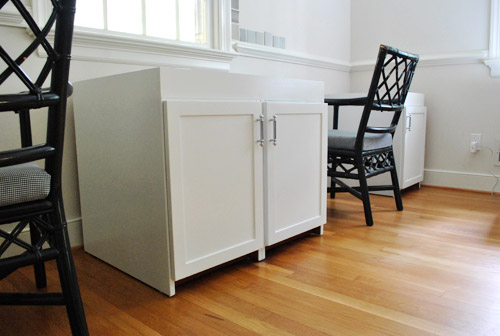
Then using my Kreg jig I drilled some pocket holes to attach the front and side together, and then screwed them into the top of the cabinet. You can see it more easily on one of the single side cabinets in this shot:

Then I attached the back piece which is where I used an un-primed 1 x 4″ (because it won’t be visible at all against the wall and under the countertop). Why? Because an 8ft piece of primed 1 x 4″ was about $1 more, so using unprimed boards wherever they weren’t visible saved me a few bucks. Sure, I could have saved $3.50 more by just using unprimed wood everywhere and priming the visible parts afterwards, but since we already primed all the cabinets we lazily decided that it was worth spending $3.50 for primed wood in the visible spots so we wouldn’t have to break out the primer and do all that clean-up again. We figure finding six dollar cabinets makes small luxuries like an extra $3.50 spent on pre-primed wood ok in our cheapskate hearts.

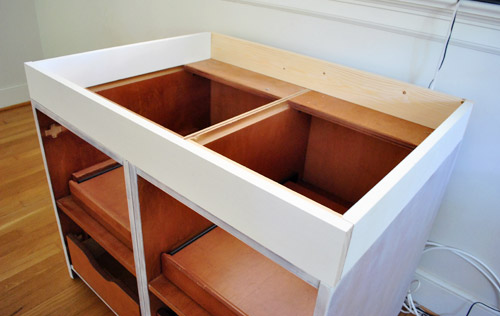
That simple frame accomplished exactly what I needed in terms of building things up and connecting the two center pieces, but the cabinets weren’t thoroughly prepared to handle a counter top quite yet. That’s where some 1 x 3″ boards came into play. I cut a few pieces that would span the inside of my new frame and drilled them into the top of the cabinet. This added even more strength/stability, just because I’m Captain Careful.
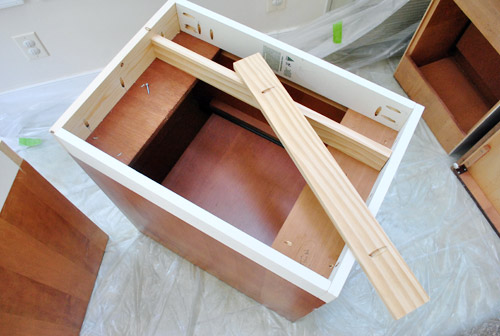
Then I topped that with some leftover 1 x 4″ slats that lay flat – which created a platform for me to screw the counter top into when it comes time. They’re not attached in this pic below, so you can see that they don’t sit level with the frame at this point – but I’m going to add some washers to raise them up a smidge when it comes time to actually screw them in (so it’s all one big level plane):
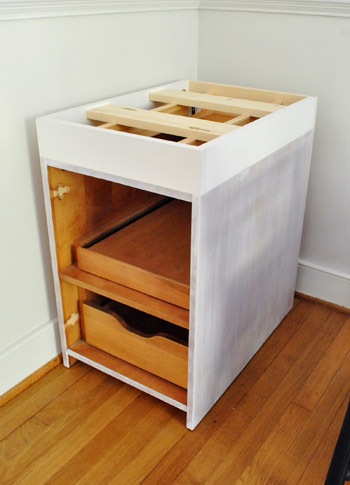
With that, the construction portion of the project was largely over – well except for the counter of course, which we’re still working on and will cover in a few days. We’re doing something similar to the top of our living room console table… sort of (more details as soon as we’re a little further along). Once that’s all said and done, we’re also planning to add some baseboard trim around the bottom of the cabinets (where they meet the floor on the sides and front) to make them look even more “built in.” So yeah, I guess maybe the construction portion isn’t completely over. But we’re good for now.
So let’s move on to painting the cabinets. As we’ve mentioned, we’re painting them white for a nice clean look (which will tie into the white built-ins that are visible in the adjoining dining room, don’t wanna get to crazy with colored built-ins near white ones- we just want these to look like they’ve always been here).
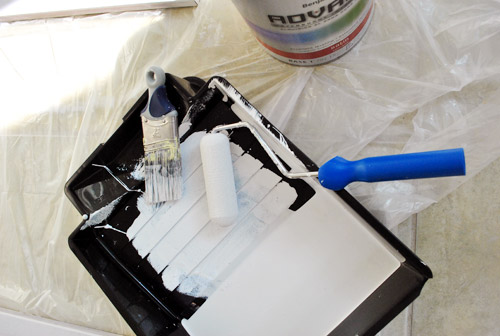
We decided this was a perfect opportunity to try Benjamin Moore Advance paint, which a number of you guys have raved about recently. It’s self-leveling, which means it helps coat more evenly for a smoother finish (something that’s perfect for a cabinet project) and it’s a high quality alkyd formula (so it should be nice and durable) and it’s also water based and extremely low-VOC (even after the colorants are added) which is always a plus for us – and is extremely rare for cabinet paint.
The only drawback is that it’s expensive, at least for cheap-os like us (it’s around $45 a can). But as a thrifty reader named Heather suggested, Sherry told the Benjamin Moore guy about a 30% off sale at Sherwin Williams and asked if he could match it. He said he couldn’t do 30%, but offered 10% off on the spot – without so much as a coupon. So she saved around $5 by asking a quick question at the register.
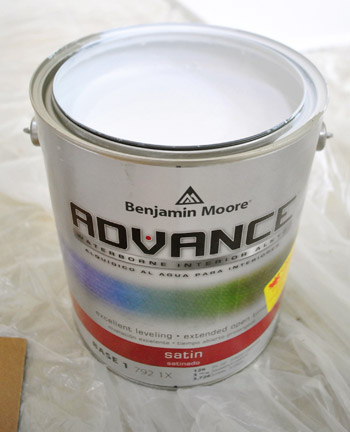
We got the paint in Decorators White (a bestselling color by Benjamin Moore), which is pretty much the perfect white tone according to the lady wife. You could hold fifteen swatches of white paint up and they’d all look the same to me, but apparently Sherry can see all sorts of variations and likes Decorators White the best. Oh and we got it in a satin finish because they only offered that or high-gloss (which I worried would show more imperfections).
Interesting side note – the pic above is taken after we were done painting all of our cabinets. So you can see the insanely small amount of paint we used for this project (it was nice and thick, so it covered really well). This means we definitely could have gotten by with a quart (for around $25) but we’re glad we got a gallon since we plan to use the rest of the gallon to paint the cabinets in the kitchen down the road. Which might further take the burn out of a $40 gallon of paint. Haha.
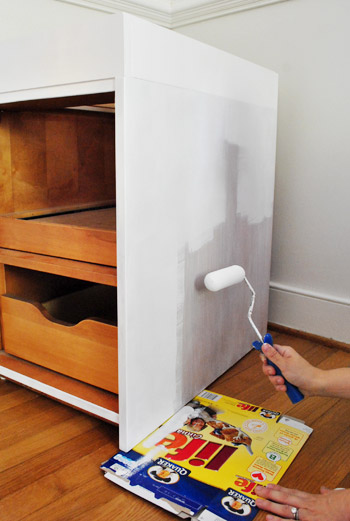
Sherry’s tools for the painting task were both a brush (to get in cracks and corners) and a small foam roller (for a quick, smooth brushstroke-free finish on large surfaces).
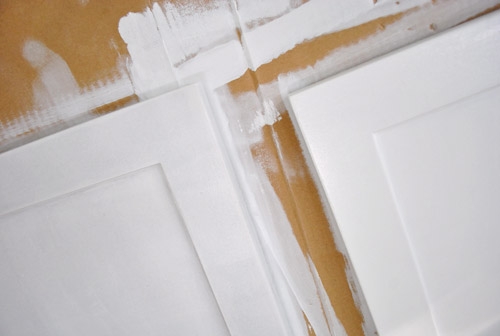
You can (hopefully, although it depends on your monitor) see the slight difference between one coat (on the door on the left) and two (on the door on the right). Two coats probably would’ve been fine, but we did a third just to be safe – and to make sure there wasn’t a difference between the areas that we primed and painted and the pre-primed 1 x 4″ boards that we only painted (which were much lighter than anything else to begin with). Three thin and even coats (remember, this is Sherry’s mantra) definitely did the trick, and as seen from the photo of the paint can above, we hardly used any paint. Which is nice since we initially wondered how far it would go.
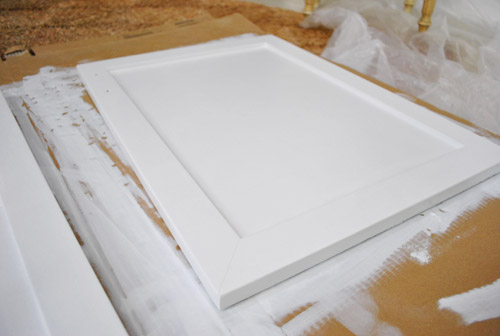
Here’s a finished door after three full coats. Each coat took Sherry about 30 minutes, which wasn’t bad at all. Except that the can called for over 16 hours of drying time between coats, so instead of finishing this process in an afternoon it was a bit more drawn out over the course of a few days. But everything cured up nice and strong and looks great. As for Sherry’s review of the Advance paint: “I want to marry it.” So yeah, she loves it.
And of course, a few consecutive days of painting is made much easier when you’ve got a fan club watching you intently (as some of you already saw on Young House Life). Here’s the wife in the sealed sunroom sporting her inside-out painting clothes with the bean looking on. You can see that we just used some leftover cardboard (from old Ikea purchases like the file cabinet) to paint on.
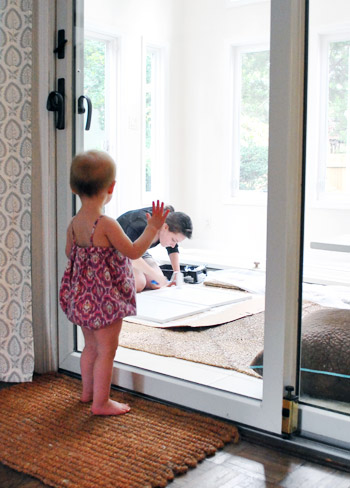
Even though the Benjamin Moore Advance paint is low-VOC, it’s not no-VOC. Which is why Sherry painted all of the doors in the much-ventilated / Clara-and Burger-free sunroom (also to avoid baby hand-print and puppy paw-print mishaps). We had to paint the cabinet bases in place in the office (the big middle section was too heavy to lift once the two cabinets were built up and connected), so we just kept Clara out of the room and opened all of the windows and ran some fans (Sherry painted during her nap, so by the time she woke up things were aired out and then we just kept her out of the room so we didn’t get little fingerprints going on). Thanks to a little flat-cereal-box-under-the-spot-being-painted trick (to keep paint off the floor), we got to avoid putting down drop cloths. Oh yeah, we’re rebels.
Oh and the shot above demonstrates how nice the BM Advance paint coverage was for us. This is just the first coat going on over the coat of primer that Sherry added a few days ago. That’s a really good showing for a first coat according to my paints-everything wife.
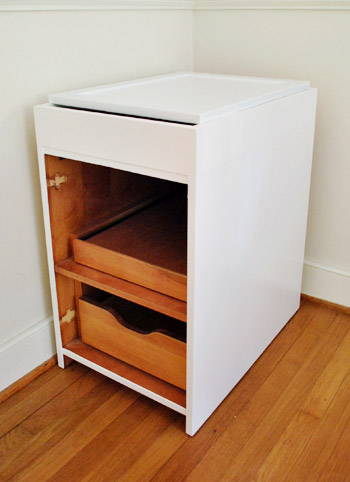
So here’s the finished piece all painted (and with the cabinet door just laying on top – we later moved that out of the sunroom to make way for countertop progress).
Oh and as for why we didn’t paint the inside of the cabinets, here’s an excerpt from our initial post about that for anyone who missed it:
As for the backs of the doors and the cabinet interiors, from day one we decided that we wanted a nice clean glossy front for our wall to wall built-ins, but to keep the backs and the interiors (and slide out interior fittings) of the cabinets the same natural wood tone that they were to begin with. We certainly know that not everyone would go that route, but the new KraftMaid drawers that we installed in our first house’s kitchen renovation had wood interiors and we really liked them (you can actually see some of them here full of tools):
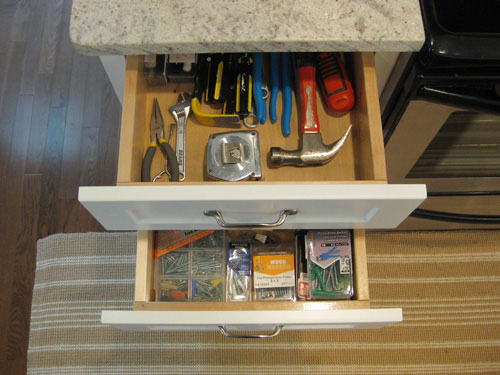
They had glossy white drawer fronts, but inside they held up a lot better to natural wear and tear than anything painted (since we’re weirdos who will stash hammers and screwdrivers almost anywhere). And we actually don’t mind the whole wood + white look (sort of like the dresser we refinished for Clara). Although in this case we decided from the outside that the cabinets would look entirely crisp and white (no contrasting color in the door front or anything), and only when you swing them open will you see the wood tone.
But back to our freshly painted cabinets. The white paint was a big help in making the middle pair seem like one piece. We contemplated adding some caulk or wood putty in the slight crack down the center, but we held off since we thought it might be less obvious once the doors were reattached.
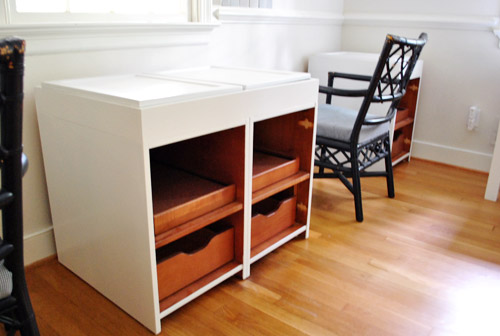
And sure enough, they were. So here’s everything built up four inches and fully painted. We just needed to wait a few days to attach the cabinet doors…
… which looked pretty darn good once we added those:
Of course we still have to add molding around the base of them all (so they look even more built-in), which will hide any areas down by the legs that still appear to be wood toned. And we’re going to trim out the sides as well (so they appear to attach to the walls on either end). We’ll hopefully be back with those details soon. But in the meantime, you know we love a budget breakdown, so here’s the wall-to-wall desk tally so far:
- Cabinets (from Habitat For Humanity ReStore): $6.30
- Kilz Clean Start No-VOC Primer$0 (leftover from painting the kitchen paneling, but it would be around $20 to buy for those wondering)
- Electric sander & sandpaper: $0 (already owned, but would be around $25 to buy)
- Benjamin Moore Advance paint (in Decorators White, satin): $40 (thanks to 10% off haggling/begging)
- Pre-primed & unprimed wood to build up cabinets (from Home Depot): $51
- TOTAL: $97.50 (which was about the cost of one unfinished base cabinet at Home Depot or Lowe’s)
We’ll also be back with all of our countertop details soon- just gotta make enough progress to snap some pics and share that stuff. One thing is for sure: we can’t wait to use our new double desk. And yes, Sherry has been walking around saying “double desk” like Robert DeNiro says “double dose” in the Little Fockers trailer (not sure how I feel about this weird club mix of it below though):
What did you guys do over the long weekend? Any building? Painting? DeNiro impersonating?
Psst- To follow our cabinet makeover process from the beginning, here’s the post about finding our $6 cabinets, the one about other places we looked, and the post about sanding and priming the cabinets to prep them for paint.
Pssssst- I just shared one of the coolest dresser makeovers we’ve ever seen on BabyCenter (and it’s not just for kids).

cristina s says
It looks great!
We did nothing on our first place this weekend :)
Actually we came back from a 8 day cruise on Sunday & Monday was just a perfect day to lounge, get laundry done, stared at our tanned skin + pinterest searched :)
Glad you guys were productive, beautiful as always.
Megan H. says
I broke out my painting clothes this weekend too! My parents were getting rid of an old laminate headboard that they had been storing in their basement for some time. I have always wanted one, so spent the weekend sanding, priming, and painting it a rich brown color to go wiht the mahogany furniture in our master bedroom. It turned out great!
I also took Sherry’s tip on the Wooster Shortcut brush and finished painting some trim in our hallway. Never again will I use painters tape! Thans for the tip!
Ashley Bird says
Its hard to beat $6 cabinets! I would have done the same thing! They look fabulous! I wish I had them in my crafty room!
Johanna says
I’m loving t the way it looks and thinking that it would be so cool for our office. Wishing there were more places here (AZ) that had those kinda deals on furniture – maybe I just don’t know where to look. Also, I was wondering if you guys were planning on painting the base of the wall to match the cabinets now. Its hard to tell in the pics if its Decorators White there, but just wondering.
YoungHouseLove says
We’re planning to paint the walls a color so the cabinetry pops. More on that soon hopefully!
xo,
s
Erin @ One Project at a Time says
I’m loving the progress! Can’t wait to see the counter top solution.
We spent the weekend fixing the laundry shoot that the show Bath Crashers put in when they redid our Master Bathroom. The bathroom looks good, but the laundry still needed a lot of work… http://oneprojectatatime.blogspot.com/2011/09/trimming-laundry-shoot.html
YoungHouseLove says
Love it!
xo,
s
sarah k says
Hi YHL! My fall project is to paint our basic wood kitchen cabinets white, which I think will look great w/our lemon yellow kitchen and black countertops. I’ve been reading up on your posts about kitchen cabinet painting and the built-in cabinet painting and now I’m second-guessing my paint plan. I was planning to go with semi-gloss paint, but after reading about BM’s Advance Paint, I’m wondering if I should go with that in satin finish, or stick with the semi-gloss. Is semi-gloss more appropriate for kitchen cabinets? Also, do you have any tips on installing cabinet hardware for the first time?
YoungHouseLove says
They don’t make the Advance in semi-gloss so it’s just a choice between high gloss or satin. Semi-gloss works well too though (we’ve used it in the past). Hope it helps!
xo,
s
Angela says
Love it in white! Nice work!
laxsupermom says
Looks terrific! Great review on the paint. I always have such a tough time with the concept of spending so much on paint, but if it covers that well, I’ll have to look into finding some coupons or something.
Love the idea of turning the extras into a play kitchen for Clara. Can’t wait to see that project. Thanks for sharing.
carolinaheartstrings says
Starting to come together nicely. I cannot wait to see the finished room. They will look like they were always there!
Caitlin Wallace says
I was just wondering if you are going to do anything about the space on the side of the cabinets against the wall? The crack that the baseboard leaves? It might take a little away from your built-in look. Maybe you could fix it with a small piece of wood like you plan on adding to the bottom of the cabinets?
YoungHouseLove says
Oh yes- John’s going to trim that out! Forgot to mention that.
xo,
s
tracy says
I know I’m in the minority, but I liked the six cabinets better. I think I just like the more robust feel of the extra two in there. But you’re going to spend a lot of time in there, so comfort is a pretty huge factor, so good choice for you guys.
So, are you thinking of putting an apron connecting the cabinets underneath the counter top to make it appear even more built in (like on a dining table), or will that make it hard to fit your legs under it?
YoungHouseLove says
Nah, no apron this time. We’re just going to treat it like a built in desk with just a top and some bases underneath it for support.
xo,
s
Bboss says
Excellent work! I’m a Sherwin-Williams girl, but my bosses (architects) always specify Benjamin Moore. Might have to switch.
We had company so no projects this weekend.
jodi says
looking good!! can hardly wait to see the finished product. and i’m sure you guys can hardly wait to have to finished product to use!
Katie Kat says
This is something my husband and I say to each other…. “how do you be so awesome.” I am saying this to you and your little family.
Carla says
You’re probably not going to do this (understandably if you ever want to change your office), but to make this look like a true built-in, the baseboards on either side of the desk could be cut so that the end pieces sit flush against the wall. Anyway, I loved learning about that paint and am really impressed with your $6 hotel find. This will surely make the rounds in the blogsphere!
savuryandsweet says
did i mention i’m obsessed with your blog and how much you’ve inspired me to get off my kiester and start doing house stuff? THANK YOU! i continued my journey in organizing, decluttering, and redecorating. the main highlight is that i finally completed our photo wall collage. we used a bunch of Ribba frames and travel pictures… my husband decided to eyeball all the picture hooks which resulted in one to four holes in the wall per picture – an average of two per picture really. is there any way to NOT riddle your walls with excessive holes in the quest for a perfectly level wall collage?
YoungHouseLove says
You could try paper templates to be sure you like the placement before making extra holes. Or even try using 3M stuff to hang things!
xo,
s
Reenie says
Looking good!! And Clara looks so big there!
Rachel says
Looking amazing!
Lauren says
Pure Awesomeness! (is that even a word?) Love the KREG!
I wish we could post pictures, so I could show you what my hubby has been up to in the garage.
Thanks to you (I never would have known what a Kreg was otherwise), I got him a Kreg jig for Christmas a few years ago, and now he is building a bookshelf/cubby hole/drawer thingy for our daughters room.
Just one question. I was thinking about painting it a semi-gloss rather that a satin…do you find that the satin holds up better?
YoungHouseLove says
I always used semi-gloss and loved it but this paint only came in satin or high gloss so I went with satin since high-gloss shows lots of imperfections. So in short: I like both semi-gloss and satin.
xo,
s
heather the haggler says
BOO YAH! Haggling almost *always* works in scenarios like this. Call it the Yankee Thrift attitude, but the worst someone can say is “no”. I’m thrilled to hear you guys got 10% off!
As far as baby/paw prints, wicked smart to seal yourself off. We painted our large high-ceiling-pain-in-the-butt-to-paint “common room” (center room to the home). The dogs had free reign at the time. Let’s just say one dog stepped in joint compound and we now have puppy paw prints on the floor (which neither of us realized until it was dry and too late…I’ll be scraping that). Yesterday the older one got *so* excited their Dad was home she jumped over an object on the floor and three paws STRAIGHT into the paint and roller and then STRAIGHT onto the kitchen floor. Thankfully my Bro in law scooped her 60 pound butt up and we wiped the paws (and the floor) off.
Mayhem. Here are said joint compound pawprints.
http://www.likeacupoftea.com/a-common-mess/
heather the haggler says
P.S. those cabinets are the shiz. They look awesome. At one dollar a piece I’m thinking you guys could easily fit into the Mainer life style in a heartbeat. :)
YoungHouseLove says
Haha, love it. Thanks so much again for that haggling tip Heather! And your weekend sounds like quite the adventure.
xo,
s
Shan says
Heather:
Joint compound will usually wash right off with just a little elbow grease(I use a wet sponge). I learned this the hard way after scraping joint compound off the floor and taking some finish off at the same time. Also a useful trick to remove any particularly large bumps of compound on the wall without sanding.
Roeshel says
So clever! I love projects like this and can’t wait to see it all finished. The Kreg jig is on my wish list…which I’ll be getting soon as we’ll be building a kitchen island (yikes!). Hopefully it’ll help make the task less intimidating. ;)
Great job so far!
Jaclyn says
They look so good! Can’t wait to see the finished product. My hubby and I did some home improvement over the holiday weekend too – painting our dining room, Vintage Blue by Laura Ashley for Valspar. LOVE it. It came out a little more sky-blue than we were expecting, but we like it even better that way. Win.
Laura says
It looks fabulous so far! Does it break your heart that you wasted two whole dollars on two of those cabinets? ;)
YoungHouseLove says
Haha, I have big plans for those babies!
xo,
s
Becca says
It looks great!
I’m curious about what you guys are going to do about the baseboards/wall space behind and beside the cabinets. Are you going to leave it as is, or will you do something so they’re flush against the walls?
YoungHouseLove says
We’re going to use trim around the base of the cabinets (the front and sides) and the sides of the cabs against the wall on each side to make them look built in so when we pop the counter on top you won’t see that smidge of space that they sit away from the wall at all (unless you’re on your knees under the desk).
xo,
s
Brianne Franklin says
What about stacking the extra two on the ends of the desk? Then you could put small bulletin boards on the vertical surface.
YoungHouseLove says
I definitely have a plan for them in another room. More details soon hopefully!
xo,
s
Micha says
Looooooove your desk arrangement! Consider us green with desk envy!
Keely says
Love the decision to use 4 instead of 6. I bet it’s hard to give up the extra storage, but there’s still going to be loads of space for stuff and it looks way better/roomier that way.
One thought, and it’s probably too late now: maybe the extra constructed boxes should be on the bottom, even though it’s harder to build them there, because then when you add molding around the bottom for that uber-built-in look, you could duplicate the molding on the walls around the base of the cabinets. If the connection between the new cabinet molding and the wall molding was seamless enough, it’d look like the cabinets were part of the original construction, or something. Though maybe it’d look weird to have the cabinets sitting on top of molding-boxes. I’m sure whatever you guys do will be beautiful.
YoungHouseLove says
We definitely considered that but it was cheaper/easier to do it this way. Once we add the molding to the bottom we think it’ll look great!
xo,
s
Erin says
I LOVE BENJAMIN MOORE. I have never been disappointed by his paint. I am excited to try the Advance Paint on our bathroom cabinet. They have been screaming for an update since we moved in…four years ago.
Looks like you are picking out some paint colors in your last couple of photos. Loving the grey blues but I am interested what it would look like off of the dining room.
Christine says
Lookin’ Goot (that’s good with a “t”)
Melissa says
1. You guys rock!
2. I have no experience in DIY but would like to start trying. My question is how do you know what material is ok to paint? And how do I know if I need to sand it and add primer? And finally…how do i know what type of paint I should use?
Thanks,
Inexperienced in Miami
YoungHouseLove says
Anything wood or wood veneer is great with paint! Anything laminate or plastic-y might have issues with adhesion. As for how to paint it, oil-based primer followed by latex paint works for us. Or Kilz Clean Start (which is water based and no-VOC). Good luck!
xo,
s
Amanda Wells says
You guys make me envious – wishing I had a Habitat store somewhere close! It looks great!
http://www.amandadovewells.com/?page_id=45
Kathy says
They look amazing! I have a DIY/help me fix the mess I made/mounting question. So we have aluminum columns on our front porch (hollow) and I need to mount a flag pole holder (it’s metal, about 5 inches long and 4 inches wide, oval shaped, and has 3 holes for screws). Any idea what kind of screws or material we should use? Or where/who we could ask for help? (I have to say, we tried normal screws and super duper glue [and some major hoping] and the wind ripped it off yesterday)
YoungHouseLove says
Oh man, I would try asking at a home improvement store. I have no idea. Anyone know?
xo,
s
Heather says
Hi =] I’ve been a Young House Love reader for a few years but never commented….but I was wondering….weren’t you going to build the built ins on the wall facing the car port? When I saw this post with them facing the yard I was really confused lol Either way they look amazing<3
YoungHouseLove says
That’s actually the wall facing the carport! Haha. There are bushes out there beyond the carport so maybe that’s what you’re seeing!
xo,
s
alg says
What, Sher? No ORB on those desk handles? (I kid, I kid.)
This weekend I finally got my jam jar lanterns done & up! WOO HOO! Reveal pics are over on Rental House Rules today, followed by the how-to post tomorrow or Thurs :)
Oh, and one other interesting thing happened this weekend: My bestie Nicole got knocked unconscious by her cat! (For real!)
miriam says
I painted our bathroom on Friday! It was my day off from work, so I just popped over to the paint store for a brush + roller and went to town with the leftover paint from my old bedroom– Benjamin Moore Aura paint in Constellation, which goes perfectly with the vintage blue-tiled floor. BM’s Aura line is paint + primer in one, so I only needed one coat over the previous off-white paint!
What a big difference for a 4-hour project! All our white accessories look so fresh and crisp against the new paint. Now the rest of the apartment looks shabby by comparison… I see more trips to the paint store in my future!
Brittany says
wow! I can’t wait to see the final product! I am seriously shocked as to how low of cost you did this for! $6 dollars for the cabinets, who finds $6 dollar cabinets! If only I could be sooo lucky! ;-)
Ashleigh says
While killing a spider this weekend, I found myself saying “Double dose” to him when I had to him with with a double shot of Raid. Love Robert DeNiro! Oh, the cabinets look awesome, by the way!!
Julie says
This is all coming together so great! Love all your projects.
One thought: depending on how much you use them while seated, you might want to reverse the direction those center doors open — swapping so the left one opens from the left and the right from the right. You probably already thought of this though and have a good reason why not, knowing the thought you all put in to everything!
Keep it up, you’re awesome and very inspiring.
YoungHouseLove says
Yeah, we thought about that but figured since our chairs have arms we probably won’t be reaching over them to open cabinets and might just have to stand up to get into them like we would in our kitchen. Who knows though, if it annoys us we’re planning to switch them for sure!
xo,
s
melissa says
Hi — apologies if this has already been asked – what paint would you recommend for painting furniture white? you seem happy with this paint so I may try it.
YoungHouseLove says
Oh yeah, this stuff is the best I’ve used, so I’d definitely recommend it for painting furniture.
xo,
s
Liz says
It looks fantastic! I love the airier look of the 4 cabs instead of 6, too. Can’t wait to see it finished. And now I want to try out that new paint!
debbie c says
This is starting to look gorgeous! Can’t wait to see it finished! I love built ins, makes the room look more intersting, less boxy. Great job!
Julianne says
Hi guys,
Silly question – we’re in the throes of a cabinet painting project and our little foam roller is sucking majorly – do you know what brand/size yours is? Our doesn’t spin as well as a full-size roller and it’s making it difficult to get paint on evenly. Thanks! Your desk project is looking wonderful!
YoungHouseLove says
Ours is about 4″ long I think. It’s made of foam and it’s labeled for smooth surfaces and even specifically lists cabinetry on the label. Hope it helps!
xo,
s
Courtney says
I love the way the new cabinets look!
I’ve actually recently decided to paint the cabinets in my kitchen white. I’ve read your post about painting the cabinets in your first house. I’m wondering if – now that you’re painting cabinets again a few years later – there any other/new tips you might give…
Thanks for all of the inspiration! I get totally motivate to work on my house after I read your blog!
Tara says
Can’t wait to see the final product. I have been working on a similar vision for my new basement office. I have had trouble figuring out how I want to manage my base cabinets since you all did all the footwork now I can work my plan. I might even hit hte Arlington Restore to see if I will be as lucky :-) Cross your fingers. Keep the great ideas coming!!
YoungHouseLove says
Fingers crossed! Have fun!
xo,
s
Lisa P. says
A nice coat of white changes everything! We just finished our kitchen cabinets if you want to have a look see :)
YoungHouseLove says
Wow- they look so good!
xo,
s
Kaytie @ GardenKitchenHome says
Absolutely incredible. I wanted to do something similar for my office, but I eventually broke down and bought a desk. Great job, guys! You always, always inspire me :)
change of scenery says
Fantastic job. No worries on checking it out in the space before actually starting the revamp – I do that all the time! I think it’s because it always looks so great and amazing in my head that I don’t want to spoil the moment. Plus, measuring is such a drag :)
Can’t wait to see it all finished!
Jen @ The Decor Scene says
The cabinets….I mean your built-ins, look awesome!!! This room is going to be gorgeous when everything is finished. Can’t wait!!! :)
angel p says
The desk is looking awesome! I was thinking about the great view from your desk and then realized that is where the garage will be and you won’t have that view always. Can’t wait to see what you come up with that will be fun in place of a window. We stayed home all weekend and I worked on Halloween and Thanksgiving projects and crafts. I think next weekend it will be time to pull out the saws and start on the outdoor Halloween projects. :O)
Abbey_S. says
I really like the cabinets, but do you think you will miss not having at least one set for drawers? Any solutions in mind to hold pen’s, post-its, etc?
YoungHouseLove says
We figure we’ll have lots of those things out on the surface of the desk (pens in a cup, a pretty acrylic tape dispenser, etc) since we’re used to keeping that stuff out on the surface of our desk anyway. And since it has pull out shelves within the cabinets, we can always put a basket on them to create a pull-out drawer.
xo,
s