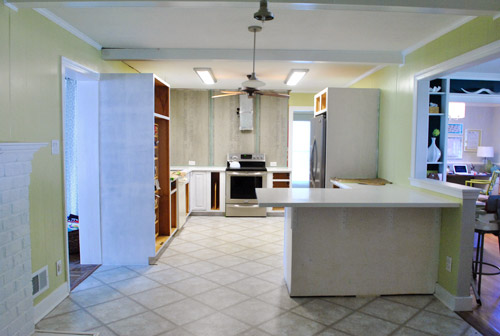
Between finalizing our 260+ page book manuscript (due Jan 4th- ack!) and hosting/enjoying family time (and lots of delicious food), we’ve also been priming! Can I get a “holla!”? Or more likely, a “you’re crazy.”
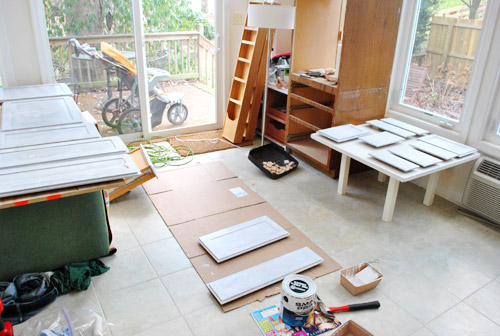
Thank goodness our guests are so understanding! Oh man, and it feels great to be seeing some progress.
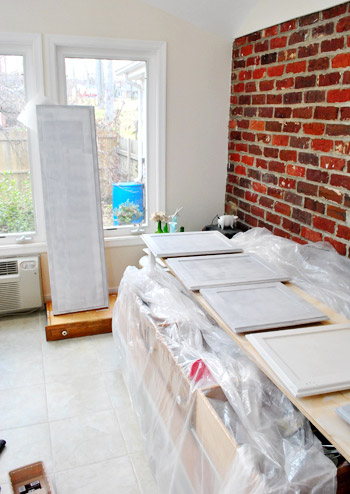
The beauty of primer is that it always looks a little rough (so you don’t have to stress about getting it to look perfect). By nature, it’s just a sticky sub-layer that helps grab paint and hold on for the long haul, so as long as you apply things thinly and evenly (drips = baaaaad), you’re all set to just follow the recommended drying time and then get right to painting!
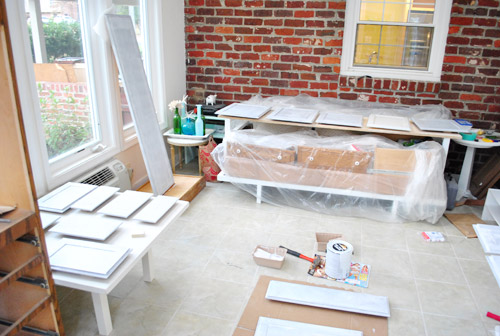
You definitely want to use a stain-blocking primer when painting wood cabinets (especially when they’ve been stained and exposed to kitchen grease like ours). We chose Zinsser’s Smart Prime (a super high quality low-VOC primer sold at our local Benjamin Moore store that was recommended by two different pro cabinet painters). The nice thing about it is that it’s “open” a bit longer than some other primers, so it doesn’t dry right away while you’re still trying to work it into the cracks and smooth it out to make sure it’s not drippy or bumpy. And it’s nice and durable, so it should definitely help with those decades-of-great-results that we’d like.
Oh and we use a small foam roller and a 2″ angled brush for the smoothest application. Of course there are a million other primer steps to share (and even a video to show exactly how we apply it), so we’ll be back to detail every last step (arms. too. tired. to. type.) next week.
You know, after the painting’s done and our sweet and extremely understanding house guests bid us adieu. Until then, picture us painting / doing the happy dance / book editing / asking everyone if they’d like something to eat or drink (in the dining room or living room since the kitchen’s kinda out of commission).
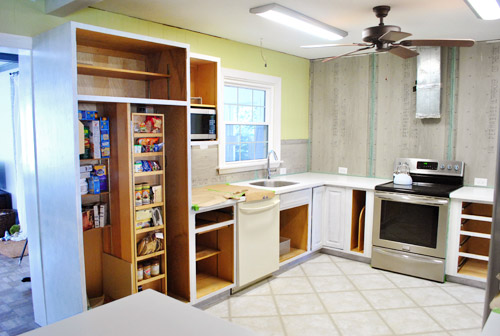
Oh man, this is totally the exciting part though. And we’re inexplicably excited to add hardware once everything cures up. Yes, we’re strange birds. New hardware = beyond thrilling. Especially when the room used to look like this:
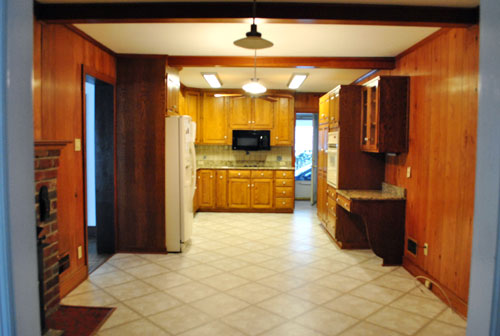
Wahooo progress!
Psst- Check out this kitchen post all about how we prepped our cabinets for paint and this one about how we picked hinges and a cabinet color.
Psssssst- We picked this week’s giveaway winner. Click here to see if it’s you!

Ann says
primer makes all the difference!
Kim says
Love the progress! I think I see your pantry covering up the trim on the door to the living room though. Will it stay that way? My type A-ness would go bonkers over that!
YoungHouseLove says
We have plans for making that look better with trim! Hope to detail that as we go! The old fridge actually did the same thing when it was in that spot (aka: the cabinets, no matter the configuration, were not fitting on that wall) but we think we can make it look nice and balanced someday!
xo,
s
Myrna says
Besides measuring each door and opening,does each door have a hidden code so you know which door goes where? There are lot that look the same but need to be put in their original place. You two work VERY HARD and I hope you will get a chance to just sit back and admire the cabinets when they are done.
Congratulations on your future apearances. Take a bow!
YoungHouseLove says
We actually laid them out in a specific order for priming/painting them in the sunroom, so we can wait for them to cure and rehang them in the same order to keep things straight!
xo,
s
Mary says
Your kitchen is going to look so amazing when it’s all done! My cabinets have been painted – do you think if I repainted them that I would need primer, or could use a paint with primer in it? The previous homeowners did a nice job, unfortunately they matched the paint to the floor and the counters (a dull blue-gray)so I’m thinking repainting the cabs will be the way to go.
YoungHouseLove says
I would use deglosser and even sand if they feel too slick and then use primer and paint! Paint is meant to stick best to primer, so paint over paint (years later, which grease buildup since it’s a kitchen) won’t make for the longest-lasting result! Hope it helps!
xo,
s
Beth says
If you squint your eyes, you can see what it will look like when it’s all done! Looking good so far…
YoungHouseLove says
Haha, I’m a big fan of the squint approach.
xo,
s
Sarah says
I have an addiction to your kitchen makeover.
YoungHouseLove says
Haha, I think I’m in the same boat. I keep screaming “yesssssssss” and “progggggggressss”
It’s very very weird.
xo,
s
Sarah H says
I’m on pins and needles waiting to see the kitchen in all its “final product” glory!
morgan says
Does anyone know anything about this product? http://cabinets.rustoleumtransformations.com/
It looks sort of amazing!
YoungHouseLove says
We’ve heard from other bloggers who have used and loved it! We opted to go kit-less because we wanted to sand to be extra thorough (their kit doesn’t call for that) and we love low-VOC products (the kit doesn’t mention that perk so we don’t think it is) but for folks who don’t mind the small and want to skip the sanding step it could be perfect!
xo,
s
Chrystal says
Its already looking 1000x better! Can’t wait to see the finished product. Its so fun to watch the transformation-thanks for sharing!
Ali says
Looking good! I couldn’t get over how much it brightened up our own kitchen to go from the same wood tone you had to white. The space looked twice as big as well!
I’m curious to hear more about your foam roller usage, though, because I tried one of those with our cabinets and found I just couldn’t get it on evenly? Maybe my fine motor skills are just lacking? :)
YoungHouseLove says
I’ll share a little video that hopefully makes it all nice and clear for ya!
xo,
s
Jessi says
It’s coming right along. Congratulations! We just finished (all but a few finishing touches, which never seem to end!) a kitchen re-do ourselves. It’s a lot of work, but well worth it.
And, in case you don’t hear it enough, thank you for being such an inspiration, not to mention a great how-to guide for not only kitchen stuff, but also other household projects. I’ve been following along for a year. In fact, I kind of feel like our house has been stalking yours since we found you with similar art projects, laundry room additions and a kitchen redo. Not sure I want to know what you’re doing next. My house might get ideas!
YoungHouseLove says
Aw thanks Jessi. That’s so sweet of you to say!
xo,
s
Marie says
Looks great, but I noticed you aren’t painting the inside of the cabinets. How new are your cabinets? I bought my childhood home from my parents and while the cabinets are solid, they show a lot of wear and tear inside and out. Have you ever painted cabinets on the inside???
YoungHouseLove says
They’re from the 80s, but they have all sorts of custom interior fittings (lazy susan, pull out pantry, pull out cutting board, etc) so we decided they were in great shape to keep as-is. We’ve actually never painted cabinets on the inside just because we fear them getting dinged up or things sticking to them that sit there for months, but I bet with enough drying time and good primer + paint it would work great!
xo,
s
Lynn @ SafeBeauty says
This is the part where it’s like “Just keep swimming, just keep swimming…” until one day you look up and it’s all done. If we get this house we are hoping to put up wood cabinets for storage in the laundry room so all these steps (and that straight to dvd step-by-step tutorial you guys are working on) will surely come in handy. Thank you.
My best, Lynn
*how long did it take you guys to hear back on your offer on this house?
Lynn @ SafeBeauty says
Nevermind. Don’t answer that last question. Enjoy your company. I’ll go and peruse your archives and find out for myself. I actually enjoy getting “lost” on here. It’s like reading a good book!
MB, Lynn (why write it twice? you know who this is.)
YoungHouseLove says
Aw you’re so sweet! It’s an easy question so here’s the answer: 48 hours. It felt like forever!
xo,
s
Nedra says
You guys amaze me. Not sure how you do it all. But I am thoroughly enjoying being a spectator to your kitchen progress.
Sarah says
I take it no issues with the “Frankenstein-ed” doors? Looking great, loving the progress!
YoungHouseLove says
They look pretty good but we are reserving judgement until all of the paint is on and cured, just to make sure it doesn’t settle into those seams or anything. Don’t want to jinx ourselves, hahah.
xo,
s
Kati says
Are you guys keeping your old dishwasher? I thought you bought a new one?
YoungHouseLove says
We have to install the new one after the new floor goes in (so it’ll run under that and the fridge and stove, which we’ll slide out for that step).
xo,
s
Emily E says
I am in the thick of our bathroom remodel. I painted the vanities and the shelving yesterday. And, can I just say that as a painting virgin, the primer totally freaked me out. It does NOT look even or nice. I kept thinking, “Oh no! What did I do?! I should have left it!” But, after the first coat of paint it looked awesome. And after the second, it looked even better. Phew.
YoungHouseLove says
Yes! It’s such a good lesson to learn about primer! It’s almost designed to look terrible because that roughness is what grabs paint! So glad it all looks great!
xo,
s
Sarah @ The Strength of Faith says
You guys seriously deserve a vacation!
Bobbie Brown says
Whew! I am tired just reading all that you two have been up too! But I’ll give ya a big “Holla!” and say take a break when you can and get in some relaxation time :)
melissa says
I’m soooo excited for you guys!!! :D
Traci says
Wow, everything looks so goodalready. It’s nice to finally get a glimpse of how white cabinets look in the kitchen and with the counters. Can’t wait until you guys get the penny tile up!
Fallon Ferrara says
It is looking amazing! I am not sure if you have already answered this question, but why did you move the fridge to the other side of the room?
YoungHouseLove says
Our old fridge was tiny by new fridge standards, so in order to get a side by side fridge, none of the new ones would fit over there (they would have overlapped the door) but moving our pantry freed up space for a new wider fridge on the other side of the room!
xo,
s
Alyssa says
Do you have new hardware picked out yet?
YoungHouseLove says
Yes! So exciting! It’s supposed to arrive in the mail any day now and then we’ll shoot pics and share it all!
xo,
s
Wrenaria says
Gosh, that white is already making a huge difference. I love me a white kitchen. So glad that’s what you went for. <3
Jami @ An Oregon Cottage says
It already looks so amazing- can’t wait for the finish. You guys had a great eye to be able to see past all that orange wood when you bought the house. ;-)
And I’m taking note of your painting steps, as I’m going to soon be re-painting our cabinets that we sprayed white when we moved in 7 years ago. There was so much to paint then – in only a week – that we didn’t prep properly and have lived with the chippy (and not in a good way) cabinets ever since. This time I’m doing it right! Thanks for the details.
Emily says
UGH I’M SO EXCITEDDDDD!!!
I just yelled that in my kitchen when I saw your cabinets all primed :)
Hope you can feel my happy dance vibes all the way from Florida! SO PROUD OF YOU GUYS keep it up (insert NFL-butt-pat here).
YoungHouseLove says
Hahaha. Thanks for the butt pat. It’s keeping me going!
xo,
s
Lindsay says
You two are totes craycray! I understand though, getting stuff done feels so good!
YoungHouseLove says
Haha, for some reason craycray = hilarious to me. High five.
xo,
s
Charlotte says
I am following along breathlessly as we hope to do something similar with our maple veneer cabinets one day…
Question: are those teeny-tiny doors on the white coffee table actually drawer fronts? Did you take apart the drawers? I cannot wait for the video…
YoungHouseLove says
Yes, we did! They just screwed on (not all do, but ours were easily removed that way so it was a lot easier to paint them when they were off like that). Hope it helps!
xo,
s
Gabbi says
I love seeing the change your cabinets are going through. We finallyyyyyyyyy finished ours up {including rehanging and attaching hardware…well, all the hardware except the 6 pulls that have magically disappeared in our house) over the week before Christmas. You can see a slight sneak peak of the cabinets in this post. I can’t wait to reveal the final result, but I don’t want to show it off until I get more pulls to finish the few cabinets without hardware.
http://retroranchrenovation.blogspot.com/2011/12/lets-catch-up.html
YoungHouseLove says
They look amazing! And those floors! Wow!
xo,
s
Ruthy T. says
my mother in law is just about to redo her cabinets which are practically identical…i directed her to your website since you guys do such a great job illustrating and breaking everything down step by step!
YoungHouseLove says
Aw thanks Ruthy!
xo,
s
Christie says
Looking good!
I love that your blog is truly how-to-DIY, and not just the final reveal of home decorating. The how-to posts make the reveal that much more appreciated knowing how much work goes into it.
And I love the DIY details, with brand names and brush types, so that I can refer back to these posts when I paint my kitchen. Thanks!
YoungHouseLove says
So glad Christie! You know we love to over-share!
xo,
s
Ang says
OMG. I’m getting excited. Just with the primer it looks awesome. Thanks for showing us how to be patient and do it in pieces so it doesn’t have to cost a fortune! About those floors, installed on top of the tile?
YoungHouseLove says
Yup, we discovered there’s an asbestos liner under the vinyl tile, so the recommended method is not to rip anything out and just float a new floor right over everything!
xo,
s
Kristina Gulino says
Sigh! You guys seriously have the best house ever. So stinking talented and patient to plunge into all these amazing DIY’S! Very impressed. When my husband and I eventually get our first place, this is going to be my go-to page for some SERIOUS inspiration!!! Cheers :)
Kristina
something 2 write about
home decor, lifestyle + adventure
GreenInOC says
Even though it’s just primer you can really see a difference in the kitchen with the color change! It feels so wrong to be this excited about someone else’s renovations!!
Angel says
It is looking good! So excited to see the paint on. Even more excited to see the tile and the floor in!
Shauna says
The kitchen looks amazing! I can’t wait to see the painted cabinets!
I have a question, can you recommend a good low flow shower head?
YoungHouseLove says
Hmm, I wish I knew where we got ours. I think from Home Depot maybe? But it had a little “low flow water saver” icon on it! Or maybe it was Target? I think maybe it’s by Waterpik. Ack, hope that helps!
xo,
s
linda says
I bought Speakman shower heads after a rave review from Lou Manfredini. I absolutely love them. Got them at Bed Bath & Beyond – a little more expensive than some of the Waterpiks (which I had previously), but maybe worth a gander. Good luck – nothing is better than a nice relaxing shower!
YoungHouseLove says
Thanks for sharing Linda! Much more helpful than I was!
xo,
s
Rad Designing says
Yay! How exciting! Its looking really great! Cant wait to see the official, final “after”!
Regan @ RenovatingRothenbergers says
It already looks amazing!!!! :)
Christine Schwalm Design says
You’re on your way! See, now I’d make my guests be cheap labor–but you’re nicer than that! =>
YoungHouseLove says
Haha, I don’t know if I trust them with our beloved cabinets! Haha. We have our own little tricks by now… haha.
xo,
s
mp says
The guy who painted my first house recommended Zinsser too. Apparently pros like it a lot better than Kilz.
YoungHouseLove says
So interesting!
xo,
s
Whitney Dupuis says
You guys are amazing. Even with house guests, you still find time to work on your house, a book, and a blog!
Beano Wagner says
Random cleanliness/organizing question: How do y’all hide cords and plugs? I never see them in your pictures, and I have a hard time hiding cords in our house. We have a floating wall shelf used as a media console, but since it’s floating, the cords show through the bottom. And in other places, lamp and stereo cords show. Any tips in hiding these? (To give an example, our TV console is similar to this on your house-crashing pics https://www.younghouselove.com/2011/06/house-crashing-classic-with-a-twist/ )
YoungHouseLove says
Hmm, it’s probably nearly impossible to fully hide cords if things are floating but they sell cord hiders (these paintable sleeves for cords that you can slip over them and then paint the wall color to help them blend in). We generally just run them behind things like ottomans or under our media console or behind our built-in cabinets in our office whenever we can. Hope it helps!
xo,
s
Joanne F says
Awesome (as usual)!
Alison says
You guys have so much energy, I love following your progress! We’re moving from a new house in the exurbs of northern VA to an older house in Vienna… very excited about the move, but the kitchen (among other things) will need some updating. Now that you’ve lived with the Corian glacier white for awhile, how do you find the day-to-day upkeep? I adore the look of those counters, but am wondering if random crumbs and stuff tend to show up on them? Do you find you need to wipe them down more frequently than you did your old counters to keep them looking good?
YoungHouseLove says
Oddly enough this counter looks cleaner than our last one! Probably because it’s so bright white that as a whole the room looks bright and clean (even if you get very close and see crumbs, haha). So we wipe it down probably once a night before bed or if we see anything sitting on it just like our old one. Hope it helps!
xo,
s
teresa says
Just came across your site and boy, just in the nick of time! You see my kitchen looks something like yours used to and although we are pretty decent DIY-er’s with other stuff, we’ve never painted wood cabinets before! Can’t wait to see your end result AND finally tackle this project with your help! :)
Lilly says
look beautiful already cant wait to c end result. I remember when we painted ours a couple months ago so exciting n fun, enjoy.
Deb Owen says
I have a house full of oak that I’d like to paint too. Are you doing anything special to keep the woodgrain from showing through or will your primer take care of that? I’m eager to see your kitchen reveal. You guys are an inspiration!
YoungHouseLove says
How much grain shows through really depends from project to project since some things just have more distinct grain to begin with! We primed and painted our cabinets in the office and zero grain showed through (thanks to high quality primer and self-leveling paint called Benjamin Moore Advance). We’re using the same paint and better primer on the kitchen cabinets but we might still have a little grain peeking through since you can never be sure! We don’t mind painted wood that looks like painted wood though, so a hint of grain is ok with us as long as the paint looks glossy and even and smooth!
xo,
s
Amanda says
Hey. I don’t know if you guys have talked about it before and I just missed it but…I was wondering what your plans were for the beam in your kitchen. It looks like it hangs low on the left side. We have a beam that’s a little seperated from the ceiling in our living room and I’m not sure what to do with it. Hopefully I get some ideas if/when you tackle that!
YoungHouseLove says
It’s just missing some small pieces of trim there from when we demo’d out the old fridge cabinet a few months back! Once we get that trim up and painted it should be seamless!
xo,
s
Annie says
So… ya’ll decided to prime your tea kettle, too?
YoungHouseLove says
Haha- you know I love white ceramic things…
xo,
s