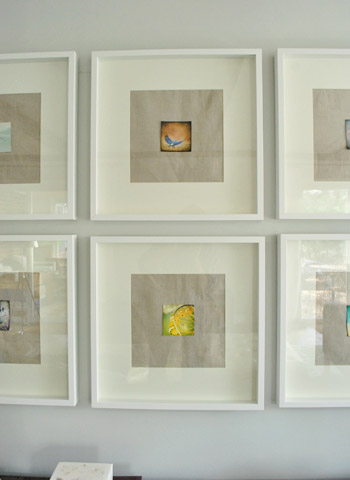
***This giveaway is no longer accepting entries – see who won below!*** Random.org is wishing a very happy new year to TWO of you by selecting you as our winners. And those lucky people is… KC (who after a recent move to a smaller space would really love to pare down her home to the bare essentials) and Katie (who needs to gets her computer files organized since she can’t find anything). Congrats! Since ringing in the new year usually means ringing in some resolutions about simplifying or getting organized, simplify 101 might come in handy. They offer online workshops (as well as free guides) to help folks get organized, stay focused, and reach their
Painting Our Wood Cabinets Cloud Cover by Benjamin Moore
Ok, so we completed the door-painting process a few days ago (picture us doing the droopiest super-tired happy dance that you’ve ever seen) and we’re now into the “waiting game” portion of the cabinet painting process. But we couldn’t wait to share all the photos of everything both during the painting-process and now that they’re all glossy and finished, so here ya go: We used Benjamin Moore’s Advance paint in Cloud Cover in a satin finish (it’s a soft tonal taupey-gray color, so it’s not quite as bright as our glacier white counters for a subtle layered look). Benjamin Moore Advance paint (in the satin finish) actually came recommended by a few pro cabinet painters
December Superlatives
Holy cow, is it really going to be 2012 on Sunday? December flew by. So before it scoots away for good, we like to take a moment to look back on all that we’ve done at a glance (and gather all the links in one handy place for ya). And of course we tossed in some never-before-seen stuff for kicks. This month we were all over the place as usual, but focused a lot of our time on the kitchen along with tackling a few other projects in rooms like the living room and the hallway while shoving a decent portion of holiday fun in there too. So let’s take a walk down memory lane,
Priming Our Wood Kitchen Cabinets
Between finalizing our 260+ page book manuscript (due Jan 4th- ack!) and hosting/enjoying family time (and lots of delicious food), we’ve also been priming! Can I get a “holla!”? Or more likely, a “you’re crazy.” Thank goodness our guests are so understanding! Oh man, and it feels great to be seeing some progress. The beauty of primer is that it always looks a little rough (so you don’t have to stress about getting it to look perfect). By nature, it’s just a sticky sub-layer that helps grab paint and hold on for the long haul, so as long as you apply things thinly and evenly (drips = baaaaad), you’re all set to just follow the
Twenty-Twelve Resolutions
Every year we publicly proclaim a few of our resolutions in the hope that it’ll light a fire under our arse (arses?) and help us “get there.” So without further ado (except for this gratuitous and very much in-progress pic of the cabinet doors being primed)… … here they are: Resolution #1 – To Get Around: We’re excited for 2012 to be a good travel year for us, since we have been invited to speak at the Portland Home & Garden Show in February (really? us?) and at the Haven Conference in Atlanta in June (we’re the keynote speakers, which makes us excited and nauseous all at the same time). So we’ll hopefully get to
The Best Way To Prep Cabinets For Paint
I guess that title should really be “Puttering Around With Putty (aka: Wood Filler) And Sandpaper And A Spackle Knife And Deglosser.” But that was too long. In a nutshell, we prepped all of our cabinets for primer by: puttying all of our cabinet frames and drawers and doors sanding everything (to smooth the putty and rough things up for primer) deglossing everything (to further aid with adhesion) laying all doors and drawers out in the sunroom (on lifts) so we’re ready to prime But that’s not enough detail for chatterbugs like us. So let’s get into the nitty-gritty. First we used Elmer’s ProBond Professional Strength Wood Filler (we asked around for a favorite filler
Fab Freebie: Gotta Hand It To You
***This giveaway is no longer accepting entries – see who won below!*** Thanks to random.org, we’ve got a Merry (belated) Christmas prize going out to… Kristin Aune (who made t-shirts for both of her kids, ornaments, buckeyes and has been trying to perfect her fudge pie recipe). Congrats! Wahoo. Hope you guys all had an awesome holiday weekend (you can see a sliver of ours here). As we mentioned on Friday, we’ll be stopping in with one quick post each day this week (amongst family hosting, feverish book-deadline writing, and priming & painting all of our kitchen cabinets). But we couldn’t wait to share today’s giveaway that we wrangled after seeing so much amazing stuff
An Easy DIY Christmas Card Idea
With family arriving tonight for our first ever Christmas in Richmond, we wanted to be sure we shared our holiday card with you guys first (you know we love ya like family). We couldn’t do this little blog-thang (look at me getting all twangy) without you. And we sincerely appreciate you for dropping in on us. We shot this earlier in the month with the help of a bunch of ribbon snagged on clearance from Michael’s last Christmas (some of which later ended up on our tree). It’s actually two pictures photoshopped together, since getting Clara and Burger to sit still that close to one another without doing something weird (like synchronized diaper sniffing/tail grabbing)
Updating A Dated Kitchen Yourself
We were so happy to stumble upon Beth’s email in our inbox. Her retelling of her kitchen redo had all the elements that we love in a good renovation story: an ugly before (a brown fridge!), lots of DIY details (yesss!), a bit of drama (the counters arrived the day before Christmas, yowza!) and – best of all – a beautiful after. Here’s her note: Hello, Sherry & John! We bought our current home a little over a year ago, and to say it was outdated is the understatement of the century. Like you, we wanted something to fix up and make our own. Our kitchen was dark, ugly, and closed in. No matter how
A Handmade Holiday Craft Show
Two Sundays ago we hit up the Richmond Craft Mafia’s craft show called Handmade Holiday. As one of my friends described it, it was like Etsy… only in real life. We love supporting/meeting local (and not so local) artists and artisans, so we went expecting to see some cool things, bump into a few people we knew, and maybe even to snag a gift or two. Instead, we saw LOTS of cool stuff, bumped into DOZENS of friends and blog buddies, and snagged a BUNCH of gifts. Well, I guess I should clarify. They were gifts for ourselves. Here’s a snapshot of our handmade bounty after we returned home and laid everything out on the
How To Add Toe Kicks & A Window Sill
Can’t we just paint some darn cabinets already?! If your patience to see some painted cabinets is wearing thin – just imagine how we feel! When we were planning this kitchen project our big-picture brains said “We retrofit those few doors to match the rest of the room and then we paint. Hooray!” But now that we’re in the weeds (amid holiday madness, no less) we realize that a lot of stuff actually has to happen between those two steps.” There are gaps to be filled, rough spots to be sanded, trim to be added, hinges to be dealt with, hardware to be chosen, primer to be selected, a final paint color to be decided,
A Free Calendar Printable
First we’ll get to the freebie download for all of you lovely people, because you know we heart you for reading our little ol’ blog. Since we’ve made a tradition of designing a homemade calendar each year (and 2012 ain’t gonna wait just cuz we’re mid-kitchen reno) we stole a moment – while the wood putty dried – to throw something together for the big one-two. Our calendars from the last few years have all been text-based (you know, as opposed to full of photos). Like our 2010 calendar, where we assembled a dozen weird family phrases & inside jokes and laid them out in simple bright colors: Or our 2011 calendar, where we used
- « Previous Page
- 1
- …
- 122
- 123
- 124
- 125
- 126
- …
- 242
- Next Page »


