We’re back to share phase three of our sunroom mini makeover (see phase one here and phase two here). And this week’s update is all about a punchy turquoise stencil that we added. It took a bit of trial and error (like most of our learn-as-we-go projects) but we’re here to share the goods and the breakdown when it came to our method.
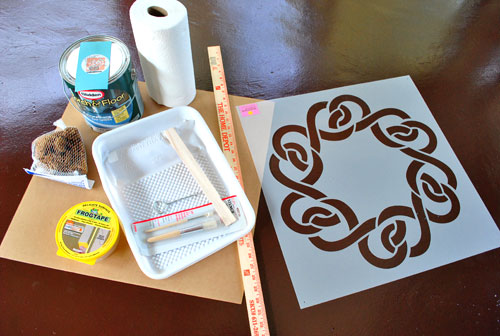
First we gathered our materials. We had a lot of painting supplies on hand so all we had to do was pick up some floor paint (Martha Stewart’s Lagoon color matched to Glidden’s oil-based porch and floor paint) along with a sea sponge and this amazing Ciel Stencil from Sunny (a local paint guru that we’ve loved ever since checking out her store and seeing her amazing stencils in this house and this house that we crashed a while back). The cost of the stencil, the paint, and the sponge came to $57 and we already owned the rest of our supplies.
After gathering our tools we measured the room to mark off where our stencils would go. Obviously this will be different for everyone (depending on the size of your room and your stencil) but we just figured out how many rows of stencils we could fit on each wall (seven on the long one and five on the shorter one) and used tape to delineate where the edge of each stencil could be placed to keep them within those rows (with about 8″ between each one on each side, since that’s how the math worked out). The lesson here is that this step is everything. As they say in home improvement, measure twice, cut stencil once. You NEVER want to get halfway done with your floor only to realize the layout won’t fit, is wonky, etc. So definitely do whatever it takes to visualize the plan before painting (like placing pieces of paper around the room to ensure that the arrangement will look balanced and even) before cracking open that can of floor paint.
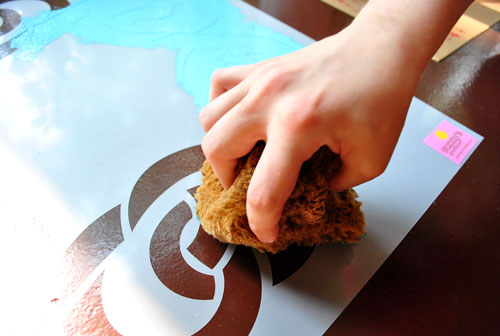
Then it was time to stencil. We used delicate surface Frog Tape to hold down each side of the stencil just to keep things in place. Then using light up and down movements with the sponge, we carefully dabbed on some paint (being sure not to go diagonally with the sponge for fear of getting under the edges of the stencil).
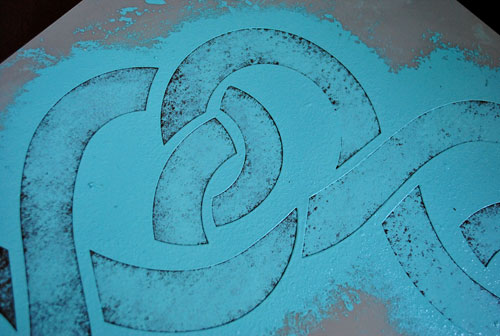
After we covered 100% of the brown floor paint that was showing through, it was time to peel back our stencil to reveal…
… a nasty and horrible result. Ack! The problem was clear- we had applied way too much paint and it had bled everywhere for a less than clean and pristine result.

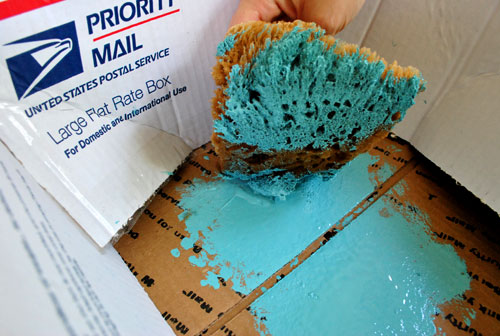
Thank goodness we had created that first stencil in a won’t-be-seen-spot thanks to furniture that will be placed there once the floor is dry. Needless to say we quickly revised our method from there on out and prayed to the paint gods that we would get a better result after our second attempt (and we’d definitely recommend testing your stenciling skills on cardboard or poster board before moving on to the floor). On our second attempt we only applied about 80-90% coverage (so the brown paint still peeked through) and we also decided we needed to dab the sponge on something before taking it straight from the paint tray full of blue paint to the stencil on the floor…
So John grabbed a cardboard box from the garage for me and I used it to dab off the excess paint for a much less gloppy application.
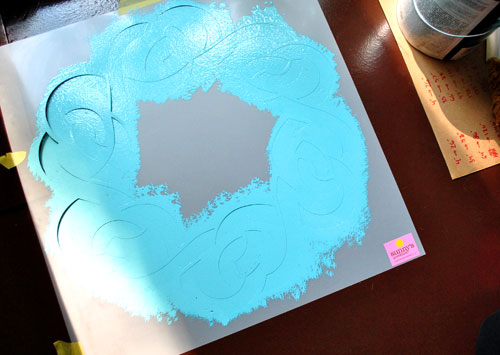
And the result this time (whew) was perfecto! Picture us beaming with pride as we peeled back that stencil. The interesting thing is that we thought it would look less than crisp since we didn’t have 100% paint coverage (remember we aimed for 80-90% instead) but it looked super clean and perfect once the stencil was removed. Victory!
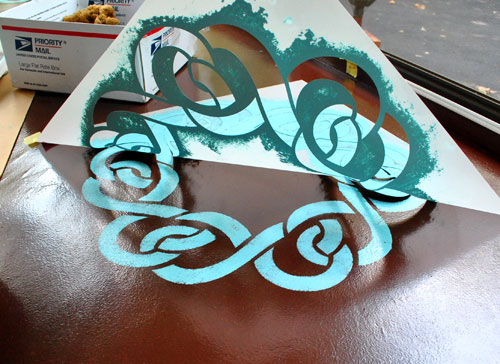
Here I am smiling because we figured out that less paint = more crispness. Which meant that stenciling got a lot less stressful from there on out. Oh and you’ll notice that I’m in a corner. We actually stenciled the four corners of the room first because we figured that way we’d have four stencils in different areas of the room to use to orient ourselves, so that’s another little tip that we picked up along the way.

And after completing those four corners I just painted my way around the room, sliding my cardboard box and my piece of cardboard with the paint tray on it around the room with me.

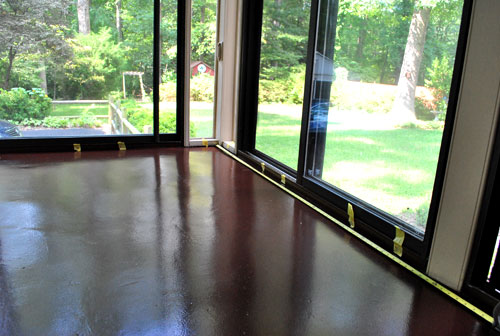
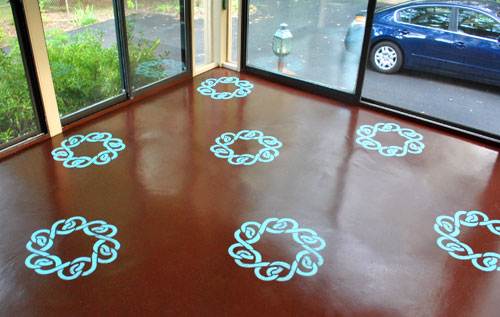
And here’s the final result:
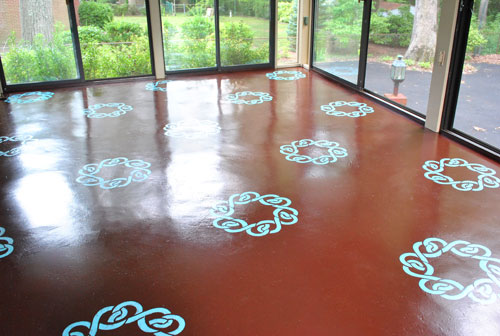
Sorry for all the glare, that’s one shiiiiiny floor.
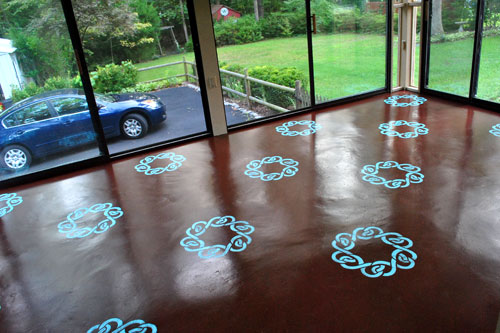
We really love that a $57 project could add such interest and texture to the room (especially since the turquoise stencil plays off of the lighter teal ceiling in the space). It’s akin to buying a super pricey area rug to spice up your room but we spent a fraction of that cost for an interesting and fun result. In short: we’re in love with our rich chocolate and link-chic patterned floor.
And we figured we’d share a few quick tips for anyone else who may attempt this project in the near future:
- Be sure to use paint that’s specifically formulated for porches and floors for extra durability (we went with oil-based stuff because that offers maximum protection and also works with the oil-based chocolate color that we previously applied – applying water based paint over oil-based paint would have made for a cracked and peeling result).
- You don’t need a lot of paint for a stenciling project (we could have gotten by with less than a quart but they only sold it by the gallon at our store).
- Measure out your layout a few times to be absolutely sure it’ll look balanced and even before beginning- and it helps to paint those corner stencils first and work around the room from there so you have a few different points of reference.
- Tape your stencil on all sides with 2″ of delicate surface tape, just to hold it in place.
- If you get any paint on the underside of your stencil (which only happened to us on our failed first attempt) wipe it off before placing the stencil on the floor again.
- Use a gentle up/down application with a sponge that you dab a few times on cardboard to remove the excess and aim for 80-90% coverage instead of 100% saturation (which we found led to bleeding and blobs).
- Give painted floors a ton of drying time before walking on them or moving furniture back in (we’re giving ours 7 full days since it’s humid, so stay tuned for the reveal pics next week once we can move things back in!).
- Cleaning up oil-paint on errant body parts is easy thanks to mineral spirits (update: many readers mentioned that a cooking oil, like vegetable oil, can also be used to remove oil-based paint in a more natural way).
So there you have it- our stenciling project from soup to nuts. Hope it helps anyone who is gearing up to add some interest to their floors sometime soon. What do you guys think? Anyone else tempted to try it?
Pssst- Wanna see how we painted our chocolate sunroom floor to begin with? Click here for all the deets.

liz @ btb says
I had the same problem with a quatrefoil stencil I made for a wooden box. It was a big ol mess. So I just changed it to a Chevron pattern instead…
http://bontempsbeignet.blogspot.com/2010/08/quatrefoiled-plans.html
LOVE that color!
Cait @ Hernando House says
The stencils look great! Can’t wait to see it next week with furniture moved in!
Jessica @ How Sweet says
Oh WOW!! I absolutely love the color – how unique!
Beth says
I really appreciated this post! Just yesterday I was browsing stencils online, thinking about stenciling the ceiling to make it look molded OR stenciling the bathroom to create a wallpaper affect. I will definitely use this ideas.
Amanda @ Our Humble A{Bowe}d says
The floor looks great! I recently painted a chevron pattern on a rug using a similar technique:
http://ourhumbleabowed.wordpress.com/2010/08/16/weekend-painting-chevron-rug/
LizzieBeth says
I have to say I’m surprised. You two never really struck me as the “stencil” type– but I have to say I’m kinda digging it. I’m curious to see how the furniture looks.
LB
Gina A. says
oh i LOOOOVE IT! Its gorgeous! Great job Youngsters!
Mike @HA says
So unique! I can’t wait to see what it looks like with furniture next week. Isn’t waiting the hardest part?
YoungHouseLove says
Tooootally. We’re dying to move our furniture back in for the full result!
xo,
s
Laura says
That looks great! I didn’t think I’d like it, but I actually love it!
Kate @ Twenty-Six To Life says
Great job! I’ve been feeling the stencil look lately too so these tips are great.
JMB says
This looks GREAT!! As always, thanks for the tutorial.
melarse says
Great work! It looks so cool – can’t wait to see it all put together.
And don’t forget one of your Reader Redesigns: https://www.younghouselove.com/reader-redesign-stellar-stencils/. This is where I fell in love with Sunny’s stencils.
YoungHouseLove says
Hey Melarse,
Oh yeah, we love the idea of using our stencil on fabric as well! Love that one!
xo,
s
OwningSingle says
Cool. Wish I had a sunroom. I stenciled a wooden toybox for my god daugter when she was born and your tips are right on target. Use the right paint and don’t use too much!
Cat@BudgetBlonde says
Haha, I actually had a feeling that you guys had this up your sleeve with all the talk about Sunny’s and mentions to your friend’s old House Crashing post! Love it!
caligurl says
very nice! the results are much better than i thought when i first starting reading the post!!! good job, sherry!
Mary says
Love.it.
Rebecca (Craving Simplicity) says
Love it!! Looks fantastic!
bridget b. says
neat idea! if you changed your mind, would you have to repaint the entire floor or could the stencils be removed? there are a a few things that i want to do around my house that i’ve ended up passing on when i think about how hard/expensive it would be to undo later if it went wrong.
do you guys get ever get the jitters before doing these types of semi-permanent projects?
YoungHouseLove says
Hey Bridget,
We could just repaint the floor if we wanted to remove the stencil, but painting is one of the easiest things to undo (well, redo) so we say go for it! Usually once we see something in an inspiration room and love it the jitters are gone and we’re dying to jump in and get going!
xo,
s
Lisa says
My mom is a big fan of stencils and she’s found the best results using a very stiff short-bristled brush (I think it might be called a stippling brush?) That also gives a lot of control, so she can blend and layer colors, which is kinda fun.
Cat@BudgetBlonde says
Also, is sealing the floor necessary? Just curious, if I take this on in the future.
YoungHouseLove says
Hey Cat,
There’s no need to seal the floor if you use porch & floor paint which has that all built in. Hope it helps!
xo,
s
ALittleBite says
Love it! Can’t wait to see the reveal pics!
KARA @ KARA PASLAY DESIGNS says
B-E-A-UTIFUL!! Looks great guys!!
Jen says
Oooh, I have been planning on doing the same in part of our lower level, so glad to see how it’s done ahead of time! You gave me that extra push I needed to take the floor stenciling plunge! Love it! Can’t wait to see the whole room put back together!
xoxo,
Jen
Suzie @ cupcake monkey says
Oh wow!!! That looks great! I cannot wait to see the finished room…you guys are killing me!! :D
Victoria says
Hi, Sherry and John! Loving that stencil! We’ve been planning to paint our front door, which is right now a sickly pink. We have been thinking about turquoise and my husband just now saw your stencil color and said, “that’s the one”. My question is: Have you ever used interior oil-based primer on an exterior door? Is there any drawback to this if the door is under a covered portico?
We have a 5 gallon bucket of the interior stuff that we need to use us and don’t want to have to buy the exterior-grade if we don’t need to. Appreciate your input.
Victoria
YoungHouseLove says
Hey Victoria,
We definitely recommend using exterior paint for exterior spaces (even if they’re covered, the tenpurature changes will compromise interior paint). Hope it helps!
xo,
s
Adriane says
As soon as I started reading, I thought, “OH NO!” I should know to trust you two by now… Can’t wait to see it all put together. It’ll probably look amazing with those little patterned edges sticking out from the rug and such!
Jackie says
The floor looks great. Clara will love dancing and twirling in there!
Carrie says
LOVE this! Great color choice.
Christin says
Really creative and lovely. Can’t wait to see how the finished re-vamped room looks. :)
Emily, Timeless Paper says
I updated my guest room with a stencil project this week! I stenciled and painted imperial trellis onto curtains. Check out my blog for the DIY process + photos.
http://www.timelesspaper.com/blog/
Christa M says
Great job! Can not wait to see the finished result with the furniture back in, I know there will be an exciting surprise thrown in there! ;)
Want to mention that it’s probably best and will save a lot of time and agony for a first timer to practice on cardboard or something else flat first.
Amanda@The Hand Me Down House says
WOW! LOVE this! The color is just wonderful and really pops on the dark floor! Thanks for the awesome tips on stenciling too — I’ve been really wanting to do some stencils on the wall, but I’m too nervous I’ll have a huge disaster on my hands. :) You guys always give me courage to try it on my own!
LOVING the price tag on this project, too!
Jen @ The Decor Scene says
Gorgeous! I love it. I didn’t think I would like it because it sounded like it was going to be too many, but you guys put just the right amount of them. Gorgeous!!! I wish I had a solid floor in our sunroom, but we have a wood flooring (decking). I guess I will just have to be creative with rug tiles. ;-)
Are you putting your rug back down or will there be no rug in there?
Either way I think it will be gorgeous with all your white furniture and the recent pops of blues you put in the room. I can’t wait to see the Big Reveal!!! Your killing me!!! ;-)
YoungHouseLove says
Hey Jen,
We’re definitely planning to bring the rug back in but we’ll have to see what it looks like when we do before making a final decision. Stay tuned…
xo,
s
Beth @ bethcooks says
Wow- that looks awesome you guys. I love it!
Amy says
I love the stencils! What product did you use for the floor/concrete paint (the brown, base color under the stencils)? We are looking for a good concrete paint to use on our back patio and that color looks perfect- it also looks well-sealed and chip resistant. I’d love to know if you get a chance~
:)thanks
YoungHouseLove says
Hey Amy,
Just follow the link at the very bottom of the post for that info. Hope it helps!
xo,
s
Amy Wolff says
Awesome.. never saw this one coming.
what color is the floor- the brown? Is that a Behr oil based paint?
YoungHouseLove says
Hey Amy,
Just follow the link at the very bottom of the post for that info. Hope it helps!
xo,
s
Jill Stigs says
WOW………….looks amazing! Great job!!
heather s. says
I never thought of y’all as stencil lovers. I have to admit – I’m not a fan. I was hoping you were going to do a border around the room since I think that would have looked neat (although your stencil does seem rather large) but I’m not a fan of stencils all over the floor. To each his own, though!
Jyl says
Looks great!
Just sharing my two cents:
I’ve learned that if you need to remove oil based paint from your skin and you don’t have mineral spirits around, use vegetable oil first to remove the paint (it comes off easy with gentle scrubbing) and follow up with regular dish detergent like Dawn to remove the oil. It worked great in removing Kilz oil based primer from my arms and hands :)
Melissa @ HOUSEography says
That looks so great! I have been thinking about doing something like this on my porch floor which needs repainting anyway. Not sure if I am as bold as you are with the color choices (which I love), so may try it in two shades of the same color.
Some pics of my porch here – http://houseography.blogspot.com/2010/06/its-curtains.html
Rachel says
The word stencil makes me think of country or granny decor, but this is so chic (as are all the examples of stencils you’ve featured).
mIranda f. says
Oh that is SO COOL! I can’t wait to see it with the furniture! Putting it all together is my favorite part! I so wish I had a sunroom to play with. I’m so cray-cray I would probably do this to my garage. LOVE IT and thank you for the tutorial! Clara will look super cute inchin’ across that floor!:)
Lindsay says
What did you all originally use to paint the floor with? Is your floor concrete?
I’m wondering if painting our floor would be a good alternative to laminate (and cheaper!) after we pull up our carpet.
YoungHouseLove says
Hey Lindsay,
Just follow the link at the very bottom of the post for that info. Hope it helps!
xo,
s
andrea p says
I am impressed! I had no idea what you would be up to for today’s sunroom report! Truly awesome!
I have a paint-related question:
Would you paint your trim (baseboards, window casings, etc) 1st or the walls 1st when painting a room?
Thanks!
YoungHouseLove says
Hey Andrea,
We prefer to do trim after the walls but it can really work either way. Hope it helps!
xo,
s
Laura (Blogging Over Thyme) says
I love stenciled floors! I would love to do this at some point if I have a house with a floor that makes sense to do this on. I definitely am intimidated by the process though–especially since it seems like you could so easily mess up the layout! Aghhh
How exactly did you lay them out evenly across the floor so they were equi-distant from eachother?
YoungHouseLove says
Hey Laura,
We just measured the length and width of the room and divided those numbers by the length/width of the stencil (which was the same since the stencil is a square). That taught us that we could fit seven stencil widths on the long wall and five on the shorter wall with about 8″ between each row. Hope it helps!
xo,
s
Cassi @ Miles from Suburbia says
Okay, this post totally makes me want a sun porch! What a clever idea. I think we may try something similar on our front porch – only we would be painting on wood instead of concrete. I’m thinking after a while we may get a pretty cool, weathered look. Hmmm… (Sorry for the thinkin’ out loud – er, typing out loud? Yeah.)
Nicone says
I’m impressed by your color choices. Pretty unconventional and the result is cool. I’m looking forward to seeing the room with the furniture back in it!
ally says
Love the floor!
I read a post that recommended using vegetable oil for cleaning up your hands after using oil based paint. I used it yesterday after staining a piece of furniture and it worked great! I was thrilled not to have to put mineral spirits on my hands.
YoungHouseLove says
Love that tip!
xo,
s
Amber says
I’m loving the stenciled floor! I have seen this in a few books lately, but would have never had the guts to do it. Looks great with the new ceiling color.
Kate Ediger says
If I remember correctly, you upgraded to a DSLR. If you get a circular polarizing filter you can get rid of the glare on the floor. Just a tip. Love all the tips you give us, just thought I’d send one back. :)
YoungHouseLove says
Good to know! Thanks for the tip!
xo,
s