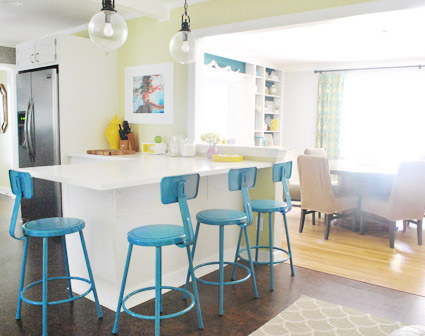
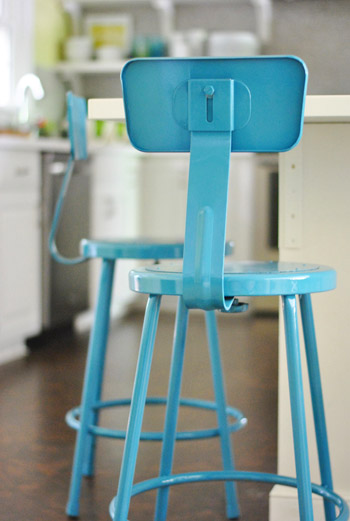
Well, after reading every last one of the 750+ suggestions you guys left on this post (no doubt about it – there are definitely a million ways we could have gone with these guys!) and putting lots of thought into pretty much every possibility under the sun, we ended up going with our very first instinct. A chipper turquoise-y-teal tone.
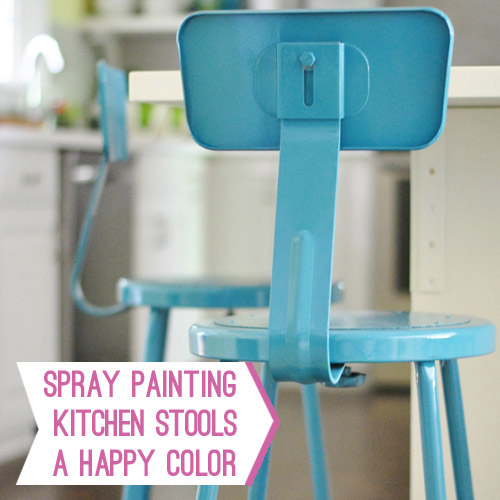
So here’s the rundown of how we transformed these basic $32 stools from an online supply store.
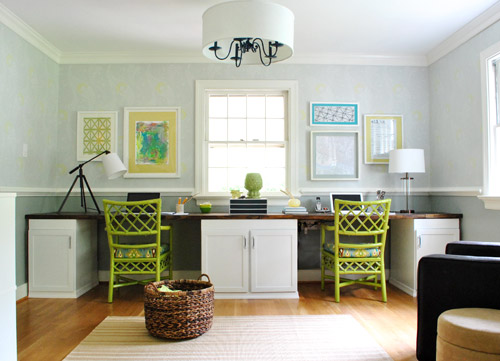
The funny thing is that there were probably the most votes for blue from you guys too (closely followed by yellow). Although there were definitely suggestions for a ton of other options (four different colors, tones like orange/coral/purple/pink, upholstered cushions, seats painted a different color, dipped legs, an ombre effect, etc). But even before sharing our stool musings we found ourselves gravitating towards turquoise or teal. Especially since we already have green chairs that we painted and reupholstered for the office…
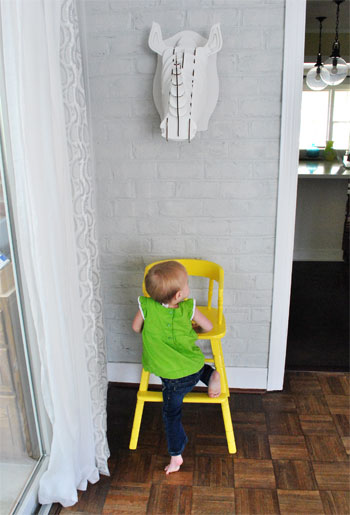
… and a yellow highchair for Clara that gets used in the dining room/living room (it’s not counter height, so it works better at normal tables than the kitchen peninsula, where we typically use a booster seat attached to one of our stools).
We decided not to make any final decisions until our rug arrived, and then to just follow our gut and pick a darn color already go with whatever we liked best. The truth is that a ton of other colors definitely could have worked (white cabinets & counters + gray tile + brown floors = a pretty neutral backdrop for any splash of color), so it really just came down to personal preference. I think we always would have done the “what if” thing if we hadn’t just followed our nose heart.

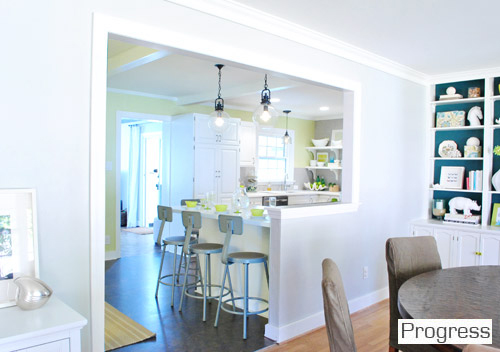
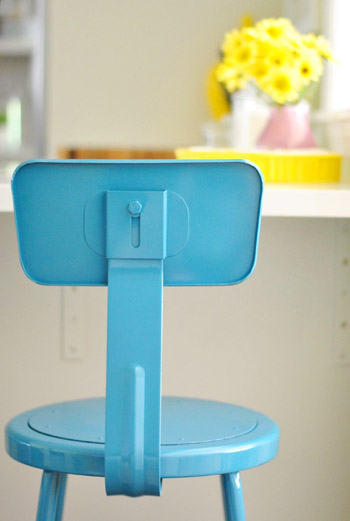
We love how the color relates to the dark teal built-ins in the dining room without being too matchy-matchy, and even ties into the small pops of color on the open shelves. Although I’m sort of tempted to completely white-ify the stuff on the shelves and the counters (fewer pops of yellow and blue) so the stools can really be the star – just because a lot of the kitchen photos that I’ve pinned as inspiration with colored stools don’t usually have a lot of bold pops of color all over the rest of the room (although some have a few). So I’ll keep you posted as the accessories continue to evolve in here!
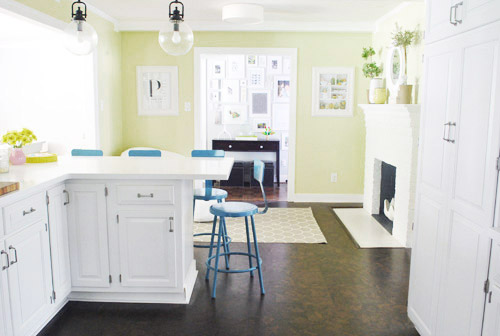
In the meantime, it’s an especially great upgrade when staring at the other side of the room from the stove. Without any penny tile to the ceiling or colorful shelf accessories, this side used to look sort of bland. We love how the new stool color makes it look alive, but not too clown-car-crazy. It just feels like us.
The kitchen officially fits into the rest of our house, which has other bold pops of color going on in every room that we’ve tackled – like our teal guest room with a bright yellow rug, our gray living room with a bright green rug, our pink nursery with bold floral curtains, our stenciled office with green chairs and multicolored art, our gray-blue bedroom with a teal and charcoal rug, and our gray dining room with green curtains and dark turquoise built-ins.
And ultimately it was freeing to realize that the worst that could happen if we didn’t like our choice was that we’d repaint. Although I’ll admit that I’m very thankful that we like them this way (this wasn’t exactly a ten minute project). Haha. And luckily the veneer-ish brown seat took the new coat of paint really well, so the whole chair looks even and feels nice and durable. We opted to paint the brown part of the seat the same color just to keep things graphic and simple (we feared they might get too busy-looking with a brown seat and a blue painted frame).

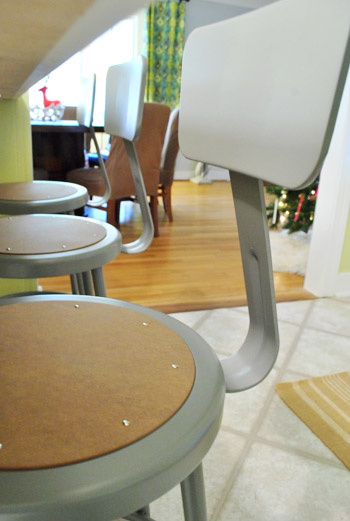
One of our favorite views of them is this one, which used to look sort of flat with the stools in their gray-with-brown-seats state…
… but now looks cheerful and less monochromatic to color lovers like us (thanks to those hot little turquoise gams).
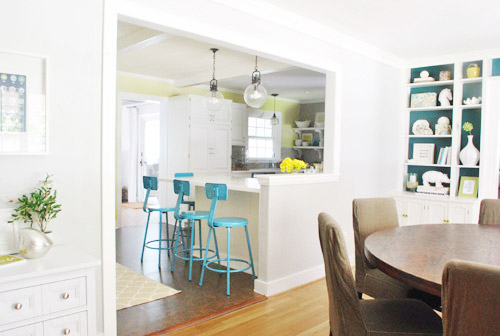
Even the view into the dining room makes a lot more sense in person (now that the stools tie into the subtle pops of turquoise in the ikat curtains). It used to be dull with eight brown dining chairs in the background and four gray stools with brown seats in the foreground, so it’s nice to have broken things up a bit more with some color to set the stools apart. And someday we’ll figure those dining room chairs out once and for all. Haha.
But I doth jabber on. Here’s how I got ‘er done.
1) I roughed them all up with 300 grit sandpaper. Just to give them a little tooth so they’d be more durable for the long-haul.
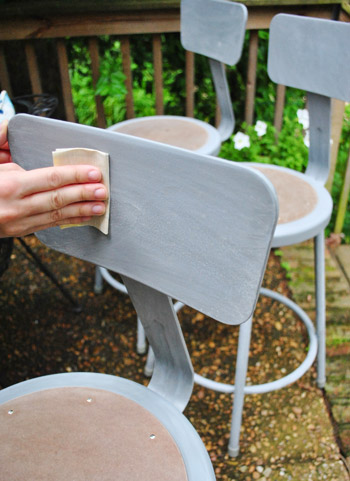
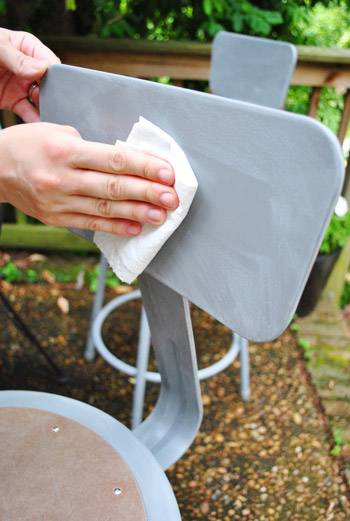
2) I used a liquid deglosser to remove all that sanding dust and further ready them for primer and paint (I like how it looks like I’m thumbless in both this photo and the one above it). We use a no-VOC deglosser called Crown’s Next that we got from Home Depot a while back for a few bucks.
3) I sat them out in the yard on an old tarp and some cardboard (so their legs wouldn’t sink into the grass so they could be sprayed evenly).
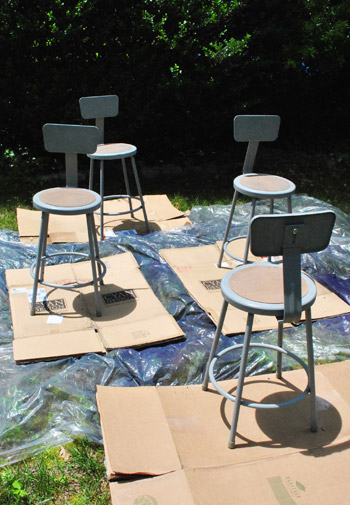
4) I misted them with very thin coats of spray primer until they had a nice even coverage (we generally love spraying metal since it takes paint really well – especially if it’s sanded, deglossed, primed, and painted in thin and even coats). You can check out some general spray painting tips of ours here.

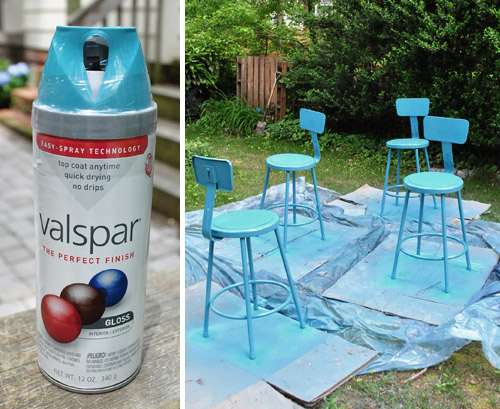
5) I misted them with very thin coats of spray paint until they had nice even coverage. We went with Tropical Oasis by Valspar in a gloss finish (we liked that it had a fair amount of gray in it, while some other teal options looked a little too bright for us without any muted undertones to tie them into things like our gray wall of tile and our new scalloped rug). We applied around five super thin and even coats, beginning on the next coat pretty much as soon as the first one was done (light misty applications like that hold really well and don’t drip or peel like thicker ones tend to do).
6) I left them outside in the sun for 24 hours (after checking to be sure there was no rain in the forecast) so they could off-gas and cure up. Next they got brought into the sealed-off sunroom for another two full days, just so they could continue to cure up and let out any fumey smells before they were allowed into the house. Then finally (those few days felt like years of waiting) we got to bring them back into the kitchen and see how they looked. They should hold up for a nice long time (painted metal, when done correctly, can look great for decades). We’ll definitely keep you posted on how these guys do over time.
And now for a budget breakdown:
- 3 cans of primer + 3 cans of spray paint = $29
- 300 grit sandpaper and liquid deglosser = $0 (already owned, but they might run you $6 if you have to buy ’em)
- TOTAL: $29 (which meant each of my $32 stools got a $7 upgrade)
I totally think people would spend way more than $39 a pop for these chipper little stools at a furniture store. So, yay. As for a time breakdown…
- Sanding and deglossing them all = 1 hour
- Priming them all = 1.5 hours
- Painting them all = 1.5 hours
- TOTAL: Four hours (obviously with time in between steps since I primed during one Clara-nap and painted during another).
Speaking of the bean, Clara actually stopped to pet one and say “blue stool! so pretty! like a princess!” right after we brought them in. No idea why she equates blue stools with princesses, but we’ll take it. I gotta say that the kitchen finally feels semi-complete. Huzzah! And I might be imagining things, but proofing 352 pages of book layouts (not exaggerating) on our upgraded stools was a little less of a grind for some reason.
Maybe they have magical happy powers?
What have you guys been upgrading with paint or primer these days? Have you ever used a liquid deglosser? We used to be so scared of it since they seemed like it’d be fumey and burn your fingers off, but we love the stuff we use (and it has yet to remove my fingerprints – although it might have taken off my thumb for a few pics).

Lisa says
Totally get why you need to sand and degloss before painting something, but my question is, how does the finished and dry painted surface feel since you’ve sanded first? Is it still smooth, the way you’d expect an oil-based or automtovie paint to dry, or does it feel at all rough or grainy?
YoungHouseLove says
It’s super smooth! Especially if you pick glossy paint. Sanding with that grit (300) doesn’t scratch it up as much as it very very finely buffs it, and then primer and paint fill everything in so it’s smooth and metal-like (spray paint is oil-based and very similar to automotive paint).
xo,
s
Katherine says
They look GREAT! You picked the perfect shade of turquoise – just bright enough to be happy, but not over the top.
Time to sit down and enjoy breakfast at a happy place.
gina says
I love all the happy colours going on here.. you have a happy kitchen/home.
Sherry… I hope this don’t sound stupid.. but can I see your non stick bake wares? do you have all the same colours? or multi? just curious.
I LOOOVE your little family. and Burger too!
YoungHouseLove says
Haha, we have all black eco ones (called GreenWare, we love them!). We got a set maybe three years back from Bed Bath & Beyond and love it.
xo,
s
Emiles says
I dig! Great upgrade to the stools. PLEASE don’t get rid of your pops of color in the rest of the kitchen! I love ’em and it gives it some personality!
YoungHouseLove says
Aw thanks Emiles! Someone else said we could pack even more color onto the shelves as another alteration so that’s something else I’d love to try! It’s like pillows here, the items on the open shelves get switched out a lot depending on my mood! Haha.
xo,
s
Emiles says
looking at them again…i kind of wonder what the “seats” would look like painted yellow! :) not a jarring change, but a little touch
YoungHouseLove says
Always another possibility down the line! We really like how graphic and not-busy they are now that they’re a solid color (with four of them gathered together we didn’t want them to be too chaotic looking) but you never know where we’ll end up!
xo,
s
Carli says
Love this color!! Works really well in your kitchen. Question though, are you planning on covering the back of the ‘back support’ portion of the stool. Like where you can see the bolt and neck of the stool connect? Or are you going to leave it more industrial chic, like it is? Either way will rock, just wondering :)
YoungHouseLove says
Industrial chic! We actually like the lab-geek vibe mixed with the happy color so they’re not too sleek but not too rough either, ya know?
xo,
s
Carli says
Totally!! Good choice :)
Shari says
I LOVE the color! It really seems to be the finishing touch to your kitchen project!
Aimee says
Perfect color choice, looks SO great! Love it!
Elle says
So I think I’m going to, ahem, swipe this idea. Quick question: how did you prepare the seats for spray paint? Did you sand/degloss/etc. those too? Thanks!
YoungHouseLove says
Yes, I followed exactly the same steps (sanded and degossed them when I was doing the rest of them, primed them along with the other parts, etc).
xo,
s
Colleen says
Just wondering, do you look into the forecast for a low-wind(y) day?
Whenever I spray paint anything outside, I get debris or bugs or something sticking to my project. I’m probably spraying it on too thick… So frustrating!
YoungHouseLove says
I just got lucky this time to get two calm days, but if I get out there and set things up and it’s too windy I won’t start spraying since it can totally ruin things! Also applying things thinly and evenly helps it dry faster, so if a leaf falls on something an hour later it just bounces off instead of getting stuck.
xo,
s
Kristie says
Love the color choice, kids! But I’d be lying if I said I wasn’t disappointed that the post didn’t include a picture of Sherry “Thin, Even Coats” Petersik in her official spray painting uniform. You know, the one with the sexy black socks!
YoungHouseLove says
Bwahahaha, I was definitely rocking my sexy spray painting socks. I’ll leave it all up to your imagination this time… haha.
xo,
s
Crystal says
A certain improvement. I see you considered fabric on the veneer section– what about using a stencil just on the seat?
YoungHouseLove says
Always another idea down the road! For now we love the graphic simplicity of them (four leggy stools like this could get busy with too many bells and whistles) so for now we’re happy with an all-one-color looks!
xo,
s
Sam @ The Junk House says
Love them! And I’m glad you picked blue – that was definitely my favorite of the colors you showed. They make the kitchen seem so bright and cheery like the rest of the house.
Lovey says
LOVE them! They look awesome in your kitchen. I spray painted some metal chairs we have a couple months ago: used liquid de-glosser, sanded and primed. But I guess I didn’t sand enough because they are already getting nicks and scratches. Sad because it took me forever and cost quite a bit, I even spray painted the vinyl on the chairs with vinyl spray paint (that’s holding up well)
YoungHouseLove says
Oh man, that’s frustrating! Another great tip along with sanding as much as possible would be applying thin and even coats. The thinner they are the harder they cure up and the less they’re likely to crack and peel!
xo,
s
MJB says
I love white kitchens, but I think they need a few pops of color like you have on the shelves and now the stools. They look awesome with the DR built ins.
Any thoughts as to putting some color on the side of the big pantry cupboard? A colorful chalkboard for Clara, maybe? (You can DIY chalkboard paint in any color.)
Just a thought. I can make decisions more quickly for YOUR kitchen than I can for mine. (Analysis paralysis.)
YoungHouseLove says
Oh yes, we’ve been planning something for that big spot on the side of the pantry for ages. Still debating, but will keep you posted…
xo,
s
Kerry says
LOVE the transformation!
I recently spray painted my own stool: http://lovetheslolife.blogspot.com/2012_04_01_archive.html
(about 3/4 down the page)
Also, I just pre-ordered your book. I can’t wait!
-Kerry
ps.- I don’t believe I’ve ever commented on any of your posts, but I adore your blog and read it every morning as part of my waking up/breakfast routine!
YoungHouseLove says
Looks great! Love that happy red color! And thanks for pre-ordering our book! Ack- can’t believe it’s up on amazon already! Even if the pic is missing. Haha.
xo,
s
Abbey says
Looks great! I love how the teal also picks up the blue colors in your kitchen water art. One question – did you ever consider taking off the backs of the chairs? It is probably more comfortable to have them on (plus safer for Clara), but I thought it might be a good streamlined look…
YoungHouseLove says
Oh yes, they’d definitely look chic without the backs but we were adamant about getting stools with backs so they were functional for us (more comfy for adults and safer for kids). It was just a little sacrifice we were happy to make!
xo,
s
Alicia says
Yay, I was pulling for turquoise! They look great, so cheerful and happy!
Julia says
What a huge difference! I love the blue and how it “goes” with the teal in the bookcase, without being too matchy-matchy!
Caitie says
I am in LOVE with that color! Great job guys! :)
Kristin says
Do you always use sandpaper and degloss when you are spray painting metal? I want to spray paint our glossy brass fireplace insert black and my husband said I should use sandpaper to get the spray to stick and not peel, but I’m nervous it will leave scratches!! The stools came out great by the way…
YoungHouseLove says
For that I would just degloss and prime and paint it. I usually sand something when it’ll take a beating (ex: furniture you sit on or eat on) but since you don’t manhandle the fireplace insert very much it should be fun!
xo,
s
Jamie says
Well, thumbs up! Definitely looks less school chair like, especially since you painted the brown “seat” part the same color. I totally agree with you on the white accessories.
Crystal says
Can you say “Nailed It!” ha ha….Love them. You picked the perfect color. Keep us updated on how the paint holds up.
Anne says
I LOVE THEM!! For the longest time, I thought that you guys were going to keep the stools gray and brown. It reminded me way too much of school. :( I absolutely love the pop of color. Makes me want to paint our awful metal filing cabinet.
Crystal says
I LOVE your color choice and how your eye bounces around the kitchen and dining room to all of the blue pops. They turned out fantastic! And I like that Clara thinks of them as princesses :)
Kate says
Love the stools! I just bought a fantastic old metal cabinet from Craigslist which I intend to spray in a similar color. The hubby is going to build a topper for it out of left over 1×6 planks and it is going on our covered back deck for storage/a place to put stuff when grilling. Cant wait to see if my project turns out as great as yours!
LauraC says
I love them with the littler pops of blue in your kitchen. I think the little spots tie in well with the big stools.
I have been spray painting recently. I really wanted glass-knobed door knobs on our spare room door when the original knobs broke. But nice quality ones were ex-pen-sive!! So I found a cheapo goldy-brass set at Lowes, and spray painted it Rustoleum’s ORB, then put a protective clear coat on top. They turned out great! I spray paint a lot, but was extra careful on this project not to have drips. Very happy with it.
YoungHouseLove says
That’s awesome! I love that idea!
xo,
s
Kelley says
LOVE x infinity! They look great and I love the color. I’ve been admiring those stools for a while now. They’d work great in our kitchen as well. And the price is fab! I love what you guys did with them and I think the color choice is perfect. I love how they look in the pic where you can also see the shelves in the dining room. Those colors compliment w/o matchy matching!
Katherine Immel says
Love the stools! I have a large veneer bookcase that I want to paint for a pop of color. How would you go about painting something that texture and that large? I am thinking about doing a purple, yellow or blue of some sort. Where has the best colors? How do you choose!?
YoungHouseLove says
We have a post about painting and staining veneer on our Projects page (see the tab under our header). Hope it helps! As for choosing colors, just go with the one you like best!
xo,
s
Jenny B says
I luurve the pretty blue stools :) They fit in perfectly!
keri says
PERFECT!!!!!!!!! I am so happy. Winning.
jocelyn says
Perfect color, it looks really good from all angles. And I agree with Clara, blue is a princess color and so is yellow, pink, green, etc. A princess is entitled to all the colors :)
Question, have you considered getting a paint sprayer rather than use cans of spray paint? I keep toying with the idea, especially since Harbor Freight has really inexpensive options.
YoungHouseLove says
I thought about it but worry that spray paint is somehow a stronger formula than spraying regular paint. It’s oil-based and usually has things to thicken coverage and some comes with primer built in, so I worry I won’t get a durable/long-lasting result with just spraying on regular paint, ya know?
xo,
s
Leanne says
Love the teal! Wanted to share that I found an apartment complex that I’ll be moving into by myself within the month. I asked about decorating and she said the usual, hanging and whatnot BUT I CAN PAINT! This was a surprise and a welcomed shock as most of the other places I’ve looked at have said no to the paints. I am giggly with excitement for all your inspiring tutorials and actually putting Pintrest to some good use!
YoungHouseLove says
That’s so exciting!!
xo,
s
Deanna says
Fantastic – love them!
Darcy says
They look sooo AWESOME, guys!! I am totally in love with them! Honestly, I thought you were crazy when you first talked about painting them, but you made me a believer!
That color is just perfection, and I love how it ties into the built ins! love, love, LOVE!
Also, I must add that I am with all the other pp about keeping the pops of color in the kitchen – Its just so you guys – the all white just wouldn’t feel right!! just my 2 cents! xoxo
YoungHouseLove says
Aw thanks Darcy!
xo,
s
Sherry from BC says
The chairs look fabulous…..I do love turquoise. Really sets off the room. I have never used a deglosser. I have to spray my wicker chairs which are on my back porch. They really need a pick me up and I have been toying with a dark turquoise. Should I use a deglosser on them?
YoungHouseLove says
It never hurts and doesn’t take too long- I would do it just to get off any outdoor grime that might not help your primer/paint stick!
xo,
s
Sherry from BC says
Thanks for the tip. I will try it out.
Lisa@ wanderdownpennylane says
Love, Love, Love! Of course, I was on the paint them train so I may be biased.
I was just wondering if you guys were doing any veggie growing this year? We tried potted veggies on our deck this year since we have a shady yard and its working well so far.
http://wanderdownpennylane.blogspot.com/2012/06/summertime-changes.html
YoungHouseLove says
Ugh, I wish! We have just been farmer’s marketing it up instead. Feels like we missed the boat on planting stuff this year but we’d love to make raised beds next year!
xo,
s
Elizabeth says
Looks amazeballs!!
Nicole says
You picked the perfect color! They look absolutely great in the kitchen….now what to do about the dining room chairs?
YoungHouseLove says
Haha, I know, right. Someday I’ll make those chairs say my name.
xo,
s
heyruthie says
LOVE them! although I’m kinda wishing you’d tried taping off the brown seat part first, and painting the rest–just to see what that would look like. i kinda liked how the brown seat tied in with your ORB accents in the kitch. but you can always ORB the seats back to brown! LOL!
Skittle says
Love them! I just bought that SAME color last week to paint our bathroom light fixtures! I’ve painted all sorts of stuff: a 62″ gilded mirror “rich plum,” a dollar store plastic vase bright orange, a bamboo tray from Goodwill that had a pineapple painted on it is now hot pink, a little gold rack is now curing as bright yellow & will hold a green chevron blanket when it’s done. We bought a cool vintage floor lamp that is already red but needs a minor repair with some JB Weld, so it will get a new coat of red soon. I was given what I lovingly refer to as “the ugliest frame ever” & painted it a turquoise/blue & will be making it into a display board for my daughter. I bought a broken mirror at a craft store (is that bad luck?) because of the pretty scroll-y frame & painted it “key lime” & have some fabric to put in place of the mirror (IF I can ever find my spray adhesive). Next up are some owls from Goodwill that are a hideous red & gold at the moment, but NOT FOR LONG!! :)
YoungHouseLove says
Haha, I love it! You’re a busy woman!
xo,
s
Naomi says
The color is amazing :)
? Naomi {Starry Eyes + Coffee Cups}
Melissa says
I absolutely love them! I admit that I was not crazy about how they looked unpainted. (I think it was the seat.) This is just fresh and fabulous, and the view looking onto the sitting nook is especially gorgeous. I’m now more than ever jealous of every other city in the country having access to spray paint except for Chicago! That color is perfect, but there is no Lowe’s outside of the city within decent distance.
Also, I must comment that the different in photography between the before/progress photos and the finished shots in this post is astounding. (Hopefully taken by the same person, so as not to offend one of you.) Not only do the colors appear to be more true to life based on how you’ve described the kitchen wall color in the past, but the focus is interesting and perfect, especially in the close up shots.
YoungHouseLove says
Aw thanks Melissa! We’re slowly but steadily learning how to use this camera of ours! Haha.
xo,
s
Heidi says
Great color choice. You guys are wonderful! I look forward to reading your blog every day. I can’t wait to see how the new deck turns out.
stephanie says
These look fantastic! I LOVE the pop of color!! Have you guys ever spray painted a plastic or laminate surface?? Any tips?
YoungHouseLove says
We have sprayed a plastic lawn chair (with spray paint that specifically said it worked with plastic outdoor furniture) and had pretty good luck with that. Hope it helps!
xo,
s
stephanie says
Thanks!!!
Alan says
love the color!! looks great!
Amanda says
Love how they turned out! Especially the view from the dining room. For some reason I was really liking the idea of them being the plum in Sue the Napkin, but I love the color choice now.
Donna says
I had been rooting for a bright daffodil yellow, but this blue is so fresh! I completely love it. Your kitchen looks like such a happy space!
Jenny says
How do you decide whether to use spraypaint or regular paint? I could see spraypaint as being the logical (only?) choice for something like these, because they’re metal and it takes so well to metal. But what about wooden pieces? Is there a rule of thumb? Thanks!
YoungHouseLove says
Yes! Exactly. We use spray paint for metal almost always (it takes so well with the proper prep work) and with larger wood items (armoire, bed frame, cabinets, a desk) we use a foam roller with primer and paint- just since it’s easy for giant pieces to get drips and not look as seamless as thin coats with a roller.
xo,
s
Rebecca in NC says
You did an awesome job. They’re so happy!!
Jen@The Decor Scene says
OMG that is the perfect color. Love it! I was going to start looking for a turquoise/teal-ish color so I can spray paint my outdoor ugly white plastic chairs. This would be the perfect color to go with our gray pavers. I really love this color in your kitchen. GORGEOUS!!!
One question, have you ever painted white plastic chairs? Do you think I need to sand, prime and paint or just wash of dirt, prime and paint them? I’m a spray paint virgin. :( I know that is crazy for you guys to hear, but I’ve never used spray paint before. haha!!!
YoungHouseLove says
I’d get spray paint made for plastic and you should be golden with just that unless it tells you to sand or prime (plastic is a different beast than metal). Hope it helps!
xo,
s
Jen @ The Decor Scene says
ok didn’t realize they had spray paint just for plastic. Thank you. :) Hopefully they have some pretty colors for plastic spray paint. ;)
Linda says
I did my first real spray paint just a few weeks ago, thanks to YHL. I had an old white plastic (resin) outdoor table. I got the Rustoleum spray paint for plastic, etc – http://rustoleum.com/CBGProduct.asp?pid=178 – and my mantra was thin and even coats, keep that arm a-moving, as I tried to channel my inner Sherry. It worked!!!! I just washed my table off as well as I could, and sprayed.
YoungHouseLove says
Yay! So glad!
xo,
s