Truth: Sherry was oddly into fan hunting and the idea of adding two new fans to keep our freshly-opened sunroom cool (and to create a nice mosquito-warding-off current while we’re out there relaxing), but I was NOT excited about said fans.
We actually have quite a bit of practice removing fans (I submit to you Exhibits A, B and C) – and just look at how happy it made me.
Generally we’ve had 7.5 to 8′ ceilings in most rooms with them, and being 6′ tall, I’ve always felt like they were low-hanging oversized pinwheels that were one inch shy of giving me a haircut – although we’re suckers for function, so we’ve always kept a few around wherever they were especially useful (we kept them in the sunroom and den of our first house, and the sunroom and guest room of our second house). In other words, a few got to stick around, but we’re not really in the practice of adding to our total-house-fan-number, if you know what I mean.
This is actually the first time we’re increasing our count, by going from one out here to two thanks to this wiring that we had done after we ripped out the ceiling. We knew two fans would more efficiently cool the space (and make mosquitoes say “ain’t nobody got time for that”) and thanks to the freshly lofted ceilings we hoped the fans wouldn’t feel too low-hanging or heavy. But the thought of installing new fans STILL wasn’t something that my brain could get excited about. So it settled on assuming the task would be difficult and the results would be underwhelming. Awesome attitude, self.
After looking everywhere from craigslist and thrift stores (it was hard to find two of the same kind secondhand) to more obvious places like Lowe’s and Home Depot, we settled on this model from Home Depot (which we found to have a better fan selection in general, by the way).
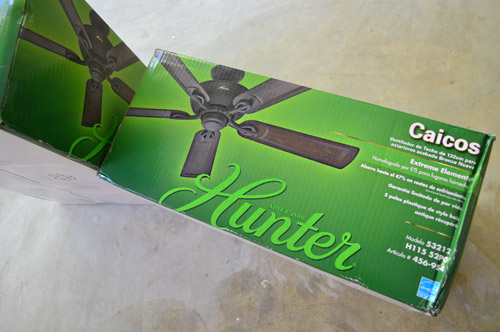
They were $119 each, plus a $10 downrod that we had to add to each of them since our ceiling is lofted. You may be surprised that we didn’t buy white fans, but with so much lightness in the ceiling area already we thought something dark would add some nice contrast and play off the dark floors (once they’re tiled).
Beyond just looks, we also had to be sure to buy something that was safe for use outdoors and that could be installed on an angled ceiling.
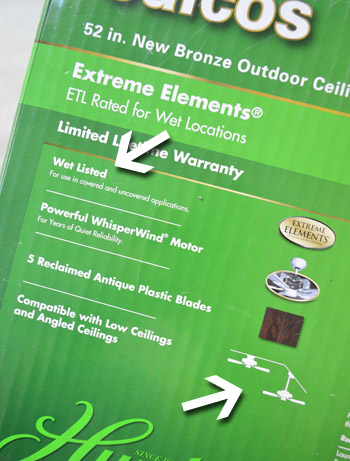
They’re not shown here on the box, but we also checked with the store associate to make sure it was compatible with light kits (check) and remote controls (double check) in case we wanted to add either of those things down the line (we’re currently planning to add sconces on the columns around the room for softer eye-level lighting instead).
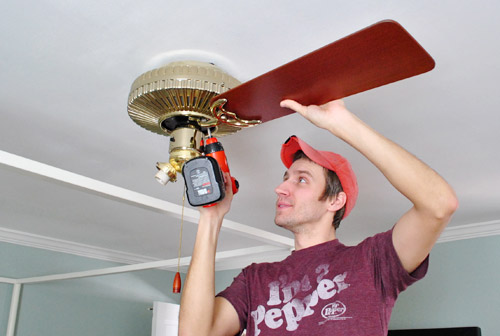
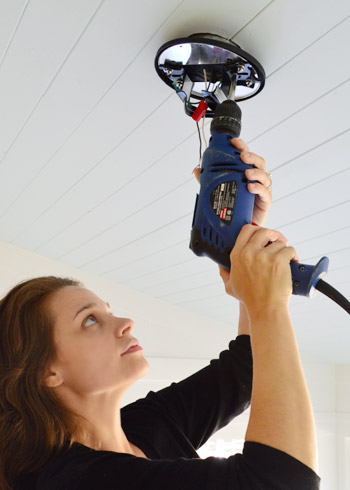
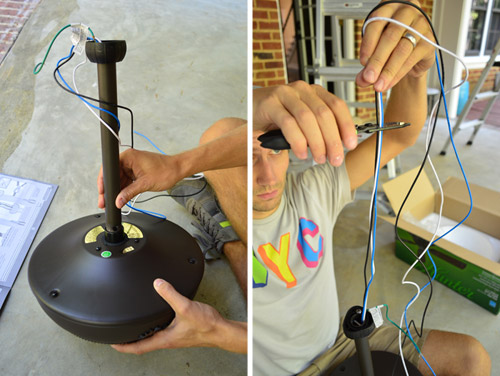
Before diving into installing each one – a task I was certain would involve a few missteps and lots of upper body strain – we made sure the power was off, both at the breaker and the light switch. And then Sherry still insisted on triple-checking things with our little live current tester (sometimes outdoor wiring can be tricky – for example in our first house a few outdoor things got power from a shed way back in the woods).

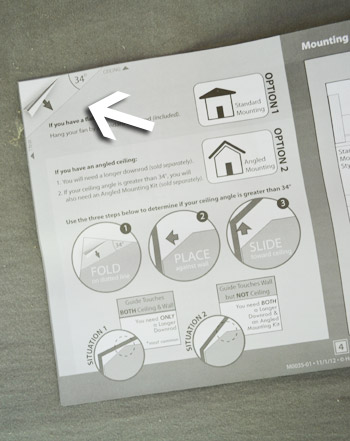
Before I go further, I should be clear that Hunter doesn’t know us from Adam and certainly isn’t in cahoots with us or this post. So the gushing I’m about to do about their instructions is purely because, having dealt with plenty of sub-par instruction books in my day, it makes me downright joyful when I encounter a manual that’s well done and easy to follow (like the one for our Nest thermostats). For example, this manual included a section for double-checking that your ceilings aren’t too angled for the fan to be compatible. They even marked the corner of the page so you could fold it down and hold it against your ceiling to check the angle and be sure. So simple. So smart. Maybe this install wouldn’t be so bad after all?
Another little ingenious touch: the hardware was separated into different bags and labeled by step with a unique symbol that the manual referenced whenever it was time for that particular batch of parts to be used.
![]()
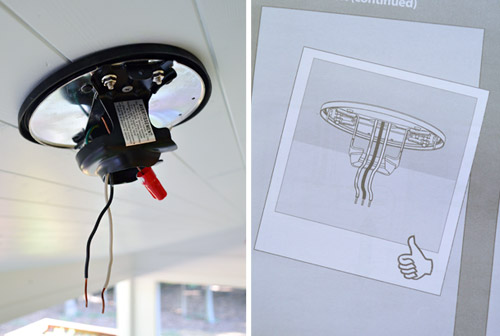
Obviously you’ll want to consult the installation instructions for your fan since they can vary, but for anyone else who is tackling a fan installation, we wanted to cover the general process for you – especially since it was something we had never done before (and I was convinced would suck). Our first task was to assemble and install the mounting bracket to the fixture box. This is basically what secures the fan to the fixture box, which needs to be braced properly for the weight of a fan. The good news was that the electricians took care of that bracing step for us when they added the two fixture boxes, so we just needed to secure the top of the fan to our already braced box.
I also liked how the instructions gave you a thumbs up at the end of each step. Nothing like a big confidence boost from a little hand icon.
The next part was actually what I was most anxious about – adding the downrod. This was where we had to modify the parts included with the fan (i.e. sub out that nubby rod with the longer one) so that ours would drop down from the ceiling a bit. For some reason I assumed this would be the point I’d screw up.
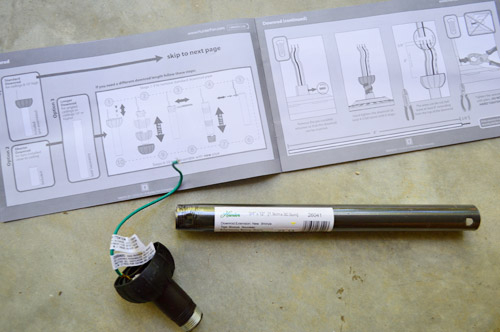
But once again, the instructions made it error proof. Basically we just removed a couple of screws and stuff from the rod they included…
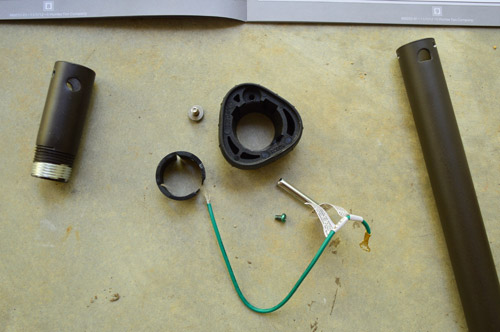
…and reattached them to our new one.
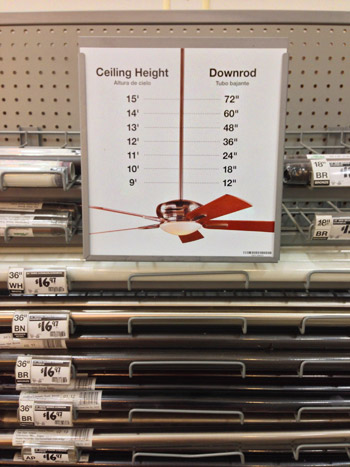
Oh, and if you’re wondering how we knew what sized downrod to buy: Home Depot had a guide on display along with all of the differently sized rods. Our ceiling was a little over 9ft at that point, so we got the 12″ rod.
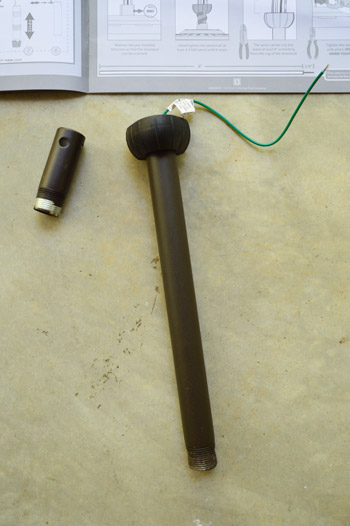
The fan had tons of extra wire, so it was just a matter of threading it up through the longer rod.
Then I attached the rod to the fan (it twisted in and got held in place by a screw) and I clipped most of the excess wire off.
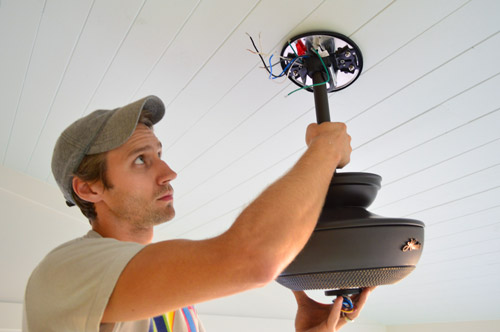
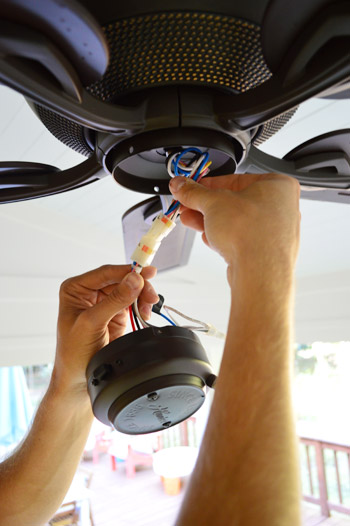
Even this part – where I expected to be exhausted by meager upper body strength while holding the heavy fan up for hours minutes to get it in place – was no big deal at all. The little ball at the top of the rod slid into the mounting bracket with virtually no effort and within seconds my arms were free. Seriously, it was a motion that took ten seconds tops. Well, except for the added time that was required to pose for this picture (it took me a few tries to nail the “focused, but not too strained” look that I’m sporting).
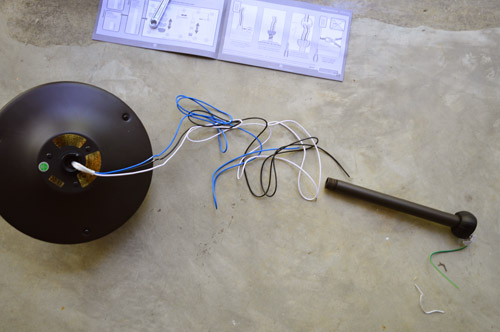
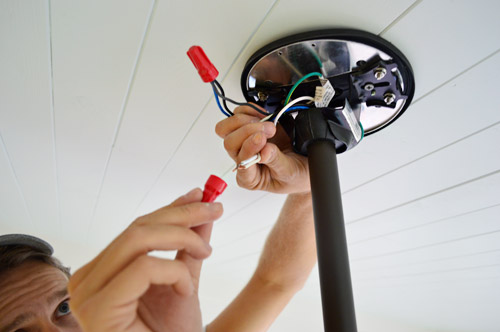
With the mounting bracket doing the work of holding the fan up, it didn’t strain me at all to connect the wires (and the instructions were very clear about what color went where).
And then while I screwed the canopy in place…
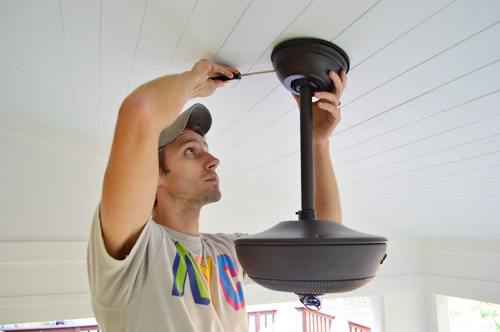
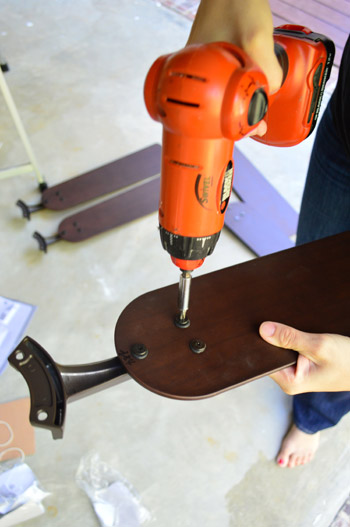
… Sherry got the fan blades prepped by adding rubber washers and screwing them into each of the five metal arms.
Then up those went, finally making this fan look like a fan.
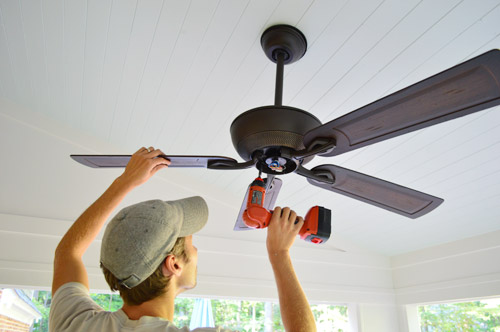
Last but not least was installing the cap at the base which is where a light kit could go eventually, if we ever decide we want one (hence all of the wires that get tucked away in there).
As much as we wanted to sit back and celebrate our first-fan-ever-installed victory, there was the minor detail of getting the second one up. The first one took us a bit longer because of instruction reading and photo taking, but I still think we got both fans up in about 90 minutes. Zero missteps. Minimal arm strain.

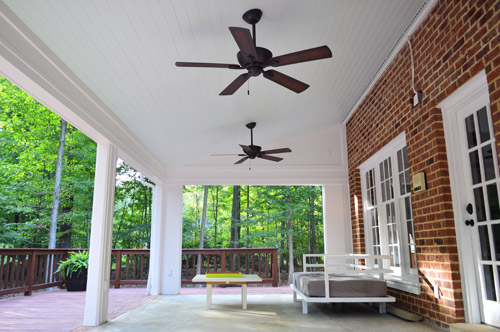
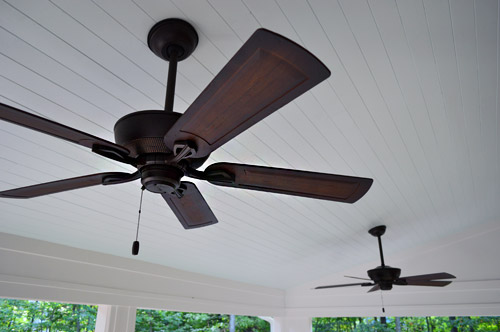
And, here comes the real shocker, we LOVE them. I didn’t know my heart had such a great capacity for loving fans, but I couldn’t stop smiling once they went up. Maybe it was knowing that it marked the end of working above my head for a while? Or maybe it was just how finished they made the room look (assuming you kinda held your hand over the lower half of this photo). But seriously, picture them with the dark slate-like floors that we’re putting in. Not bad, eh?
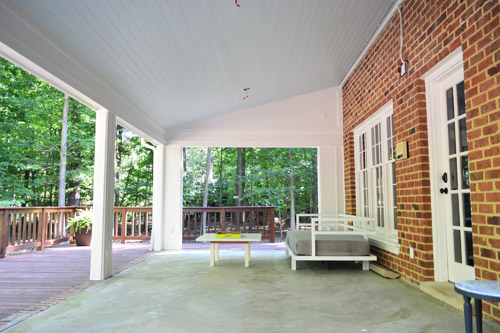
I think they’re just one of those “moments” in DIY that really hit home how far a room has come. From this…
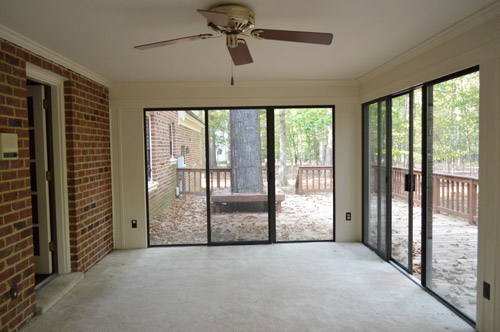
…to now this.
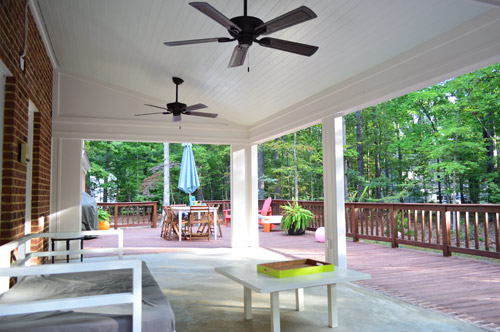
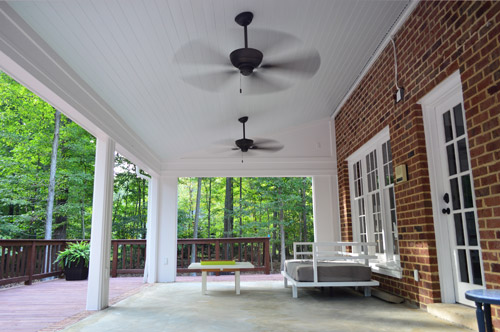
We’re also relieved that our instinct to go dark with the fans was one that were really happy with. Sunny spaces like this can usually use some contrast, and these fans are finally giving the light blue ceiling and all of that white trim a little pow, if you know what I mean.
Now, if only we had finished this project about a month ago when their cooling action was actually still needed. Oh well, at least it gives us something to look forward to for next year.
New truth: I’m crazy excited to have our fans installed in the sunroom.
Secondary truth: I have no idea why the ceiling looks so light/not-blue in these photos (see the first picture of this post for a more accurate color depiction). Or just ignore the ceiling and keep oogling the fans.

mp says
I love ceiling fans. I’ve added them to both my houses in every room but the bath. I was so pleased this house already had one in the kitchen.
Now for bad directions, how about none: this past weekend I unpacked a cabinet I bought at Lowe’s for bathroom storage, and it didn’t have a single sheet of instructions. Not even a couple of sentences on the side of the box. I’m afraid to Google the company and then find out they don’t provide directions, just expect you to magically assemble the cabinet from your basic intuitiveness.
YoungHouseLove says
Oh man that stinks!
xo
s
Sarah says
The whole room looks beautiful! I can’t believe the difference, nice job. The fans are the perfect finishing touch. I saw a couple comments about curtains – breezy white ones are just what I can picture in that space! That and a beach just beyond them. :)
Pam says
I love the fans. You might want the light kits if you could use a dimmer switch so they’re not so annoying bright….
YoungHouseLove says
Smart!
xo
s
JessicaL says
Ooohhhhh, I like them a lot! Gorgeous. I can’t wait to see the finished product with the new floors. My “Ooohhh” with have a lot more “O’s” in it I’m sure!
Becky says
I share your joy! We just added a fan to our outside living room, and absolutely LOVE it. Our room is all pine interior, so we went with a lighter fan. But your dark one really pops. Way to go!
Marc says
I love outdoor fans too. I made sure that mine was an outdoor fan and not just a regular ceiling fan. The blades on many “regular” fans are a composite material that absorb moisture from outside and then “droop”! I drive past two homes near me with sad, drooping fans and think to myself that my extra $50 was well worth the cost.
Yours look great! I love the new outdoor room, and, of course the whole blog.
YoungHouseLove says
So smart! I hope ours are like that too since it’s made to be outside! Will keep you guys posted!
xo
s
Daniella says
My hubby (6’5″) and myself (5’12”) loving refer to the ceiling fan at my in-laws house as the “decapitator” ;)
YoungHouseLove says
Best name ever!
xo
s
Victoria says
When you said you were going with dark fans I thought ‘Oh No!”
Well, as usual, you were right. The beautiful brown against the blue ceiling and the white walls and brick is perfect. In fact, I am now “stealing” this idea for my front porch. I have long wanted to paint the ceiling light blue (Southern tradition) and install ceiling fans. The house is brick and the trim is white so your “scheme” will look wonderful at my house. Now if I can work up the ambition to “get ‘er done!”.
Thanks for always being informative and inspiring.
caroline [the diy nurse] says
Boom. It makes the room. You can stop now. I am pleased.
Catherine says
When I started reading my first thought was ‘in 3 houses they’ve never installed a fan!?’ Here in FL we have fans in every room except the kitchen and dining (no one likes cold food!) and we’ve installed every fan in both of our houses (to a total count of 10!) They are a necessity here. :)
I do love the look of the dark fans with light accessories! It’s looking so nice!
Vane says
Great read! John your POV had me cracking up!
And congrats to you and miss barefoot&preggo!! To health and easy instructions!
Alexandra says
I am cracking up the the box says the blades are reclaimed antique plastic, that would be recycled plastic right? and i didnt know plastic could be antique, lol.
this room looks amazing, you guys did a great job! and the fans look awesome.
Kari says
Looks great! Any plans to revive or remove the old school intercom? It’s too bad that they put one in the outdoor brick work!
YoungHouseLove says
We’re thinking about either converting it to an outdoor-safe sound system or just removing it and capping it. Will keep you posted!
xo
s
Jaz says
Wow! Looks sharp! Can’t wait for the tile…
We enjoy the energy efficiency and comfort aspects of ceiling fans, so it is great to see some here. You will LOVE them!
Amanda says
Longtime lurker … finally commenting to say I am so jealous your first ceiling fan installation went so smoothly. I installed two in my did-it-herself condo renovation earlier this year and swore they were harder than an Ironman triathlon (which I have done) or childbirth (which I haven’t done, but I’m pretty sure sucks). Those instruction manuals look amazing. Thumbs up to companies who care enough to make good ones! And your sunroom is making me wish I had a sunroom :)
Lora says
I love the fan on our covered patio. I live in Alabama, so a fan is required from March until November. Our outdoor fan does have a light kit included, but we do not keep lightbulbs in . Bugs are drawn to the light but then they get sucked in by the fan blades. Next, you have critters being shot out in all directions. I hated being pelted with creepy crawlies!
Petra says
great fans! But where did the tile go we learned about a few posts back??
YoungHouseLove says
We mentioned in Monday’s tile post that we had done the fans first (so before we started tile work) but were just posting them out of order. Sorry for the confusion!
-John
Kirsten says
You guys made a great choice with the fan colour and style! I really like the look and think that the floors will totally complement the fans.
Rosie S says
I personally LOVE ceiling fans, and wish I had more of them here in MINNESOTA! Hardly the South! :) I love them for just keeping the air moving. Makes such a difference! We have a Menard’s (home improvement)chain here in the Midwest, and occasionally they put some great Hunter fans on sale for $88. We even installed one in our last garage for THAT price! Love that you went dark too, we had all white, and I was forever cleaning the leading fan blade edges. Sure, the dark still gets dusty, but at least you don’t see it as much! Happy cooling!
Tami says
Sherry! You are just too sexy with that power tool in your hand! :D
Love the new outdoor porch.
– just a mom in Chicago
Elizabeth says
I noticed there’s no light kit on the fans, do you have alternate lighting for this space? Just curious!
YoungHouseLove says
We’re planning to try hanging outdoor sconces on the columns around the room for eye-height lighting, but if those flop or we can’t get them in these fans can have light kits added to them, so that’s our backup plan.
xo
s
Katherine says
I have a great tip for you I discovered while building our house. You can buy lowes coupons on eBay! They are seriously amazing y’all! They are a couple of dollars each usually and are for 10% off at lowes and they will also accept them at Home Depot. The 10% can really add up to big savings on large projects! Love y’all’s porch!
YoungHouseLove says
Never knew that!
xo
s
Miyu says
I love this idea of lofting the ceiling and adding fans!! I have a side porch, but I am TERRIFIED of looking what’s behind the ceiling (our house is a tudor style home with a very curved roof… see my website for some pictures) but a higher angled ceiling would do wonders in the space. Were you guys scared of what you were going to find? Also — any plans to add outdoor curtains? Those make the space so incredibly home-y!
YoungHouseLove says
Yes, we were so scared but it was so worth it! We started by pulling down one rectangle of ceiling just to poke around. And as for outdoor curtains, yes, we’d love those during the furnishing phase!
xo
s
Abbey says
Have to admit when I saw you removing the structure of that space I was all, but they’ll be eaten alive!! But this looks amazing and seems like a good mosquito repelling solution. Can’t wait to see more!
Nolanova says
The before to after is just UH.MA.ZING! It gives me hope that if I put some effort into my home I could go from frumpy to wow too.
Thanks for the motivation!
Melissa says
Just saw these on sale at Menards for $89
YoungHouseLove says
NO WAY! Thanks for the tip! Wish we had one here in Richmond!
xo
s
Kim says
I was interested in seeing your list that you cross things off of for this project. And not to be pushy, but when’s that luxe fire place going up? Lol
I love ya guys!
YoungHouseLove says
Haha, we’ll have to add that list into the next post! As for the fireplace, that’s a down the line thing (it’s not in our budget for this phase, but maybe next year?).
xo
s
Lynn says
We are considering a fan for our gazebo, but may try something with a light on it. Any ideas on lighting yet? Looks awesome! :)
Lynn says
PS: We have an indoor/outdoor sound system that the hubby installed in our garages, porch, main living spaces and our bedroom as well as the backyard…TOTALLY worth it! :)
Lynn says
…we also had a sound system installed in the house/backyard…totally worth it!
YoungHouseLove says
Sounds awesome!
xo
s
YoungHouseLove says
We’re hoping to add outdoor sconces to those columns for some eye-height light (instead of overhead light) but if that doesn’t work we’ll add a light kit to the fans (they’re compatible).
xo
s
Trina @ Let's Just Build a House says
we have a fan on our covered deck and we LOVE it. best choice ever. We spend so much more time out there with the nice breeze from the fan on us!
and your two look GREAT!
thelady says
Excellent timing! I’ve been debating for a month on outdoor ceiling fan versus standard flush mount light fixture for my front porch in Baltimore.
I’m originally from the Midwest so the idea of an outdoor fan seemed strange to me. Kind of comforting that you guys are not that far away geographically and also installed outdoor ceiling fans.
My contractor suggested the fan since there is a sconce light next to the front door making the porch light redundant. After much searching I finally found an outdoor oscillating ceiling fan I really like.
http://www.homedepot.com/p/t/203245545?storeId=10051&langId=-1&catalogId=10053&productId=203245545&R=203245545#.UlhAj3d3d8E
Kind of comforting that you guys are not that far away geographically and also installed outdoor ceiling fans.
YoungHouseLove says
That one’s so charming! I love it!
xo
s
Susann says
Great job, you two! Looks terrific and I bet will be so comfortable next summer. I’m always so impressed by your improvements (and the work involved).
Nikki H says
I love the contrast of the dark fans with the light ceiling and trim. Y’all were right! They look lovely.
Gabi says
Your hair is *gasp* down! The room looks awesome!
Teresa says
And the two fans (and the doors being gone
And the roof being raised–I mean ceiling) make the space look huge
In comparison to the one fan. :) love the dark fans against the light room!
Hilary says
The dark fans look awesome!
Manda Wolf says
Looks really good. I love the dark fans against the light ceiling. I think you guys should have splurged and got the fans that can also heat a room that way you could enjoy the outside even when it is a bit nippy out there.
YoungHouseLove says
We’re planning to add a fireplace down the line so we hope to fire that up and stay cozy.
xo
s
rachel says
looks great keep up the good work your passion is huge!
lee ashley says
Ok, so I’m a little late to the party here. Was on vacay in Charleston, SC and Savannah, GA with the hubs. Your porch looks awesome!
Along the way, I learned a cool historical fact…the light blue ceilings you’re seeing on porches come from 2 sources. Originally it was believed that evil spirits could not cross water. So, if you could fake them out by having these outside your house. The other theory was that birds/bugs/etc. would be less likely to nest since they thought it was the actual sky. At any rate, we saw LOTS of blue ceilings around Charleston. With oil-rubbed bronze fans, of course. :)
YoungHouseLove says
Love those theories! So much fun!
xo
s
Minnie says
At first I thought dark fans would look absolutely terrible in there, but they look great! It really adds a nice finished look to everything.
Andrea says
Yep. The dark fans against the light walls are magical.
Amanda B. says
Great choice on the fans! They look awesome, and my electrician father-in-law says “Go Hunter or go home.” After his long experience they are the best for function and durability. I am so digging this sunroom.
angela says
Are you doing any lighting out there? Are the fans adaptable?
YoungHouseLove says
Yes, we can add a light kit to them if we need to but we’re hoping to add four outdoor sconces to the columns around the room for more ambient light (instead of overhead light).
xo
s
Gretchen says
I just went back to look up this post to see what type of fan you guys put in outside. Are you still happy with them? I need to replace the 2 on our porch outside, and wondered if they have been working well and if you are still happy with your choice.
Congrats again on Teddy’s arrival and I hope that you are all doing well!
YoungHouseLove says
Yes, still very happy with them!
xo
s