Truth: Sherry was oddly into fan hunting and the idea of adding two new fans to keep our freshly-opened sunroom cool (and to create a nice mosquito-warding-off current while we’re out there relaxing), but I was NOT excited about said fans.
We actually have quite a bit of practice removing fans (I submit to you Exhibits A, B and C) – and just look at how happy it made me.
Generally we’ve had 7.5 to 8′ ceilings in most rooms with them, and being 6′ tall, I’ve always felt like they were low-hanging oversized pinwheels that were one inch shy of giving me a haircut – although we’re suckers for function, so we’ve always kept a few around wherever they were especially useful (we kept them in the sunroom and den of our first house, and the sunroom and guest room of our second house). In other words, a few got to stick around, but we’re not really in the practice of adding to our total-house-fan-number, if you know what I mean.
This is actually the first time we’re increasing our count, by going from one out here to two thanks to this wiring that we had done after we ripped out the ceiling. We knew two fans would more efficiently cool the space (and make mosquitoes say “ain’t nobody got time for that”) and thanks to the freshly lofted ceilings we hoped the fans wouldn’t feel too low-hanging or heavy. But the thought of installing new fans STILL wasn’t something that my brain could get excited about. So it settled on assuming the task would be difficult and the results would be underwhelming. Awesome attitude, self.
After looking everywhere from craigslist and thrift stores (it was hard to find two of the same kind secondhand) to more obvious places like Lowe’s and Home Depot, we settled on this model from Home Depot (which we found to have a better fan selection in general, by the way).
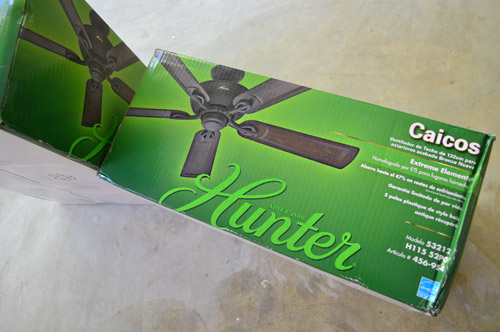
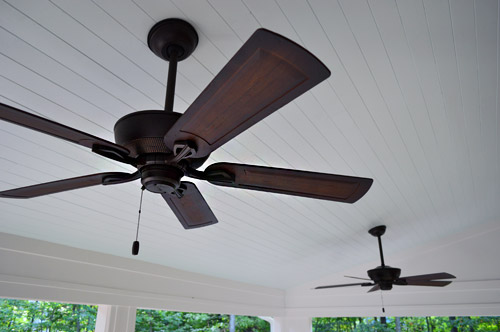
They were $119 each, plus a $10 downrod that we had to add to each of them since our ceiling is lofted. You may be surprised that we didn’t buy white fans, but with so much lightness in the ceiling area already we thought something dark would add some nice contrast and play off the dark floors (once they’re tiled).
Beyond just looks, we also had to be sure to buy something that was safe for use outdoors and that could be installed on an angled ceiling.
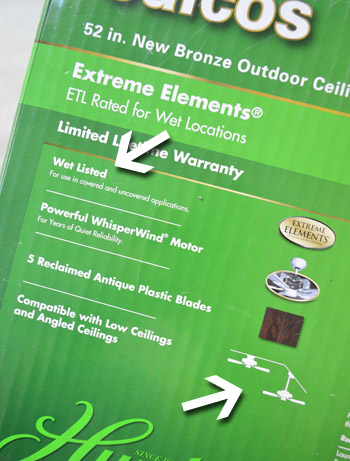
They’re not shown here on the box, but we also checked with the store associate to make sure it was compatible with light kits (check) and remote controls (double check) in case we wanted to add either of those things down the line (we’re currently planning to add sconces on the columns around the room for softer eye-level lighting instead).
Before diving into installing each one – a task I was certain would involve a few missteps and lots of upper body strain – we made sure the power was off, both at the breaker and the light switch. And then Sherry still insisted on triple-checking things with our little live current tester (sometimes outdoor wiring can be tricky – for example in our first house a few outdoor things got power from a shed way back in the woods).

Before I go further, I should be clear that Hunter doesn’t know us from Adam and certainly isn’t in cahoots with us or this post. So the gushing I’m about to do about their instructions is purely because, having dealt with plenty of sub-par instruction books in my day, it makes me downright joyful when I encounter a manual that’s well done and easy to follow (like the one for our Nest thermostats). For example, this manual included a section for double-checking that your ceilings aren’t too angled for the fan to be compatible. They even marked the corner of the page so you could fold it down and hold it against your ceiling to check the angle and be sure. So simple. So smart. Maybe this install wouldn’t be so bad after all?
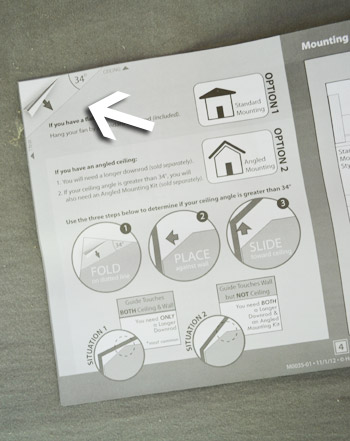
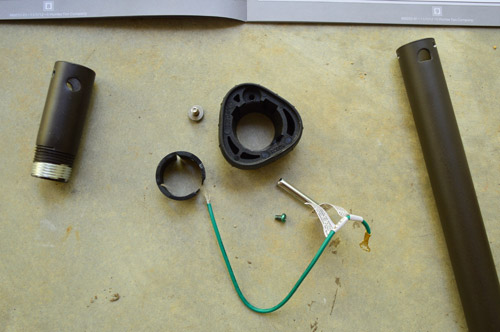
Another little ingenious touch: the hardware was separated into different bags and labeled by step with a unique symbol that the manual referenced whenever it was time for that particular batch of parts to be used.
![]()
Obviously you’ll want to consult the installation instructions for your fan since they can vary, but for anyone else who is tackling a fan installation, we wanted to cover the general process for you – especially since it was something we had never done before (and I was convinced would suck). Our first task was to assemble and install the mounting bracket to the fixture box. This is basically what secures the fan to the fixture box, which needs to be braced properly for the weight of a fan. The good news was that the electricians took care of that bracing step for us when they added the two fixture boxes, so we just needed to secure the top of the fan to our already braced box.
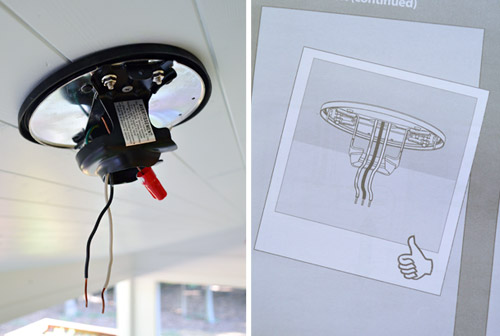
I also liked how the instructions gave you a thumbs up at the end of each step. Nothing like a big confidence boost from a little hand icon.
The next part was actually what I was most anxious about – adding the downrod. This was where we had to modify the parts included with the fan (i.e. sub out that nubby rod with the longer one) so that ours would drop down from the ceiling a bit. For some reason I assumed this would be the point I’d screw up.
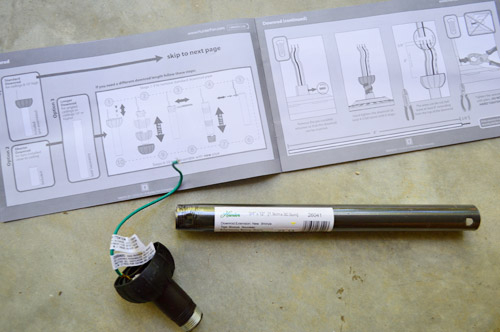
But once again, the instructions made it error proof. Basically we just removed a couple of screws and stuff from the rod they included…
…and reattached them to our new one.
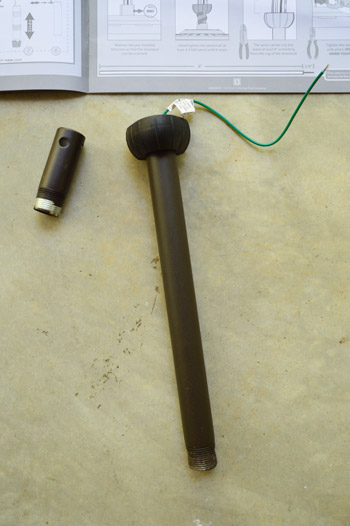
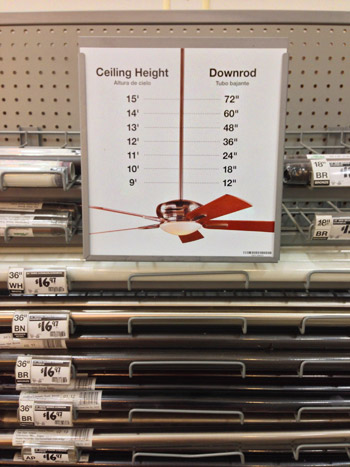
Oh, and if you’re wondering how we knew what sized downrod to buy: Home Depot had a guide on display along with all of the differently sized rods. Our ceiling was a little over 9ft at that point, so we got the 12″ rod.
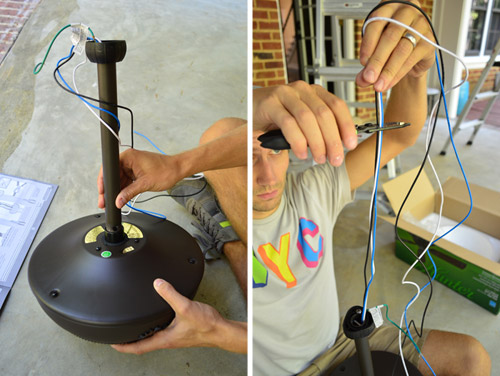
The fan had tons of extra wire, so it was just a matter of threading it up through the longer rod.
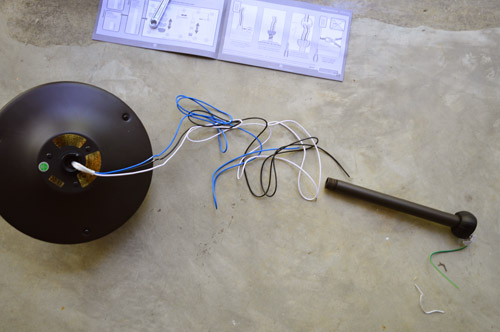
Then I attached the rod to the fan (it twisted in and got held in place by a screw) and I clipped most of the excess wire off.
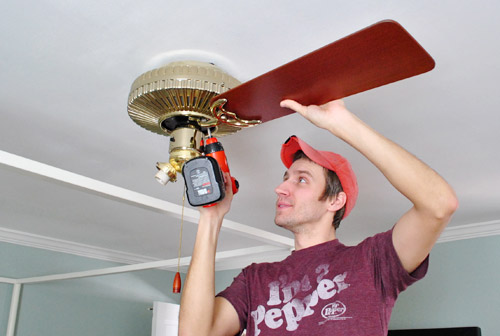
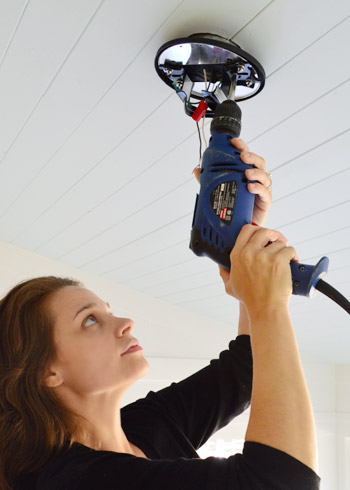
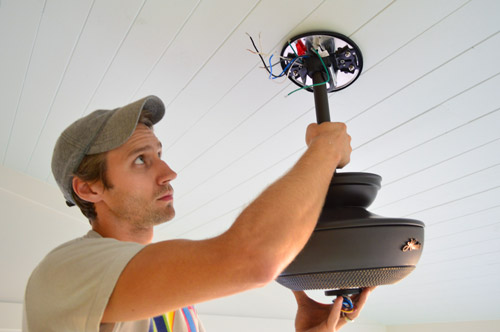
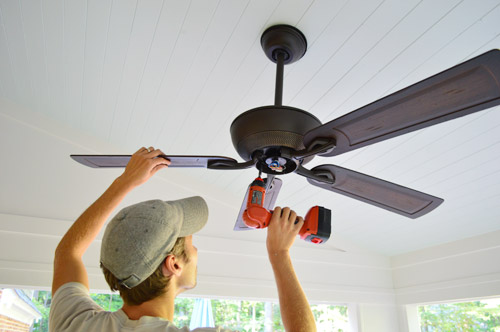
Even this part – where I expected to be exhausted by meager upper body strength while holding the heavy fan up for hours minutes to get it in place – was no big deal at all. The little ball at the top of the rod slid into the mounting bracket with virtually no effort and within seconds my arms were free. Seriously, it was a motion that took ten seconds tops. Well, except for the added time that was required to pose for this picture (it took me a few tries to nail the “focused, but not too strained” look that I’m sporting).
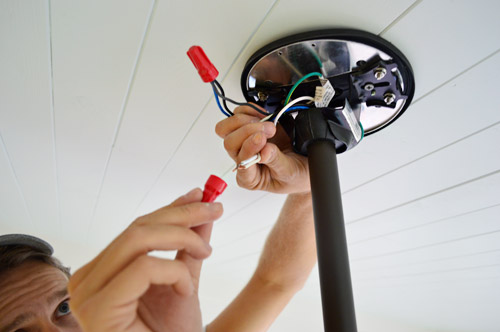
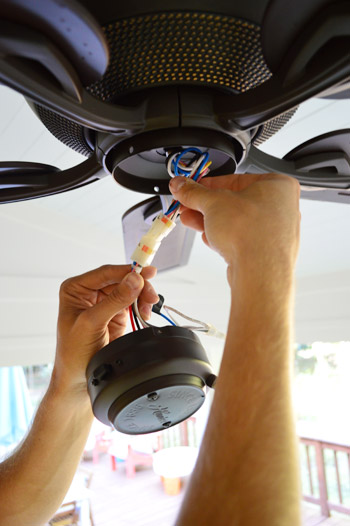
With the mounting bracket doing the work of holding the fan up, it didn’t strain me at all to connect the wires (and the instructions were very clear about what color went where).
And then while I screwed the canopy in place…
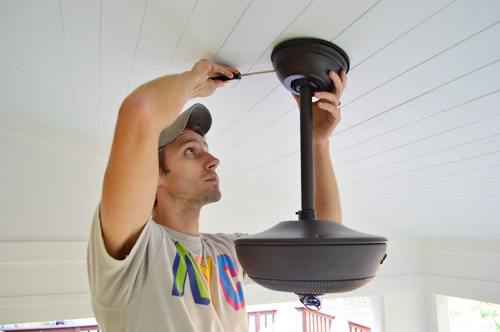
… Sherry got the fan blades prepped by adding rubber washers and screwing them into each of the five metal arms.
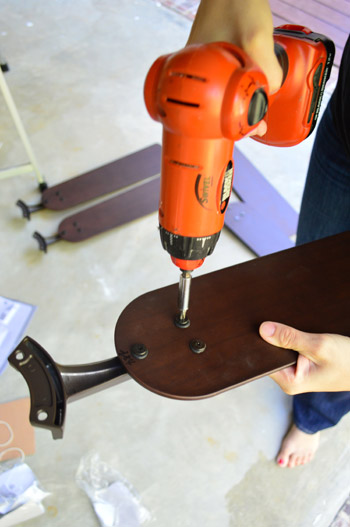
Then up those went, finally making this fan look like a fan.
Last but not least was installing the cap at the base which is where a light kit could go eventually, if we ever decide we want one (hence all of the wires that get tucked away in there).
As much as we wanted to sit back and celebrate our first-fan-ever-installed victory, there was the minor detail of getting the second one up. The first one took us a bit longer because of instruction reading and photo taking, but I still think we got both fans up in about 90 minutes. Zero missteps. Minimal arm strain.

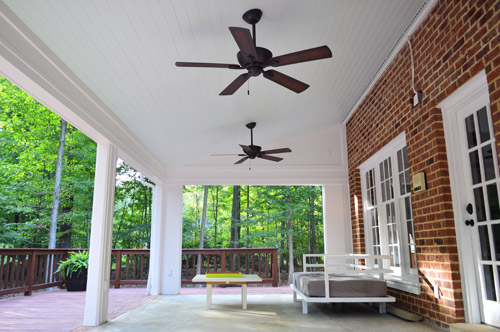
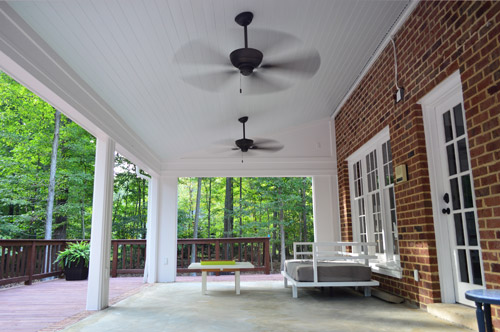
And, here comes the real shocker, we LOVE them. I didn’t know my heart had such a great capacity for loving fans, but I couldn’t stop smiling once they went up. Maybe it was knowing that it marked the end of working above my head for a while? Or maybe it was just how finished they made the room look (assuming you kinda held your hand over the lower half of this photo). But seriously, picture them with the dark slate-like floors that we’re putting in. Not bad, eh?
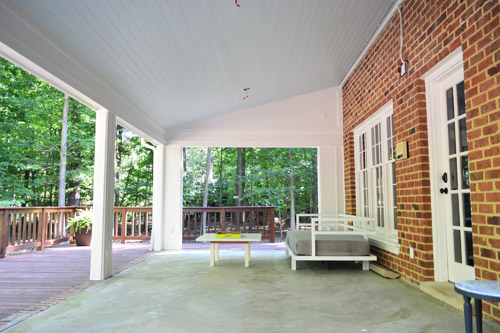
I think they’re just one of those “moments” in DIY that really hit home how far a room has come. From this…
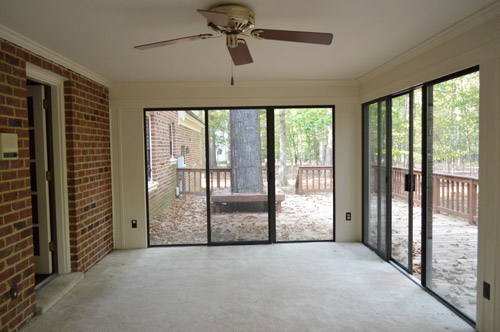
…to now this.
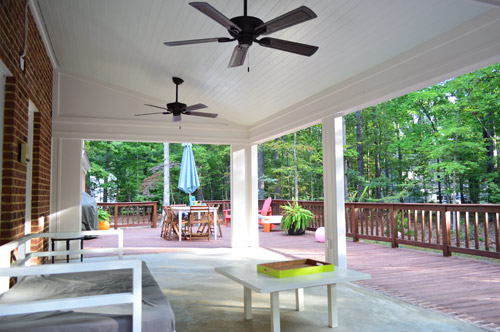
We’re also relieved that our instinct to go dark with the fans was one that were really happy with. Sunny spaces like this can usually use some contrast, and these fans are finally giving the light blue ceiling and all of that white trim a little pow, if you know what I mean.
Now, if only we had finished this project about a month ago when their cooling action was actually still needed. Oh well, at least it gives us something to look forward to for next year.
New truth: I’m crazy excited to have our fans installed in the sunroom.
Secondary truth: I have no idea why the ceiling looks so light/not-blue in these photos (see the first picture of this post for a more accurate color depiction). Or just ignore the ceiling and keep oogling the fans.

Megan says
LOVE THEM!! I’m a huge proponent of fans (almost said ‘a huge fan of fans’ but the pun hurt too bad) since my area has hot, dry summers. Could not survive the month of July without fans. The husband and I both agree that our next house needs to have an outdoor living area (yours is very similar to what we have in mind) so we can actually enjoy being outside during the hotter months. This summer, we had to hole up inside or suffer the sun’s wrath in our unshaded/unfanned backyard.
Meredith says
I’m a fan of the fans! And now, I’m totally going to be that girl and alert you to a few typos:
I think Sherry triple-checked that the power was off
Were really excited about= We’re really excited about
And (near the end) if you now what I mean=if you know what I mean.
Okay, that’s out of my system now. :) Love you guys!
YoungHouseLove says
Thanks Meredith!
xo
s
Bethany says
1) Is it just me or is Sherry the spitting image of Fiona Apple in the drill shot?
2)Gracias for choosing a dark fan. I loves me some contrast!
3) Thanks for your no-swag policy. I love getting your honest and unpaid-for opinions on things. Nothing kills a blog for me when I feel like their voice has been paid for.
YHL…best blog ever.
Love,
Bethany
YoungHouseLove says
Aw you’re so sweet Bethany! As for the Fiona Apple thing, that’s the first time I’ve heard that but I’m a crazy middle school fan (as in my screen name once was Carrion19 from that song of hers – which only later did I learn meant “decaying flesh” – oops).
xo
s
Kerry says
I think it’s funny that you (and another commenter) found a better fan selection at Home Depot. I found far more fans that I loved at Lowe’s. Weird, huh? :)
YoungHouseLove says
Funny! I wonder if it’s regional!
xo
s
Koliti says
At the end, I was hoping to see a pic of a smiling John underneath a fan with lots of head room & holding a tall glass of sweet tea! Thanks for taking us through the steps!
YoungHouseLove says
Haha, we’ll have to do that once the floor’s in and he’s celebrating his victory.
xo
s
rachel says
Cute! I’m not a huge fan of ceiling fans, but they are super practical in our house as we do not currently have central ac. (Hopefully coming, 2014, along with new light fixtures to replace all the ceiling fans!) But I would really love on our front porch.
Julie says
This looks sooooooooooooooooooo good!
Kate says
I would have initially gone with lighter/white fans, but you totally changed my mind now with seeing the dark fans against the light ceiling. Loving the contrast! Can’t wait to see the whole package once you have the tile floor installed and it furnished. It’s going to be a great place for you guys to hang out in. =)
Larissa says
I would have gone with white, too. But the dark looks so good. How do you know?!
YoungHouseLove says
I think we just had an instinct at the store when we were staring up at them that with the dark tile and the brick wall and the brown deck it might be nice to bring some dark color up since the ceiling and trim are so light.
xo
s
Julianne says
Looking good! Can’t wait to see it all together with that tile down. :0)
Liz says
Great update! I think you definitely made the right choice going with darker fans.
Danielle says
I’m a big fan of what you’ve done with the space, but I do have one question. Do you ever sit outside in the evening or at night? We love to use our outdoor space on summer nights. What will you do to light your new covered porch?
YoungHouseLove says
We’re planning to add some sconces to the columns for some eye-height lighting (and if that’s a bust we’ll add light kits to the fans).
xo
s
Ashley@AttemptsAtDomestication says
I love it! This makes me wish I had an outdoor space to decorate!! We really need to work on our patio this spring!
Amy says
I love fans…..useful and they can look good. These really seem to add and compliment the room/area. Nice contrast and it seems to ground the space:)
Sophie says
Long time lurker, first time commenter — I just have to say you guys really are the best. I love how much time you take to explain each step of the process, which is unbelievably helpful, because lots of times I read other blogs that just say, “we did this hard project, it was hard, but tada, we did it!” without any sort of explanation in between. Thanks for providing constant inspiration and amusement to a newbie homeowner!
YoungHouseLove says
Thanks for that Sophie! Sometimes when I’m droning on about something I figure it might bore some people, but if it’s helpful for another fan-fearer out there, then I’m glad to continue droning. Ha!
-John
LMN says
Maybe because we don’t have a deck and I want one. Maybe because you can actually go outside and not sweat to death in VA (i live in SC). Maybe because I LOVE ceiling fans (again, SC here). Probably a lot of all of these, but this room might be my favorite you’ve ever done. And it isn’t even finished yet. wowza, love it!
YoungHouseLove says
Aw thanks LMN!
xo
s
Lindsey d. says
Glad you are aboard the fan train! I think it’s the difference between upper and mid-south (where you are in Virginia) and deep south (where I am in Louisiana). I can’t imagine living WITHOUT fans. Summer heat and humidity would be too much to bear and my AC would be on constantly! So we have them in each bedroom, both living rooms and a great little Hunter stand up fan in the kitchen.
Installing fans is generally easy, unless you encounter the screw ups of previous DIYers, like the last fan we switched out. The previous owner stripped the screws for the mounting box so extremely that we had to get the Dremel from my fiance’s house (an hour+ round trip) to cut new slits into them to take them out. And since they didn’t properly wrap all the wires and nuts, everything was very rusty and a bit scary up there! But my fiance went crazy with the electrical tape, so we feel confident about the new installation (which only took about 45 minutes after the whole mounting box debacle).
TL;DR – I love a fan and installing them is generally pretty straightforward, barring crazy DIY of previous home owners.
Sarah says
They look fantastic! Love that you didn’t got with white here. These are perfect for the space.
I’m loving how this space is turning out, but I’m still confused about the indoor/outdoor aspect of it. Is the interior drywall (that’s now exterior) the same as what would be used to build an outdoor space, ie: is it made to hold up to elements and moisture the same as it would be if it were originally built as an outdoor porch? It really is looking fantastic, such a cool transformation.
YoungHouseLove says
All of the exterior stuff is actually plywood/framing lumber with exterior paint on it (we think this was a screened porch when it was first built and the glass doors were added later, so it’s all outdoor/weather-safe material). Drywall definitely wouldn’t have held up outside so we would have had to sub it out for plywood and other outdoor-safe stuff (with exterior paint and caulk to keep it sealed up) so we’re grateful it was sort of already set up for us!
xo
s
Lynn @ Our Useful Hands says
I love the action shot at the end. I was hoping it would all work out and that the last sentence of the post wasn’t – “I flipped the switch and womp, womp nothing happened.” It looks so nice guys! I agree that HD has a much better selection. We have local fan shops here but their prices are outrageous! (Did I mention I was waiting for you guys to tackle your fans before we dove into ours? haha. Nothing like having guinea pig interweb “friends”!)
My best, Lynn
YoungHouseLove says
John did forget the part where he flipped the switch and nothing happened and we both looked at each other in horror and then he said “whoops, wrong switch” and I nearly lunged at him. It was hilarious after I stopped profusely sweating.
xo
s
Amanda says
“5 reclaimed antique plastic blades” . . . what the what?
The whole space is looking pretty amazing.
YoungHouseLove says
Hahaha! Didn’t even notice that description on the box! It’s both hilarious and highly confusing.
xo
s
Lesley says
I knew I couldn’t be the only one who noticed that. What is “reclaimed antique plastic”?
Apparently we aren’t the only ones confused, there were a LOT of hits for “how old does something need to be to be considered antique”, and the answer is:
“In purist terms, and according to the U.S. Customs Service, an antique is an item with at least 100 years of age under its belt.”
Plastic itself is not that old so the Hunter folks are overly optimistic in their description.
In the end I do love the “reclaimed antique plastic” look of your fans. I can almost see them with the darker shades in the brick and the gorgeous tile floor.
YoungHouseLove says
Haha! I wonder how that got through the whole legal claims department? I feel like “antique-look” or “for that antique feel” would have sailed through though!
xo
s
Katy says
As a Florida native and resident, I cannot imagine life without fans so I love to see that you’ve not completely written them off. :) I truly appreciate the power of the fan, so I’m excited for you (but I also love to see the beautiful light fixtures that you use to replace your fans)! They look amazing and I love the dark contrast especially. I’m glad it was a simple installation and that you’re happy with them. I can’t wait to see the tile!
Katy says
PS – Your before and after comparisons are like DIY porn. Keep ’em coming and (as always) thanks for sharing!
Alice says
Anyone else laughing over the “5 Reclaimed Antique Plastic Blades”?? Just where are they reclaimed from?
I’m picturing an old barn made of plastic faux-wood planks :)
YoungHouseLove says
Haha! Yes! Amanda just mentioned that and I didn’t even notice that description on the box! It’s both hilarious and highly confusing.
xo
s
Allison says
This space is looking so great!
We’ve been pretty happy with Hunter fans, although we had one major snafu with the one we replaced in our upper living room. It’s a large fan since it’s a big open space and we installed it on our angled ceiling. The screws that came with were very undersized, but we thought they maybe had enough bite to them still. An hour later we found out we were so very wrong when we heard a big crash and found our new fan on the floor. We’re both glad we weren’t in the room at the time!
Thankfully we were able to bring it back to Lowes and they replaced it with a new one and we went into the hardware section and bought screws about an inch longer than the supplied ones. It’s still up two years later, although still makes me paranoid since it’s now our 1 year old’s play space. :)
YoungHouseLove says
OH MY GOSH! So scary! I can’t believe they weren’t recalled for that. So dangerous!
xo
s
Eadie says
Love it! So happy for you that the installation went so well!
What a joy that is! Sometimes it seems like all the projects are so hard, so what a treat when all goes well!
When that happens in our house, we say “OK, remember this. It’s important to remember this!” because of all the projects that take longer/need more parts/have broken parts/missing pieces/wear you out/physically hurt or just generally fail. REMEMBERing the easy, good wonderful projects helps one slog through the stinky ones! ;)
Michelle says
My husband is a ceiling fan guy. He loves them and when we moved into out new house he wanted one in every room. I fought him but in the end he won. Well not in every room but we did install six of them. I have to say I actually rally like them and am glad in this case he won.
Your looks perfect. The porch is really turning out nicely. I look forward to seeing the end result.
And congratulations on your pregnancy. When I was pregnant with our first we named him peanut(when he was in my belly) and our second was the bean.
YoungHouseLove says
Aw thanks Michelle!
xo
s
Brooke says
I know indoor ceiling fans usually have a direction change function, so in the winter you can pull warmer air from the ceiling and send it down. I wonder if that works the same way in outdoor settings? (Or if you’d even want to be outside in the winter, ha.)
YoungHouseLove says
These guys are indoor/outdoor and they have that switching function so I bet it could work at least a little. Anyone ever tried it outside?
xo
s
Sarina says
They HAVE made ceiling fans so much easier to put up! I did the one in my bedroom by myself and as a 40 something female with crappy arm strength.. it really wasn’t hard at all. The worst part was the balancing. My first assembly was really wobbling.. but I followed their suggestion to switch two neighboring blades and it really worked fine! I love a ceiling fan in the bedroom.. the gentle breeze can really be soothing and cooling during the hot summer days! It also does a good job of moving air around the room so it is not all hot at the roof and cold during the winter either!
Ethne @ Wom Mom Blog says
Looks great! Love the spinning picture. So fancy. And, on a COMPLETELY unrelated note besides the word fancy which is drilled into my head lately, you must get Clara some Fancy Nancy books. Our girls love them lately and they are pretty cute. They’re only a little ahead of her age-wise.
YoungHouseLove says
They sound so cute!
xo
s
Becky says
It may be too chilly for the fans blowing down, but you could flip the switch on the side to have them blow up and circulate any warm air that may be hanging out near the top of the room and keep any determined bugs away :)
YoungHouseLove says
Oh yes, we love that feature!
xo
s
Carla says
The first ceiling fan I helped install was back in the late 80’s and was on my parents screened in porch. I am not even making this up…these were the instructions:
1. Remove fan from packaging.
2. Assmble fan. (yes, assemble was misspelled!)
3. Enjoy.
We had parts left over when we were done, but that fan made it for 15 years before they changed it out with a white one. :)
YoungHouseLove says
OH MY GOSH! That’s literally John’s worst nightmare. Ha!
xo
s
Kate says
Okay, I might have missed this in the previous posts about the porch, but were the fan boxes already there or did you have them put in, and do you know if they’re the same or different than regular light fixture boxes?
Our bedroom has an high angled ceiling (so really great to see about how you put in the extension rod!) with a light fixture, but my husband would really like a fan and light combo. I’ve had a really hard time even trying to figure out if that’s possible given an existing light box or if it would also need some kind of reinforcement/electrician to add more wires/etc. I’m a bit perplexed as to where I would even ask to figure it out!
YoungHouseLove says
We had the electrical for the fans installed and they braced them (knowing we’d be installing fans) when they were installed. I think if you’re going from light to fan in a spot you’d need to brace the fixture box a bit more securely in almost all cases. Anyone know?
xo
s
Laughing Abi says
Thank God you posted about the sunroom today because I needed some motivation. Still trying to finish up the exterior painting and I just don’t wanna play today. (whine) Those amazing pics were just what I needed to pry my butt off this couch and grab my paint brush. Looks amazing! Can’t wait to see the floor.
abi
Allison says
We have a light blue/aqua ceiling as well and it never looks blue in photos. Sunlight washes it out.
Haley says
Looks great! I’m not sure why people hate on ceiling fans so much… yes, some of them are really ugly, but I use them 24/7.
Since you mentioned it again. Can you give us an update on the Nest? How is it working out?
YoungHouseLove says
We’re so happy with it! So far we are addicted to seeing how much we save each month and the house is always very comfortable. Best feature is still getting to adjust it from bed. Haha!
xo
s
Nancy says
They really do look so great!
Nancy says
They fans really do look so great!
Elaine - visual meringue says
I love them! Great choice on the dark colour. Really finishes off the upper portion of the space. Awesome.
Starr @ The Kiefer Cottage says
I think the dark fans were a good choice.
But I like fans in general. Great for energy conservation, even though most aren’t very attractive. After last summer’s outrageous utility bills, we put them in almost every room!
Callye Lawrence says
I’m always jealous of rooms/designs that have sassy overhead lighting as opposed to clunky ceiling fans. Living in sweaty-all-the-time-Austin though is a bit limiting in that we MUST. HAVE. FANS… EVERYWHERE!
But aside from my bitterness over never being able to opt-out of having fans, y’all’s fans look great and will be so awesome in the warm weather! I’m getting obsessively eager when it comes to seeing the end result of this project :)
Jeannie says
It looks great! I totally thought of your open sunroom when I was this on House of Turquoise yesterday: http://www.houseofturquoise.com/2013/10/kim-e-courtney-interiors-design.html
YoungHouseLove says
So beautiful! Man I love that blog.
xo
s
Matt says
About the ceiling color, your white balance is off. I’ll send Sherry an email with a reworked version for comparison.
YoungHouseLove says
Thanks Matt!
xo
s
Pat S says
The fans look great and I know they will be wonderful next year. I live on the ground floor of a 3-story condo and I would LOVE to have a ceiling fan over my deck but I know the condo association would probably go berserk at the very mention of such a thing … so I use floor fans … nowhere near as effective.
seansmom says
John,
The next time you need an extention rod for a fan, you can do what we did….buy a piece of galvanized pipe, cut it to length and thread the ends. Then I spray painted our ORB and presto!…. cheap custom fan extention rods!! Definitely LESS than $10 each!!!
YoungHouseLove says
Great tip!
xo
s
Debby says
I love the dark fans. So pretty! I would love my current deck to be covered like this with the fans. For now I will live vicariously through your pics LOL
ryan says
those fans look so great! to be honest, i was always surprised when y’all have removed fans from rooms in your houses (with john’s ‘haircut’ explanation, i now understand why). i realize they’re not necessarily a designer’s dream, but damn if they’re not functional. i lived in richmond for a couple of years and found fans essential to keeping my place comfortable in the summer time without spending $1000/month on electricity. now i’m back home in austin and, well, you can guess how many rooms in my house contains ceiling fans. we are spared any sort of winter but pay for it with 100+ temperatures for 5 months out of the year! yeehaw! :)
Sarah says
I love the direction you guys are going with this project. It is very dream worthy!
Amanda says
I don’t know how (2) ceiling fans could change the look of a room so much! Don’t get me wrong, I was loving the renovation already but HOLY MOLY!! The two fans are a game changer. This would be my new favorite place. Scratch that, CAN this be my new favorite place? I’ll be over in an hour.
Side Note: Do people still say Holy Moly? What does that even mean? Whats a moly?
YoungHouseLove says
Haha! My friend was telling this amazing story in college and she paused and screamed Holy Moly. For some reason it was so hilarious we still scream Holy Moly when we see each other to this day. Much to the chagrin of everyone around us.
xo
s
Jennie says
Unfortunately, in response to Amanda’s last question there, the only thing I could think of was Austin Powers #3 … gag :)
julie says
I love outdoor ceiling fans!! When we built our house, my husband thought I was crazy for insisting on pre-wires for the patio. He loves it now!
The patio is looking great!
SharonNYC says
Did I miss the finished tile floor post or is that still coming? And if the latter, WHEN? So anxious to see the darkish tile with the dark fans. (I had been doubting the floor color choice, but now it totally makes sense!)
YoungHouseLove says
UGH! Mother Nature is killing us with all this rain, so the tile is slow going (certain things can’t be done until it has been dry for 3 straight days, which feels like it’ll never happen). We’ll share an update next week, but we’re not sure it’ll all be grouted. If you’re listening up there, please stop raining on us! Ha!
xo
s
Courtney says
It’s amazing the vision you guy have and are able to execute!
Pam says
Looks great! Love Hunter fans, the hubs just put a new white one up in our haint blue trey ceiling and it looks just as fabulous and so quiet! He is more of a computer geek(i ususlly do the diy stuff ;) so the detailed instructions were most helpful! Definitely a high five moment!