Oh sweet victory, our much debated office art project is done and I’m here to spill the beans about how it all went down, er, up.

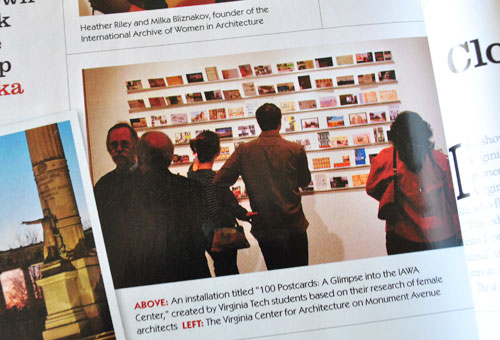
After all, we already gave you this no-detail-left-behind play by play about how Sherry and I fiiiinally agreed to base our design on this gallery of postcard ledges that we spotted in Richmond magazine:
The project was pretty darn easy and actually really fun to do, especially after some of you suggested that we collect reader-submitted postcards from across the globe to fill our wall with an ever-changing arrangement. That suggestion really made trips to our PO Box a lot more exciting than usual. So thanks to everyone who sent a postcard our way (from a bunch of exciting places like Hawaii, England, Spain, Canada and a slew of other spots in the lower 48).
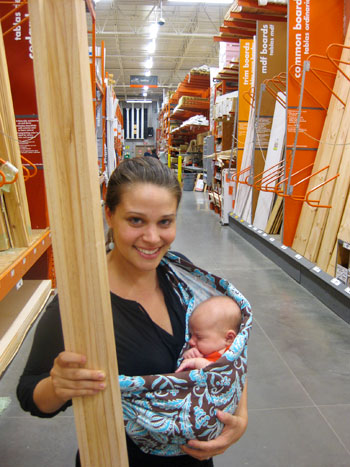
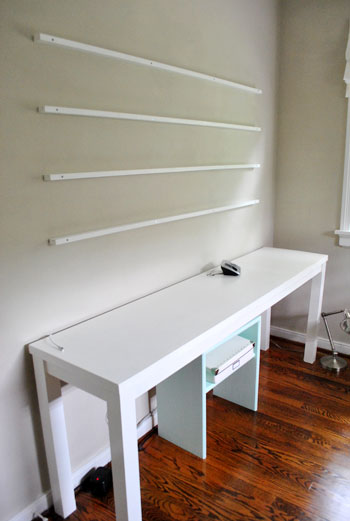
The gallery-inspired shelves started with a trip to Home Depot (Clara’s very first!) to buy supplies. And boy were some of our orange-apron-wearing friends excited to see the tiny human who lived it up in Sherry’s belly for all those months. But back to business. Based on some measurements of the wall, we determined that we wanted four rails above the desk, each measuring 64″ long (we used blue painter’s tape to mark where we wanted them and how long they should be – it’s such an easy way to try out a few zero-commitment arrangements to land on something you love).
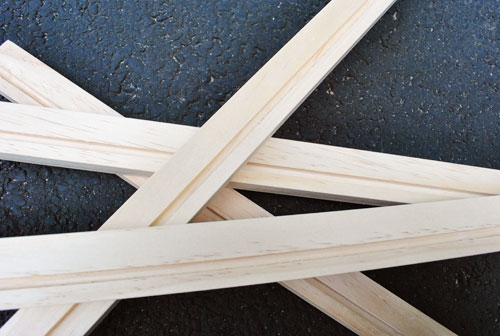
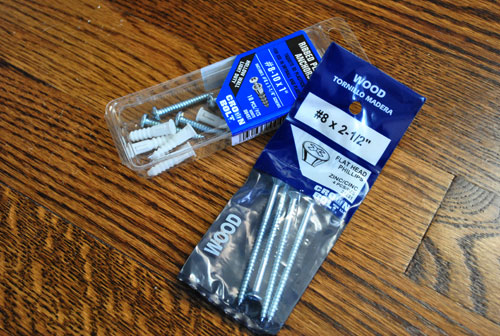
So with our trusty measurements in hand, we snagged some simple 1 x 2 pine boards for about $4 a pop, plus a bunch of screws and anchors (which I’ll talk more about later). In the end this would be the only cost for the entire art wall project, bring the grand total to under 25 bucks. Not bad for filling a giant expanse of wall, right?
And although we once had visions of taking a more complex narrow-shelf-with-a-raised-ledge approach, that all went away when we realized this was the perfect project to break out my Father’s Day present: a Dremel Trio. Sherry must’ve seen me lustily eying it every single time we entered any home improvement store (I’ll admit that I lingered a bit each time), so she surprised me with the $99 tool for daddy’s day (even though I didn’t have a specific sanding, routing, or cutting project in mind). I like to call it fate.

The reason the Dremel would be perfect for this project is because it would allow me to route a small straight groove along each of my four pine boards, creating a perfect spot for postcards and other small art to rest. But before breaking out my new tool, I used an old friend (the miter saw) to cut my four 1 x 2s to identical 64″ lengths. Note: you can have this done at the home improvement store if you don’t have a saw on hand.
Then, despite my enthusiasm to begin Dremel-ing, first I decided to read the directions and (more importantly) do a few test runs on a scrap piece of wood. Thank goodness I did, because I spent about five minutes trying to route with the cutting tool. D’oh. I also learned that the Dremel really likes to pull to one side, so making straight grooves posed a challenge. But thankfully it was a challenge that could easily be overcome by using the metal guide included in the set. Disaster averted.
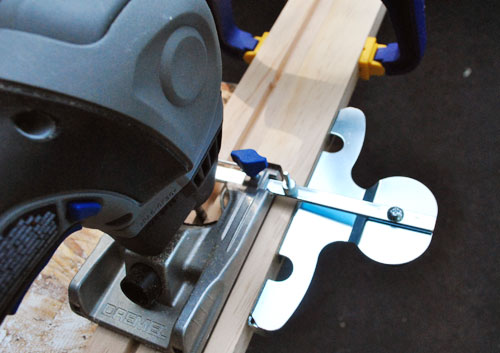
The adjustable guide let me set exactly where I wanted to make my grooves. Although I did hit one snag in that the 1 x 2 boards were thinner than the width of the Dremel. So to use the guide I had to clamp two boards together. No biggie.
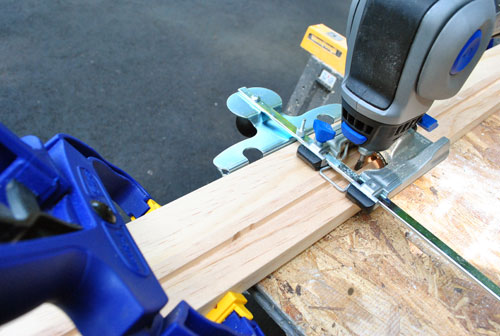
With everything clamped I set my guide so I’d make my cut about a half inch from the outer edge and I set my depth to about 1/3″ inch.
I found the Dremel really easy and fun to use, and once I had everything set and had practiced my system of moving clamps as I went (since they would eventually get in the way of my routing path), it took me about ten minutes to do the remaining three boards.
With everything cut, I did a quick sanding job to smooth everything out (by hand, not using the Dremel) and then applied one coat of primer followed by one coat of semi-gloss white paint. Sherry and I discussed staining them a dark wood tone or even painting them a color, but ultimately decided they weren’t the stars of the show so the white would help the postcards pop best while making the shelves feel architectural (like the white trim and crown molding in the room).
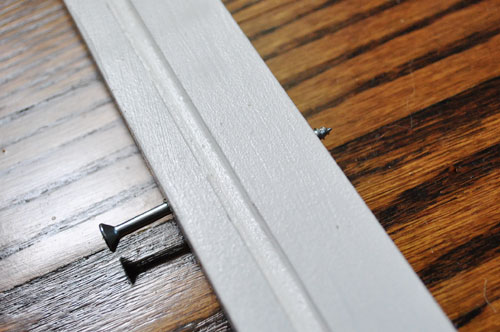
Then we could move into the installation phase of the project. Again we discarded any complex ideas about hiding the screws and decided we’d just screw straight through the boards into some anchors in the wall (and then roughly disguise the screwheads on the front of each shelf with a bit of white paint). Since the boards were pretty light, just 2″ deep, and would be holding postcards, we weren’t too concerned with them being able to bear any intense amount of weight. So our weapons of choice were some long 2.5″ screws and a pack of drywall anchors (since only about 1/2″ of screw would be sticking out the back end after it passed through the 1 x 2, we had to buy a separate pack of smaller anchors).
We opted to go the anchor route (instead of finding studs) so we could place the semi-visible screws evenly across the front of the 1 x 2s. Speaking of which, I took my first board, measured an even spacing for each of the four screws and marked spots to drill my pilot holes. Thus would begin my somewhat intricate one-person system of hanging these suckers. Sherry had already helped me mark a level line for the bottom shelf before Clara woke up (phew) so I was able to hold the shelf in place and then re-drill through my pilot hole far enough to make a small mark on the wall. After following the same process to mark the rest of my holes, I put the shelf down, drilled the rest of the holes, and placed the anchors.
Now here’s a little trick I like to use when doing these things. Trying to screw the rail in place by myself could be a nightmare in terms of lining up the holes to the anchors. So instead I put the screws through each of the four holes in the 1 x 2’s on the ground, allowing the screw tip to poke through the back of the shelf, just a bit. Then when I held the shelf back up against the wall and attempted to line it up with the anchors that I sunk into the wall, I could feel when the screw tips fell into place (plus it helped to keep the shelf from slipping while I one-handedly tightened all of the screws into the anchors in the wall).
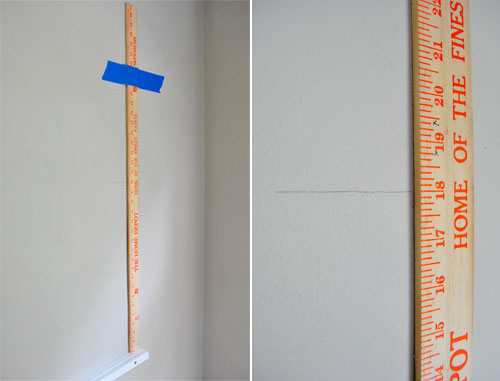
Hanging the first shelf was pretty easy (heck, it almost stayed in place with just one screw). But getting the other three to be straight and evenly spaced required a game plan. Sherry and I had decided that we wanted the four shelves to be nine inches apart to allow enough breathing room for a vertically placed 5 x 7″ piece of art on the shelves. So to measure my nine inch increments I vertically leveled a yard stick and employed some blue painters tape as my second pair of hands to hold it in place while I marked the wall. I did this for each of the four vertical spots that I’d be placing a screw to make sure all of my anchor points were lined up and evenly spaced.
I spare you the rest of the process since it took longer than I expected, especially since I double and triple checked a lot of my measurements. But in about 45 minutes I had all four of the shelves hung. And wouldn’t you know it, they were perfectly level and extremely secure. Phew!
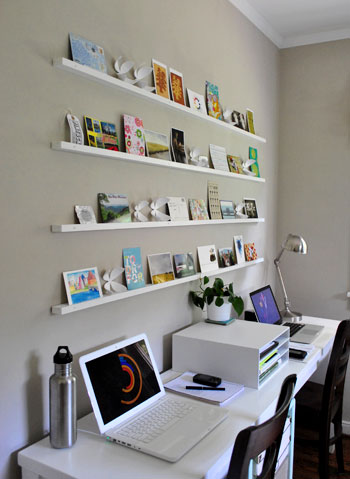
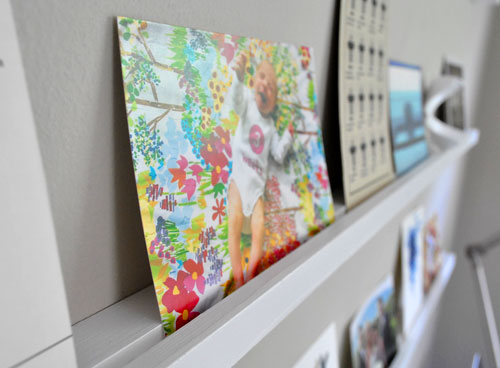
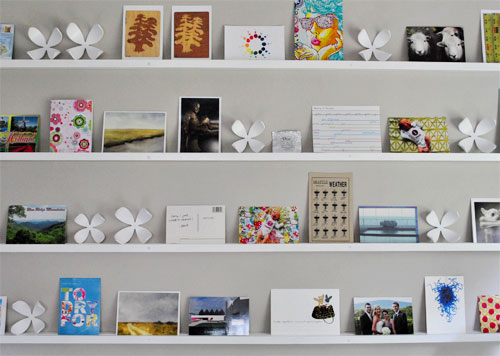
Then all that was left to do was to populate the shelves with postcards and other postcard sized artwork. And thanks to a bunch of you, we had plenty to choose from! We also peppered in a few photos, cards, and other miscellaneous items that we liked (from flattened foil chocolate wrappers with sweet quotes on them to art that we cut out of magazines and backed on cardstock to create a postcard-esque weight). Here’s a shot of what it looked like yesterday afternoon (after a trip to the PO Box- thanks again to everyone who sent cards our way!).
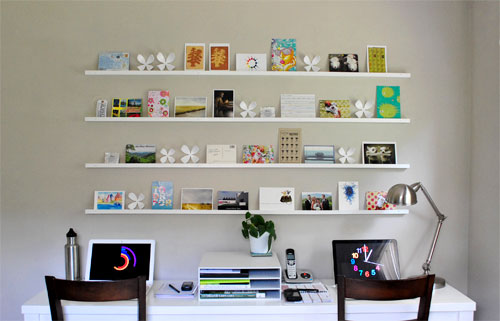
You’ll notice that a few of the displaced Wallflowers made it back up on the shelves. Oh and we found a new spot for the rest of ’em too, which we’ll share in our next office progress post. But for now we’re happy to bask in the glory of this project: the big intimidating blank wall is no more. And we finally have a rotating wall of eye candy to enjoy (and switch up whenever the mood strikes).
Heck, it’ll probably look different by the time we post our “big reveal” photos of the whole room.
We know some of you are wondering how we’re going to keep things from blowing off of the wall. We haven’t devised a system for that yet, since it’s not a problem that we’re going to encounter ’til (at earliest) the fall when we might throw open a window or two. But when the time comes we’re thinking of possibly backing things on hefty mat-board to keep them from budging in the breeze, or even using that removable blue sticky tack to keep the backs of the cards adhered to the wall (other ideas we flirted with: magnets or even velcro). Ultimately we don’t want to do anything too permanent because it defeats the ever-changing nature of such a project. We promise to keep you posted if we find that we have to implement any of those stay-in-place strategies.
Thank you again to everyone who sent us postcards. It’s been such a sweet byproduct of this art project and we’re very grateful. We plan to keep a stash of all of them so we can continually rotate them out (so if you don’t spot yours in these pictures it’ll definitely still be enjoyed!). And if you want to add to the collection our address again is: PO Box 36665, Richmond, VA 23235. We’d love to hear from you!
But enough about us, we’re wondering if you guys have implemented or otherwise come across any other interesting ways of displaying collections, whether they be 3-D or flat-ish (like our growing postcard collection). Any gallery-inspired art walls? Or shelves full of like objects (snow globes? Eiffel tower statues? garage sale oil paintings?). Spill it.
Psst- Wanna follow the entire office/guest bedroom/playroom makeover? Click here for the intro post, here to read about the big sleeper sofa hunt, here for the DIY desk play-by-play, here for the homemade light fixture project, here for our hacked Ikea bookcase, here for the file storage we built, here for how we squeezed in some toy storage, here for how we picked out some DIY art that we could agree on, and here for how we wrangled our wires.

Randi says
So excited to see the finished project! WELL DONE! Looks fab. And… ummm… I have to say… some of those postcards are lookin’ migh-ty familiar! I’m so glad they worked with your vision. Oh, and to see the “flowerdy” covered note I sent… amazing! YOU. MADE. MY. DAY.
YoungHouseLove says
Thanks so much for sending us those fun cards Randi. You made OUR day!
xo,
s
Melissa says
Oh my gosh~ LOVE LOVE LOVE. I am making my spare room into a scrapbooking/guest room and I have a fantastic blank wall above my desk. I totally stealing this idea :) Thanks for the inspiration~
Melissa
Lisa in Seattle says
Squee! I’m so thrilled to see my little Seattle Weather postcard on your shelf! It’s not actually raining here right now – we’ve had several gorgeous days of cool mornings and pleasant afternoons. But we keep that a secret so the rest of the country won’t pack up and move here.
OOPS.
Allison says
Love it! Off topic — but what brand of baby sling are you using with Clara? I’m getting an Ergo, but I’ve been researching different slings and wraps.
YoungHouseLove says
Hey Allison,
It’s a Hotsling (a hand me down from a friend). Clara loves it! Sometimes I just wear it around the house to get things done!
xo,
s
Jen says
Come December, I see those ledges filled with Christmas cards that I’m sure you’ve saved over the years and photos of your family during the holidays etc.
Shelley @ Green Eggs & Hamlet says
The shelves look awesome! Having an art installation that’s constantly changing in your own home must feel so fancy, like your own little gallery.
A word of advice, I used that blue sticky tack to adhere some art to my walls back in the day and when I removed it, it left little spots behind (almost like grease spots) so you could tell where it had been. Might want to try it out on an inconspicuous section of wall before making a full commitment when the time comes. :)
YoungHouseLove says
Thanks for all the tips when it comes to keeping our postcards in place everyone! Lots to think about!
xo,
s
Marisol says
You guys are so awesome! I love this wall! I’m gonna copy, you don’t mind right? I think one day I might end up with a little replica of your home. You have really inspired me to take on some more DIY projects. I even started a little bog. Nothing fancy just a little something for my family and friends http://lifeasiyouknowit.wordpress.com/
Not sure where it will go or what I will exactly write about but you guys are definitely one of the motivators. Just thought I would let you know.
beth says
Just wanted to say it is great to see you wearing your little sweetie in the sling :) We’ve been babywearers through 3 kids over the course of 6.5 years now. My youngest is almost 4 months and rode in the mei tei sling on my back this morning so I could bake cookies with the two oldest kids.
Go you :)
Andrea P says
Just wondering if you ended up patching & painting over the old holes left by the wallflowers?
YoungHouseLove says
Hey Andrea P,
Yup, just a little bit of spackle and one coat of paint did the trick!
xo,
s
Julie Ball says
I have been reading your blog for over a year but have never commented. After all, with so many comments, I figured I didn’t have anything more than what had already been said.
I think you guys are awesome!! I love your house and your wedding was one of the most beautiful I’ve ever seen in pictures. Being that I live in East Tennessee, I also know that you guys are close to me so I can always rest easy knowing that some of the cute things you find for your home could be attained by me as well (if for nothing else, a short- well, semi-short, trip to Richmond, VA!!)
Anyway, this wall project is maybe my favorite project you’ve ever done. I want to leave work right now, run home, change into jeans, and run to Home Depot to start my own!!!
GREAT JOB ~as always~
Oh yeah!! Clara is like the icing on the cake when I click on younghouselove these days:) It is SO evident that you are both just beaming with excitement and love for her. With two sweeties of my own, I can see that happiness radiating through you both.
Begoña says
I gotta say, i was a little bit skeptical when you first talked about this idea but it looks pretty amazing. Love, love, love it!
Libby says
Wow! What a cute way to display cards! I absolutely LOOOOOOVE it!! :) Thanks so much!
Gayle says
I like it!
Nikki T says
I’ve been reading you blog for a few weeks now (Found it via Caitlin’s HTP) and I’m in LOVE!
I’ve already have tons of cool ideas for my own house that were 100% inspired by your beautiful DIY projects.
I LOVE, love, loved looking at your wedding posts and photos- You guys are really something else!
And of course, Clara is beautiful! :)
I’m really liking this postcard idea- great work! Makes me wish my hubs and I had collected postcards from all the places we’ve visited…but I guess we can start now!
We have a blank wall in our front entryway and I’m collecting ideas from your blog on what to do with it…I’m leaning towards something that includes pics of our fur-baby, Bella!
Thanks for the great daily reading material and viewing pleasure!
Nikki :)
Amanda Wright says
This is the best thing you’ve ever done! Not that all your other projects weren’t great, but WOW.
Mustang says
I have made very similar gallery-inspired shelves. I used 1 X 2 boards but instead of Dremel-ing, I simply used 1/2 round (the stuff that goes on your baseboards) and nailed it to the edge of the 1 X 2, thus creating a little “lip” to hold pictures and such. It worked!
Alisa says
Hi Sherry, John & Clara,
I really, really like this project! Our current office has 2 large windows on 2 walls which are above our L shaped desk…while they are nice (and I know I shouldn’t complain) I wish they weren’t there so I could do this! The silver lining is that this home will not be our “forever” home…so there is always a chance for me to create my version of your great idea! I will file this away for the future!
I think that this would look cool in the (right) kitchen, maybe with plates and scaled down in size????
Have a wonderful day!
Alisa
YoungHouseLove says
Hey Alisa,
We think it would look lovely in a kitchen as a plate rail display of sorts! Good luck!
xo,
s
Vickie D says
It looks fabulous!
One question: Did removing the flowers left some noticable tiny holes in the wall? I have a set that I haven’t put up yet as I am concerned about that (I’m in a rental…) Thanks!
YoungHouseLove says
Hey Vickie,
Yup, we spackled and painted (just one coat) to get rid of the holes left behind by the Wallflowers. It was no biggie though- probably took about ten minutes total. Hope it helps!
xo,
s
Kay says
I would be interested to see if you could secure your postcards with MUSEUM GEL or putty (sold by Amazon). I’ve never used it, but I think it would also help keep your little one from toppling the many decorative “objet” you have around the house.
Carmen says
Quiuck question: do you guys print pictures at home or get them printed? I see some cute Clara birthday pics, and was just wondering. I also saw the timeline card that john made, lhow did he get the textured look ( is it printed on special cardstock or did he get that look in photoshop? ). Thanks so much, and maybe I will see my postcard up there one day.
Jocelyn Stott says
Wow – GREAT idea here! What a perfect way to add some color and character to the room.
Leigh says
love this! such a great idea. you know what might look cute too…painting an S and a J on the back of your desk chairs. and making/buying some seat cushions.
Leah says
Your project turned out great! Nice work, as always :)
I was wondering if you had the name of those beautiful colorful sheets (are they from Pottery Barn?) that Clara is pictured with on one of the postcards? I adore that print!
Ashli M says
So in Love what a great idea!!! Fantastic!
Now you can look at fabulous pictures while you stuck typing away!! Love it!
~Ashli
http://www.maillardvillemanor.com
Kelly Rand says
I just had a thought on how to keep the breeze from knocking them off. Could you adhere everything to mat board and then tap a heavy magnet to the bottom of the back? Combining the two approaches may keep them weighed down. Best of luck!
Laura @ youngDCliving says
This looks so great! In my opinion, it far exceeds the one you pictured in the Richmond magazine. I like that you added the flowers, as well, since it broke up the pattern and added more visual appeal.
Just curious, how many postcards do you both receive in all?
Christine B says
I like how you made use with the flowers I think it helps make the art. The VT student one is awesome too but the flowers make it more welcoming.
Nicole says
So fun and functional! You’ll be able to switch out those items whenever you wish!
Jenny says
Hey guys!
This looks AMAZING. So fun!
Question for you: what’s the current wall colour you’ve got goin on in the office right now? Not sure if it’s listed in your room-by-room post or not.
Thanks!
YoungHouseLove says
Thanks so much to everyone for the continued ideas for keeping our postcards in place. So far they’re quite secure but if we need any ideas down the line we have a bunch here from you guys to refer to!
Jenny- It’s Glidden’s Sand White. Hope it helps!
Laura- We’d guess that we’ve received a couple dozen postcards- and they still seem to be rolling in. So fun!
Leah- Yup, they’re actually two pillowcases from Pottery Barn that we lined up and posed Clara on. We don’t know the name but remember they were organic and might have been called something like the woodland series? Hope it helps!
Leigh- We actually do have plans to pick up some cushions for our desk chairs (which we’ll share in the big reveal post in a few weeks). Stay tuned…
Carmen- We get them printed from Flickr (well, they send them to Shutterfly and we pick them up at our local Walmart or get them mailed to our house). We had some of those extra pics of Clara laying around (we got some printed for friends and family members so they were handy to use on our little wall of cards). As for the textured look of my timeline, it was something John did in Photoshop (he did a google image search for paper and used that as the background, then he changed the color and made it lighter). Hope it helps!
xo.
s
Melissa says
We did something similar with our daughters book collection. We <3 it.
http://img.photobucket.com/albums/v83/coleman/36778_1374966932135_1170663074_3089.jpg
My fave thing about this is that we can see the fronts of her books, which makes it easy for our 3 year old to pick out a book since she can't read just yet.
Jennifer M says
Hi I think your display looks fab. Just a quick suggestion on how to keep your art from flying around you could try weighing them down with coins.
Katie says
Thanks for some detail on how you put these up! I have a few collections of funky small toys & collectible figures tucked away in boxes and have been thinking about putting up some narrow shelving in my home office to display a collection. I was skeptical about how to hang it, but with some sturdy anchors, drilling straight through might work for me too. Hmmm… I’ll have to check the weight and do some planning. Thanks for getting my wheels spinning on tackling my own idea!
Elyse says
I am really really loving this… this could be a great way to display greeting cards too, instead of immediately throwing them away or stuffing them in a box. I think I need to find a place to do this!
Lisa O says
This looks amazing! No surprise there :).
We have had blank dining room and living room walls since we moved into our house about a year ago because we can’t decide what to hang. I think we’re going to try doing something similar! Any ideas on how we might achieve a similar effect without the Dremel?
YoungHouseLove says
Hey Lisa,
You could possibly use a circular saw to carve out a little notch in the wood like a Dremel, or you could glue or nail a small “rail” (using a 1×1″ strip of wood) to the front of your shelf to keep postcards in place. Hope it helps!
xo,
s
Handy Man, Crafty Woman says
great job! I love the idea of rotating post cards and pictures over time.
Kris says
Thank you so much! I have an elaborate postcard collection from around the world that I just couldn’t figure out how to display. Your’s looks fantastic! If it’s ok with you guys, I’m totally stealing this idea! Thank you!
tawnya says
too cute! very artfully displayed. in terms of “staying put” you might consider that gummy, poster-stick product on the bottom of what you put up to adhere it to the shelf itself, too…that is magic material. I love this wonderful blog!
bridget b. says
the room looks great you guys! i’m thinking about doing this in my guestroom to display postcards from my travels.
on a side note, i have a new little one and there were recently a lot of news stories about baby slings
( http://www.google.com/search?q=slings+%2B+danger&sourceid=ie7&rls=com.microsoft:en-US&ie=utf8&oe=utf8 ) just wanted to pass the info along in case you guys hadn’t heard about it.
keep the design inspiration coming!
YoungHouseLove says
Hey Bridget,
No worries, we’re all about sling safety! We’re always sure not to cover Clara’s face with fabric and we make certain that she’s safetly supported and not too squished in there (so her breathing isn’t compromised). Thanks for being sure that we’re in the loop when it comes to babywearing safety though!
xo,
s
Kate says
A-MA-ZING. Triple love it. Everything you guys do is amazing…. Midas Touch? Great job. :)
Anna says
Oh my gosh .. I absolutely love, love, love this idea! Wow!
Jen says
Oh my this turned out better than I could have imagined! I really like the variety of colors and textures that you used to mix and match. You have given me some inspiration for a blank wall that I have yet to fill!
Thanks so much!
xoxo!
Autumn says
This ended up looking even better than I expected (and I expected it would look great). Fits the space sooo well!
Andrea says
I cannot believe how adorably this turned out! What an ingenius and inexpensive way to fill up blank wall space. Love it!
Comma Happy says
I LOVE it! Reminds me of those narrow Ikea shelves but with a much more fun purpose. A tip for securing the postcards (which you probably already know)… there is a museum putty product that would be perfect for something like this.
Renee Smith says
LOVE IT!
Lori Sanders says
Love this. I think I will put one up in my art gallery.
Redlilocks says
This came out so wonderful! You two never cease to amaze me – what a simple, creative and inexpensive idea and it looks FAB!! Btw, you got a big mention on my (new) blog the other day for being the very first blog I fell in love with.
Need to get a postcard from Manchester England to you – I love the idea of your readers getting to add to your space! Talk about interactive!!! ;)
Christine says
So neat! It’s like the grown-up version of the “postcards and random stuff” wall collages I used to create in my dorm rooms, lo these many years ago (picture it: album cover postcards like The Cure, New Order, etc. mixed with moody floral postcards from the National Gallery store, and magazine clippings and bits of artsy things drawn/painted by friends). Much better without all that Scotch tape :)
dinah says
OH EM GEE This looks so so so so very amazing. You continue to blow my mind away. Now I REALLY want to do this in my room.
Kat says
Love how it turned out, thinking I need a mini version of this somewhere! I have a shelf full of all of my small elephants that I collect – love them so much!!!