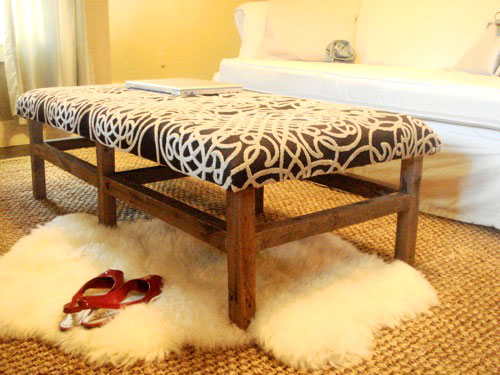
You guys may remember Kara from Kara Paslay Designs thanks to the amazing house crashing tour that she took us on a while back. And when she sent over some photographs of a stunning ottoman that she DIYed, we begged her to treat us to an exclusive little YHL tutorial. And- oh happy day!- she was game. So without further ado, we’ll hand this post over to Kara so she can take you through the process of making your very own version of the lovely (and surprisingly doable) ottoman that she whipped up. Gorgeous, eh?
Hello YHL readers! I am so excited that John and Sherry have invited me to share the details about my DIY tufted ottoman! Here we go:
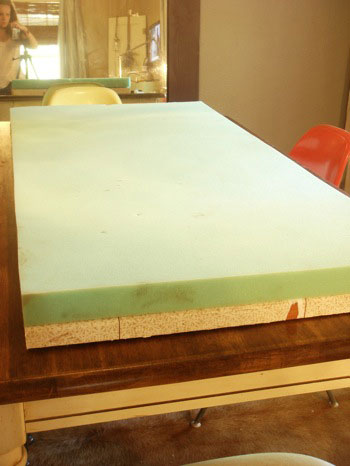
Step 1- Cut a piece of wood (or MDF) to the coffee table size of your choice, unless of course you are using your current coffee table to save some moolah. If you’re building it from scratch, I’d suggest using 3/4″ plywood (or MDF) to avoid sagging. Next, choose the spots where you’d like to add button tufts (6 or 8 or as many as you’d like) and pre-drill small holes through the MDF or wood. Then cover your wood top with contact cement and place 2 inch foam (cut to the same dimensions) on top. You can find the foam at your local craft store.
Step 2- Cover your top with extra-loft batting, securing it underneath the table top with a staple gun. Then trim the excess.
Step 3- Cover the batting with your chosen fabric. If your fabric has a pattern, make sure it is straight before placing all your staples. When upholstering a simple square or rectangle: put a few staples in one side, then go to the opposite side, pull it tight, and add a few staples there. Do the same with the other two sides. This ensures that your fabric is taut and you don’t end up with bunches and bulges that you didn’t expect. Also pay attention to how tight you are pulling the fabric and keep the tension the same all the way around for a professional look!
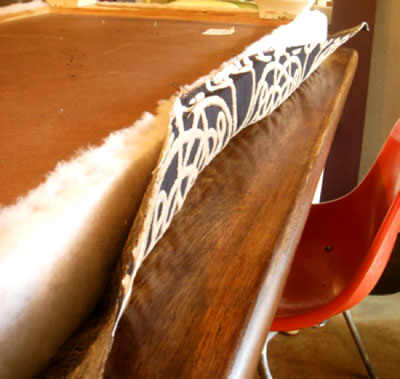
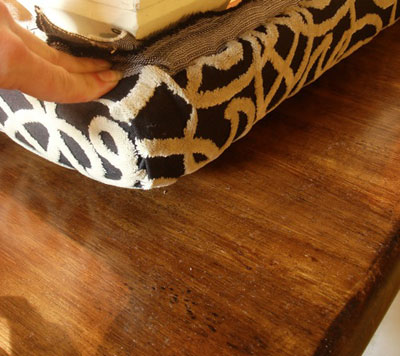
Step 4- Finish out your corners. They should look like the photo below at the beginning.
Then pull the left flap to the right and staple. Next pull both flaps to the left and staple, being sure to smooth out any lumps and humps because regardless of what the song says, these are NOT lovely or ladylike! Here’s what you should end up with:
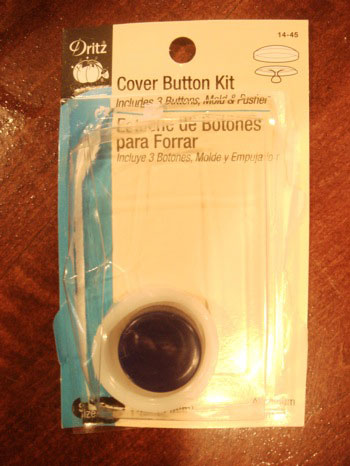
Step 5- Now it’s time for tufting. You can find buttons and cover kits at your local craft store. Once home, cover your buttons using the instructions on the packaging.
Step 6- String a heavy and strong thread through the eye of a very large needle. Do not cut the thread.
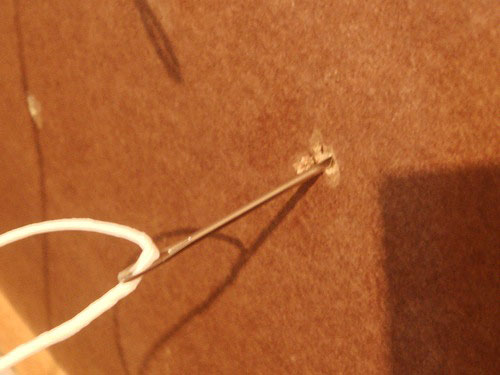
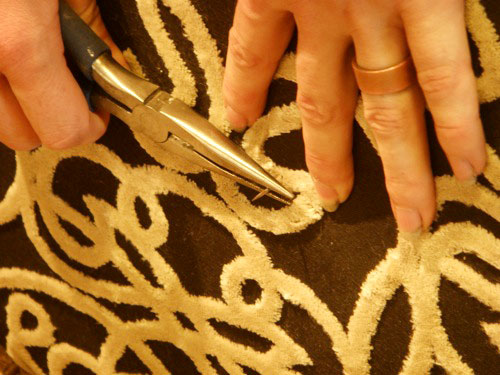
Step 7- Push the needle and thread through (from the back to the front) of your piece, through a pre-drilled hole where you want your button tufting to appear. You may need to use pliers to grab the needle and pull it through.
Step 8- String your button onto the thread and then push the needle back through. It may take a few tries to find the hole, but keep trying and you will get it!
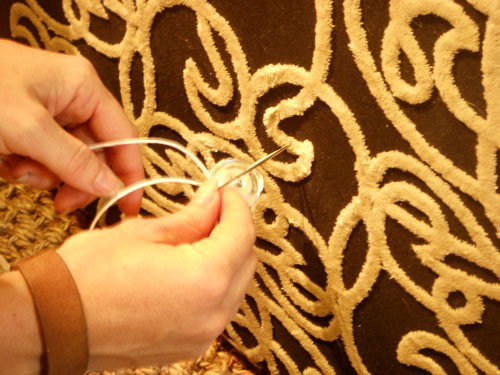
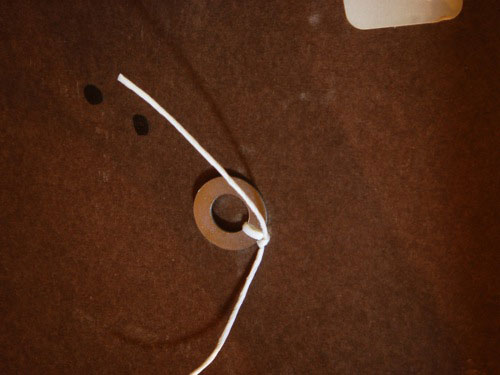
Step 9- Thread a washer onto one end of the string and then use both ends to tie a knot ensuring nothing comes loose. Have a friend or spouse push the button in on the other side while you tie the knot to ensure that all your tufts are the same depth.
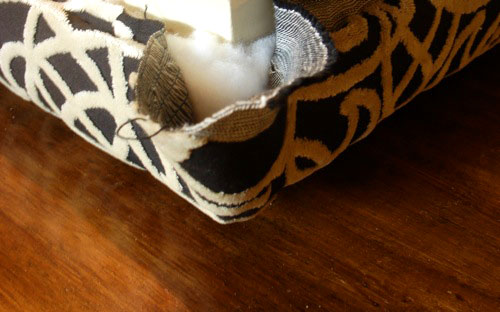
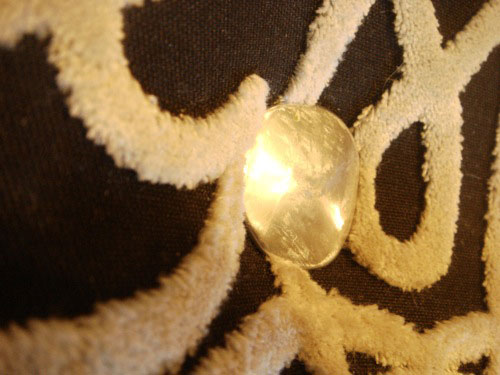
You tufted button should look like this once completed:
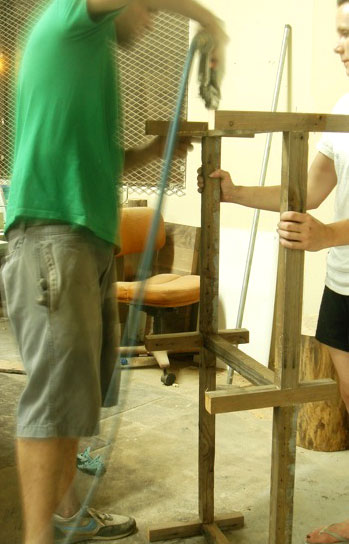
After you do all of your buttons this way you should be left with a beautiful tufted HEADBOARD!!!! All you’d have to do is hang it! But we needed an ottoman, so Tim and I put together some “look at me” legs. I always like a piece with some history, so I chose to make my base with old 2 x 2s that we removed from our house during its renovation. Our house was so old/not up to code, a few walls were made up of 2 x 2s set in a grid pattern (instead of 2 X 4s centered on 16s). YIKES!
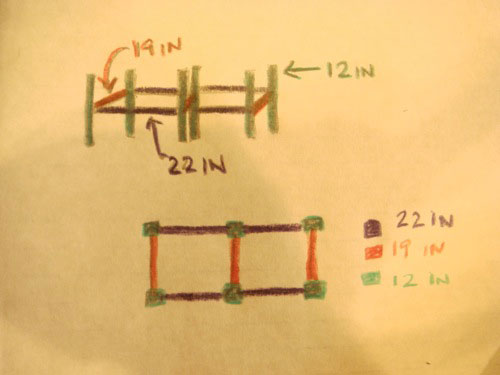
Step 10- Next we cut our wood into: six 2 x 2s at 12 inches, three 2 x 2s at 19 inches, and four 2 x 2s at 22 inches. Here is a color coded drawing to show you how we put the pieces together. The 1st drawing is a side view while the bottom drawing is a birds eye view.
Step 11- Bring your base together. Now would have been a great chance to use that Kreg Jig that John has been loving, but unfortunately we don’t have one. So, we opted for a 1-2 punch of finish nails and Liquid Nails. You could also use screws and Liquid Nails. Things are pretty sturdy in the beginning, but once the Liquid Nails hardens up, things are Jillian Michaels tough!
Step 12- Attach the base to the top. We used Liquid Nails again and then toe-nailed our finish nails to secure the top to the bottom. To “toe- nail” simply means to nail things in at a diagonal. You should also do this if you are using screws (and be sure to pre-drill)!
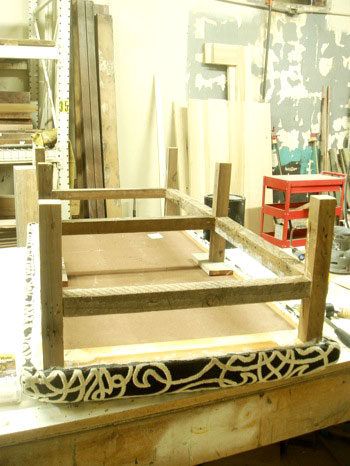
Now that we’re finished, here’s what it looks like in our living room!
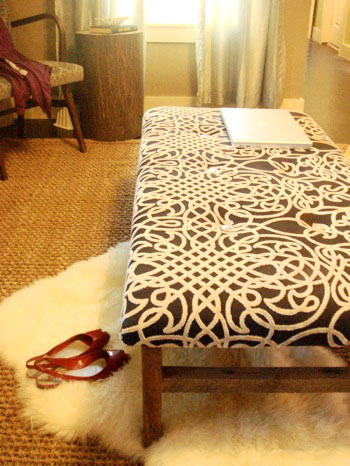
We are so excited to have a brand new piece of furniture that is incredibly functional, serves as a reminder to our renovation experiences, was made from mostly reclaimed materials, and only cost us about $35! Here’s the budget breakdown:
- Top from former coffee table- FREE
- 2″ thick foam- $27 (with 40% off coupon)
- Contact cement- already owned, aka: FREE
- Fabric (scrap piece) – FREE
- Tufting buttons- $5
- Reclaimed wood legs- FREE
- TOTAL COST: $32
Although we lucked out by finding pieces we could reuse, we’re sure you can do the same by upholstering a coffee table you already have, using an old curtain panel for your fabric, and scouring your local thrift shop or Habitat For Humanity ReStore for wood scraps or pieces that you could reinvent as an ottoman. Good luck!
Doesn’t that DIY ottoman look fantastic? And you can’t beat that price. We’re sending out a huge thank you to Kara and Tim for providing such amazing photos and this awesomely detailed play by play of their upholstering and building process. What do you guys think? Anyone out there who will be referring to Kara’s tutorial to whip up one of their own? We must admit that we’re more than tempted to try our hand at one for ourselves!

liz @ bon tempsbeignet says
Love (!!!) Kara’s projects. I’ve checked her blog daily since you posted her house crashing a while back. If I was living in the OK area I’d buy her house in a heartbeat!! I can’t wait to see what she does with the next one.
Kelly says
I LOVE this idea! So cute and best of all, cheap! Thanks for sharing!
Lauren says
Wow – add this to the bottom (or top?!) of my knock-off-wood to-build list. Where’s the hammer!? (My neighbours downstairs are going to hate me….)
Sarah @ The Ugly Duckling House says
This tutorial will come in handy once I get around to building our bedroom bench. Thanks for this post!
Cori says
Thank you! I’ve been thinking of making a coffee table and this would be great with kids- no sharp corners! Just put some storage basket underneath for toys and it’ll be perfect for my family.
Kara says
This is so weird. I was just thinking how I wanted to build an ottoman like 5 minutes ago. Then I opened my google reader to find this post and my name is Kara… too weird…
Jessica @ How Sweet says
That is too cool. It does look fantastic!
Caroline @ The Feminist Housewife says
Super cute! I want to try this now! I love Kara’s design work!
Catherine M says
Beautiful job and gorgeous fabric, the pattern is awesome!
Profit From My Closet says
This is fantastic! Totally gives me a home project for this weekend :)
Brien says
Such a great idea! I especially love your suggestion of covering an existing piece of furniture with fabric for a similar effect. Us non-handy people appreciate projects that don’t involve power tools and/or the sawing of any wood : )
Lisa says
What a great idea. I love a place where I am not afraid to put my feet up!
Kimberly says
It is beautiful. I would save the money on the foam and scout out the alleys in the fan. There are always couches and chairs that people are throwing out!
Laurel-Dawn says
This is beautiful, and it looks “do-able” to all DIYers! Thanks for the great idea!
Laura says
I actually think that this would make an amazing stool for the end of a bed! And could be made totally from scratch with plywood & 2xs for legs!
Thanks for the great idea!
Jes says
I love this idea!!! I can see it coming in handy when we buy a new couch/chair, but dont want to fork out the extra dough for the other pieces!! This would be a great sitting area at the end of a bed if cut the right height! =) Thanks for sharing!
Adriane says
WOW! I remember this from the house crash but has since forgotten. My mother in law watches my nephews who are starting to walk and was JUST saying that she’s worried about the corners of her coffee table. I’m texting her TODAY that we have a new project! It’d be a beautiful, cost-effective upgrade and safer for the kiddos to boot.
Michelle says
Looks amazing!!!
Renee says
LOVE THIS! Thanks for the tutorial. I’ve always struggled with the tufting and now I think I’m going to give it a shot!
Emily says
I love this idea and the fabric is fab.u.lous!
Karla @ {The Classy Woman} says
This ottoman is gorgeous! I LOVE that fabric pattern! Thanks for the breakdown. It’s funny, I’m always amazed at how much a piece of foam costs-thank God for 40% off coupons!
Lenore @ Lather. Write. Repeat. says
What an excellent tutorial, so easy to follow. I always wondered about tufting but not it doesn’t seem so scary!
XO
Lenore
Rob says
Kara, what is the wood blocking on the bottom? Seems you steps did not address that.
Viideo says
Thanks for the great idea!
Autumn says
That is one of my favorite projects I’ve seen so far!
Vinyasa Mama says
I LOVE this!! I’ve been looking for a great DIY tutorial about this as our little one wil be walking soon and we will need to replace our glass coffee table with something a bit more toddler (i.e head bump) friendly. Thanks so much for sharing!!
Elizabeth says
Can you tell me the manufacturer and name of the fabric? Thanks!
Mary Sue says
Wow, great job! The buttons are fantastic! I may use this technique to make a bench for the foot of my bed!
http://www.etsy.com/shop/MarySueTattoo
katy says
please tell me the name of the fabric or where I can get it?! Its perfect! I made a DIY upholstered headboard and this fabric would be perfect
Amanda says
I love this! Ever since you house-crashed Kara I’ve been following her blog. Her designs are some of my absolute faves!
Amanda@The Hand Me Down House says
What an awesome tutorial! Thanks so much for sharing this with us. I will definitely be using their instructions to make my own. :)
Jocelyn Stott says
Wow – this looks great. I love this because you can truly make it your own without paying those ridiculous prices for custom upholstery.
Paula/adhocmom says
That is really impressive. I love the pattern. Would also hide juice, crayon marks and veggie bootie debris. Plus, it’s SO CUTE.
Amanda V says
What a great tutorial from Kara! I’m going to be doing this very soon!!! And it’d be so easy to make 2 of these, the other being a bench for the bedroom! You could also change out the fabric and/or buttons when your mood changes!
Question: do you think the ottoman is sturdy enough to hold 2 person weight? Would we need to at more 2x2s to add more support?
RD Shugart says
Fantastic! I am seriously loving the fabric. I’ve been looking for something like this to re-do an antique chair. I know it was a scrap piece for Kara, but I would love to know where she purchased it originally!
YoungHouseLove says
So glad everyone is loving Kara’s ottoman as much as we are! Here’s hoping she stops in to answer your questions soon!
xo,
s
Ashlee says
I have a foot bench at the bottom of my bed that I want to recover…thanks for showing me a great way to do it! On a side note, how do you get your picture to show up on these posts?
YoungHouseLove says
Hey Ashlee,
Here’s a post about getting an gravatar to show up when you comment: https://www.younghouselove.com/2009/03/bloggy-bonuses/
Hope it helps!
xo,
s
kelly says
This is so do-able! and cheap! love it!
http://www.kellyloves.wordpress.com
Karina says
WOW!!! Seriously – fabric name please! It is AMAZING. You did a phenomenal job!!! :)
Ashlee says
Thanks, Sherry!
Testing to see if my picture shows up? Used the one from our anniversary vacay to Paris this year. We are 7/7/7 wedding also! :)
YoungHouseLove says
Hey Ashlee-
Looks like it worked! And happy late anniversary to you!
xo,
s
Sunny's Life in Rehab says
Wooohooooo, Kara, great job as always, and congrats on being featured on YHL!
- Sarah :-) says
This ottoman looks great! Definitely has me wanting to make my own… if only I had the space.
One question/suggestion, though – wouldn’t it maybe be easier to attach the legs to the wood/mfd base before covering it with foam, batting, and fabric? This would avoid the angled nail/screw holes and still keep it securely fashioned.
I’m definitely not a pro, though, so if this wouldn’t work, I’d love to learn why.
Thanks!
Charity says
I am in love with this ottoman!! I’m definitely going to try to diMyself. Although, I love that it can also be a headboard (since I’m currently in the market for a new one). Thank you so much for posting!
Design Milk says
She did a great job on this – tufting is hard. I did a headboard once. It can go soooo badly if not done correctly.
Holly says
Seriously?! This came at the PERFECT time! I’m attempting to make my own fabric ottoman and I will definitely use this as a guide :)
Amanda @ Our Humble A{Bowe}d says
The ottoman looks great! We just might have another building project thanks to this! We just built a new dining table: http://ourhumbleabowed.wordpress.com/2010/06/29/furniture-feature-dining-table/
Cecy says
This is such a cute idea. The middle of my living room is pretty bare because I have a screaming 3yo, but I think it’s time to bring in a DIY ottoman. Great idea, guys.
Heather says
Very nice.
Christine says
LOVE this tutorial, what a great way to use some fantastic fabrics!!
Nicole says
This is definitely going in my inspiration pile! The ottoman looks great and I love that the fabric could just be changed up as your taste evolves. On another note, the rug in the first picture reminds me of a question I’ve always had (and googling always comes up with a mixed bag of answers). How are jute rugs with pet hair? Can you just vacuum it up, or does it get stuck in the little crevices? I have a (very big) dog and cat who both shed like it’s their job, but I love the look of jute.
YoungHouseLove says
We have a ton of jute rugs and a pooch (albeit one that doesn’t shed much) and they’re so easy to clean- just vacuum or shake ’em out!
xo,
s
SarahElizabeth says
I can’t even TELL you how excited I am to make this!! Just stumbled onto your great website recently and have already been inspired to step up the DIY around my home. Thanks for all the tutorials! Love it!