Alternate post title: Look how domestic my wife is.
I don’t know why I’m writing this post since Sherry is the mastermind/executor of this project. Maybe just to brag about her mad ironing skillz? I just watched the baby and approved comments while she did her thang for the better part of the day yesterday. The first step was cutting our 12.5 yards of our on-sale $8.49/yard yellowy green fabric (more info on that here) into perfectly sized panels for each side of the two bedroom windows (leaving enough leftover for one closet panel). Lucky for us, the living room rug made a great guide for keeping our cuts straight and our corners square. Especially since it’s 8′ long – so it was easy to lay a tape measure next to it so Sherry could cut five 90″ panels without breaking a sweat. As for the width, we left them the same width as the bolt itself, which was around 61″ wide. This means two panels can easily be drawn to cover each of our 39″ windows without feeling too taut or stretched.

Within about fifteen minutes she had cut all five 90″ x 61″ panels (two for each window and one for the closet) and we realized that we apparently cut it very close when buying those 12.5 yards (pun intended). This is all that we had leftover:
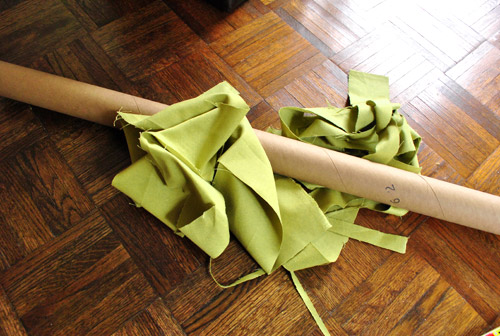
Not necessarily a bad thing (since we’d hate to dole out cash for more yardage than we needed).
Then came hemming, which Sherry tackled using her favorite trick: heavy duty no-sew hem tape. Read more about that process and learn how to make DIY curtains in general right here (for even more iron-on hem tape info, we made a video of the process here and we have even more in-depth pics of its use here). It basically involves ironing, peeling, folding, ironing, and moving onto the next seam.
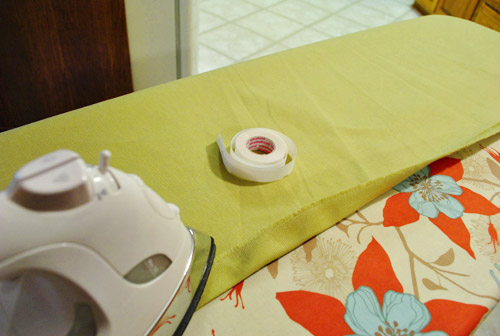
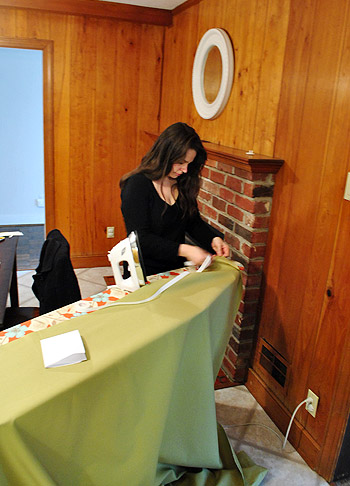
It wasn’t exactly a quick task to hem all four edges of all five panels (Sherry kept yelling out “1 down, 19 to go” which got old by about “3 down, 17 to go”) but getting that nice finished edge is certainly worth it. Plus, Clara and I kept the ol’ ball and chain company in the kitchen by singing, approving blog comments, and, um, eating while she ironed the day away. Quick, everyone freak out, Sherry’s hair is down:
But let’s fast-forward through all of the tedious stuff (the ironing, the clipping of curtain rings to each panel, and the hanging of all three curtain rods, which you can learn more about in this post of yore) and get to the fun stuff: the finished product.
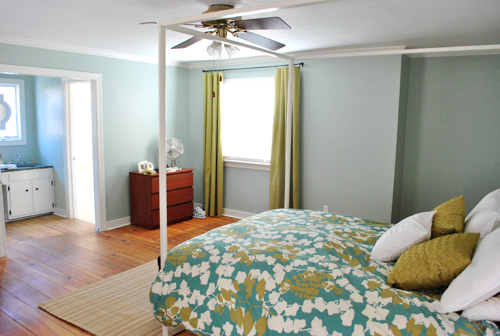
Oh and don’t mind the dresser or the fan or the lack of wall art and everything else that’s amiss. This room is definitely one of those works-in-progress that we’re taking one day at a time.

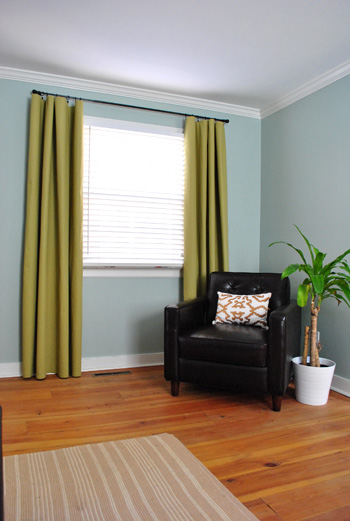
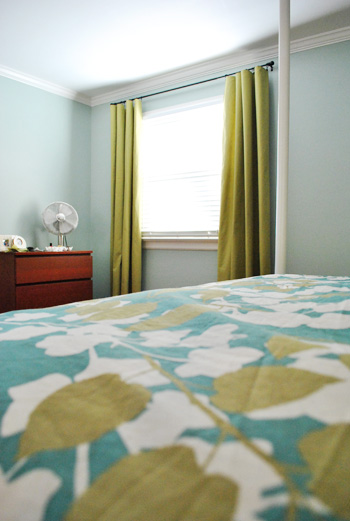
We’re really happy with how our DIY curtains turned out. And it should be no surprise that we chose to hang them higher and wider than the window itself to give the whole thing a bit more height and presence. We’ve actually had a reader tell us that she dreamed about us and Sherry mentioned something about hanging curtains “high & wide” in the dream. How crazy/hysterical/awesome is that? Nice catch phrase, babe. Who wants a “high & wide” bumper sticker?
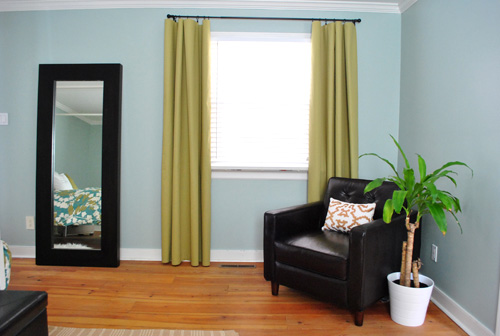
Sometimes we like curtain fabric to “pool” a bit on the floor, but after looking at it both ways we decided to let these babies barely graze the floor boards. It kept them looking crisp and modern (and created that cool loopy draping effect, which didn’t happen as much when I held the rod lower and they bunched up on the floor). So that would be our tip. Clip your panels to the rod and then move the rod around on the wall to pin down the perfect placement. That way you can raise it and lower it by hand and eye everything until you find the perfect height. Then just mark your curtain brackets and hang them right where you like them best – so your panels graze or pool to your heart’s content. It definitely beats hanging the rod and then clipping up the curtains only to find out they look all dorky and short.
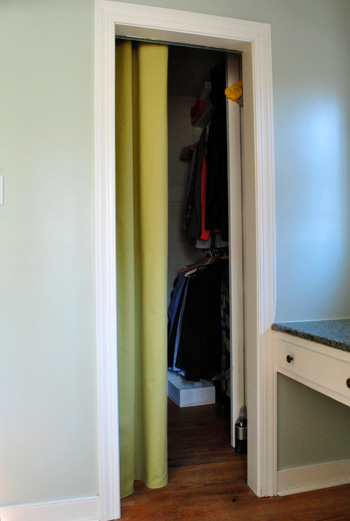
We also hung one panel on the inside of our closet to act as a less-intrusive alternative to the bi-fold door that used to be there. Most of the time it’ll sit pulled to the side like this:
But if we ever need to conceal our mess (or duck in there for privacy if someone’s over but we need to make a quick change) we can pull it closed like this:
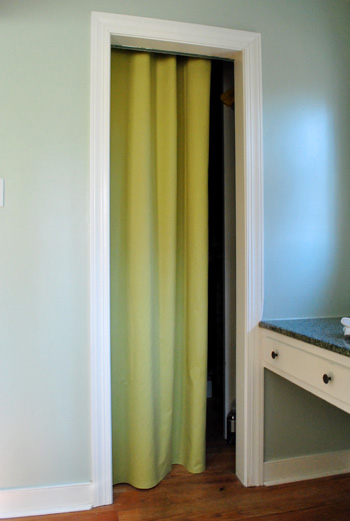
It’s kinda like a mini dressing room in there now- there’s even a light. And Sherry gets a kick out of picturing Clara doing puppet shows and other stage-related things from within the closet when she gets bigger and has that amazing imagination that only kids have.
Oh and if you’re wondering, here’s how it’s hung from the inside. We placed the rod high enough so that it’s not seen from the outside, and wide enough so the curtain can be completely closed (for privacy) or fully opened (so it’s not in the way of anyone walking in or out). It’s kinda the best of both worlds.
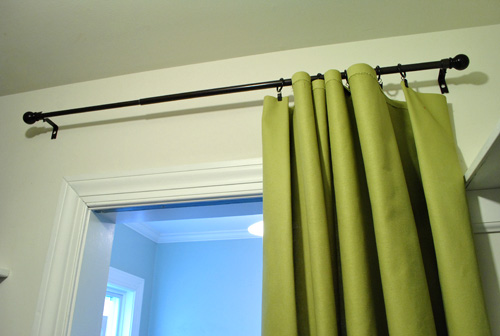
Oh and we got our oil-rubbed bronze curtain rods and ring clips from Target (aka Tar-hay) for cheap. It was around $40 for all three rods and all five packs of ring clips thanks to a few sales going on in the curtain aisle (and the 5% off we get for using our Target card). We love ring clips because they make curtain-creating a lot easier (no grommets or sleeves or pleated details to deal with, so you can literally clip up bedsheets or tablecloths as curtains if you’d like, or just hem fabric on four sides like we did). We also like ring clips because they’re particularly kid-safe. Should Clara decide to go crazy and try to swing on them like a monkey, the clip will release the fabric, which will fall to the floor while the rod and the rings will remain on the wall. Gotta love a safety feature that looks this good.
As for the finish, Sherry prefers oil-rubbed bronze rods (even in a nursery) because she says they’re “like eyeliner for the window.” And I have to agree that I like the look too- especially with the deep wood furnishings that we gravitate towards (along with some white things and even some painted pieces). But again I ask, why am I the one writing this post? Makeup references & hemming aren’t exactly my forte.
Anyway when it comes to the panels, beyond the function, height, and softness they add, we’re really happy with the color. Which means those three days of fabric hunting were all worth it. The yellowy green tone does exactly what we wanted it to do – it brings out the golden-green color of the bedding without matching it exactly (Sherry has this song she likes to sing called “Matchy-Matchy, Tackly-Tacky” which came about when she was imitating her sweet Italian mom, which is always amusing). But getting back to the curtain color, we’re glad we went a bit greener (instead of browner or yellower) than the bedding, because it looks nice and fresh against the Caroline Went Clubbin’ Aqua Carolina Inn Club Aqua wall color (get that joke here) while still obviously relating to the color in the duvet.
The curtain color also goes nicely with the new pillows that we snagged purloined for the bed too. So between them, the curtains, and the bedding we feel like we’ve got that golden green color sufficiently injected into the room. Now we can start layering in some other colors and textures for a little dimension and interest. Eggplant? Navy? Charcoal? Inky blue? Who knows where we’ll end up. But let the fun begin. Oh yeah, and pardon the missing nightstands, bedside lamps, etc. They’re also on the ol’ to-do list.

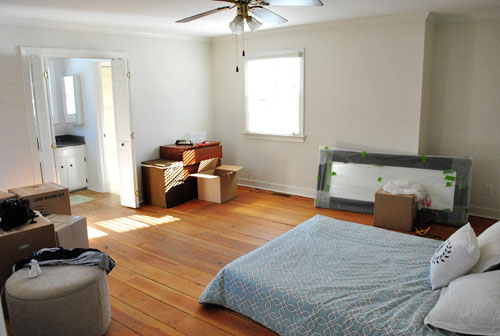
We definitely still have a lot more things to do in here (and we’re happy to take our time), but it really has come a long way in the past seven weeks or so. We almost don’t recognize this bedroom shot taken right after we moved in:
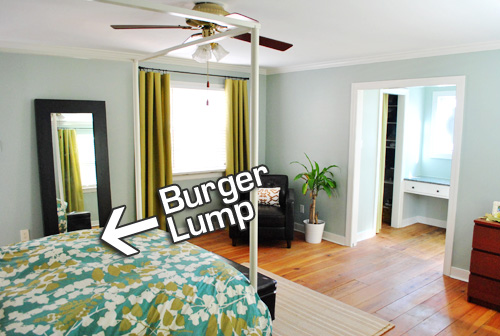
Oh, and last but not least, we thought you might appreciate a little “behind the scenes” tidbit. Sometimes we have to work around a sleepy chihuahua who refuses to get out of bed. Such a diva. But at least Burger doesn’t mind when I make the bed right over him. And our new fluffier duvet makes him nearly invisible. Yup, he was hiding in bed the entire time we shot these after pics.
And so ends the curtain diatribe that is this post. The whole process – as long as it was – has given us a bit of curtain fever. At least that’s what Sherry’s calling it when we drive by fabric stores and she presses her nose against the car window and says things like “I’ll never let go” in her best Rose-from-Titanic voice. We need them in a bunch of other rooms and we’re determined to choose bold and patterned textiles to add some serious interest. Because we definitely don’t want to end up with white Ikea curtains everywhere again (not that we don’t love ’em, but we’re just ready to have some fun and take some risks). So don’t be surprised to find us posting about our fabric store adventures again sometime soon. A guy can only listen to those Rose-from-Titanic impressions for so long before parking just to make it stop.
Psst- Burger’s totally letting fame get to his head. Check out his big DogMilk interview here.
Psssst- We just announced this week’s giveaway winner, click here to see if it’s you.

Kari says
Love!!! This room already LOOKS like you two live there. I don’t know how you do it, but when I look at it I see John-n-Sherry-live-here screaming at me. I’m voting for navy blue as the/one of your fun accent color for the room! Or maybe even a super moody, dark gray?! Maybe both?
Also, I totally know how it feels to have 1 down, 19 to go–only in terms of earning my PhD! I just finished my first course a week ago and said the SAME thing at least once. :)
P.S. burger bump=hilarity..I love how you manage to avoid rousing the guy even when you’re working!
anna says
The curtains are so lovely with your wall color!
I have a quick q about hanging curtains… I have 2 windows in my bedroom, and I just recently hung one set of curtains up and used your high and wide advice ;) … the 2nd window is located very close to the 1st one. See where your window is next to the dresser? Well, that wall that your dresser is standing in front of is kind of where my 2nd window would be! So now I’m a little afraid to hand the 2nd set of curtains because I feel like it might be “too much curtain” in such a small space. I also bought curtains that are lined and have somewhat of a large pattern on them. I love them, but now I am rethinking this whole thing. My room is about the same size as your old bedroom, and I am unsure of what to do! Should I go ahead and hang the 2nd curtain… or should I just install some shades in both windows and leave the one window curtain-less?
Please help a sad, curtain confused girl!
YoungHouseLove says
We like hanging curtains on all of the windows in a room for balance. Sometimes treating them the same way makes them more “neutral” so even with a big bold pattern it will look surprisingly great when they’re all ‘dressed’ the same way. Good luck!
xo,
s
heather j. says
i’m referencing cappy’s mirror question:
the post was for clara’s mirror, and i think she was wondering about the large one in your room. how did you tilt it & also anchor it?
YoungHouseLove says
Ohhhh got it! Thanks for the clarification Heather J! They actually sell wall anchoring kits for TVs and bookcases and mirrors so we used one of those for that. Got it at Home Depot!
xo,
s
L says
Can we see a photo of how it worked? How does it anchor but still angle out on the floor?
YoungHouseLove says
We’ll have to write a post about it soon!
xo,
s
Erin @ Where Beauty Meets Function says
No big surprise….they are perfect!! :)
Elizabeth says
I’m actually amazed that ironing is the task you would do with your hair down, Sherry. That’s the type of “constantly looking down” activity where my hair drives me CRAZY if I don’t pull it back into a ponytail or messy bun!
Isn’t this an insightful and design oriented comment?
YoungHouseLove says
Haha, it’s true. I tie it back to paint and stuff but I must have been so focused that I didn’t notice my hair in my face!
xo,
s
Ashley says
Was I the only one that thought the first pic of the ironing board cover was a teaser of some cute fabric for elsewhere? Haha, cute cover though! The bedroom is coming together beautifully! Can I start a team eggplant for future color?
LauraC says
L.O.V.E. E.V.E.R.Y.T.H.I.N.G.
ashley says
alright i need to know your secret to cutting long panels of fabric. about to embark on my first wedding diy project…burlap runners! tips? i don’t think i’ve sewed since 7th grade home ec, so even cutting the fabric seems overwhelming at this point.
YoungHouseLove says
Use a rug! See that first pic? It’s my secret to straight cuts. i use it as a template.
xo,
s
Emily says
Hey Ashley, I used to work at a fabric store – here’s a tip for cutting burlap straight – because it’s a wide enough weave, you can usually pull one thread out. Once this one is missing, it creates a channel that you can easily see and follow with scissors. Just check the weave before you start – if it looks like a straight grid, you’ll be good to go (you don’t want to use this method if the burlap isn’t woven straight). Measure to the edge you want to cut, pull out the string (you can get it started in the middle by pulling it up with a pencil tip or a blunt needle), and your groove is ready! Hope this makes sense :) And, of course, for a tighter-woven fabric (or a knit) Sherry’s rug method is the way to go!
YoungHouseLove says
Sweeeeet tip. Love it.
xo,
s
Emily g. says
Sherry, I love your hair down!!! You look stunning! ….and the curtains look great too! Not to be a Negative Nancy, but what happens when you need to wash those beauties? Did you prewash the fabric after you cut it?
YoungHouseLove says
Hey Emily,
Good point! We always wash all curtains in cold water and tumble dry low or line dry them (to both avoid shrinkage and to keep the iron-on hem tape from getting sticky). We haven’t had any panels shrink on us yet from that method, but since we use ring clips if they did shrink a bit we could just clip them a bit less “deeply” if that makes sense (clip just the top half inch instead of the top inch) to eke out a little more length. Hope it helps!
xo,
s
Dannielle says
The room is looking amazing! I really love how much the curtains make everything else pop. It almost looks like a luxurious room you find if you’re going to the beach. Great job! :) And I really do love Sherry’s hair down, looks fantastic!
holly says
hi! i am a new blog follower and SO happy that we have the same duvet! we ordered for our new house (moving next month) and so thrilled to see your great ideas with it! i would love to attempt the curtains – do you have more detail on the name of the fabric? might check out hancock this weekend!
YoungHouseLove says
Hey Holly,
We sadly don’t have any info on that fabric (no name or number was on the bolt we got) but it’s the only fabric of its color or kind in the upholstery area (where they have all the larger home improvement bolts). Hope it helps!
xo,
s
ari says
I love how your house is shaping up! It looks lovely. I have a question – I have a malm bed from ikea, and my silly puppy somehow put his paw right through the headboard. It has a small (quarter-sized) hole, right smack in the middle. The bed is only a year old, and I don’t want to get a new one yet (plus, I can’t afford it). What would you do to fix that? Any suggestions? I know you can’t paint that kind of veneered wood. I’m thinking maybe something with fabric, but I’m not sure how I would achieve a look that says it’s supposed to be that way, and I’m not just covering up a hole. Could I put one of your DIY headboards right over the existing one? Thanks for any help you can offer!
YoungHouseLove says
Hey Ari,
One way would definitely be to build out a DIY headboard with wood or even make a fabric slipcover to hide the one you have. You could also try patching the hole with wood putty and using a wood-tone marker (they sell them at Home Depot) to get the closest match. Might blend right in. You also might want to cover the whole headboard with something cool like textured wallpaper (grasscloth?) and then poly that so it’s nice and strong. Hope it helps!
xo,
s
Tina says
I scored awesome curtains for both living room and kitchen on clearance at World Market. My husband (& most everyone else) hates the kitchen ones, but I don’t care-I love them! Its amazing how they make a room-yours are fabulous.
Katy says
I know your motto is “high and wide” for curtains, but how wide do you actually hang them? I see that your windows are 39″ wide – how long is your curtain rod? How much room is there to hang the curtain from on either side of the window? I’m trying to figure out how long of a rod I should get for a 65″ wide window.
YoungHouseLove says
Hey Katy,
We went 12″ beyond the window trim on both sizes. Hope it helps!
xo,
s
Renee says
how in the world does Burger breathe under there!??! that chihuaha is Krazy! (yes, crazy w/a “k”!) and oh so cute!
love the curtains and colors in the room! looks awesome!
YoungHouseLove says
Seriously! Sometimes I duck under to visit and have to come up for air about 30 seconds into my adventure!
xo,
s
Sara says
We have two cats that do the same thing. They love sleeping burrowed under all the blankets on our bed. Sometimes they will sleep most of the day or night under the covers like that, especially in the winter.
We were on vacation and had my dad come by to feed the cats and he was afraid they would suffocate under there so he kept pulling back the covers to make sure they were alive!
Tanya says
My fur baby does it too. He picks a spot close to the edge so when he tents the bed he gets a tiny draft of fresh air! Sometimes you see is a little nose sticking out – so cute!
Jenn L @ Peas and Crayons says
awwww the Burger lump! <3 The curtains look amazing! and actually pretty easy too! Kudos
xoXOxo
Jenn @ Peas and Crayons
jeanne says
I don’t know what makes me more happy:
Sherry and stitch witchery/iron on seams
Or
Burger having a fantastic time on the bed.
That’s real life.
Curtains are GOOD.
xo jeanne.
Aly says
Have you thought about painting your dresser eggplant? It could look pretty awesome!
YoungHouseLove says
We actually want to get two dressers (the chair will move and we’d love to place our his & hers dressers on the wall on either side of the sink nook) so that dresser will probably return to the guest room soon. We’ve been looking at thrift stores for some fun dressers that we can show some love!
xo,
s
DJ says
I am alternately jealous and mad that you have done more work to decorate your new home in 7 weeks than I’ve done after 8 years… You guys are inspiring- it really makes me wanna get on the ball!
Design Elements says
congratulations for the link love on Apartment Therapy!!!
lovely greetings
YoungHouseLove says
Thanks so much! We’re honored to be in such good company!
xo,
s
doahleigh says
LOVE this! You guys have such amazing vision. I could never have put these elements together. Great job!
Sarah says
Do you mind telling me which Hancock you ended up getting the rest of the fabric at? (since the other one I’m assuming is out?) Was it the Richmond or Midlothian one? Thanks!
YoungHouseLove says
We got most of it at the Midlothian one and also went to the Broad Street one to get the last 2.5 yards. Hope it helps!
xo,
s
Sarah says
Thanks! I called them hoping they could possibly give me the number so I could check with my local Hancock, but sadly they could not help me. The person I spoke with told me that the fabric number and/or description would be listed on a receipt. Would you happen to still have your receipt to check and help a girl out?! Sorry if I’m coming across as pushy, I’m not trying to be, promise!
YoungHouseLove says
Alas, when you asked for info we looked for the receipt but the trash had already been taken out! Once we made the panels we tossed it. So sorry we can’t help. But we promise if you go to the store and walk into the upholstery section you’ll immediately see it. The price is $16.98 per yard (we got it 50% off at $8.49) and it’s the only greeny-yellow upholstery fabric on those large bolts. There’s nothing even remotely similar to confuse you. Hope it helps!
xo,
s
karen @ our slo house says
Beautiful!
All that ironing and hemming was worth it. And I’m guessing that it was a big ol’ pain in the @$$. Having just finished a project that took hours and hours to complete, I know how happy you must be to be d.o.n.e.
Your master bedroom really does look like a whole new place! : )
melissa says
you guys! those look AWESOME!! i am loving the entire room.
i have a question for you. sherry said she likes the oil-rubbed bronze rods… (by the way, i love the eyeliner reference. i always tell my husband that lighting fixtures are the earrings of the outfit -er- house. i’m glad we are on the same page there.) i totally agree, they look great! my husband and i move in to our new home next week (eek!) and i have curtains, but no rods. i was thinking i should get brushed nickel since all of our fixtures are brushed nickel, but would that be too “matchy matchy, tacky tacky???” now that i’ve seen this post, i’m really wondering what to do. the tones in our house are really warm and bronze would look FAB…but is it okay to mix them in with all of our brushed nickel? if you have any advice and could take the time to give me your input, that would be awesome!! thanks!
p.s. clara in the pillows. cutest picture i’ve ever seen.
YoungHouseLove says
Hey Melissa,
Yesss! Mix those babies in. At least that’s what we love to do. It’s a total personal preference thing, but we think finishes like brushed nickel and oil-rubbed bronze can be layered really easily as long as they both occur a few times so neither material is the odd man out. For example, a room with brushed nickel lamps bases and a brushed nickel table fan can look gorgeous with two oil-rubbed bronze rods on either side of the room. The effect will be a nice evenly distributed look that’s balanced and fun. Shouldn’t look mismatched at all!
xo,
s
Katrina says
Love that color fabric!! So pretty, were thinking about a similar color for drapes for our baby’s nursery!
Cori @WhereYouHangYourHeart.com says
I love it! That is so inspiring, I’ve never made my own curtains before, because I don’t sew. But, it looks like I won’t have to now. Thanks for the tips!
Kait says
Unrelated, but worth noting, you’re in the lead for the homies at AT!
http://www.apartmenttherapy.com/ny/the-homies-best-home-design-blog-of-2011-submit-your-nominations-137078
YoungHouseLove says
We love AT. So crazy! We’re just so honored to be in such good company!
xo,
s
T @ talk.date.love. says
I am going to make these curtains for a friend’s bedroom next weekend! I love the way yours turned out. They look so great in the bedroom. So excited to keep watching the progress.
P.S. You guys are such a sweet and inspiring couple.
Sarah@grownupnow says
I’m really loving the way your room is coming together. You’ve really got an awesomely soothing feel going on in their. As far as the curtains go, did you guys use something like stitch-witch for the hem tape, and have you ever had any problems with it coming undone over time?
YoungHouseLove says
Hey Sarah,
You can follow the links up in the post where we mentioned our no-sew iron on tape to see specifically what we use (and love!). After years of use (and even washing it) we have never had an issue with anything coming undone! Hope it helps.
xo,
s
Jen @ The Decor Scene says
OH MY GOD!!!! GORGEOUS! I had a feeling when you gave me the hint yesterday of “heat” that you were ironing the curtains for the hems. Love it guys. I love blue & green together. I think you have one good looking bedroom there. Been really lovin’ all your colors for the new home so far. Really comin’ together.
Paula/adhocmom says
I so wish I could do that. I’m just going to completely admit that I am impatient and suck at things like measuring. It’s so unfortunate. I have curtain fever too. We’re moving from a one bedroom apartment (which was totally lacking in windows by the way) to a FIVE bedroom house (good-bye NYC!). I’m OBSESSED with curtains. Have just discovered saffronmarigold.com if you guys don’t know about it. It’s pretty awesome, but then again, um, you can measure and sew and stuff. . .
YoungHouseLove says
Oh yeah we love Saffron Marigold! We actually did a giveaway with them a while back. Amazing people- and amaaaaazing fabrics!
xo,
s
Tasha says
Where did you get the mirror in the bedroom? It is just what I am looking for, for my master bedroom. Thanks!
YoungHouseLove says
Hey Tasha,
It’s from West Elm (a sweet wedding gift from the hubs) but we’ve seen an extremely similar model at Ikea for cheap. Hope it helps!
xo,
s
MissCaron says
LOVE love love the colors! The curtains turned out amazing and work perfectly with the duvet cover without being too matchy. GREAT JOB Y’ALL!
Kristen says
Your curtains turned out great! The room is really coming together so well.
kat says
do you know what the brand of hemming tape is?
I love that pic of Clara – totally cracks me up.
YoungHouseLove says
Hey Kat,
Just follow the link in the post where we mention the no-sew tape for lots of info, pics, etc. Hope it helps!
xo,
s
Kelly says
I’ve never posted a comment before but I’ve been a long time reader. I have to say, you guys are awesome, give me great ideas and make me laugh. Although I don’t think my husband would like you too much since I just told him to charge his drill because this weekend he is all mine ;).
Love the curtains and the progress of the bedroom!!
Kelly
Meghan Solberg says
Love love LOVING the way you’re room is coming together! Colors are awesome and it just looks very, relaxing!! Great job :)
Alma says
Sherry you got MAD SKILLZZZZ!!!!! Looks great guys!!!
misscorinne says
The bedroom looks great (and I wouldn’t have noticed the lack of bedside tables if you hadn’t pointed it out)! I agree with the “Matchy-matchy, tacky-tacky” mantra, and you did just the right amount of color matching here…
I was also at Target (Tar-jay to me)the other day shopping for curtains, and ended up buying a bunch of their cloth tablecloths that were on sale, as well as a cloth shower curtain. The patterns were bold and modern and I’ve been able to make multiple curtains from each. I usually go the curtain ring route, but am trying full hems this time since I’m using tension rods inside the window (I like seeing the wooden window frames in this house).
Keep at it – decorating a new house is so fun!
Sarah says
Adorable! Adding this to my list of things I’d like to tackle soon :) I think I can handle it… we’ll see!
http://myshuckinglife.com/
Jennifer says
1. Hair down, how exciting! (I’m a long-haired chronic poly-tailer, too!)
2. This room reminds me of a grown-up version of Clara’s nursery in your old house.
3. Absolutely love it so far! The duvet looks so gorgeous with the curtains and Carolina’s Aqua Country Club.
4. I am living vicariously through you guys until my hubby and I buy our first house next year. Thanks for the tips and inspiration!
Jana says
Sherry!!!! (John too!) Everything has come together so beautifully :) The curtains look great!
I can’t wait to see the next design improvement in the house…I’m staying tuned!
orangesugar says
Just curious…did I miss the reason for using tape vs. a sewing machine? After you use the tape is it washable?
I made my own grommet top curtains. (http://orange-sugar.blogspot.com/2010/02/tutorial-lined-grommet-top-curtains.html) I made them about 65″ in length to avoid them catching on fire due to our house having baseboard headers. Do they look like they are waiting for a flood? Absolutely, but I’ve learned to deal with them.
If I decide to replace the curtains I’ll probably search for curtain rod extension brackets so that I can have floor length curtains without them touching the heaters.
YoungHouseLove says
Hey Orangesugar,
A seamstress I am not. So because we’ve had so much luck with hem tape over the last 4+ years I stick to that. And it’s totally washable and holds up well. Thank goodness! And your curtains look awesome. Can’t believe you made those! Wow.
xo,
s
Carol N. says
I love curtain rings too! When my 6 month old kitten was but a wee tot (aka about 7 weeks old) he would grab hold of the curtains (or belt or whatever he could grab) and swing like a wild monkey from them! As he got a little older and heavier, I was glad that we had the curtain rings that would pop off when he got a little too frenetic with his swinging. So they work well for cats as well as kids! I never could get mad at him because he was just so cute swinging like that.
JenWoodhouse.com says
They match the pillows perfectly! Looks great… well done!
Megan M says
You have truly inspired me to make my own curtains for our home office. The ones I love are $278 each panel from Anthropologie, but I will now be on the hunt for some fun fabric to make my own. Thank you for all your tips!
Rochelle says
HAHA! Laughing at the Burger Bump. Our current chi is Peanut and my kids are always checking any bumps in our beds or blankets on the couch for him. We’ve accidentally sat on him too many times! Poor thing growls now when you touch his “bump” to warn us if we are too close! But chihuahuas are the best for getting in bed on a cold evening- instant bed warmers.
Ali says
I have to say this post may just change my bedroom in a really good way! The closet curtain is such a great idea. I am working with limited space & taking off the door may be just the thing I need in order to fit a cabinet where I want it.
Your’s is so pretty, it doesn’t seem like it would be a down grade from my current door that swings out into the room.
One of those …d’uh why didn’t I think of that moments! But honestly even if I had thought of that, I think I would be afraid it would look bad, but seeing yours makes me want to give it a shot!
Thanks for the inspiration.
Candace says
I love the way the curtains tie the room together! In your current state of “curtain fever” keep your eyes peeled for other options. I’ve seen some fantastic ready-made curtains at Pier One recently. You could also use a fabric shower curtain (Tar-hey has some great ones) or a cool tablecloth with curtain clips attached.
Erica @ Erica's Inspirations says
Looks great! I am amazed at all you have done to your home so far! I plan to do the same “sewing” treatment to my master bedroom windows. Problem is….I CANNOT find a fabric that I love and is cheap at the same time. I guess I will just keep searching.
I love that Sherry calls the dark bronze rods “eyeliner”!! I love eyeliner for my windows too :)