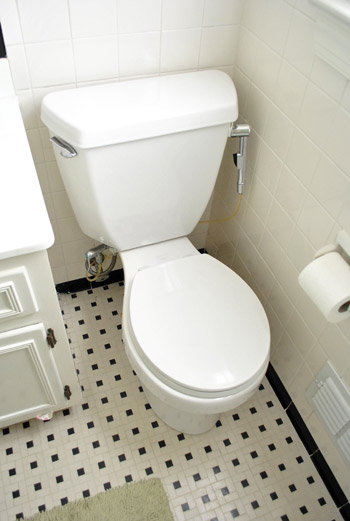
The toilet in our hall bathroom has rocked a little bit from the day we moved in (the inspector even noted it on our little home inspection form). Some people can fix this with plastic shims or tightening bolts, but we quickly diagnosed the issue as a rusted bolt under the toilet flange. That’s a fix that requires removing the entire toilet and replacing the bolt, so it took us a while to get to this to-do task. But here’s how I finally decided to seize the day toilet and show this rocking throne who was boss!
The process is similar to our toilet installation tutorial, but that project didn’t involve removing an old toilet first. So today you’ll get to see the fun part of removing an old, somewhat grody wax ring (along with some uncomfortable close-ups of the Petersiks’ potty). Sounds like fun, right? Don’t say I didn’t warn you. Let’s start with turning off the water.
Materials For Fixing A Rocking Toilet
Removing and reinstalling a toilet involves pretty basic hand tools (no power tools!) that most homeowners will already have around their house. The only thing you’ll probably need to buy at the store is a new wax ring kit, which is
- Flathead screwdriver
- Wrench
- Hacksaw
- Small putty knife
- Bowl, sponge, and/or paper towels
- New wax ring kit*
- White silicone caulk
*We always recommend buying 2 just in case… and make sure it’s the KIT that comes with bolts!
Step 1: Turn Off Water & Drain The Tank
Start by turning your water supply line valve clockwise to turn off the water. Try to do this by hand to avoid breaking the valve. If it’s stuck, try spraying WD-40 or even olive oil to lube the connection (don’t remove the screw!)
With the water off, flush the toilet to get as much water out of the tank and bowl as possible. Then use towels or a sponge to sop up the extra water by hand. And no, I won’t show you a picture of my hand in the toilet bowl.
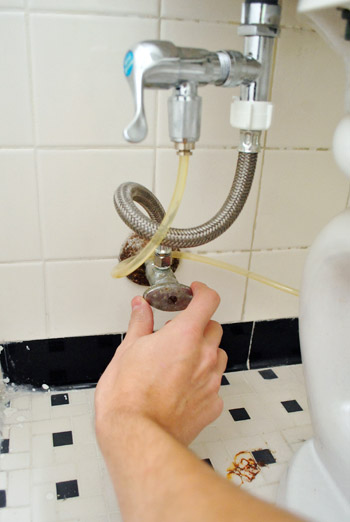
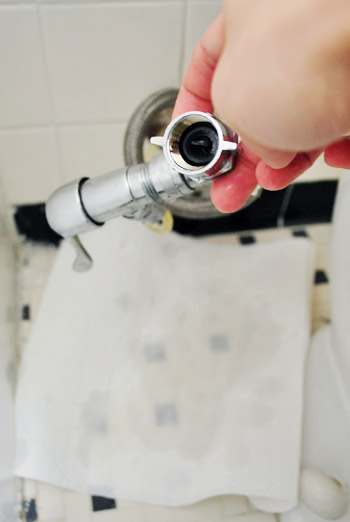
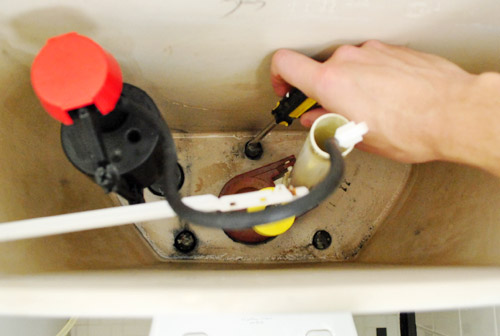
Step 2: Detach The Supply Line
Once things were pretty dry, I unscrewed the supply line from the bottom of the toilet tank. We’ve got a diaper sprayer attached so ours looks a bit crazier than your average toilet, but the idea is basically the same.
There was a bit of water leftover in the supply line, so I had some paper towels on hand to soak it up.
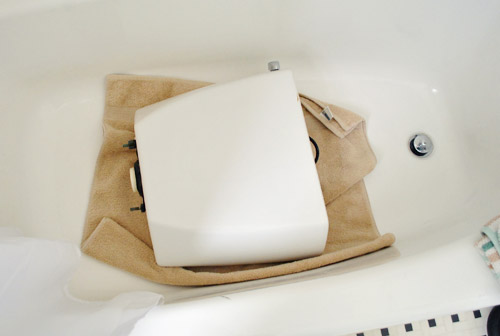
Step 3: Unscrew & Remove The Toilet Tank
Next up was removing the tank, which is bolted to the bowl in three spots. I was pretty much able to do it with a screwdriver all from the top, but I did have to unscrew the nut from the bottom side at one point.
Once it was unscrewed, I lifted it up carefully and set it down somewhere soft and out of the way. In this instance, that meant an old towel in the bathtub. Oh yeah – we’re a classy operation ’round here.
Speaking of classy: here’s our topless toilet.
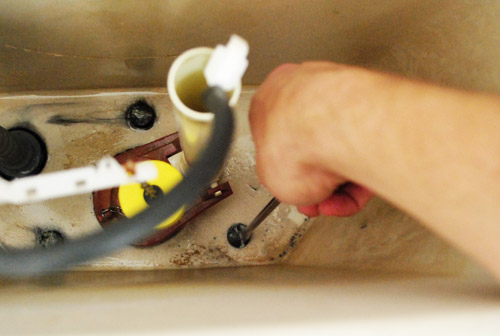
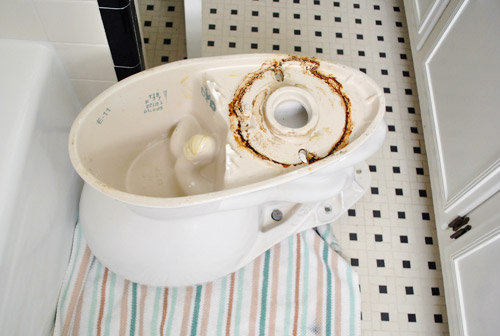
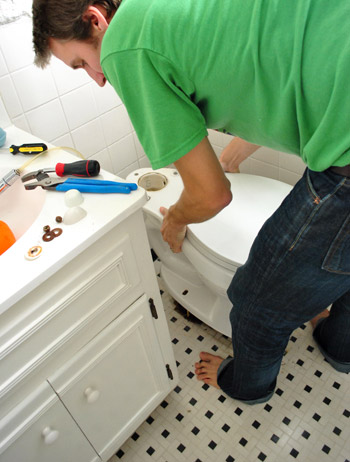
Step 4: Remove The Toilet Bowl
To remove the bowl, I used my wrench to unscrew the bolts on either side – this particular guy was the culprit for the rocking situation that got us into this whole mess:
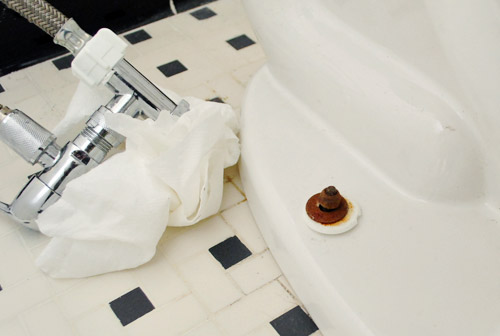
With both bolts unscrewed, I used a gentle rocking motion to detach the toilet from the floor. It’s stuck to the floor in place by a wax ring (just wait for that beautiful picture – it’s coming up!). But once you’ve got it unstuck, the bowl comes up pretty easily.
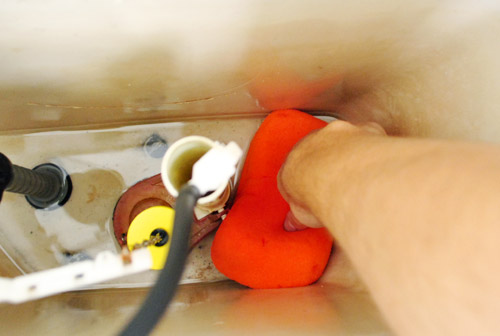
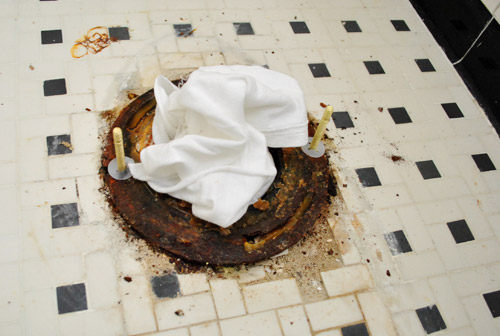
Step 5: Plug The Sewage Hole
And here’s that beautiful picture I teased. If you’re eating breakfast, you might want to stop scrolling. You can see I plugged the hole with an old rag to minimize the odors creeping back up and assaulting my nostrils. You just have to be careful not to put it in so deep that it gets lost into the sewer system. You might anger the Ninja Turtles living down there.
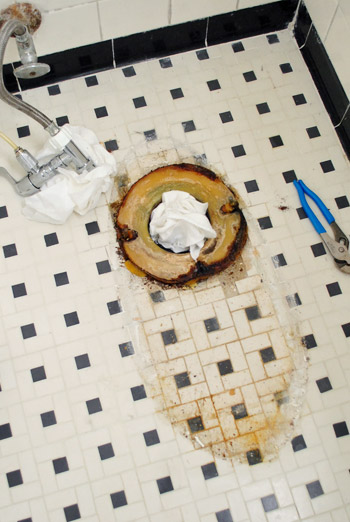
Step 6: Scrape Away The Old Wax Ring
Since the old wax ring had to come up to make room for the new one, I got to scraping it with a plastic putty knife. This is probably the grossest picture of the post, so please accept my apologies. But rest assured that it’s just wax and rust – nothing more.

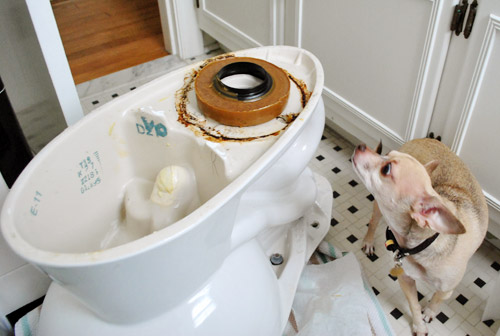
Oh, and I made sure to remove the old rubber reinforcement ring too. This comes in some wax rings, so it shouldn’t be left in place (our new wax ring had one in it).
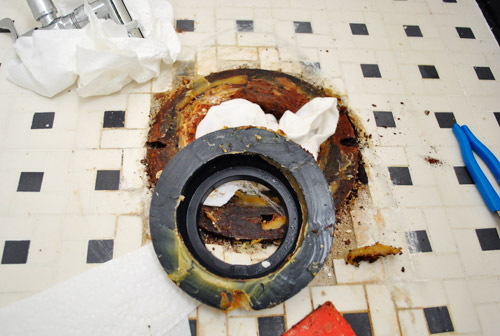
I also had to clean a little bit of the wax off of the base of the bowl too so it was all pretty looking. Well, pretty is probably a stretch.
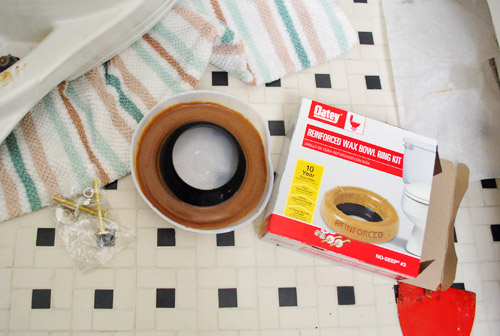
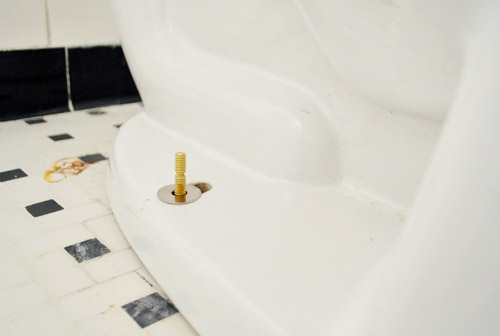
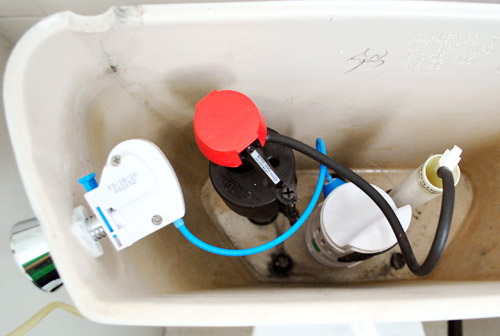
Step 7: Put The New Bolts & Wax Ring In Place
Here’s the new wax ring kit. It came with new bolts and everything for a whopping $7 at Home Depot.
The new ring gets stuck to the bowl, not the floor. I just pushed it slightly down over the opening at the bottom of the bowl. Be sure to have an inquisitive chihuahua double-check your work.
Oh, and of course the new bolts had to go into place around the flange (that’s the steel piece attached to the floor – ours is very rusty). And remember to pull up the rag right before you put your toilet back into place (so as not to meet the wrath of Ninja Turtles living in our sewers).
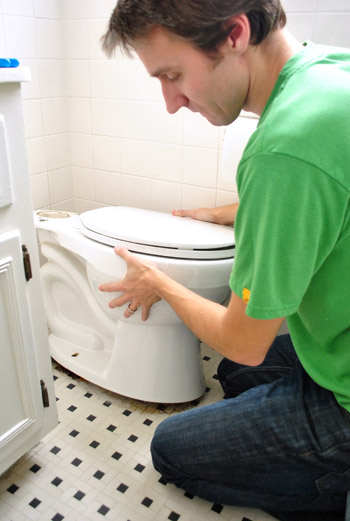
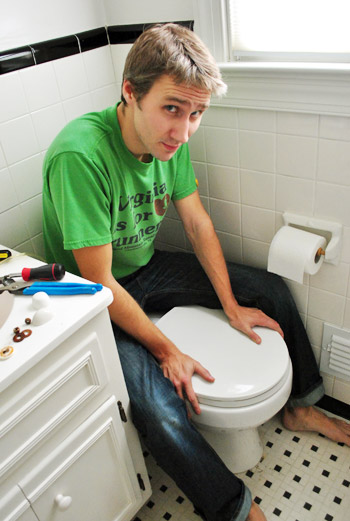
Step 8: Set The Toilet Bowl Back In Place
Then came the tricky part – which I’ve been known to mess up in the past – putting the toilet bowl back into place. It’s tough only because:
- They’re a bit heavy and
- You have to line it up perfectly over the bolts
But if worse comes to worst, you just pull it back up and try again (though if you’ve squished your wax ring too much you may need to put a new one on). That’s why I always buy two wax rings just in case. Better to spend an extra $6 to save a trip to the store (or risk a leaky toilet). Plus you can always return it the next time you’re at the store if you don’t end up needing it. Oh and this step can be helpful with two people (Sherry did once she was done taking this picture!)
Once we had the toilet placed and straight, well, I sat on it. This little bit of pressure squishes the wax ring into place to ensure that we were getting a good seal. I wish I could say this is the first post that featured a picture of me on the john, but alas…
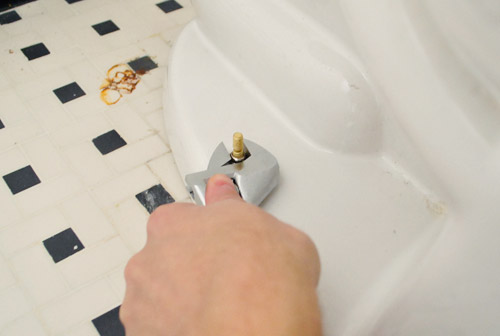
Step 9: Tighten The Bolts
Once it felt pretty set, I went to work bolting it into place. You can see how the new bolts stick up nicely through the holes in the bottom of the toilet bowl. Note: that is not a hairball on the floor, it’s a weird rust stain that has been there since we moved in. So we plead the fifth.
I hand-tightened the nuts most of the way, but used a wrench to finish things off. The thing about a toilet is you don’t want to over-tighten because it can easily crack the ceramic. So just be sure to do this slowly and go back and forth tightening each side a few spins for an even installation. You can also break out a level if you really want to make sure.
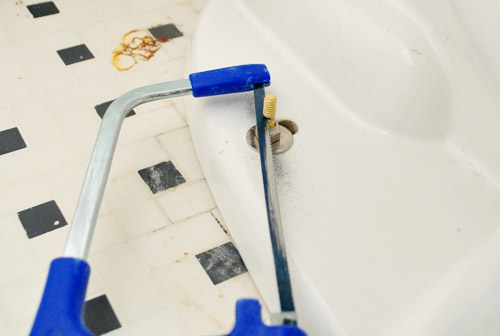
Step 10: Cut Off Excess Bolt Length
Your bolt will likely be a bit too long for those little plastic covers to fit over them, so use a hacksaw to saw off any extra length.
Step 11: Reattach Your Toilet Tank
Bowl securely in place? Check. Not rocking anymore? Check. Now it was time for some tank action. I put the tank back into place on top of the toilet and screwed it in. Again, not too tightly because I didn’t want it cracking. But enough so that it felt secure and I didn’t think it would leak.
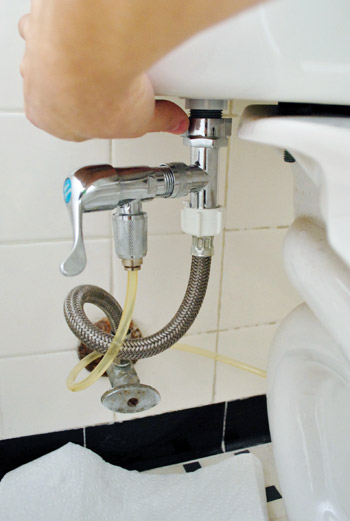
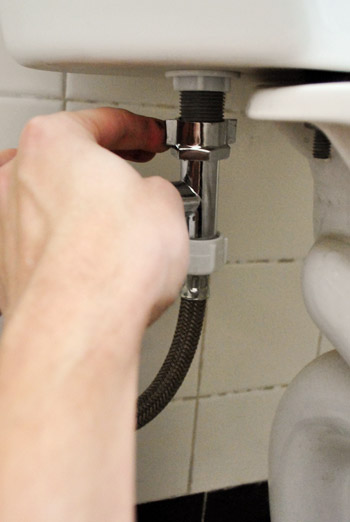
Step 12: Reconnect Your Water Line & Check For Leaks
And last but not least, I reconnected the water supply line so we could refill the tank and bowl. Be sure to check for leaks around the base of the bowl, the bottom of the tank, and where the water line is connected.
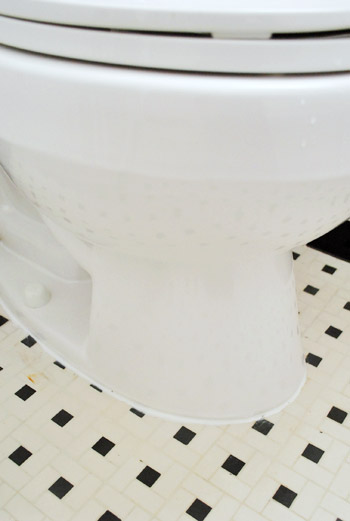
Step 13: Caulk Around the Base Of the Bowl
All of that checked out okay, so I ran a line of caulk around the base of the toilet. I only did it around the front 75% of the bowl so that if a leak were to happen in the future, it could escape out the back and alert us to the issue (that’s a little plumber’s trick we learned a few years back for ya).
BONUS: Add A Dual-Flush Converter Kit
This is usually where a toilet replacement adventure would come to an exciting conclusion, but we used this as an opportunity to install a dual-flush converter kit to this toilet.
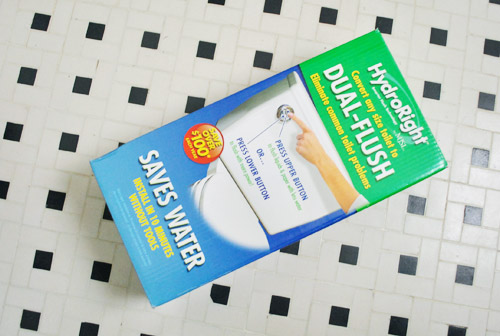
We did this in our last house so you can read our more in-depth dual flush toilet conversion tutorial. But basically, this $25 converter kit lets you take a normal toilet and give it two flushing options: a lighter flush for, um, lighter “activities” and a fuller one for the, you know, other stuff. Hooray for saving water (and money) and pretending your toilet is from the future.
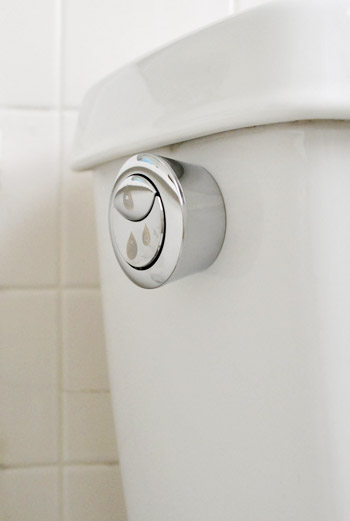
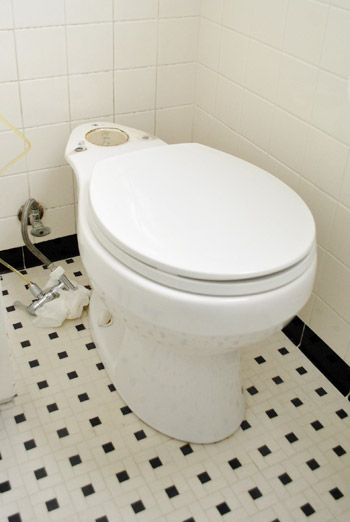
The installation was a cinch compared to the whole wax ring replacement stuff. Here’s a shot of the finished product.
And for the grand finale – and “after” shot of our now fixed, now dual-flushing toilet. Sure, it looks pretty much the same. But just try sitting on it. It’s soooooo much better. No more seasick-esque motion. No more shouting a warning to guests who head down the hall to use the facilities.
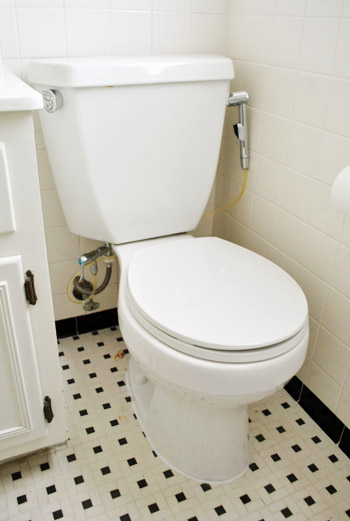
And admit it, that diaper sprayer on the right is hardcore. Like our toilet is wearing a little holster or something…
Psst- Now that I’ve assaulted your eyes with toilet pictures, check this out (it’s much cleaner and sweeter).

Brenda Schwarz says
oops! I love that John ***is*** most always barefoot in posts :)
Firesparx says
The toilet at my work has the same “affliction”. It’s a blow to the ego when you sit down on something and the whole thing noisily shifts.
When we winterize the cottage my dad uses a turkey baster to remove the last bits of water in the toilet. We buy a new baster every year because we aren’t convinced the grody one didn’t end up back in the kitchen…
Bryn says
Thank you SO MUCH for posting this! Very timely, as last night I noticed water in our basement…turns out our 1950’s toilet (with a wooden seat, mind you!) was leaking…so we need to replace it and the wax ring. I am a newbie to home improvements like this, so your step-by-steps will be a great start for us on this loo adventure!!!
Craig@WestwoodDriveBTS says
Hey Sherry and John,
My wife and I completely revamped our 1/2 bath after we moved in. Not only did we replace the toilet, but we ended up moving it slightly. Also installed new pedestal sink and flooring. Check it out:
http://westwooddrivebts.blogspot.com/2012/01/1-thing-you-must-do-for-yourself-your.html
http://westwooddrivebts.blogspot.com/2012/01/floor-it.html
http://westwooddrivebts.blogspot.com/2012/02/creating-our-12-bath-moving-plumbing.html
YoungHouseLove says
Wow- awesome job!
xo,
s
Kitty says
Ahhh…put the wax ring on the toilet first…could have used that little nugget of advice 3 wax rings and some serious swearing earlier! We put it on the floor and kept trying to line the toilet up to it and the bolts. Good to know for next time!
YoungHouseLove says
So sorry Kitty! Glad to help for the future!
-John
tiffaney says
Not sure if this has been mentioned, but bar keeper’s friend is supposed to work wonders.
You may what to check out this blog if you havent already
http://www.colonialrevivalrestoration.com/Home_Page.php
I’ve read every page, and I can tell you its chock-full of great renovation information. They even have a post similar to yours here about the toilet. Its a fascinating read.
Keep up the awesome work!
YoungHouseLove says
Thanks to everyone for such great info on this post!
xo,
s
Lauren H says
You guys are lucky! When my hubby and I decided to tackle the toilet removal/replacement, we found a cracked flange that was one piece with the pipe in a slab floor- ugh!
We found that they actually sell a flange repair kit, thank goodness! So, everything went back together smoothly {except for the screwdriver hubby dropped down the drain hole that we couldn’t retrieve- yikes!}
Re: TB removal- You don’t necessarily need to detach the tank from the bowl when removing. It’s just heavier that way…And, you can pour a bucket of water into your toilet to lower the water level quickly- it won’t remove all of the water but will do a decent job.
Love you guys and looking forward to your book!
YoungHouseLove says
Thanks for the tips Lauren!
-John
Jennifer Bauer says
I didn’t read all the comments, so I’m not sure if this has been pointed out to you. But, it looks like you caulked around the base of the toilet. That is not recomended, I know of home inspectors who will remove that to see if the toilet leaks.
YoungHouseLove says
Hey Jennifer,
You might have noticed that we only caulked around the front edge. This was a trick someone taught us that you still get a finished edge where mostly visible, but still leaves a lot of the back open to alert us to any leaks that may spring up.
-John
Erin says
Thanks, John! I can’t tell you how timely this post was.
This tutorial may have saved my little 85-year-old neighbor a lot of money.
His handyman was trying to rip him off.
YoungHouseLove says
So glad!
-John
Sally says
I’ve spent many a time laying on bathroom floors, helping my husband zero in on putting the toilet back on the two bolts – then we discovered that some people (smart people) just put two drinking straws over the bolts, and lower the toilet down over the straws; sort of a guide, you know? Works every time.
YoungHouseLove says
LOVE that tip!
xo,
s
Meg says
Can you tell us the brand and model of this toilet? We are overwhelmed by the options at Home Depot and wondered if you did much research? Thanks!
YoungHouseLove says
This is just the toilet that we inherited with this house, but the favorite toilet we ever had was an American Standard for about 90 bucks at Home Depot. We even got a pricier Kohler and didn’t like it as much. Hope it helps!
xo,
s
Nikki Kelly says
I just did a little “dude, get on that already” action onmy bathroom last week. It’s so nice to have a functioning bathroom now too. Oh and I totally used the same dual flush kit from this post without even realizing it! Here’s a link for your viewing pleasure http://theambitiousprocrastinator.blogspot.com/2012/05/press-2-for-solids.html
Nikki
YoungHouseLove says
Love it!!! So glad you got on that. Haha.
xo,
s
Cait B says
Just wanted to say thanks real quick, my husband and I just bought our first house and we needed to know how to fix this exact problem. Your guide made it easy and even almost fast despite the fact that neither of us are “handy”
sooo Thanks!
YoungHouseLove says
So glad to hear it helped!
-John
Megg says
I know this post is over a year old, but it was extremely helpful in replacing our toilet this afternoon! Thank you for the tips!
YoungHouseLove says
Aw, so glad!
xo
s
DCWJes says
What? No disclaimer about handling a heavy toilet and bare feet? I have started the blog from the beginning and I noticed a disclaimer on your other posts when John isn’t wearing shoes.
YoungHouseLove says
Haha, must have slipped through – don’t try this at home!
xo
s
Stephanie @ Whole Health Dork says
Thank you so much for this tutorial! Attempted it yesterday and even though we had Lowe’s and Home Depot’s sites up, the flange area on our didn’t look anything like what they were showing. I knew you had something on your site and was so relieved to see that ours looked much more like yours (quite rusty as the house is 60+ years old!). This put our minds at ease and we ended up following the rest of your tutorial, which was much easier to follow. Thanks again and congrats on the cute addition to your family!