Painting your cabinets is a perfect way to makeover a dated kitchen without splurging on a big renovation. It doesn’t cost much and, with the proper preparation, your paint job will look great and last a long time. We’ve used the tutorial outlined below to paint cabinets in 4 separate kitchens (not to mention cabinets in other rooms too) so we’re confident it’s a DIY project that will work for you. Follow along below!

The kitchen featured in this tutorial is from our second house which had solid oak cabinets throughout (along with wood paneling!). So while steps focus specifically on painting wood cabinets, the process is similar for any cabinet material. You can also refer to our tutorials about painting already-painted cabinets and painting Ikea cabinets.
Steps To Painting Cabinets
Here is a brief overview of how to paint your kitchen cabinets. The process takes time, patience, and a little bit of elbow grease – but nothing is especially complicated or tiring. At worst, it’s just a bit repetitive – especially if you a big kitchen.
- Remove cabinet doors and hardware
- Patch cracks and holes (optional)
- Lightly sand all surfaces
- Apply a liquid deglosser
- Prime one coat
- Paint two coats
- Rehang cabinet doors
- Reinstall cabinet hardware
This project can be completed by one person but may go faster with help. Proper surface preparation is the key to success here, so don’t rush steps 2-5.
The overall time lime depends on the size of your kitchen, but even painting a small kitchen will span several days due to drying and curing time between coats. You also want to make sure you have ample space to spread out your cabinet doors, like in a garage or spare room.
How To Paint Cabinets Video Overview
You can see these steps in motion by watching the detailed video below. To view an abbreviated version of this process, you can see a quick version of painting cabinets on YouTube.
Note: You can also watch the video above on YouTube.
Supplies Needed To Paint Cabinets
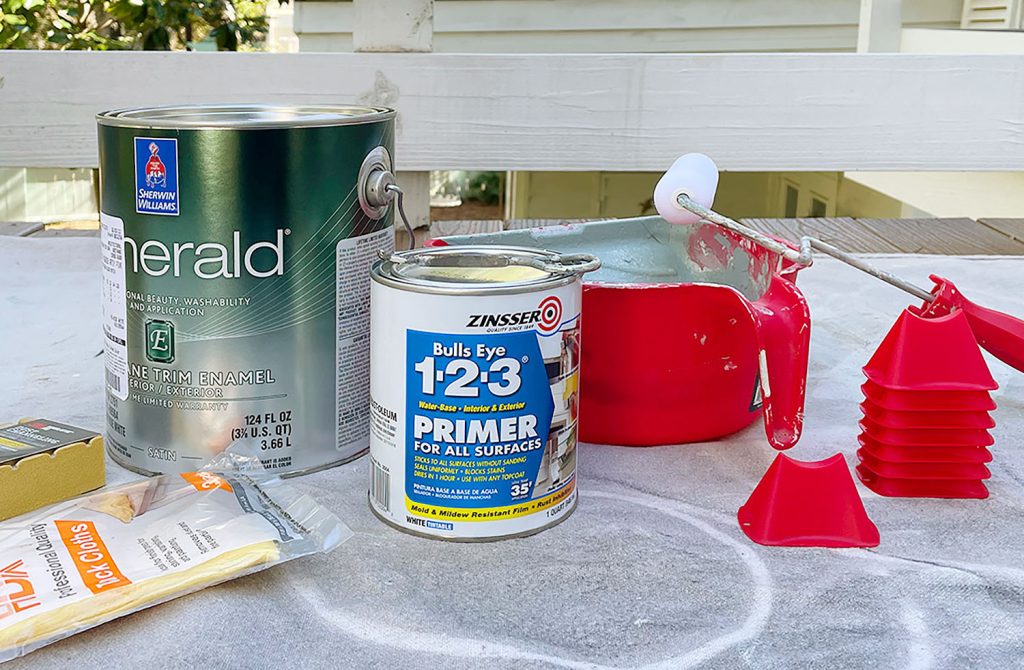
The materials you’ll need to paint your kitchen cabinets aren’t much different from other painting projects. So you may have many of these supplies already on hand.
- Primer
- Paint (we recommend satin or semi-gloss finish)
- Small 4? or 6? foam rollers
- Roller trays
- Short, angled paint brush
- Drop cloths
- Painter’s tape
- Painter stands or tripods
- Electric sander & sandpaper
- Electric drill & driver
- Liquid deglosser
- Wood filler (optional)
- Putty knife (optional)
You could use a paint sprayer for this project, but we don’t feel it’s necessary. If you already own a paint sprayer and are comfortable using it, go for it. It can save time. But we’ve never regretted painting by hand instead.
What paint should I use to paint my cabinets?
Water-based, latex paints formulated for cabinets or trim are best for painting kitchen cabinets. Oil-based paints used to be recommended, but are not necessary or practical for a DIYer. They are smelly, difficult to clean up, and can yellow over time. Also, water-based paints have come a long way and offer a similarly smooth and durable finish. Our favorite cabinet paints are Sherwin-Williams Emerald Urethane Trim Enamel and Benjamin Moore Advance. If you prefer a different brand, consult the paint desk expert for the best formula for your job. Buy the highest quality paint your budget allows.
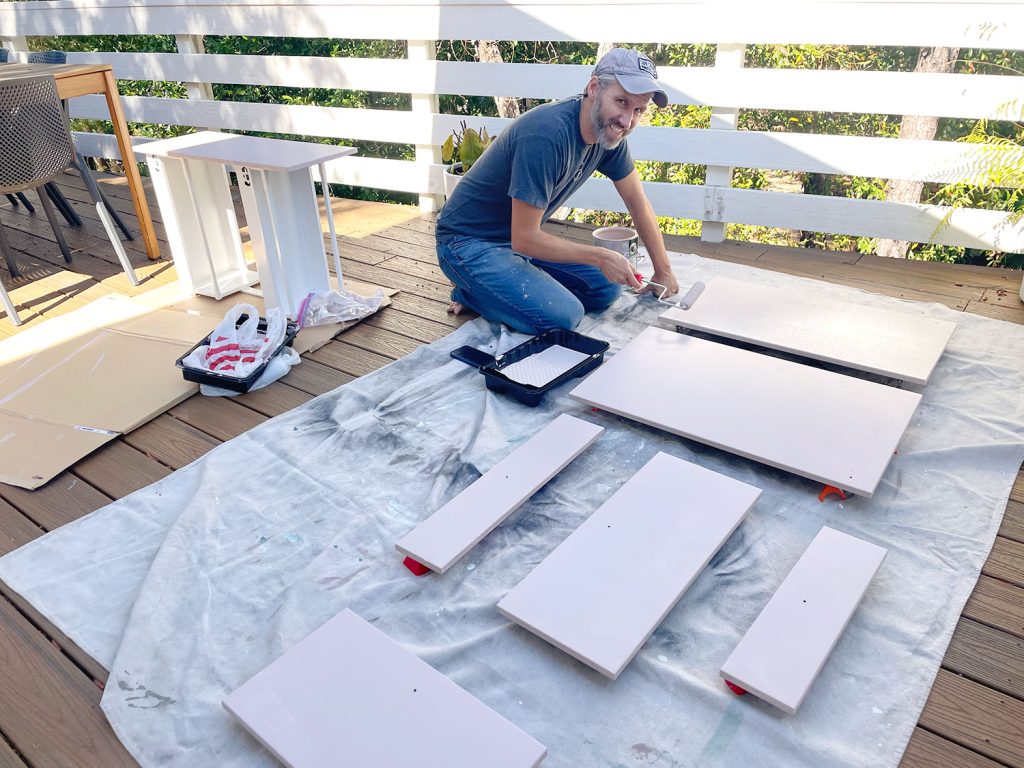
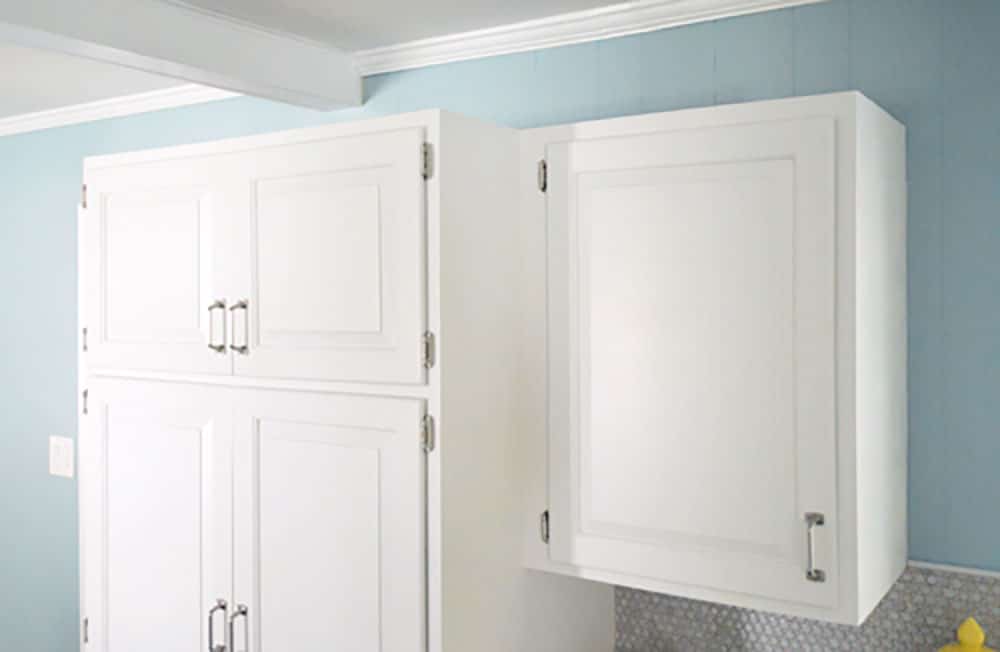
Step 1: Remove cabinet doors & hardware
Carefully unscrew all cabinet doors from the frames using an electric driver. Remove existing hinges, knobs, pulls, or other hardware. If you are reusing this hardware, be sure to collect it in a bag or box for later. You may also want to label each door with painter’s tape (I.e. “lower left stove cabinet”) to help avoid confusion during reassambly.

You will also need to slide out any drawers from the frames. If possible, unscrew the drawer front from the box. You may also need to empty some drawers and cabinets. We don’t typically paint the inside of the cabinets, so most things can stay in place while you work. But take care to cover or temporarily move items while you sand, to keep them from getting dusty.
Step 2: Patch cracks and holes (optional)
You can skip this step if your cabinets are in good condition and you’re reusing the existing hardware placement. For our cabinets, however, we planned to swap the existing single-hole knobs for two-hole pulls. The existing hole was in the wrong place, so we used wood filler to patch all of the existing hardware holes before proceeding. We were also changes the hinges, so we patches the holes for those too on both the doors and frames.
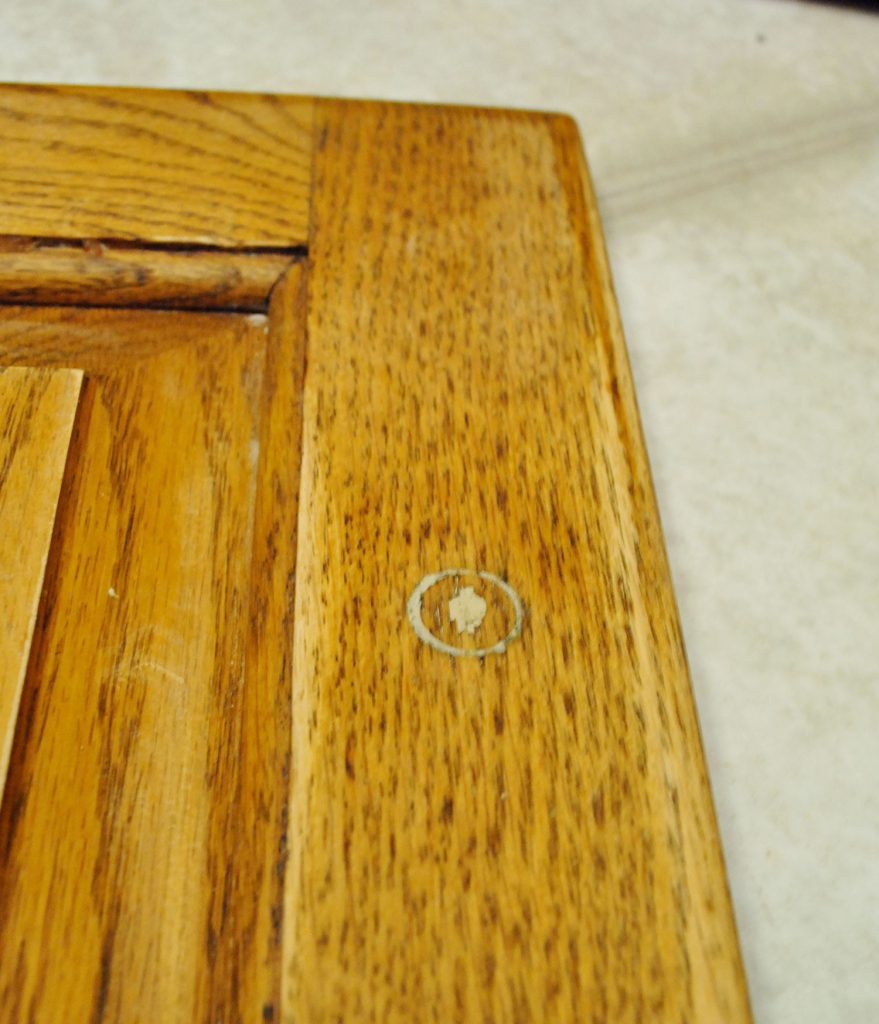
To apply the wood filler, use a putty knife to push it into the hole and smooth it. Once dried, sand off the excess. You may need to do a second coat, since it may shrink slightly as it dries.
Step 3: Lightly sand all surfaces
Prepping your wood cabinets for paint is the MOST IMPORTANT step if you want a long-lasting, durable result. Skipping the next few steps puts your paint job at risk of scratching or rubbing off, especially in high-traffic areas. So while this part is probably the most labor-intensive, please don’t shortchange it! We also have more detail in a dedicated post about prepping cabinets for paint. Here is an overview:
Use an electric sander and medium-grit sandpaper (like 120) to lightly sand every surface you will be painting. This means doors, drawer fronts, faces of cabinets, sides of cabinets, etc. You do NOT need to remove all of the existing finish. The goal is NOT to get it back to raw wood (although that it is okay). The goal is simply to rough up the surface enough to help primer and paint bond to it. You may need to hand sand small corners and nooks.
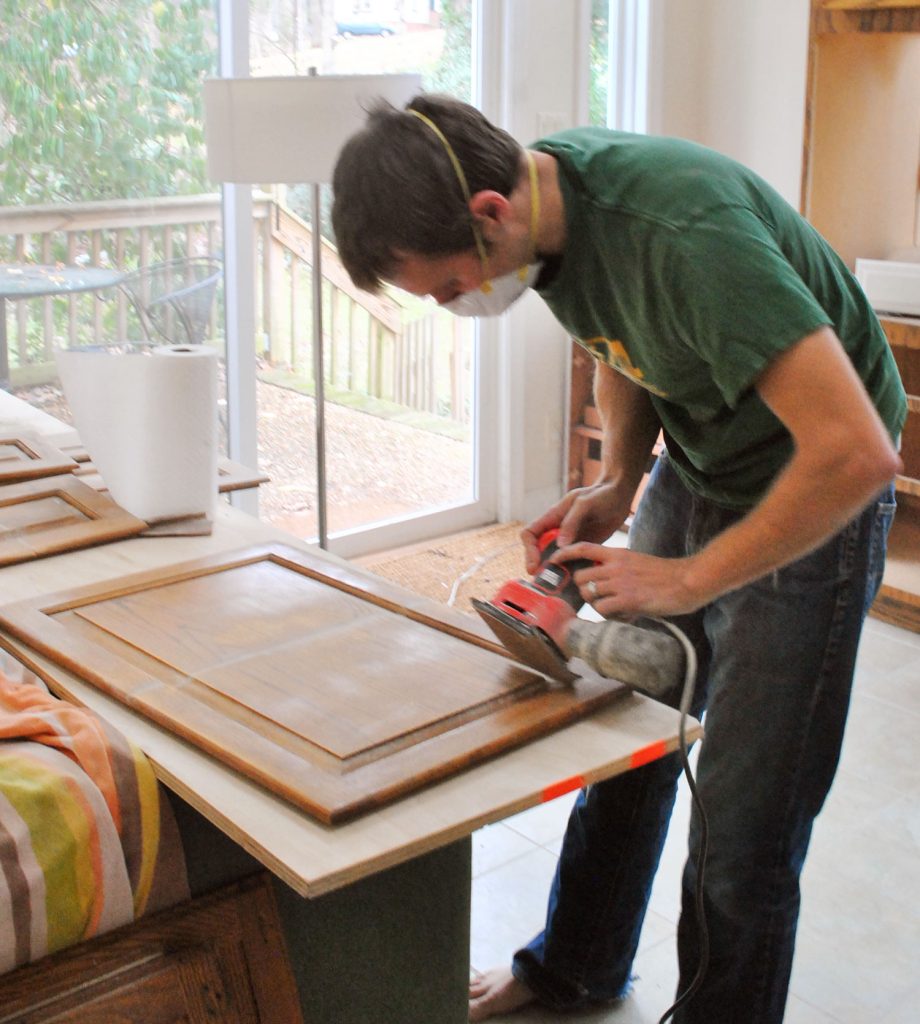
This process will be dusty, so try to do it outside or in a well-ventilated space (we did most of ours in our sunroom, above). When it comes time to sand the frames in place, cover items in your kitchen as needed to keep sanding dust from getting everywhere. After you’re done sanding, wipe your cabinets clean using a tack cloth.
Step 4: Apply a Liquid Deglosser
Liquid deglosser (sometimes called “liquid sandpaper”) helps etch the surface of your cabinets & frames, helping ensure a strong bond with the paint. Krud Kutter Gloss Off is our preferred deglosser. The one pictured below is difficult to find.
Some people use a liquid deglosser in place of sanding, but for wood cabinets we recommend doing both to be safe. It also helps remove any built-up grease or oil residue you may have missed while sanding, especially in nooks and crannies. You may also have heard of using a chemical called TSP (trisodium phosphate) instead. However, TSP is more of a cleaner than a deglosser, so we don’t recommend it.
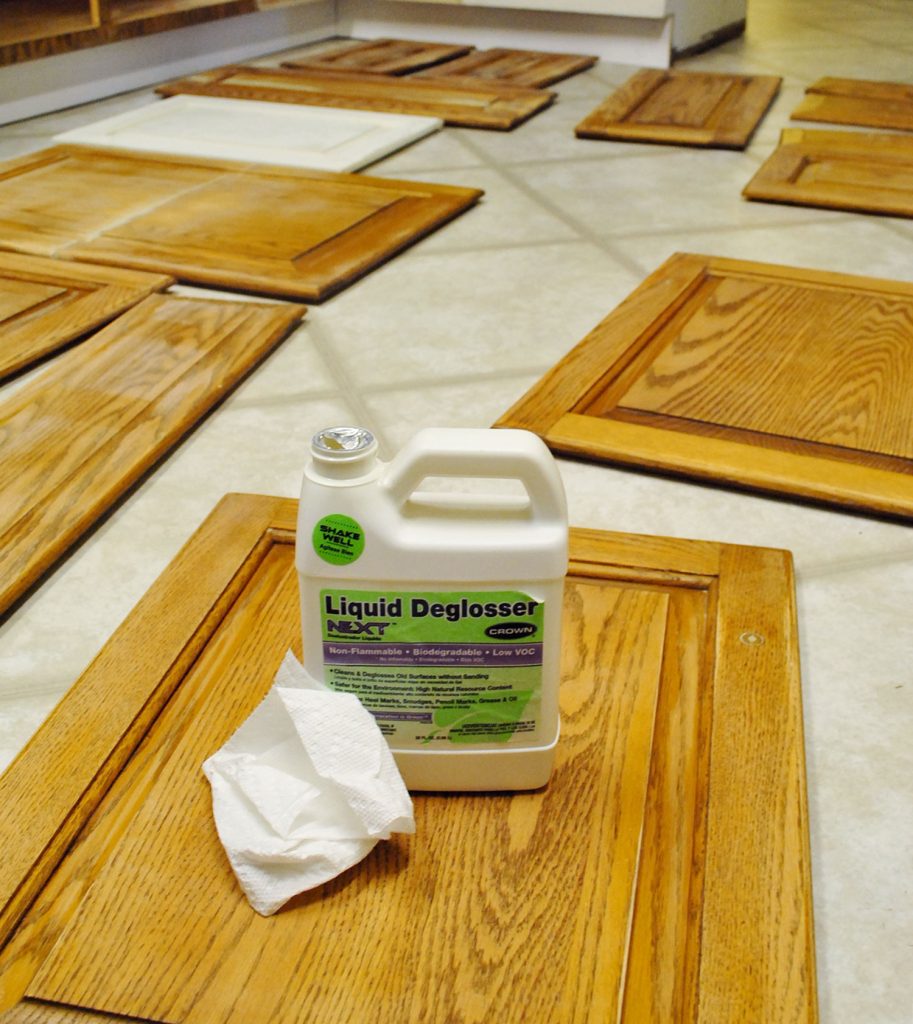
You can apply it with a rag or paper towel or put it in a spray bottle. It doesn’t need to be rinsed or wiped off. Just give it a few minutes to soak in. We sometimes do two applications to be safe.
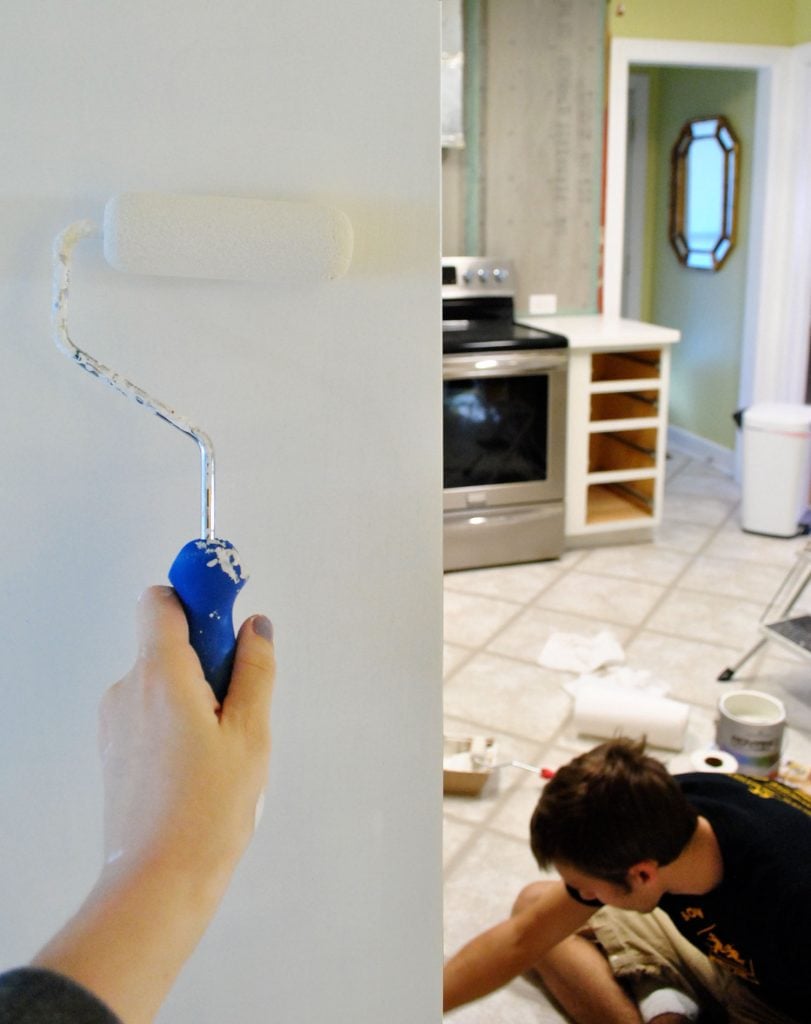
Step 5: Prime One Coat
The last prep step before painting is priming! Primer is a critical element to good coverage and a long-lasting finish. Do not skip it! We like a Zinsser all-surface primer. It can be used off-the-shelf if you are painting your cabinets white or another light color. For darker or more saturated paints, consider having your primer tinted to match.
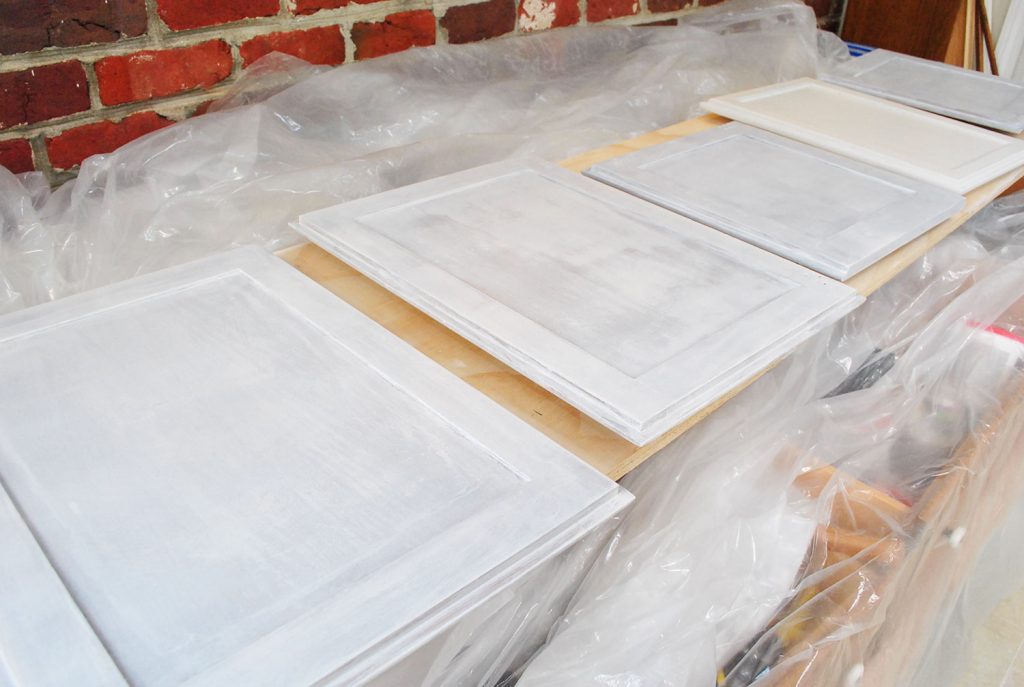
As you can see above, you’re not going for perfect coverage. Primer will be splotchy as it dries. This is okay. The main goal is to get a thin, smooth, and even coat. To do this, we recommend (1) using an angled paintbrush to get into edges or corners, then (2) using a small foam roller to remove brush strokes and coat the large, flat surfaces. Go slow and watch for drips along edges!
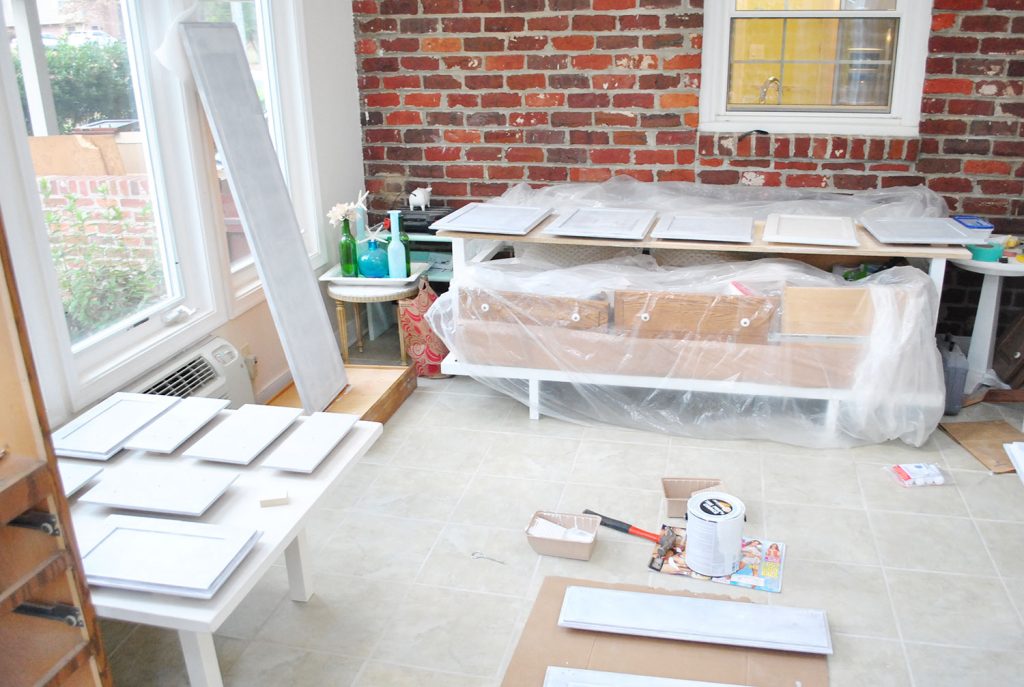
We suggest propping your doors off the ground with painter stands to make priming and painting easier. And if you’re painting both sides of your doors (which we think you should!) we’ve developed a specific order that helps minimize marks or dings on your freshly painted doors. It requires a bit of patience as you wait for one side to fully dry before flipping it over to do the other.
Don’t forget to do your cabinet frames and boxes too! You may want to use painter’s tape and drop cloths to protect walls, floors, appliances, and countertops.
Step 5: Paint Two Coats
Once your primer coat has fully dried and cured (see the manufacturer’s instructions on the can for specific times), you may repeat this process with your chosen paint. We used the color Benjamin Moore Cloud Cover. Again, use a combination of a brush and foam rollers to get a smooth finish. The paint may look slightly textured from the foam roller, but it will even out as it dries. Just remember: your main goal is thin & even coats without drips!
As a rule of thumb, we do two coats of paint for any painting project. But it’s especially important with painting cabinets. More thin layers is stronger and less prone to scratches than one thick layer. Just be sure to allow enough dry time between coats before touching or recoating.
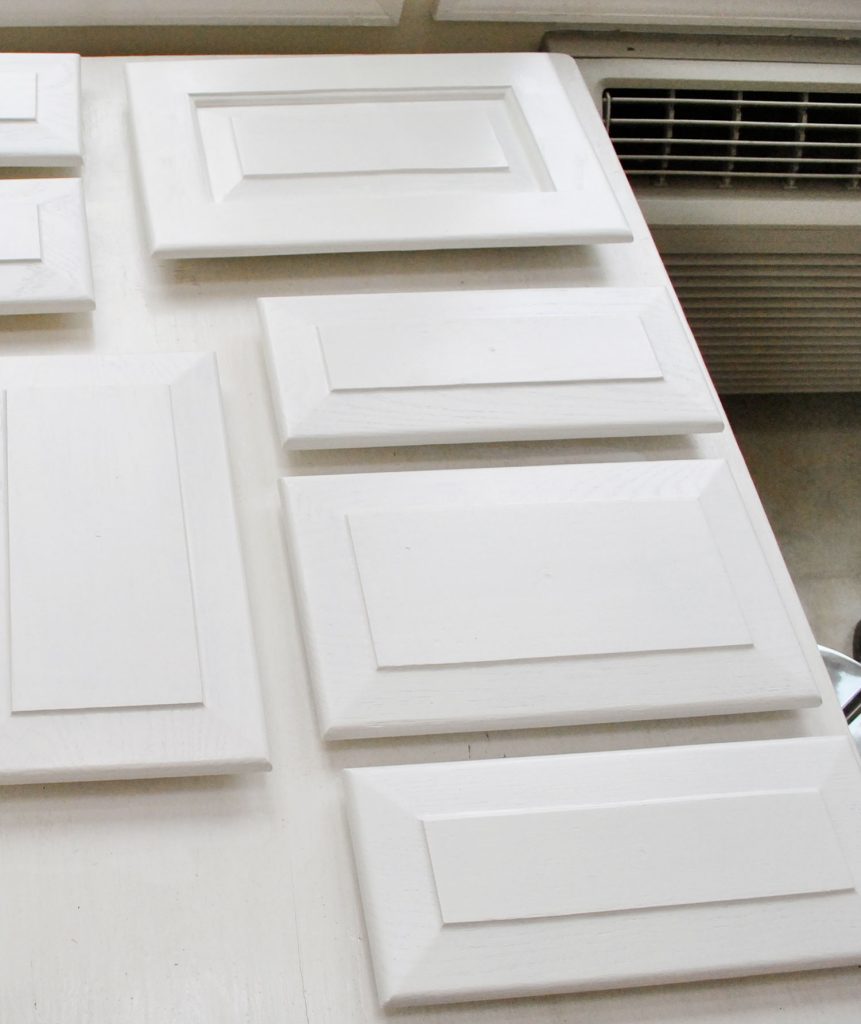
This part should be super satisfying. You’re finally seeing your hard work pay off and your vision come to life!
Step 7: Rehang cabinet doors
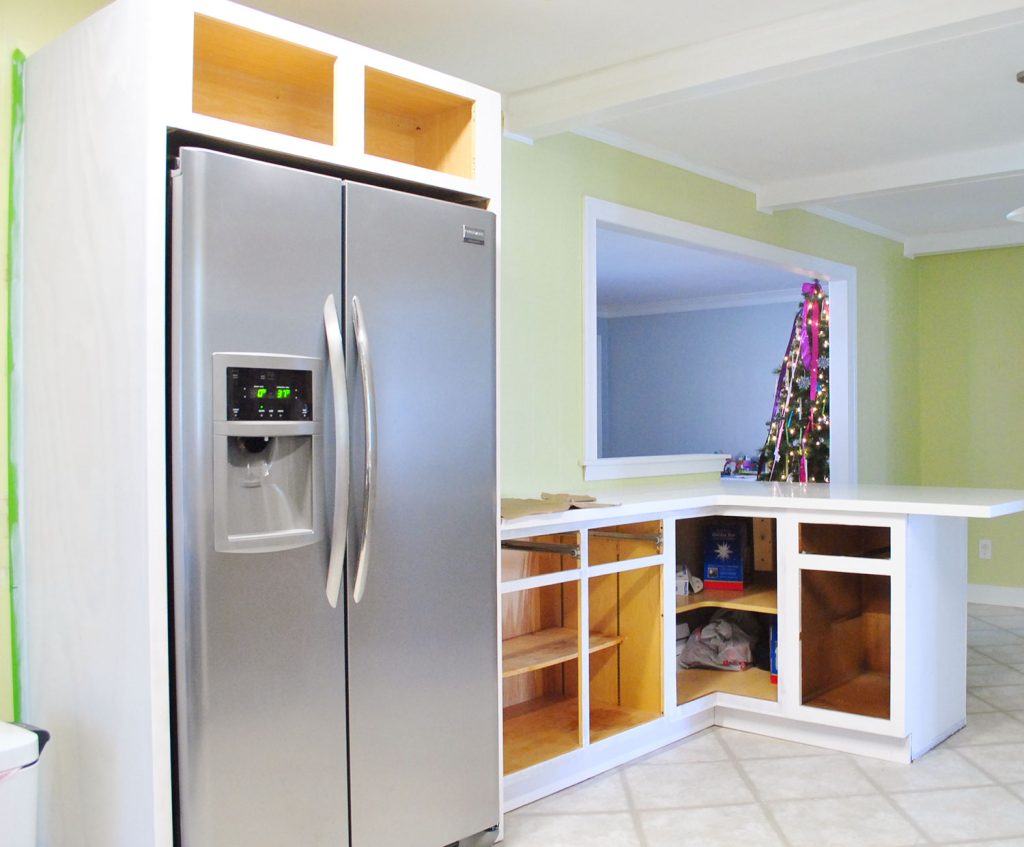
Once everything has fully dried, you can reassemble your kitchen. Screw hinges back on. Slide drawers back in place. You can even put things back in your cabinets.
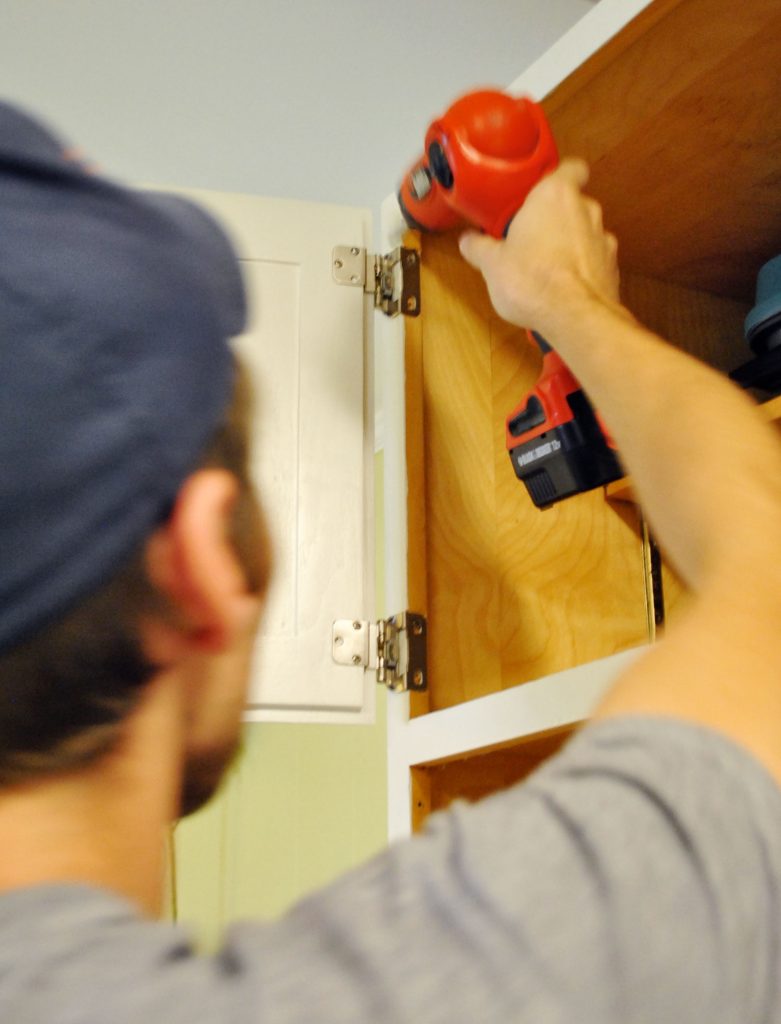
Things might get banged around in this process, so we often like to give our paint an extra day to cure before beginning. You’d hate to scuff up or scratch off the fresh paint right away!
Step 8: Reinstall cabinet hardware
At the same time, you can all reattached your cabinet knobs or pulls. However, this will be a bit more involve if you – like us – filled all of the old holes and need to make new ones.
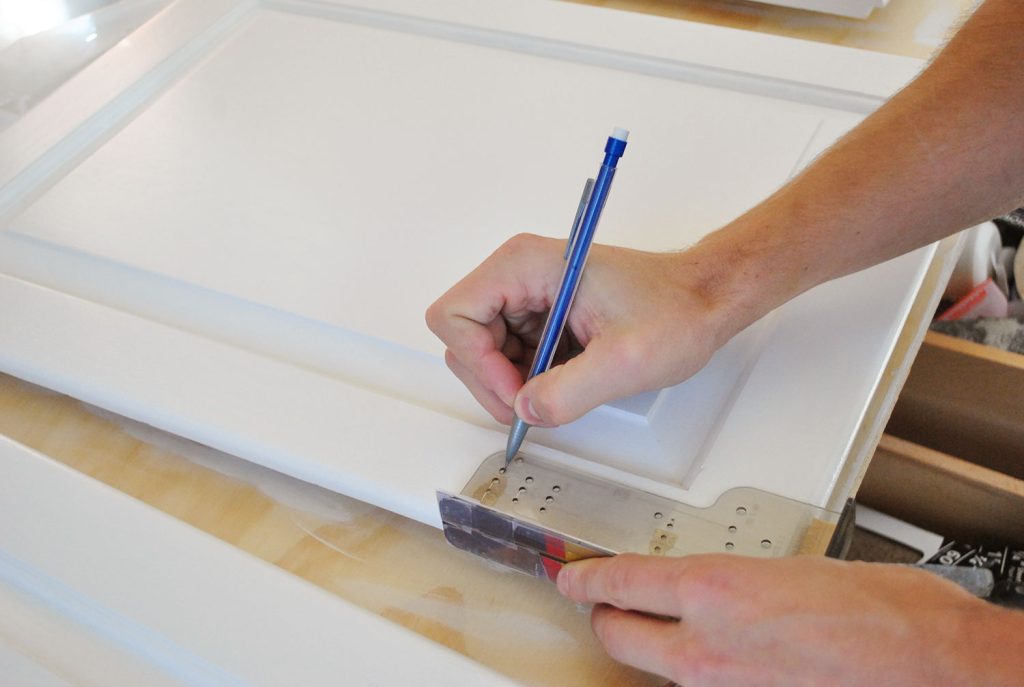
We have an entire post – with video! – dedicated to how to install cabinet hardware that will help you do this with precision and speed. But as you can see above, we highly recommend purchasing a hardware template for this step.
How long does it take to paint kitchen cabinets?
Painting these kitchen cabinets took us 15 days to complete. A lot of that time, however, was waiting for things to dry and cure. They were not 15 days of straight work! So while this isn’t a project you should expect to knock out in a weekend, it’s also not something you need to take 2 weeks off of work to complete. It can easily be done on nights and weekends, like we did. We even had a toddler at the time!
How much does painting cabinets cost?
Painting kitchen cabinets yourself is very affordable, especially compared to the alternative of hiring it out OR replacing your cabinets entirely. We completed this project in 2012 for just $300 and half was for new hinges and pulls. So if you are reusing your hardware, you can expect to spend even less. Here is a rough estimate of what you might spend to paint kitchen cabinets.
- Sandpaper: $10
- Liquid deglosser: $10
- Primer, 1 gallon: $30
- Paint, 1 gallon: $80 – $120
- Paint supplies (roller, brush, trays, etc): $40 – $60
- TOTAL COST: $170 – $230
If you don’t already own an electric sander or drill, those may cost you about $50 each. You can complete those tasks by hand to keep your budget down, but it will significantly increase your time and effort.
Other Cabinet Painting FAQs
Here are some other frequently asked questions about painting kitchen cabinets:
Do I need to apply a sealer or topcoat?
No, you do not need to apply a sealer, varnish, or polyurethane to your painted cabinets. Paints, especially those formulated for cabinets or trim, don’t require a protective topcoat. In fact, applying one could cause your color to yellow.
What finish paint should I use on cabinets?
We recommend using a satin or semi-gloss paint for a hard, wipeable finish on cabinets. Gloss or high-gloss paint can offer a sleek, modern look with high shine, but should be applied professionally with a paint sprayer to avoid brush or roller strokes. Matte, flat, or eggshell finishes will be harder to wipe clean.
What color should I paint my cabinets?
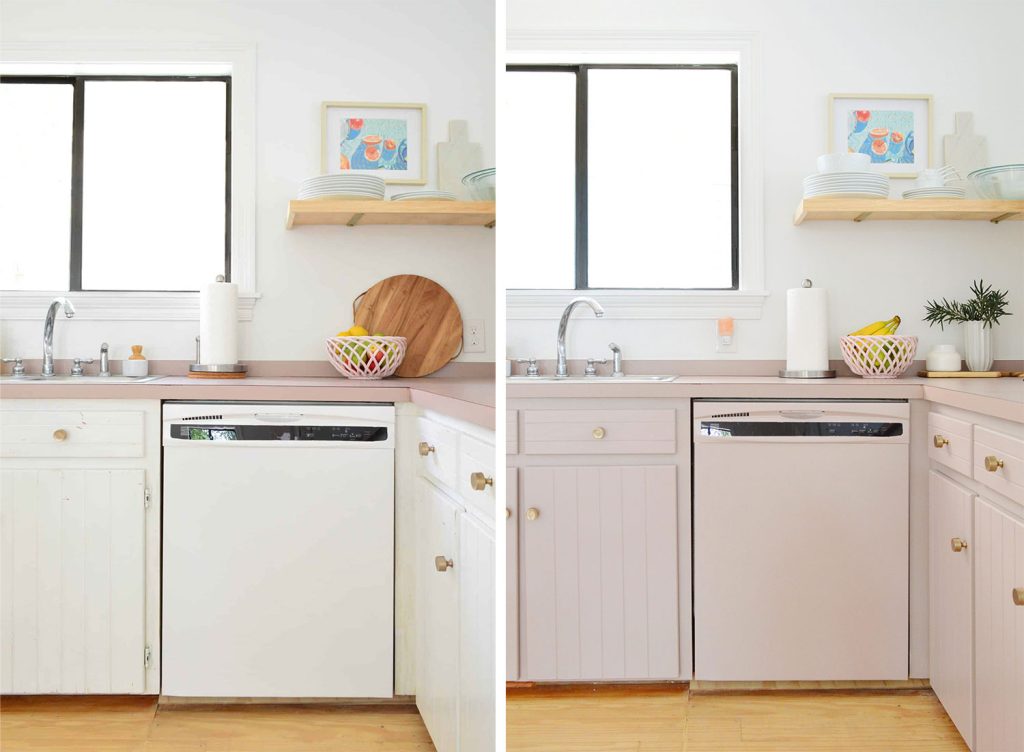
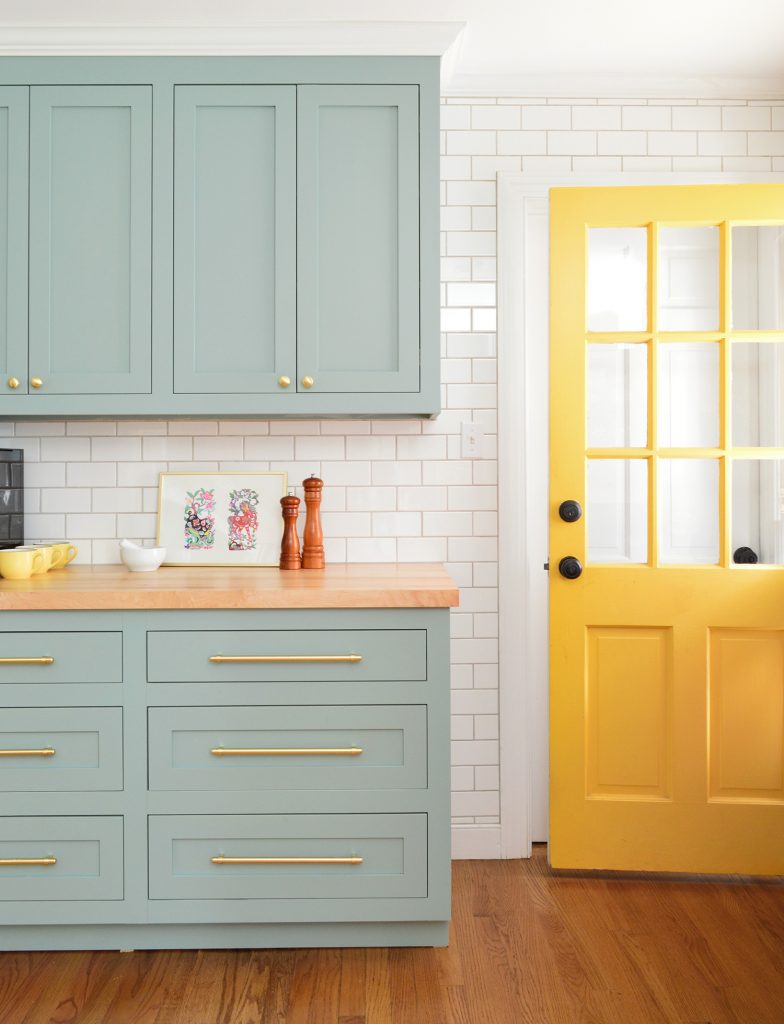
There is no limit to the colors you can paint kitchen cabinets! We love classic white cabinets, but colorful cabinets have also been trending lately – like our current cabinets (Artsy Pink by Sherwin-Williams) or our friends’ painted cabinets below (Halcyon Green by Sherwin-Williams).
We always recommend testing any color before proceeding. Colors often appear brighter or more saturated than they seem on a small swatch. Whites also can appear stark or cold, so we recommend something with subtle yellow or gray. Any of these expert’s favorite white paints work well on cabinets.
More Kitchen Cabinet Projects
Looking for other budget-friendly ways to update your kitchen? Here are some other projects you might be interested in:
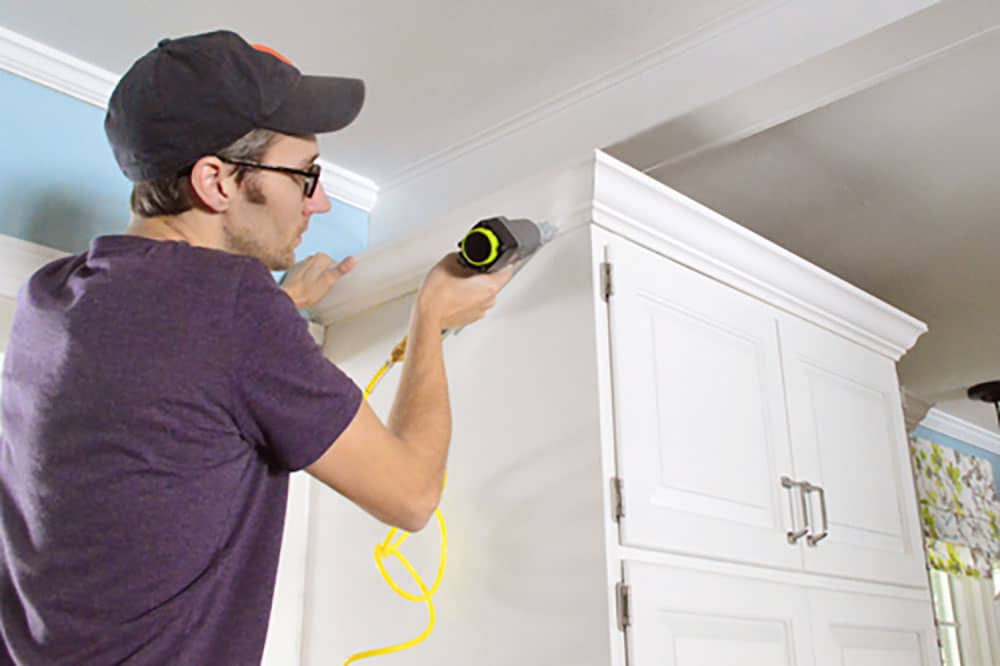
- How to Add Crown Molding To Cabinets
- How to Properly Prep Cabinets For Paint
- How To Paint Ikea Cabinets
- How to Install Kitchen Hardware
- Organizing a Small Kitchen
- Installing Hidden Ginges on Old Cabinets
- Staining Wood Cabinets Darker without Sanding
Update: Our painted cabinets are still holding up great. Check out a little update post here.
*This post contains affiliate links, so we may earn a small commission when you make a purchase through links on our site at no additional cost to you.

Gwenalyn says
This makes me want to paint my kitchen cabinets white. They are stained that 80’s honey oak color. Ew. Our house is on a weird angle so we don’t get a lot of natural light in the kitchen and it needs to be brightened up! But, I was raised with my mom telling me not to paint wood. Ever. So, I’m having a hard time getting over 27.5 years of hearing her voice in my head telling me what I want to do is an abomination! Silly mom voice in my head. Gosh I hope that’s normal…
What I’m saying is: Your kitchen is beautiful! I wish I had half as much motivation as you guys have! Wonderful job! Though, I can tell you’re really going to miss your cabinets staring at you. Haha!
Vanessa says
Is it totally absurd that I am weeping right now at how much your hard work has paid off? It looks AHHH – wait for it – MAZING!
Good Lord, if I am this emotional at the painted cabinets I may be in full hysterics when the backsplash is installed. Oy.
Great job you guys!
YoungHouseLove says
Oh Vanessa. I love you.
xo,
s
Rachael says
Is this the incredible growing house?! It seems to triple in size every time you make a change!
YoungHouseLove says
It’s so crazy how that happens! I keep saying “it’s the same room, we just moved stuff around and painted it!” but it truly feels so different to stand in the kitchen now!
xo,
s
Tiffany C. says
Looks super awesome!!
Reenie says
LOVE it!!!
Ann L says
Okay now that my brain has had a minute to process everything, I can type. I think this spring we are going to take on painting our kitchen cabinets. I have wanted to do it since moving in 5 years ago because yellowy oak just isn’t my cup of tea, and everyone convinced me not to since they were “new”. Well guess what, it’s my house and I hate them, so I’m gonna do it!! :)
Now that that’s out of the way, I would probably paint them plain old white. Do you have a white paint you recommend? One that doesn’t have too much blue, too much yellow or green–just good old fashioned white? AND, did the people at BM recommend satin finish for kitchen cabinets specifically over semi-gloss?
YoungHouseLove says
Benjamin Moore’s Decorators White is an awesome classic white (we painted the cabinets in the office that color). As for the finish, they said Advance originally only came in satin so it was their recommendation for cabinets (they later added semi-gloss for people who wanted it shinier, but satin is easily wipeable and durable in the kitchen thanks to the superior formula). Hope it helps!
xo,
s
Morgan @ Pieces Of My Heart says
What a difference! Amazing face lift…I love a really bright kitchen. Y’all worked so hard and it shows. I would love to redo our cabinets in white, but don’t think I could convince the hubby (contractor by day) to do it for me just because I like it better! :) He knows how much work is involved. I truly enjoy your blog and all your wonderful ideas/inspiration.
Teresa @ wherelovemeetslife says
Oh.wow. That isn’t the same room. Seriously… this might be one of the best before/after projects I have ever seen. What speaks to me in this space? The vision that you guys had…and are bringing to fruition! It amazes me that you can look at what you started with, and you guys made a plan and transformed that space.
Oh and that shot you love? It’s probably because it looks like something out of Real Simple, or Better Homes and Garden under a heading of “clean and simple”
YoungHouseLove says
Haha- totally! That’s totally why! Haha.
xo,
s
Kay says
Did you say in your comment above that you are going to build a range hood?
YoungHouseLove says
Build a wood frame. We’ll use an industrial range insert but like the look of those wood-encased hoods so we’re going to give it a try. No idea how yet! Haha. We’re focusing on the backsplash first and then taking things one step at a time from there!
xo,
s
Karen L. says
Love, love the super change in your kitchen! Since I’ve moved around quite a bit in my life, I’ve actually had a few kitchens like your old one and can appreciate your new one even more. You’ve done such a great, patient job of making those cabinets and hardware look seemless—-and I mean seamless, as I sure can’t see anything off at all. Wonderful new, fresh-as-spring look, Sherry and John!
Leslie says
Great job, as always!
Small typo for you to fix, it’s there a couple times even.. 2? brush… probably supposed to be 2″ brush :)
YoungHouseLove says
Thanks! Such a weird formatting glitch! Off to fix it!
xo,
s
McKenzie says
it looks amazing! My husband and I painted our cabinets a few years ago, pre blog help, and we are so happy with the bright white! So impressed with all of your work :)
Lynn @ SafeBeauty says
Okay wow. That came out looking tremendous! I love it! I want more of it! I can’t use anymore exclamation points without it getting ridiculous. But job well done. This page is now bookmarked in our Painting Bookmark Folder. Thanks guys…
My best, Lynn
*I knew that you had finally put this meaty post up when I went to refresh your page and my Mac sounded like it was eating Chex Mix due to downloading all your data. Haha!
YoungHouseLove says
Hahaha- sorry about the noise!
xo,
s
Katie G says
It looks so great and the before and after is hard for me to wrap my mind around, too. Y’all definitely have vision!
Also, I only mention this because I know you’re sticklers for grammar and are way sleep-deprived, but I think you’re the Mayor of BrightVille instead of mayer! Feel free to delete this comment — I don’t want to be a jerk who comments to point out typos!
YoungHouseLove says
Aw thanks Katie! We always appreciate typo tips! All fixed!
xo,
s
Stacey says
Wow!! This could not be more gorgeous! I don’t blame you for wanting to spend every minute in that kitchen– the pictures make it seem calming and refreshing. I’ve loved following every step with you and can’t wait to see the floors and back splash installed! Meanwhile…did I notice a terrarium on the counter? Think you might want to do a post about how to make one? I’ve been oogling a few myself but aren’t sure where to start…
YoungHouseLove says
Oh that’s a $4 yard sale find that usually sits on the console in the frame hallway. I just popped a fake-o plant from Ikea in it. Haha. Those are surprisingly realistic looking and I have yet to kill it!
xo,
s
Kerry says
You should paint the cabinet wall by your fridge with chalkboard paint! That and the pantry both have large white side walls that would be perfect for it. Then, you can just write your grocery list on the wall next to the fridge!
YoungHouseLove says
Could definitely be super fun!
xo,
s
heather says
You can get it tinted too like a regular paint. A secret grellow chalkboard wall?!
YoungHouseLove says
Haha that’s fun!
xo,
s
bfish says
It looks fantastic — all of your hard work and attention to detail paid off! The best thing about your blog is that you “tell it like it is” re: how much work can be involved in DIY. Projects like cabinet altering and painting aren’t for the impatient or faint-of-heart. And I could not see a line or anything on the pieced cabinet that isn’t 100% perfect; maybe in-person is a different story.
The lab stools as they came are perfect and funky — I hope that you decide to leave them alone.
stephanie says
BEST “before and after” ever….and its not even done:)
Ruthy T. says
truly, truly remarkable…I have a feeling I’ll be referencing this page over and over in the near future!
kate says
LOL “Mah man” – I say that all the time about my hubby. “That’s mah man” :)
Cabinets look FABULOUS by the way! And I like the natural insides, though I might be inclined to line them with some snappy shelf paper – but maybe that’s old school?
YoungHouseLove says
I actually love that idea! Someday I totally expect to do a quick little update like that and share all the deets!
xo,
s
Nicole says
FYI-I bought some shelf liner from Bed Bath and Beyond that is awesome! It’s a tad more expensive than the usual meshy type stuff,but well worth it. Its a vinyl-ish material (white)with ridges….its not floppy and its WIPEABLE!You just cut it to fit your cabinets and it never slips out of place! I highly recommend it! I dont know the name…but its on the aisle with the rest of the shelf liner. (:
YoungHouseLove says
Sounds awesome! Thanks for the tip!
xo,
s
Kathleen says
Thank you soooo much, this will really help us in the next couple of months when we tackle our 80’s kitchen! You guys are simply amazing. Love the new kitchen!
Emma says
Amazing! I love the handles too. Well done!
Alanna says
looks fantastic! as usual, grat job!
wish we could have painted and reused our old cabinets instead of having to buy new ones when we remodeled our kitchen. unfortunately, our old cabinets were made of avocado green metal which had later been faced with a plastic, wood-laminate-looking material (http://alanna-wendt-to-tennessee.blogspot.com/2011/01/why-new-kitchen.html). So there was no way that we could work with what we had. But thankfully we got a pretty good deal on our new cabinets and we’re so pleased with the outcome (http://alanna-wendt-to-tennessee.blogspot.com/2011/09/kitchen-renovation-update.html).
YoungHouseLove says
Um yeah- AMAAAAAAAZING! What a fantastic transformation!
xo,
s
Maya says
Looks amazing!! I wasn’t totally sure about how the peninsula worked with the rest of the kitchen before, but now it looks totally balanced– the L of the cabinets and the L of the peninsula work great together!!
Jen @ Domesticated Nomad says
It looks FAB-U-LOUS! Thanks for sharing about the Ben Moore paint. I’m painting my cabinets this spring, and I’d never heard of the paint before, but now I’ll go to my Ben Moore store.
Anna says
So gorgeous! Can’t wait to see it with the backsplash!
Maya says
Btw have you thought of using the Clara rug in the kitchen? It seems like it might look great!
YoungHouseLove says
I’d actually love to! I think it might be too big but it’s worth a try!
xo,
s
Tammy says
Love the painted cabinets! Great job! Looks so professional.
Love your blog BTW. You two are busy, busy, busy!
Seriously Sassy Mama says
It is so bright and cheerful! I love it!
Kate Battle says
Yay! It looks fantastic!
You guys have me all excited to start painting my cabinets…I’m a bit nervous though because they are not in as good of shape as yours. They are plywood from the 1960s and some of the doors have chips. I am going to try and putty/sand them to look better, but I don’t know if it will turn out as nice as yours! Thanks for breaking down your timetable! I work full time so I will be doing this on nights/weekends. I’m planning to start THIS WEEKEND! BAHHHHH! On a side note, our local Home Depot did not have the Next deglosser, the guy there sold me TSP and told me the new formula was eco friendly, but it still says to wear gloves when applying it, so I am not sure how eco friendly it actually is.
I hope I can do the tired/happy dance by the end of January!
YoungHouseLove says
Oh yes, I think TSP is similar and should work really well! It’s a bummer that it’s so hard to find Next (we have had ours for so long). I hope they didn’t discontinue it! Good luck with everything!
xo,
s
Kelly says
you are the MAYOR (spelling!) of BrightVille ;)
YoungHouseLove says
Haha- thanks! All fixed!
xo,
s
renee says
YES!!! So gorgeous. Would love to hear what the former owners of your nest thing.
One nit-picky note, you are the MayOr of BrightVille :)
xox
YoungHouseLove says
Haha thanks Renee! Fixed!
xo,
s
renee says
ha ha – I nit pick you and then leave my own typo.
“would love to hear what the former owners of your nest thinK”
gaaaaah
YoungHouseLove says
Haha, I knew what you meant! We know they read our blog (or at least they did when we moved in last year) and seemed to love watching us “do all the work” – haha. They’re so cute about it! Just so excited to see us make it our own. It would be fun to have them over to see it someday… hmm, I wonder if they’d let us video tape that…
xo,
s
Karen J says
Renee, our former house was a 50’s bungalow that had been completely reno’d by the last owners. The man who built the house originally stopped by one day (I was working in the yard), and we chatted a bit. I asked him if he wanted a tour , because I was SURE he would want to see all the changes and updates. He said “No, I prefer to remember it the way we built it.” I was surprised, but in retrospect it’s a bit like saying “everything in your house was WRONG” to a former owner.
YoungHouseLove says
Haha, I can totally understand that!
xo,
s
jules says
This kitchen reno is to die for. As for former owners looking at their house post-updates- thought I would share this awkward little tale. The former owners of our house, in our opinion *ahem* did a fabulous job of tearing up the carpet and refinishing ever square inch of our 2 story, 1935 brick tudor’s original hardwood floor. They used a dark mocha a lot like you did in your first home. They painted every inch of trim in a bright beautiful white and redid the kitchen with new stainless, big sink, granite counter tops and best of all- new white cabinets.
One day a few months after we moved in (still totally living out of boxes with no furniture because we more than doubled our square footage) a neighbor rang the bell and introduced us to the owner of the house before the one we bought it from and they asked for a tour…. um… cut to me dashing upstairs to change out of my nursing tank while my husband let them in…
Well, he hated everything. “You’ll hate these wood floors they’ll be too cold!” I believe he called our beloved kitchen a “tragedy” and was almost in tears over the color of stain and all the white. I’ve never felt so uncomfortable. Sometimes it’s best not to revisit the past, I guess!
YoungHouseLove says
Oh no he di-int! I can’t believe he called your kitchen a tragedy while you stood right there! And to show up unannounced like that! I would have fainted!
xo,
s
michelle says
also, I would love to see you guys go back to your old house. (if the new owners are willing)
YoungHouseLove says
Oh yes, we have told them we’d love to do that and left the ball in their court! Here’s hoping!
xo,
s
linda says
Simply amazing – congratulations on a job fantastically well done – and thank you so much for the tutorials!
TheChangingHouse says
OH MY!
Look at the difference! You must walk into the kitchen and feel so happy. The brightness will keep away the “winter blues”! I really love the work you’ve done.
Eve says
Ah! I love it. I can’t wait to see what it looks like with everything finished, but it’s already gorgeous. Good job with the retrofitted cabinet doors, too!
Rebecca @ the lil house that could says
You two have outdone yourselves again! Bring on the backsplash!! (Readers are so greedy, aren’t we?) :)
Karen J says
Congrats on finishing; it looks great. Any ideas how us mere mortals (i.e., those without a “magic” sunroom) could do this?
P.S. I think the computer put in “?” after the 2 inch brush parts (2? brush). And I think you want to be Mayor of BrightVille not Mayer (unless you mean John Mayer??).
YoungHouseLove says
Haha thanks for the typo tips- all fixed! As for those without a sunroom, any room that you can use to clear space (like a spare bedroom of even one side of a living room) could work and plastic drop cloths could even be taped up to “seal” it off to keep sawdust from going all over the house!
xo,
s
Candice says
Looks amazing! One question for you guys, I have awful 80s cabinets (with the lower wood handles) do you think that they would be worth painting? I’m so inspired by you guys!!!
YoungHouseLove says
Oh yes! Ours were 80s oak ones too, so this method should work on any and all wood cabs (laminate stuff could be trickier, but if they’re wood, you’re good)!
xo,
s
kristen f davis says
it looks so great, guys!!! love it! i know i was not the only person that has been impatiently waiting for you guys to paint those cabinets since you moved in. i can’t believe how un-dungeony it looks now! so light n airy, and looks so much larger. the handles are very cool, too… can’t wait to see the cork floors and that awesome tile installed. get to work!! :)
Beau says
Congrats! It looks great!
Did you guys think about installing the hardware to make the drawers close slowly? Is it possible to retrofit that?
YoungHouseLove says
Oh yes, we can always add that a bit later. Would be a fun upgrade down the line!
xo,
s
Christen says
Wow! Totally looks amazing! I just love white cabinets in a kitchen! Speaking of your stools, I made it out to Pasture, a new Restaurant in Richmond last night, and the first thing I noticed was that their bar stools are the EXACT SAME as the stools you have! They kept theirs as is, but added a number in teal paint on the back of each. They looked uber chic in the space – just like in your kitchen! The food was great – check it out if you have a date night sometime soon!
YoungHouseLove says
Wahooooooo! I love it – we’ll have to check those out!
xo,
s
Raina@ Mamacita Spins The Globe says
I definitely cannot see any seams where the cabinets were “magically” resized. Your kitchen is looking great!
Krystle @ ColorTransformedFamily says
This post gets me motivated to paint mine. Unfortunately, with a two month old on my hands I don’t see this happening any time soon.
I love how you were able to see such vision for this room. It has done a complete 180. I do think the bar stools would look great with splash of color on the seats though. My thoughts on that may change once the flooring is installed though. I guest that’s what you are waiting on too.
lisa says
as i said in yesterdays comment sectio, holy %%%$$## ##%^^^$%! looks great! haha.:)
lisa says
oh also i forgot to write this before……that new sandra bullock movie..extremely loud and incredibly close….well, i was watching the commercial trailer and john, you resemble him…haha.
http://articles.latimes.com/2011/dec/31/entertainment/la-et-thomas-horn-20111231
YoungHouseLove says
Haha, we’ll have to check it out!
xo,
s
Debbie C says
Oh my goodness this looks sooooo good. So many people have said the same thing, but I’ll say it anyways…AMAZING! So much brighter and bigger and I’m guessing more functional. Love the new hardware too. Yay!
Allison says
Wow! I am so hesitant to paint my oak cabinets, but these look amazing! I will need to rethink my kitchen now. Congratulations!
Lena says
This looks Awesome and so much brighter. I’m working up my courage to talk to my DH about painting our cabinets. When we moved in I told him we’d have to do something about the kitchen (brand new btw) as it wasn’t to my liking, but he hates paint fumes so really have to show good cause. Was much easier when he was away all week and I’d just paint stuff and it was done when he got home.
To make a long story longer, your photos when showing the difference in the light will likely help my cause as I think it is too dark in the kitchen. The rest of the house is very bright light wise and we rarely have to have the light on during the day except the kitchen.
May I make a request to see a photo of the painted kitchen with a photo of the unpainted cabinets, but with the dining opening just to see how much lighter it looks with the light fromt he dining.
YoungHouseLove says
Sure! Here’s a post with a pic (at the end) like that for ya: https://www.younghouselove.com/2011/11/and-all-the-trimmings/
xo,
s
Lena says
Thank you!! You guys Rock!!
Chris says
That does it! Gray cabinets here I come! I think a light gray will look great with the light blue walls in my tiny galley kitchen, and contrast well with the black and white speckled Corian we have. I need a change and tearing down walls is not in the budget yet. But paint and a new floor – yes! (Just have to clear some space for 2 weeks of door painting)…Thanks for the gumption!
Michelle says
Looks amazing!!! I’m just trying to get up the umph to stain a dining table… :)
tara says
There are no words!! It looks so amazing!!! You guys did such a great job…I’ll do a happy dance in my house for you guys:) I can’t wait to see the entire transformation with floors and backsplash making their appearance.
Congrats on finally finding a little bit of balance in your life too:) You deserve it!