Back when we admitted to putting up our Christmas tree before Thanksgiving (oh the shame) a bunch of you asked if Clara was getting a special “First Christmas” ornament. Well, we finally got around to DIYing one right before moving boxes took over our house (at which point we got so caught up in packing that we neglected to write this post, which is why it’s getting posted about a week after our tree came down). Oops.
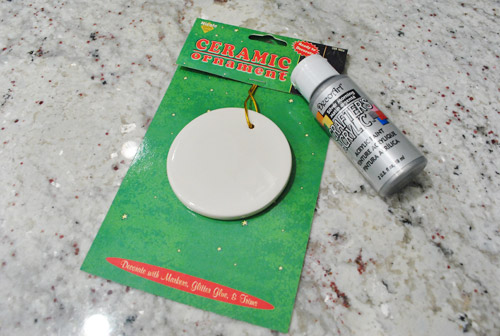
Anyway we decided to make something silver so it would have a good chance of matching our tree for years to come (we tend to use some element of silver since we have so many silver ornaments and you know we like to use what we’ve got). But of course we wanted it to be distinctly Clara circa 2010, so it would feel as special and customized as possible. So at the craft store (Ben Franklin) we grabbed this plain white ceramic ornament for just a buck and some 50 cent silver acrylic paint. Well, the real story is that we actually bought two ornaments in case the first one didn’t work out. They only cost a buck, after all. And we’re paranoid like that.
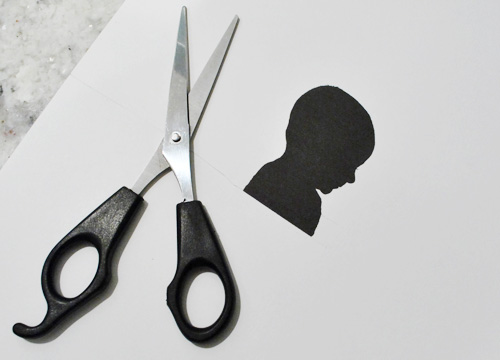
The plan was to create a silver backdrop onto which we could Mod Podge a scaled down version of Clara’s baby silhouette. That way we’d get something that definitely says “baby” but also creates a silhouette theme that we can carry on year-after-year if we’d like. It’ll be sweet to see how much she has grown and changed (here’s hoping she decides to grow hair one of these years). And since I still had the digital file of her silhouette from this project we just resized it, printed it, and started cutting. Sidenote: those are the haircutting scissors Sherry got from CVS a million years ago that she also uses to cut my hair. But I guess they’re better than a Flowbee.
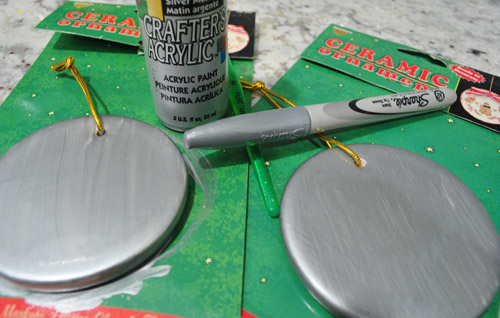
When it came to painting the silver backdrop, my hairdresser wife noticed that it was a bit streakier than she’d like. So she figured she’d give the metallic Sharpie that we had in our junk drawer (which has since been packed up- yessssss) a try on the back-up ornament. Good call lady wife. It wasn’t much less streaky, but we later learned that the dried acrylic paint just peeled right off the ornament in one puffy-paint-esque blob. Duh. The lesson? Metallic sharpie grabs glossy ceramic far better than peelable acrylic paint. And a second “coat” of Sharpie about three hours later leaves it looking pretty seamless. So use that if you’re going to DIY one of these baby headed ornaments for yourself.
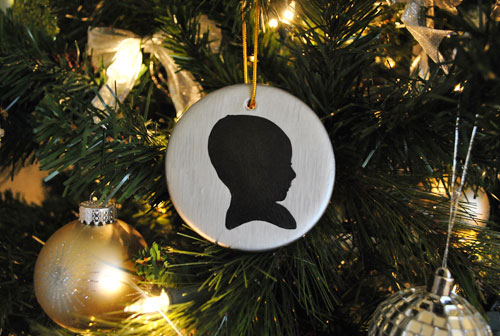
Anyway, after Sharpie-ing both sides of the ceramic ornament for a shiny silver coin-like finish, we placed Clara’s cutout silhouette in the middle of one side and glued it in place using Aileen’s Tacky Glue (being careful not to let too much squeeze out the sides onto the silver part – if any did we quickly wiped it). After the glue dried, Sherry got her Mod Podge on (covering the entire surface of the black paper silhouette with a few thin and even coats so it was a bit more sealed and protected for the long haul). The result was nothing short of charming. Especially for an under $2.50 project.
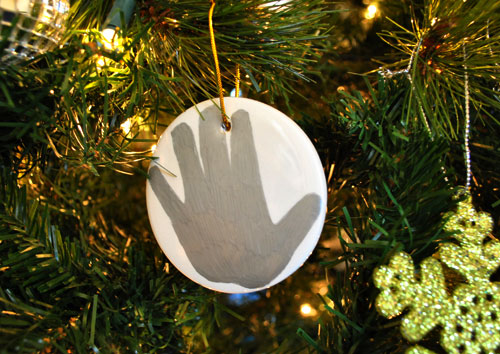
Oh, and we also wrote “Clara’s 1st Christmas, 2010” in small handwriting with a black Sharpie on the back. But our marker fun didn’t stop there. Since our spare ornament was now peeled of its paint (it really did cleanly peel off just like puffy paint) we were able to start from scratch and create an alternate version featuring Clara’s hand-print (which we got by tracing her hand on paper, cutting it out, and using it as a stencil to trace the outline right onto the ornament with silver Sharpie). Then we filled it in. I love how her hand just fits. We probably can’t do this one from year to year unless we hunt down some bigger ornaments, but she’ll totally get a kick out of knowing that her hand was once that small.
So that’s how Clara’s first Chirstmas was officially represented on our tree in two fun DIY ways (at least for a few days before we packed everything up). But here’s hoping they make an encore appearance at the new house when we do some quick & dirty Christmas decorating over there. Have you guys DIYed any ornaments? I should mention that Sherry wanted to shove a pink baby sock into one of those round glass ornaments with removable tops to create a third Clara themed ornament but I thought that was weird. So I’d love to know if anyone else out there has tastefully created a baby sock ornament that they’d like to share. I might just change my tune.
Psst- Check out some other ornaments we DIYed a few years back here and here.
Update: You can check out all of our favorite holiday decor finds here – many of which are under $15!

Stacy @ Every Little Thing says
Great ornament project! Love it.
Colleen says
What an awesome idea. I’m sad that my oldest is 6 and it seems a little late to start a tradition. One thing that we’ve done that you might want to incorporate when she’s older is having the kids sign the back of their ornament each year. I can’t wait to see how their handwriting changes from year to year.
Best of luck with the move. Thanks for the continued inspiration!
Jessica @ How Sweet says
Such a cute idea!
Stacy says
Such a great idea! Love it.
jiye says
What a simple but adorable idea!!
jiye
pearlsandgreentea.blogspot.com
Mary Kathryn says
good gravy what a fabulous idea.
Must.make.now.
Thanks for the inspiration!
Blog is the New Black says
Love it!!!!
Relevant Notes says
Those are both so cute! The hand one is my favorite. I can’t believe the sharpie marker looks so smooth.
heather s. says
Amanda over at Our Humbled A{Bowe}d did something similar this year. Very cute.
http://ourhumbleabowed.wordpress.com/2010/12/08/silhouette-ornaments/
YoungHouseLove says
That’s so cute! The whole family! Amanda did an awesome job! Thanks for the link.
xo,
s
Jenn from Much to My Delight says
You guys are amazing. How you find the time to handicraft, write, and take care of a baby in the middle of moving is totally beyond me. What a cute and special ornament. Baby Clara circa 2010 is one lucky baby!
LittleMissEclectic says
I am a sucker for silhouettes. I DIY ornaments every year, hand beading them. I have a tutorial on my blog.
Jamie B says
Last year, we made Cinnamon Applesauce cookie cut-out ornaments with our daughter (now 3.5). We has such a blast painting them all. And they smell amazing! That’s the first thing you smell when you walk into the house!
Also, when I was young, I remember my mom saving the small boxes baby cereal used to come in. We then wrapped them with paper, ribbon, bells, etc, and had adorable little presents hanging on the tree.
Kay says
I’ve done a cute sock ornament. It was a christmas sock for my newby that had a sweet bow on it so I just stuck the hook that hangs it on the tree directly through the top of the sock and hung it au natural. Easy and cute.
YoungHouseLove says
That IS cute!
xo,
s
Ally says
Super adorable ornament! This is a great idea. I know a lot of people have the tradition of getting their children Christmas ornaments every year, but I think making the ornaments is even more special. Nice touch!
Also, nice job turning “Sharpie” into a verb. :)
Last thing — are you familiar with the Kristen Wiig character on the SNL sketch of the Lawrence Welk show? (She has a big forehead and teeny-tiny hands.) Your tiny hand-print ornament just made me think of her. That character WOULD be able to fit her hand-print on a tiny ceramic ornament year after year. : )
YoungHouseLove says
Hahahah, we love that character. ANNNND I’M EUNICE!
xo,
s
Caroline @ The Feminist Housewife says
Such a cute idea!!! I’m definitely going to have to steal this one!
Kelly says
Those are really cute! Great job!
p.s- I bought these 2 books from amazon last week and they are great. I thought you’d like to check them out. I know you are loving color for your new home.
Jonathan Adler on Happy Chic Colors
Jonathan Adler on Happy Chic Accessorizing
xo,
Kelly
YoungHouseLove says
Love J-Ad! I’ll have to check them out.
xo,
s
Mary C says
Love your silhouette and handprint ornaments – what treasures! I bought those same ornaments for my 14-y-o daughter last week. You’ve set in motion some ideas, and once she sees what y’all did, she’ll be jumping right on some DIY projects of her own. And that, my friends, could result in some very merry Christmas!
Amanda @ Our Huble A{Bowe}d says
I did some of our family, too! I love how they turned out, especially because they’re so custom! Great work, guys!
http://ourhumbleabowed.wordpress.com/2010/12/08/silhouette-ornaments/
Mary says
I sewed some ornaments this year:
http://lifeon19th.blogspot.com/2010/12/reverse-applique-christmas-ornament.html
Maggie S. says
The first year my husband and I were dating, I bought inexpensive ornaments, wrote their names and the year on them, and used them as the gift tags on their presents. It’s really special that I still get to see them on their tree every year.
Jessi E says
I am loving how the recently discovered versaility of my old sharpies. I have been thinking of some DIY canvas art, but I may give this a go first. Thanks for the idea!
Stacey says
I’m actually doing something similar to give as Christmas gifts this year. Thanks for the idea to use the sharpie! That seems like it will be a lot easier.
PS Best of luck with the move!
Elizabeth says
I JUST DIY’d a baby sock ornament not two weeks ago. I made it into a snowman. Take one baby sock and stuff it a little less than half full with cotton batting. Secure with a rubber band and stuff more batting and secure again with another rubberband. Fold over the top of the sock to make a little hat for your snowman. Use puffy paint for eyes, mouth, and a little carrot nose. Tie a little piece of felt around the neck for a scarf and glue on some buttons on the bottom half to finish off our snowman.
caree says
so cute!
question: did ya’ll make a ‘our first christmas’ ornament after you were married? we just got married a month ago, and I’ve been on the lookout for something like that, but the ones I’ve found have been, well, kinda kitschy. So I’d rather make my own. Any ideas?
thanks!
YoungHouseLove says
No but we should have! Anyone have newlywed ornament ideas for Caree? Maybe print out a picture from the wedding and Mod Podge it on there with the wedding date or the words “our first Christmas”? Good luck!
xo,
s
Elizabeth says
P.S. Create a loop to hang it with by threading some yarn through a needle and poke it through the snowman’s head and tie it off.
Janet says
Serious kudos for the Flowbee reference – a about died when I read that! It always makes me think of the infamous Suc-kut from Wayne’s World (it sucks as it cuts!). Awesome.
Jamie M says
I just did the hand-print snowmen ornament with my kiddos. My son is 7 months old so his fingers/snowmen are a little smeary, but it’s still pretty cute and they are going to be gifts for the grandparents who live so far away.
(here’s a link to someones online picture, in case you haven;t seen them before)
http://lovemylifex4.blogspot.com/2009/12/handprint-snowman-ornament-christmas.html
Jen K says
I love the silhouette idea! I’m making one this evening! THank you. This is our little hand ornament for this year:
http://eatplaylaughoften.blogspot.com/2010/12/advent-2.html
jennifer says
every year my mum makes an ornament for each one of us [well now they have evolved into an ornament she buys and i write all of our names on]and ties it on the top of our present stack [aslo wrapped in individual paper]. my first one [and my favorite] is a snowflake she made with each kids “school” photo in it [back then she made one for all the cousins too], but since it was my first christmas it has a baby picture in it. when we moved out on our own, she gave each of us a box full of our yearly ornaments and some extras that she had purchased over the years so that our first tree of our own wouldn’t be naked.
this year i have decided to knit cute little sparkly cardinals for gifts and tie a loop on them so they can hang on the tree… i really need to get a move on those!
Nota Supermom says
Those ornaments are adorable. You’ll treasure those forever.
Don’t worry about the hair. I had a kid bald for eighteen months. Even dressed in pink, people would ask what his name was.
Now she has beautiful thick wavy hair.
You know you can use Elmers school glue to glue bows right to their head? I think it’s a little crazy, but I had a friend who did it. She even sold bows on etsy for other bald babies.
Allison says
This turned out great! I may have to make something similar for my sweet niece.
I’d also be interested in hearing other people’s ideas for a newlywed “our first Christmas” ornament!
AnnaMae says
darling ideas! my kids are a little older now, 5 and 3, but better late then never to start something like this. I love the idea of seeing their growth and changes like that. As for baby socks my mom kept a pretty pair of lacy baby booties that I wore my first Christmas. She simply attached a ribbon in a loop to hang from the tree. I loved getting them out every year and now with my kids it’s fun for them to see my little shoes. :) I did the same with a pair that my daughter wore to carry on the tradition.
good luck with the move!!! :D
Alisa D says
Could you use liquid starch or something to stiffen the sock? Maybe cut a little hole in the cuff of the sock before stiffening the fabric so you can loop ribbon or a hood thru it. (I sure hope this isn’t a dumb idea on how to do it… I haven’t ever used liquid starch before so I don’t know how stiff it would even make it.)
YoungHouseLove says
Oh yeah, I bet that could totally work!
xo,
s
Cait @ Hernando House says
So cute! With all the silohette projects in the blog world, I’m thinking I may need to make some of my own.
Ashley G says
Love the ornaments…maybe you could incorporate pink by tying a pink ribbon to hang them from instead of the gold elastic? Also, does Burger have a silhouette ornament? Certainly he should have something to mark his first year as a Big Brother! I think Crayola still sells Model Magic and you can shape it into a circle (or other shape) and make a paw (or hand) print in it for an easy ornament! As a preschool teacher, I have to mention my all time favorite ornament/Xmas decoration: the reindeer foot and hand print. Trace the child’s foot on brown paper, trace their hands on black paper. Attach hands as antler to top of foot near toes. Draw a face, or attach googly eyes and a red pom pom nose…so precious…with the drawn on face it can be laminated for protection! Happy Holidays and good luck with the move!
YoungHouseLove says
Yeah, we thought about somehow trying to make a paw ornament for Burger. Maybe after the move… or next year if things are too crazy. Somehow I think he might mind the process of making one more than not having one. Haha.
xo,
s
Krys72599 says
This year my tree is all white and silver, but at the tippy-top of the tree are three un-matching ornaments that go on every tree I do, no matter what the color, theme, etc.
One is a gold filigree ornament that screams “Mom” to me (it used to hang on her tree – she doesn’t know I stole it!), another is a small red bleeding heart that I bought the holiday after my dad died, and the third is a clear red plastic ball that’s hollow, that has dead gold tinsel inside and my initial “K” on the outside in silver glitter tape. My dad made each of us one of these when we were small, and there will never be a tree in my house that these three ornaments are not included on – yea, I know, bad grammar…
Any ornament, with or without a sock, that you make for Clara and that she learns to value because Mom and/or Dad made it for her will mean the world to her, even when the tinsel (or the sock!) inside is deader than dead…
You don’t really think I’d replace Dad’s tinsel with fresh, do you?!?!?
Emily says
Those are adorable, but the cheap gold thread on it is killing me. Is it possible to replace it with some nice ribbon? I think it would really elevate the look.
YoungHouseLove says
Of course! That would be easy. Except it’s packed…
xo,
s
Ami @ beyondpeasandcarrots says
very cute!
stephanie says
very cute idea. love it!
Meghan says
I have done two things this year.
1- picked up really sparkly costume jewelry from flea markets and stuck an ornament hook in it. Bam! Instant one-of-a-kind vintage sparkly ornaments! It’s on my blog here:
http://ironandspice.blogspot.com/2010/12/its-beginning-to-look-lot-like.html
2 – I make ornaments out of the corks from meaningful wine bottles. We did one for the champagne we drank the night we got engaged, one from our wedding wine, and we’ll keep doing that as we drink on special occasions! Same deal – take cork, stick in ornament hook. We mark the date in Sharpie on the bottom.
Merry Christmas!
bridget b. says
how freaking CUTE! i’m totally going to do the handprint with my babygirl. she has a head full of fuzzy curls, so not sure that the silhouette would turn out so hot.
Megan says
What you didn’t add in your post was how you got Clara to sit still to trace her hand. Is she really just that easy of a baby?
YoungHouseLove says
Let’s just say she was just fed and a little tired (so that helped keep her mellow) and it took four hands to accomplish (John held her and chatted with her to keep her distracted while I held one hand down on paper and gently traced around it with the other hand).
xo,
s
bria says
what a tasteful & timeless 1st baby ornament! love it!
Wintry Mix says
I’ll be honest, silhouettes TOTALLY creep me out. The people we bought our current house from had a huge wall in the their living room entirely covered with small silhouettes–like twenty or thirty of them. Oh the horror. Really, I don’t know what it is, but I find them spooky and weird. I realize that I seem to be alone in this.
The Clara-print, though, is super super cute and I could definitely see myself snagging that idea once we have a wee one with a wee hand.
shanna says
Love this! Honestly, I am so impressed that you guys are still able to post while moving. But truth be told, your posts do not need to be DIY or project-related – you’re such great and funny writers, that any post is a joy to read!
Oh, as to your question about sock ornaments: I did this for each of my babes. I saved my favorite sock that each of them would have worn around their first christmas. Then I bought a pack of alphabet beads that are in the jewelry section of Michaels and picked each kid’s initials and sewed the beads to the top of the sock. I just use a regular tree ornament hanger to hang the sock from the tree. It’s very sweet and super easy.
Karrie says
This year is Grandma’s first year at the Lodge after selling her house and getting rid of all her stuff. My mom bought her a new little tree for her room, but she still didn’t have much for ornaments. My mom mentioned in passing that the kids could maybe make her some ornaments. So I grabbed some instructions off of Pollywantacrafter and we came up with some cute ornaments for her.
http://sweethappens.blogspot.com/2010/12/grandmas-ornaments.html
I also made her some advent boxes to count down to Xmas with. http://sweethappens.blogspot.com/2010/12/grandmas-advent-boxes.html Looking forward to going to see her this weekend for the Lodge’s Family Christmas Party and putting them on the tree!
carolinaheartstrings says
Oh how charming. I can see a future tree just for Clara and any future siblings covered in their “special” oraments. Perfect. Afterall, you can never have too many trees decorating your house. That would be so cute in a kitchen.
Kristen says
Love the first year ornaments you made. They are adorable and I’m sure you’ll treasure them for years to come!
Sara @ House Bella says
For some reason, the finished ornament image isn’t showing up in the broswer! All the others are. So sad, from how you describe it, it certainly SEEMS cute! ;)
YoungHouseLove says
So sorry! We can’t figure out what the issue could be on our end, but perhaps you can try opening our blog in a different browser (like Firefox instead of Safari?). Hope it helps!
xo,
s
Crystal says
I love the silhouette, very cute idea. Just an idea…the gold thread hanging it would look so much better if it was silver, or even black. It would be a super quick switch out and make the ornament look a million times better!