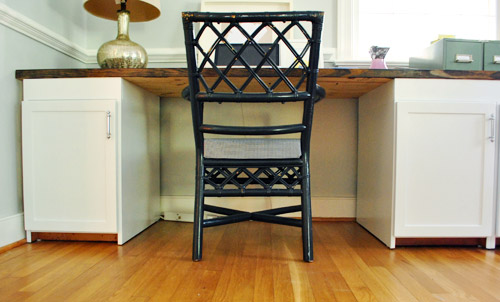
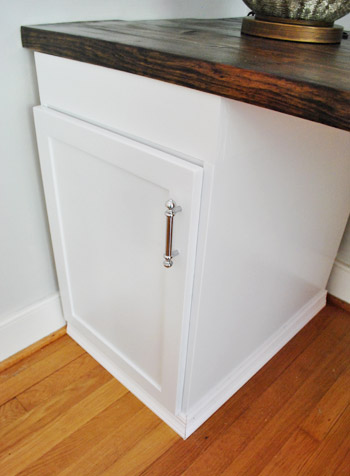
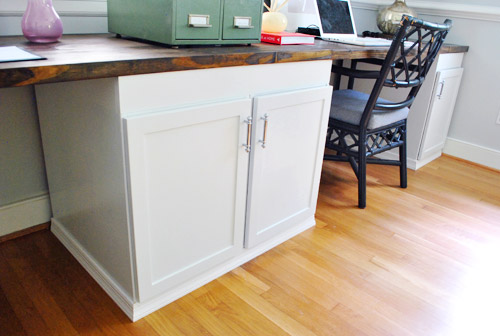
Yup, we got a little trim. As you read in last week’s Day In The Life post, we recently tackled the add-trim-to-the-hooter-and-the-hotter-office-desk project. The basic game plan was to add some simple baseboard or molding to the bottom of our cabinets so they looked more like built-ins. In other words, the bottoms were looking a little unfinished…
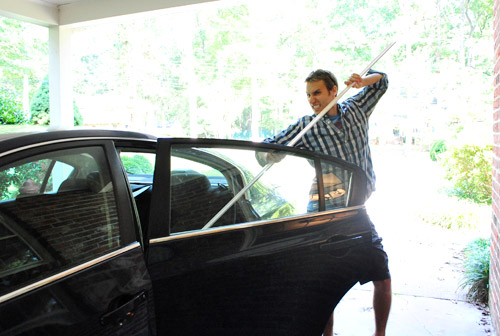
I took measurements and headed off to the store with my little cheat sheet. Notice how I mark which way my cuts go? When I’m making angled miter cuts I’m so anxious about cutting the wrong way that I leave myself as many reminders as possible.
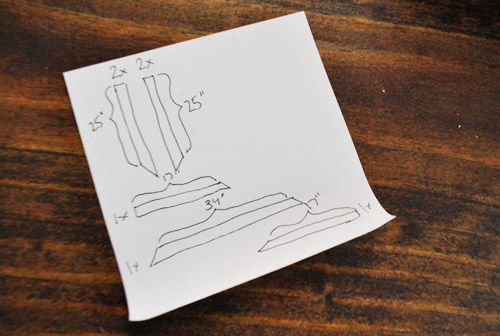
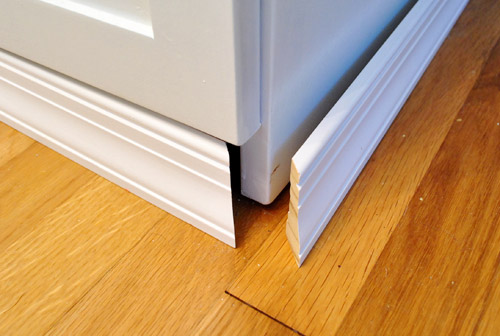
One very critical measurement, not shown here, was the trim height. We had less than 3″ of distance between the floor and the cabinet doors, so traditional baseboard wasn’t gonna work. I actually ended up (dramatically) bringing home trim that was very similar (actually, maybe exact) to what we used around our bathroom mirror. Total cost for three 8ft pieces = $14.
I measured my pieces and again left reminders about what angle my cuts needed to be…
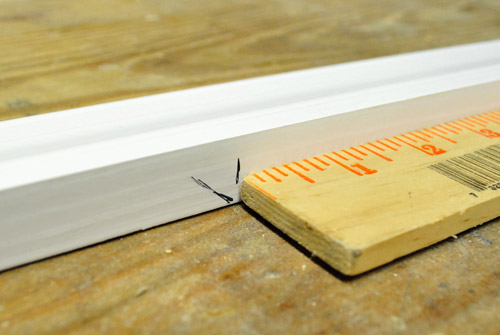
…so that even at the last second I could make sure I didn’t have my blade or trim piece in backwards or something.

I checked each piece as I cut it just to make sure the lengths and angles were right.
After everything seemed to be lining up, it was time for the nailing portion of the day’s festivities. I hammered the small finishing nails in most of the way with my hammer, then finished it off with my nail punch (which helps get the nail set into the trim slightly without banging up the surrounding wood).
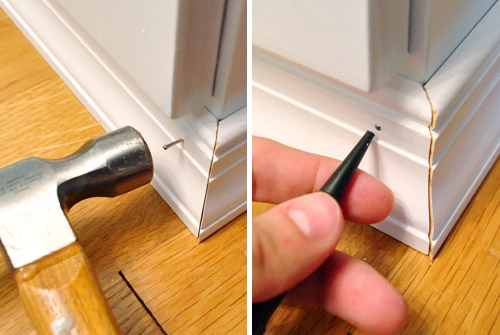
Of course the edges weren’t 100% perfect, but that’s what a bit of caulk is for (just rubbed into the edge with a finger). It’s also good for hiding those slightly sunk nail heads (thanks to the nail punch). Though we actually haven’t done either of those things yet. Oops. Soon…
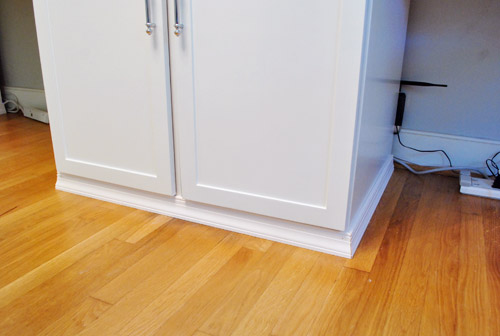
I put two or three nails in each piece of trim, securing it to the cabinet – not the floor – and was done in almost no time. If the white of the trim weren’t so darned close to the white of the cabinets already, we’d probably have painted them immediately. But they actually look great as they are (so we plan to paint them when we caulk stuff, just to finish things off).
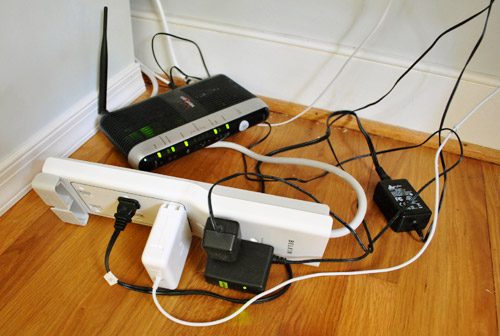
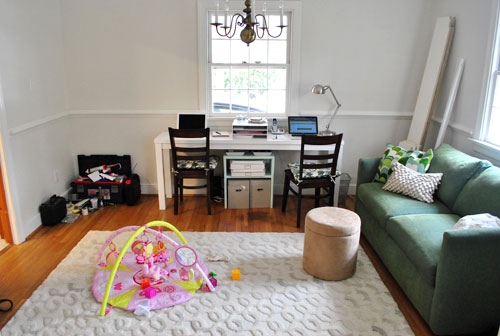
What wasn’t looking so great was the mess of cords in these pictures. We’ve just sort of been ignoring them up to this point, but after taking the pic above we suddenly realized that they were ruining the finished look of our new trim. So we decided to finally do something about it.
Sherry’s side was easy because she only has two plugs in one small power strip (her computer and lamp – although for some reason her lamp wasn’t plugged in for the picture below). The outlet is hidden behind the desk, so we thought ahead and plugged the power strip in before finishing the desk. Luckily I was able to just tuck her strip out of sight behind the cabinet since there’s a smidge of space to allow for the plug (there’s no space between the countertop and the wall, so it looks 100% seamless from above – you only see that small crack where the cabs don’t sit right against the wall if you’re on your knees under the desk). Oh and ignore the raw bottom of the countertop in all of these pictures (it’s also not seen except by someone who is Burger’s height, but we’ll probably do something about it someday because we’re anal).
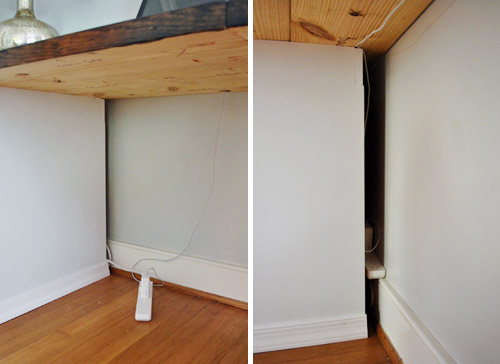
My side was a bit crazier, since I had a larger power strip (from our old office set-up), more plugs (computer, phone, external hard drive, etc) and that big honking wireless FiOS router. Behold the hot mess:
Since tucking it away like Sherry’s side wasn’t an option (stuff was way too bulky to slide behind the cabinets), I opted to hang the power strip on the wall right under the counter, that way it’d be virtually out of sight. The power strip already had notches for screws on the back, so I just used a homemade guide to make sure I drilled my holes in the right spots.
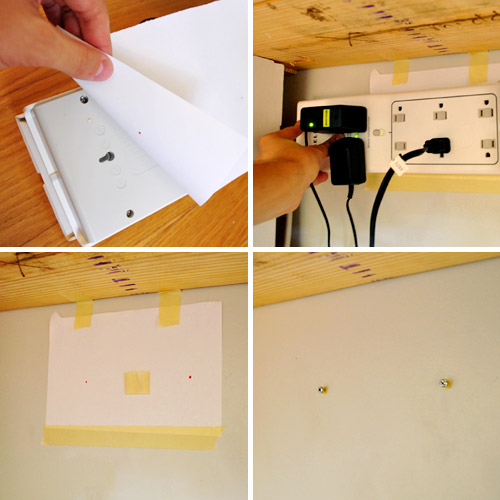
In case the pic isn’t self explanatory enough, my basic system was:
- I taped a piece of paper to the back of the strip and poked holes through the paper with a red pen, marking the notches.
- I then held the strip where I wanted it on the wall and taped the paper to the wall
- When I gently pulled the strip away, it un-taped itself and left me with two red guide dots
- I just drilled right through the paper so I had perfectly placed holes for my anchors and screws
- Then I hung the strip on the wall and plugged everything back in (and slid the router behind the cabinet)
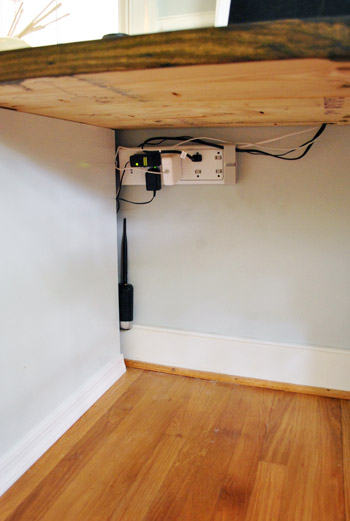
Still looks a bit messy in the pic above, but when you stand back to look at the whole room it’s not very noticeable at all. So your eyes can just concentrate on the freshly added trim instead. Note: of course we still have to hang art and window treatments and add bright lamps/shades and rearrange tons of desk stuff, so other than the newly completed desk there’s not much about this room that’s done.

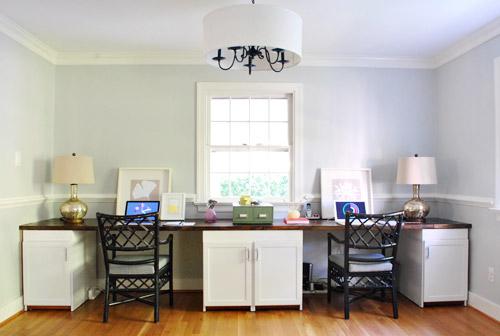
Just as a reminder, here’s what the room looked like without the added trim and cord organization. We think it was well worth $14 for the extra polish that it adds:
Oh and here’s what the room looked like right after we moved in nine months ago, just for some way-back-when reminiscing:
This room in general has really come along in the last month or so. Which is nice since we spend so much time in there.
Oh, and I had once talked about trying to add some trim to the side edges (where they almost meet the wall) to complete the look, but Sherry and I had about fifteen pow-wows on the subject and finally decided it wasn’t worth the trouble (to make it look truly flush I’d have to do lots of cutting around the baseboard and that didn’t sound like much fun – and doing it half-heartedly would probably just make it look worse). So once we caulk those newly added trim corners and nailheads, I think we’re pretty much calling this desk project D-O-N-E. Here’s how much we spent in total on our 13 foot long wall-to-wall double desk:
- Cabinets (from Habitat For Humanity ReStore): $6.30
- Kilz Clean Start No-VOC Primer: $0 (leftover from painting the kitchen paneling, but it would be around $20 to buy for those wondering)
- Electric sander & sandpaper: $0 (already owned, but would be around $25 to buy)
- Benjamin Moore Advance paint (in Decorators White, satin): $40 (thanks to 10% off haggling/begging)
- Pre-primed & unprimed wood to build up cabinets (from Home Depot): $51
- Framing lumber for counter (from Home Depot): $27.30
- Stain & poly for top: $0 (already owned, but would be about $8 and $20 respectively if you didn’t have any)
- Drillbit for boring cord holes in counter: $4 (from Lowe’s)
- Trim for bottom: $14 (from Lowe’s)
- TOTAL: $142.60
Not surprisingly, our attention has already moved on to another project in the office and we CAN’T WAIT to share it with you. Lets just say that Sherry’s epically sore, there’s paint in her hair, and she’s nowhere near done. More details (and pics) tomorrow for sure. Until then, have any of you guys added trim to make something look more built-in. Or launched a full-scale cord organization? Tell me about it.
Psst- To check out our entire desk building adventure from start to finish, here’s the post about planning the layout of the room, here’s the post about buying the cabinets, here’s the post about other cabinet research we did, here’s the post about sanding/priming the cabinets, here’s the post about building them up to desk-height and painting them, here’s the post about building and staining the counter, and here’s the post about drilling cord holes into the counter.

Michele says
Ummm..am I the only one who laughed hysterically when I saw the title of the post? Am I that immature? yes, yes I am. Thanks for the big giggle at the office today :)
Lisa in Seattle says
Michele, I’m wondering if we are the only two people who know what that term means! Apparently there’s more to our charmingly boyish young host than meets the eye!
YoungHouseLove says
We’re clueless over here! Someone give us a hint! It was totally just a haircut reference to us. Haha.
xo,
s
bridget b. says
er, slang word for a woman’s “naughty place”. lol.
Sarah @ Redhead in Ruffled Flats says
I looks great! My hubby and I have been making many trips to Ikea to finish off our little home office in our bedroom. I just decided to start a photography business as of yesterday (ooooh so scary), so I’m going to need all the organization I can get! Thanks so much for the inspiration!
Amy says
It’s so amazing that you guys built that! It’s fantastic.
tjack432 says
I love it. It creates a nice balance with the large white space at the top of the cabinets.
Emily says
Wow! It looks like you guys have been hard at work making that office look GREAT! The new baseboards completely change the look of the desk and the room. Love it, keep up the hard work!
Emily
Amber says
Your desk looks wonderful! We added trim to the top of some standard IKEA Billy bookshelves to make them look like a wall of built-in shelves. We get so many compliments on it, and it was such a simple project!
YoungHouseLove says
Love that idea!
xo,
s
Katie Rose says
I’m dying to try this cord organization method: http://pinterest.com/pin/179331293/
YoungHouseLove says
So smart! Love it!
xo,
s
Lindsay says
Hey! Non post related, did u see the living social deal? Its for a photo book with my publisher. Good deal! Wanted to pass alomg :)
YoungHouseLove says
Sweet! Thanks for the tip!
xo,
s
Bboss says
I live in an older house with few outlets. Our office holds all computer stuff (desktop, monitor, printer, router, modem, light, etc.) and they all need an outlet. We have two outlets in the room. Do you worry (like my husband does) about the load on an old system with so many surge strips, etc.?
YoungHouseLove says
We typically don’t like to fill a power strip completely with cords (maybe we cap out at four?) and we also use “smart” power strips that we can click off at night before bed (to save energy and also reduce any overloading issue). Hope it helps!
xo,
s
Adriane (aka the greenhorn) says
Hooray! You guys did great and what a great feeling to scratch something else off your list.
We actually wanted to add trim to our refinished storage cabinets but after some good measuring at home followed by really poor measuring regarding angles as we tried to cut it with a dull hand saw at Home Depot, we gave up. We now have 6 pieces of crown molding sitting in the garage.
Maybe we’ll try again now that the sting and need for cursing have worn off… :) You can see the mostly done cabinets here http://wp.me/p1rUVn-kP
Adriane (aka the greenhorn) says
Gah! The short link betrayed me, LOL. For real this time, here:
http://greenhornliving.com/2011/08/17/overdue-update-on-my-big-storage-diy/
YoungHouseLove says
Love it! So organized!
xo,
s
Monica says
The desks look amazing and for the cost it is even more impressive! Have you guys considered stand-up desks given how much time you spend at your computers? Would love to see a post about making stand up desks look as put together as you guys did here. My husband built us stand up desks but we have had a hard time finishing the look because there are not that many examples. Also, your blog is my late night reading when I am up nursing our daughter. Thanks for being my entertainment so I can stay awake!
YoungHouseLove says
We made our old double desk with a door – and it seemed to look a lot more finished when we added the wood rails (I think it’s also called an “apron”) around the sides to beef it up. More on that here: https://www.younghouselove.com/2010/06/office-progress-deciding-to-diy-a-desk/
xo,
s
Paige @ Final Clothes-Out says
Do you guys watch All American Handyman on HGTV? One of the projects last night involved trim! It was kind of stressful to watch everybody cut it wrong several times in a row… Clearly, John is onto something with those drawings.
YoungHouseLove says
Wahoooo! Go John! We meant to watch that show but forgot all about it. Might have to look for one of those all-day reruns of the season when it’s over!
xo,
s
blake says
Have you guys thought about using chalkboard or magnetic paint anywhere on the office walls?
You could frame a square of chalkboard paint, or do magnetic above the desks and cover it with the grey-blue that’s already on the walls so it’s unoticable but totally functional with magnets for posting notes/pictures/fabric swatches, etc.
Just a thought … been dying to work one of those into my office or kitchen for a while :)
YoungHouseLove says
We used magnetic paint (secretly under the regular wall paint) to hold up magnets for Clara in our last office so we’d love to do that again somewhere! Not sure if we’ll add that to the office or playroom though…
xo,
s
OMG Ponies! says
Trim _is_ magic!
Nice work, your ideas are inspiring me to build my own “built-in” bookcases.
Good call on not worrying about the trim between the wall and the desk. Protecting plaster walls = super important, and you can always go back and add in trim later if it ends up bugging you.
I did kind of wonder why you didn’t stain the underside of the desk before, but I figured it must have been part of a master plan. Do you wish you had stained the underside of the counter top now?
YoungHouseLove says
Yeah, that probably would have been nice looking back! We honestly just figured that no one would see it. Who knew we’d take so many photos from below the desk? Haha. I did hear from someone that painting the underside white can help the boards from warping over decades of use (somehow it seals them to prevent heat/cold contracting or something) so maybe I’ll slip under there and give them a coat or two while I paint the trim after we caulk…
xo,
s
brita says
i live in a dorm room so for all my cord taming activities i use the command velcro picture hanging strips. They work so well as a temporary solution for sticking a power strip onto the side of a desk or something like that. also, i looove the built-in desk look and it makes soo much sense for my formal parlor turned office/tv room at home. sooo many good ideas!!!
<3
-brita
Nikki P says
Yes, you are TOTALLY missing a reference with the post title. In more urban settings, getting trim is equivalent to getting the goods, the good stuff, going all the way, need I say more??? *blushing* So, so very sorry that I had to write that, lol.
The guys on the street (the ones who may catcall at you) use that term often…
YoungHouseLove says
Reallllllllly?????! Wow, you learn something new every day. Haha. Completely unintended reference there. Off to tell John and watch him blush…
xo,
s
Kate Whitmore says
Still amazed that you turned $1 cabinets into THAT. Gorgeous! Absolutely love the trim.
Allen says
First things first; love you guys, your family, the blog and that in my head we are total BFFs.
Now that I’ve primed the pump; a request! I really appreciate the cost breakdown of all your projects, it’s a great litmus test more my motivation! Ever thought about adding what you spend in time? Planning, prep, execution and clean-up?
After reading through all the Blogiversary breakdown (Happy 4th!!) I was struck that the time and effort it takes you guys might actually be comparable to what it would take ‘ordinary folks’ since you are managing so much else with your time.
Anyhoo, I started reading your blog a few months ago BUT I’ve just started reading the archives and it totally feel like YHL True Hollywood Story getting all the behind the scenes stuff after the fact.
The real story of $her-dog and J$!!!
keep on keepin on!
<3 <3 <3
YoungHouseLove says
We’d love to add time breakdowns whenever possible! Sometimes it takes more time that we have (haha, the irony) but we did include one in this post from a while back, and we love looking back on that info: https://www.younghouselove.com/2009/12/tackling-the-basement-done/
Here’s hoping we can work more in as we go!
xo,
s
Linda says
Apparently ‘trim’ is also slang referring to sexual intercourse and/or part of the female body. Didn’t know that myself til I goggled it, but I’m guessing that’s where all the giggle are coming from.
YoungHouseLove says
No way!!! Wow, you learn something new every day. Haha. Completely unintended reference! Now I’m off to tell John slash watch him squirm. Haha.
xo,
s
Nikki says
Now I just feel old. I completely missed the reference and have NEVER heard that before…as in it came from a younger generation that I am no longer a part of. Man that’s tough to swallow!
Lauren says
Haha love the National Lampoon’s Christmas Vacation reference. My family and I watch that every Thanksgiving and then again on Christmas Eve. :)
Jill @ Mission Decorate says
Great job on the trim. It makes a huge difference! For less then $150 I am amazed how expensive it looks. NIce work as always.
BTW – the “form” email I received back from you guys from the submission page was the most pleasant form letter I have ever read. It totally made me smile!
YoungHouseLove says
Aw so glad! We tried not to make it sound like one of those mean we-don’t-care ones. Haha. We’re crazy.
xo,
s
Arrie says
I wonder why you keep listing $6.30 for the cabinets, even though you only used four of the six? Are you using the other two cabinets elsewhere in the room?
YoungHouseLove says
We just spent that much so we wanted to keep the number true to what we spent. When we buy a gallon of paint for a project but only use half of it we still include the entire amount since it’s what we spent. Hope that makes sense!
xo,
s
Michele says
The ladies are correct! Typically the word “trim” in slang is a woman’s umm…how shall I say this?…well, I will just come right out and say it…vagina.
So the title of the post “Getting a Little Trim” had me on the floor laughing hysterically!!!
YoungHouseLove says
Oh my gosh- totally not intended!!!! Yikes.
xo,
s
Vivian says
This desk is by far one of my favorite makeovers. Custom, practical, gorgeous, and the price has been beyond right. Keep it coming Youngsters!
Alison says
Looks amazing!!!! Seriously great work, this might be one of my favorite things you’ve done in the new house. I can’t wait to see the secret project, I’m guessing it is stenciling, I think you mentioned doing that in the office a while back.
Mary @ stylefyles says
wow it’s amazing what a difference the trim and cord update makes!
Courtney Foster-Donahue says
Swank! Love it. Also, thanks for listing your materials and their sources — I have never heard of the Habitat for Humanity Restore (there isn’t one where I live in Brooklyn, I’d have to drive, but it sounds like it’d be worth the trip). Glad I found your blog — I’d originally heard of you two when you were in The Nest, and my husband and I basically copied your idea for faux built-ins on either side of your bed! Thanks for being a great and encouraging resources, especially for burgeoning, first time bloggers like myself :)
Lindsay Butler says
I loved getting a look inside your blog world last week, and how you run your business!
Would you consider doing a post on how you organize your photos? I imagine you must have a good system between the two of you, and I’d love some advice on keeping track of all our photos; originala, the edits, etc.
Thanks so much for all the work you put into everything. It really is a treat for all of us, and I love reading your blog, and getting inspiration!
YoungHouseLove says
We generally just back up all of our family ones on Flickr and print out an annual photobook that we call our “yearbook. We store blog ones on Amazon.S3 and our hard-drive along with keeping some of the important ones really big on our desktop (like before and after photos, in case a publication needs them for a story). Hope it helps!
xo,
s
Allen says
meant to include this earlier…
http://www.ajc.com/lifestyle/some-ranch-style-homes-1185556.html
YoungHouseLove says
Fascinating! Love it!
xo,
s
Amanda says
Another quick and easy and cheap way to make cables look so-much-more-neat is to use cable ties. One bundle of cables looks much better than many cables that aren’t all together. They also have cable tie mounts that you can attach anywhere (sticky on the back side) if you want to route cables along the bottom of the desk, etc.
YoungHouseLove says
Love that tip!
xo,
s
Ashley says
The trim looks great! Thank god for caulk, seriously. I also love the power strip solution. So much so that I think I need to go home and do the same in my office!
Jenna {Jenna Sais Quois} says
This is amazing! What a difference some trim and a little extra cord-disguise makes…
I have to say, though, one of my fave things about YHL is the fact that you tackle issues like exposed cords/plugs/general unsightliness, when it seems like most decorating shows & blogs gloss over them. In perfect land, they must not need silly things like electricity…
Shellie says
Hi, I loved this post because I also have an old home and it’s challenging at times with limited space. Great site by the way!
Cinemarie says
Holy Cow – this looks really really good! You’d absolutely never know these were 6$ cabinets! Good Job! :)
Alison says
Your office is looking great. I would have stained the bottom of the desk surface, I know nobody sees it, but it would bug me. Great job with the used cabinets and doing it frugally.
YoungHouseLove says
Yeah, we’re wishing we had thought to do it while we were doing the rest too. Someday we’ll take care of it, I’m sure!
-John
Meredith says
Great post! You have shown, yet again, how attention to detail makes all the difference in making a room look put together.
On completely different note, have you been over to An Inch of Gray recently? I found it on your list of favorite blogs and was shocked at what their family is going through right now. Just wanted to let you know since you guys were so busy last week you might not have been able to catch up on other blogs. And a warning: your heart might explode.
YoungHouseLove says
Oh yeah, we heard the day after it happened. Still can’t stop thinking about it. I hope she’s finding a bit of healing everyday.
-John
Carla says
An off-topic question:
I loved reading all about the business/technical side of running your website. Something I’ve noticed is that your entire site loads quickly, despite the heavy amount of content. I’m not sure if this was already addressed, but I would welcome some tips and tricks. My site is extremely light on content and yet it loads noticeably slower than yours. Thanks!!
YoungHouseLove says
If you’re on Wordpress, I’d recommend installing a caching plug-in like W3 Total Cache or WP Super Cache. That’s the closest thing we have to a secret to a fast-loading site (which isn’t always as fast-loading as we’d want, unfortunately).
-John
Tannie Smith says
Thanks so much for sharing this. It looks fabulous I feel totally inspired. I especially love seeing the easy “stencils” you two use to help hang stuff. Why in the world have we NEVER thought of that before!!!! From here on out my life is going to be easier.
Kara says
Wow, lots of comments about filling those gaps on the sides!
If you decide at some point you want to fill them in (with less effort than trying to cut trim to fit), you could always take some weather stripping and just wedge it in? I have a safe in my office and the safe installer suggested this trick to keep things from falling down behind the safe, never to be seen again since it weighs a million pounds and cannot be moved by a normal human being.
Anyway, it works really well and the weather stripping matches the color of the safe and is not noticeable at all. Just a thought; i don’t think the gap is a problem and i’m sure is less noticeable in person than in the photos!
Sandy says
Not related to this post, but I have a question re the number 4 Katie Bower gave you guys. Do you by any chance know if she made that? If so, any idea how? Loved it and can’t seem to get that out of my mind! Would love to DIY if possible. Thanks!
YoungHouseLove says
I have no idea! My best would be that she made a big number four in photoshop and somehow used all of our names over and over again within that outline to create it? Anyone have any ideas? Maybe pop over to Katie’s blog and see if she can tell ya?
xo,
s
Emily says
Haha best post title ever, don’t change it just because we’re all pervs! (pearl necklace flashbacks) …hooters and hotters, em.
Relevant Notes says
I can’t get over how awesome this whole project is – I love how it turned out!
tina says
i think i love the clever hiding of the mess that are power strips as much as i love that those were once rejected & $6 cabinets! you guys are so fun to follow :)
anissa says
Why didn’t you stain the underside of the desk top? That skipped step would bother me every time I dropped a pencil or got down on the floor to tend to a child.
YoungHouseLove says
Yeah, looking back we should’ve just stained it when we did the rest. But I guess we were thinking how lots of furniture have unfinished undersides and didn’t think it’d be a big bother. And 95% of the time it isn’t, so it’s not high on our to-do list at this moment.
-John
Erin says
Hmm…did you paint the ceiling?! That would definitely equal soreness AND paint in the hair. Your new trim really adds a lot!
YoungHouseLove says
Haha, nope but good guess. Details and photos tomorrow morning!
xo,
s
Jenna says
The trim definitely makes it! Details – they make it or break it. Great job! You guys are inspiring, as usual. :)
Jen says
It is really nice to see that I’m not the only deviant/perpetual sixth-grader who immediately started laughing at “Getting a Little Trim.”
Leslie Ann says
I would like to chime in and say that I think trimming the sides would be worth it… the shadows make the space between the wall and the desk very noticeably to me.
YoungHouseLove says
It’s definitely one of those things that shows up more in pictures (we place the camera around 3.5ft off the ground, so from normal height you look at the seamless counter and don’t notice it). If it ever bothers us we’ll definitely take care of it and fill you in on all the details!
xo,
s
Ashli Malinek says
LOVE IT!
Trim makes all the difference.
We recently trimed out our billy bookcases, in our ‘library’ here’s the link:
http://www.maillardvillemanor.com/2011/01/bookcase-tutorial.html
http://www.maillardvillemanor.com/2011/08/new-library-rug.html
and we trimmed out our tall ones in our last home too:
http://www.maillardvillemanor.com/2010/07/billy-bookcase-all-trimmed-out.html
It made a Huge difference!!!
Lots of Love
Ashli
YoungHouseLove says
Wow- amaaaaazing job!
xo,
s
Claire says
it does look much better. it’s funny how one little detail can complete a room! that is such a cute office, too!