- The 12 Best White Paint Colors
- Benjamin Moore Edgecomb Gray
- Benjamin Moore Simply White
- Sherwin-Williams Pure White
- Sherwin-Williams Extra White
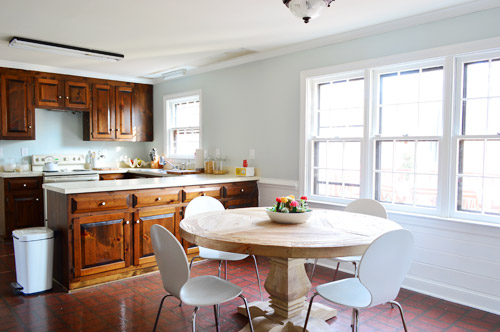
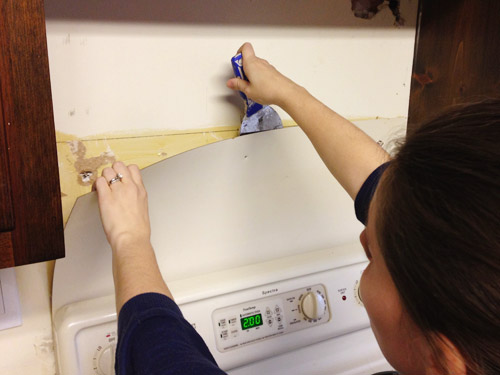
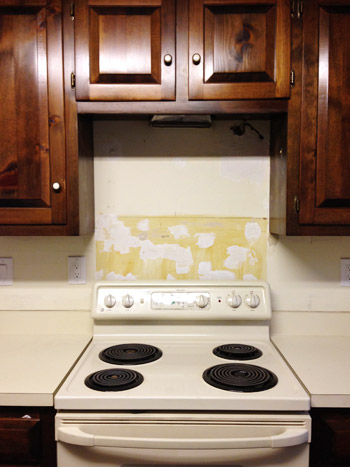
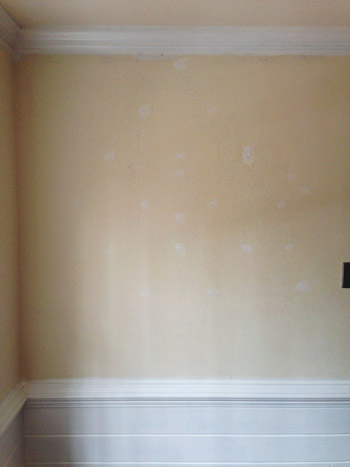
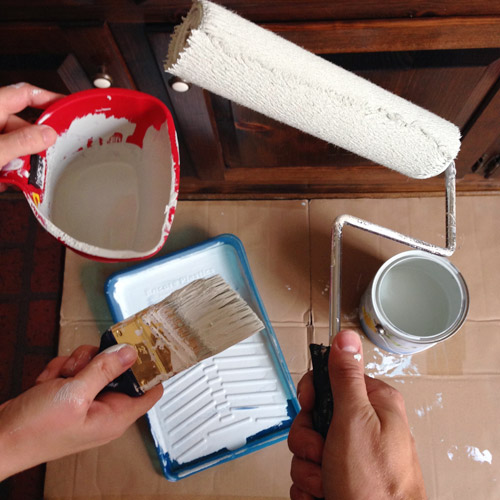
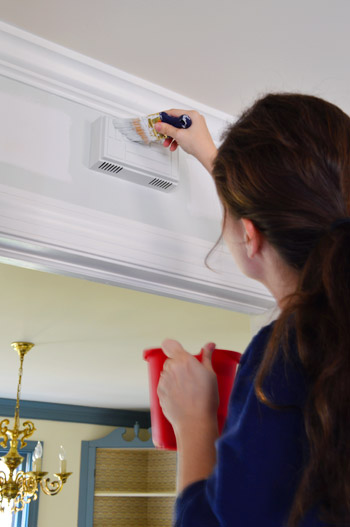
- The areas behind the cabinets that we took down had never been primed or painted, and it’s always good to prime drywall before painting it.
- Walls that haven’t been painted for several years may soak up more paint (as we experienced when painting Clara’s room) and we’d rather it soak up extra primer instead, since it’s cheaper than paint (one coat of primer + two coats of paint is almost always cheaper than three coats of paint because you usually need to buy more than one gallon of paint for more than two coats).
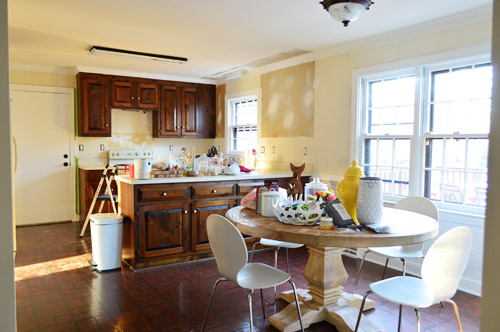
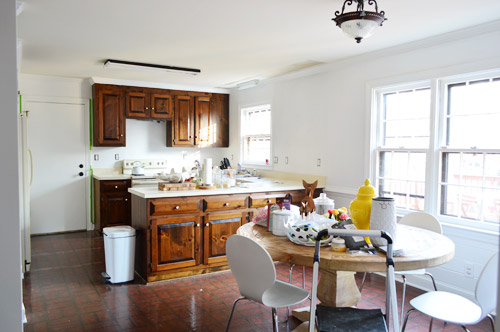
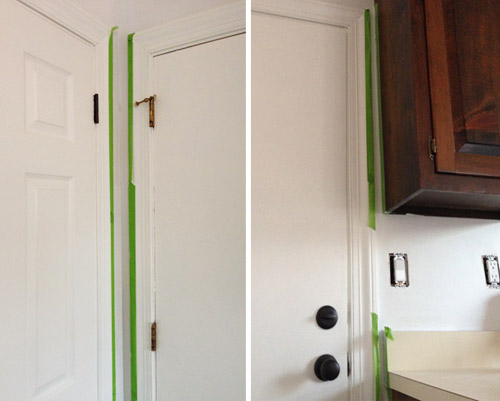
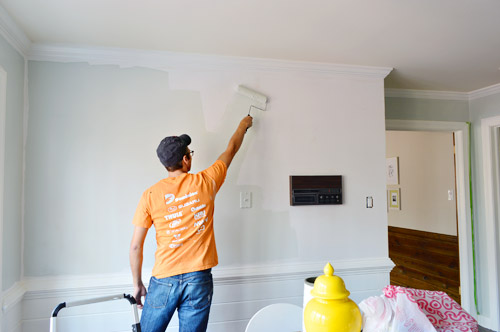
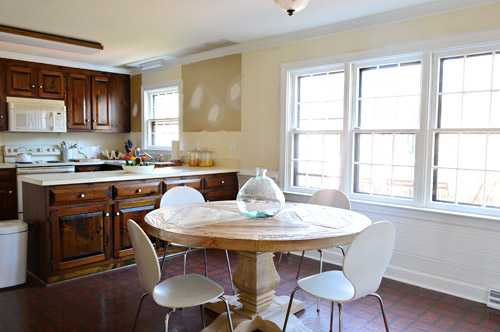
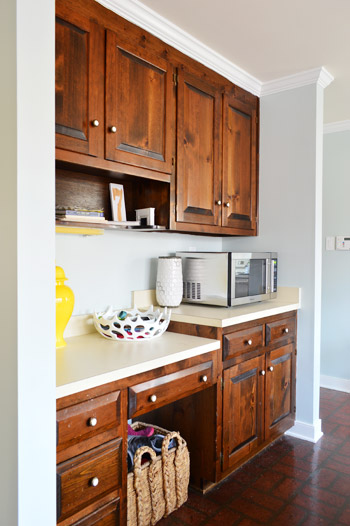
Remove wallpaperMove fridge cabinet forwardRemove upper cabinets on window wall to prep for open shelvesReinstall crown molding(you can read about how we did those first four things here)Prime & paint the pantry and the door to the garagePrime & paint the trim, crown molding, & baseboardsPrime & paint the paneling(you can read about how we did those last three things here)Prime and paint the wallsRemove the existing microwave (craigslist it?) and get a countertop one we can eventually install in the pantry- Install a cheap range hood (we’ve seen some like this for $20 on craigslist) to lighten up that wall
- Patch and paint the ceiling
- Replace the florescent light in the cooking area and the pendant over the sink
- Replace and center the light over the dining table
- Hang floating shelves on the window wall
- Paint the cabinets (you can see the colors we’re leaning towards here)
- Update the old cabinet hinges and knobs
- Get a rug for eat-in area? Possibly install peel and stick tiles everywhere?
- Curtains for windows?

Megan says
Looks great! I love how the blue brings out a richer tone in the wood cabinets. Makes them easier to live with, I’m sure!
Alison says
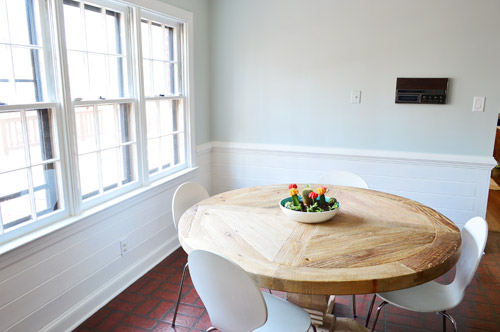
How is the table working out for you on a day-to-day basis? It looks gorgeous, but I’ve always heard that those unfinished wood type tables are tricky to maintain and clean. I am table shopping myself and would love to hear your feedback after a few months of use!!
YoungHouseLove says
It’s great so far! No stains or issues so far, and it hides crumbs (which is both a blessing and a curse, haha) but a quick wipedown helps with that.
xo
s
Lee Ann says
Geez, guys, you sure know how to “inspire” (read: “guilt”) a person into thinking seriously about a kitchen re-do. I swore that my kitchen re-do was at least a year away … you know, to let the Carpal Tunnel syndrome die down a little from this last paint job … but after looking at your kitchen work, I’m feeling like “maybe …?” If my kitchen can look half as good as yours, I need to get on the ladder and start! Thanks (?) for the inspiration.
YoungHouseLove says
Haha! Usually it’s the husbands saying “thanks for making my list longer” – sorry Lee Ann! Maybe you can hold off until after the holidays. You know, to regain your strength and power up on eggnog. Sometimes I try to convince myself of that!
xo
s
veronica says
I love the new color, it makes such a difference. I have ‘In Your Eyes’ as my pantry color and was considering using it in my kitchen whenever I paint my oak cabinets white, but it’s a little too icy. I like warm kitchens (mine is currently golden yellow). I know you all used the same color on your patio ceiling, so I’m wondering how does Nelson Blue compare to In Your Eyes? I know it’s got some green in it, but from the pictures it looks a little warmer. Is that pretty accurate?
YoungHouseLove says
Yes, I’d say it’s warmer, slightly more toned (not as light, but still very airy) and has some green. Still feels cool though, so a warmer one would be Quiet Moments (love that one too!).
xo
s
Josephine says
“And in less tight spaces, she’s great at just freehanding things”
THAT’S WHAT HE SAID!
Am I the only one who thought that? Couldn’t help myself. The kitchen is looking fantastic! You guys are geniuses!
YoungHouseLove says
Haha!
xo
s
Alicia says
Love that blue and I’m usually not a blue fan! Unrelated question – I really like the Edgecombe Gray color you used in your entry. I went to Lowe’s (the only place I buy paint) and they matched it from the computer. I’ve only ever seen the color online (no swatches or anything) so when the little pot came out a light beige/tan no real “grey” at all, I was surprised. I haven’t painted it on the walls yet but was wondering if this is what yours looked like and I’m just seeing something a little different in the computer images?
YoungHouseLove says
I think it reads differently everywhere (we even hear it goes green in some lighting scenarios and is completely gray in others while it’s sort of a creamy sand color in our house) but I have heard that when they match it on the computer it can be really off, so perhaps that’s coming into play too.
xo
s
Alicia says
Okay that’s good to know. It is coming off a little creamy sand so hopefully when I get it on the walls it has a similar look to yours (which I love). Thanks for answering my question! :)
YoungHouseLove says
Of course!
xo
s
Linda says
Also, and especially with Benjamin Moore paints, paint matching may not work perfectly. It’s a matter of the quality of the pigments and the paint itself. Sometimes the match will be close enough to make you happy, and sometimes it just won’t work. In my own experience, BM has a greater depth of color that’s hard to match in a big box store paint.
Victoria says
Wow! The kitchen doesn’t even look like the same room. I love the soft blue against the white horizontal paneling. The whole space looks so much bigger and manages to be both serene and lively. It makes me want to sit down at that lovely table, drink some coffee, and gaze out of the windows at the “park” outside. I am so excited to see the rest of phase 1.
Hope you had a great Thanksgiving. My husband and I were both sick with some strange virus that is going around so we had to cancel Thanksgiving. We just didn’t feel up to company and we didn’t want to spread the “love”. So we made the best of it and snuggled in our pj’s and ate Trader Joe’s
microwave Thanksgiving entrees and sides. It was actually quite yummy. We followed that with a couch based movie marathon. The virus is, of course, temporary but it certainly made us aware of how much good health is something to be very thankful for and how thankful we are for each other.
YoungHouseLove says
Oh no, so sorry you’re so sick Victoria! Although it does sound like you made the best of it! Feel better soon!
xo
s
Cair says
That looks great!
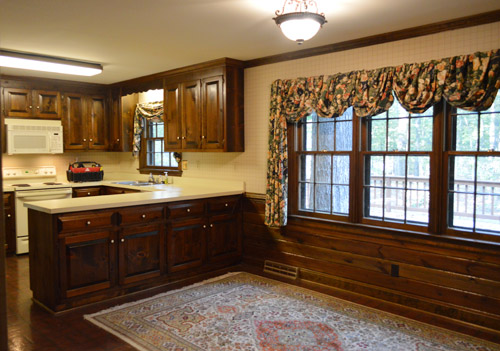
Unfortunately all that lightness and crispness just shows how nasty dark your cupboards are!
Leslie says
Looks fantastic – love the color. I think it’s funny how much you dislike the intercom system! I’m 52 and just bought a 1968 contemporary that has the original system that still works. I love it, but also like retro decor. My husband wanted to upfit it with something modern and leave the original wall plates on for me since I love them, but unfortunately the 1968 wiring couldn’t handle it. We listen to the radio all through the house when we are doing projects!
YoungHouseLove says
I wish ours worked! it cuts in and out, but I’d love to give it a facelift and some new wiring/fixes so it plays again!
xo
s
Alexi says
Love how light & airy the new color feels! Gorgeous! Plus the wall color + white trim + the table is amazing together! I may be painting a room Nelson Blue now, great color!
Jodi says
It looks great! Would you please share what type/formula/finish of paint you use that is wipeable and splatter-proof? Every time I get the slightest smudge on my paint I need to paint over the spot and it’s disastrous! Thanks so much.
YoungHouseLove says
Satin or semi-gloss! And a good brand (like Ben Moore) is really scrubbable!
xo
s
Erin says
Holy wow! What a breath of fresh air! It’s hard to believe this kitchen is going to get even more awesome; it’s come so far already!! Yowza, this is going to be one bomb.com kitchen.
Erin@Managing the Manor says
Ahh, so nice and clean looking now! When I was little, I thought the intercom systems were those coolest things ever and wished my parents had one. And now I think, “Ick!” when I see them in a house. Funny how times change :)
SM says
Leaps and bounds better than it was! But I think the color is a little bland. I was hoping for something a bit more rich. Can’t wait to see what you do with the cabinets.
katrina says
About the intercom/plans for a new music system, I wanted to recommend Sonos. We have one in our offices at work and absolutely LOVE it. (Ordered off Amazon I believe.)
Here’s a link for info: http://www.sonos.com/system
(I know this seems like spam or an ad but I really do think it’s perfect for what you have in mind!)
YoungHouseLove says
Thanks so much for the tip!
xo
s
H_gibbs says
Holy crap that’s fantastic! It is simply amazing how a simple coat or two of paint can change a room!
Ranelle says
Well, after two years of being renters, we closed on a condo this last week…and spent the better part of this week on paint adventures – paint chips, sample painting, and then a all day marathon of painting (Edgecomb gray by the way)! My husband and I were commenting about how long it had been since we had painted, sore in places I’d forgotten I could be sore in! Wahoo for DIY!
YoungHouseLove says
Wahoo! Go Ranelle!
xo
s
Tara says
Hi! Looks great! I just painted my kitchen and dining area as well about the same color! Question, I see that you replaced brass looking door knobs and we have too with the black brushed Bronze look. Are you also going to replace the door hinges, or can you spray paint? I am not wanting to spend more money, and am going to try to spray paint mine!
YoungHouseLove says
Yes, we have had luck getting contractor packs of them at Home Depot (saves money to buy them in bulk, and that way we don’t worry about them chipping if they rub against themselves all the time).
xo
s
Andrea says
Look SO much better already! That would be really neat if you were able to turn the intercom system into a music system that connects to an ipod! I can’t wait to see if that works out!
Kristin says
Thank you for addressing the intercom, I am very interested to see what you replace it with. I have what appears to be the same system in my home and have come to love it (i.e. Saturday morning breakfast/chores with NPR audible on every floor of the house). I’ve done a little research on a modern system that would do the same thing but none seems to function quite like that sad old intercom.
Karen says
Here’s the truth I have you guys saved on my home screen that’s how much I adore you. Then I check every day for a new blog. Everything looks great I’ve learned so much especially about the paint brush used for cutting in. I went to s Williams and prayed let this make it easier, not only was it easier I needed no painters tape. It cut my prep or cutting in time down by 90%. People you have to invest in that brush. Thanks guys.
YoungHouseLove says
Aw thanks Karen! So glad that brush was magic for you too! Totally changed my cutting in life!
xo
s
Angela says
It looks amazing. I am always so excited to see your vision come into being. I love it.
charlotte m. says
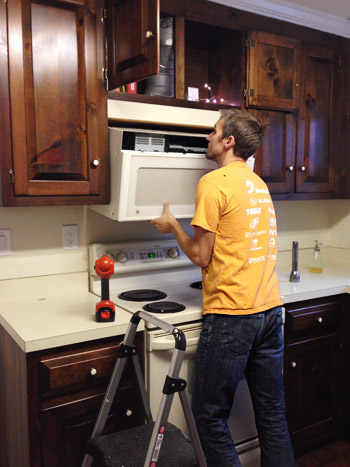
Awesome. It looks amazing. WE are thinking of tearing out our over stove microwave and going with a hood. The microwave died in only 6 years and I do not want another monster up there. Any advice? Should we get a pro to look at it? Hubby is not really wanting to do this himself this time.
YoungHouseLove says
It’s usually a really straight-forward process (you unscrew a few screws while he supports it from below and guides it down). I would look in the upper cabinet to see if the screws are easy to get out and go from there!
xo
s
Nicole @ Liberty Belles says
any plans to sell that old microwave on Craigslist (I can’t really tell if it’s in good enough condition, but it seems so)? would bring down the already-low price of the new micro even more :)
YoungHouseLove says
Yup, that’s the plan! Gotta love getting rid of things of that way. It’s already in the garage and we have some photos, just have to get the listing up!
xo
s
Ally says
I love love love it! What a bright and refreshing change! I can’t wait to see what the end of phase 1 brings – way to go guys!
Kristy says
You both never cease to amaze me. You are full of fresh, creative ideas …. plus energy up the wazoo!
Kristy :)
http://www.journeyintomotherhood.ca
betty says
this thanksgiving weekend we ripped up the carpet on the stairs, sanded (and sanded.. and sanded), stained the treads, painted the risers white, and ebonized the railings.. my poor tree is getting neglected because I cant stop looking at my fresh stairs!
betty says
and btw.. WOW. im so in love with everything you’ve done with this house so far. I cant wait to see more!
YoungHouseLove says
Aw thanks Betty! Sounds like you were crazy busy! Congrats on all that you accomplished!
xo
s
Meghann says
Will you get new fridge, stove/oven and dishwasher in phase 2?
Also, will you be getting a new washer and dryer before the baby arrives? We had old ones at first, then finally broke down a few months after our daughter was born. Should have done it sooner! Babies create a ton if laundry for being so little:)
YoungHouseLove says
We’re keeping an eye out for sales on a washer & dryer but they’re still running well (knock on wood) so we’re hoping they don’t conk out on us! As for the new appliances, yes, we’re saving up for those for Phase 2. We figure we might reconfigure things (for example, we might want a wall oven in the new layout or something) so we don’t want to buy anything now that might not “fit” the new plan down the line.
xo
s
Michelle @ A Healthy Mrs says
Looking good! SO much lighter & brighter! :)
Janna says
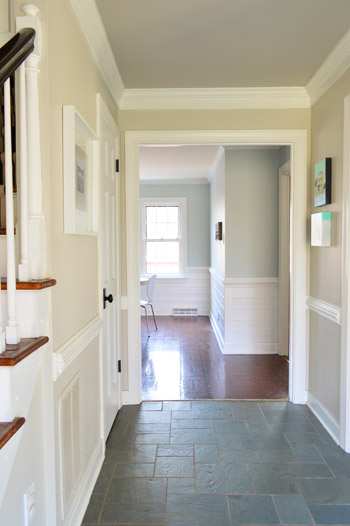
Loving the transformation!! So, your walls are totally smooth then right? We have an offer in on a house from the early eighties that is completely wallpapered, including the ceilings (at least the ones that aren’t planked). We were thinking after paper removal we will like smooth walls, but have gotten some input that we should texture them. Did you consider that? And, if we end up with this house I will be constantly referencing your blog as we renovate!
YoungHouseLove says
Yes, they’re nice and smooth! We tend to prefer smooth walls, so we left them. But if you like textured walls that sounds like it could work too!
xo
s
Edwina - The Old Post Office says
That blue is gorgeous and the difference in the before and now photos is huge. It’s looking amazing.
Cara says
Looks great! How long do you think you will live with your phase 1 update before going for the full remodel?
YoungHouseLove says
In our first house we did a Phase 1 in the kitchen (painting the cabinets, new appliances, and new peel & stick flooring as well as new paint, hardware, etc) for about a year. Here I think the difference is going to be more dramatic (aka: more liveable) so it’ll depend on what we end up wanting/planning for Phase 2 I think (for example, if we want higher end appliances it might take us two years to save up).
xo
s
Shannon [Our Home Notebook] says
I love how light and bright it looks now! Your potted cactus look beautiful there.
YoungHouseLove says
Thanks Shannon! So glad they’re still alive!
xo
s
Sandra T says
Your kitchen looks so much brighter and happier! :) Our house used to have that same microwave. It took both my husband and I to get the thing off the wall and out the door! It was so heavy, I can’t believe that John took it down by himself. Kudos, he-man!
YoungHouseLove says
I was so nervous it was going to break his hands coming down (squashing them on the stove) but he had a nice good grip, thank goodness!
xo
s
Marie says
So jelly of your phase 1 renovation motivation!! My phase 1 has consisted entirely of stomping around insisting we need to rip everything out, pointing out every Ikea 20% off kitchen sale, designing my dream kitchen for hours on their crap-tastic app that freezes and randomly quits all the time, pouting for unspecified amounts of time, settle on buying a random large appliance (hello black friday french door refrigerator sale), and finally trying to rationalize my purchase to my husband :-/
YoungHouseLove says
Oh man Marie, your comment cracked me up. Something about picturing that app freezing made me laugh and cry for you at the same time.
xo
s
Jennifer says
I love the new wall color and the painted paneling is really inspiring! I’ve been scared to paint our paneling(http://blog.christmastreemarket.com/2013/06/home-decor-101-how-to-be-your-own-interior-decorator/), but you may be giving me just the encouragement that I need. I’m always nervous about painting over “real wood” because you can’t go back. But your ligther walls are such an amazing improvement. Thanks for the post and happy holidays!
YoungHouseLove says
Thanks Jennifer! Good luck with everything!
xo
s
C.A. @ Heroine Chic says
Y’all, it looks amazing. Bravo.
P.S. Sherry, your hair is so thick and lustrous! (Even more so than usual) You are especially lovely while preg. xo
YoungHouseLove says
Aw thanks C.A. – that’s so sweet! It’s just one big knot-ball, but I’ll take the compliment. Haha!
xo
s
Tashi @ Love Like Crazy Design says
Loooove a bright kitchen! Planning to change the color of mine too…
Love!
Carli says
Ooooemmmmgeee!!! That blue is gorgeous!! Love it!
Emily Maldonado says
Wow! What a difference! I love the color, it feels so fresh!
Jen@Domesticated Nomad says
Okay, I didn’t say anything when you repainted the kitchen in the last house, but now I’ve got to ask – why blue in the kitchen?! I know it’s sort of trendy thanks to Candace Olsen in particular, but blue is a well-known appetite suppressant (which is why you rarely see it in restaurant interiors). Blue has been shown to lead to people spending less time preparing and eating food. It makes me kind of sad to see blue there since I expect that the kitchen is the “heart” of your home like so many people. You guys have me worried. :/
YoungHouseLove says
We’ve just always had a soft spot for our first house’s kitchen, which was a soft blue tone for over three years and we ate like champs and loved being in there. So we must be immune to the almightly power of blue! Many a cake were baked in there, and many a pot o’ spaghetti for family and friends. I think the warm wood floors and woven rug probably helped (I can see how a cold and icy kitchen wouldn’t be as welcoming, but if it’s balanced with warm and cool elements, it can be really homey). So that’s the goal for this kitchen as well – a nice balanced room with a lot of rustic/warm elements in the mix as well!
xo
s
Susan says
Nice work guys. It all looks so clean and sweet and so …. You!
Minnie says
Looks so much better! I do wonder when you’ll get your painting done when Clara doesn’t take naps anymore.
YoungHouseLove says
Oh man, it’ll be back to doing it at night by the light of ten lamps (when she was younger her naps were shorter so it was almost always night painting for us!).
xo
s
Shawna says
YOU GUYS!!!!!! It looks SO good! I can’t believe the difference!
Denise says
I love the kitchen up date..you guys are amazing and fast at what you do. Way to go! Great color and love the fresh open feel of the kitchen now.
Alyce {Blossom Heart Quilts} says
Ohhh, what a breath of fresh air!! Even with the cabinets still the same dark wood, it’s just so amazingly beautiful what a fresh, light paint job does. Can’t wait to see the final product one day – I will patiently wait!
Kimberly says
Looking great! I am just curious to know what drill you own and if you are happy with it? My husband wants a new drill for Christmas. It’s for all the projects I make him help me with after reading your blog! Haha
Thanks!
YoungHouseLove says
Ours is by Black & Decker. Just a battery operated 12 volt drill/driver. They’re around $40-50 on amazon. Hope it helps!
xo
s
Jennie says
11 hours later and the title of this post finally clicked for me. Hahaha!
YoungHouseLove says
Ha! I had to ask John what it was!
xo
s
Diana says
Love the transformation so far!! That shade of blue is perfect!
Kate says
Wow, I am so tickled–our coolonial house had the same flooring and intercom. Love your progress!
Kate