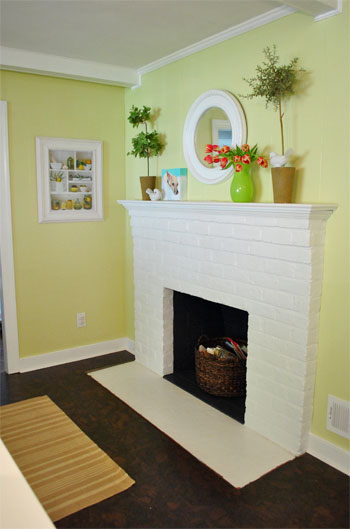
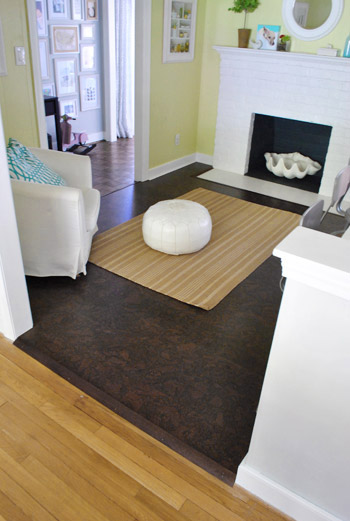
Since sharing this photo over a month ago, some of you have asked for more detail about putting the transitions around the cork floor in our kitchen (and around the fireplace’s floor surround).
Oh but remember we’re eventually going to be refinishing the rooms with the orange wood flooring to match the darker cork tone, so it should look something like this down the line (pardon the bad photoshop):
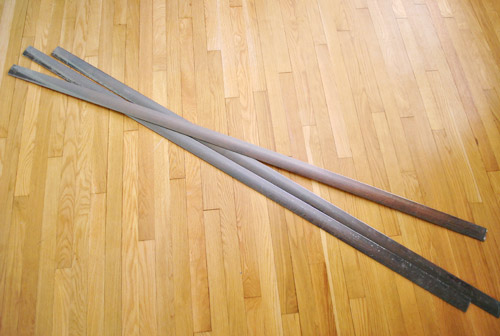
Finding the right thing for the job was a bit of an effort on our part since our Lisbon Cork doesn’t come with matching transitions. In fact, the guy at Lumber Liquidators recommended against any kind of cork transition because they’re not as durable as a harder wood when it comes to the kicks and bumps that transitions may have to withstand. Lumber Liquidators sold oak transitions that we could’ve stained to match (I think the price was around $45 for a 72″ piece), but I found an engineered option at Home Depot for $27 that was a pretty darn close match already. The only bummer was they only carried 48″ pieces in stock, so I had to special order the 72″ pieces (and then wait a few weeks for them to arrive at the store where I could pick them up) which is why only our shorter doorways got transition-ed back when we finished the floor in March. So yeah, it was about time we got on the rest of them.
When it comes to installing transitions on cork floors, there aren’t a lot of tutorials out there (at least not that I could find) so while I’d love to create one, I’m not sure I’d call my methods perfect – but I’ll tell you guys about my process so at least there’s something out there on the ol’ internet. Since I didn’t photograph the process of putting in the transition above back when we finished the kitchen, let’s follow the story of this guy instead (who we finally tackled last week).
![]()
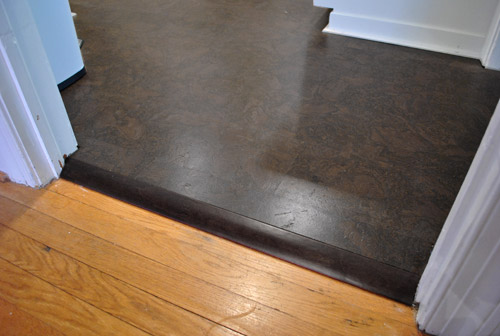
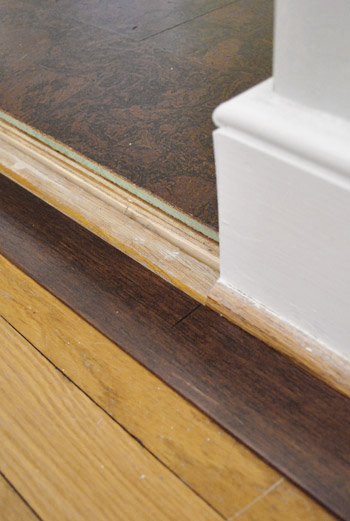
Since we installed our floating cork floor over an existing floor (due to an asbestos liner under our vinyl tile), our transitions have a smidge of a step down. Around 1/4-1/2″ because the existing floor was already a tiny bit higher than the original hardwood in the dining room (keep in mind these rooms didn’t connect like this until we made them). In instances where hardwood floors aren’t the same level, you need a transition piece called a “reducer.” I’m sorry the photo below looks like a hand puppet choking on a giant piece of wood, but you’ll see how one side slopes down and one side steps up – that’s how it connects a slightly lower floor to a slightly higher one without making a big bump that everyone trips over. The key to the most seamless look is to keep it gradual and not go for anything that looks crazy curved, like the letter C.
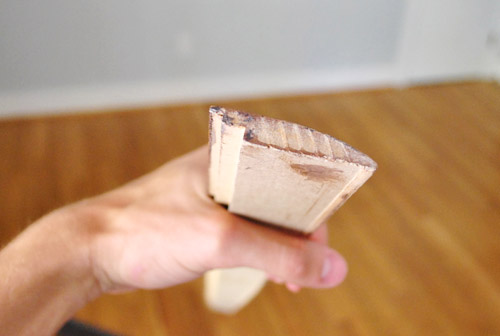
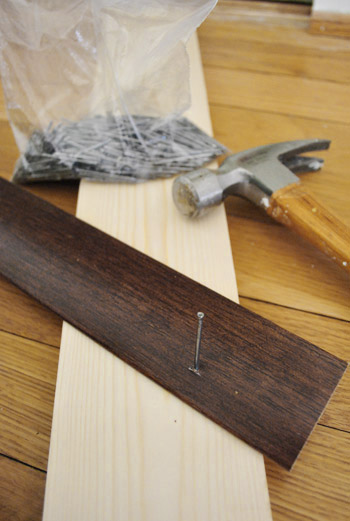
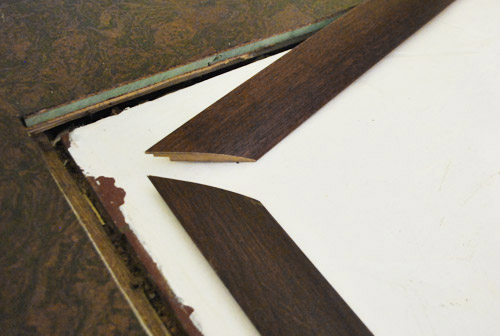
Once I stripped the plastic off of them (that’s what looks marked up in the third picture), I drew a line with a ballpoint pen where I needed to cut it in order to get a good fit. Then I made the slice with my miter saw.
Some of the tutorials I read suggested using adhesive to keep the transitions in place. All of the transitions in our house are nailed in, and that’s how the transitions were in our last house too – so I decided to go that route again. Since we haven’t purchased a nail gun (although we do plan to take that plunge soon), I pre-set the nail into the wood before putting it into place in the doorway by partially banging it in with a piece of scrap wood underneath to get it started (pre-drilling a very small hole could also work, especially if you worry about your transition splitting).
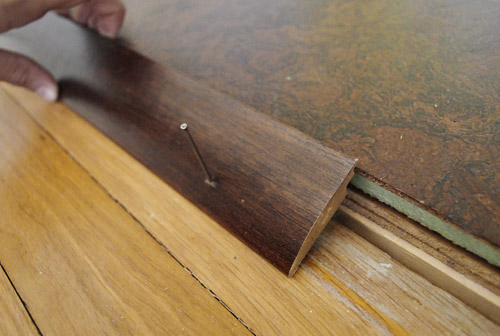
Here’s how I was positioning the transition along the doorway. Since this was the most drastic drop, I actually rested the small lip on the high end on the top of the cork to keep it in place.
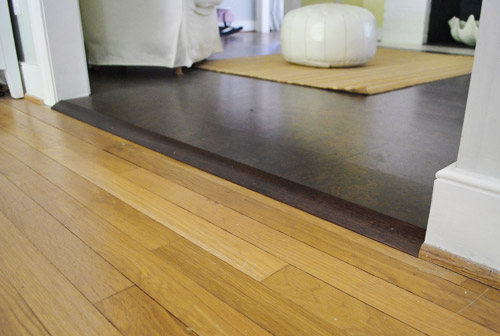
After banging it all in to get things flush (tip: we like using a $3 nail punch to avoid denting the wood), it actually came out looking pretty good. And now it’s no longer the toe-stubbing hazard that it’s been for the last four months, though we’ve somehow dodged getting tripped up on it (perhaps because the for-now floor color change makes it so obvious).
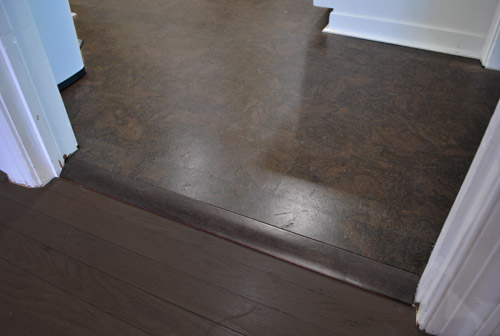
The transition along the hallway was pretty much the same exact process, so I’ll skip right to how we finally tackled the unfinished fireplace. It was an interesting case since it has corners that I had to miter, but I just cut 45 degree angles with my miter saw after measuring the length of each side. You might remember seeing the raw edge most recently in this post.
Right now the fireplace is lower than the cork, so we needed to use the reducers again. It’s kind weird, but it’s only temporary (once we find tile that we love enough not to feel like we’re settling, we’re planning to retile this area, which will raise things up so it’s all flush and we’ll scrap these tide-us-over-for-now transitions).
But for now, our transition trim actually works pretty well. It’s so funny how sometimes these little steps like trimming something out can make such a big difference when it comes to something looking polished and complete. Three cheers for no more raw edges!
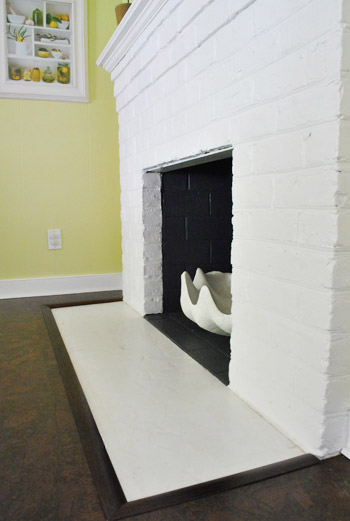
Here’s a view from the hallway of the new transition in that doorway (and the fireplace beyond it). Oh and yes, that is a giant faux clam shell in the fireplace. It was the item from our Joss & Main collection that we bought for ourselves (you know how Sherry is about giant fake clam shells…). It’s huge and probably weighs twice as much as Clara, but oddly enough at least five of our friends/relatives have asked where they can get one for their empty fireplace. Haha, let’s start a clam-shell-in-the-fireplace movement.
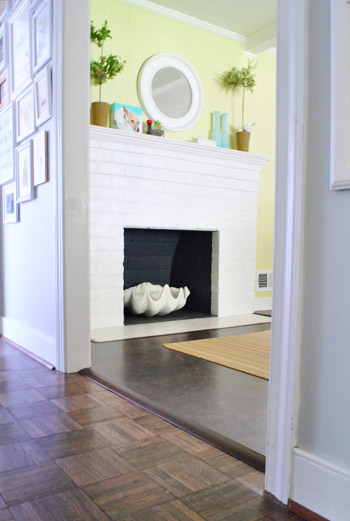
And now for a shot of all three freshly transitioned-areas at once. Ta-dah! We have officially trimmed out our way to a completed cork floor. Don’t mind the place-holder rug in there (it’s leftover from our first kitchen, but would love to replace it someday).
Anyone else have any transition adventures? Or need to take care of some doorways around their house? I was so surprised there weren’t as many cork transition posts on the interweb as I thought there’d be. In the words of Keenan Thompson: what up with that?

Corey says
I just love the color of that cork flooring every time i see it. What a great choice guys :)
YoungHouseLove says
Aw thanks Corey!
xo,
s
Kristen @ Popcorn on the Stove says
The transitions definitely help the floors look more finished. Too bad there aren’t more tutorials available online (that’s surprising because I feel like EVERYTHING is online, especially after your post on Friday).
Will you plan to stain the orangey-floors yourselves or bring in professionals??
YoungHouseLove says
Hahahahah, so true! How is video footage from 13 years ago online and there aren’t more cork transition tutorials?! As for the floors, we’d love to tackle them ourselves (although we have a local floor guy that we love, so it’ll definitely be weird not to have Mr. Sanders (that’s really his name) come over. Haha.
xo,
s
Donna Jean says
I love it when people’s names and professions match up in almost comical ways! Before moving to Richmond I had a dentist named Dr. Fill and a physics teacher named Mr. Boyles – too perfect!
The transitions look great! We have a really big difference in the floor height between our kitchen and living room – I’m talking like almost an inch (it was like that when we bought the house). Right now we just have a piece of quarter round as the transition, but it’s obnoxious that it is such a big difference. My son tripped over it more than once while learning how to walk. I’m hoping that once we are able to tear up the hideous tile in the kitchen and replace it with either better looking tile or laminate or something like that we will be able to address the huge difference in floor heights.
YoungHouseLove says
Hahaha, I love those names. And good luck with the kitchen floor replacement!
xo,
s
preethi says
How’s Mr Fawcett who is a urology surgeon or Dr D’eth or Dr Dark for anaesthetists!?
Lindsey @ arkadian belle woods says
Looks so much better! Amazing what a big difference such minor tweaks can make (those are the best!)
Jess @ Little House. Big Heart. says
We’re seriously considering putting cork flooring in our little office. It’s currently the only area in the entire Little House without hardwood. We found some that is a similar color to our existing floors without looking like we tried to match stains.
This will definitely help us make the transitions from the office to the other rooms in the house!
Theresa says
In the future, you might want to predrill the nail holes with a slightly smaller hole than the nail. When one of those strips splits when you are punching through the nail, Clara should not be subjected to the language that usually follows. Trust me.
YoungHouseLove says
Haha, thanks for the tip Theresa!
xo,
s
amybeth says
That white fireplace surrounded by the dark cork is so beautiful. I feel like these pics are really good for seeing the whole “soft avocado”ness of your walls too. (It really does look lime green sometimes lol) Great palette. Thanks for the inspiration!
YoungHouseLove says
Aw thanks Amybeth! It’s really soft in person, so it’s so funny when folks tell us it can look lime green on certain monitors!
xo,
s
The Mrs @ Success Along the Weigh says
Isn’t it amazing how much more finished and lovely it all looks just with that one (or several) pieces of wood? Great job!
A Wife and her Carpenter says
Looks SOO fresh around the fireplace! Now I can’t wait to put in our transitions after we ripped up the carpet in our dining room!!! :) I bet it will make a world of difference.
http://awifeandhercarpenter.blogspot.com/2012/04/mint-ice-cream.html
Krystle @ ColorTansformedFamily says
It’s the little details that really complete a space. It looks great. With the dark cork flooring I actually like the white fireplace but I am sure you guys have something great in mind.
Amanda K says
I’ve been thinking about re-tiling the area in front of my fireplace, but now that I know you guys are planning to do it, I think I’ll hold off and wait to read your post about it first. On another note, I tried your cutting in method for the first time last weekend when I repainted my bedroom, and it was amazing! It pains me to think of how many rolls of painters tape I’ve been through in the last five years. Thanks for the tip!
YoungHouseLove says
Yay! So glad it worked! I love that little brush of mine!
xo,
s
Lauren@FilingJointly says
The floors look so much more finished! I love the color by the way, our new house (we move in May) has hardwood floors almost the exact same color and I am OBSESSED with them.
This post is helpful as some of the transitions in the new house are unfinished and will be something we need to tackle at some point. Probably quite soon after moving in as I am the clumsiest person of all time and will definitely trip as long as they’re unfinished.
I think I’ve mentioned this before but I have really really really long arms (a la John)and yesterday I actually managed to trip myself with my own hand/arm(sounds impossible, but it’s not apparently.)
Feel free not to read this. I know how busy you guys are but I wrote about it here http://www.filing-jointly.com/2012/04/i-got-hate-mail-today-i-have-made-it-as.html
YoungHouseLove says
Haha, you’re a trip.
I’m sorry.
I tried to resist.
I couldn’t.
xo,
s
Stephanie says
I just want you to know that I literally laughed out loud at work while reading that post.
Lauren@FilingJointly says
Thanks Stephanie! That’s great to hear.
Lauren says
Nice!
Have you guys considered doing the fireplace surrounding in the same gray penny tile that’s on the feature wall?
YoungHouseLove says
We thought about that briefly but wondered if something else could be more fun over there instead of just matching the backsplash – just to spice it up. We’re waiting to find the perfect tile that we have to have and then we can’t wait to get ‘er done.
xo,
s
Taya says
Look great!
S @ keepitneat says
You beat me to it – I was just about to say, how is that your awk & amazing Eminem video is out there, but no cork tutorials? Also, love the Keenan reference. Remember “All That”? Ha.
YoungHouseLove says
Haha, yes! I still remember the jingle. This is allllll that. This is alllll thaaaaat! Also I can sing the one from Hey Dude and Salute Your Shorts. Hahaha.
xo,
s
A Wife and her Carpenter says
Oh my goodness!!! Great memories! Loved that show!
S @ keepitneat says
Sherry you forgot the “yeahs”! This is allll that! Yeah-ee-yea-ee-yeahhhh, this is allll thaaaat!
YoungHouseLove says
Hahhaahah, I wasn’t quite sure how to type those out. Well done!
xo,
s
Janice says
Should I mention that in the wee early hours of the morning, the channel Teen Nick re-airs some of those shows (All That, Keenan & Kel, etc)? http://en.wikipedia.org/wiki/The_%2790s_Are_All_That
YoungHouseLove says
We were actually just talking about that. Too funny!
-John
Becca says
The “hand puppet choking a giant piece of wood” was a LOL- just so you know! ;-)
xo Becca
Beth says
Are you still liking your cork floor after living with it a while? It’s on our kitchen floor short list next to Marmoleum, and I would love to use it.
YoungHouseLove says
Yes, we’re really happy with it! No dings or scratches or stains with a crazy toddler and pooch with tiny scratchy nails, so we’re really happy! It’s so soft underfoot it’s almost like standing on a pad.
xo,
s
Willow says
We have cork in our entire house except for the kitchen, which is Marmoleum. I wish so badly we had just gone with the cork in the kitchen as well. The Marmoleum scratches like crazy! Our cork has dings and scratches too, but because of the way it looks you can’t see them unless you know they are there and are right down on the floor. It is also quite hard compared to the cork – after standing on it for a while cooking my feet get sore.
Ginny @ Goofy Monkeys says
The transitions look great! Not much excitement over here last weekend – very rainy & lazy. We all need weekends like that sometimes, right?
YoungHouseLove says
Haha, yes! We used the sunny day (Sat) to celebrate our nephew’s birthday and the rainy day (Sun) to proof 250 book layouts! Eeeks!
xo,
s
Margo says
I can’t believe you’re going to stain those beautiful floors darker… I will be very sad when you do.
YoungHouseLove says
Sorry Margo! It’s definitely one of those personal preference things, so we promise to support your right to stain your floors any color that tickles your fancy if you forgive us for doing the same!
xo,
s
betty in munich says
What Margo says….
emily @ go haus go says
It looks great. I have similar unfinished edges around my fireplace (I ripped them to paint the tile surround versus gently removing… i’m regretting that now) and this just may be the thing to get me motivated. I’ve been living with mine for a few months now!
Nichole says
Oh man, it looks great! I’m a little disheartened after seeing this post, though, because my husband and I are dealing with our own transition/trim woes as I write this. We had hardwoods installed (over a floating subfloor) in the living room, which transitions the the now lower tiled kitchen. The actual transition piece is fine, but the large space beneath it is less than ideal. But our major hang-up is how to trim the wall where it slopes into the kitchen. We have an open concept, with rounded corners where the walls meet (make sense?). Anywho, our floor installer said he’d figure it out (that small weird transition trim dilemma… It’s not in a doorway like yours is) and we were so over our experience with his work ethic (far too long a story to divulge), so we said we’d just take care of it. In comes guy #2 to do the trim, promising a smooth trim transition. I want to cry. It looks TERRIBLE. Any suggestions on what to do or where to seek help? It looks like a cosmetic surgery gone way wrong… But on my floor. It’s sad. Thanks guys!
YoungHouseLove says
Oh no! So sorry about the bad floor surgery! We can’t really picture your dilemma, but if you posted a photo on our Facebook page we could try to suggest something (along with other readers who are usually far more brilliant than we are, haha). Hope it helps!
xo,
s
Rebecca says
Did you fill the nail holes in the transitions or are they not noticable?
YoungHouseLove says
We just left them! Haha. They’re not very noticeable and we just looked at the other transitions around the house and saw tiny little nail heads there, so we went for it. Haha.
xo,
s
brooke says
Looks awesome as usual! I was thinking oh I love that basket with toys in the fireplace looks great! Then the Clam…Love it!
Brooke
onprairiehill.blogspot.com
Jenn @My Southwestern Life says
Wow, those look great! We are going with a similar color to your cork for our vinyl floors that look like real wood. Hopefully, we will be getting them in the next few months.
P.S. I love that giant clam in your fireplace! It’s always interesting to see what you guys put in there.
Allie ~Theinspiredmomma says
Looks good! It’s amazing how finishing touches can make a big difference…. I love the big shell! That’s so cool….me and hubby sing “what up with that” all the time, so funny! Lol
Nickie says
I love the shell! But you so should get a little mermaid figurine to put in the clam shell. I know I am totally random, but the little mermaid musical performance was the first thing that popped into my head:)
YoungHouseLove says
Hahaha, I agree! Or a giant pearl! Or a stuffed crab. Haha. So many options…
xo,
s
Ted says
The transitions look great! Good job. And thanks for the tips since there are so few tutorials on-line.
As for the clam shell, am I the only one who thinks it looks like a webbed hand waiting for something to be put into it to snap shut? :-)
YoungHouseLove says
Haha – it’s a traaaaap!
xo,
s
Ashley@AttemptsAtDomestication says
We’ll be refinishing our wood floors in the dining room (and eventually the rest of the house) but we aren’t sure if we want to try ourselves or if we want to hire someone…
The transitions look great! I would have stubbed my toes so many times by now!
Kristen says
“I’m sorry the photo below looks like a hand puppet choking on a giant piece of wood…” Thanks for that, John. Made my day! :-)
heather s. says
I’m confused as to why you thought there would be cork transition tutorials. Cork flooring is just like any other flooring and you’d use the same transitions between hardwood, laminate, cork, tile, etc. My transition was between a laminate kitchen and hardwood dining room and is now is wood kitchen to wood dining room and I used the same type of transition for both. I think the transition you use doesn’t necessarily matter on the wood type.
YoungHouseLove says
I guess it was more that we wondered why there are so many cork installation tutorials online but no one talks about finishing them (there’s not as much about sealing them and hardly anything about adding transitions). Although it might be the same process for wood flooring, we just would have loved reading what worked best for someone with cork! You know, just to be sure there wasn’t some reason that gluing them or cutting them a certain way would make more sense for a floating cork floor like ours.
xo,
s
Carley says
I love the picture to the side of your fireplace! It looks like a teeny, tiny built in!
YoungHouseLove says
Aw thanks Carley! That was from allposters.com a while back! I think they still sell it!
xo,
s
Melanie says
I finally found that here: http://www.allposters.com/-sp/Provence-Posters_i2036279_.htm
YoungHouseLove says
Thanks for sharing the link! So glad it’s still there!
xo,
a
Crystal @ 29 Rue House says
I noticed this too and I couldn’t tell at first if it was real or a picture. I like it!
Brandy E says
that looks so nice! I am jelly!
Jen says
Looks great! Did you guys have to do any fill in work where you took the wall out or did you just run the cork closer to the dining room floor? We moved the door over during our master bath remodel and the carpet is too short where the old wall was so it leaves us with a really awkward threshold space. We don’t want the bathroom tile to show on the bedroom side of the door so we have about a 4 1/2″ gap to cover with a transition piece but we aren’t sure what to do. Our original plan was to match the wood to our vanity (which is a dark stain similar to the color of your floors) but its just too jarring against the white tile and beige carpet. The correct solution is to redo the carpet but we can’t afford to do that right now and don’t have any scraps to even do a patch. Any suggestions?
YoungHouseLove says
Oddly enough we used a plank of leftover paneling (from the wall that we removed) to fill in the tiny height gap before laying cork right over that (it kept the whole floor flush). Then we just added the transition and it was all pretty seamless. As for your 4 1/2″ gap I’d use a wood/stone transition that’s less jarring I think. If it’s as wide as the walls/doorway it will hopefully look ok! Maybe try white painted wood like the trim (if the trim is white) so it hopefully blends?
xo,
s
Jennifer (iffles) says
We just put down a new wood floor in our family room, and it bumps up to the tile floor of our entryway, but the tile floor is just a *smidge* higher. It’s not nearly as big of a difference between your two floors, but it’s not completely even, either, and I’m not sure how we’ll handle that, because I’ve only seen the transition pieces like yours (which are too much of a difference in height), or the T ones that are for when both floors are the same height. Am I missing some obvious solution?
YoungHouseLove says
I wonder if you can buy one like ours (except unfinished) and sand it down with a hand sander until it’s less steep/thinner?
xo,
s
marie says
oddly enough, we ARE dealing with transitions around here. we are having laminate installed on friday and the stair step the installer told us to order is NOT going to work where we ripped up the old stair step. the guy at lumber liquidators told me to put the old stair step back and stain it to match the new floor. guess what i’ll be doing before friday since my husband is out of town??
YoungHouseLove says
Oh yes, that’s smart! We couldn’t reuse a lot of the old stuff since the floor height changed (and we added that doorway) but if you removed it and can just restain it and put it back in it’s a great idea!
xo,
s
Brenda says
First of all, I’m not sure whether to give you bonus points for mentioning “What Up With That” or to take them away for getting the song stuck in my head.
Second of all, it’s always so nice to see the little details come together. I think the fireplace looks especially polished now.
Zandi says
That looks great! It is crazy how small quick details really make everything look SO much better.
Lynn @ SafeBeauty says
Last weekend we added the finishing transitions to our wood laminate flooring too. We used a T mould to attach the living room to the tiled kitchen. It looks so finished and grown up now. We love it because it makes the house feel more homey and less “squatter mansion”.
My best, Lynn
YoungHouseLove says
Haha, isn’t it amazing how much they can finish things off? Congrats on getting it done!
xo,
s
heather says
It’s amazing how transitions can change things! Good luck finding a nail gun you love :) I was going to recommend the one we have. Except I remember it was pneumatic and I’m pretty sure you guys don’t have a large air compressor with tons of air hose to bring out haha. I’ll ask the hubs though if he has a good recommendation you can look up more on to see if it’s a good fit for you!
YoungHouseLove says
Aw thanks Heather!
xo,
s
heather says
I asked hubs and he said Paslode for a cordless nailer. Also can I tell you how friggen excited I am over here—I just got first glance at a rough (no finishes) view of our house in 3D. I might have yelped a little and someone asked if I was okay.
Bahaha.
YoungHouseLove says
Haha thanks Heather!
xo,
s
heather says
http://www.paslode.com/products/Cordless-Nailers/
Link to the Paslode cordless nailers. We’ve had one for years and years and years without fail.
Nora says
Great job! How did you tell that the vinyl tile had an asbestos liner? Our house is older with two layers of linoleum and subfloors over the kitchen floor but the previous owner said they had all the asbestos removed. I’m not sure if they would have considered that floor or just the basement where asbestos on the pipes would have been more noticeable.
YoungHouseLove says
We heard that any liner that’s black and sort of looks like tar paper in a house of our era is usually full of asbestos and shouldn’t be messed with, and sure enough when we were moving our fridge and pantry position we saw that telltale black liner so we knew we’d be adding a floating floor.
xo,
s
Meghan says
Oh man! Now I have that SNL song stuck in my head! Which is kinda okay cause it makes me laugh. But I’m going to end up singing it out loud I know, and my co-workers will think I’m nuts.
YoungHouseLove says
Haha, we’re singing it over here too!
xo,
s
Suzy says
We just moved to Richmond a few months ago and close on our new home next week. I just met w/ “Mr Sanders” this morning to refinish our floors. He was great and gave a competitive quote. Thanks for the recommendation!
YoungHouseLove says
So glad! He’s the best!
xo,
s
Nina says
We are about to put in transition pieces (laminate wood to cheapy vinyl in a bathroom), only we have a concrete subfloor. So I think we have to use some type of adhesive… I’m so scared!!!
YoungHouseLove says
You can do it! I would just ask what they recommend in the home improvement store.
xo,
s
Brooke says
What would you suggest using to hold the transition piece down other than nails? We have concrete underneath, so I’m not sure nails would cut it. Liquid nails maybe? Or some other adhesive?
YoungHouseLove says
Yes, I would look for some sort of heavy duty adhesive (maybe ask the people who work at Home Depot what they’d recommend?
xo,
s
Amy says
I love the plants on the fireplace. Real or not, which kind of plant is it??
YoungHouseLove says
The topiaries are faux (from Crate & Barrel about 5 years ago).
xo,
s
Krista says
typo ‘Or need to take care of some doorways around there house?’
there- their
YoungHouseLove says
Thanks for the typo tip! Fixed!
xo,
s
Crissy Woolever says
I LOVE the large sea shell in the fireplace, Where did it come from??
YoungHouseLove says
We bought that from jossandmain.com about a month ago during our sale with them. ZGallerie also has something similar. Hope it helps!
xo,
s
Callie says
This is weird but I just had to say that I’m happy to hear you guys don’t own a nail gun yet either!! I haven’t taken the plunge yet and I’m definitely behind you guys in my DIY pursuits…but sometimes I just feel like everyone has a nail gun in their back pocket! ;) Huzzah for arm muscling in those nails – and I’ll be listening if/when you do take the plunge and then you can write about your research of which one to get, hehe :)
YoungHouseLove says
Haha, we feel like we’re the last people in the nail gun club too! Haha. Will share all the details when we find one!
xo,
s
Devon @ Green House, Good Life says
Looks great!
My husband and I were really careful not to have any transitions when we built our home two years ago (wood everywhere except bathrooms, which are tile), but because of the radiant floor in the master bathroom, it was going to be a quarter-inch or so higher than the wood. When our builder asked how we wanted to handle the transition (put a curve the edge of the tile abutting the wood?), we asked if the tiler could slope the first tile gently upward to meet the rest of the tile. He didn’t think that was possible, but the tiler was AWESOME, and you totally can’t tell that there’s any height difference at all.
http://www.greenhousegoodlife.com/2010/04/looks-like-theyre-getting-serious-about.html
YoungHouseLove says
THAT’S AMAZING! Wow, so glad it was possible. I love that solution!
xo,
s
Wendy says
Thanks for this post. I am currently dealing with the transition issue between my kitchen (light ceramic tile) and dining room (maple hardwoods) — and we’re not just talking a doorway, we’re talking the wall was removed and the two rooms are fully (except for an island in the midst) open to each other with one of those ugly metal transitions between the two floors — ugh. Hoping to have hardwoods installed in the kitchen, budget allowing. If not, perhaps new tile that’s more in keeping with the hardwoods color-wise.
Love your blog!!
YoungHouseLove says
Ooh I bet a nice maple hardwood transition would be a huge upgrade to those metal ones even if you can’t get hardwoods or darker tile in the kitchen!
xo,
s
Tiff says
Where did you get your pouf? I’m loving it and looking for one for my nursery! Thanks!
YoungHouseLove says
Thanks! It’s from jossandmain.com a while ago. It moves around a lot, so it used to live in Clara’s room. She likes sitting on it and often will wake up from a nap and say “Go on the pouf!” – it’s hilarious.
xo,
s
Crystal says
Your flooring look beautiful! I’ve always been apprehensive about darker wood floors. But you’ve changed my mind! Are those actual shelves in the corner by the fireplace with the little jars? Or is it a framed print?
YoungHouseLove says
That’s just a print from allposters.com! I got it a few years back (it was in our first house’s dining room) but I think it’s still sold on their site.
xo,
s