Update: Holy cow, you guys are full of so many fun ideas today! I’m having trouble keeping up with comments since they’re rolling in so furiously, but please know I’m reading them all and loving all the suggestions!
Happy Friday! We’ve been all over the place this week, painting the walls/trim/ceiling in the bathroom & closet, diving into some basket craftiness, de-wallpapering our biggest room yet (the 21′ long kitchen), and now we have a little Clara-room update along with some photoshop percolating as we plot our next move in there. But first, here’s the tiny (and twinkly) addition:

Things just got a little brighter in here…
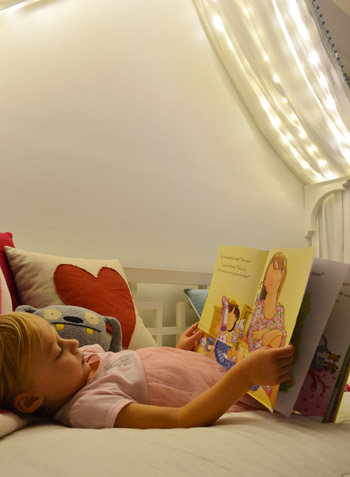
Ever since we hung her canopy, we’ve thought about adding lights to it. Both for the magic of it (Clara loves them) and also for the function of it being a well-lit place for bedtime stories. We feared traditional Christmas lights would be too heavy and make the fabric sag in weird ways (plus, they could look a little messy when they were off) so after some hunting online, we came across what are often dubbed “Fairy Lights.”
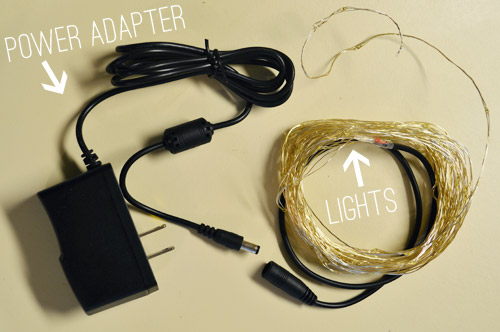
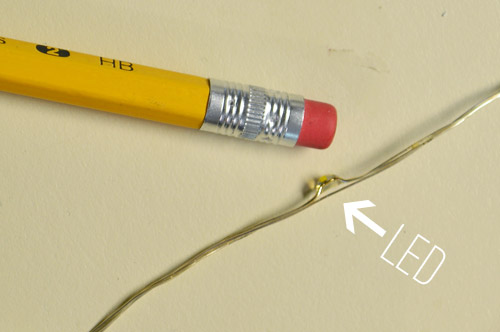
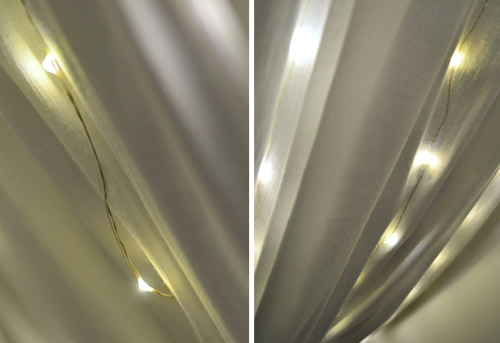
They’re basically small LEDs (check out this picture for scale – they’re tiny) that are strung on a thin wire. The particular set that we bought was 33 feet long and sold for $14 on Amazon. They’re not longer available but here’s an affiliate link for something similar.
The wire itself is extremely light and pretty moldable, so it was easy to weave it back and forth across the 18″ corbels that the fabric rests on. And by some luck of the draw, 33 feet was just about the perfect length to go back and forth four times on each side of the peak to the side brackets and secure them at each turn with white tape, so they’re not something Clara easily unwind and swing around like a lasso – but they will easily release under her weight, so she couldn’t strangle on them.
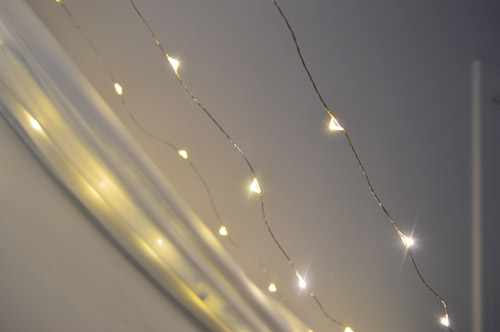
The next step was just draping the canopy back over them. The LEDs are so small that they tuck into the folds and are barely visible when they’re off. And when they’re on, well, you can see how they twinkle below. And since they’re LEDs, they’re completely cool to the touch – so we don’t have any fear of them being against fabric. I also love that they’re small resin-ish glowing dots instead of larger glass bulbs that could shatter.
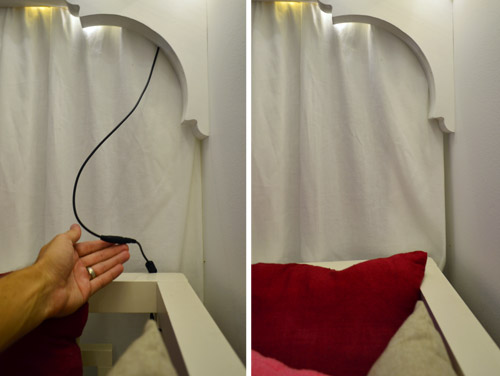
I wish the part that plugs in weren’t big and black, but we were able to plug it in behind the bed and wrap the cord around the bed in a way that it’s able to be hidden behind the canopy most of the time, but easily accessed when it’s time to connect the cords to the power adapter. See how you can see it on the left, but it’s tucked away and invisible on the right? Thank you John, hand model of the ages.
Clara LOVES them. Partly because they’re called “Fairy Lights” but mostly because she feels very special having her own set of secret lights above the bed. We intended just to put them on for story time at night or other special play times, but they actually put off a fair amount of light, so we’ve found ourselves putting them on just about any time we’re in the room and the sun isn’t fully out.
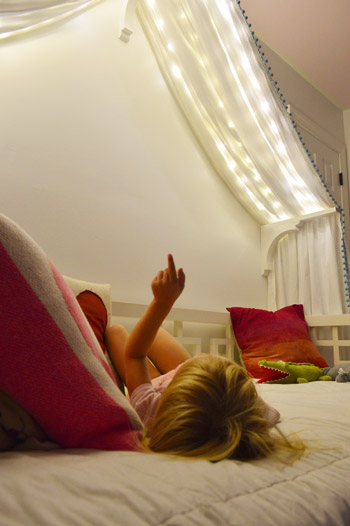
We’ve had them up there for a week or two (didn’t want to sing their praises too soon only to have them burn out or something weird) and so far they have been awesome for our gentle girl. She hasn’t touched them once, but loves gazing up at them. Meanwhile, my best friend’s four year old daughter is nothing short of an acrobat, so we laughed about how she’d probably scale the canopy and hang from the fabric like she was Pink in concert.
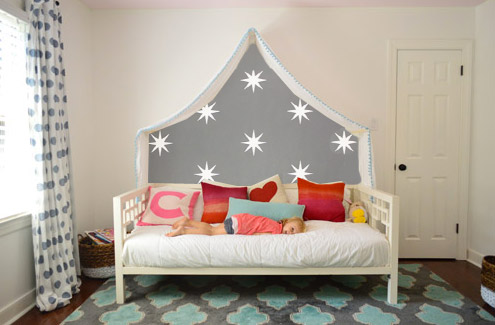
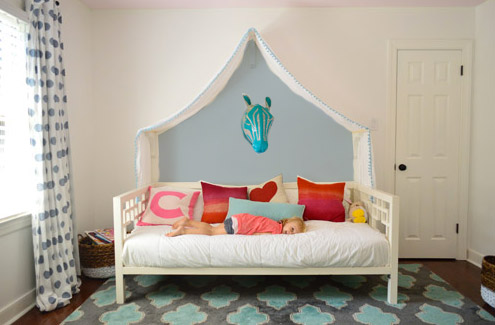
But even with the addition of the lights, the canopy is still definitely missing something above it. There’s still so much white on white on white that we’ve been brainstorming which way we want to go. We’ve debated painting just that peaked area under the canopy for a while and then adding something else in there (like a hanging paper lantern or mobile or even a cute little animal head or something). So here are a few ideas, thanks to our good friend Photoshop.
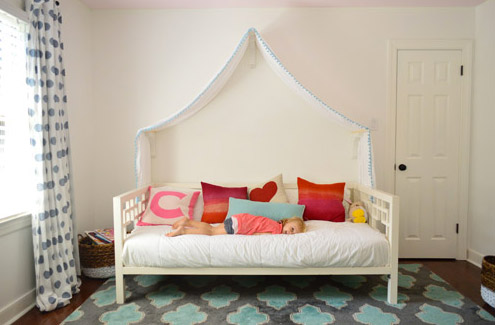
Idea #1: A gray tone on the walls to add drama and a little dreaminess to the canopy, inspired by this wallpaper by Osborne And Little.
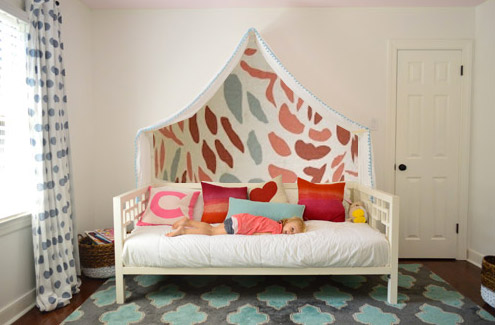
Idea #2: Maybe I could freehand some sort of imperfect painterly-ish mural, inspired by this awesome fabric covered lamp shade?
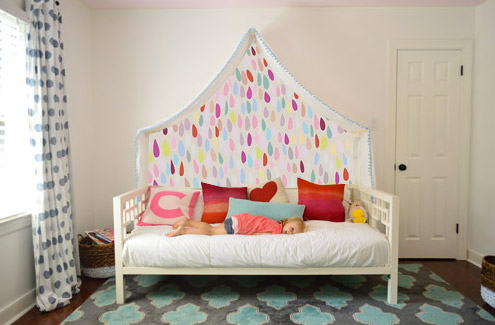
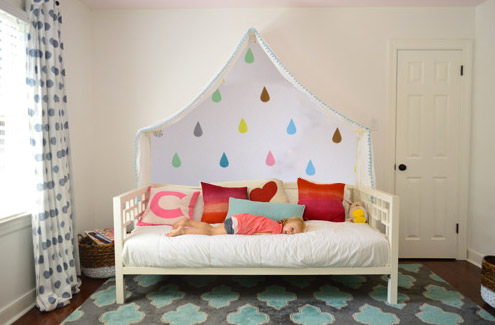
Idea #3: Another hand painted mural possibility could be something like this cluster of colorful raindrops in a variety of colors (inspired by this amazing but sadly sold out print).
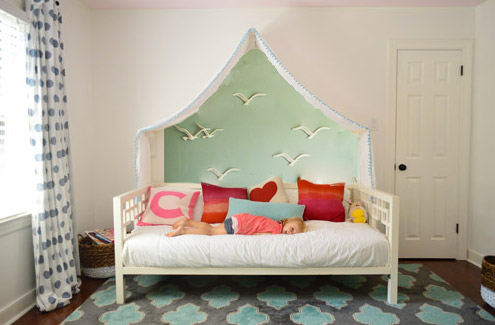
Idea #4: Then I saw this picture of a pretty blue-green wall with little birds on it and thought that could be fun.
Idea #5: Since Clara’s quite the animal lover, we thought maybe a friendly giraffe or zebra (like this one from Dwell Studio) peering down at her while she sleeps could be fun with a blue-gray wall.
Idea #6: These little teardrops in a few different colors had my mind spinning with possibilities too.
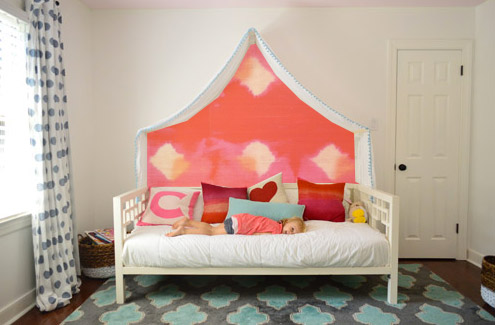
Idea #7: Then I thought about a colorful fabric hung along that back wall, perhaps something with the same large-scale boldness of this pink and red wall coverings that Jenny shared here.
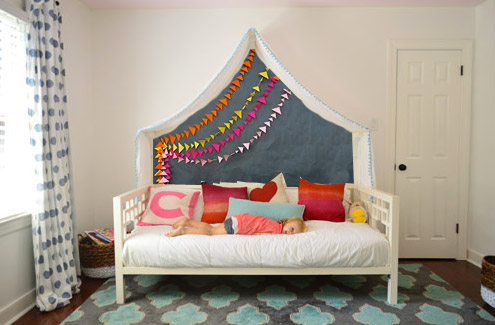
Idea #8: And then there was the possibility of even darker charcoal paint on the walls and some asymmetrical handmade banners in a few colors like these (which were actually a super cool photo background for this party). Update: since this one looks chalkboard-ish there have been a lot of suggestions to do that so Clara can doodle away, but we worry that chalk dust over her bed might not be the best call (there are chalk markers but they’re not as charming, so we’ll have to see where we end up).
What do you guys think? Any favorites? Or combos? I think we’re leaning towards the gray background tone in Idea #1 or the dark charcoal color in Idea #8, but we’re not sure if we’ll stencil stars or something else – and we might just combine it with something 3D (like a little felt circle bunting or a hanging paper lantern or something). We’d love for Clara to weigh in on things too, and then I’m hoping to work on it this weekend (along with stenciling the bathroom floor and helping John finish that sunroom tile). What are you guys up to this weekend?
Update: Clara weighed in on these photoshopped pics as well as some more that we made based on people’s suggestions and then we made one last photoshopped picture for her, since she wanted to combine a few ideas (we even video-taped her reaction, which was pretty funny). Can’t wait to get it done and share what she liked best!

Michelle @ A Healthy Mrs says
I love the gray tones as well, and I think #8 is my favorite. I love charcoal with a pop of color!
Leslie says
I like Option #1 – gray with stars…love her room.
Megan says
I’m loving #8! Such a great contrast with all of the white/bright colors. I’m a little obsessed with charcoal grey right now, though, so I may be a little biased. :)
Christina @ The Murrayed Life says
Love the animal head! And the seagulls are a close second.
My dad grew up calling Christmas lights fairy lights, which I always thought sounded so magical. These are perfect for that term!
Jeanie says
Hi! Long time reader, first time replier. :) I have been looking at those lights for a long time! (We’re preparing for our own backyard wedding). I was wondering how much heat they generate? I assume not much as they’re right against fabric. Love all you do, and thanks so much for erasing much of my DIY house fear.
Jeanie says
Sorry, I see that’s already been answered! For some reason my pc only loaded half the comments on page 3.
YoungHouseLove says
No worries!
xo
s
YoungHouseLove says
These stay cool to the touch, although I hear it varies with LEDs (so not all are heat-less).
xo
s
Hanna says
I vote for #4 and #8 :)
Berglind Ásgeirsdóttir says
I am in love with the last one! :) need to find time for myself to clean out the girls bedroom, paint the walls and start fresh! ;)
Jessica says
Grey with stars! I love with this idea.
Rose says
We LOVE those LED’s! You can do so many great things. Use them above or below cabinets for a soft light or even IN cabinets and are to dark and deep. You can very easily get a dimmer control to control the amount of light they give off because those little suckers can really pack a punch! My husband has been using them for different things and his friend owns a snowboard shop and just had him come in and put some in their displays.
For the backdrop of the bed, have you ever heard of using fabric and spray starch? I saw this once on the Nate show and it’s great! And super easy to remove – just think, you can do seasonal fabrics :-)
YoungHouseLove says
That’s a fun idea too! You guys are all so much fun. Thanks for sharing, everyone! I’m soaking up every single idea (even though I’m having trouble keeping up with comments and responding to every suggestion).
xo
s
Megan P says
What about painting the rest of the room, but leaving that space under the canopy white, like the canopy itself? It’d be a little light fortress in an otherwise colorful room, and even if you took down the canopy, it’d make a great accent. I just think there’s still so much white-on-white if you do the only accent underneath the canopy.
fulori says
That’s what I was just thinking – you could paint a great mural outside of the canopy and she could read under a “tent” (maybe a bright day/glow in the dark starry night?)
katrina says
so cute! something boat like — I think stars and moon would be neat ! they have really nice removable wall decals. The way the fabric is it reminds me of a sail of a boat. all she needs is an owl and a pussycat on her bed or maybe peeking around from the curtain!
unrelated exciting caulk question when I searched your archives:
outside windows– if nothing I use will remove the old caulk– have you used that liquid remover? I tried a special tool. Is it really a no-no to clean the old caulk ( with vinegar?) and caulk over if I can not remove it with special caulk removing tool?
YoungHouseLove says
I don’t know! Anyone have tips for Katrina? We’ve never tried liquid remover, although I like (carefully) cutting old caulk out with an exacto knife or a box cutter if I’m desperate.
xo
s
Kate says
I like #1, but instead of the grey, I would use a dark navy blue and make the stars a little smaller and more random to imitate a star filled sky at night!
YoungHouseLove says
That sounds like fun! More like constellations.
xo
s
Emily says
I love idea #1!!! Sooo cute. Which one does Clara like best?
YoungHouseLove says
We’re going to ask her this weekend when we can get started on it (she tends to be inpatient about stuff, so I’d rather ask her when we can dive into something rather than a few days in advance because she acts like I’m making her wait for ten years if it’s a few days until we do it, haha!).
xo
s
Chelsey says
What about felt as a backdrop with little felt cutouts in various colors and shapes (birds? animals? stars?) that she could move and position. Felt usually sticks to felt fairly well with no additional velcro needed.
YoungHouseLove says
Love that idea too!
xo
s
laura says
what an awesome idea. it is weird that i’m 25 an want a cool lit canopy!?!>?
I love the idea of painting stars in – i think keeping with the dreamy-nighttime theme would be so cute!
katrina says
another unrelated question!!
have you ever been to the outer banks? any cool and quirky stores near Duck NC or on the way?
YoungHouseLove says
Yes, we have been there! Sadly I don’t know it well enough to rattle off store names (it was many years ago). Anyone have recommendations for Katrina? It’s beautiful there!
xo
s
Becky says
Urban Cottage http://www.theurbancottage.com/
Duck Donuts…yum
KDH Cooperative in Kill Devil Hills is an artist coop. Lots of different stuff.
Elizabeth says
I’m confused as to why there are so many suggestions to put chalkboard paint above a kid’s bed. Bed really isn’t the place you want to stimulate their imaginations, or brush up against them and always have chalky pajamas? Another area of the room maybe, but I would think as soon as they get into bed for a nap or the night, they would want to fool with the chalkboard.
Amy Mason says
I think painting/putting something just under the canopy still leaves a lot of white on white. What if you do something to the entire wall? I love the darkest ones best.
Yael says
I really like option 8, but instead of chalk that can get all over the place, maybe use magnetic paint so Clara can decorate it however she likes…as she grows she can also start putting up pictures of friends, awards she’s won from school, etc. It’s also always fun to make your own magnets at home.
Jenn C says
I love the colorful raindrops or multi-color tear drops!
Katie says
So sweet! I like #1 the best when looking at it with just the bed, but I’m wondering if that, with the rug and the fabric at the windows, is too similar in scale and pattern?? Is having a grid-structured pattern on the windows, floors, and behind the bed too similar? Which makes me think something of a different type of pattern (vertical stripe?) or something more free-flowing would be pretty. I also really like #4. That all being said, you might find a stamp from the English Stamp Co. big enough to do the project if you decide to go for something like #1 and paint it on the wall.
Such a sweet bed for a sweet bitty girl! ;)
betty (the sweaty betty) says
I LOVE THE LIGHTS! i actually had lights under my lofted dorm bed and slept on a futon underneath with the same effect. i loved the way it looked at night! i’d still def rock this!!
i lovee #1 and #8.. but i’m partial to gray :)
Lindsey says
What about a wood name sign that says “Clara”. I ordered one for my nursery from The Lettery on etsy! It is really awesome!
YoungHouseLove says
Another fun idea!
xo
s
Rachel A says
I LOVE #8!! So cute. #4 is also really sweet and peaceful.
Amy says
We have 3d-ish (is that a word? haha!) butterflies over our daughter’s bed. They add visual interest without being too OMG BUTTERFLIES. Our daughter loves them. I can’t find them online, but they’re in the wall art section at Target :) I think they’d look awesome with that first grey option!
Heather says
I got a bunch off etsy. I have a crack in my wall and now u have butterflies instead. :)
Laura says
Oh my gosh, 1, 3, or 8 all the way! You should have your readers vote and then base it on that. ha ha. So I guess I can’t vote three times, so probably #1 is my favorite. Great ideas.
Karen J says
I agree with Gwen. Paint the entire wall and something fun inside OR something fun on the outside (pretty much reversing the ideas you have posed).
Elizabeth says
I’ve been wondering about those fairy lights, glad to hear that they are working well for you. I actually tossed up some twinkle lights last weekend in the arched opening between my kitchen and dining room, then I tucked in a few crape paper leaves I picked up at the dollar store. It is so perfectly fallish and I feel like I have a head start on Christmas decorating too!
Rebecca says
It’s so pretty and fun for Clara! Is she sleeping in that bed now or still in the crib?
What about magnetic paint? I’m not sure if that comes in different colors, but that would give her the option to play with different designs on the wall and not make a mess! You could cut out different patterns and glue them to magnets…so many possibilities!
YoungHouseLove says
The magnetic paint is fun too! As for Clara’s sleeping habits, she’s still making the transition so she’s not fully in the bed yet. She has some time (6 months until this baby comes) so we’re not rushing her but we think she’s pretty close!
xo
s
Michele says
I thought I liked #4 until I got to #8. And now I say #8 for the win!
Laura says
My only thought with just painting under the canopy is what happens if the canopy fabric shifts around and then you can see the paint lines either above or below? Or is the canopy up there really sturdy? One thing that you could do is paint that entire wall one color, then accent under the canopy with stars or bunting or a lantern. Excited to see what you decide.
YoungHouseLove says
So far it hasn’t shifted at all (and we figure we can use velcro to hold it in place along the corbels and the wall if we want it to be more secure). I mean, if someone yanks it, we’d have to place it back where it was, but it’s sort of like making a bed once a month if it gets shifted (it’s not moving around every day or anything). We worry the whole-wall painting thing might be strange since there’s a big door on the right and we think a rectangle of white will feel unbalanced on an accent wall, but who knows where we’ll end up!
xo
s
Allison says
I love the first option! Stars seems perfect for a night-time space (if Clara agrees of course).
Bonnie @ The Pin Junkie says
My favorite is idea #1. I think the star pattern would look really nice with the lighting in the canopy. Clara is one lucky little girl to have such a pretty place to read a good book!
Kristy says
I love idea #1 (looks like a theater!) and idea #8 (so cute).
I just wanted to THANK YOU for finding these fairy lights. I’m currently buying them as we speak. The house my husband and I just bought has a “bonus room” that the previous owners used as a bar area. We liked it, so we’re doing the same thing (great entertaining space!). There are small hooks around the top of the room for lights, but I didn’t want to drape Christmas lights up there (we aren’t in college, for goodness sake), but this will be perfect! Unobtrusive during the day, but so festive at night! Thank you!!!
grace Nielsen says
Option #1 with the gray and the stars! And you could still hang a paper lantern at the apex of the canopy. The fairy lights are SO darling and perfect for the little Princess Clara!! Loving the space you’ve created for her!
If you do want to create some sort of garland – I have had great luck sewing paper or felt shapes on my sewing machine; just continuous seam and the thread in the middle/between the shapes. Don’t know if that’ll work on every machine, but it works on mine. Only thing is, if you are sewing on paper it will dull your needle and you will want to change it for your next project. Knowing how Sherry LOVES sewing!?! I’d be happy to do it for you, if you’d like! :-)
YoungHouseLove says
Haha! We’ll have to see how me and Oh Brother get along…
xo
s
Valentina says
Idea numero uno is the best, in my opinion. It would look even better with smaller stars, maybe even shooting stars, instead of static ones. You can also do them with glow in the dark paint; they would be magical at night. Another idea is to do whatever you choose with ironing fabric cut-outs straight to the wall with Heat-n-Bond or starch or fusible webbing. Check this out: http://www.adasinteriordesign.com/monday%E2%80%99s-make-it-%E2%80%A6-fabric-wall-decals/
It peels off cleanly, so you can change the design when Clara gets tired of it.
YoungHouseLove says
I’ve never seen that method before! So interesting!
xo
s
Annie says
Sweet! I don’t like the idea of something falling on Clara.
I love the idea of the stars. When I was looking at your pics I kept thinking that you needed something that began outside of the canopy and continued underneath it. Though I’m not sure what that is. For example, and maybe this isn’t your style, like clouds on the wall with raindrops falling down on the wall and under the canopy. Or maybe a crescent moon in outline and stars with an outline, and then under the canopy they become solid and the background color changes. But basically the whole wall is the canvas and the canopy is Clara’s little shelter.
(caffein induced stream of consciousness…)
Thank you for the light source. They’re beautiful!
YoungHouseLove says
There have been a lot of fun ideas to this extent! Like raindrops just outside the canopy like the fabric is covering her from them. I think it’s a really fun way to go! Thanks to everyone who’s offering up so many awesome suggestions!
xo
s
Brenner says
#1 and #7 are my favorites! I love the fairy lights too! I wish I had place to put some in my house. :)
Lynn @ Our Useful Hands says
My pick? Number 1. My Sofie beans pick as she walked by and doubled back? The last one. It got a long line of “oooo’s” and “aaaaahhh’s”. Can’t wait to see what you pick. Have a great weekend!
My best, Lynn
Maximalist says
#8 is my favorite, although they are all adorable. Can I sleep under there, please?
YoungHouseLove says
Sure! Come on over!
xo
s
Michelle says
#8.
Eight is great!
No more debate!
Go to the store and grab the paint!
(a little #8 cheer for you)
YoungHouseLove says
Hilarious!
xo
s
Kristi says
What about painting the raindrops on the wall, but not under the canopy. Then maybe paint the “triangle” under the canopy a sunshine yellow or something light but fresh. When I was a child and couldn’t sleep I used to pretend my bed was a boat in the ocean and my blankets protected me from the rain.
YoungHouseLove says
Lots of people have been recommending this and I love the idea! Will have to photoshop it up and see what Clara thinks!
xo
s
heather beals says
The animal head totally creeps me out but also makes me think she’s just going to bonk her head on it repeatedly if she’s anything like my little girls who are very active! I LOVE option #1!!!
Azni says
Are you absolutely sure that these dont create any kind of fire hazard?
YoungHouseLove says
Yes, we left them burning for hours and I can pinch them in my fingers and they’re cool to the touch. I’m way too paranoid to mess around with that stuff! Although I’d never leave them plugged in overnight or while we’re out just in case (they’re like christmas tree lights to us, if we’re in the room they’re on and if we’re not, we unplug them).
xo
s
Laura Hazel says
My vote is for the stars – they “go with” those fabulous fairy lights!!
Freehand paint them in rainbow colors, and it would look amazing, IMHO.
katie says
That’s seriously just about the sweetest thing ever. Especially love the colorful raindrops. Reminds me of an adorable print from a Spanish artist Blanca Gomez. Anyway, Clara is one lucky little girl.
Mikki says
What about painting it with chalkboard paint and magnetic paint so that Clara could design her own backgrounds? She could also use magnets to put up artwork and school work. You could design magnets out of her artwork too. You could use those chalkboard paint markers or regular colored chalk too. John could make a chalk holder…a large dowel with the end drilled out the circumference of the chalk. Clara could change the chalk as needed.
YoungHouseLove says
We added an update to #8 about chalkboard paint since so many folks are asking about it! Hope it helps!
xo
s
Lauren Nicole says
I think the canopy needs something above it/around it, not under it. Maybe some raindrops that look like they are falling down on it so it feels like a tent that is protecting her from the rain? Then maybe a small lantern or something could hang from the peak underneath the canopy?
Kristen says
I had the same thought as a few other commenters I saw. If you just painted the area of the canopy, wouldn’t it be really difficult to get that exact area? The fabric will move around and then you’ll be left with paint showing outside the canopy or white areas inside of it. I think some sort of accent wall with decals inside the canopy area might be a better option like someone else suggested.
I just know if it were my house, it would drive me nuts to have paint “outside the lines” if the fabric moved around, haha!
I love the paint idea of #1 though :)
YoungHouseLove says
I worried about the same thing, which is why I wanted to live with the canopy a while. I envisioned having to fix it every day or something, but it doesn’t really move at all! I think I could add velcro to hold it in place even more firmly if it did end up shifting more as Clara grew, but w’ll have to see where we end up!
xo
s
Tracy says
I vote for the grey with the twinkle stars. I think you should paint the entire wall though, not just where the canopy falls.