Update: Holy cow, you guys are full of so many fun ideas today! I’m having trouble keeping up with comments since they’re rolling in so furiously, but please know I’m reading them all and loving all the suggestions!
Happy Friday! We’ve been all over the place this week, painting the walls/trim/ceiling in the bathroom & closet, diving into some basket craftiness, de-wallpapering our biggest room yet (the 21′ long kitchen), and now we have a little Clara-room update along with some photoshop percolating as we plot our next move in there. But first, here’s the tiny (and twinkly) addition:

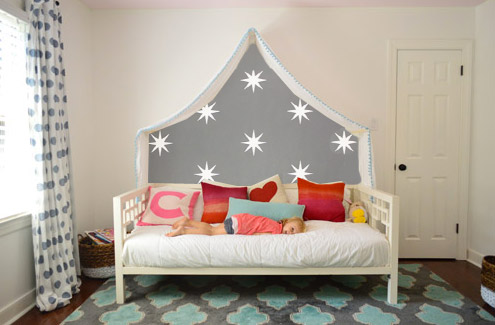
Things just got a little brighter in here…
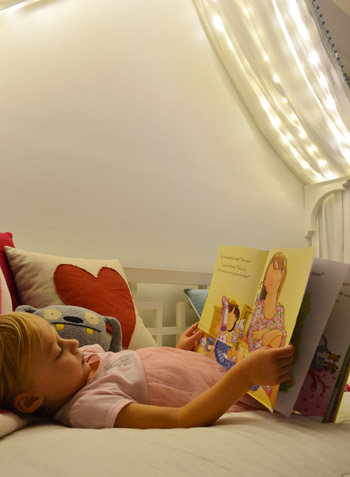
Ever since we hung her canopy, we’ve thought about adding lights to it. Both for the magic of it (Clara loves them) and also for the function of it being a well-lit place for bedtime stories. We feared traditional Christmas lights would be too heavy and make the fabric sag in weird ways (plus, they could look a little messy when they were off) so after some hunting online, we came across what are often dubbed “Fairy Lights.”
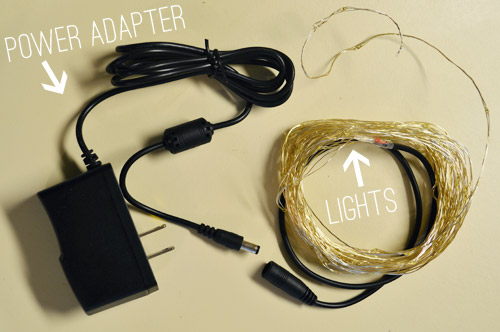
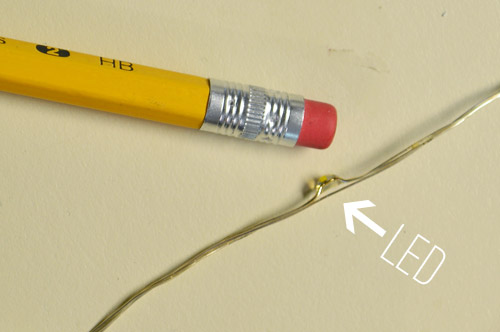
They’re basically small LEDs (check out this picture for scale – they’re tiny) that are strung on a thin wire. The particular set that we bought was 33 feet long and sold for $14 on Amazon. They’re not longer available but here’s an affiliate link for something similar.
The wire itself is extremely light and pretty moldable, so it was easy to weave it back and forth across the 18″ corbels that the fabric rests on. And by some luck of the draw, 33 feet was just about the perfect length to go back and forth four times on each side of the peak to the side brackets and secure them at each turn with white tape, so they’re not something Clara easily unwind and swing around like a lasso – but they will easily release under her weight, so she couldn’t strangle on them.
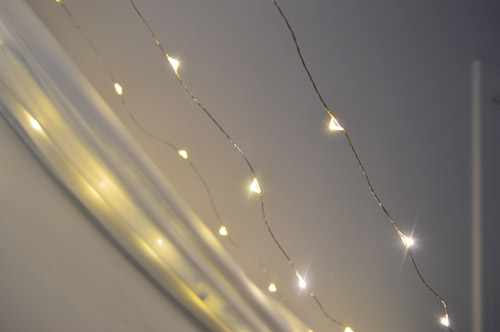
The next step was just draping the canopy back over them. The LEDs are so small that they tuck into the folds and are barely visible when they’re off. And when they’re on, well, you can see how they twinkle below. And since they’re LEDs, they’re completely cool to the touch – so we don’t have any fear of them being against fabric. I also love that they’re small resin-ish glowing dots instead of larger glass bulbs that could shatter.
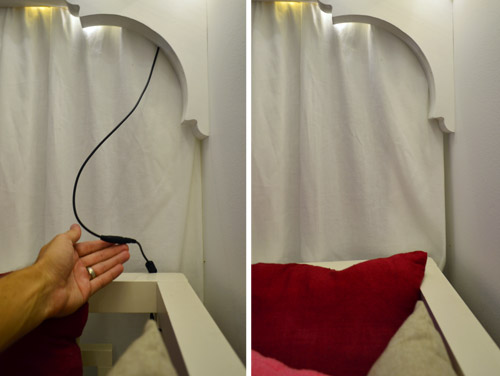
I wish the part that plugs in weren’t big and black, but we were able to plug it in behind the bed and wrap the cord around the bed in a way that it’s able to be hidden behind the canopy most of the time, but easily accessed when it’s time to connect the cords to the power adapter. See how you can see it on the left, but it’s tucked away and invisible on the right? Thank you John, hand model of the ages.
Clara LOVES them. Partly because they’re called “Fairy Lights” but mostly because she feels very special having her own set of secret lights above the bed. We intended just to put them on for story time at night or other special play times, but they actually put off a fair amount of light, so we’ve found ourselves putting them on just about any time we’re in the room and the sun isn’t fully out.
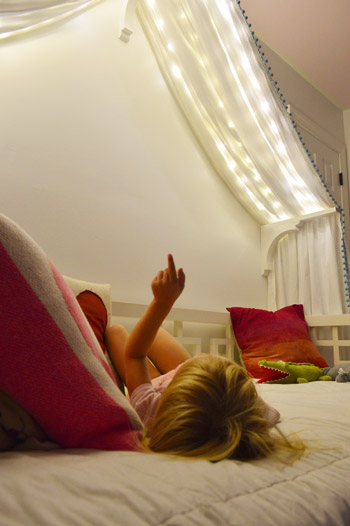
We’ve had them up there for a week or two (didn’t want to sing their praises too soon only to have them burn out or something weird) and so far they have been awesome for our gentle girl. She hasn’t touched them once, but loves gazing up at them. Meanwhile, my best friend’s four year old daughter is nothing short of an acrobat, so we laughed about how she’d probably scale the canopy and hang from the fabric like she was Pink in concert.
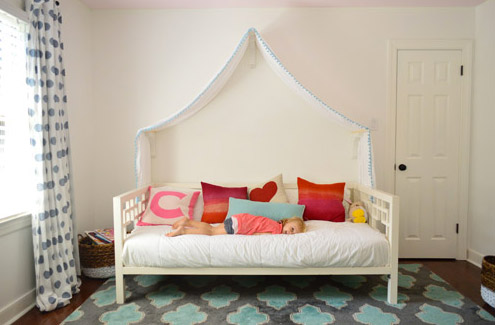
But even with the addition of the lights, the canopy is still definitely missing something above it. There’s still so much white on white on white that we’ve been brainstorming which way we want to go. We’ve debated painting just that peaked area under the canopy for a while and then adding something else in there (like a hanging paper lantern or mobile or even a cute little animal head or something). So here are a few ideas, thanks to our good friend Photoshop.
Idea #1: A gray tone on the walls to add drama and a little dreaminess to the canopy, inspired by this wallpaper by Osborne And Little.
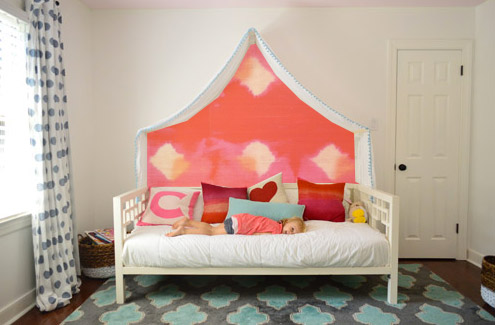
Idea #2: Maybe I could freehand some sort of imperfect painterly-ish mural, inspired by this awesome fabric covered lamp shade?
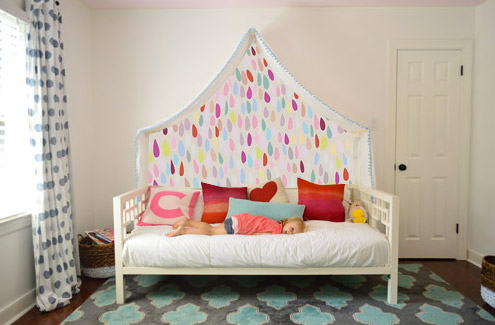
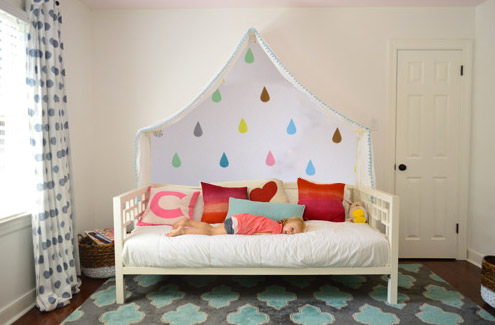
Idea #3: Another hand painted mural possibility could be something like this cluster of colorful raindrops in a variety of colors (inspired by this amazing but sadly sold out print).
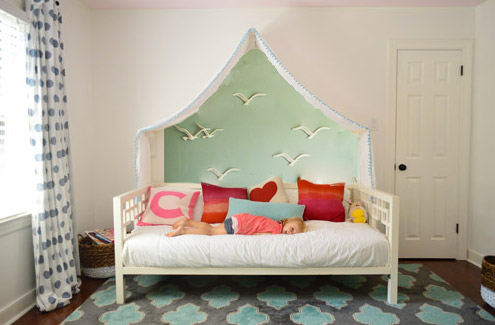
Idea #4: Then I saw this picture of a pretty blue-green wall with little birds on it and thought that could be fun.
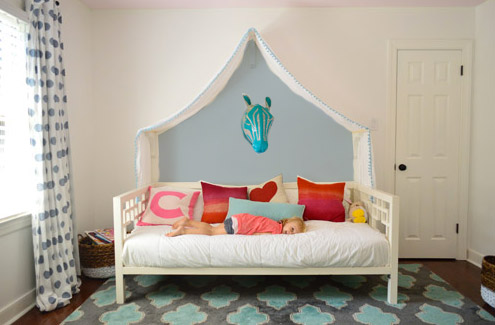
Idea #5: Since Clara’s quite the animal lover, we thought maybe a friendly giraffe or zebra (like this one from Dwell Studio) peering down at her while she sleeps could be fun with a blue-gray wall.
Idea #6: These little teardrops in a few different colors had my mind spinning with possibilities too.
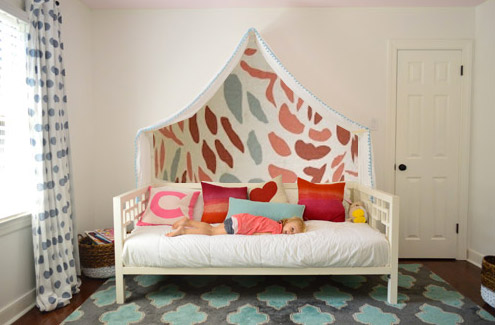
Idea #7: Then I thought about a colorful fabric hung along that back wall, perhaps something with the same large-scale boldness of this pink and red wall coverings that Jenny shared here.
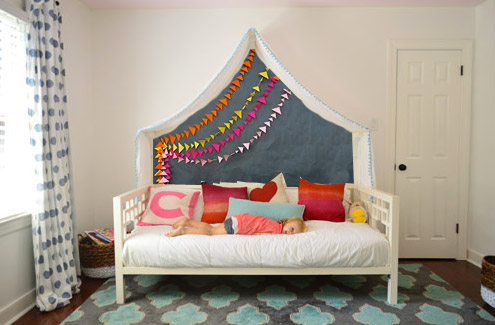
Idea #8: And then there was the possibility of even darker charcoal paint on the walls and some asymmetrical handmade banners in a few colors like these (which were actually a super cool photo background for this party). Update: since this one looks chalkboard-ish there have been a lot of suggestions to do that so Clara can doodle away, but we worry that chalk dust over her bed might not be the best call (there are chalk markers but they’re not as charming, so we’ll have to see where we end up).
What do you guys think? Any favorites? Or combos? I think we’re leaning towards the gray background tone in Idea #1 or the dark charcoal color in Idea #8, but we’re not sure if we’ll stencil stars or something else – and we might just combine it with something 3D (like a little felt circle bunting or a hanging paper lantern or something). We’d love for Clara to weigh in on things too, and then I’m hoping to work on it this weekend (along with stenciling the bathroom floor and helping John finish that sunroom tile). What are you guys up to this weekend?
Update: Clara weighed in on these photoshopped pics as well as some more that we made based on people’s suggestions and then we made one last photoshopped picture for her, since she wanted to combine a few ideas (we even video-taped her reaction, which was pretty funny). Can’t wait to get it done and share what she liked best!

Jen says
It looks SO GOOD! I love the lights you chose. I’m really loving option #8 – it’s adaptable for the future if you want to add something different to it and Clara can help create the banners!
Also, at first in the photoshopped image I thought it was chalkboard paint!
Sarah says
I LOVE #8! The colour is classic, but the bunting/banner adds some whimsical fun. Great idea!
Tessa says
LOVE the lights! so magical! I’m stealing the idea for breakfast-for-dinner/slumber-party-inspired dinner party I’m having!
What about doing the opposite — use one of these awesome ideas for the whole wall, /except/ for under the canopy? Then the canopy would pop out like a little oasis of calm underneath for sweet Clara’s sweet dreams…
Bec says
Sherry,
I know you’re worried about the door on that side, but at the daycare centre I used to work at we just carried the mural over the door and made it a part of the room. I’d totally go with the raindrop idea with nothing under the canopy and have raindrops falling on the door… Or a woodlands scene with a tree over the door…
YoungHouseLove says
Thanks Bec!
xo
s
Jess @ Little House. Big Heart. says
Ohh, I love the dark charcoal idea! It would help cut down on any glare and make the twinkles seem like stars in an inky sky (ohh, you could do navy).
Love her big girl room so much!
Mandy says
Oh my gosh, #1 all the way! Love the fairy lights! Do you have any advice for wallpaper sources? (I’m on the westcoast).
YoungHouseLove says
Anyone have wallpaper sources for Mandy? We have only bought a few rolls for the book (from online places after just googling around).
xo
s
Christiane says
#1, 7 or #8, but I like #1 and #8 way more than 7. To be honest, the rest all look too cluttered and crazy and mismatchy.
Please don’t do the giraffe. I had such high hopes as I was reading since I love animals, too, but it’s FRIGHTENING. LOL!
But I LOOOOOOOOOVE 1 & 8. 1 is so whimsical and ties in with the fairy lights. But darker background I think is the ticket. :)
ANna Pola says
I love #8!!!!!!!
Katharine says
#1 is definitely my favorite. Strangely enough, I also like #2. At first it seems like it would be overwhelming, adding yet another strong pattern to the room, but it ties in with a lot of the pillows on Clara’s bed AND has an animal vibe to it for your animal-lovin’ girl.
J says
The last one is my favorite, especially since it looks like a chalkboard! Do chalkboard paint so you can mix up the decorations! Draw raindrops one day, birds the next, all with Clara art everyday!! If you’re worried about the dust by her bed, go for the chalk markers that are smoother and less messy. :)
Tonya says
LOVE #1
Carlin says
What about chalkboard paint? Clara’s doodles could be the pops of color you’re looking for!
YoungHouseLove says
Just added an update to the post in #8 about chalkboard paint for everyone who’s asking! Hope it helps! Can’t keep up with comments today – you guys are so full of ideas!
xo
s
Beth A says
I love the idea of the color in #5 combined with the birds in #4. I also love #8 as is. So cool to see various possibilities!
jamie says
I love #8 and #4 is a close second. How fun!
Julia says
I love idea #1, as well! The warmer, darker gray tones could make it all the more cozy, and I think the stars would really add to the cozy, twinkly light bedtime story vibe you have going on, and create a magical nighttime scene. You could even paint the stars with some glow-in-the-dark paint so they continued glowing for Clara even after the lights go out. Just a thought :) All the ideas are great, though! Looking forward to seeing what you choose.
YoungHouseLove says
Love that! There are so many ideas rolling in we can’t keep up. Thanks to everyone for sharing their thoughts and fun suggestions! Can’t wait to scroll back through them all tonight with John and ask Clara what she loves most in the morning (when we’re ready to dive in!).
xo
s
Jessica says
Love the last option because it can really be customized. What about glow in the dark stars so after the lights go off it’ll still light up. I’m totally a 90’s girl when it comes to those glow in the dark stickers… ;)
Jessica says
Jessica,
I LOVE YOUR IDEA. Also I am an 90’s girl (also with the same name) and loved glow in the dark stickers. I actually had them all over my dorm room in university. And glow in the dark sheep to count.
Sherry, apparently I am just going to keep commenting and share all of my bedroom decorating memories from my childhood. Sorry.
YoungHouseLove says
Haha!
xo
s
Kelly says
I definitely like the first and last options the best. So many cute ideas though! Thanks for sharing. I can’t wait to see what Clara thinks.
Rachel says
LOVE idea #8! That one is definitely my favorite!
Tammy says
Love the first one, and the one with all the multi-colored raindrops. What a fun little girls room!
Mandi says
I thought #3 was my favorite until I got down to #8. The colorful garland is so fun! And I love the dark grey contrast with the white and colors. Adorable. I might steal it for when I have little ones. :)
Kelli says
I’m with ya on número 1 & 8!!
AlisonG says
Go for whatever Clara chooses. I like the green with the birds the best. Cute ideas. Have fun with it. Have a good weekend.
Stephanie Acker says
Love the fairy lights and idea number 1! You guys amaze me with your brainstorming power. I can hardly come up with 1 idea, let alone 7 or 8. Haha!
Addie says
I love 1 and 8! The gray with stars is my personal favorite, but I think 8 is so perfect for a little girl :)
nicole chiles says
http://www.ebay.co.uk/bhp/miho-deer-head
If you want an animal in there, check these out!! Fun, colorful, unique!!
YoungHouseLove says
Fun!
xo
s
Kelsey says
I really like the first idea, until I saw idea #8. I am obsessed with that one! That would be so fun and easy to change out if Clara wants a different pattern or color!
Ellie says
#1 definitely! Clean and still warm and goes with the fairy light theme.
Love the canopy!
Sarah says
Love #1!
Ananda says
I love the first or last option!!!! Those are great and I think you just gave me an idea for my daughters room!
Megan says
Oh – I really like them all. But I think that my two favorite are #3 and #4. But you could always do the Antonio treatment and paint the birds hot pink :) Cant wait to see what you do.
Andrea R. says
I love idea 1 & 8. Love the drama of gray under the canopy. Its almost like you are peering into a real tent. And it looks like something she can grow with!
Ellen says
Idea #1 I uh-MAZE-ing!!!! I want to do that in my room now! :) You could hang one of those Moroccan-looking star-shaped paper lanterns from the center, too. Your ideas are all fun, though, and how cool would a mural hand-painted by her mother be for Clara?
Kimberly says
The color on option #4 looks the best with the rug. Plus, the birds are sweet.
Hollie says
Option 3 is so sweet – I love how it ties in the colors in her room and doesn’t take away too much from the canopy!
Rachel says
I LOVE the twinkly fairy lights – so pretty! (I shall google for some of my own.)
But I’m not big on the idea of having part of the wall a different colour to another part of the wall. If it works for you guys (and Clara!) then that’s great, but I don’t think I’m convinced. Personal preference, though, since I’m not big on feature walls either.
Looking forward to seeing the progress in the sunroom soon!
Whitney says
What about painting the wall only outside of the canopy, instead of under it. They maybe add somethign 3D on the inside of the canopy. I would like to see how painting outside would look in photoshop…
Love the lights!
YoungHouseLove says
We thought about painting that whole wall but since there’s a big door on the right side we thought it might look unbalanced to have a big white rectangle on the side. Not sure where we’ll end up!
xo
s
Kristen says
all so cute! especially love the zebra and the bird choices!!
Laura Lou says
I really like the last option… the banner flags! Very cute.
Kristy Swain says
Zebra head all the way!!! Love that.
Stefanie says
I love option #3 – it’s so “little girl” :)
Kyle says
Idea #3 or #8 FOR SURE
Sue says
Love the fairy lights! I’m digging #1 and #8. Good luck with the next step!
Hollie says
What about the whole wall painted with a few accents painted under the canopy?
amy says
#1 sticks out to me!
Lauren says
Love the gray in #8 – pulls in the rug. What about gray chalkboard paint (and banners), and Clara could write sweet little notes to herself under her well-lit canopy? Every option is adorable.
Brittany W says
I love the rain drop idea. You could leave the wall color and then use vinyl wall art to create them, that way it’s not permanent if you decide to change things up!
Robin W says
I love the raindrops as well and think a removable option would be great.
I’ve seen that you can iron on fabric: http://www.brassyapple.com/2010/06/fabric-wall-artcreate-your-own.html
could be a neat way to put up raindrops or anything else.
YoungHouseLove says
Thanks for all the tips guys!
xo
s
Janelle @ Two Cups of Happy says
I really really like the first 4 ideas! I have faith that you could freehand a pretty brightly coloured pattern. Go, Sherry, go!
Andrea says
I like the raindrops. I did my daughters room in a cowgirl theme at her request. I even hung a rope on the wall with hats. But after a few weeks the hats had to go as something coming out of the wall scared her. I can’t imagine how she’d freak out at a zebra head!
Our weekend consists of date night, sushi and the Seattle auto show :)
Alicia Llanas says
i like 2,4,6,8
i like the grya in #1 but not much the starst
and the head of the zebra … i would be scared too lol but im pretty sure if you go with that would look awesome
Allison says
Love the last option! It is so happy and fun with the banners. You may also be able to find some cute decals. That way you could change them up and Clara could pick out something she loves. They have a TON of options on Etsy.
Joanna says
I love the lights! I also like #1 or #8 the best, but I’d love to see you photoshop the rest of the wall outside the canopy so we could see what that would like (leaving under the canopy white.)