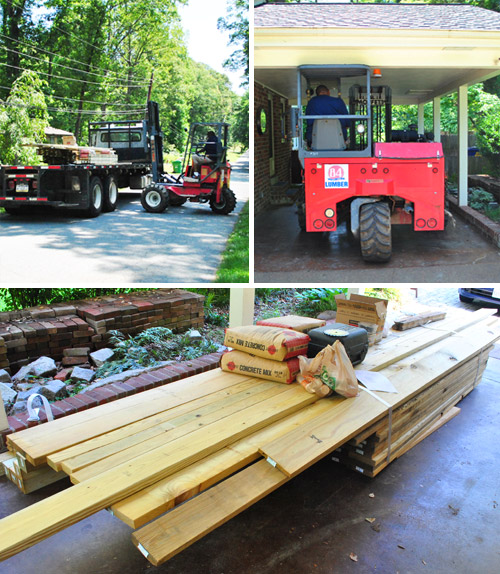
Good news: we made progress on deck building. Huzzah! Bad news: we didn’t make as much as we’d hoped. Harumph. I’m kind of having flashbacks to our bathroom remodel project back in 2009, when we’d schedule a long weekend with my dad to hopefully complete the whole thing but found ourselves just having started tiling by the end of the last day with him. But that’s just how real DIY life tends to go. So let’s rewind to the middle of last week when we got all of our materials delivered from our local 84 Lumber store (totaling about $1,000 including delivery and screws/metal hardware/concrete for footers/etc). That all went smoothly, especially when we realized that our carport was barely tall enough for a forklift to fit under. Seriously, the top of it just grazed an old plant hook hanging from the ceiling. Phew.
My dad arrived on Thursday morning to lend a hand while Sherry Clara-wrangled/tended to the blog/took pics/conferred as we went. We all spent the first hour-ish talking through the plan together. It was my chance to double-check that I knew what I was doing (or at least sort of knew what I was doing) and my dad’s chance to get up to speed. Here’s roughly what our deck frame will look like (except it’ll have stairs, which we’ll talk more about when we get to that step) thanks to the plan that 84 provided me. Oh but this isn’t the plank pattern that we’ll be attempting (that can be seen in this post).
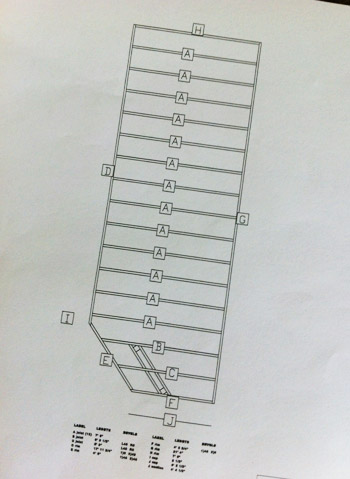
I realize that’s not a terribly descriptive picture, so bear with me. The only thing to note right now is that our deck-itself (not including the stairs) only requires two posts (near labels B and C) since most of it will be attached directly to the house. The only mid-project inspection from the county needed is a footing inspection, which ensures that I’ve dug my post holes to the right depths and widths. So theoretically I could just find those points, dig, get the inspection, and then do everything else. But Sherry and I figured we should start other portions of the deck before the footing inspection because (A) they’ll help us be more precise about our exact footing placement so there are no woopsies later on and (B) the inspector can warn us if we’re off track with anything else during the footing inspection – rather than telling us to take everything apart once the whole sucker is done. So the focus of Thursday’s work was to hang ledger boards and joists. Allow my little Photoshopped picture to explain that a bit further…
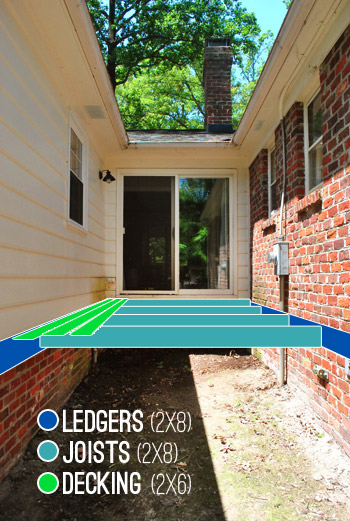
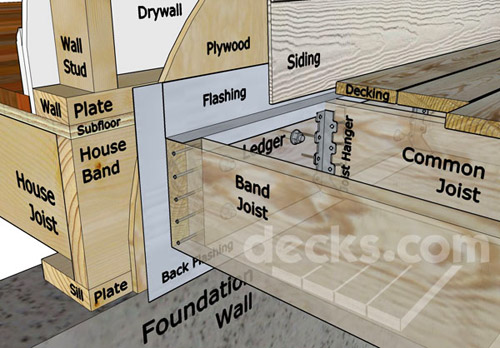
The ledger boards are bolted or screwed into the house on both sides, then joists will attached to each side, creating a span on which the decking boards can be nailed. Pretty simple, right? Well, there’s all sorts of considerations and steps that need to be taken – especially in regards to hanging the ledgers. For instance, they need to go all the way through your house into the band board (i.e. not just into the siding or brick facade) and you need to install flashing to prevent moisture damage. This graphic from decks.com is the closest thing I found online (after LOTS of searching) to what the whole dealio looks like:
So our first actual step was to installing flashing. Our county just requires back flashing, but I also plan to add some on the top too since after a bit more research we hear it’s generally a good idea to further protect things from water damage and rot. I had trouble finding info about attaching flashing to brick, until I happened upon these “Flash The Ledger Board” steps on One Project Closer‘s deck tutorial. Looks like my first step was to “trench out one of the horizontal mortar joints above the ledger board” about an inch – which I did by setting the depth of my circular saw and using a masonry blade:

It was quite dusty. At this point Clara and Sherry were glued to the sliding glass doors inside, watching all the action. And Clara started yelling “fire is hot!” because all the dust actually looked like hibachi smoke (more on how we might have permanently scarred her with that experience here). But it was all good. No actual fires started and Clara simmered down and actually enjoyed watching the process when Sherry explained that the white dust was kind of like snow (the girl loves Frosty, so we were all good from there).
The idea here is that we could fold over a small hem on the end of the flashing and stick it into the exposed joint, sort of wedging it into place (though it also says to add a bead of clear silicone caulk over the seam, which we’ll also be doing). You can see my test strip of flashing below. I’m using vinyl flashing, since standard aluminum flashing isn’t recommended for pressure-treated wood applications (and is actually not permitted by our county). My other option was copper, but it was about three times the cost and seemed more finicky to work with, so I went for the cheaper and easier option.
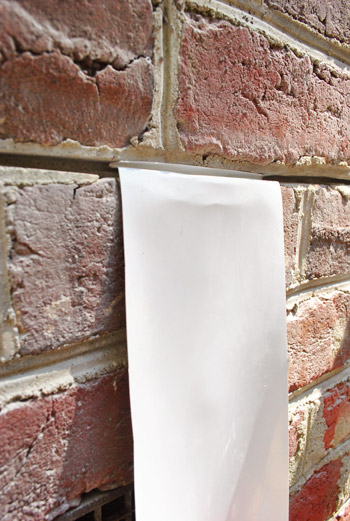
I rolled out the right length of flashing, cut it with my scissors, and bent the folded hem by hand (which was actually really easy to do). Though it did take the assistance of a ruler to actually force it back into my trench (probably a good sign that it’ll stay in place).
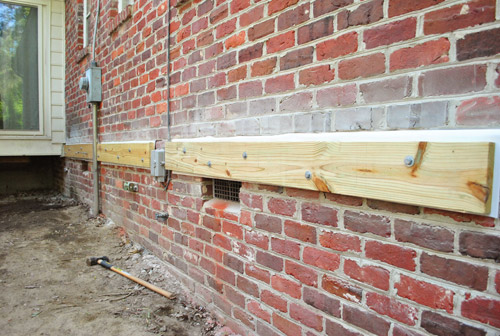
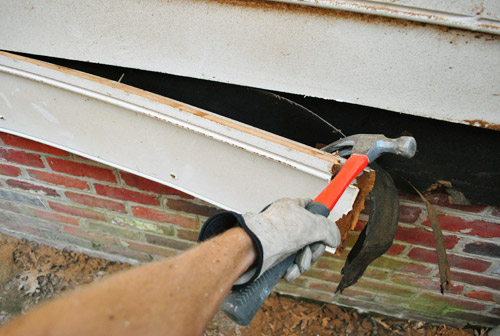
Here’s our first piece of flashing in place (though it will lay flat against the house once the ledger is attached by being drilled through the brick over the length of flashing). This is a good time to point out that the ledger board on the brick side of the house will be broken into three sections, since we have to work around a couple of obstacles like the electrical meter on the right side of this picture (thankfully the electrical municipality in our county is all good with us building this deck although it makes the height of the meter a bit lower so someone reading it will have to crouch). The lesson: be sure to call yours to make sure there’s no odd zoning rule like “the meter must be at eye level” that could ruin your deck-building plans. We hear in other parts of Virginia this entire deck could have been a no-go due to that rule.
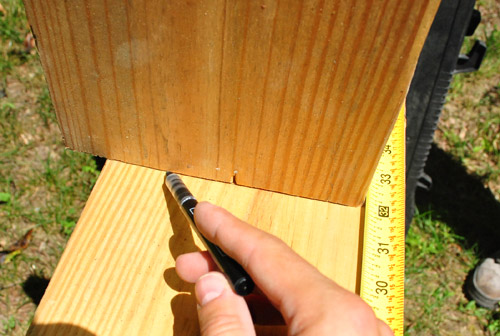
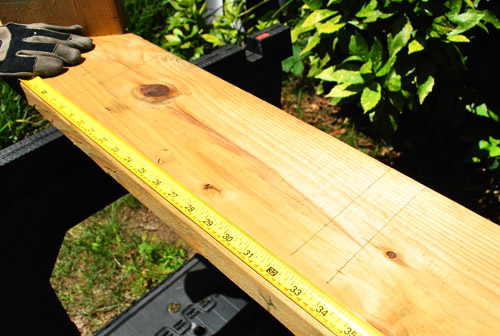
With the flashing held in place, we went to work on our first piece of ledger board (a 2 x 8′ board of pressure treated lumber). I cut it to length using the circular saw and starting by marking where my joists would go (my county guidelines required them to be no more than 16″ apart when measured center to center). I used a scrap piece of 2 x 8 to draw where they would go so I was sure not to place any screws in the way.
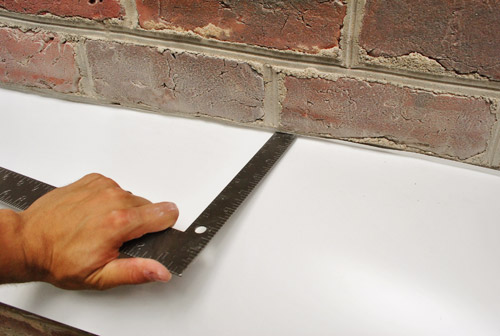
Speaking of screws, our county is very specific about those, as illustrated by this graphic in their deck guide:
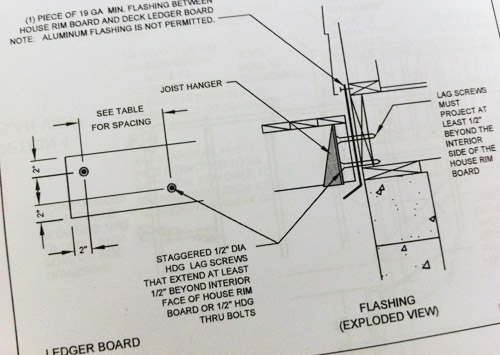
The spacing guide said my screws needed to be no more than 23″ apart. I opted to do them at 16″ increments because it’d be easier to remember that I just had to do one between each joist.
So after marking the ledger board and pre-drilling some pilot holes in both the wood and in the brick, my dad held the board in place so that I could get our first screw in on one end just enough to hold the board up. When then checked that it was level and put a screw on the other end the same way, that way we didn’t have to exhaust ourselves holding it up against the wall.
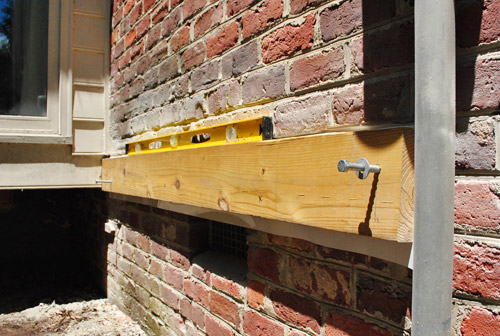
The screws we’re using are technically HDG (hot-dipped galvanized) lag screws, which are one of only two types of screws that are approved by our county. They’re massive: 1/2″ thick, 6″ long, with a big hex head on the top. My power drill didn’t have enough torque to help me, so we had to hand wrench all of them in place…

… fortunately my dad had the bright idea of buying a piece of $2 scrap pipe to extend the handle of our socket wrench to give us more leverage. It actually made it quite easy to drive them in.

The not so easy thing? The hiccups we hit that caused some delays. First off, we had to go out and buy longer screws – 8 inchers – because the county requires the screws to stick out the other side of the house’s band board. When I checked on our first two screws in our crawl space I could see the 6″ guys weren’t making it all the way through. The 8″ screws did the trick, but we had to be more delicate with them because a couple of them broke off mid-way, requiring some extra work to remove the broken screw and drill new holes. So by about 2pm (after over four solid hours of work), this is all we’d accomplished. Can I get a womp-womp?
Fortunately we found our rhythm after lunch (my Whopper must’ve done wonders) and made lots of progress in the next couple of hours – completing the rest of the ledger board on the brick side of the house. Woo hoo!
Wasting no time to celebrate our accomplishment, we turned our attention to the ledger board on the siding side of the alley. I wanted to make sure it sat level with brick-side ledger, so we decided to temporarily set a joist to help us out. The joists attach to the ledger boards in these metal hangers. I just loosely nailed in it place at this point.

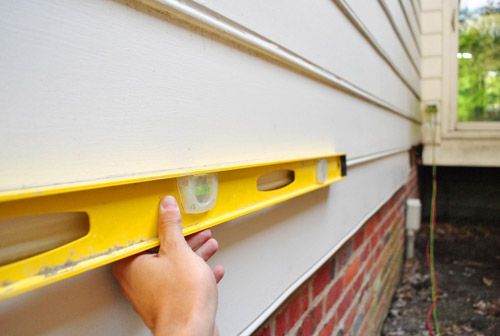
After having cut another 2 x 8′ board to act as a temporary joist, I held it up using my level as a guide. Then I marked the siding wall to indicate where the top of our ledger on that side should go.

Since a ledger board is never supposed to attach through siding, it meant we’d need to remove the siding that was in our way. And since we have wood siding, it meant cutting it with a circular saw. Not gonna lie, the idea kinda got me nervous. It just felt so wrong to cut into perfectly good siding. But I measured up from my ledger board mark to accommodate for the width of the decking (as well as a small extra gap, which I had read was helpful to keep moisture from getting trapped against your siding). Then I used my level to make a straight line down the length of the wall. A laser level would’ve done this much faster, but we had left it at my dad’s house. Oops.
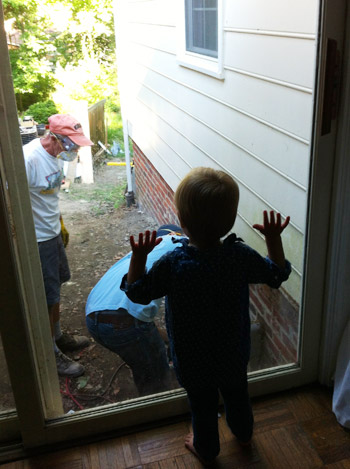
This must qualify as the “exciting part” of the day, since Clara again became glued to the window. I’d like to pretend she’s fascinated by construction, but really I think she just wanted to get her grandpa’s attention (picture a broken record of hearing “Hi Tom Tom! Hi Tom Tom! Hi Tom Tom!” like a kid on the way to Disney asking “Are we there yet? Are we there yet?”).
After setting the depth of my circular saw to be sure I’d only go through the siding (and not the band board of the house), I followed my line as carefully as possible.

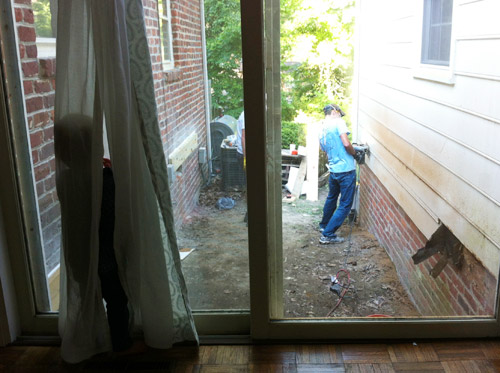
The noise and the dust from the saw must’ve been too much for Clara, as this is about the time she took cover in the curtains.
Once I had my line cut, it took a bit of prying but we quickly got all of the wood siding loose from the wall. It was a beautiful sight.
It was getting on about 6pm at this point, and Sherry and my mom had dinner waiting for us inside. But since a thunderstorm was forecasted for that evening, I wanted to at least get the flashing up on the now exposed siding-side of the house. To do this I took sheets cut to length and shoved about 5 or 6″ inches up under the bottom edge of the siding so that it overlaps. Then I nailed the flashing in place right under the siding (I’m later going to use silicone caulk on these nail spots to make sure moisture doesn’t seep through and will also run the bead that I’m supposed to add across the flashing on the brick side of the house).

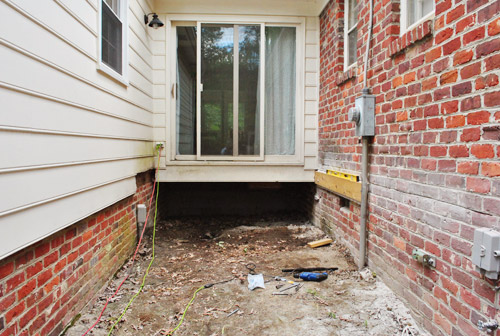
With that, we decided to call it a day. We didn’t get anywhere close to measuring for post holes. Heck, we didn’t even get both ledger boards up. But I feel really good about the work we did accomplish… even though it doesn’t look much like a deck yet. We hear it’s this leveling and framing stuff in the beginning that takes the most time, but really lays the groundwork for a nice long-lasting end product. So we’re looking forward to smooth sailing when we get all of this annoying stuff out of the way. Here’s hoping, anyway! We certainly won’t be setting any speed records for our construction method since we can only work on this baby about one or two days a week, but we figure that’s actually pretty close to how it works for most evening-and-weekend-DIYers out there.
Oh and I definitely could’ve earned the “dirtiest” award for the day. Between the dust kicked up by cutting out the mortar and slicing off some of the siding, I was quite the looker. Sherry especially loved that goggle line I was rocking.

So next up will be finishing the ledger board installation and making some pretty sizable footing holes. Then we have our first inspection. And you know we’ll keep you posted. Here’s hoping slow and steady wins the race builds the deck…
Who else is in the midst of a project that’s taking them longer than expected? Have you been hitting snags or are things just more complex and time consuming than you anticipated? I know I always feel better knowing I’m not the only one behind on a project – and it’s also pretty satisfying to get something done right, even if it means things take a little longer to knock out. Hope to be back with more deck progress later in the week! Until then, I can be found trying to get all of the sawdust out of my eyebrows…
Pssst- See how we stated planning the deck here, how we cleared the alley so it was ready for building here and here, how we selected our deck materials here, and how we got our permit here.

Stacey says
Projects ALWAYS take us longer than we expected, but thats ok, we just take it one day at a time.
I also wanted to mention not to forget to fold the little drip edge at an angle at the bottom of the flashing. That part is very important in keeping the water from running down the brick.
YoungHouseLove says
Thanks for the tip Stacey!
-John
heather says
Lookin’ good in the Suburban Hood!
Okay so, our project that is taking longer than expected is just getting our addition *started*. My husband would say it’s not taking longer than expected, because he expected it. I did not however, and thus, I proclaim it late haha. At least we’re prepping. (http://www.likeacupoftea.com/its-all-in-the-preparation/)
Also, that last photo of John dirty reminded me of Andy after he finished sanding our deck rail. Scroll to the bottom here to see it haha. (http://www.likeacupoftea.com/all-hands-on-deck-part-four/)
YoungHouseLove says
Hahaha, that’s too funny! Our guys are so macho. Haha.
xo,
s
Jess G says
Love that you were building a deck while we were tearing one down! Got ride of a 2 story 350 Sqft deck with my husband’s family this weekend. Good news is, I work this coming weekend and they will be starting reconstruction. I have a new respect for doing something right the first time so it doesn’t need to be torn down in 15 years and rebuilt.
YoungHouseLove says
Wow- that sounds like a ton of work! Good luck with everything!
xo,
s
Erica says
I’m having flashbacks to our little wallpaper removal and painting last Labor Day weekend. We were going to strip the wallpaper one weekend and then paint the next. Ugh! Nope! It took us three weeks to get the layers of painted-over wallpaper off the walls. Then we got to paint. We’ve now learned slow and very thorough definitely wins in the end.
Also received your lovely note about the produce bags. I’m glad you like them.
Allyn says
Dang, I’m exhausted just reading this. I wonder how many people build stuff like this around you guys and just stay sneaky and don’t get it inspected. Quite the process to do it all up to code (though totally worth it obviously).
Stephanie says
This deck building is so exciting. It’s just so interesting to really understand how a deck is constructed.
Getting my new place together is taking much longer than I thought. I don’t think I truly realized just how much furniture I’d need and how expensive it all was. Couple that with the fact that I really haven’t had a free weekend since I moved in and I just haven’t had the time to do the footwork. I know it will take time but a table would be AMAZING.
YoungHouseLove says
Aw, you’ll get there Stephanie! We were totally there six years ago! I remember eating dinner on the sofa with a blanket under us every night since we didn’t have a table!
xo,
s
Stephanie says
Thanks, Sherry! That’s pretty much exactly what we’re doing right now. It’s either eat standing up at the kitchen counter, or sit on the sofa and precariously balance the plate. I hold my breathe whenever someone eats. LOL
My room is terrible too. I need a dresser BAD. There’s clothes all over the floor. Not a pretty site.
heather says
hahahaha – that’s what we’re doing now..only it’s because we don’t have room for a table in our house right now! Thankfully we have our patio set so we’ve been eating most meals on the deck. :)
YoungHouseLove says
Aw, that sounds sweet!
xo,
s
Naomi says
It’s so cute that Clara was “glued to the window” :)
? Naomi {Starry Eyes + Coffee Cups}
Carley says
Things are coming along nicely! I am impressed you guys are taking on the deck! This weekend we tore out a brick walkway (soon to be taking out a brick patio as well) that was laid completely wrong. We thought it would take a million years, but it really only took us about 2 hours. The best part was because it was put down so horribly, it actually made it easier to take up! ;) Now we do have to tackle the patio, and unfortunately, tackle another part of our patio that kind of continues off our deck and is laid wrong, but we think the area need regraded and then we want to lay a cement area. Yikes!
YoungHouseLove says
Sounds like lots of work- but I bet it’ll we awesome when it’s all done!
xo,
s
Crystal says
Thanks for the detailed posts. A new deck is something we would love to tackle next year and this will be a great reference!
YoungHouseLove says
Aw, you’re welcome Crystal!
xo,
s
Adriane (aka the greenhorn) says
It isn’t as pretty as a finished deck but I think you made a ton of progress! All that pre-work is the roughest part. I actually have a deck post planned for this week (we hired people to do ours) and they estimated a day and a half. It took SIX (I think they actually lost money on our job, whoops). Decks, especially on older brick homes, just equal gobs of time!
YoungHouseLove says
Wow! That’s awesome to hear- if for no other reason than I can tell John that it even takes the pros more time than they expect sometimes!
xo,
s
Shannah @ Just Us Four says
Looking at these pictures is totally giving me flashbacks to June 2010 when we started our deck. I remember every single part of it taking longer than expected…especially after we started digging post holes only to discover we live on some kind of old rock quarry. Yeah, that was fun!
Good luck with the next phase :)
YoungHouseLove says
Yikes, that sounds hard! I’m so nervous about the digging part- don’t want it to kill us! Haha.
xo,
s
heather says
Since you would have to do it by hand, check into renting a post hole auger!
Sherry from BC says
I love your detailed how to’s. So useful when I want to tackle a project, I always learn a little even if I don’t plan on doing the same exact project. Your planning process is amazing. It does seem that everything takes 5 times as long as you think it will cause something always crops up. I kept the house after the split and have done a few small projects but it is hard to do it all on your own when you are working full time and getting up there in age. I just don’t have the stamina to really go for it on weekends anymore. I envy you having your Dad come to help. That is what I need. Is you Dad looking for a holiday in Vancouver? Would your parents like to visit…..they can stay for free if he helps me with a few projects…..hee hee…..I am sure my grandchildren would watch to make them feel at home. I didn’t get much done as I had my grandson for most of the weekend. We did an aquarium visit and then he painted up a storm. He is 5 & wants to paint all the time. We have built and painted 2 tool boxes and now a pencil case…..as well as lots of great artwork. Next weekend I think we will paint some clay pots. Then plant them up.
YoungHouseLove says
Haha, we’ll have to ask Tom Tom if he’s in the mood for a trip to Vancouver!
xo
s
Ellen says
The progress, however minimal, looks great! I’m excited for this project because I’d love to put a deck on the back of my house. It will involve moving cable TV lines and possibly air conditioning lines though, so it’s down the road. But I’ll know what to expect thanks to you guys!
Devon @ Green House, Good Life says
It’s great to see you guys doing things in such a technically correct way — flashing is super-important for the reasons you mentioned, and deck collapses due to improper bracing/screws that aren’t long enough/etc. can have really tragic outcomes. I don’t have the technical expertise to vouch for the process you’re using, but it looks like you’ve done all of your research. A+.
YoungHouseLove says
Aw thanks Devon! John is sad by how long it’s taking but he gets all smiley when he talks about the technical stuff, so it must make him feel really good to be doing it right, so this baby lasts!
xo,
s
Kasey M. says
This gives me a new appreciation for the deck our cousins are having built on the side of their house! They’re hiring someone to do the work (she’s pregnant, he’s working night shift + over time) and after seeing how much materials cost I know they got a good deal on the labor!
Alisa says
I am SO excited about your deck! Probably because we can’t build one at our house (boo!) so I’m just living vicariously through you :) We have landscaping timbers that form a planter around the perimeter of our house (make sense?) and the timbers have been sliding down the small hill we’re on with the storms we’ve had recently. So we figured we’d just put stakes up to stop it til we could afford to get new timbers. Well, the other day I found a lady who was selling brand new timbers! They only cost us $16 then she threw in a few extra 8ft boards she didn’t need for free so now we finally have the supplies to get this thing fixed! The most exciting part is that we’ll be able to reuse the old timbers as planters around the rest of our property. WOohoo! wowza, this got long…sorry!
YoungHouseLove says
Wow- that’s awesome! What a score!
xo,
s
Jen@The Decor Scene says
Oh we feel your pain. It took us 1 year to finish our Family Room. We took it down to the studs and worked our way back to the finished product. We only worked on that room over weekends. We even had cement poured in that room so that set us back with some of our work. We have a Hi-Ranch and this room used to be part of the garage, so we had to level things out. If you want to see, you can see the whole process here: http://www.thedecorscene.blogspot.com/2011/04/our-family-room-tour-big-reveal.html
Happy Building!!! :)
YoungHouseLove says
It’s amazing Jen! Turned out so well!
xo,
s
Tiffany says
You might not have gotten as far as you wanted too, but you made a LOT of progress overall. Sometimes projects just go like that. Hopefully, the rest of the project is easy, peasy. Oh yeah, and WAHOOWA!!!
Alana says
My boyfriend and I have been working on a fence 80x50x80 for the last few months. We have tackled red clay, massive tree roots, rocks from prior landscaping or remodeling and anything else that can be buried in the ground. While digging our last 5 post holes we ran into a pipe – that ended up being our 80 year old drain tile for our gutters. The drain tile had previously busted and was packed with red clay. Building a fence turned into replacing 60 feet of drain tile. Unfortunately the location of the pipe was right on our property line and near where other major utilities entered our home underground. So the 60 foot trench had to be hand dug.
We hit every snag possible but after this weekend we got 3/4 of the trench dug and new pvc drain line installed as well as our last picket hammered in. The last thing to tackle on our list is a gate and then we will be able to enjoy our summer.
Good luck with the deck and upcoming inspection! Hoping the remainder of the project goes more smoothly.
YoungHouseLove says
Holy. Cow. That is a TON of work! I am bowing down to you. Amazing that you guys have tackled it all! Good luck with everything from here on out!
xo,
s
S'Mo (aka Sarah) says
I’m not way behind on a DIY project, but I am supposed to be reading for my Ph.D. candidacy exams (which I will take in October)…
I have 175 books on my reading list–some of which I’ve read already, but nearly all of which I need to revisit.
I have finished 1 book in the last week. I have 20 weeks to go.
Yikes!
YoungHouseLove says
Wow- you can do it! Totally rooting for you!
xo,
s
Gloria says
Wow, you just helped me decide what I want for lunch. I’ve been thinking about it the past half hour. BK Lounge it is!
YoungHouseLove says
Haha, who knew a deck post could have that influence!
xo,
s
gina says
Aww Clara watching here daddy! …
and me watching her daddy… John Y U so sexy!
This post needs some Sherry! Sherry, make a sherry post! WITH PICS! U know we LOVE you!
YoungHouseLove says
Haha, I have been in hiding lately. I cut off all my hair and only wear hot pink now. Just kidding. I look the same. Haha. Will have to weasel my way into more pics…
xo,
s
Mona O | Renters In Love says
Looking really good, guys. I love construction!
By the way, looks like an R is missing from “conferred” in the first sentence of the second paragraph and an extra E was added to “her” in the sentence about traumatizing poor Clara.
YoungHouseLove says
Thanks! Both fixed!
-John
Nikkidd says
A project taking longer than expected? No way, not here. Just ignore those kitchen appliances that have been sitting in my dining room since December; and the pantry items/dishes and cookware that have been sitting in my dining room since early April and now have a thick coating of dust all over them; and the kitchen that still doesn’t have a floor… nope, nothing to see here, move along.
YoungHouseLove says
Ha! Know how you feel…
-John
Brandyn says
Lol! Everything takes longer than I anticipate it taking. I’m going to stencil one wall in my new office, but after reading how long your stenciling took I keep putting it off until I have a full weekend to dedicate to it. I think I can get it done in 8-10 hours since it’s only one wall, but I don’t want it bleeding into the work week.
And yes I’m using the same stencil you used – I didn’t like anything else as well. Hopefully you believe imitation is the sincerest form of flattery :)
YoungHouseLove says
We still love it, so we think think it’s a solid choice. Good luck with the project!
-John
Sayward says
fire is hot! fire is hot! … adorable but poor Clara. Captain Safety taught her well. Sooo, no fire pit in your family’s near future?
Robin @ our semi organic life says
Not related but… I saw the cover of your book on Amazon!! Super cute! Can’t wait!!
YoungHouseLove says
Thanks! Funny that it suddenly popped up there. It’s actually still a placeholder design so don’t be surprised if it changes at some point. We can’t wait to have it finalized! :)
-John
Lauren@FilingJointly says
I just raced over here to say the same thing! It was in my ‘recently-viewed items’ suddenly showing up with a cover. Adorable!
YoungHouseLove says
Ahhhh- so nervous. That’s not the final cover, but it’s the one we have started with. Lots still to be done, so it’s funny that it’s up there! Should be fun for you guys to see how it changes as we go! Haha.
xo,
s
Carrie says
Curious… Do you say “Huzzah!” in real life? I see it all the time on your blog, never heard it before then, so I finally had to Google it. Looks like a legit word (not that I doubted you. Well, maybe a little. LOL. :)). I guess I’m more of a “Hooray!” kind of gal. :). Thanks!!!
YoungHouseLove says
Hmm, I’d say it probably falls in the category of things that I write but don’t actually speak out loud (like “LOL” and “Woot”).
-John
Heather says
We are in the same boat here. We are building a fence and the layout and post setting took far more time. But, once we got that, without seeing much progress, we were able to get the pickets and trim pieces up with a snap and finally, we were able to see progress!
Carli says
Totally know the feeling. These kinds of projects ALWAYS take longer than expected. Good for you guys though, it didn’t seem to dampen your DIY spirit! This is going to look so amazing once it’s finished! Can’t wait to see it.
Well, I can. Like, don’t feel rushed on my account ;)
And with that disclaimer aside…I seriously can’t wait to see it!! :)
Linda says
John, you and Tom Tom are to be applauded for doing things the right way – too many folks (even shady contractors) take short cuts to save time and/or cash…it’s great to see someone doing the research and taking a real craftman’s approach to a project.
You gentlemen really deserve a round of applause!
Brianna says
I hope you hosed him off in the yard before coming in the house!
YoungHouseLove says
He shook around for a second and then I let him in. Haha.
xo,
s
Amanda says
HA! Sherry … for a second there I thought you were talking about Burger! Oops, sorry John.
Jyotsna says
Hey, I see the cover for your book now on Amazon! So awesome :-)
Jyotsna
YoungHouseLove says
Ahhh- so crazy! That’s the old cover (still tweaking a lot of things) so it should be funny to watch as it updates over the next few months!
xo,
s
Jackie says
We allotted 4 weeks to renovate our kitchen when we bought a new house (hoping to finish it before we had to move in). Let’s just say we cooked on the grill and washed dishes in the utility sink in the garage for a few, um, MONTHS. Cabinets arrived a few weeks late, granite arrived a few weeks late … I just don’t understand why suppliers are dishonest about delivery expectations.
Anyways, we have since renovated a bathroom and are currently laying 1,100 square feet of unfinished hardwood flooring. We have given up on setting deadlines :)
YoungHouseLove says
Wahoo! Sounds like you’re getting so much done! Thanks to everyone for encouraging us that things can take a while but that’s par for the course!
xo,
s
Michelle says
Building anything always takes longer than expected. That is the only KNOWN element of any project!! Having seen what you two can accomplish, I have no doubt whatsoever that this will be another beautifully done project, very shortly. One question and maybe I missed it but do you have plans to address the drainage below the deck?
YoungHouseLove says
Thankfully none of the downspouts on our house are where the deck will go (so there are gutters above it, but the water comes down in other areas) so we’ll be adding a weed fabric base with gravel on top under the deck, which allows for drainage and supposedly keeps animals from wanting to hang out under there. Will keep you posted on that as we go!
xo
s
Marcie says
As a physics teacher, your example of lengthening the wrench (lever arm) to get more torque makes me so happy!
YoungHouseLove says
Thanks Marcie! Physics = important in real life. Haha.
-John
Kjirsti says
You guys amaze me! This take DIY to a WHOLE new level. Props.
Marissa@ohhhsolovely says
that looks like a terribly difficult project! but, you two are the perfect people for getting something like this done. good luck & can’t wait to see the progression.
Andy says
John, you mention leveling the ledger boards, but you don’t actually mean “level” in this case, right? Don’t you want them slightly sloped down away from the house for proper drainage?
YoungHouseLove says
We did actually build it on a very very subtle slop down, but it’s very subtle since many of the drainage will happen between the boards- and the end closest to the house won’t actually be against the house (there will be a very small gap, also to account for drainage).
-John
karen says
WOW!! good job though!!
Kate says
Wow, despite the snags I’m so impressed! Whenever John breaks down projects like this that he’s completely new to, it gives me courage to try to tackle something on my own with some research and planning! Corny, I know but thank you YHL!!!!
Anika says
Wow! I’m so impressed you guys are taking a project like this on; it gives me hope that in another few years my diy skills can continue to develop too. Can’t wait to see what it looks like in a week or so.
how2home says
Great post!! The deck is coming in very nicely and the step by step process is phenomenal! Cutting the brick wall must have been a pain! You think this project will be done by next weekend?
YoungHouseLove says
Ha! I wish. If we were able to work non-stop every day maybe, but with other things going on – and having to wait for the inspector come this week – it probably will take us another couple of weekends.
-John
how2home says
Is this a mandatory action to have inspector to check the deck? Or this is a specific American law? The reason I’m asking is b/c I’m from Toronto and we never had to ask an inspector to check our deck?
YoungHouseLove says
It definitely varies by location, so there might be permit requirements in parts of Toronto too, I’d give your county or municipality a call to see (or check out their website).
xo,
s
michelle says
the technical term for that $2 piece of scrap pipe around our place is a “persuader”. just so ya know…
Erica says
My dad and I are currently building a pergola for my backyard so I can hang up my porch swing. We’ve worked on it two days total so far but we haven’t got much done! Last Sunday, we started measuring where stuff will go and dug the post holes, and started to put the 6 posts up. We got 3 1/2 finished because the drill we rented from Home Depot didn’t drill into my 30 year old concrete very well! We went back this weekend and got a better drill and it went much faster! I hear it helps if you have the correct tools! So now we’ve got 6 posts up and 4 outside boards up too. In 16 hours, that’s all we’ve done! Kind of depressing, but we’ll get it finished someday!
Oh, and almost 3 years later, my own fixer upper isn’t anywhere near finished! :-) It doesn’t help that I keep adding projects!
Erica says
Oh, and we used a piece of curtain rod to get some torque when we put our lag screws in! 10 inches long and we had to use 3/4″ socket for the head. Yikes!
YoungHouseLove says
I feel your pain – we’re using a 3/4″ socket too! But those 2 extra inches sound killer!
-John
Jackie Toye says
Wow …… We just cut through concrete to make a window in my new bathroom (a former storage room attached to the carport (the carport is now my Masterbedroom) … I had flashbacks in Lowes and Home Depot asking for the blade to cut brick. hahaha
You guys are moving on up the ladder of DIY .. Thanks for taking us along
YoungHouseLove says
That sounds scary but awesome! I bet it’s so nice to have a window in the bathroom!
xo,
s
Amanda says
As I type this, my husband is cutting the toe-kick boards for underneath our new kitchen cabinets (I would be in there helping, but I’m 7 months pregnant and crouching isn’t my strong suit right now). May I mention that the kitchen cabinets and new tile floor were installed just about a year ago now?
I hope your deck doesn’t take this long…. ;)
Joanna says
After trying to snake and pour every drain cleaner down our tub we decided we needed to fully replace the old plumbing. We are on hour 70 of PROJECT: REPLACE TUB DRAIN PLUMBING. Requires removing toilet, tile, subfloor, and 60 year old pipes (required blow torch!). THEN, it requires putting it all back, but brand new. And after 5 million mislabeled or cheaply made Home Depot plumbing parts and 8 trips to the hardware store, we have the new plumbing in and the subfloor down. The tub actually drains now! It was amazing to take a shower without water up to midcalf. The old pipes were so clogged, you couldn’t even see any light through them when held up to a window. Now onto tiling and new toilet installation…
Dylan says
All of my projects take longer than expected. Most recent: bathroom remodel when we decided in the middle of the renovation to replumb the whole house since the water main came into the house in that bathroom. We had copper pipes u der the house that were working fine but who knew what 2 days or 10 years could bring and I didn’t want to tear up my new bathroom 5 months after making it my dream bathroom. So we used pex pipe all throughout the attic.