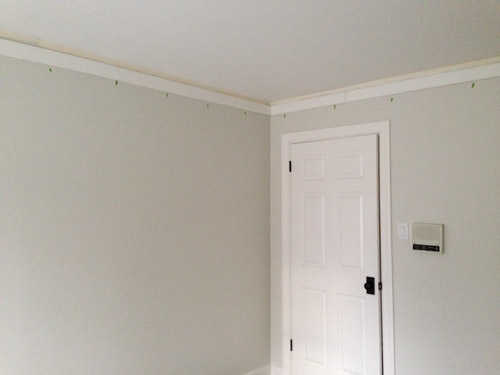
We hoped to have all of the nursery’s extra chunky crown molding painted, cut, hung, caulked, and touched up by the end of the weekend, and we just made it by the skin of our teeth (where did that gross expression come from anyway?).
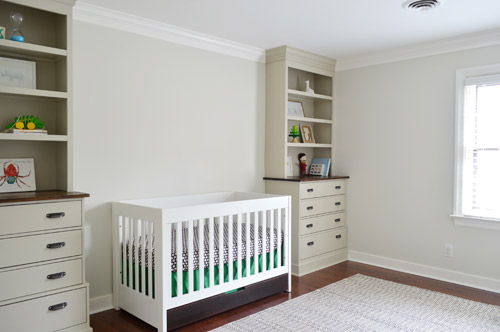
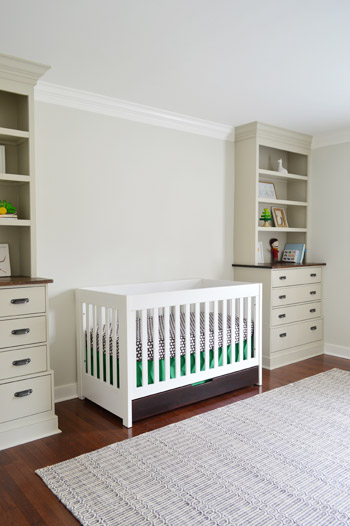
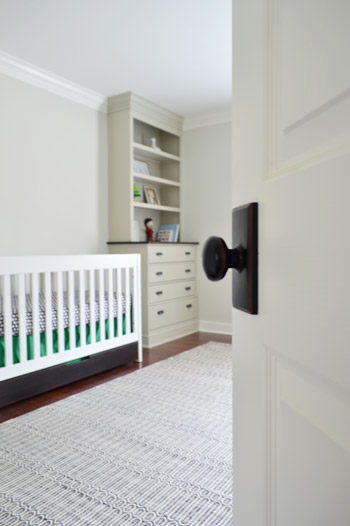
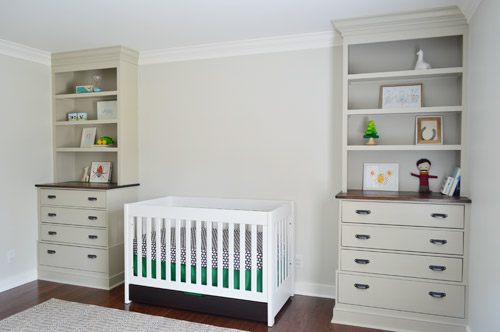
Crown is always one of the those “it’ll be nice” things on a to-do list, and then whenever we add it we’re blown away by how much of a difference it makes. Even the most basic and boxy rooms suddenly look taller and just generally upgraded in a surprisingly significant way. Which we always appreciate since a lot of the rooms in our homes have been devoid of amazing architecture (no extra high ceilings, arched doorways, cool columns, etc). So between the addition of our little corner built-ins, and the new extra chunky crown, this 11 x 13.5′ rectangle of a room is really coming along.
You know, after eight months of looking like this.
Don’t get me wrong – we still have a long way to go (there are three completely unaddressed walls, and not nearly enough color/fun/personality yet), but this chunky crown molding is a pretty glorious sight. It erased all of those unfinished cracks and crevices and made the room feel so much more polished in a few short days.
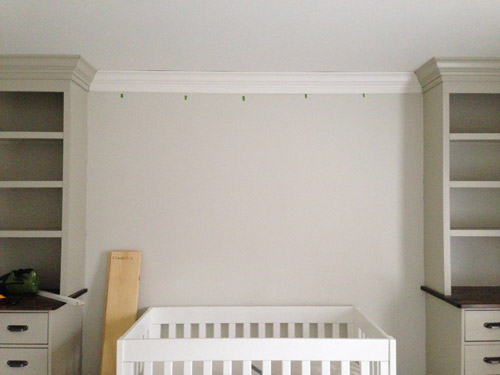
As for how we installed it, we followed the same method that we tried out in Clara’s room, which is to use 3 1/4″ baseboard as the first “layer” – and run that around the room first. We used a spacer to drop it an inch and a half down from the ceiling for more of a chunky look, a level to make sure it stayed straight, and we marked our studs with painters tape so we knew just where to fire the nail gun into the wall to hold them up.
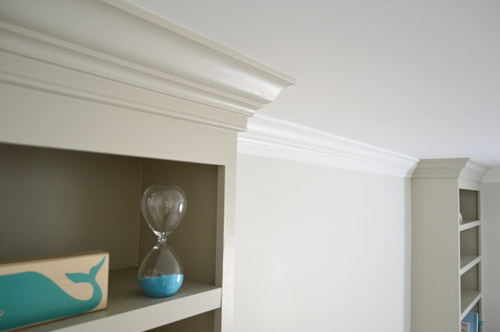
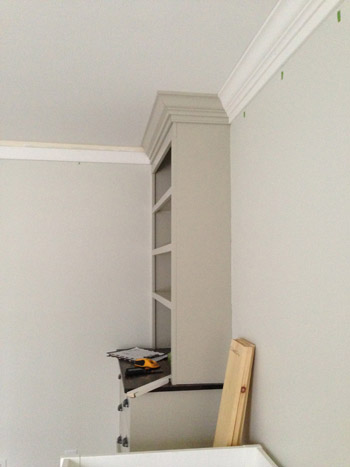
The second “layer” involved hanging actual crown molding (we got nice beefy 4 5/8″ stuff from Home Depot) right over the baseboard, for that extra chunky look. You can see how the left piece has been “crowned” and on the right there’s just baseboard waiting for us to hang crown over it to complete the look. This is how all the crown on the first floor of our house was done, along with the stuff in our master bedroom, so we wanted to keep any new crown that we added looking cohesive.
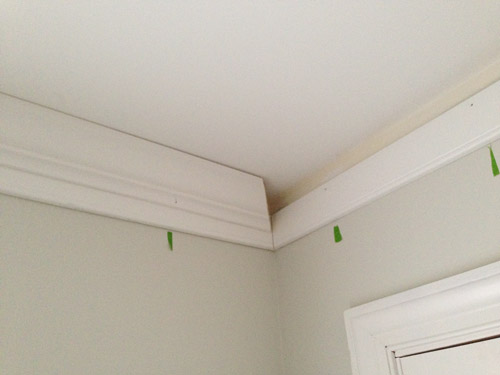
We went with pre-primed baseboard and crown to save ourselves a step, so we just had to lay it out on the floor with a drop cloth and paint it before we hung it. We prefer that to painting it in place because it’s a lot faster, and then we only need touch-ups after hanging it and caulking it. It was funny to paint just a tiny bit of it with the built-in color, and the rest of it white, but we’re really happy with how it all turned out.
Here’s the crown between the built-ins after it was hung but before we caulked it or did any paint touch ups. See the slightly imperfect wavers of the ceiling above it? Those are nice and finished looking when you squeeze a line of caulk up along that crevice and just drag your finger across it to force it into those small gaps. And if you wipe it fast enough (we apply it about a foot at a time) you can usually get it off the pre-painted ceiling and crown so it’s just in those cracks and there’s no need to touch up the ceiling or crown again for the most part, which is nice.
After some final paint touch ups (mostly along the nail marks that we filled with caulk), and removing all of those tape marks for the studs, it gets a lot better looking. Like so:
For anyone looking for additional details and photos of this chunkier crown effect using baseboards + molding, you can click here to read about how we installed it in Clara’s room. The cost of hers rung in at $137, and that’s a significantly larger room, so although we can’t find the receipt for this latest trip to Home Depot, we’re guessing it was around $115 to do the nursery. And you’ll want to add a tube or two of caulk and a can of paint to the project cost if you don’t have those on hand already.
I also finally got to dive into the crib bedding arena, which you all know I’ve been excited about thanks to John’s revelation that I wander around the house impersonating Golum and whispering “CRIIIB SKIRT.” Here’s a close up of the sweet little organic crib sheet that I found on sale from Pottery Barn for $9.99 (I think we paid something like $25+ for organic crib sheets before Clara was born, so I’m psyched to see that these have become a lot easier to find & more affordable in the last four years).

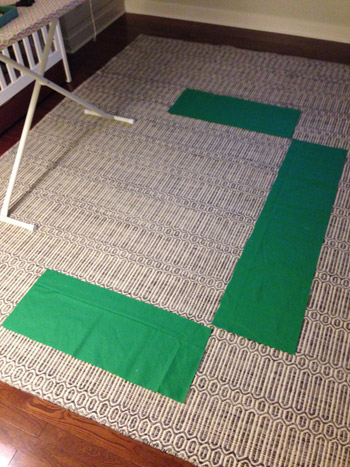
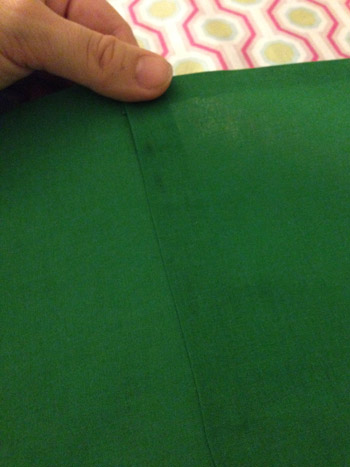
The green rectangle behind that parade of adorable elephants is just 1.5 yards of fabric that I grabbed from JoAnn during one of their 50% off sales. So the grand total for the 1.5 yards of fabric that I needed to make the crib skirt was a wallet-busing $3.73. You know I did The Mom Victory Dance at the checkout, right? For those not in the know, that involves all sorts of ridiculous movements like high fiving your embarrassed husband and waving your hands around like you’ve won the lottery when in fact you have just saved something like $3.50.

Once at home, I laid out my fabric and cut out three pieces (two sides and a front) which will make up the crib skirt. To get the measurements of those three pieces, I just measured the crib skirt area’s height and width in that section, and then added 3″ to each measurement (to account for 1.5″ hems on each side). So for example, if the measured height for the side panel of the crib was 10 inches, I added three more to make it 13 inches. And if the measured length of that side panel was 28 inches, I added another three inches to make it 31.
Oh and it would be a nice moment for me to mention that if you’re using any fabric with a pattern on it, make sure your three panels all go in the same direction and have the pattern level or centered (so you don’t end up with wonky stripes or something from cutting things in the wrong direction). You might need more yardage for certain patterns or longer crib skirts.
I debated sewing these panels together or just using Heat N’ Bond hem tape, but since the crib skirt that I made for Clara was with Heat N’ Bond, and it held up really well, I figured that was a good choice again – especially since this is more of a tucked away element in the room (for example, I sewed Clara a quilt, but I used hem tape for her crib skirt, since it’s less of a hands-on item).
As far as what materials you’ll need if you’re attempting to make a crib skirt using this method, you’re all set with fabric, hem tape, scissors, and an iron. Oh and some velcro tabs, but we’ll get to that in a minute. First you just need to use hem tape on all four backsides of each of your three panels to hem them for a nice finished look in the front.
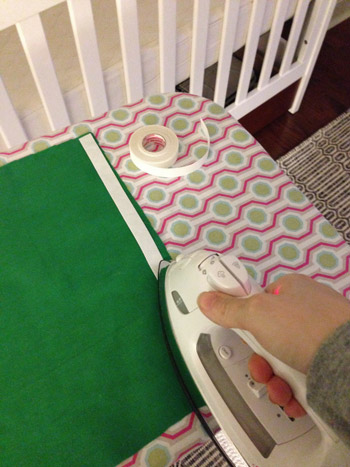
It’s really easy stuff to use, just iron it on, peel off the backing, fold the fabric over, and iron it again to make a hem. The fabric panel on the left of this picture was hemmed on all sides, and the panel on the right was also hemmed all the way around, and then I laid one more strip of hem tape down the side (along the back edge) so that I could join these two panels by ironing it on, peeling the backing, moving the second panel over the first one to overlap them, and then ironing that edge so they were fused together.
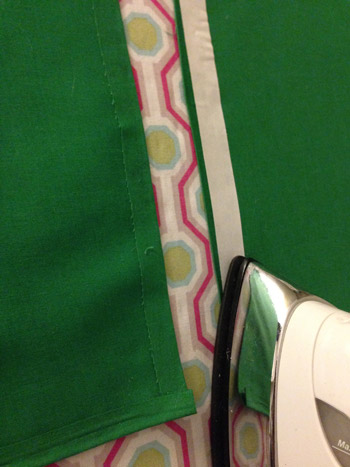
Once you turn it over, you’re left with a nice clean seam in the front of the fabric. And that seam will fall on a corner of our crib (behind one of the legs) so it won’t be seen.
I joined the middle panel to the two end panels this way on both sides and then it was ready to be attached to the crib. I used small velcro tabs around the metal frame of the crib to hold our skirt in place (you can get them at JoAnn or Michael’s which is also where they sell Heat N’ Bond).
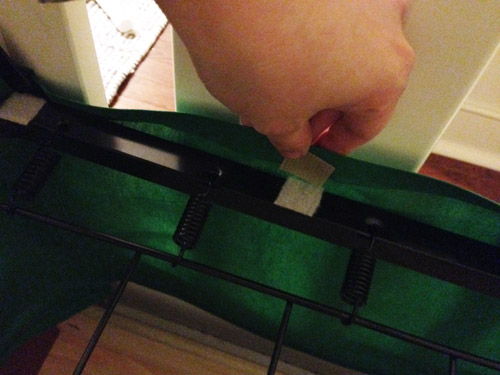
Velcro is a nice option because it makes it easy to remove and wash it if you ever need to (hem tape is washable if you follow the directions and avoid high heat).
Our crib mattress will be lowered once the little guy is more mobile, so we won’t always need this skirt to bridge the gap between the bottom of the mattress and the drawer, but it’s such a fun little addition. Especially for $3.73.
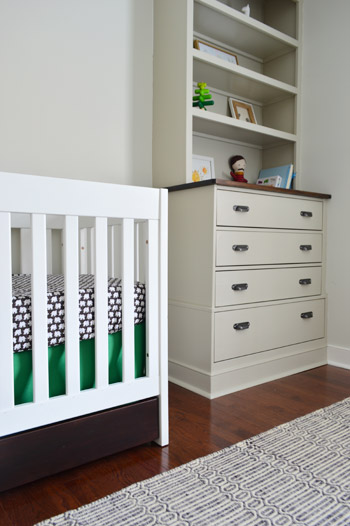
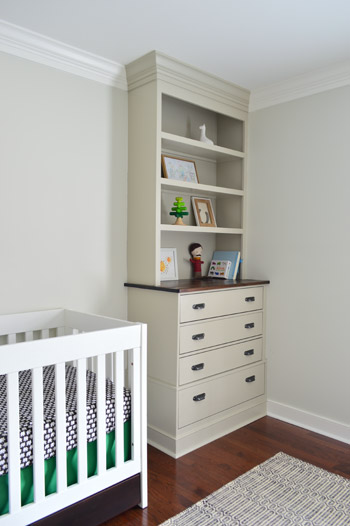
We also used two coats of satin PolyShades gel stain (in Tudor) to make the bottom drawer of the crib a little darker, since it was looking kind of reddish-orange in comparison to the floors and the wood dresser-tops. We thought a hit of darker color would be nice to ground our light-colored crib, and it would also tie into things like the dark hardware on the built-ins, the chocolate elephant crib sheet, and even the oil-rubbed bronze doorknob that leads to his room.
We sealed the PolyShades with two satin coats of Safecoat Acrylacq, which is an awesome non-toxic sealer that keeps things from off-gasing, since Polyshades is low-VOC but not no-VOC.
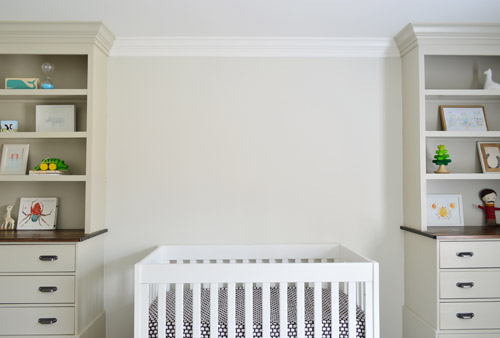
It’s probably obvious that I just tossed like eight things on the built-in bookcases so they weren’t painfully bare, but I literally gave them four minutes of my time, so I can’t wait to gather some baskets and frames and books and toys and other fun nursery items to fill them in for real. (Shout out to the lone giraffe on the top right shelf). I think they’ll end up being super functional and a nice way to add a lot more fun/color/personality to the room, so I can’t wait to get cracking.
For the space above the crib, we’ve been debating everything from large scale art to some sort of accent like a slatted wall or a giant mobile. We even tried leaning the bike prints up there just to see what they’d look like, but we think they’re better suited for the opposite wall since they look a little busy with the built-ins.
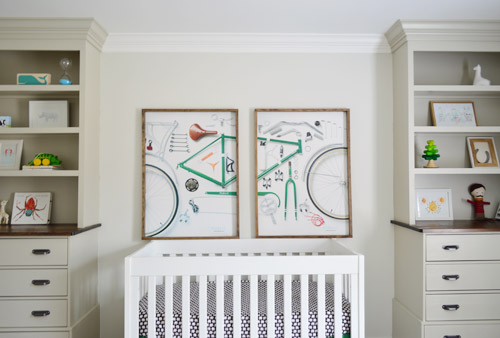
So we’re planning to fill those built-ins “for real” and then see where we end up with that wall. I think we’re leaning towards a really fun large scale mobile – maybe like this but with hits of bold green, black, and white? And maybe another animal instead of birds (Burgers? Or whales since he’s The Barnacle?)…
What did you guys work on this weekend? Do you have any mostly-empty bookcases that you’re ready to go nuts on? Or some bare walls that are begging for some action?
Psst- To see our nursery progress from the very beginning, here’s the planning and rug-buying post, the dresser-sourcing post, the wall and ceiling painting rundown, the first half of built-in building, and the second half of the built-in project.

Heather says
It’s looking so cute! Sophisticated, but still playful. I love it!
Since I don’t have any babies yet to make crib skirts, I do have one question about the iron on hem stuff…have you ever used it to hem pants? I busted the hem out of a couple of my pants and have been kind curious if I could just use the iron on stuff to fix it back up?
YoungHouseLove says
I actually never have, but I think it would work really well on anything that’s not too thick (super dense wool or denim might not hold as well).
xo
s
Paula says
I have and it worked, although they get washed so much that sometimes the hem does fall out – I find I can just re-iron it and it sticks again though. If they’re pants you don’t want to iron a lot, sewing might be better – but I always have to iron this pair anyway, so its no big deal.
Erika says
What kind of caulk do you use? Starting to get everything together to paint all the doors and trim in my house and I know some of them need caulked. Thanks!
YoungHouseLove says
We’re big fans of Dap window and door caulk (make sure it’s white and paintable – that matters!).
xo
s
Jan says
Very nice. I love the elephants.
Ashley says
Everything is really looking great in there! I know you thought you initially had the problem of the built-in paint being too light but now I think it couldn’t be more perfect because the insides of the shelves are that darker color you were going for and add some nice dimension however if the paint had been darker then the shelf area may have been too dark with all the shadows. Anyway, long winded way of saying it looks so good!
YoungHouseLove says
Aw thanks Ashley! Never even thought about that, but I think you’re right. Hooray for happy accidents!
xo
s
Julia Kent @ The Domestic Blonde says
I think the prints would look great on another wall (it’s a bit too busy with the built-ins). LOVE the idea of a giant mobile!
Teri says
I work at Lowe’s on the weekends and they recently updated some of their plastic totes. There is a green chevron one which makes me think of Barnacle’s nursery every time I go down that aisle.
Love the built ins and totally think that the crown matching the color of the built ins was the exactly right call! Can’t wait to see what you do next!
YoungHouseLove says
That’s so sweet Teri! Will have to check that out!
xo
s
Leslie says
I got seriously giddy when I logged on today! I am loving the green so much (I’ve never been a green girl) and the warm gray and the wood all just works so well. What a lucky little boy!!! I’m super excited about window treatments next. Fantastic job so far guys!
YoungHouseLove says
Thanks Leslie!
xo
s
Mikki says
Love the Bird Mobile…have you thought about printing bird pictures on transfer paper and ironing it on white or light colored fabric then sewing little stuffed birds? Clara could help with that. Or you could really use any pictures to copy and transfer, including pics that are “square” to avoid the curves when sewing. You could use your instagram pics…let Clara pic the ones she likes, then she has a real invovlement with the project…just like you are doing with other things. I would cut the “squares a little larger than just sew inside the edges…I wouldn’t turn them inside out…let the edge be a little decorative/frayer/cut with pinking shears. Clara could stuff them too. You could use a photo on the back and one of the front. Just a thought…would really give you some color over the crib too!
YoungHouseLove says
That’s so much fun! Love the mobile ideas guys!
xo
s
Natalie says
I think this is a very nice neutral start and although I agree the bike prints are not great on that wall, they are going to look fabulous on the opposite wall, they really tie what you have done so far together.
The bookshelves are genius based on what you started from.
This house is overall way more neutral/light than your last two…it’s looking good.
I love all color; light, dark, medium, bright, muted so I have loved all your homes!
YoungHouseLove says
Aw thanks Natalie! We definitely still love bright pops of color, we just usually add those in the end stages (as opposed to on larger “foundation” items that go in first), so because many spaces are in their earlier stages, I think they’ll come in a little later. But for example, in Clara’s room (which is further along) we’ve had so much fun with bold colors on the bed-wall, the closet door, in the rug, etc – and even the foyer door being the same bold color that it is outside has been fun for us :)
xo
s
Teresa @ wherelovemeetslife says
I really like how this room is very much able to handle a baby and also an adult at some point. :)
I have been working on kids rooms, master bedrooms and entryways. I feel like I get a bunch done on one then off to the other. lol
Here is my enry sans art or pictures of some sort:
http://wherelovemeetslife.wordpress.com/2014/02/06/an-entryway-we-can-use/
YoungHouseLove says
That looks amazing Teresa! Holy cow, what an awesome change. That whole nook is so charming now!
xo
s
Heather says
I really love how you’ve approached this room. It feels like a slightly more classic style but without losing the quirky fun nature of your past design choices too. It’s really fun and classic. Love it! Nicely done.
YoungHouseLove says
Thanks so much Heather!
xo
s
Alisha says
This looks amazing. But nobody is surprised everything you do is amazing! This makes me want to install crown in my house – today! Great work guys
YoungHouseLove says
Aw thanks Alisha! You can totally install crown. Good luck, girl!
xo
s
JennP says
I actually don’t think the bike prints look too bad there, but they look like they’d be easily reachable once he can stand!
YoungHouseLove says
Yeah, that’s true too!
xo
s
Kerri says
The room looks absolutely beautiful! I also have the same crib and I love how you stained the drawer. Would you mind sharing what product you used. Thanks so much! :)
YoungHouseLove says
It was PolyShades from Home Depot (satin finish, Tudor color). Hope it helps!
xo
s
lisa says
I love the ingenuity of the built-in design. This is definitely one of your standout projects! Just wondering why you chose to break the continuity of the crown by matching it to the built-in instead of maintaining the white?
YoungHouseLove says
Aw thanks Lisa! We’ve seen it done both ways, but here’s a room where it matches the built-ins, which we liked more. We just pictured a white stripe at the top and bottom of them looking funny – kind of like the middles are floating. So we liked the idea of grounding them with same-toned baseboards and elongating them by continuing that color on the crown.
xo
s
alexis says
i recently made a crib skirt like this too, but had trouble getting the velcro adhesive to stick to my fabric and ended up hot gluing it. did you sew the velcro to the fabric?
YoungHouseLove says
I didn’t yet, but before I tossed it into the wash I’d put a stitch through each one just to hold them in place.
xo
s
Ryan says
I think those built-ins are one of my all-time favorite Petersik projects! Fantastic!
YoungHouseLove says
Thanks so much Ryan!
xo
s
Jenny says
Anthropologie has some whale decor right now. There’s a giant one on a shower curtain that you could cut down and stretch like a canvas for artwork over the crib, r just take as inspiration. They also have some whale bookends that are cute and would look great on your shelves.
Marimeko also has a gorgeous panel that has some greens (although not as dark as what you have started using) and could be also be stretched to make some artwork for over the crib.
http://usstore.marimekko.com/fabric/kaiku-cotton-fabric.asp
YoungHouseLove says
So sweet! Love those ideas!
xo
s
Ellen says
Wow! You guys, it looks so great! We’re in the same boat-one toddler and baby #2 due mid May, and it’s so great to see all the baby stuff and Clara too. John had a post about Clara and her having to share parents and attention, and I’m right there with ya! I worry about that too with our son, being the king right now, but my husband keeps reminding me we’ll be giving him a new friend forever, so that helps! But I love seeing all the updates and now baby boy stuff- I check your blog every day (for about 4 years now) and I’m so happy for you and look forward to it each day. His room looks so great; he’ll be so happy with a sweet sister and a sweet room :)
Best wishes!!
YoungHouseLove says
Thanks so much Ellen! Best wishes to you too!
xo
s
Jeff says
This weekend I was caulking crown molding and trim of my own. I did a similar wall treatment to your master bathroom. The lattice turned out great I love the way it looks.
YoungHouseLove says
Wahoo! Congrats Jeff!
xo
s
Jeff says
Thanks!
The built ins look great! love the way the base and crown came out around them as the same color.
Elizabeth says
I am SO FASCINATED that you painted the matching crown the color of the bookshelves instead of matching it to the white trim on the walls. What made you decide to do it that way? Was it a design choice or just more practical? Because I think I love it.
YoungHouseLove says
Aw thanks Elizabeth! We’ve seen it done both ways, but here’s a room where it matches the built-ins, which we liked more. We just pictured a white stripe at the top and bottom of them looking funny – kind of like the middles are floating. So we liked the idea of grounding them with same-toned baseboards and elongating them by continuing that color on the crown.
xo
s
Lara says
Lovely, love it!!! Where’d you sweet friends get that cutie whale “block” (it’s sittin’ on one of the shelves)? I’m thinkin’ I need to scoop one up for my little fella.
YoungHouseLove says
That was from a shop in Rehoboth while on vacation. Here’s that post: https://www.younghouselove.com/2012/07/window-shopping-beachy-shops-thrift-stores/
xo
s
rachel laree says
Looks good and very masculine! I’m getting super stoked to see the future green door pops with everything!
Sara says
A hamburger mobile would be hilarious. A nod to burger and Sponge Bob’s Barnacle Boy in one. Or maybe the cold medicine is making me loopy…
YoungHouseLove says
Hahahaha! I love it. John can’t stop laughing.
xo
s
Sara says
Where did you get your crib? I love the simple shape and lines. Thanks for the post about the Polyblend Grout Renew! My husband and I used that to freshen up our dingy grout in our entryways and kitchen this weekend!
YoungHouseLove says
So glad about the Grout Renew! As for the crib, here’s that post: https://www.younghouselove.com/2010/02/nursery-progress-crib-notes/
xo
s
Kristen says
Ahhh love the built-ins. I’m loving the idea of a slatted wall WITH a giant mobile. Not or. slatted wall AND a giant mobile. haha :)
YoungHouseLove says
Haha, thanks Kristen! Now that the built-ins are up I’m not sure if more slats (since we have all of those horizontal shelves) will be too many lines. I’m a weirdo! Will have to see where we end up!
xo
s
CandiceMcC says
Hi, lone giraffe. :) I’m loving the green. I think I’m paiting a desk that color. I’m also loving navy so I feel a preppy phase coming on.
I have tons of walls that are begging for art. I don’t know why, but I’ve been hesitant to hang it in this house before the room is otherwise done. I’ve never done that before because art=home to me. Strange.
This weekend was the most productive since I was nesting with baby #1. :) I finished the kids’ bath (except of one piece of art I’m making. And totally took on the craft/multipurpose room. We got Elfa for the closet and I’m in lurve…which officially makes me an adult. An organized closet makes me giddy. Monica Geller over here, too. Have a good week!
YoungHouseLove says
We hear such awesome things about Elfa! Congrats on all that you got done, fellow Monica ;)
xo
s
Krystal says
Love how this room looks! Seriously obsessed with how you guys can pull a room together. In the first picture of the post the back of the build ins(particularly the one on the left) looked as if it had been painted a deeper moss-ish green… kinda like the dining room shelf in your last house I think. Scrolling down I realized that must just have been the lighting. I do think that would be a nice touch though :)
YoungHouseLove says
We actually thought about that too (accent color or fabric or wallpaper or gift wrap around cardboard stuck in the back of those shelves) so we’re going to wait until they’re filled to make sure we don’t think it’ll be too busy and then see where we end up :)
xo
s
Tabbitha @ Turnip Tootsie says
Darling, absolutely darling!
<3
Tabbitha
kelley says
Love it! That space would be perfect for an awning, similar to this one (obviously different colors):
http://www.craftycupboard.net/2012/07/pink-and-green-nursery.html
Baby rooms are so much fun to do. I’m sure you can’t wait until the little guy is here to enjoy it!
YoungHouseLove says
That’s really cute too!
xo
s
Reenie says
WOW!! Absolutely beautiful. Great job Youngsters!! :)
Danielle says
Nice!
I am using using polyshades on my crib drawer as well. I picked the color Bombay mahogany, though, to match our dark cherry dresser.
How do you like the results?
My husband is a bit worried that we will cover up all of the wood grain. I can’t quite tell from your picture how opaque the polyshades went on.
Thanks!
YoungHouseLove says
Polyshades is pretty opaque, so I’d use regular minwax stain if you want more grain (but you’ll need to sand it a lot before applying it). It’s really stinky (not prego friendly at all) so you’ll probably want to get someone to do it for you, let it air out a lot, and ideally seal it with something non-toxic like Safecoat Acrylacq if at all possible :)
xo
s
Heather says
Another question on the Polyshades – is it something you can do while pregnant? My hubs is super busy these days with work and I’m trying to do as much as possible on my own. If Polyshades isn’t preggo friendly – is there any other staining product I could use? Thanks!
YoungHouseLove says
I have used it with a respirator (it’s low-VOC but not no-VOC). I don’t know of any stain that’s completely VOC free. Anyone have tips for Heather?
xo
s
Kim says
Loving this room so much!! A quick suggestion if you’re going to be making a mobile: my mother once told me that most mobiles are designed more for Mom’s viewing pleasure than for Baby’s, which sounds ridiculous until you really think about it. A lot of mobiles look adorable when you’re just standing there looking at them, but imagine what it actually looks like to the baby who’s lying beneath it! 90% of mobiles out there look awful from below, you can’t see much color or shape or anything. So I’d suggest keeping in mind what it will look like to Baby :)
YoungHouseLove says
Great tip!
xo
s
Koliti says
All of John’s hard planning (and math!) and hard work just shine in the built-ins!!! Bravo! I couldn’t quite picture in my mind the different color of the crown with the built-ins vs all white – now I see the amazing result. WOW! You rock.
YoungHouseLove says
Thanks so much Koliti!
xo
s
Kerri says
OOPS! I failed to miss what stain you used… sorry!
YoungHouseLove says
No worries at all Kerri!
xo
s
Lauren says
I definitely think a large scale mobile would be an amazing geometric addition to balance against the symmetry of those fabulous built-ins. I am also selfishly saying this because I would LOVE to see a DIY tutorial on a big old mobile. Maybe that could be your next installment of Weekly Crafting? I miss those!
YoungHouseLove says
Aw thanks Lauren!
xo
s
GreenInOC says
It looks SO good!
Emily says
What about some type of banana leaves or bamboo stalks art above that crib? Love the progress you guys have made so far!
YoungHouseLove says
That’s a really fun idea too!
xo
s
Victoria B says
This room is looking awesome! I think some large scale art from The Animal Print Shop would look amazing over the crib. Especially the cute baby elephant:
http://www.theanimalprintshop.com/baby-elephant/
Just my two cents. :)
YoungHouseLove says
I LOVE LOVE LOVE those print! Such a sweet idea.
xo
s
Julia says
I love reading your blog! The nursery is coming along so well. Can’t wait to see the finished product! I started reading around the time I bought my first house, and you guys really gave me some direction in decorating where I felt lost.
I’m also looking forward to your master bath and kitchen renos down the line. My favorite part of the new house is the foyer and staircase – such an improvement over how it used to be.
YoungHouseLove says
Thanks so much Julia!
xo
s
Kristen says
It’s looking really great in there!
Kelly K says
Love it! What a huge difference the crown makes!! And I need help settling a dispute in our house – We want to put crown in our living room which has an open staircase like your foyer. How do you install crown in an area like that? Do we just accept that there will be an edge to the crown instead of meeting up in all four corners like most rooms? My husband says we just can’t have it at all, and I say there’s a way to make it look good. Can you settle this for us (and side with me?!?) :)
YoungHouseLove says
We have some in ours, and this picture sort of shows how they dealt with terminating it. It’s hard to see, but it sort of turns the corner and then ends.
http://images.younghouselove.com.s3.amazonaws.com/2013/07/painting-foyer12.jpg
Hope it helps settle the dispute, haha!
xo
s
Kelly K says
Yes! Thank you. Dispute settled. Score one for crown molding!
Leah says
We met with a carpenter today, and I want you to know that we brought your built-in pics as inspiration! We have a different (and much trickier) setup with radiator, pipes, etc. But we are getting built-ins around a window with dressers on the bottom and shelves on top. Thanks for spurring me to action! Those have long been awkward areas for that room, and I think the built-ins will really ground the area and make it more useful.
YoungHouseLove says
That’s so awesome Leah! All the best with everything!
xo
s
Kristen @ LoveK Blog says
I love the way this room is coming along! When you first shared the mood board, I couldn’t get a good feel for it but now that things are coming together it’s going to be such a cool place for the barnacle!
YoungHouseLove says
Thanks so much Kristen!
xo
s
Andrea says
OMG stunning just stunning! No more words.
YoungHouseLove says
Aw thanks Andrea!
xo
s
Cassie says
Okay I have to admit I wasn’t sold on the whole built in look until today! WOW! That looks so good, and I LOVE how the bottom of the crib ties in with the built ins now. I don’t know why I wasn’t a believer before, everything you guys do turns out amazing. Can’t wait to see the rest of the room come together!
YoungHouseLove says
You’re so sweet Cassie, thanks!
xo
s
Isabel says
This room is coming along so nicely, the crown really does add something special :) We went on a “quick” trip to HD yesterday for spray paint and ended up spending an hour in the trim aisle looking at all the crown molding options. We finally broke out my brother-in-law’s miter saw (thank you Paul!!) and for whatever reason as soon as I looked at it everything just clicked in my head – your video and tutorials and my neighbor’s explanations – and we were able to successfully install the kitchen cabinet trim we had been having such a hard time with. Crown molding, here we come!!
YoungHouseLove says
That’s awesome Isabel! I’m over here beaming with pride. Go tell that crown molding who’s boss!
xo
s
kathy says
This looks fantastic. Nice job!
Laura says
The colors probably aren’t quite right, but I thought of this mobile when you mentioned whales! All of her stuffed animals and mobiles are made from upcycled sweaters!
http://caitlinwicker.com/product/whale-mobile/
YoungHouseLove says
Those are SO SWEET!
xo
s
Tasha says
I LOVE the way your son’s nursery is coming along. You would NEVER know that those are not custom built ins. GREAT JOB! Pinning!
YoungHouseLove says
Thanks so much Tasha!
xo
s