Quick note: For now we just have lots of rain and a few wind gusts thanks to Hurricane Sandy, but things are supposed to get a bit rougher later today and tomorrow so we expect to be without power for a while (although we’ll post remotely whenever we can). We hope everyone else is staying safe and dry!
Since pegboards are my new favorite thing, you knew I was bound to write another basement organization post that mentions them (along with some other methods to contain/control things like screws and nails) right?
Here’s how I brought some sexy back to the basement (which I recently started to clean up after a yard sale, a bagster pickup, and some yard tool organization).
Next up on the organization to-do list were my regular tools. We actually made the decision to relocate most of our tools to the basement after years of being weirdos who stored them in our kitchen drawers. We’ll still keep duplicates of a few popular items – like hammers, nails, and caulk – in our sunroom (where everything’s been living most recently) but having the rest of our arsenal neatly hung/stored in one place (aka: the basement workshop) definitely outweighs the extra trouble of walking down to the basement now and then to get a few things.
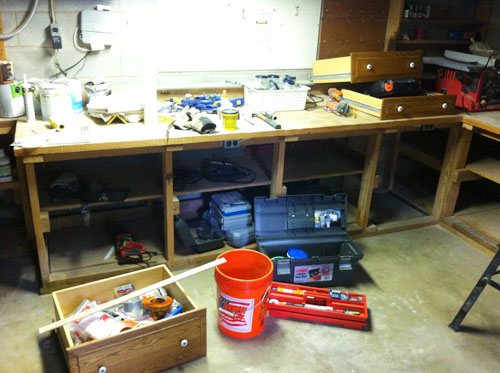
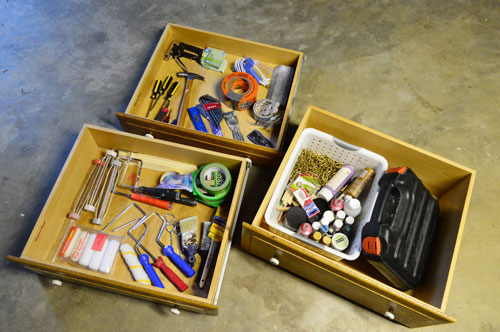
So we began this phase of basement org by trucking everything down (i.e. drawers, toolbox, etc) to the basement so I could begin sorting. Forgive the sucky pictures. Sherry was using the camera for another project so I was stuck taking phone pics.
First I spread everything out on the work table to see what I had and how I might categorize everything.
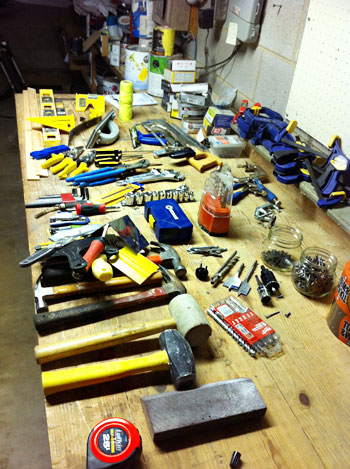
Going through everything was kind of a weird, sentimental walk down memory lane. It was just so funny to see old items that were hanging around after projects from the past, like our old kitchen knobs and the clothespin chandelier that we made.

How could we forget those eyeball-ish kitchen knobs?
I also found tools with some memories behind them. Like the Boy Scout pocket knife passed down from my Papa (sidebar: I was the first in the line of my male cousins on my mom’s side NOT to become an Eagle Scout. I started and stopped right at Cub Scout. #blacksheep). And there was the first set of screwdrivers that my dad gave me back in high school (at the time I’m sure I accepted them with some sort of angsty “when will I ever use these stupid things??” type of look).
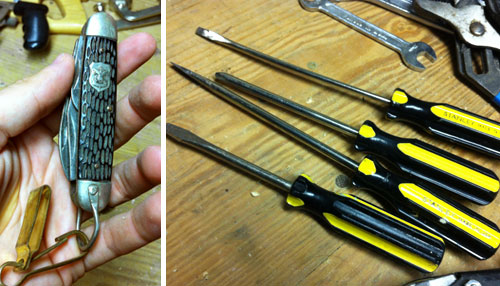
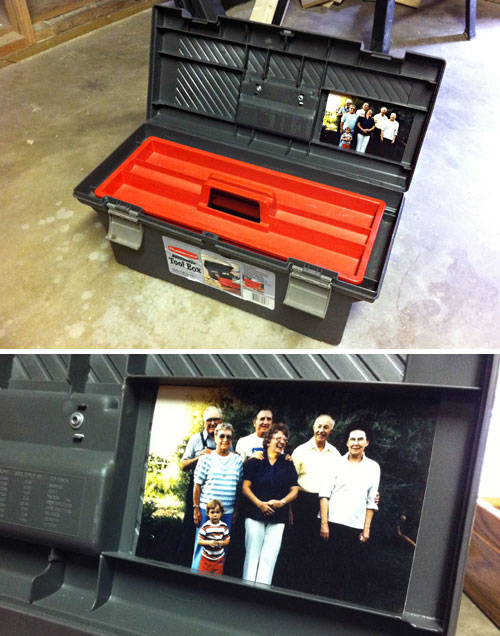
My dad actually gave me those screwdrivers along with the toolbox below, which traveled with me to college and even to New York – although for most of its lifespan it has held a measly three or four tools. But one reason I’ve kept it is because my dad taped a picture of his family inside. The couple on the right is my grandfather Emanuel and his second wife Helen. His first (my dad’s mom) died when my dad was young. She’s the Clara that our bean is named after.
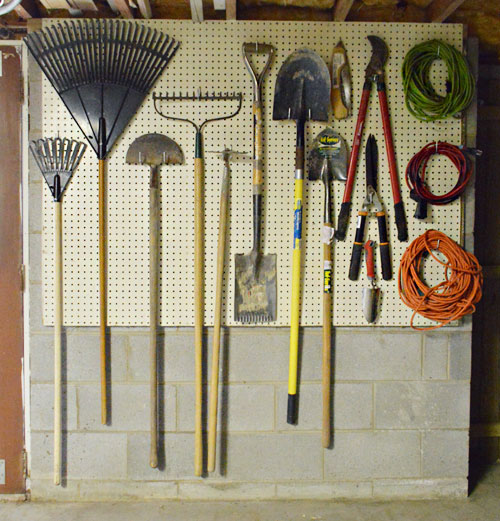
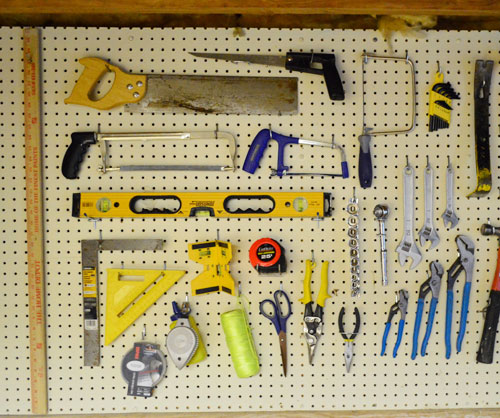
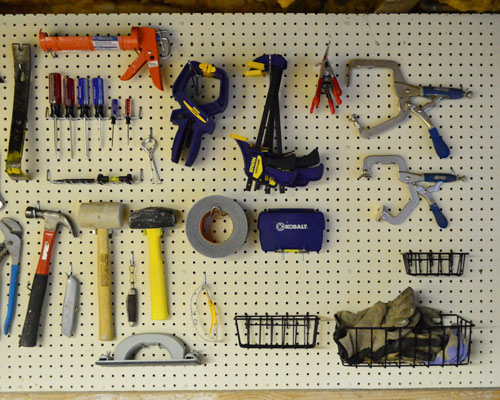
But enough sentimental stuff. On to the pegboard! After a couple of hours (and a trip to Home Depot to buy a set of pegboard hooks) my tools finally looked like they always should have: orderly and ready to go.
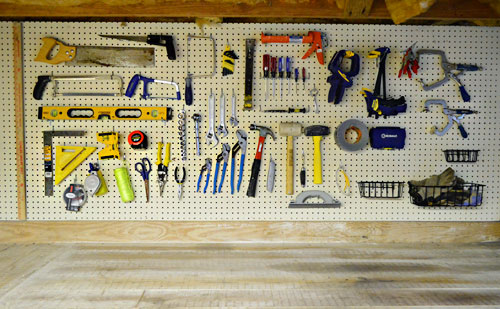
Here’s a couple of closer shots for ya, in case you’re like me and enjoy staring at pegboards full of tools for extended periods of time.
This actually isn’t everything. We decided to keep paint & craft supplies (i.e. glue gun, staple gun, etc) upstairs in the sunroom along with a few other essentials (like picture nails and anchors, along with a hammer and caulk) since we tend to use them more in the house than in the workshop. And I stashed a lot of my project-specific tools in the toolbox (finally it’s getting use!) so I know that’s where to go when I need plumbing or electrical supplies.
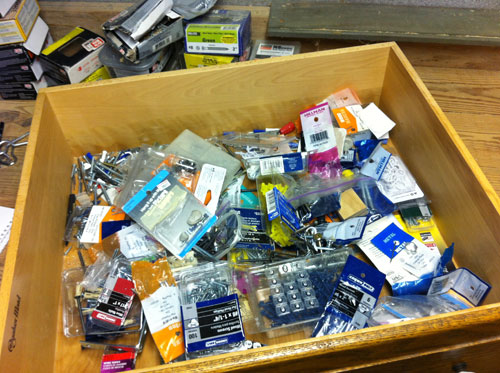
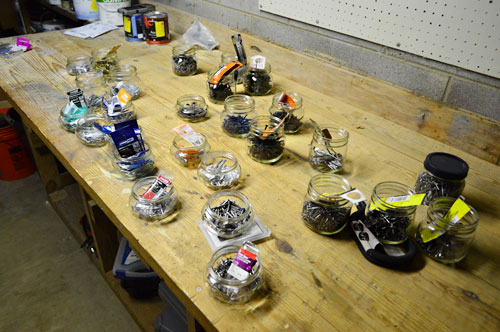
I could stare at those pegboards all day. But then I wouldn’t get any actual work done. And sadly I still had this crazy drawer full of screws, nails, and other hardware that was crying out for help.
So I used a similar process to sort them. First I spread everything out on the table and started grouping similar items. Then those similar items went into mason jars together.
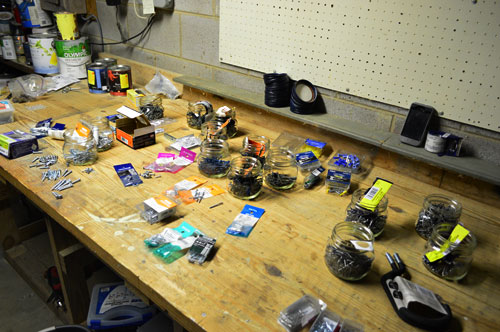
I actually had a bunch of mason jars sitting around from a failed project Sherry tried taking on. She was going to repackage our vacation time capsules into smaller jars… but realized too late that the stout new jars that she bought obscured the items inside too much (so taller mason jars like the ones we used originally actually work best). So the too-short jars got passed down to me after she had already spray painted the silver tops a cool midnight blue color. Lucky me.
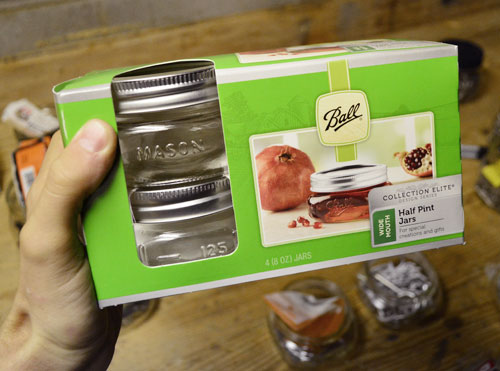
But Sherry’s pint-sized hand-me-downs weren’t quite enough for my sprawling assortment of screws, so I did have to invest in some (even smaller) half-pint jars myself (from JoAnn with a 50% coupon).
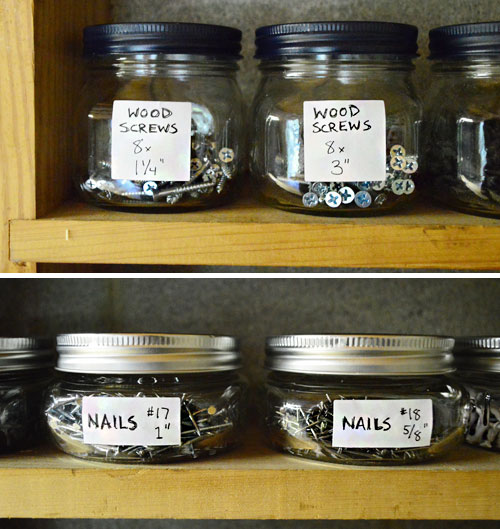
Here’s everything once it had found a jar to call home. Don’t mind the pieces of paper sticking out of them. Those were labels from the hardware packaging that I hung on to so I could remember what was what (since I planned to hand-write my own labels later).
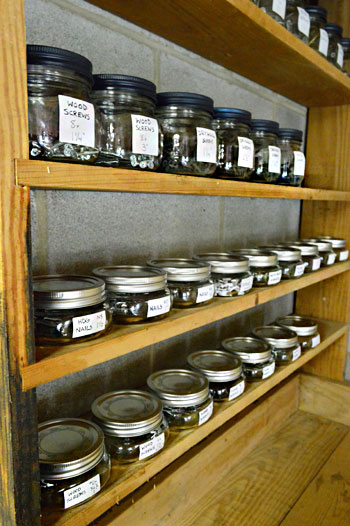
Once everything was labeled and canned, I stuck them up on this shelf that the previous owner had built in above the work surface (don’t mind the edge that looks like it was once on fire – we plan to stain it all soon).

The shelf spacing is a bit much for these tiny cans, but it’s not worth rebuilding the shelves or anything, so I’m just happy they’re here to house my collection.
As for the labels, I just bought some 1.5 x 1.5″ square Avery labels at Staples for a few bucks and hand wrote the info on the front. I debated printing them on the computer to make them look slightly fancier, but I figured that was a system I’d never keep up with.
Eventually I hope to take these two projects a step further by painting the pegboards and staining the shelf as I mentioned (along with some other items in the room like the built-in work table). We think that’ll really help pull things together and make it look a little more workshop-swanky as opposed to old-ignored-basement. I don’t think I’m going to go too over-the-top with things in the basement just because I like to be realistic about what’s worth my time and what’s easiest to maintain over time. Which is why I’ve decided to pass on the idea of outlining my tools on the pegboard, since I feel like it’ll just create frustration when I have to add or subtract a tool and don’t want to repaint the whole thing. But who knows, I could change my tune someday (Sherry mentioned chalk outlines since those are easily changed, but we don’t want chalk dust all over our stuff so we later both dismissed that option).
I was just grateful that the drawers I was bringing back upstairs to the sunroom were looking much more clutter free. So these are the items we kept upstairs since we think we’ll use them more up there while the rest makes more sense to keep together in the workshop.
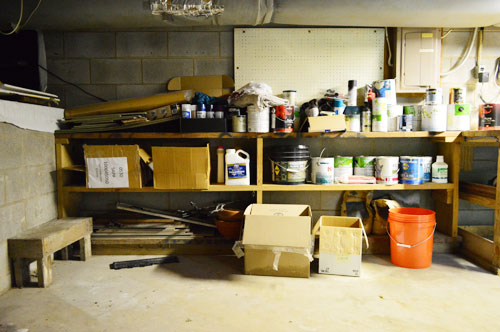
And while my newly organized tools and hardware supply was making me quite confident about how the basement was shaping up, let us be reminded that I still have this to deal with: the wall o’ paint, spray paint, and other buckets. But that’s a project for another day…
Okay, so who has a pegboard obsession? Is anyone else planning to paint and stain things in the basement for a little more of a finished look? Do you have a hard time figuring out which tools should stay out in the garage, basement, or attic and which ones should be inside and easy to grab? I gotta admit that once we spent a few minutes thinking about what we use upstairs vs. what we use in the workshop it really wasn’t too tough to commit to keeping stuff in the areas that make the most sense.
Psst – We finally have our apple picking photos up on Young House Life (spoiler alert: Clara’s life was made when she got to be a worm, well, a caterpillar).

Pallavi says
John! Can we be peg board buddies? I recently did the same “tool on peg board” project and have never seen anything prettier. My husband doesnt seem to understand so I need a buddy to talk about how awesome we are!
YoungHouseLove says
Sounds good to me!
-John
Justine says
I love the pegboard. Wish I had taken a run to Lowes yesterday because that would have been a great project to take on in the creepy basement on this stormy day. We keep a 2 sided screwdriver, a hammer, a tape measure and a level in the house because those seem to be our go to tools. It’s interesting you use calk frequently. lol Maybe I should add that to our in house arsenal.
Kay says
My favorite books from childhood were the Berenstain Bears books and after reading the book about their messy room, I’ve been obsessed with the idea of a peg board. Ironically, I’m about the messiest person in the entire world but I have this dream that a pegboard will solve all my problems. :)
Johanna says
John I would just like to say that the entire time I read this post all I thought of was Pinterest LOL. Maybe it was the spray paint, the totally ocd neat peg board, or the mason jars, but goooolllly, it screamed Pinterest. And i love it! I bet you just love walking in there to look at it. I know I would haha. :)
Becky@OrganizingMadeFun says
LOVE LOVE LOVE your organization! It looks fabulous! I am a BIG fan of pegboard. I have more ideas here, if you want more to drool over :)
http://organizingmadefun.blogspot.com/2012/10/31-days-of-organizing-fun-day-19.html
Beautiful! I’ll be pinning this for sure!
Becky B.
http://www.organizingmadefun.com
Organizing Made Fun
YoungHouseLove says
LOVE IT!
xo
s
Taylor says
Stay safe! Great progress on the basement!!! We dont have one but the amount of tools I am trying to store in my laundry room is quite the task! My husband is a carpenter so we have a ton and this is a great way for me to start thinking about how to help us get more organized in this area. To me, all nails are the same as are hammers, etc…I have much to learn.
Ginny J says
Love it! I WISH my hubbie would do this for his work area in our garage!
Maggie says
Oh Wow! That’s all looking so good!
Will be thinking of you and our other friends in Richmond as the winds begin getting stronger. Stay safe!
Best wishes from Liverpool, as ever, Maggie
Mary S, says
There was an existing pegboard in my garage when I moved in. Who knew the holes can be different sizes? I was happily loading my cart at Home Depot with all types of hooks and baskets to get home and realize I have the smaller holes instead of the 1/4″ ones. BOO!
One more trip to the Depot and I now love it when I pull in my garage, ooo it makes me so happy to see that organization! I’m with John, pegboard everywhere :)
Tricia Regar says
I pinned several pictures to Pinterest! Yay for garage organization!! This is seriously the garage of my dreams.
alisha says
Yay basement tidiness!
I’m still dreaming of a pegboard wall to call my own, but wanted to share one idea for the jars of screws, nuts, & bolts (although they are already looking sharp on the little shelves): my husband’s uncle has extensive pegboard walls in his workshop and years ago mounted jar lids directly onto the pegboard (I believe with nuts and bolts through pre-drilled holes in the lids) and then just screws on/off the jars as needed. The jar bottoms (which face out) are labeled w/ what is inside.
For added organization I would also label the inside of the jar lid (which would be what you would see mounted on the pegboard minus the jar) with what is in the jar so you could easily match up which jar goes with which lid.
Might be a little more permanent than you care for, but is something I can’t wait to do myself someday! =]
YoungHouseLove says
That is a cool idea! We’ve seen things somewhat similar to that (I’ve seen one where the tops were mounted to the underside of a shelf so they hung down). But for now this seems work for me.
-John
Anna says
great job!
it looks awesome!!
nancyo says
Hi, John –
I have jars of screws. I would love to do a similar organization as you.
For the screws that didn’t have a little box, how did you know the head size (#7, #8, etc)? Do you have any tips?
Thanks,
Nancy
YoungHouseLove says
Fortunately I had most of them in boxes or bags, but for the few loose ones I just tried to match it up to ones I had. I’ll admit some were guesses, but if I really wanted to be sure about it you could always take them to Lowe’s or Home Depot and they’ve usually got guides there in the hardware aisle.
-John
nancyo says
good for you! I thought I was being helpful by putting them all in a jar based on length. I later realized that it’s probably better to sort by the head then the length instead.
I’ve seen a guide sold.. maybe I’ll buy a guide to match them all up.
Thanks for the responding!
amber says
how did you hang the pegboard on the cement wall? I have all cement in the basement and would lOVE a pegwall!
Amber
YoungHouseLove says
You should be able to use a masonry bit on a drill to predrill a hole and then use a screw to hold it up. Hope it helps!
xo
s
Lauren says
We don’t really have basements commonly in Australia, but we are about to tackle our garage. We currently don’t have a driveway, so we are still parking outside-consequently our garage has become full of junk and things from our recent move. Tackling it also involves moving 1 and a half pellets of spare bricks to make more room.
Megan says
I am so jealous!!! I wish my basement would be this organized! Maybe my husband would then put things away. We have a small pegboard that got put to use with some random tools but definitely need this. My dad had something similar for some of his tools (he’s a carpenter, so he has everything) and he outlined the shapes so he would know what went where if we ever used more than a couple tools. It was very helpful!
alisha says
P.S. BURNING QUESTION:
It seems like you guys are both pretty into organization, but do you have any tips for those of us whom are NOT married to organized folks on how to help them clean up their act/keep the peace?
Try as I might to organize our tools/kitchen/garage/etc.. for convenience & functionality (visibility, accessibility, putting like with like, etc…) as soon as my husband LOOKS for something, anything, it unravels into a pile of chaos that will not be put back in order til I break down and reorganize it myself.
It’s funny to me since I have NEVER been a terribly organized person until recent years when I realized how much better it feels to have less clutter and visual “noise” everywhere.
I’m just trying to make our space more functional and enjoyable to be in, but I feel like I’m in a losing battle with my favorite person on earth, and the constant disarray (and discord) leaves me miserable.
How can I coax him into sharing the organizational load with me so I don’t feel like an Obsessive-Compulsive tyrant?
YoungHouseLove says
Hmm, that’s a great question! And I think we can all relate to organizing something and then ten days later it’s all crazy again (totally happens to us too!). I think the best way we have found to combat that is to have an actual system. When you stack a bunch of boxes in a closet so they’re just balancing and almost about to tip over, the next time you go in there they will, and it’ll be a mess. So we have found that bins and baskets for similar items tend to make it easier to find something and put something back there. In short, anything labeled or any easy to understand cubby or drop-spot or basket seems to work better (we put all of our lightbulbs in a basket under the kitchen sink for example, which holds them in there and we don’t worry about them rolling out and breaking). And since it’s such an obvious visual “hint” about where things go, John and I can stick to it better than having to stack things the right way every time to keep things from toppling. Hope it helps!
xo
s
Rachel says
LOVE Classic Peg–it’s the name of our wireless network. When the cable guy was here awhile back, he laughed at us when we had to explain, but later confessed that he, too, loved him some Peg. Halloween 2013: Sherry as Target Lady and John as Peg?
YoungHouseLove says
Hahahahah! Hilarious!
xo
s
Lou says
Stay safe, guys.
YoungHouseLove says
Thanks Lou!
xo
s
mp says
Organization porn! [swoon]
AmyB says
Dry erase paint!!!!!Wonderful stuff :)
Megan says
Sherry! John! Clara! Burger! I preordered your book from chapters/indigo.ca (I’m Canadian) forever ago and they just emailed me confirmation that it has shipped from the warehouse. SO, I guess your little babies are making their way into mailboxes this week! It usually only takes 2 days for preordered books to show up on more doorstep so I am thinking it will appear on Halloween! Earlier than I hoped :) SO EXCITING! CONGRATULATIONS!
Megan says
P.S. I totally plan on staying home from medical school on Wednesday afternoon to read it cover-to-cover HAHAHAHA. I might also encourage my classmates :P
YoungHouseLove says
Oooh, that’s great to hear!
-John
Sonya says
I just added pegboard to the inside of a kitchen cupboard door. The cupboard is where the pet food and other kitty items live, and now the pegboard holds collars, brushes, claw trimmers, and treats (the treats are on butterfly clips). I open the door just to marvel at the organization. That little stuff used to get lost in the big cupboard, but no more!
harmony says
Love it. gosh I’m actually looking forward to the weekend so I can get my butt in gear and organize my tools!
Jordan at Frigidaire Dishwasher Parts says
Oh my god, I wish my basement could look that organized! We’ve been just tossing things down there for so long I almost think it’s beyond hope.
brooke @ claremont road says
My husband has a pegboard above his workbench in our basement for hanging his tools, and he even took it a step further than you: he outlined all of the tool shapes with a Sharpie, so if he ever takes several tools down at once, he always knows exactly where each item goes back on the board! OCD much? :)
Kate from Aus says
Sorry if someone has already suggested this (I’m at work and don’t have time to read all the comments), but if you put a screw through the jar lids and secure them to the underside of the shelves where you have plenty of clearance, you can just unscrew the jars from the lids when you need to access whatever’s in them (leaving the lid screwed to the underside of the shelf). This will effectively double the storage in one shelf space. You can also do this on beams etc. :-)
Susan @ Sweet Little Nest says
You know I was going to comment about fastening the lids to the bottoms of the shelves, but I see lots of people have already asked and you’ve addressed it already. Then it occured to me that since you used all the same type of jars, you could simply keep four extra lids and pop those on when you need to take a jar or four elsewhere for a project if you were so inclined. It looks great as is – just offering a possible solution if you DID want to attach them.
Ellia says
Looks great! Your pegboard love reminds me of my grandfather =) I remember spending hours in his workshop, where he had pegboards lining all of the walls, and he had taken a thick Sharpie marker and outlines each tool so that everything would be returned to the correct place. You never got away with borrowing one of his tools =)
Johanna P says
I would love to do this with my husbands garage. It’s already neat, but being able to store things up out of the way but easily accessible makes me super happy.
I’d like to use traced cutouts of the tools using coloured contact sheet. That way it’s a perfect shadow of the tool but I can easily peak it off the board and reposition where I like.
Sally says
Forget the outline the tools idea. Its a little too much, you know? Don’t get carried away with yourself. Think about the line from the movie Babe. “That’ll do, pig, that’ll do”.
Tarnya Cook says
Hope you guys are ok and not too badly affected by the storm. xx
Leslie F. says
Mother Earth News has great plans for a wooden tool rack if you aren’t lucky enough to have a pegboard and don’t want to invest in them. Also, you could use little squares of chalkboard paint on your jars so that if the contents change you can just erase and rewrite!
It looks great, I wish our workshop area at home was this organized. Maybe soon!
Leslie F. says
Duh… link for the Mother Earth News tool rack is http://bit.ly/PDDCKW
Veronica says
I am totally one of those weirdos who keeps her tools in her kitchen drawer…actually 2 drawers! I use them too often to keep them elsewhere. My house’s previous owner installed pegboard in the garage. I will be painting it and adding my tools when I clean out the garage in November. Ps, totally agree with you on not outlining your tools. I won’t be doing it either.
Tina says
Just had to drop in and wish you best of luck for getting through the storm safely – it’s all over the news here in Australia too and I hope you and your families all make it through OK.
Whitley S. says
I LOVE THIS. It’s kind of a dream of mine to have wood/tool/work shop that super organized like yours is becoming. I can’t wait to see what you do with the paints and staining the shelves and such. I find that if I have everything organized and easily accessible that I’m much more likely to accomplish those small projects that are so easy to put off. So yes, the peg boards do admittedly make me drool a bit.
Alyssa says
Skimmed through the comments and it didn’t see as though anyone mentioned this. Have you ever heard of Chalk Ink? No dust and washable. Take it from a teacher – it’s the best!
YoungHouseLove says
Sounds awesome!
xo
s
Kristen says
Pegboard question… I want to do one in my bedroom closet for hats, scarves, etc. All I can find are brown pegboards but my walls are white. If you paint them, how do you get paint in all the little holes without them getting all drippy and clogged? spray paint? Thanks! love you guys! (I showed a bunch of people at work your blog- they loved it too but totally made fun of me for being mildly obsessed. hehe)
YoungHouseLove says
I think just rolling them and then using a brush to poke into the holes could work (maybe just rolling them is all it takes if you have a high-nap roller). Hope it helps!
xp
s
Michelle Krommer says
I have an idea for your old kitchen knobs, I saw on pinterest if you take a lovely colored sharpie and color each one then bake them then it looks like lucite, well as much as it could…looked pretty cool on the pics. Might be cool for your pinterest challenge!
YoungHouseLove says
No way! Sounds cool!
xo
s
Emily says
As an OCD organizer, pegboards make me super excited. So do jars with labels. Someone might have already suggested it, but have you thought about gluing the lids to your mason jars to the bottom of the shelves (so that they are hanging)? My grandfather did this in his workshop so that the jars wouldn’t bang together or slip and fall and create a broken glass mess. He also used baby food jars for the really tiny items. They were just darn cute.
YoungHouseLove says
Oh yes, we thought about that but usually like to bring the whole jar with us (to a friend’s house or upstairs) so not attaching the lids works better for now.
xo
s
Kristin says
The Target skits are more hilarious to me because I actually work at Target! If you’re ever in the Northern Utah area, I’ll share my discount! :D
YoungHouseLove says
Haha, you’re sweet!
xo
s
Dawn G. says
I had those some knobs on a piece of furniture I bought at a yard sale! I wasn’t fond of the gold, so I taped up the white part and spray painted the metal brushed nickel – now I love them!
YoungHouseLove says
So smart!
xo
s
Donna says
I would like to install pegboard in my garage. How did you install it? Are there multiple ways to install? Can you glue it?
YoungHouseLove says
I would use a masonry bit with a regular power drill and make a pilot hole for a screw to screw/bolt it into the cinder. If you have wood or drywall in your garage, just using screws and anchors should work well! Good luck!
xo
s
Roseanna says
I imagine it’s been mentioned already in the four pages of comments, but something like electrical tape or painters tape could outline the tools on the pegboard and is easily changeable.
Looks great!
YoungHouseLove says
That’s fun!
xo
s
Brandan WH says
Just beautiful and oh so organized. Just wish I has a workspace so I could make it look pretty like that. Great job and glad you’re safe!
YoungHouseLove says
Thanks Brandan!
xo
s
Kal says
Haha. I totally should get some cool points from you both. I actually sprayed the lids on the half pint jars that same blue, but… I filled them with spices, not screws. ;) They work so well; and make my kitchen feel so organized. It’s funny John had the “same” idea… :)
Amy says
Glad to see you folks are okay after the storm!
I am completely lusting over the peg board organization. We’re planning something similar for our garage (peg board and labeled containers for small bits) with a fold-down work table since our garage is too small for a work table and parking a car.
Kate says
It’s more work that is maybe not worth it, but since you are the type of guy who paints the back of chalkboards bright yellow to look nicer…have you thought about painting that white peg board with a bright awesome color? Ever since I saw it in bright green in Home Depot’s style guide this past summer, I stopped ruling out peg board for being a too boring a storage solution. Unfortunately, I can’t find a link since the new fall style guide is up, but tere is a ton of painted peg board on pinterest if you wanted to see how it looks first.
YoungHouseLove says
Oh yes, I can’t wait to paint it! I’m thinking something manly like navy, but I’ll keep you posted.
-John
Allison H. says
Oh John… I am beyond impressed by your sense of humor (laughed my butt off at that SNL video) and your organizational abilities. I thought men were completely missing the capability to organize, but I guess that is just my husband :) I am a little OCD and have been wanting to do this with my husband’s tools which cover our whole garage and basement, problem is, I don’t know what half the stuff is! Your shelf with all the neatly lined up and labeled jars gives me chills I love it so much!