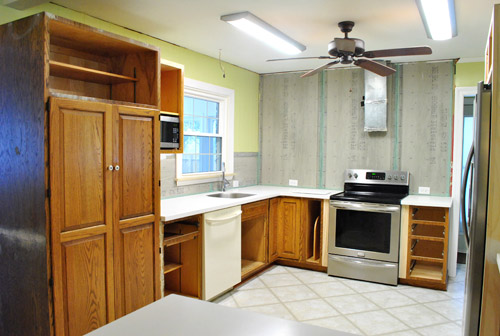
Can’t we just paint some darn cabinets already?! If your patience to see some painted cabinets is wearing thin – just imagine how we feel! When we were planning this kitchen project our big-picture brains said “We retrofit those few doors to match the rest of the room and then we paint. Hooray!” But now that we’re in the weeds (amid holiday madness, no less) we realize that a lot of stuff actually has to happen between those two steps.” There are gaps to be filled, rough spots to be sanded, trim to be added, hinges to be dealt with, hardware to be chosen, primer to be selected, a final paint color to be decided, etc, etc, etc.
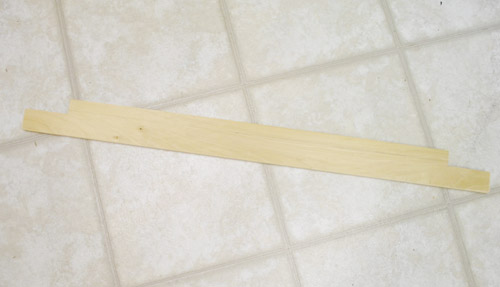
First up, this goes under the category of trim: I wanted to rebuild the window sill and molding so that we could caulk / prime / paint it while we had everything out for the cabinets. And since our old sill was a piece of granite that matched our old counters (but we were very happy with a wood sill in our first house), I snagged a piece of pine board at Home Depot that would fit in the space and cut a couple of notches out of it.
Then I just slid and nailed it into place.
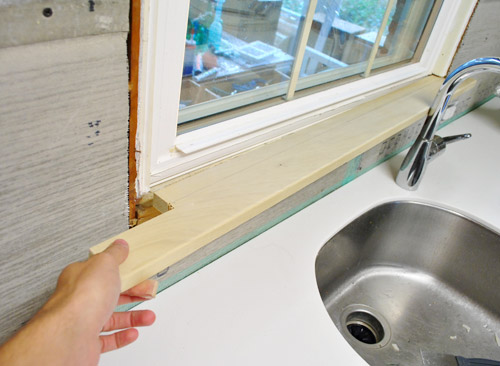
From there, it was the usual song and dance of cutting and nailing the trim casings around the edges. I even added a smaller piece underneath the sill to mimic what we had done on the half wall ledge.
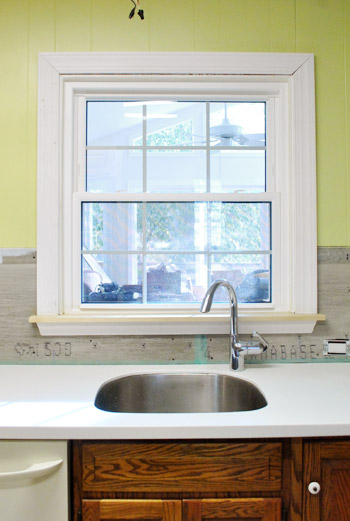
Now that the window’s ready for caulk (to fill the small gaps at the corners), primer (for the raw sill) and white semi-gloss paint (to protect the wood and keep it all durable and wipe-abe) – it’s onto some other trim. Specifically, the toe-kick that goes around the bottom of the base cabinets. A lot of it got removed when we shuffled cabinets around. So in some places I was able to cut down/reinstall the leftover pieces.
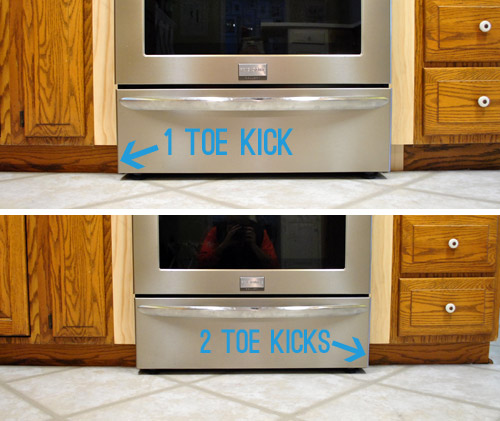
But around the peninsula I needed to buy new stuff (since we added that to the layout). I actually couldn’t find any off-the-shelf toe kick trim (perhaps it was sold out due to last minute holiday DIYers like us?) and although I knew I could special order it through the Home Depot’s kitchen department, I didn’t have that patience. So I just bought some standard pre-primed baseboard that would fit under my peninsula cabinets and installed that. Since everything’s getting painted the same cabinet color, no one should be the wiser. Whew.
Oh, and since we’re still undecided on what treatment to give the back of the peninsula (worn wood? raised panels? we’ll keep you posted!), that’s why the toe-kick stops suddenly there on the right. I’ll cover up that raw end with whatever trim/wood we apply to the side and back. And although I did buy all of my shoe molding, I’m not installing that until after the new floors are done (we’ll prime and paint it before it goes in to avoid getting paint on the new cork floors).
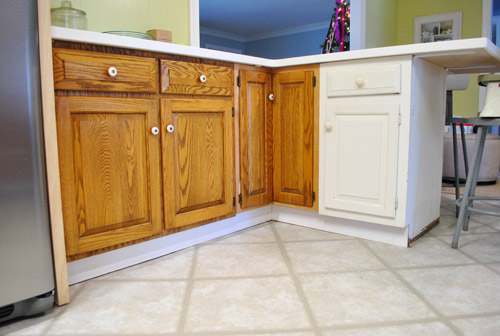
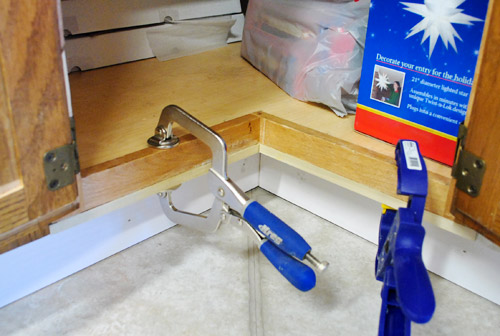
But that wasn’t the end of my trim-venture. Check out the subtle unevenness when it comes to the bottom edge of that corner cabinet’s frame. See how it’s a tiny bit higher than the two cabinets surrounding it? Annoying, but not the end of the world. Fortunately it was exactly 1/2″ too high on each side, so I just bought 1/2″ pieces of pine craft wood and securely wood-glued them into place with clamps and glue boasting an especially heavy duty hold (there was no way I could fit a hammer or screwdriver under there). Once we putty, sand, prime, and paint it should be completely undetectable.
The only other trim we had planned to install at this point was some crown around the upper cabinets. But, believe it or not, we’ve kinda been digging the clean and modern look of just the sharp squared-off edges (we held some crown up against it and cringed, really- it just seems sleeker and cleaner without it and a bit too adorned with that stuff going on up there). So we’re gonna leave things alone for now and proceed without crown. But if we decide later that it’s missing something we’ll just add it after the fact (pre-primed and painted like the shoe molding so we won’t worry about ruining our cabinet paint job).
Oh and as for hinges, we considered hidden ones, but our doors are half-sunk (more on that here) so they have a very thin stepped down edge all around them (and since hidden hinges need to be routed in, our doors would be too thin around the edge so it wouldn’t work for us). No worries, there are plenty of awesome kitchens on Pinterest (according to my obsessed wife) with exposed hinges and great hardware – so we’re cool with them. So after moving on from hidden hinge research we thought we might be able to spray prime/paint the hinges that we had (since they’re pretty rare/hard to find and it would save us money) but we gave it a try with two different satin nickel finishes (we picked hardware- it just hasn’t come in yet- but it was nice to make that decision so we knew what exact finish our hinges should be)… and… it didn’t work.
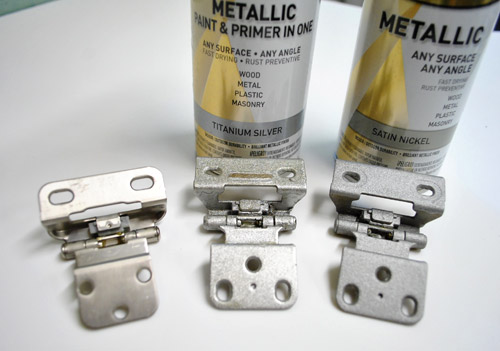
See the hinge on the left? That’s a new hinge (one of the rare ones that actually work with our door- which we tracked down at a local hardware store called Pleasant’s with tons of extra options). And it’s in the exact finish we need to work with our hardware (which they also had in their store, just not enough of it to take home on the spot). Those other two hinges to the middle and right are the original ones from our kitchen after being sprayed with the two types of spray paint in the cans above them. See how they don’t look as smooth and satin-nickel-y… and look a bit stippled and – well, fake? And even worse, when you moved the hinge back and forth (which would happen a million times a day for the next few decades) the paint actually got worn off on the middle of the hinge:
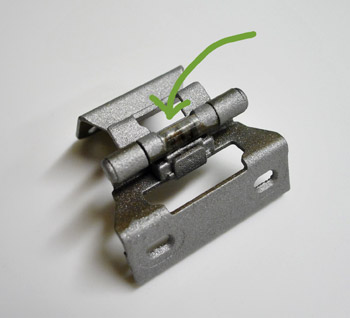
So it didn’t work. But we’re happy we gave it the ol’ college try. Thankfully shelling out $90 for new hinges isn’t really much in the scheme of a full-on kitchen reno, and definitely worth a clean/fresh/new/functional look.
Oh and speaking of other decisions we’ve made, we’ve finally picked a cabinet color. As in, there’s no going back (we got it mixed and brought it home and everything). We were switching back and forth between pure clean white (we loved our white cabinets in our first house) and a soft warm gray or gray-beige color – but ultimately decided against anything too gray or gray-beige because:
- there’s so much gray on the walls of the dining room, the living room, and the hallway that a room in the middle of all of those spaces full of gray cabinets (especially when seen from the gray dining room since they’re so open to each other) might be too much
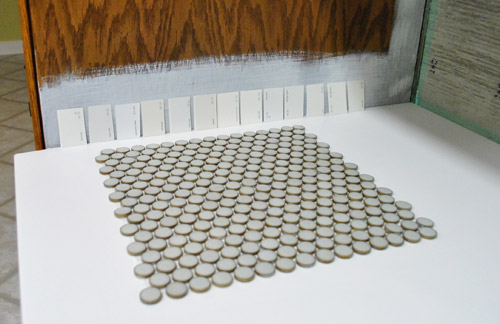
- our backsplash is a soft gray penny tile, so that’s a less severe way of adding that color to the room than putting it on every cabinet – plus the penny tile will really pop if the cabinets are lighter instead of too blendy
- painted cabinets in a tone of white feel the most classic to us – so we won’t worry that they’re trendy or “out” in a decade
But we didn’t actually go with a bright white color – so we sort of landed in the middle of the two camps. Here was our process:
#1. Pull a ton of swatches out to look at them with the counters and the backsplash tile and the rich dark cork floors (which will definitely keep the room from feeling too sterile and white-washed):
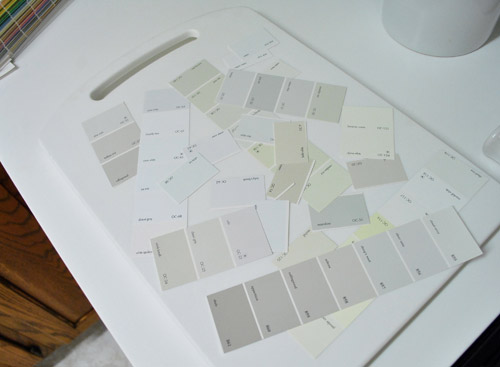
#2. Pick our favorites of the bunch and place them on the plane that they’ll live on (ex: sit them vertically against the cabinets to see how they read vertically since that’s how the color will be seen). Oh and the backsplash tile is there too for our reference.
# 3. Study those colors in the morning, noon, and night (and on a sunny and cloudy day – just to be thorough) and slowly eliminate swatches until we were left with our four finalists:

#4. Realize that we probably can’t go wrong with any of them so just go with our gut (our favorite swatch all along- yes, from the very beginning, was the one second from the right). It’s called Cloud Cover and although the picture above hardly does any of them justice, it’s basically not a bright white (which you can see represented by the bright white counter under it) but it’s sort of a very very very light gray- but it’s a warm gray. Sort of the lightest greige in the world that would look like a soft white from afar but as you get closer and see the bright white counter it’ll be clear that it’s not completely white and a bit moody and tonal. So yeah, it’s safe to say we’re so excited and can’t wait to see how bright and glossy and clean our new kitchen is going to look once those cabinets slip into their new “wardrobe” and our floors get the rich cork treatment to keep it from light/white/bright overload.
And speaking of getting to the cabinet painting finish line, here’s a quick breakdown of our steps:
- Remove doors, drawer fronts, and hardware
- Remove everything from our cabinets
- Use wood putty to fill any lingering gaps, seams, and holes (like where the old knobs were since our new hardware won’t be placed the same way)
- Sand dried putty as well as any ridges, scrapes, chips, or other dings that our cabinets have collected over the years to get them as smooth as possible.
- Sand all cabinet doors (front and back) as well as all cabinet frames to rough them up before priming (some folks skip sanding, we want these babies to last forever so we’re not taking any chances)
- Clean up all the sanding mess to ensure that we don’t get dust in our primer
- Use a liquid deglosser on all cabinet doors and frames to be extra sure they’re ready for primer
Buy hardware and finalize hinge plan- Prime (hopefully one coat, depending on what kind of primer we end up getting – still have to talk to a paint pro and decide)
- Paint (we’re hoping that two coats on each side of the doors and the frames give us enough coverage, knock on wood)
- Let everything dry and cure for 3-5 full days (at least that’s what the paint can said the last time we did this- and we followed that to the letter)
- Drill holes for and install new hinges and hardware
- Reinstall all doors and drawers
- Restock the kitchen with all the stuff we took out of our cabinets/drawers
- Take a long nap (preferably for 2-3 days, Clara permitting)
- Take after photos (preferably 500, from every last angle)
Man, just typing that out made me tired. But we’re trying to be thorough because we want our paint job to be clean, even, and durable. As in a-couple-of-decades durable. So even though it will take us extra days going through all of the prep, we think it will be well worth it in the end. It’s actually looking like we’ll be priming and painting during the week between Christmas and New Year’s. Which means we should have 500 after pictures for you in early January. Woot. We can’t begin to tell you how excited we are to have “new” cabinets for the new year!
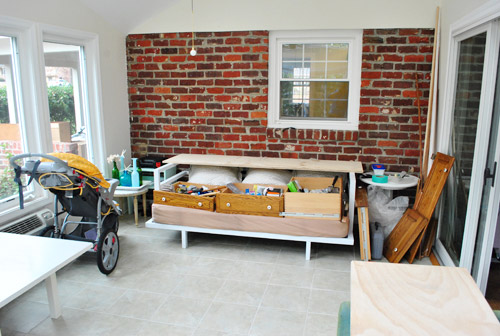
Oh but if you’re dying for a before & after rightthissecond, here’s an equally thrilling much less exciting one for ya. This is what our sunroom (aka our kitchen reno storage room) looked like recently.
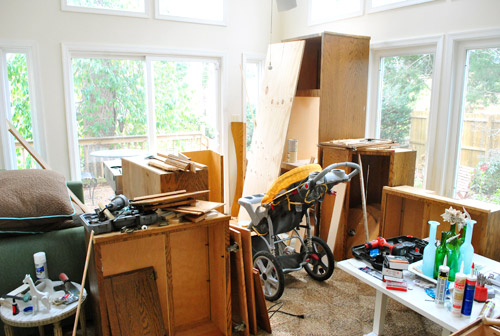
We were basically hoarding every scrap from the demo process “just in case” we needed it to rebuild cabinets or complete the peninsula. But now that it’s clear what cabinet, doors, and trim we needed – and, more importantly, what can go – we did a big clean up. And now it looks like this:
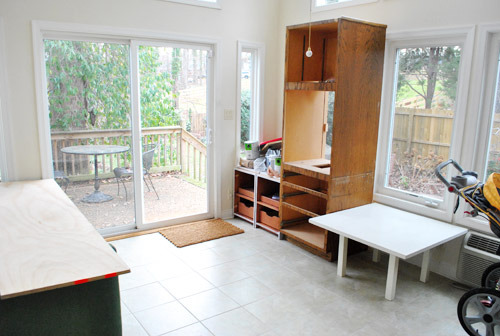
We brought all of the usable cabinet scraps out into the carport to be donated to a local thrift store (one of our local favorites, Diversity Thrift, came right to our door to pick them up on Monday). Then all of the smaller pieces of wood got tossed into my scrap pile in the basement. There might have been some general tidying too… like putting my tools away properly.
Oh, and notice those big planks of spare plywood resting on the couch and the daybed?
Welcome to our makeshift cabinet door wood puttying / sanding / priming / painting zone (we’ll just lay some drop cloths under the plywood to protect the couch and the daybed first). We figure the sunroom is a good place to spread out and get work done (while keeping things off limits to Clara, and keeping the fumes out of the house – even though we’ll be using low and no-VOC stuff). So expect a lot of pictures taken in here in the coming days.
Maybe I should’ve added “prep sunroom work area” to our list so I could have another thing crossed off. Well, make that two other things…
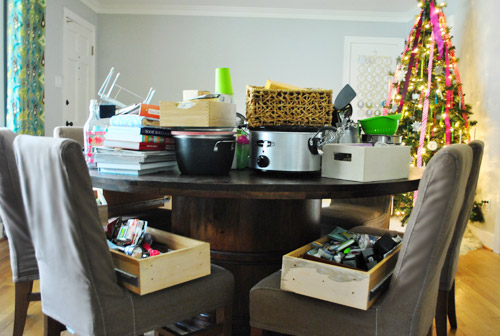
Yup, the cabinet doors, drawer fronts, and hardware have been officially removed. Oh, and since we emptied the cabinets (mostly) I guess that makes another things off our list. Looks like we’re on a roll.
Prep sunroom work areaRemove doors, drawer fronts and hardwareRemove everything from our cabinets
Only fifteen more to go. Let’s just say it’s a good thing my parents are hosting the official Christmas dinner…
… although we do have four relatives staying with us for the holiday weekend. Thankfully they’ve come to expect nothing less than chaos whenever they come over. They even claim to look forward to seeing what we’re up to. Now that’s unconditional love. Update: although the chair covers look different in the pic above (not sure why) we haven’t dyed or changed them out, so they’re still the same mocha color – for now…
What are you guys doing this week and next? Any big projects? Big meals? Big presents? Big lists?
Psst- We’re over on BabyCenter talking about Clara’s favorite books/toys/songs/activities for anyone looking for last minute toddler gift ideas of something to do with their little ones over the holidays. You can find it all here.

Georgina Moore says
Your background is very hard to read. . It is covered in small pics of you Sherri
Georgina
YoungHouseLove says
Haha- you must be looking on a smart ohone that’s being glitchy! If you go into your browser’s preferences and clear your cache/cookies/data it should go back to normal!
xo,
s
Tirzah says
Did you guys consider trying out the actual paint on various walls first?
YoungHouseLove says
We did but have gotten somewhat good at making a call with swatches. But if we weren’t 100% sure we would have gotten test pots of paint for sure to be 100% sold before doing all that painting and biting our nails the whole time!
xo,
s
Sarah says
Hooray for grey.
Ours are a soft warm grey too and I LOVE them. Such a nice change from all the sterile white kitchens around.
Good choice fellas!
Ryan says
oh my goodness, how do you keep Clara out of all of the stuff being moved around, like those drawers on the chairs?
YoungHouseLove says
Haha- we got lucky! She mostly plays in the kitchen/living room/office/nursery. So the dining room isn’t a spot she hangs out (and when she occasionally wanders in a good “no please, let’s go read a book in the living room” usually does the trick!). Whew.
xo,
s
Ginny @ Goofy Monkeys says
I must admit that I’m dying to see how the cabinets will look with paint! I do love the penny round tiles for the backsplash, so much so that I’ve fallen in love with some similar tiles that I saw at the Depot this weekend – light green
We don’t have any major projects going on. My husband put up some new baseboard behind our Christmas tree (it had been missing since we moved in), and I’ve got a little furniture painting going on for a Christmas present for our daughter, but other than that, it’s the usually holiday shopping, wrapping, baking…we’re in the home stretch now!!
Bethany says
In case I forget/ don’t have time before the holidays, just wanted to shoot you guys a great big MERRY CHRISTMAS & HAPPY NEW YEAR!!! I’ve been a daily reader since 2009! THANKS so much for injecting my day with a fun decorating slash random humor hit! ~Bethany
YoungHouseLove says
Aw thanks! Merry Christmas and Happy New Year to you too!
xo,
s
mp says
John, you have the energy of a man 20 years younger than me; I’d have had the cabinets sprayed a la Sarah Richardson. But you and Sherry luckily don’t end up in the ER like I do every time I attempt a project. (I’m coming up on the anniversary of dislocating my shoulder during the beginning of the MBR reno.)
Pleasant’s is a toy store for adults!
YoungHouseLove says
Aw so sorry about your shoulder! And yes, Pleasant’s is so much fun!
xo,
s
Amanda says
It’s all coming together so nicely! I’m so excited for you, and as always, I’m impressed by how you just jump right into this stuff and make it look flawless and easy!
Sarah says
So.. completely off topic..
Sherry, where do you keep your purse. And John his car keys/wallet?
I’m the type that needs everything to be “just so” and everything in it’s place – but I struggle with the purse and having to look it. Just curious how you handle that.
YoungHouseLove says
I keep it on my side of the desk (far enough back so Clara can’t pull it off) and John has a bowl where he puts his wallet and keys. It definitely helps to have a “spot” for them.
xo,
s
Elizabeth says
A non decorating question (though, to be clear, I love your blog and your design sense): I’m expecting my first child and have been scouring your baby section under the projects tab. I’m loving all your tips and tricks and recommendations. I noticed in this post that the stroller in your sunroom isn’t the Joovy Kooper I’ve seen before (I know, this sounds stalkerish. I’m sorry). I’m just wondering if you’ve switched strollers, and if so, why? As someone looking for these big ticket items for the first time any tips are helpful! Thanks!
YoungHouseLove says
We still use the Joovy every day – that’s just a jogging stroller so John can go for runs with Clara in the morning sometimes!
xo,
s
Elizabeth says
Thanks so much!
Erica says
lol… I was wondering the same thing!
Copy Cat Looks says
My kitchen looked very similar to yours for a while. My husband and I did the very same thing, only we painted ours black. Very daring, but turned out great!
Natalie says
You guys are amazing!! I am constantly blown away by the details you take notice of when doing these projects. Seriously, well done! :)
YoungHouseLove says
Aw thanks Natalie! You’re so sweet.
xo,
s
Lori says
As someone who is doing an entire town house on my own (my hubby isn’t in to DIY stuff) let me just say I love seeing actual progress pictures, not just the HGTV before and after in 30 minutes picture. :). It lets me know it is okay to take my time on a project and not rush through it. As for holiday time projects, I am painting a hall this week and hopefully starting on my sons bathroom next week.
Happy Holidays! Can’t wait to see the finished product! I am swooning over those penny tiles!!!
YoungHouseLove says
Aw thanks Lori! It’s definitely not the glamorous stuff, but it gets us one inch closer to a finished result! Happy holidays to ya!
xo,
s
Lynn @ SafeBeauty says
Hey guess what? Nevermind, you’ll never guess. Or you might, because people probably tell you this on the daily especially in this economy. Forewarned: imma gonna yell…
WE ARE OFFICIALLY HUNTING FOR/BUYING OUR FIRST HOUSE!!!! :oO I know right?!? Get out! So “knowing” you guys is going to pay off even more now because I won’t just live vicariously through your exploits anymore – now I can join in the fun without worrying about our security deposit. I will keep ya posted. And other than my parents and little bro you are the only ones that know because we’re treating this news like a pregnancy. We don’t want to put anyone in a tizzy until we know for sure, you know what I mean?
My best, Lynn
YoungHouseLove says
Aw Lynn, that’s so exciting! We’re rooting for us and can’t wait to hear more! Keep us posted!
xo,
s
Robin O says
I love all the work you’ve done on your kitchen! And the rest of your house of course. So, do you ever think about what the previous owners would think if they saw what you’ve done/are doing? Every time I see you make changes to the house, I wonder if the previous owners ever saw it if they’d think “man! why didn’t we think of that!?” or if they’d be all nostalgic for the way they had it and not like the changes. (Not that I can believe anyone would want it the old way!)
YoungHouseLove says
The funny thing is we think they read our blog! At least they used to when we moved in, so we assume they still do (hi guys, if you’re reading!). They’re really cool and seemed genuinely excited to see what we’ll do – especially since they don’t have to break a sweat or lift a hammer/roller/drill themselves!
xo,
s
michelle k. says
not sure why but for the past two days whenever i’ve visited your site, a couple of “blank-#.aspx” download… i have no idea what’s going on, what those are and why that’s happening but i wanted to let you guys know in case it’s something on your end!
YoungHouseLove says
You might have some sort of spyware or browser/cacheing thing? Maybe try emptying your browser’s cache/data/cookies and run some sort of spyware test? Hope it helps!
xo,
s
Suzi says
Just stumbled upon your blog – what caught my eye was painting your cabinets. OAK CABINETS!!! I just moved in at the beginning of the month to an entire house full of oak….in the kitche, great room, bathrooms, the floor…probably my least favorite wood, ever! After reading several blogs, I tried Cabinet Transformations…a little pricey, but since it had a money back guarantee, I had nothing to lose. Once I finished 2 coats, like it said I needed…I realized there wasn’t enough coverage. Sad. So, I’m still painting my oak cabinets white, I’m on the third and hopefully final coat of color and then I’ll use the top coat. Interesting how when you read blogs, DIY projects don’t seem so scary! Thanks for your blog – I’m off to go read more of it.
YoungHouseLove says
Aw, good luck with everything! I bet they’ll look lovely in the end!
xo,
s
Katie says
In case you haven’t already gotten your new hinges, you may want to check Ace Hardware – that is where we found similar hinges at a reasonable price when we gave our old cabinets a facelift a few years ago.
YoungHouseLove says
Yup, the Pleasant’s place (a local shop here in Richmond) is actually an Ace store! That’s where we found them!
xo,
s
Samantha says
Isn’t it so crazy that the blog started out from your first kitchen reno and now here you are again almmost four(?) years later? :)
YoungHouseLove says
So crazy! 4 years and 3 months later – we’re at it again!
xo,
s
Kim says
Not sure if you’ll ever read this, but I thought I might mention the paint I used for our cabinets. It’s Fine paints of Europe. It was pretty expensive, I think 120 or so for the can. But, you CANNOT beat the finish. I swear to you, it looks almost sprayed on. In areas, it really does look sprayed. I overworked it in places, but I could sand and redo the areas. But, I’m lazy. However, it really does look fabulous. I also bought it in the eco, so it didn’t have the stinky oily scary smell (it’s an oil hybrid without the vocs). They also have something called brushing putty. Apparently, it’s a dream to cover up oak cabinets. I have maple cabs and didn’t need to do that. I will not go back to cheap paint. It’s totally worth the price. The finish is outstanding. I used a darker grey (BM chelsea gray) and mixed it with simply white (BM) on top cabs. It looks gorgeous together. I’ve used BM, pratt and lambert (which I think is the best of the four), valspar, and sherwin williams. This stuff blows them out of the water. If you can, just pick up a small can. ( I think it’s 40 or 50 dollars delivered -and you get a free sample pot of another color.) in just the color you want to try it out. I’m going to repaint all of my trim in the paint. Check out the paint section (and the kitchen section) of garden web. They are the ones who got me to use it. It’s worth every penny and more. A small can should paint all of your bottom cabinets (2-3 coats) and probably some of the top. Seriously.
YoungHouseLove says
Thanks so much for the paint tip! We actually already picked up our paint (Benjamin Moore’s Advance, which is what a few pros that we know use to paint cabinets). We love that it’s low-VOC but insanely amazing (it’s aklyd based). We also used it for our office cabinets when we painted them a few months back and LOVE the outcome!
xo,
s
Virginia says
Haha so random, but my hospital unit just installed new countertops. The area was blocked off for days/weeks, so we had no idea what they would look like. They just revealed them, and they are the same as your counters! I totally get the excitement… they are beautiful and gleaming!!! We’re all obsessed!!!
YoungHouseLove says
Aw, so exciting! Enjoy those babies!
xo,
s
Andrea B says
Looking forward to seeing the result! I’d love to paint ours, so I’ll see what I may be getting into!
Lacey says
Hey,
This is off topic; but I saw these snow globes online today and thought of you and your love of ceramic animals, so thought I would pass it along
http://www.chapters.indigo.ca/gifts/Rabbit-Snowglobe-White-Resin-Base/882709037378-item.html
Hope you guys have a great christmas!
YoungHouseLove says
Those are adorable! I love them!
xo,
s
Kari says
Read some comments about the asbestos liner under the current kitchen flooring…ugh. How did you find out about this?
YoungHouseLove says
We removed some of the cabinets to see a black paper liner and did some research which identified it as something used back when our kitchen was installed which has asbestos in it – so we decided then and there to treat it as if it was 100% asbestos (since all signs pointed to that, and testing it would just mean coming into contact with it more, etc). Thankfully the recommended “cure” is just to leave it where it is and float new flooring over it (none of it is exposed anymore since the cabinets have been moved and pieces of plywood were slipped into any low areas missing tile and revealing that liner so we’ve been very fortunate!).
xo
s
Jenna at Homeslice says
Wow! You’ve been really busy!! I’m so excited about all your progress, awesome work.
jen matchett says
any tips to painting kitchen cabinets that aren’t solid wood? Not sure what you would call what we have (pressed wood with the laminate stuff that you can peel off from the pressed part?). It’s a dark red (faux cherry) and way too dark for the space!
can’t wait to see pictures of the painting process:)
YoungHouseLove says
It’s really hard to paint laminate with any successful result (it’s so shiny/plasticy that paint just peels/flakes off when something scrapes it), but pressed wood should be ok with good primer + paint so perhaps peel off the laminate since it’s so easily removable that it won’t be durable when painted and then prime and paint the pressed wood part? Good luck!
xo,
s
Jen says
i can’t wait to see the finished product! it’s fantastic to see before’s & after’s! merry early christmas!!
Amy from Grown From Scratch says
Hi you guys! I recently did the exact same thing with my kitchen and then again with my “Laundr-o-Office” cabinets. Both times I used Sherwin Williams Adhesion Primer, and it was the best. Thought I would share since you mentioned looking for primer :-).
YoungHouseLove says
Thanks for the suggestion!
-John
Jennifer Spadaro says
You guys are doing a great job. It never happens as fast as you thought, or as fast as you want, but it will get finished. I always feel like I’m in such a rush to finish everything, but the truth is once something’s done, I’m always kind of looking to do the next thing. So just enjoy the process and take your time picking everything, you are going to get to enjoy it for a long time. : )
YoungHouseLove says
Aw thanks Jennifer! It’s funny how you say the second something’s done you’re looking to do the next thing. It’s so true!
xo,
s
mribaro says
I think it would make a cute January post (and not too long one) if you just numbered which major renovation you went through during the Christmas Season for the past 5-6 years (one photo and one sentence for each year) :)
Best wishes and may the painting force be with you! :)
YoungHouseLove says
Haha- we definitely think it’s hilarious that we seem to keep ending up with a major renovation at Christmas/New Year’s!
xo,
s
Tiff says
Painting our kitchen cabinets white was such a pain. I have to admit though, it made a world of difference!
Alison Hodd says
What type of paint are you using? I know that oil-based is best for durability…. Oh, and this question may already have been covered!
YoungHouseLove says
We’re using Ben Moore’s Advance paint which is Aklyd-based (it’s a newer formula than oil that the pros prefer for cabinets since it’s extremely durable but less fumey and it dries quicker). More details as we go!
xo,
s
Alison Hodd says
Oh, we used that Advance Alkyd on a Mission Chair (egad! paining over wood!) and it is holding up rather well. We are experiencing some scuffing and maring where the heels of our shoes hit the bottom though. Good luck!
Emily L. says
My in-laws live in Chesterfield and my FIL has mentioned Pleasant’s many times – I’ve even been there once. Whenever we visit and I go out shopping (the thrift stores there are the best!) I always hope I’ll run into you. I can’t wait to see this kitchen when you’re all done!
YoungHouseLove says
Aw, here’s hoping we see you there someday!
xo,
s
bridget b. says
sorry to be so tardy for the party with yet another window sill question. you know how some windowsills are rounded off at the front edge? i noticed that the long front edge of the pine board pictured above is more square shape, but the edges don’t look as sharp as just a plain piece of wood.
did you guys soften the edges somehow or can it be bought that way? and are round edged window sills considered old-fashioned?
thanks!
YoungHouseLove says
We couldn’t find a rounded edge board but since the ledge on our half wall is just a sanded piece of wood (to soften the edges) we did the same thing for the window. Hope it helps!
xo,
s
Ellen says
We sure wish you’d paint your cabinets, too. We’re waiting for your method to copy for ours!
YoungHouseLove says
Haha, the plan is to be done by New Year’s! We’ll keep you posted!
xo,
s
Heidi P. says
Seeing those empty cabinets is really exciting. :D :D :D
And the chair covers look really nice in the gray tone that they show up as in the picture. Hmmm….?
Deanna Divino says
It’s amazing! So excited tosee it all come together. We’re at the backsplash stage of our 16 month DIY kitchen remodel. You should see the similarities in our choices and layout! We also added a peninsula in the corner of our kitchen, next to a great room. Built a fridge cabinet, penny round backsplash, ect… As you guys were putting posts up it on stuff we either had done or was next on the list it was making me feel like I knew what I was doing!!!! (Sooo, not the case.) It’s often a “What would John and Sherry do?” statement that helps me decide!
It’s coming along great and I can’t wait to see the grande finale! Merry Christmas to you and yours!
YoungHouseLove says
That’s so exciting! We’d loooove to see photos of all your hard work when you’re done! Good luck with everything!
xo,
s
Kasey says
We just spent quite a bit of money updating our kitchen with white painted cabinets, black granite countertops, new ss appliances, new hardware, etc. We have the same hinges as yours and I could not find new ones anywhere. So, we had the painters paint them white, but like your experiment, they are peeling in the center. It’s driving me crazy! Do you know what that style of hinge is called? I’ve tried to find them online, but haven’t had any luck yet.
YoungHouseLove says
So sorry, they didn’t have a name for the style, but they are by Anderson (they have an A in a circle as a logo on them, if that helps). Good luck!
xo,
s
Leila says
I am painting my cabinets white too and I’m curious about your color selection. I can’t decide between a tinted white or just a plain pure white with no tint. Did you guys think the pure white would be too bright/intense?
YoungHouseLove says
We had bright white in our first kitchen and loved it! We just didn’t have bright white counters there, so that’s why we thought some sort of tonal change from cabinet to counter might be nice and soft and layered looking!
xo,
s
Sheralyn says
LOVE Cloud Cover! It is to our house what Moonshine is to yours :)
In one of our rooms (with halogen pots) it has a bit more of a yellowish tinge, but I think that’s just b/c of the lighting…everywhere else though it is the moody greige you’ve described.
Farrah says
After procrastinating endlessly on painting my kitchen island, I finally did it with my superman-DIY dad who was up for the holidays – and when we went to Benjamin Moore to buy deglosser/primer/paint, they showed us “Cabinet Coat” which requires minimal prep, is very low-odor/water-based, and has a factory sprayed-on finish. Two coats took my espresso-with-weird-red-undertones island to a pretty pale grey. I am still shocked by how painless that product was to use. I’m in Canada, so who knows how products differ – but is this something you have ever used or considered?
YoungHouseLove says
That’s so funny! I think it’s what we use here (called Advance in the states). I love the factory finish look and the low-VOC thing! Those newer alkyd formulas are the best! Congrats on your island!
xo,
s
Jamie says
What were your other cabinet color finalists? I’m planning to paint mine soon, so I’m on the lookout for good color options!
YoungHouseLove says
Hmm, I don’t remember (we don’t have the swatches that we cut out on hand anymore) but they were all Ben Moore colors in the soft white range. Hope it helps!
xo,
s
Betsy says
I am so excited – I am painting all my awful wood kitchen cabinets to white – just like you guys – and 100% because of YOUR inspiration. I am following you religiously now and if I had seen this post about hinges I really could have saved some time this week (just tried spray painting them with exactly the same result as you)! Here’s to hoping you still can help me save a little time! :-)
So, I am trying to desperately find the right hings. My hinges are almost EXACTLY like the ones you have, I have overlay face-frame cabinets too (learned all about THAT on google today!!). Anyway, I am having a heck of a time finding the right hinge to replace them, and I either want chrome or white to blend in. Any advice on where to look, what to absolutely make sure of? I am not totally sure on how to measure ‘overlay’ and if there is any wiggle room in the measuring (my cabinets don’t touch in the middle thankfully). I have seen some ones online, but am nervous to pull the trigger since those are harder to return if they don’t work).
P.S. I did find “hidden SURFACE mount” hinges online that you don’t have to have one of those hole-things drilled into the cabinet door – just not sure how to install them.
YoungHouseLove says
What I would do is find any and all local hardware stores and bring one hinge from home (the existing ones that work) and hold them up to other options you find at local hardware stores! You can always ask if they can order them if they don’t have them in the store (many of them have books of hinges to look through for you). Hope it helps!
xo,
s
Jenny says
So I have a love of satin nickel to rival Sherry’s love of ORB. I had grand plans to follow in your footsteps and revive ugly accessories throughout my home (doorknobs, picture frames, sofa legs, curtain rods) with one of the two Rustoleum finishes mentioned in this article. (Minor setback came when I realized the satin nickel mysteriously doesn’t contain primer like the ORB does.) Would you say from your hinge experiment (“a bit stippled and – well, fake”) that the Rustoleum satin nickel and titanium silver finishes just aren’t as high quality as the ORB and are thus not ideal for sprucing up old items?
YoungHouseLove says
Hmm, I would add primer. They sell it separately so I’d sand with high grit paper, add two to three thin thin thin coats of primer, and then three thin thin coats of the satin nickel. Hope it helps!
xo,
s
Jenny says
Thanks — I was wondering mostly about the stippling and “fake” look — it seems the final product doesn’t turn out as well as ORB’d ones?
YoungHouseLove says
Hmm, maybe just buy a can and try it! I haven’t used it yet so it could be awesome or bad, but maybe worth a few bucks to buy the can and sample it on something just to see?
xo,
s
Lindsay says
Great blog just found it from crafting with the stars! I am painting my cupboards white soon, I like chantilly lace by BM, the man at the BM counter recommended painting the cuboards with a standard white, because that’s most likely what is on my ceilings and baseboard from… He said if I pick a light or off white suddenly they look like a dirty white… Any advice ? Have you heard anything like this? Thanks!
YoungHouseLove says
Oh yes it’s definitely true! I’d being home swatches and make sure they look nice together :)
xo,
s
Annie says
Super helpful with the hinge portion!!! Thanks!
Heather @ What Does She Do All Day? says
I know this post is way old, but do you happen to recall the manufacturer of the hinges? Your old hinges look exactly like the ones I have. I spray painted them in the bathrooms because I was unable to find new ones to fit the space. I’m about to paint my kitchen cabinets and really want to change the hinges without redrilling if possible! Thanks!
YoungHouseLove says
So sorry I don’t remember! Anyone know?
xo
s