Can’t we just paint some darn cabinets already?! If your patience to see some painted cabinets is wearing thin – just imagine how we feel! When we were planning this kitchen project our big-picture brains said “We retrofit those few doors to match the rest of the room and then we paint. Hooray!” But now that we’re in the weeds (amid holiday madness, no less) we realize that a lot of stuff actually has to happen between those two steps.” There are gaps to be filled, rough spots to be sanded, trim to be added, hinges to be dealt with, hardware to be chosen, primer to be selected, a final paint color to be decided, etc, etc, etc.
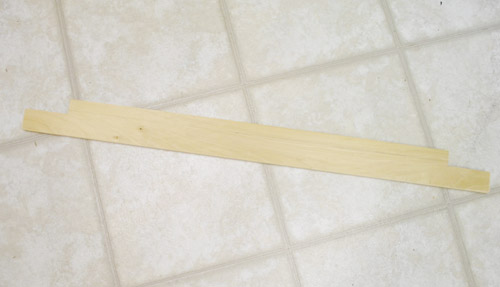
First up, this goes under the category of trim: I wanted to rebuild the window sill and molding so that we could caulk / prime / paint it while we had everything out for the cabinets. And since our old sill was a piece of granite that matched our old counters (but we were very happy with a wood sill in our first house), I snagged a piece of pine board at Home Depot that would fit in the space and cut a couple of notches out of it.
Then I just slid and nailed it into place.
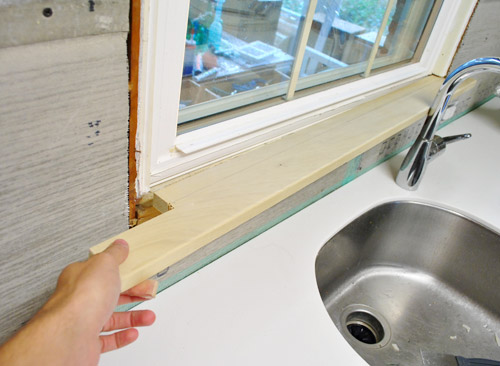
From there, it was the usual song and dance of cutting and nailing the trim casings around the edges. I even added a smaller piece underneath the sill to mimic what we had done on the half wall ledge.
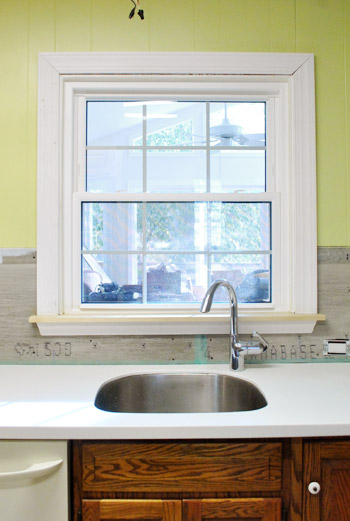
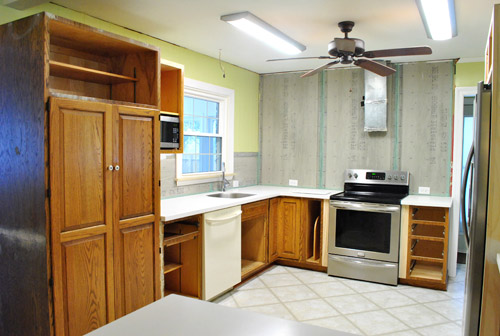
Now that the window’s ready for caulk (to fill the small gaps at the corners), primer (for the raw sill) and white semi-gloss paint (to protect the wood and keep it all durable and wipe-abe) – it’s onto some other trim. Specifically, the toe-kick that goes around the bottom of the base cabinets. A lot of it got removed when we shuffled cabinets around. So in some places I was able to cut down/reinstall the leftover pieces.
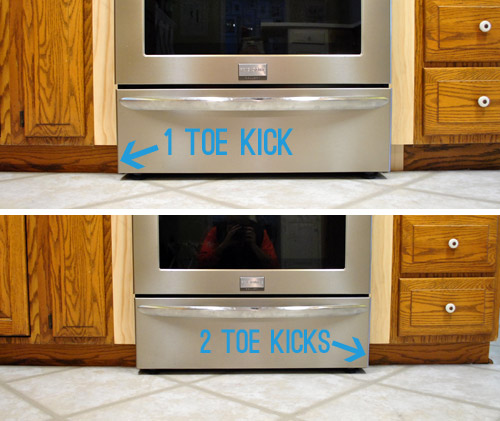
But around the peninsula I needed to buy new stuff (since we added that to the layout). I actually couldn’t find any off-the-shelf toe kick trim (perhaps it was sold out due to last minute holiday DIYers like us?) and although I knew I could special order it through the Home Depot’s kitchen department, I didn’t have that patience. So I just bought some standard pre-primed baseboard that would fit under my peninsula cabinets and installed that. Since everything’s getting painted the same cabinet color, no one should be the wiser. Whew.
Oh, and since we’re still undecided on what treatment to give the back of the peninsula (worn wood? raised panels? we’ll keep you posted!), that’s why the toe-kick stops suddenly there on the right. I’ll cover up that raw end with whatever trim/wood we apply to the side and back. And although I did buy all of my shoe molding, I’m not installing that until after the new floors are done (we’ll prime and paint it before it goes in to avoid getting paint on the new cork floors).
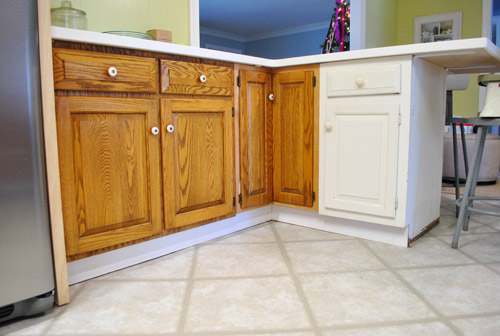
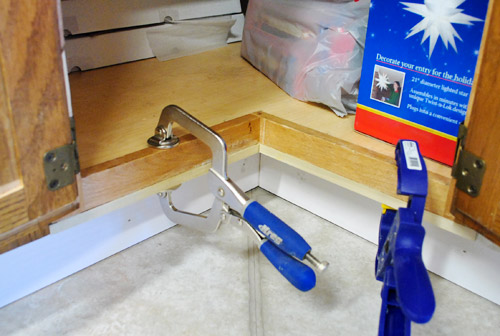
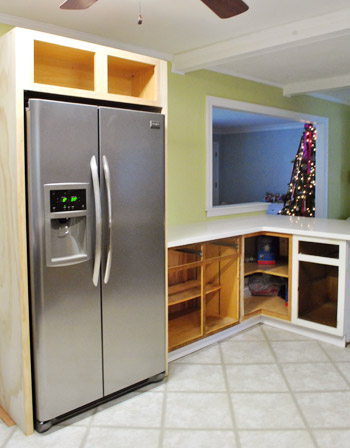
But that wasn’t the end of my trim-venture. Check out the subtle unevenness when it comes to the bottom edge of that corner cabinet’s frame. See how it’s a tiny bit higher than the two cabinets surrounding it? Annoying, but not the end of the world. Fortunately it was exactly 1/2″ too high on each side, so I just bought 1/2″ pieces of pine craft wood and securely wood-glued them into place with clamps and glue boasting an especially heavy duty hold (there was no way I could fit a hammer or screwdriver under there). Once we putty, sand, prime, and paint it should be completely undetectable.
The only other trim we had planned to install at this point was some crown around the upper cabinets. But, believe it or not, we’ve kinda been digging the clean and modern look of just the sharp squared-off edges (we held some crown up against it and cringed, really- it just seems sleeker and cleaner without it and a bit too adorned with that stuff going on up there). So we’re gonna leave things alone for now and proceed without crown. But if we decide later that it’s missing something we’ll just add it after the fact (pre-primed and painted like the shoe molding so we won’t worry about ruining our cabinet paint job).
Oh and as for hinges, we considered hidden ones, but our doors are half-sunk (more on that here) so they have a very thin stepped down edge all around them (and since hidden hinges need to be routed in, our doors would be too thin around the edge so it wouldn’t work for us). No worries, there are plenty of awesome kitchens on Pinterest (according to my obsessed wife) with exposed hinges and great hardware – so we’re cool with them. So after moving on from hidden hinge research we thought we might be able to spray prime/paint the hinges that we had (since they’re pretty rare/hard to find and it would save us money) but we gave it a try with two different satin nickel finishes (we picked hardware- it just hasn’t come in yet- but it was nice to make that decision so we knew what exact finish our hinges should be)… and… it didn’t work.
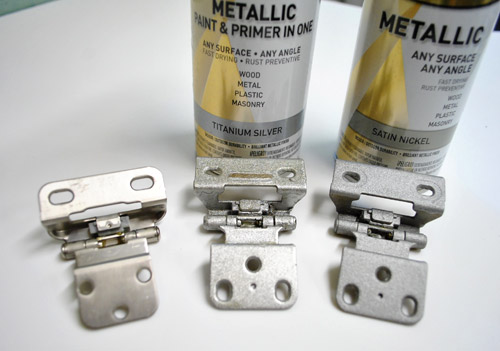
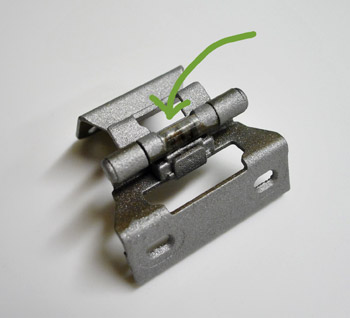
See the hinge on the left? That’s a new hinge (one of the rare ones that actually work with our door- which we tracked down at a local hardware store called Pleasant’s with tons of extra options). And it’s in the exact finish we need to work with our hardware (which they also had in their store, just not enough of it to take home on the spot). Those other two hinges to the middle and right are the original ones from our kitchen after being sprayed with the two types of spray paint in the cans above them. See how they don’t look as smooth and satin-nickel-y… and look a bit stippled and – well, fake? And even worse, when you moved the hinge back and forth (which would happen a million times a day for the next few decades) the paint actually got worn off on the middle of the hinge:
So it didn’t work. But we’re happy we gave it the ol’ college try. Thankfully shelling out $90 for new hinges isn’t really much in the scheme of a full-on kitchen reno, and definitely worth a clean/fresh/new/functional look.
Oh and speaking of other decisions we’ve made, we’ve finally picked a cabinet color. As in, there’s no going back (we got it mixed and brought it home and everything). We were switching back and forth between pure clean white (we loved our white cabinets in our first house) and a soft warm gray or gray-beige color – but ultimately decided against anything too gray or gray-beige because:
- there’s so much gray on the walls of the dining room, the living room, and the hallway that a room in the middle of all of those spaces full of gray cabinets (especially when seen from the gray dining room since they’re so open to each other) might be too much
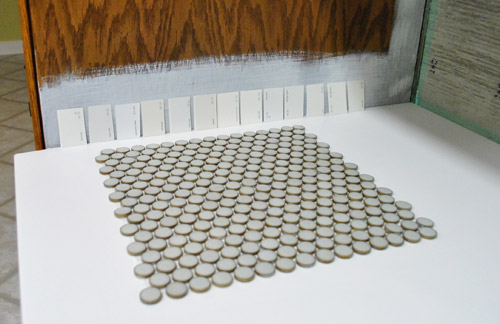
- our backsplash is a soft gray penny tile, so that’s a less severe way of adding that color to the room than putting it on every cabinet – plus the penny tile will really pop if the cabinets are lighter instead of too blendy
- painted cabinets in a tone of white feel the most classic to us – so we won’t worry that they’re trendy or “out” in a decade
But we didn’t actually go with a bright white color – so we sort of landed in the middle of the two camps. Here was our process:
#1. Pull a ton of swatches out to look at them with the counters and the backsplash tile and the rich dark cork floors (which will definitely keep the room from feeling too sterile and white-washed):
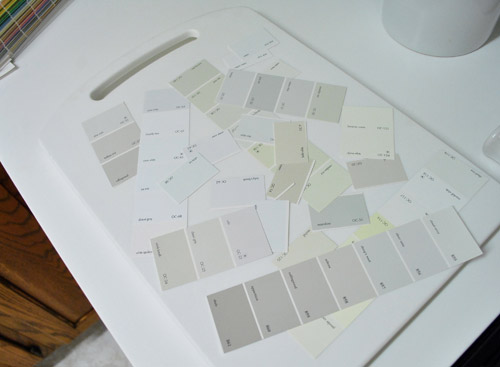
#2. Pick our favorites of the bunch and place them on the plane that they’ll live on (ex: sit them vertically against the cabinets to see how they read vertically since that’s how the color will be seen). Oh and the backsplash tile is there too for our reference.
# 3. Study those colors in the morning, noon, and night (and on a sunny and cloudy day – just to be thorough) and slowly eliminate swatches until we were left with our four finalists:

#4. Realize that we probably can’t go wrong with any of them so just go with our gut (our favorite swatch all along- yes, from the very beginning, was the one second from the right). It’s called Cloud Cover and although the picture above hardly does any of them justice, it’s basically not a bright white (which you can see represented by the bright white counter under it) but it’s sort of a very very very light gray- but it’s a warm gray. Sort of the lightest greige in the world that would look like a soft white from afar but as you get closer and see the bright white counter it’ll be clear that it’s not completely white and a bit moody and tonal. So yeah, it’s safe to say we’re so excited and can’t wait to see how bright and glossy and clean our new kitchen is going to look once those cabinets slip into their new “wardrobe” and our floors get the rich cork treatment to keep it from light/white/bright overload.
And speaking of getting to the cabinet painting finish line, here’s a quick breakdown of our steps:
- Remove doors, drawer fronts, and hardware
- Remove everything from our cabinets
- Use wood putty to fill any lingering gaps, seams, and holes (like where the old knobs were since our new hardware won’t be placed the same way)
- Sand dried putty as well as any ridges, scrapes, chips, or other dings that our cabinets have collected over the years to get them as smooth as possible.
- Sand all cabinet doors (front and back) as well as all cabinet frames to rough them up before priming (some folks skip sanding, we want these babies to last forever so we’re not taking any chances)
- Clean up all the sanding mess to ensure that we don’t get dust in our primer
- Use a liquid deglosser on all cabinet doors and frames to be extra sure they’re ready for primer
Buy hardware and finalize hinge plan- Prime (hopefully one coat, depending on what kind of primer we end up getting – still have to talk to a paint pro and decide)
- Paint (we’re hoping that two coats on each side of the doors and the frames give us enough coverage, knock on wood)
- Let everything dry and cure for 3-5 full days (at least that’s what the paint can said the last time we did this- and we followed that to the letter)
- Drill holes for and install new hinges and hardware
- Reinstall all doors and drawers
- Restock the kitchen with all the stuff we took out of our cabinets/drawers
- Take a long nap (preferably for 2-3 days, Clara permitting)
- Take after photos (preferably 500, from every last angle)
Man, just typing that out made me tired. But we’re trying to be thorough because we want our paint job to be clean, even, and durable. As in a-couple-of-decades durable. So even though it will take us extra days going through all of the prep, we think it will be well worth it in the end. It’s actually looking like we’ll be priming and painting during the week between Christmas and New Year’s. Which means we should have 500 after pictures for you in early January. Woot. We can’t begin to tell you how excited we are to have “new” cabinets for the new year!
Oh but if you’re dying for a before & after rightthissecond, here’s an equally thrilling much less exciting one for ya. This is what our sunroom (aka our kitchen reno storage room) looked like recently.
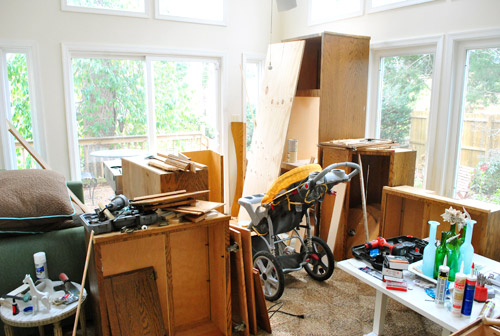
We were basically hoarding every scrap from the demo process “just in case” we needed it to rebuild cabinets or complete the peninsula. But now that it’s clear what cabinet, doors, and trim we needed – and, more importantly, what can go – we did a big clean up. And now it looks like this:
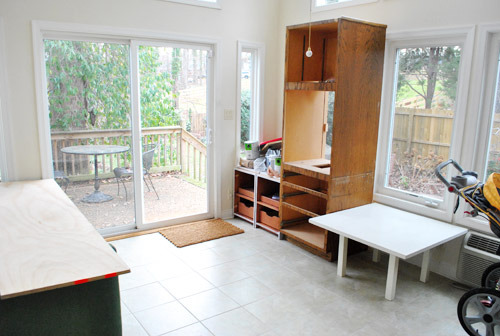
We brought all of the usable cabinet scraps out into the carport to be donated to a local thrift store (one of our local favorites, Diversity Thrift, came right to our door to pick them up on Monday). Then all of the smaller pieces of wood got tossed into my scrap pile in the basement. There might have been some general tidying too… like putting my tools away properly.
Oh, and notice those big planks of spare plywood resting on the couch and the daybed?
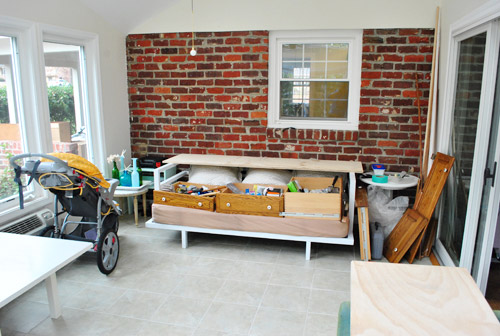
Welcome to our makeshift cabinet door wood puttying / sanding / priming / painting zone (we’ll just lay some drop cloths under the plywood to protect the couch and the daybed first). We figure the sunroom is a good place to spread out and get work done (while keeping things off limits to Clara, and keeping the fumes out of the house – even though we’ll be using low and no-VOC stuff). So expect a lot of pictures taken in here in the coming days.
Maybe I should’ve added “prep sunroom work area” to our list so I could have another thing crossed off. Well, make that two other things…
Yup, the cabinet doors, drawer fronts, and hardware have been officially removed. Oh, and since we emptied the cabinets (mostly) I guess that makes another things off our list. Looks like we’re on a roll.
Prep sunroom work areaRemove doors, drawer fronts and hardwareRemove everything from our cabinets
Only fifteen more to go. Let’s just say it’s a good thing my parents are hosting the official Christmas dinner…
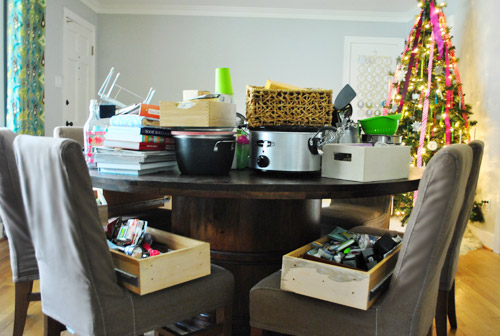
… although we do have four relatives staying with us for the holiday weekend. Thankfully they’ve come to expect nothing less than chaos whenever they come over. They even claim to look forward to seeing what we’re up to. Now that’s unconditional love. Update: although the chair covers look different in the pic above (not sure why) we haven’t dyed or changed them out, so they’re still the same mocha color – for now…
What are you guys doing this week and next? Any big projects? Big meals? Big presents? Big lists?
Psst- We’re over on BabyCenter talking about Clara’s favorite books/toys/songs/activities for anyone looking for last minute toddler gift ideas of something to do with their little ones over the holidays. You can find it all here.

T.D. says
Wonderful progress, the suspense kills us but I can only imagine your suspense as well. It’s totally worth reading all of your tips and tricks along the way to ensure any future projects I may do will have the same quality you all seem to put forth.
Question #1: I hope this may not be too obvious but do you guys draw a plan from where you took each cabinet and drawer from? Or number them? If you numbered them, wouldn’t that be painted over? Maybe it’s a gigantic puzzle piece in the end.
Question #2: Do you have plans to craigslist/donate the old hinges and hardware?
YoungHouseLove says
Yup, we actually dropped off our giant bag o’ hinges last night to the ReStore! As for each door and drawer, thankfully we’re well acquainted with them (they’re all varying sizes and shapes so it’s pretty easy for us to figure out what goes back where) – but if you have a more confusing door situation (a lot more uppers, many that are the same size or close to the same size, etc) it’s a great idea to just lay them out before priming or painting them in a certain order (ex: from the left of the room to the right) so once they’re dry you can hang them from left to right and not worry about painting over any numbers on them). Good luck!
xo,
s
Monika says
I also saw someone once putting a number on the door in pencil where the hinge gets nestled and cover that spot with a little piece of blue painter’s tape. That way it won’t get painted over accidentally. That part of the door will eventually be completely covered with the hinge, so a little unpainted spot does not matter. Then you can label inside of a cabinet with a sticky note with the same number. I think that’s much easier and could prevent MUCH confusion later on. Good luck!
Christie says
I love your very detailed how-to posts. I’m really looking forward to the painting posts, since I will be scouring Restore over the next few months for the perfect set of old kitchen cabinets which I will be painting.
I think you’re very fortunate to have the sunroom for projects. How perfect for keeping watch over Clara, for climate control (not a freezing garage in winter), for quick trips to the storage central! (My garage is detached, so you can see the appeal of the sunroom.)
Jamie@WrightHouseAffairs.com says
SO excited to see some painted cabinets!! My husband and I were thinking of painting our white- so I have been paying extra close attention to your kitchen makeover. Though,after seeing the daunting to-do list, I don’t know if I have the patience!! ;)
Hope you are taking plenty of time to enjoy the holidays!
Amanda says
So exciting!! You guys are almost past the “it’s going to get worse” phase and into the “it’s definitely getting better” phase! When we did our kitchen over the summer, I felt like we lived in kitchen limbo forever (really just about six weeks) but it’s the best feeling in the world to see it all done and know you did it yourself!! I keep meaning to send pics…need to get on that.
Anyway, we’re tackling a half bathroom update in the basement in the next couple of weeks – it’s our practice run before we get to the upstairs bathrooms over the summer. Yikes!!
YoungHouseLove says
Wahoo- we’d love to see pics! And good luck with that bathroom!
xo,
s
Elisa @ The Self Life says
I’m impressed you removed everything — we actually left our drawer fronts on and stuff inside. In our defense there are many of them. Do you find yourself looking at white kitchens on Pinterest just to keep yourself motivated? I definitely do since we still have the top half to finish! http://theselflife.com/2011/12/20/weve-been-getting-very-reacquainted-with-our-kitchen-cabinets/
Sending good painting thoughts your way!
YoungHouseLove says
Wahoo! That looks awesome!
xo,
s
Meg says
I’m hoping this isn’t one of the worst questions you’ve been asked, but I’m hoping you can settle an extremely important argument between my husband and I–both devotees of your blog.
The question is: grellow: rhymes with jello? or grellow: rhymes with J-lo? Actually, now that we’re potentially getting a resolution to this debate, he’s thrown in a third possibility (upping his potential of winning this debate) grellow: rhymes with Cee-Lo.
The debate stems from me using the term grellow (rhymes will jello) while looking at paint swatches, and him saying that that made him think that it was a grayish yellow rather than a greenish yellow. Actually, writing out this comment makes me feel even sillier than having that argument in the paint aisle, but now that it’s started, we’d love to know which one of us is crazy (the actual answer is likely “both of us”, but we’re just trying to figure out a moment in time)
:)
YoungHouseLove says
Haha. I love it. Since it’s green + yellow, we figure it rhymes with yellow (and jello). So it’s jello for the win! Hilarious that Cee-Lo and J-lo worked their way in there though!
xo,
s
Meg says
Yes, the conversation went a bit like this:
Wife: I know what I’m looking for, I just don’t know what it’s called. It’s kind of a grellow (jello).
Husband: Grey/yellow? What does that look like?
Wife: No, Green/yellow. Grellow (jello) Gray/Yellow would be gre(y)llow like J-Lo.
Husband: Then wouldn’t green/yellow be gre(e)low, like Cee-lo?
Wife: Why don’t you go grab the lightbulbs.
YoungHouseLove says
Bwahahahaha. Comment of the day. Fo sho.
xo,
s
Stacy says
Do tell what putty yall use…I recently used DAP wood putty and it did not work well! I bought it at a local ACE hardware and it could have just been old. It was so dry and flaked off my cabinets like sand…yuck! My husband,daughter and I lived like yall are for around 8 months! It felt so madding at times! The worst was our refrigerator was in our living room!
Keeping everything “neat” during the “mess” was critical in maintaining my sanity! Can’t wait to see the end result!
YoungHouseLove says
We’re using Elmer’s ProBond Professional Strength Wood Filler. So far we really like it! More details as we go for sure!
xo,
s
Lauren Wuchte says
I am fairly certain we have the same crock pot! I used it to make some food for school today, but I could not for the life of me figure out how to seal the lid! I am not sure if I am losing my marbles or if I grabbed my mom’s crock instead of mine! Ah! Maybe I missed something…
YoungHouseLove says
On ours you just pull down on those bracket things on each side and it snaps closed and feels nice and sealed up. Hope it helps!
xo,
s
Jillian@TheHumbleGourmet says
I definitely don’t envy you for the work you have ahead, but I do envy the eventual outcome!
Andrea says
Cloud Cover is a great colour!! We almost chose it for our walls in our “tone on tone” white/off white master bedroom. That will look great with the bright white and penny back splash… I am patiently waiting for the finished product :)
Kate says
I am excited to see the finished cabinets, but even moreso to see the penny tile up and cork floors down! The whole combo is just awesome.
Sandy says
Totally unrelated to the kitchen, but it would look so cool if you guys put HUGE monograms on the back of your brown dining room slipcovers. Maybe aqua? or Green? It would totally pop! And break up the brown on brown effect.
YoungHouseLove says
Haha- always another possibility! We’re thinking about dying them a super dark rich color like deep charcoal or plum…
xo,
s
NYer says
not that my opinion matters, but I’m loving the plum. (even when you first dyed the slipcovers, I totally expected the reveal to show plum. I love your taste, and just figured my guess had way-missed the mark. I love that plum is now back in contention!)
YoungHouseLove says
Definitely still a contender!
xo,
s
Sarah K. says
Can you please, please, please do a tutorial or give us some deets on the drilling and installing of cabinet hardware? I too am planning on painting our cabinets the week btwn christmas and new years and will need to drill holes for new hardware. eek! it’s making me a little nervous. your kitchen is starting to look so great!!
YoungHouseLove says
Of course! We’ll be sharing every single step of the process with pics (and even the occasional video) as we go!
xo,
s
MJB says
Would you ever put some cabinetry in the sunroom? When I saw the cleaned up “after” photo, I thought you were working on mudroom-style cabinetry (the short one looks like good shoe storage and the tall one for coats.)
It might come in handy later on…My kids are older and they run in and out the back door 1,000 times a day and leave behind a trail of shoes, baseball mitts, etc. etc. etc.
YoungHouseLove says
It’s always a possibility! I have always envisioned one of those huge Expedit cabinets in there full of baskets and bins of toys and games and other supplies (we’re thinking of keeping our tools out there in a chest or dresser of some sort too!).
xo,
s
Suzanne says
Two questions:
How did you discover the asbestos liner? Did you test yourself, did the previous owner mention it?
Also, what factored into the decision to sand the cabinets rather than use a deglosser? I’m considering tackling my kitchen cabs. I painted a bath vanity and rather than sand I used a deglosser, two coats of (water based) Zissner primer and two coats paint. So far, I’m very satisfied with the results. If I would have to sand everything I’m not sure I could manage. ;)
YoungHouseLove says
We removed some of the cabinets to see a black paper liner and did some research which identified it as something used back when our kitchen was installed which has asbestos in it – so we decided then and there to treat it as if it was 100% asbestos (since all signs pointed to that, and testing it would just mean coming into contact with it more, etc). Thankfully the recommended “cure” is just to leave it where it is and float new flooring over it (none of it is exposed anymore since the cabinets have been moved and pieces of plywood were slipped into any low areas missing tile and revealing that liner so we’ve been very fortunate!).
xo,
s
Erin says
I know you mentioned either DIYing or purchasing the floating shelves for the penny tile wall. Do you think they’ll be white or were you thinking of going with more of a wood tone.
Can’t wait to see the finished product! Paint hard!
YoungHouseLove says
We’re thinking white or “Cloud Cover”, just to keep them looking sort of connected to the cabinets so the kitchen’s “architecture” (aka: the cabinets and shelves) are all cohesive. We’ll have to see where we end up though!
xo,
s
Angela says
Do you not have to put a finish on after painting like polyurethane? Won’t the paint get scratched up without it?
YoungHouseLove says
Nope, the pro way to paint cabs is actually with oil-based or alkyd based primer and high quality satin or semi-gloss paint (preferably also oil-based or alkyd-based for maximum durability). It’s important to apply thin and even coats and allow it to cure for as long as possible, but after that’s it’s super durable! Adding sealers can mar the finish and even yellow over time, so even if you pay a company to refinish your cabinets they’re not using any poly on them – just good primer and durable wipe-able paint!
xo,
s
Keely says
The thing I most admire about you guys (Goodness! Now I’m blushing) is how easily you reassess the situation and adapt your plans. If it had been me, I would have just put the crown molding in and ended up vaguely dissatisfied.
Is it ok to put crown molding on top of the penny tiles, though? I would have thought you couldn’t really do that, not that I’ve ever tried.
YoungHouseLove says
We’re not going to put any crown on top of the 18″ backsplash part of the room – but since crown molding goes around the ceiling on all of the walls of the kitchen, we’re planning to take it across the top of the penny-tiled-to-the-ceiling wall too, just so the whole room looks balanced. Of course we’ll hold it up and see how it looks (and if it’s weird we’ll bag it- haha). And as for how we can attach it if we like it, we think we’ll be able to nail up through it at an angle to catch the ceiling instead of going into the tile on the wall. We’ll definitely keep you posted!
xo,
s
Dave says
just a reminder…sure you know or have checked this but make sure your dishwasher will fit under the counter once you put the new floors over the existing ones.
YoungHouseLove says
Thanks! We’ve double checked the measurements and it should fit thanks to little adjustable legs! Whew.
xo,
s
LaVerna DuBois says
The freakish-google-eyeball pulls are dead.
The End.
(saddly not the end of the list, I’m praying for you)
Pip says
Adieu to the eyeball drawerpulls! Can’t wait to see their replacements.
Jennielee says
We used a shellac based primer for our cabinets. It worked wonderfully. We did sand them down but this was just an added bonus, it creates a great seal and insures a great bond between the cabinet and the paint. We painted 2 years ago and I am still thrilled with the results. Good luck! I’ve been there! It is a hideous process, but I still walk into our kitchen and can’t believe the way it looks!
jeannette says
it really is good info to have that your first, eyeball/gut color choice for the cabinets is the one you ended up with after due diligence.
katrina says
I love how you two can make something so banal as adding cabinet trim into a funny and entertaining post! :D
So excited to see the painted cabinets!!
Lauren says
Can’t wait to see the cabinets! Did y’all already buy new hardware? Did I miss that post?
YoungHouseLove says
There wasn’t enough in the store so we have to go back for it. Can’t wait to share those pics when we get it!
xo,
s
Khia says
Awesome progress – especially considering its the holidays. Quick question – why did you install the toe kicks prior to installing the floor? It seems it would have been easier to install the floor first. I am sure you have a great reason but I was just curious.
Can’t wait to see the finished product!
YoungHouseLove says
We just add the floor and then install the shoe molding on top of it, so it all looks seamless and flush. Hope it helps!
xo,
s
Alisa says
We had big plans for big projects this next week but I’ve been given strict instructions to stay on the couch and try to cook this bun a couple more weeks so unless my husband wants to gut the kitchen on his own, not much will be getting done. He has been finishing small projects though (installing a new thermostat, new ceiling fan, and is attempting to switch out the range hood)so at least that’s getting done! I, selfishly, am super excited you guys are working on the kitchen through the holidays since I can’t work on mine :) But take your time with the painting! Painting cabinets is a pain!
YoungHouseLove says
Aw thanks Alisa! Have fun cooking that bun of yours!
xo,
s
Michelle says
I can see that leftover wall cabinet as a media center for the living room…. :)
Sharon W. says
I’m loving every minute of your blogs. And Clara is so cute I just want to eat her up!! (Well not really, but she is seriously smoochie!)
Question – why prime and then paint? Did you ever consider using a paint with primer built in? Or do you not recommend that for painting cabinets?
Painting my kitchen cabinets is in my near future.
YoungHouseLove says
Oh no, we don’t take any shortcuts when it comes to cabinets since we want them ultra durable! That means sanding to rough them up and using a high quality primer for maximum adhesion (aka: serious stickage!). It’s such a big job to do cabinets that you just want to do them right and do them once!
xo,
s
Lindsay says
OK, how does your house manage to stay so neat and tidy looking even when you’re tackling a huge reno project?!? And after you’ve pulled stuff out of all your cabinets? I don’t get it.
YoungHouseLove says
Hah- did you see our dining room table?! It’s crazy! Haha. But with a toddler around we try to control the chaos just for her sake!
xo,
s
Ariel says
So much work but worth the effort.
Sarah says
So excited for the cabinets!!! And the backsplash that I am kind of obsessed with.
Seperate question though: have you thought about dying the chair covers again now that the space is open?
I feel like the brown is falling flat next to all the colors… which might be exactly what you want! Just a random thought from looking at all the photos lately.
YoungHouseLove says
Oh yes, we’ve mentioned considering a super deep rich color like dark charcoal or plum! Just want to wait for other stuff to come together more to make a final call (and to get through the hard stuff in the kitchen!). Maybe sometime in Feb?
xo,
s
Wom Mom Ethne says
Looks like my island – filled with artwork and wrapping stuff. We can’t hardly keep that sucker cleaned off. That should be a New Year’s resolution – keep island cleaned off.
Olivia says
Where do you guys spray paint in the wintertime? Or is it not too cold there?
YoungHouseLove says
It’s thankfully pretty mild here in Richmond (in the mid 60’s sometimes- so we wait for those days). The can usually says how cold is too cold (sometimes it says under 50 degrees) so I try to use that as a guide! Hope it helps!
xo,
s
Michelle says
Wow, looking good!! Small steps, that’s what we like to say at our house. I am SO glad to see we are not the only ones dealing with kitchen makeover chaos! It’s reassuring to read your entries and to know that yes… a complete kitchen makeover can be done, we are not the only ones dealing with DIY especially during the holidays! Time consuming…yes…about to lose our minds..most def, but in the end it will be worth it…right??! (At least I tell myself this each day I brew my coffee in a pot on top of an overturned utility bucket).
YoungHouseLove says
Haha- it’ll totally be worth it!
xo,
s
Teresa says
Oohhh, you guys are getting close!! Can’t wait to see the cabinets painted. You def. have more patience than me. I have to force myself to wait on projects once I get started. I am so ready for the finished projects that I have to keep from rushing through. I guess that’s yet another kudos to you guys! lol
pattilouwho says
You may have answered this, and I apologize if you did…but are you leaving the inside of the cabinets the natural oak? We have similar cabinets and I’ve been trying to figure out what to do with the interiors. Our cabinets are solid birch (doors and backs) and we are going to paint the doors for sure. I am hesitant to paint the interiors of the cabinets because I feel like it will all chip away over time. On a side note, this should make you feel a little better – we’ve had our new counters and back-splash in for a year now and haven’t painted our cabinets yet! eeek! Hopefully, after the first of the year, we’ll brave the project to redo our ceiling and get the cabinets painted and then send our beautiful “after” photos! :)
YoungHouseLove says
Yup, the outside of the frames and the front and back of the doors will get painted while we’ll leave the inside of the cabinets oak. This way we can toss things in there and pull them out without worrying about scratching or peeling paint. We also like the two-toned effect of clean paint with wood interiors (we did that in our old kitchen and in our office built-in cabinets and really love the surprise of natural wood when you open the door).
xo,
s
Alondra says
Just out of curiosity and since John mentioned his mom hosting Christmas dinner, how do you guys split family time between both of your families during the holidays? Do you find it tough? I have a situation where my family and my husband’s each want to have us over for every major holiday (and yes, we tried to host both families on our turf- total fail). Sometimes makes the holidays slightly less fun trying to please everyone.
YoungHouseLove says
We tried to make a really clear plan from the get-go about holidays as soon as we got engaged/moved to VA, so hopefully no one is disappointed. What we ended up with was Thanksgiving with my family and Christmas with John’s. It’s just easier with travel and accommodations not to switch back and forth, and it works for our families, but of course things like that can be sticky if someone feels like your plan doesn’t work with their expectations!
xo,
s
Lindsay says
Ugh. My husband and I are struggling with this very same issue! It is definitely tough!
Denise says
Can’t wait to see it!
I’ve been renovating with the help of the parents for 5 months now. We’ve done EVERYTHING so far, now it’s down to getting the hardwood floors refinished before I can move in, and totally NOT taking on that one myself. But they’re getting done next week, and I cannot wait to see the finished dark chocolate product!
You two are such an inspiration! :)
YoungHouseLove says
That’s so exciting! Have so much fun and enjoy all that hard work!
xo,
s
Alison says
We have almost the exact same cabinets and the same door hardware! We live in PA so I’m sure it’s the same cabinet maker. We painted our cabinets white too and I tried spray painting the original hinges, but the same thing happened – the paint wore off. I didn’t use spray primer though, do you think that would help? Or should I bite the bullet and get new ones? Did you find replacement hinges at a big box store or a local shop? Thanks!
YoungHouseLove says
It was a local place called Pleasant’s (owned by Ace, but privately run in Richmond) so I wonder if a place like that might work for you. The spray paint we used had a built-in primer (it’s what we used to refinish our doorknobs and really loved it) but sadly with the hinges they just rubbed too much, so maybe new ones are the way to go!
xo,
s
cb says
Have you guys ever used Benjamin Moore Advance? We had our cabinets custom done and the finish is gorgeous!! Our cabinet guys said he uses Advance and lets them cure for 3 weeks then sands/steel wool them. No chipping or anything.
YoungHouseLove says
Yes- we love it! That’s our favorite paint and what we’ll be using this time around too (we also used it on our office cabinets)!
xo,
s
julie g. says
My husband is putting our freshly painted white cabinet doors on the hinges as we type!!! We switched out our white formica for Ikea’s butcher-block counter tops, got a new sink, and painted the cabinets. I was a little bummed after your hinge post today because we just sprayed ours this week. We will see how they hold up. Also, I’ve been thinking of your peninsula – we have one too and just treated it with board and batten. Yours would look gorgeous with that treatment, especially since you see it from your entrance.
YoungHouseLove says
Aw thanks for the tip about board and batten! We also love that look so it’s definitely on the consideration list!
xo,
s
Heather T. says
I am also painting my kitchen cabinets this week! I’m a teacher so I have two weeks off and figured I’d take the plunge. My current status: everything’s out of the kitchen, cabinets out, hardware off, sanding is done, taping is finished — priming and painting next! Phew!
YoungHouseLove says
Wahoooo! Have fun and good luck!
xo,
s
Nicole says
SO happy you will be changing the color of the dining room chairs! (I think/hope that was the takeaway from the last update at the end of the post…).
Jennifer Hohner says
Love the progress. When are you guys putting the new floors in? will they go over the old floor?
YoungHouseLove says
Yes, they’ll float over the existing floor since there’s asbestos under it so we can’t rip it up.
xo,
s
Stephanie says
I have a question about the cabinets…my husband and I are thinking of takeling the same project between Christmas and New Years and was wondering what your opinion is on using the paint that has the primer in it. Have you heard from anyone if they’ve used it and if it has worked? What brand of paint do you use?
YoungHouseLove says
Scroll back for my answer about that to someone else. It’s definitely a short cut that we wouldn’t take since we want ours to last a loooong time! Hope it helps!
xo,
s
Katie says
We’re about to start a kitchen remodel this week and next. We just bought our first house and the old kitchen needs some work. Any tips on repainting cabinets that have already been painted? Do you think I should strip all the old paint off, or just sand really well and then paint?
YoungHouseLove says
I alwaaaays believe in using primer when repainting something that has been painted since paint sticks to primer much better than it sticks to paint (even sanded paint). Hope it helps!
xo,
s
jody says
I think it should be “rebuild” instead of “rebuilt” in the first line of the second paragraph. Great post though!
YoungHouseLove says
Oh yes – thanks! All fixed.
xo,
s
Chris says
Hi Sherry and John,
The holidays unfortunately have me looking at your website (pictures) and a reading little less of it, however hope to get caught up with it soon. Not sure if spoke on type of paint for the cabinets. However, II just wanted to tell you that my husband and I sanded (brown) and painted our cabinets (white) when we moved into our house three years ago. We were quit obsessed with the sanding of them and using only the best paint (BEHR). Long story short, they have started to fade and at times stick, peel etc. However, I saw something on HGTV a while back, where a host said they only use “marine boat paint” for cabinets as it will not do any of these things, stick, chip or fade. I am waiting for the perfect opportunity to tell husband that I think we need to redo the cabinets again-lol it is such a process (you know)…but until that time I wanted to pass on this information to you and ask what your thoughts where on the marine boat paint. Many thanks again….love your website…Chris
YoungHouseLove says
Thanks so much! We have used Benjamin Moore Advance to paint cabinets and have been so happy with it (it’s alkyd based and so amazing with a good primer – we used it on our office built-in cabinets and love the professional finish and amazing durability). It’s a lot pricier than Behr, but we’re totally with you on using the stuff that lasts! Thanks for the tip about marine boat paint though – sounds awesome too!
xo,
s
Chrissy Henry says
Well on your way to new cabinets. Exciting!!!
I love seeing pictures of your house like the one of the sunroom looking like a disaster zone. It reminds me that you guys are real like the rest of us and your house is not always perfect!
Abby says
I’m so sorry if this has been asked, I skimmed through most of the comments and didn’t see anything so here goes ;)
About spray painting the cabinet hinges…we are hoping to revitalize our original 1940’s door hinges by spray painting them brushed nickel, and I am wondering what your thoughts are? Did it just not work with your cabinet hinges because of the *type* of hinge they are? Or cuz the paint wouldn’t stick? I am so worried that it won’t work for us, since there are 3 hinges on each of our doors, and I have priced them out to about $6-7/hinge! Mama don’t play that. Any pointers would be AWESOME!
Thank you so much! You guys are doing great, I am totally infested with jealousy by your new kitchen…and can’t wait to see what you have up your sleeves in terms of another possible kitchen in the works, as we are working on one for our shorties right now, too! :) Thank you!
YoungHouseLove says
I just don’t think it worked for ours because they grinded so much while opening and closing. Unlike door hinges which seem to twist to open, ours actually scraped, so maybe take a hinge off and look to see if it has a part that scrapes like the middle of ours. You could also try to test just one to see if it works/holds up and then if it does do them all and if it doesn’t you can save up for new ones knowing they’re the only way to go. Hope it helps!
xo,
s