We were humming along on our way to updating our $6 cabinets with some primer and glossy white paint until the whole hurricane thing took out our power (update: miracle of all miracles, it’s back on, and we’ve never loved electricity more). So the three day outage robbed us of our cabinet mojo since John has some building to do (which necessitates the use of a few electric tools like drills and saws) before we paint and reassemble everything in the office.
Thankfully we did get to tackle all of the prepping and priming before the outage, and took about a million photos of the process (who’s surprised?). So we figured that part of the makeover is worth a big ol’ wordy explanation for anyone at home who might want to follow along in detail, whether you’re also refinishing wood cabinets to make a wall to wall built-in desk or you’re just interested in refinishing your wood kitchen cabinets (which we also did back in the day). Note: this method sadly won’t work on laminate cabs – so it’s just for solid wood.
First, we removed all of the hardware on the doors along with the doors themselves (and the door hinges). Oh and we used two plastic drop cloths to create a Dexter-ish setup to protect the floor/walls from primer drips, paint splatter, and sanding dust – just so we wouldn’t have to worry as much about keeping the sunroom pristine.
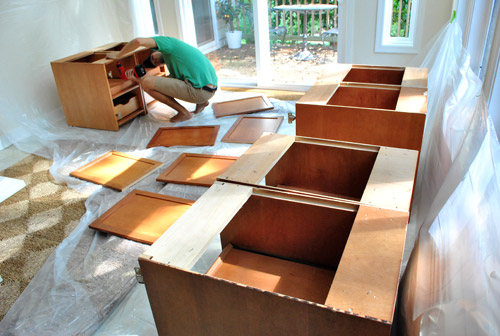
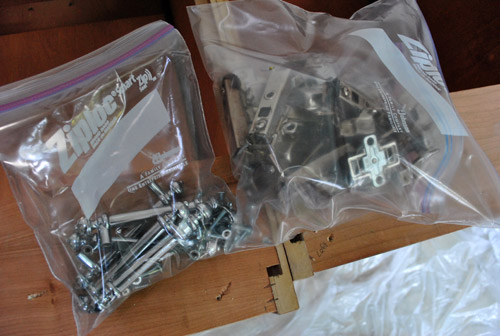
Then we put the door handles and accompanying screws into a plastic bag and all the hinge parts from each of the six cabinets into another bag. Two bags are key so you know which screws go with what (no mixing up handle screws with hinge screws), and can put everything back together in the end and hopefully not have an extra screw or part that you have no idea about (which is pretty much the story of our life whenever we assemble Ikea furniture for some reason- do they toss extra things into each box just to freak you out?).
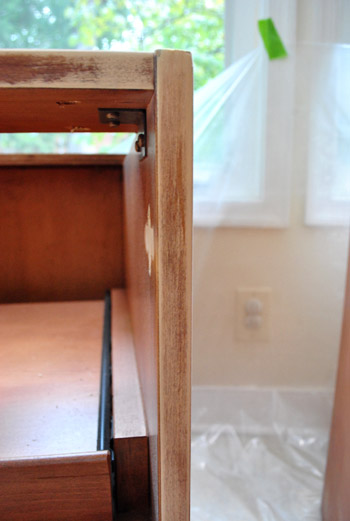
Then I got ready to sand each door down by hand with some low grit paper (50) followed by higher grit sandpaper (200), just to cut the glossiness so the primer and paint would grab on and hold for the long haul.
After one good round of low grit stuff, I myself experienced a makeover. I went from a dorky but normal-ish gal to a sweaty heavy-breathing mess. Seriously, I wasn’t ready for that jelly. Speaking of which, who else is freakishly excited about Beyonce being prego?
So then I opted to break out the big guns (aka: our little Black & Decker electric sander). Thank goodness this was back before we lost power.
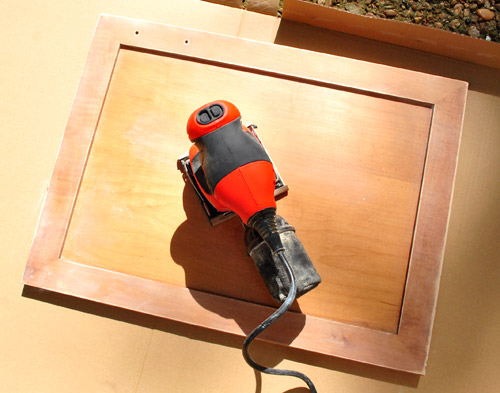
Little man got it done for me. It still took a while to sand down each door with low grit and then higher grit paper, and I did end up with a weird numb right hand from all the vibration, but I was happy to have help (as opposed to the grass roots manpowered method that I started out with). The entire door-sanding step probably took me a good hour to do each of the six doors twice (with low and then high grit paper).
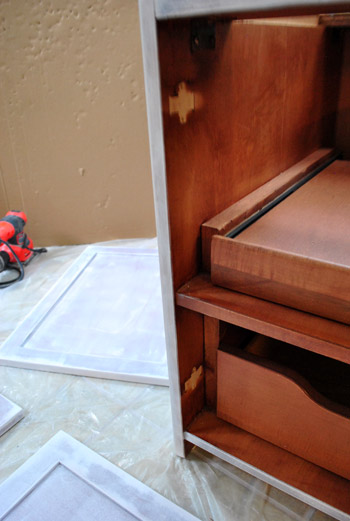
As for the backs of the doors and the cabinet interiors, from day one we decided that we wanted a nice clean glossy front for our wall to wall built-ins, but to keep the backs and the interiors (and slide out interior fittings) of the cabinets the same natural wood tone that they were to begin with. I bet you’re wondering why, or doubting this’ll look good, am I right? Well, we certainly know that not everyone would go that route, but the new KraftMaid drawers that we installed in our first house’s kitchen renovation had wood interiors and we really liked them (you can actually see some of them here full of tools:
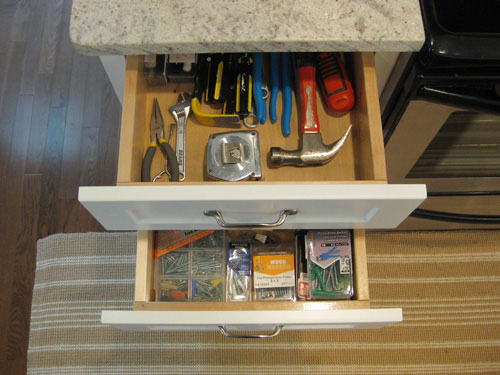
They had glossy white drawer fronts, but inside they held up a lot better to natural wear and tear than anything painted (since we’re weirdos who will stash hammers and screwdrivers almost anywhere). And we actually don’t mind the whole wood + white look (sort of like the dresser we refinished for Clara). Although in this case we decided from the outside that the cabinets would look entirely crisp and white (no contrasting top color), and only when you swing them open will you see the wood tone.
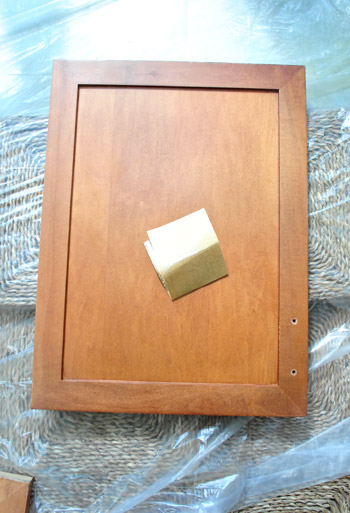
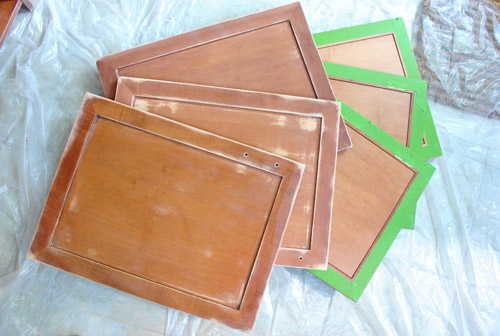
So here’s a shot of three doors face up (all sanded and ready for primer) and three face down (with Frog Tape carefully applied around the edges so we’d end up with a nice clean line between the painted fronts/sides and the natural wood finish on the back). We also considered doing both sides of the door white and just leaving the cabinet interiors wood, but decided that durable unpainted backs-of-doors was a better decision for us – but some folks might opt to paint the front & back of the cabinet doors a color and leave only the cabinet interiors unpainted, and that works too. It just comes down to personal preference.
But back to the whole prep process. Next I took Señor Sander to the fronts and sides of the cabinets (which would also be getting a coat of primer followed by some glossy white paint so the entire exterior of the cabinets would look seamless and white). In contrast to the door-sanding part, this was a sanding step that I couldn’t do outside. Well, I guess I could have carried all six cabinets outside, but instead I just relied on our Dexter-tastic dropcloth setup (and the suction bag thingie on the back of my sander). It actually wasn’t too dusty. See, no smoke cloud (which I totally expected to see):
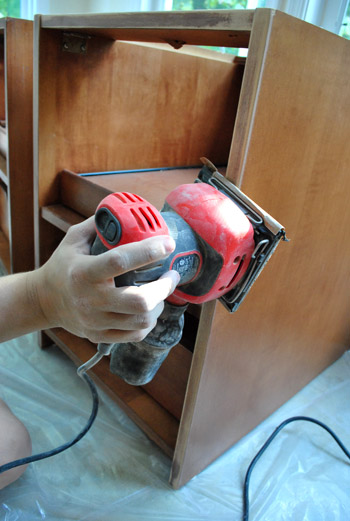
It was important to me that I got a nice roughed up edge around the cabinet frame, since the door would constantly be banging against it, and I wanted my paint-job to stick like glue for a nice long time (we had really great luck painting the original cabinets in our first house’s kitchen about two years before taking on a full kitchen renovation, and they looked mint for that entire time – which definitely gives us some confidence in this method).
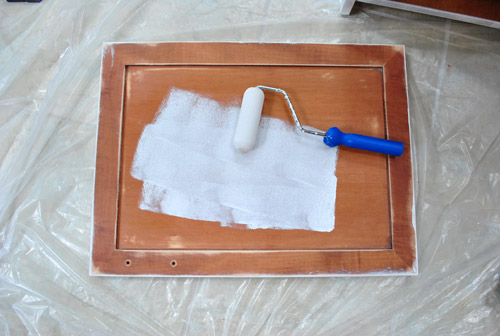
Then it was primer time. We opted to go with Kilz Clean Start, which was the same No-VOC primer that we used on our kitchen paneling with success (after trying two other low/no VOC options without much at all). I applied it with a small foam roller for a nice paper-thin coat without having to worry about brushstrokes.
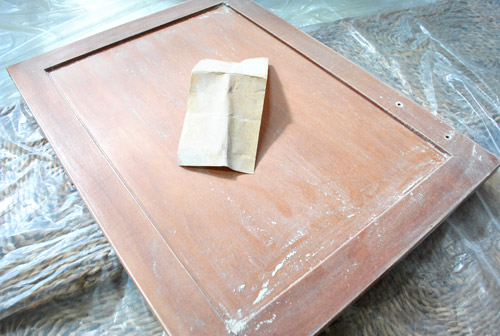
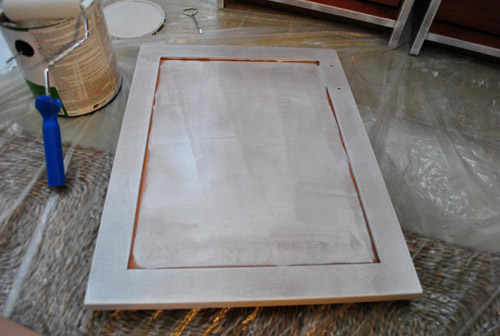
Primer always looks pretty rough when it goes on (since it’s just one thin coat, and isn’t meant to sit smoothly, it’s meant to be kind of roughed up so it can grab paint and hold it tight). I thought sharing this photo might help anyone who applies primer and then wonders if they did it wrong if it looks uneven and imperfect. Chances are you did it perfectly, that’s just how it looks.
Of course I had to use a brush to get into the frame around the edge that my roller couldn’t quite squeeze into. But notice how my brush isn’t dripping with paint in this pic. I wiped it firmly along the edge of the paint can on both sides, so there wasn’t any gunky drippy issue. Just a thin coat of paint applied around that frame. And then I picked up my foam roller again and rolled the door one last time to smooth everything out so there weren’t any rogue brush strokes around the front of the frame.

Oh but do each door one at a time (roll the sides, the front, brush the cracks, and reroll the front one last time). Because if you roll all of your doors and then go in with a brush on each frame and then try to reroll everything after that it’ll be a lot of time between those steps and it might not look as smooth (the roller could even pull up half-dry paint, so doing one door at a time keeps the paint wet enough to be “worked with” for a little bit).
Next it was on to the sides and frames of the cabinets that I sanded down about an hour before. John was going to tape off the entire interior frame of the cabinets so we’d have a nice clean line between the white paint and the wood finish just like the doors, but being ever so cocky confident in my rolling ability, I knew I could lightly roll the frames (without too much paint on the roller- this is key!) to achieve just as clean of a line as tape, and it would save us time (and Frog Tape, which is like currency at our house).
Thank goodness I was right. It looked nice and smooth. Well, as smooth as one coat of primer can look (remember, primer is meant to look uneven and kind of disastrous by nature – so fret not if your priming step doesn’t look perfectly even and smooth since a few thin and even layers of paint on top of it should get you there).
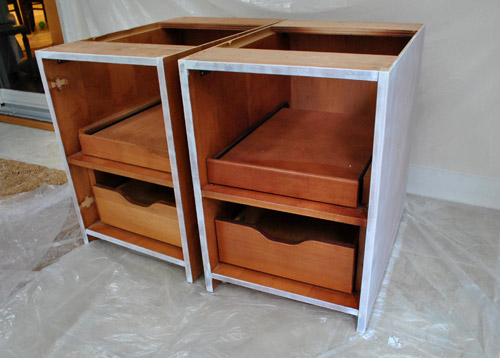
So here’s what the room was left looking like after all that hardware & hinge removal followed by door and frame sanding, and door and frame priming. Oh and see how some of the doors look whiter in certain areas? Some of them had little scratches or imperfections in certain spots, so I sanded them down slightly longer in those areas. This means the primer reads a bit more white on those spots just because the darker wood finish was removed and then primer was layered on. The good news is that doesn’t matter in the end because once a few thin and even coats of paint are applied it’ll all look seamless and bright white. At least that’s always been our experience. Probably shouldn’t count my chickens just yet though…
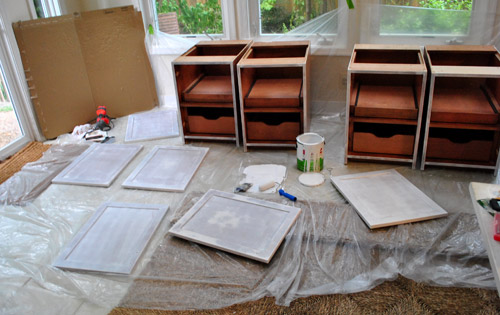
Now we just have to fire up the saw and build up the cabinets about three inches. Then we’re planning to assemble them in the office (they’ll be way too heavy/awkward to carry into the office after we screw them together to create three double cabinet bases) and I’ll apply those last 2-3 thin and even coats of paint when they’re in place (since painting them before assembling/moving them makes us fear scratches and dings that could occur when we move/assemble them). But by assemble them I just mean screwing them together to create those three pairs of double cabinets (not putting the doors and hardware back on – which we’ll definitely do after painting them, as usual).
Then it’s onto the counter. We’re still completely undecided on what we’re going to use (assembled planks of wood, one giant piece of wood or even some other material like an Ikea countertop, etc), but we’re planning to do some legwork so we can hurry up and work at our new built-in desk. We’ll keep you posted. If one things for sure it’s that we take great pleasure in over-sharing.
Psst- Speaking of over-sharing, we’re spilling all of the names that we considered when I was pregnant with Clara (including the boy ones we debated, and all of the other girl ones we tossed out) over on BabyCenter. And of course we’d love to hear any naming faves on your list. Or stories of epic naming disagreements. Those are fun too.

Annemarie says
LOL love the Dexter reference :) And thank you for the super detailed description. It looks like a TON of work but I’m sure they will look fab.
Deborah says
Any suggestions on how to sand detailed furniture legs?
YoungHouseLove says
Maybe try using a liquid sanding solution for that part? Or just gently roughing things up with sandpaper that’s folded into a little tee-pee (bad description, hopefully you get what I mean) and shoved around as well as possible? Good luck!
xo,
s
jo says
This is such an exciting project. I painted my kitchen cabinets last year – and boy was that a more involved project than I had realized. I used a belt sander for my cabinet fronts (they were flat-front cabinets) and it went much faster than the palm sander. You risk taking off corners with that thing, though. It’s really powerful! Anyway, I loved the belt sander. And I loved how my cabinets turned out, too.
I can’t wait to see your finished desks!
YoungHouseLove says
Woah- you had some serious power in the palm of your hand. Haha. I think I might take corners off as you mention. Hah. I’m low tech.
xo,
s
Adrienne says
Your desk in progress reminds me of this one I found on Pinterest (thanks for introducing me to pinning by the way – although I’ve gotten a lot less done since it came into my life!).
http://pinterest.com/pin/131847740/
They also had to raise the height a bit, like you’re planning on doing.
YoungHouseLove says
Woah- that’s about the coolest thing ever. Love it so much!
xo,
s
Kim says
Oh my gosh. Thank you for for saying it is okay to paint the front of cabinets and leave the inside wood. I’m very soon going to be taking on this little ditty of a project and I have no (I repeat NO) desire to add the extra month it would take to paint the insides. I was worried I would feel lazy and maybe a little shameful every time I opened my cabinets with company over. But if you just heard that noise, it was me breathing a sigh of relief. I’m stylish, practical, and not at all lazy. ; )
Oh and I’m new and really enjoying your blog. I’m totally inspired. In fact, I just spent the afternoon repainting a few walls WITH my 3-year-old and it was really fun!
Kim says
It was a little bit freaky just now to click to comment and have the entire background, header, and color scheme change!!
YoungHouseLove says
Haha- by night the Petersik site-coding elves play.
xo,
s
Jasmin says
Hi Sherry and John, Clara and Burger,
I really enjoy your blog I love the way, how you great your new home and I love your American way of living. I’m from Germany and I’m so glad you’re stayed save during Irene.
Love Jasmin
YoungHouseLove says
Aw thanks Jasmin!
xo,
s
Amanda says
It’s not low-VOC, but Rustoleum came out with this kit for painting cabinets that kind of rocks. I just finished two sets of bathroom cabinets and they came out pretty awesome. No sanding, even. I think it’s called Cabinet Transformations or something like that?
(Not a paid advertiser, for sure, just a DIY gal who was THRILLED to not have to figure out what to do with oak and lousy laminate cabinets, LOL!!)
YoungHouseLove says
Thanks for the review! We’ve heard awesome things about it from other bloggers, just haven’t tried it ourselves since we prefer the low/no VOC thing.
xo,
s
Monique says
Timely post as I’m considering painting our kitchen cabinets. Have you guys tried using deglosser for any of your projects. If so, why wouldn’t using a deglosser instead of sanding be a good option for kitchen cabinets.
Also, have you or any of your readers tried Caromal Colours Reclaim to paint their kitchen cabinets? According to the press, this paint is odor free, can be rolled onto cabinets and is durable. Here’s a link:
http://thestudioat3oaks.blogspot.com/2011/08/caromal-colours-reclaim-counter.html
I’m all about shortening the process to get great results but hesitant to try something so new.
Thanks for the info.
YoungHouseLove says
Anyone tried Caromal Colours Reclaim? As for liquid deglosser, we actually use it regularly (we recently mentioned it as part of our process for the front door painting project and the hardware ORBing project) so it’s just about how thorough we want to be. We want these cabinets to last a while, so breaking out the sander to truly rough them up seemed like the most peace of mind. Hope it helps!
xo,
s
alg says
Don’t you love your sander? I love my sander!
Adore your new banner, btw :)
Melissa Alderman says
I’m so glad to know I’m not the only one who is freakishly excited about Beyonce’s pregnancy! If you haven’t seen her performance at the MTV Awards where she rubs her belly at the end you should! Jay-Z’s reaction is priceless and the whole thing made me tear up!
Oh, and thanks for showing the picutres of the uneven primer. That part of the process always makes me so nervous!
YoungHouseLove says
Yes! I was going crazy with my sister in law watching that! So sweet!
xo,
s
Kristi says
Hello Sherry & John – I am about to tackle my very first DIY home project – which is refinishing an old hutch that I want to paint white. You can bet your bottom dollar that I am using your site as my how-to guide! I just had a question about what type of paint rollers and paint brushes your recommend?
Also, kind of off-topic for this post, but I believe your have ORB’d hinges (on your sliding doors?) (Well, I can assume this because Sherry has maybe ORB’d everything in the house that isn’t painted white! ha ha ) Did you have any troubles with the moving parts of the hinges and clumping paint? Is that a weird question?
Thanks for any insight!
Also happy to hear that you have regained power and that your family is safe and sound! The fact that you lost power for a few days and DIN’T miss a post!? Rocks for the rest of us!
-Kristi
YoungHouseLove says
Haha, I do ORB anything that moves! But we haven’t tried to ORB hinges yet (our sliding doors don’t have them) so we’ll have to report back on that when we do. We’ve heard from some folks who have done it with much success and others who said it scratched off (maybe due to not sanding or not applying super thin and even coats). As for the rollers, we like small foam rollers from Home Depot (any small ones for flat surfaces should do) – just like the one in the pics of this post on top of the door. When it comes to brushes, this one is my favorite of all time: https://www.younghouselove.com/2009/06/how-to-paint-trim-like-a-pro/
xo,
s
Kristi says
Thanks Sherry!! This is all excellent advice!! I really appreciate you taking the time to respond! and Duh?! hinges on a slider!? Is it Friday yet!?
YoungHouseLove says
Haha- no worries! My brain works like that too.
xo,
s
Charlotte says
Sherry please be careful! I was an art major in college and ended up with carpal tunnel syndrome after my sculpture class from using vibrating tools like sanders and metal grinders. SERIOUSLY. I got the numb/vibraty wrist thing a few times and thought “no big deal, its not like I’m bleeding or something, it’ll go away.” But eventually (like after 4 or 5 times) it DIDN’T go away. I had to have physical therapy and iontophoresis on my wrists…so if you feel that feeling, TAKE A BREAK and come back later!!!!!!
YoungHouseLove says
I’m so sorry to hear that Charlotte! What an ordeal! Someone mentioned padded vibration-proof gloves to cut down on the impact or something? I totally want them now!
xo,
s
Monique says
Sherry, thanks for your response about deglosser. I totally forgot about your door DYI. Love the new banner on your site.
YoungHouseLove says
Aw thanks Monique! Good luck with everything!
xo,
s
FunnyLastName says
Your name article definitely resonated with me! Our last name is Belcher, so we have to be EXTRA careful naming our sweet kids once they get here. Esther Belcher? Cannon Belcher? I don’t have the heart.
Marie says
Not sure if you’re aware but none of the images in your post are loading on the actual page and in my feed reader.
YoungHouseLove says
So sorry! Nothing has changed on our end (we have stored all of our site pics on amazon.cloud for the last 3 years) but it looks like they might be blocked for you for some reason? Maybe your office blocked them? Or it’s just a glitch and they’ll come back soon? Wish we could do something on our end!
xo,
s
Steph says
I hope this isn’t a stupid question, but I’m a total newbie. Can I ask why you use a roller instead of spray paint? Is it because spray paint is so toxic, or because it’s more expensive, or just because you like regular paint better?
I have a solid pine buffet that I want to paint super glossy white (think West Elm Parsons desk), and I assumed I should use spray paint to get that super-even finish, but I have NO clue what I’m doing.
Thanks in advance! :)
YoungHouseLove says
Spray painting cabinets is for the pros. They have awesome expensive paint sprayers and don’t get drips or have coverage inconsistencies… but for regular people (like us, haha) the recommended method is primer + paint applied with a brush or a small foam roller, which is what we’ve always used and had great success with! It’s just more error-proof and you have a lot more control. Hope it helps!
xo,
s
Steph says
Thanks so much for replying, Sherry! Man, I would love a professional paint sprayer. But what about cheapo spray paint like the Krylon stuff? Would that just take waaaay too long?
YoungHouseLove says
I would just be worried about drips and tackiness and generally having less control than a brush and a roller, which is why we go that route every time!
xo,
s
ashlee says
let’s face it – i’m the queen of stupid questions.
“The entire door-sanding step probably took me a good hour to do each of the six doors twice.”
do you mean that it took you an hour to do EACH door, or an hour total to do ALL doors?
also, i recently started testing out painting my kitchen cabinets by using the back of one panel. not going to well. you can see the wood grain very well, despite applying two coats of paint. i think i’ll have to try a different brand of primer – perhaps something more heavy duty.
do you mix your primer with anything for a more even roll? i read on a blog – and i have no idea which one – that it is sometimes recommended to mix it with something so it doesn’t ‘clump’ and get weird as quickly.
YoungHouseLove says
So sorry, I mean that it took me an hour total for ALL doors. As for mixing my primer or paint, I never do that. Too worried to mess things up. Just try to use a high quality primer and a great paint (I’m so in love with the paint we chose- more details on that soon).
xo,
s
Sophia says
Just saw this on pinterest and it reminded me of your work space-even the chairs! Can’t wait to see your finished room! Love it!
http://pinterest.com/pin/160570350/
YoungHouseLove says
I love that so much! We actually used that shot as one of our “inspiration rooms” a while back!
xo,
s
orangesugar says
Do you find that the Kilz Clean Start is sufficient for painting furniture? We are DIYing a lot of things thanks to Ana White and the Kreg Jig, which means a lot of bare wood/plywood needs to be painted. I have always heard water based can raise wood grain and any knots in wood will bleed through. Initially I chose BIN primer then they raised the price on that so now I’m using Zinsser Cover Stain, both stink something awful. I would love to be able to use a water based primer but I’m hesitant.
YoungHouseLove says
We haven’t used it on furniture yet but since it worked on the wood cabinets I’d be tempted to try it! Maybe just test a spot and if it doesn’t go to the stinky oil-based stuff? Might be worth a try to save you all those fumes!
xo,
s
Meg says
I noticed all the plastic on your floors while I was referencing your post for cabinet painting tips. If you are looking for a greener, reusable, and long lasting paint drop cloth idea- I use vinyl table cloths. I buy the biggest size I can find at the cheapest price (usually a holiday themed one after the holidays). I use it for my kiddos are projects too. They work great and the soft underside is safe for all kinds of floors.
YoungHouseLove says
LOVE that tip! So smart. We reuse our plastic dropcloths as much as possible, but tablecloths are thicker so they last even longer!
xo,
s
Amy says
Love the window treatment. Can you tell me how you made the arched window treatment?
Thanks,
Amy
YoungHouseLove says
That was an inspiration photo (that we credited in the post) so it wasn’t our room. So sorry- we don’t know how that was made (although some sort of rounded wood top with the fabric stapled around it (like upholstering a chair) could probably work!
xo,
s