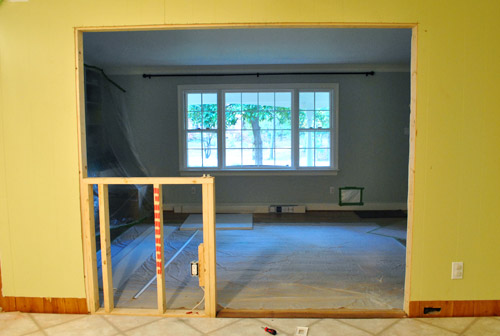
The wall is down (more here). Drywall is up (more here). Time for trim.
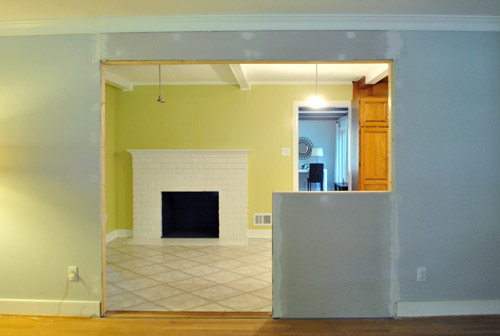
I actually kinda enjoy doing trim. Despite it requiring lots of focus and attention to detail, it’s very satisfying to see all of those rough edges turn into crisp white borders. But before I could get to trim, I actually had to take care of the ledge on our half wall and the door jambs first.
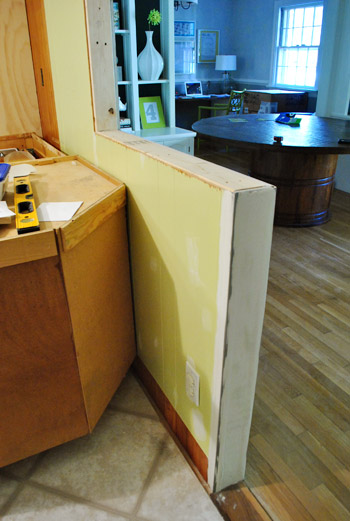
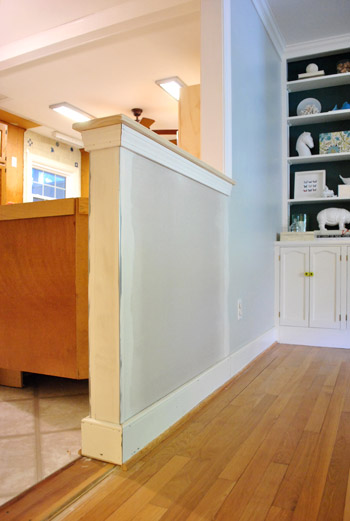
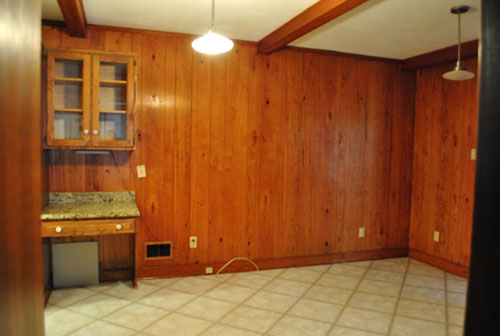
Our neighbors recently had a similar wall opening project done in their house (these guys), and we really liked how they treated their half-walls with a wood platform on top and trim beneath to dress it up a bit. It looks really finished and balanced and is also a great place to set stuff out when entertaining (like a few small dishes of nuts or candy or some pre poured drinks). So we bought this basic plank of pine that’s eight inches wide and four feet long to use for the top ledge.
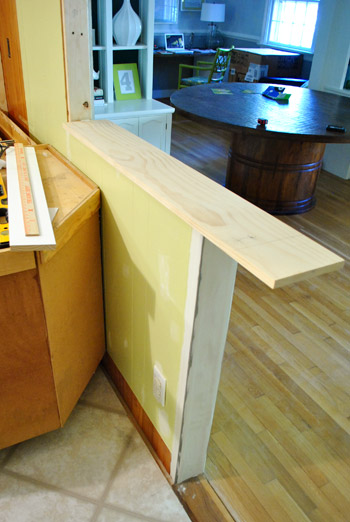
Obviously it needs to fit a bit better than that. On one end we just sliced it a bit shorter, but on the other we actually wanted to notch it over the wall so in the end it would have the same amount of overhang on each side (we had to factor in that it would have to extend beyond the trim on the inside angle, so it’ll look crazy long until we add that a bit further down the page). So we both measured and marked the wood (twice, to avoid any weird little mistakes)…
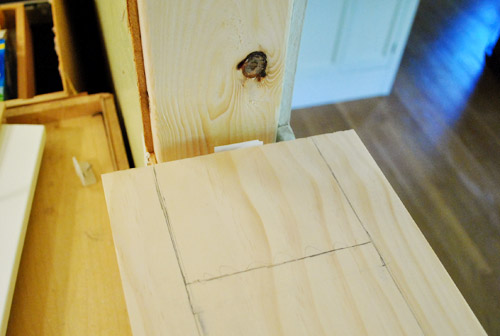
…and I ran outside to make the cuts in our driveway (using a jigsaw to cut the notch and a miter saw to get a straight edge on the other end).
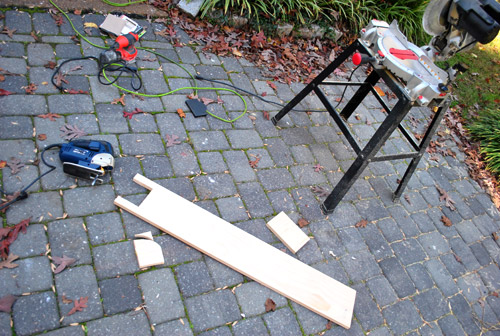
Before installing it, I also sanded down all of the edges to make them a bit softer. No one wants to slice their arm on a sharp corner walking through our new opening now do they?

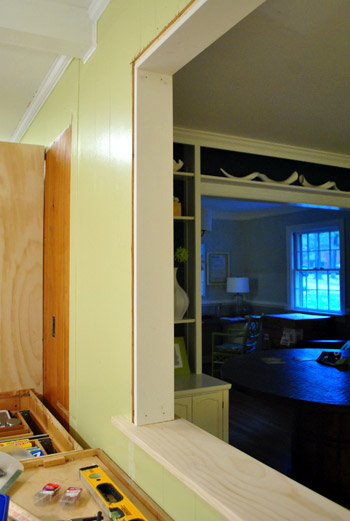
Fit-wise, we got lucky. Perfect on the first try. This was either a very good omen for the rest of my trim cutting, or a sign that it can only go downhill from here. See how it looks oddly long here? That’s just because there’s no trim on either side, which will end with just a slight overhang of the ledge under it to ground it like many of the windows in our house.
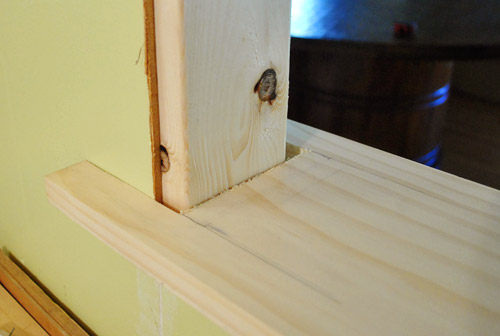
With a couple of nails on either end, we hammered that guy right into the frame and it was set (we’ll eventually prime and paint it white like the trim). Then we could begin to set the door jamb in on top of it.
Fortunately our doorway was a standard jamb width of 4 5/8″ so I could rely on this pre-packaged door jamb kit they sell at Lowe’s for about $18. Well, not completely. It was meant for a normal-sized doorway (aka a 3ft opening) so I had to buy another $6 side piece to help extend my top jamb.
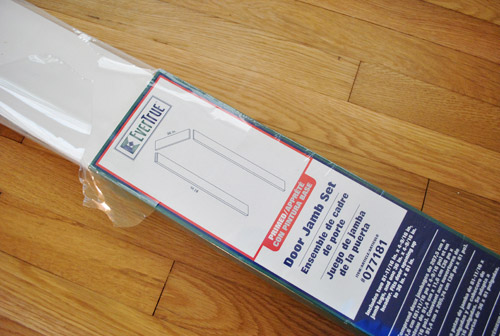
The reason you install a jamb over the wood that frames the opening is because the jamb is wider so it covers the sides of the drywall and paneling so that once the trim is added the entire opening is seamless and sealed (so you can’t peer beyond the wood framing piece from the side and see the side of the drywall).
The instructions said to assemble the jamb first and then lean it into the doorway as one piece. That didn’t seem very practical given our unique situation (aka: our uniquely sized opening), so we hung each jamb piece separately and it worked out really well. I cut the short side of the doorway first then together we held it in place and nailed it in with some finishing nails.
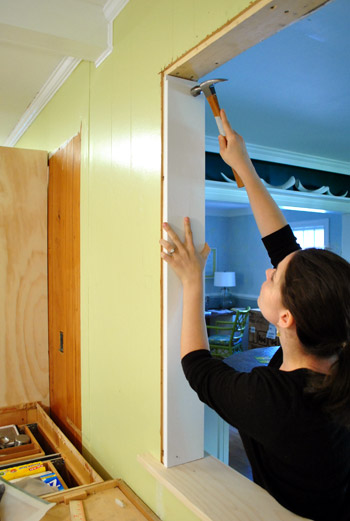
Then we slid in the short side of the top jamb and hammered again. It was finally starting to look kinda like a doorway. And trim would definitely seal the deal.
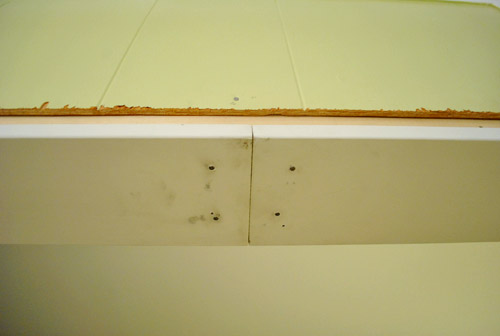
Here’s where we had to line up the two pieces of the top jamb. Ideally we’d love to have one piece, but we couldn’t find a 92″ piece. Fortunately caulk and paint will make this look pretty darn seamless. Especially since I took a minute to sink every finishing nail’s head into the jamb with a nail punch (it’s a cheap little manual tool explained more here).
With the top on and the other side hammered in place, the jamb was officially done. So with that and the ledge checked off of our list, we could officially turn our attention to the trim.
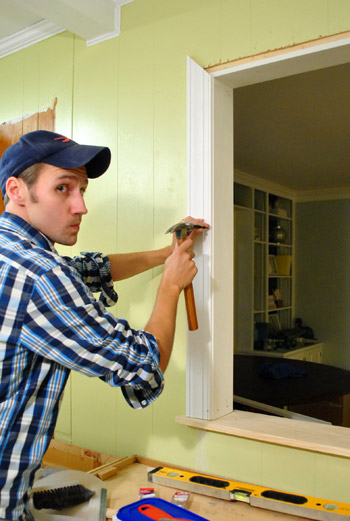
I’m not gonna go into crazy step-by-step trim installation here (you can read all about that when we re-trimmed our old bathroom). As usual it involved lots of measuring, cutting it on an angle with my miter saw, and hammering it carefully into place (using a nail punch to manually sink the finish nails to keep the trim ding-proof). This happened on all three sides of the doorway, in both the kitchen and dining room sides of the opening.
We also added some slightly smaller trim under the ledge to beef it up a little bit because:
- we had seen our neighbors treat their half-walls this way and liked how it looked
- the big picture window in the dining room along with many other windows in our house are treated the same way (with a ledge on the bottom that’s grounded by some slightly smaller trim)

In addition to installing trim around both sides of the doorway, we also had to reinstall a bunch of baseboard that had to come out during demo. Fortunately enough of it was intact enough that I didn’t have to buy anything new. Some the paint got scraped off during the removal and rehanging process, but once everything is caulked and painted again no one should be the wiser.
Some of this baseboard and quarter round may have to come up again when we do the floor, so we left some of it unfinished (like the quarter round where the transition will go after it’s added). But we tried to complete most of it so that it looks as polished as possible during our construction phase (which will last the next couple of months).
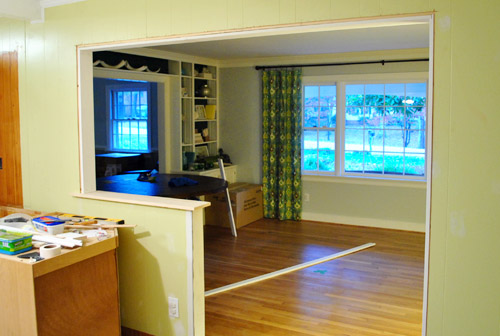
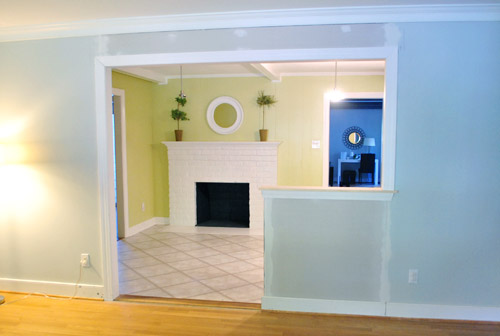
So here’s the room from both sides with the finished trim. Definitely looking more doorway-like, eh? Remember we’ll be painting the wood ledge white like the trim so it’s more integrated.
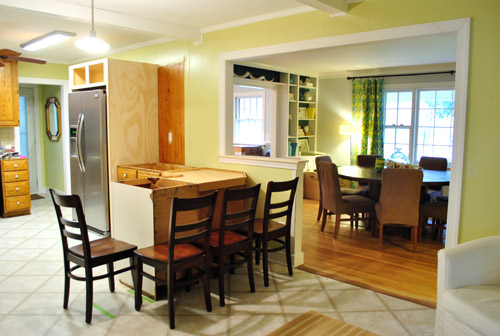
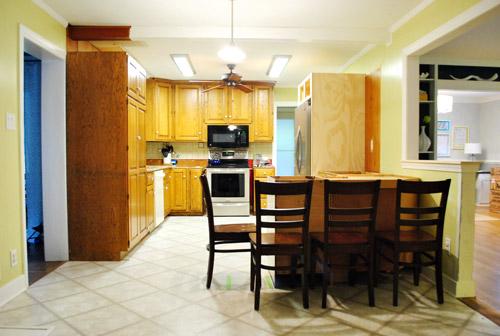
Now to make it look a bit more like a kitchen and dining room, we’ve moved furniture back in! Although the chairs in the kitchen are just placeholders (we’ll get some counter-height stools that are a bit lighter looking – maybe even acrylic or something to keep things from feeling too heavy or wood-riddled). So excuse the chaos and busyness of things that are out of place and soon-to-be changed (it’s a lot crazier and busier than it’ll look in the end).
Of course there are still missing counters, walls, and trim that need to be painted, kitchen cabinets that need to be painted, and we have a million other kitchen updates to do (lighting, flooring, backsplash, yadda yadda yadda).
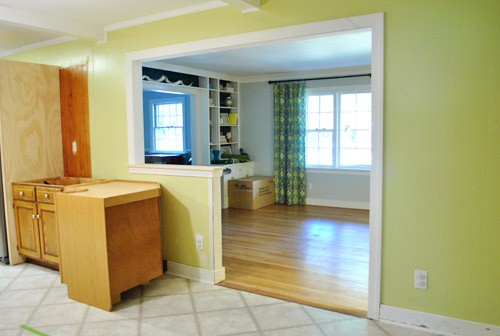
You might also notice that we acquired our last cabinet for the peninsula. Woot. See him there on the end? Guess how much it cost? Rhymes with “dero zollars.”
It’s from the ReStore, and no we didn’t steal it. When I told the guy I was looking for an 18″ base cabinet, he said they had one out back I could have for free. Apparently the donor left them outside where they endured a light rainstorm before the ReStore noticed them. So even though they hadn’t gotten damaged, it was against their policy to sell them. So why not take it home and give it a try? We gave it a couple of days in the carport/sunroom to ensure that it had aired out and wasn’t damp or anything. Then we looked it over and it checked out a-okay (no water damage/mold, etc). And the bonus? It’s the closest match to our existing cabinet doors and drawers that we’ve seen (the doors and drawer are beveled so they’re half-sunk, making them the same thickness as all of our half-sunk doors and drawers).
Oh and see the tape lines in the pic above? The first one marked where the peninsula would end and the second one marks where the 12″ counter overhang will end- so we can try to picture it as the rest of the room comes together.
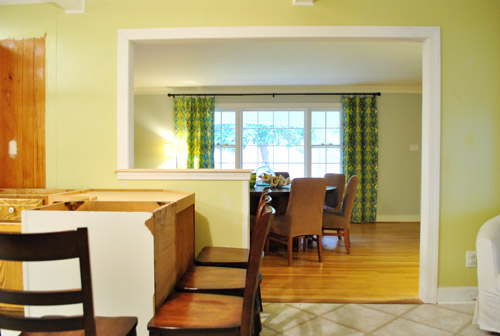
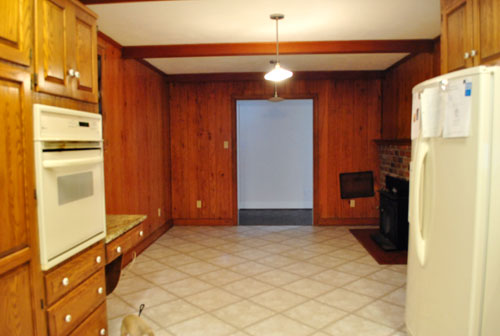
Here are a few more shots to show you how much the opening is a game-changer around here. Even with full chaos going on, it’s such a difference. It’s so nice to have more daylight in the kitchen thanks to the opening. And once we paint the cabinets and install our new white counters it’ll be even lighter in there (with mocha cork floors to ground things).
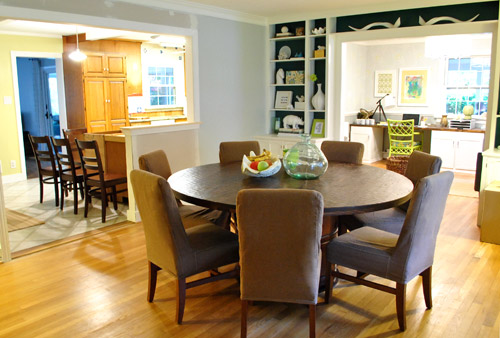
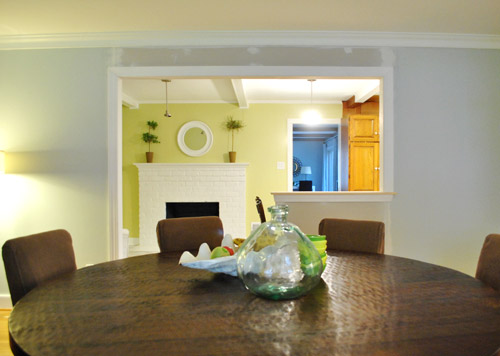
Here’s a shot through the opening now that there’s trim and the table is back and we re-hung the curtains. We love how the opening lines up so well with our big picture window in there.
Here’s the other direction. Now we can enjoy the fireplace from the dining room.
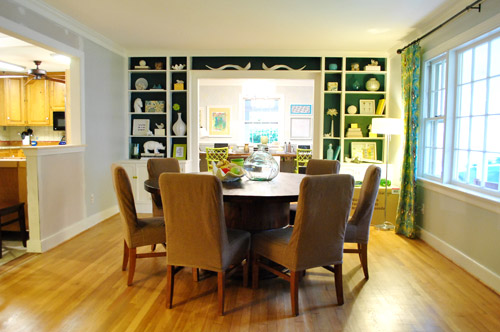
Here’s another shot looking past the dining room into the office. Ignore the abundance of odd items on the dining table (a faux clam fruit bowl, a stack of serving bowls, and a big clear vase) and the big box and floor lamp near the curtains on the right (they’re not permanent of course – just need to add a big chandelier over the table and install the new dishwasher in the box). So it looks crazier than it eventually will when things are settled.
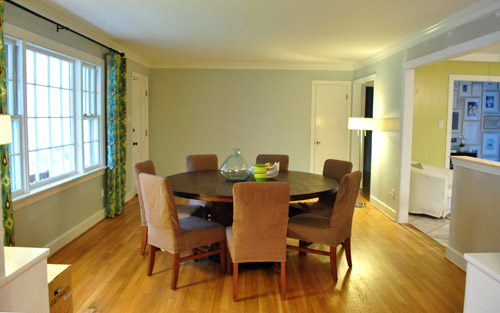
Here’s that room from the other direction (still need to add a big buffet with some large art over it and a nice sized rug to anchor the entryway area (among other things).
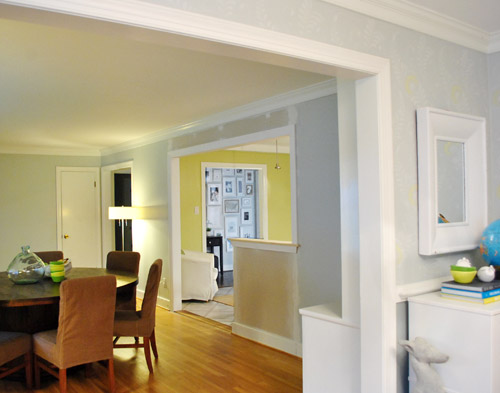
One of the coolest “bonus views” that we gained was the peekaboo into the hallway frame wall all the way from the office. It’s so nice to see the sunny avocado kitchen framing the view.
We sadly didn’t manage to get any photos of Burger running through the new doorway (the little guy was a blur), but here’s Clara loving the new route.
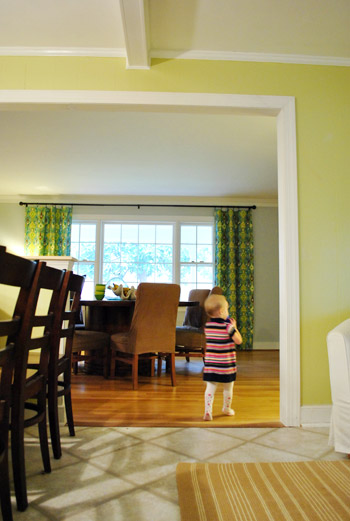
She’s such a quick adapter. She just sees something new, smiles, and tries it out. A day later it’s old hat. Like it’s always been there. Although we’d argue that it should have always been there anyway. Burger is completely used to the new flow too. He cuts through there all the time.
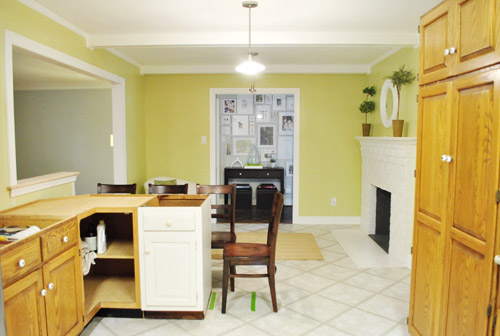
Oh and since we always love taking a look back, here are some older shots from similar angles to some of the ones above taken right after we moved in last December:
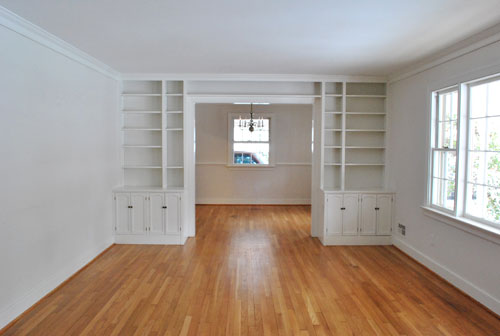
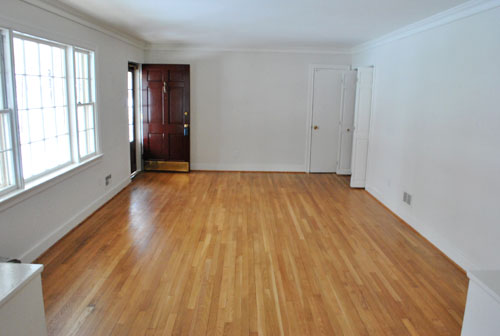
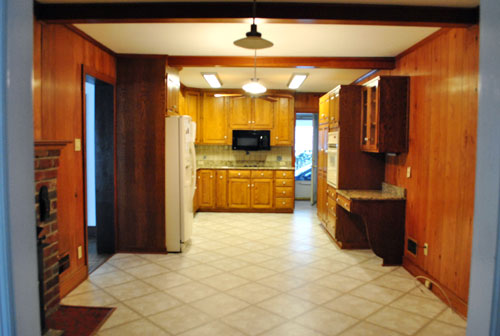
What a difference eleven months can make, huh? Still have lots to do, but it’s getting there one day at a time.
Oh and when it comes to costs, finishing the entire opening ourselves was $90 (that includes doing drywall, adding door jambs and the ledge, and adding trim on both sides of the opening). It would have been $250 to pay the contractor to do that stuff, so we’re thrilled that we could take it from here…
… and save 160 big ones.
What did you guys do this weekend? Any other door jam, ledge, and trim stuff going on? Any standing around and gazing lovingly at a new doorway? There was a fair amount of that going on here.

jennypenny says
Wow, you guys must be so excited. I’ve loved your idea of the peninsula since you first mentioned it, but seeing it come to life got me really excited, so you guys must be ecstatic! Your home is looking beautiful! I can’t wait to see your completed kitchen, especially the backsplash tile. It’s so gonna rock!
Sandi says
Looks ah-mazing!!! I didn’t know they had those jamb kits. Der. I really could have used one of those a year ago. This makes me want to knock down some walls in our house.
You guys are either very bad influences, or very good ones! I’ll need to ask my husband which…
Tiffany says
I love, Love, LOVE this! Such an inspiration. I have the will, and am willing to do the work (not knocking out walls, but in general), but I lack the vision. I love seeing your vision actualized!
Karen F says
wow, it looks sooooo good, and I can’t believe how much progress you’ve made in such a short time. It takes us (really, my husband, ahem, I move a bit quicker than he does) forever to finish things.
I’m going to play “let’s name our favorite part” and say that I love how the dining room curtains interact with the color on the kitchen walls – I guess that’s the benefit of having a “whole house” color scheme! Nice job!
Laura says
I love how it looks and how it has opened up your house!
MissCaron says
AMAZING! Looks so much better all open like that! Y’all did a great job! Can’t wait to see it all finished.
my honest answer says
Ah it looks so much better already! I knew good things would be happening this weekend. Thanks for such a detailed tutorial. I bet you can’t wait to be done with all the mess!
Alyssa says
Looks amazing guys!! I feel like you are working in fast forward, this kitchen project is moving right along. Which is great. I love how the opening lines up with the window too, what a beautiful view.
Lenore says
I love the new view, it’s amazing how much lighter and open it looks! I love that even though my style is completely different from yours I still appreciate and love all the changes you’ve made to your home. You’re inspirational!
Heather says
Looks totally awesome! Keep up the good work guys.
mribaro says
I love all the new vistas that opened up!
TheChangingHouse says
WOW! What a difference trim makes! I can’t believ how finished it looks already! Great work! And, what a blast from the past! Amazing how you started and where you’re at now!
Katrina says
I love the opening and how it’s changed your floor plan. It’s spectacular! Are you planning on pulling some of the peacock color from the dining room/your office into the kitchen? I think accents in that color would look lovely against the kitchen wall color and would tie in nicely to the other rooms.
It’s exciting to see how much you have changed in what seems to me to be such a short period of time (although I sure you were in the planning and dreaming phase for longer than it seems from your blog). How long would you say that you’ve been working on the kitchen, from planning to where you are now? I’m overwhelmed by the thought of redoing our kitchen.
YoungHouseLove says
Oh yes, I’m sure lots of colorful accessories and art will get layered into the kitchen as we go. Casual dishware on the open shelves will be fun in a variety of playful colors! As for how long we’ve been actively working on the kitchen, maybe for the last two months (when it comes to interviewing contractors and finalizing the layout, etc). But we’ve been thinking about it since we moved in- which we think is so important because we went from initially wanting an island in front of the fireplace (odd!) to a banquette (which would have been sort of cramped and weirdly un-grounded) to the whole peninsula idea (which we love the most of all – by far). So I’d say plan until you love the concept and only then should you start actively working on stuff!
xo,
s
Jess @ Little House. Big Heart. says
So bright and airy! It looks terrific!
We spent our weekend getting the house organized for our Thanksgiving company. We’re making progress, but still have tons to do!
Rebecca says
WOWZERS! That looks awesome. Even before you mentioned it in the post I was wondering if Clara and Burger go running through it yet. It must be fun for them to run that new “loop”.
Kristi @ Addicted 2 Decorating says
It’s looking so good! I’m always amazed at the difference that crisp white trim makes. I can’t wait to see the dark cork floors in there. It’ll completely change the look of that room.
After seeing the picture where you had to use two pieces of wood on the top of the door jamb, I was reminded of a tip that was given to me by a contractor, and I thought I’d pass it along to you. He said that any time you have to pieces that need to be butted up against each other (baseboards, door jambs, etc.), instead of keeping them cut at 90-degree angles, cut each piece at a 45-degree angle with a miter saw, so that one piece slightly overlaps the other. I tried it out, and it really does make a big difference. Anyway, just thought I’d pass that along! :)
YoungHouseLove says
Ooh that’s a great tip! Thanks for sharing!
xo,
s
Devon @ Green House, Good Life says
I second that. If the wood shrinks in the winter, the gap will be smaller and less noticeable.
Elizabeth says
Good job! It’s all coming together, and before you know it, the kitchen will be completed!
Nessa@{CasaBraaflat} says
seriously it is stunning. you guys are amazing.
Missy says
Wow, that looks just lovely! What a difference!
Question – would this method work to finish off a “finished” entry into our kitchen? The builder just did regular drywall for the entry to the kitchen and it looks blah, blah, blah. We’d like to finish it out with molding and after seeing this post, I’m doubly convinced that would look fantabulous!!
YoungHouseLove says
Oh yes, I believe you could add a jamb and some trim around it. Maybe just knock or use a stud finder to locate the beams behind your drywall to secure things into studs?
xo,
s
Lacy @ downMODERNhome.com says
We started renovating a townhome in Fredericksburg, VA (which we bought as an investment to fix-up and rent out). It was a lot of paint and light fixture fun so far (haven’t started taking out a couple of walls yet).
The progress on your kitchen/dining area is great! Love the view of the dining room window.
Kris says
You guys! This looks amazing!! The fireplace seems like it’s at home now finally settled into it’s oddly, but now perfect, placed position on the wall.
YoungHouseLove says
Haha, I know right? We had some family over this weekend and were trying to explain how annoying the placement of the fireplace was but they totally didn’t get it since it looks completely normal now that there’s that opening and that little cozy corner. Haha. They were all looking at us blankly.
xo,
s
Brandi @ His Shabby Her Chic says
Looks terrific! It’s all really starting to come together!
Kelly says
I never comment but I have to this morning – this is just so darn exciting!!! It looks so super amazing. I love seeing the happy kitchen color and the dramatic dining built-in color in the same glance! And I know you can see the kitchen color from the office, but for some reason it’s exciting seeing so much of the kitchen through the new opening and then glancing over and seeing the pop of your desk chairs. The colors are just all coming together so well from every angle.
Also, it all looks so meant-to-be. I love the shots from the office that show off the white chair in the corner of the kitchen – so homey and cozy!
Congrats and good work! :)
Kerry @ First Time Fancy says
We finally demo’d our second floor bathroom. We badly need to get a tub in place, as our four month old baby girl is rapidly out-growing the kitchen sink haha.
LOVE the new opening! Can’t believe how much you guys have accomplished since moving in last December! :)
Stefanie says
I like to not look at who the author of each post is and try and guess by reading the entry. It’s the little things that help get me through the work day.
Unless there is a reference in the post that makes it clear as to who wrote it most of the time I’m wrong. I guess Sherry a lot. I think it’s all of John’s celeb pop-culture references that throw me off. I wish I had a John…a man who could appreciate a nice Oprah reference (ie: My vajayjay is painin’!” You’re one lucky girl Sherry.
YoungHouseLove says
I am! John never fails to crack me up.
xo,
s
Elisa @ The Self Life says
We have a buuunch of crown moulding in our house – http://wp.me/p1pL31-ta – and you guys are very much inspiring us to get moving! :D
Dianne says
Amazing transformation! Love the new 18″ cabinet — and the trims DO look like they have always been there. What a great flow — especially for Burger and Clara :-). Great post — I’ve been looking forward to seeing the progress.
Amber K. says
Love it love it. For some reason the opening looks even bigger with the trim around it now! You guys have a wonderful vision and I am so enjoying being able to see it all come together.
Serena says
This looks fantastic!! I think this is the most excited I’ve been about any of your projects by far. Although, to be fair to all those other projects, the first time I accidentally stumbled onto your blog you were announcing Clara’s birth and sharing pics of her so they’ve all had a lot to live up to on my end :-).
Sarah says
This looks fantastic!!! You’re planning is really paying off. I love the view into the kitchen into the hallway. The gray, grellow, gray effect is awesome!
Bethany says
OMG, why are you guys so awesome?! ; )
YoungHouseLove says
No, you are! Haha.
xo,
s
Shannon says
Holy cow it looks awesome! What a huge change. This weekend we tackled a mini dining room reno. I would love if you checked it out!
YoungHouseLove says
Love the color! Such a gorgeous room. Congrats!
xo,
s
Kay says
Oh man guys I knew it’d be awesome and as usual you knocked it out of the ballpark! I so love the new access to the fireplace and it is so much more open that i think the banquette idea wouldve been-great work guys!
michelle says
Wow what an amazing difference when compared to the photos of when you first moved in, the kitchen was like a cave then. I love the way the fireplace is lined up with the new opening. Now you can enjoy it from the kitchen and the dining room.
bridget b. says
it looks great you guys! i can’t quite tell in the pictures, but with the new opening, is it possible to see all the way through the new dining room, the kitchen, and your living room area from the front picture window?
i love the open concept,and i’ve been feeling inspired by your reno to knock out a wall in our home, but wondered if you guys have any opinions on how open is too open? are there things to avoid/ look out for?
YoungHouseLove says
If you walked up onto our porch at night (with all the house lights on and the darkness outside) and pressed your face against our picture window you could see into the dining room, kitchen, and a sliver of the living room (but not the section where we sit/hang out- just the wall where we have two sliding doors and the TV). We love that the hanging out area in the back of the house is still so nice and private but it feels more open since you can catch a glance of the living room from the front of the house now.
As for how open is too open, it’s all about personal preference. Some people love a completely loft-ish feel. We still like little zones, so we leave some corners and walls up (ex: some folks would knock out the whole wall into the kitchen and just use posts to support the ceiling but I like the chair in front of the fireplace because it has a corner behind it that it backs up to – and would look odd with a chair facing the fireplace in front of a column).
xo,
s
bridget b. says
i prefer creating zones as well. especially the little area in front of the fireplace. that would be a great little spot to curl up with a book.
Ashley@AttemptsAtDomestication says
YAY!!! It’s coming along so nicely!! It looks fabulous!!
Lindsey d. says
Looks fabulous! Have y’all considered backless stools that can tuck under the peninsula to prevent a preponderance of chairs in the relatively small space of the dining room table and peninsula?
As for me, this weekend I painted everything in my kitchen but the floor and cabinets (primed walls and trim, painted walls and trim and painted the ceiling). A beautiful color from Behr – Silver Screen — a light grey with the slightest touch of blue. Working on painting the pantry door to add a pop of bright pink(!) and need to paint the decorative shelves before they go back up. So excited though!
YoungHouseLove says
Yes, we think about backless stools for form reasons, but for function reasons we think they should at least have a little bit of a back so kiddos can more easily sit on them once they move beyond kiddie chairs (like Clara uses now). That’s how we got to the acrylic idea (since they’ll almost be invisible). Whatever we land on we hope to have a not-too-chairy feeling. Haha.
xo
s
Lindsey d. says
So, I have no doubt that you DON’T need my help shopping, but these popped up on an Overstock.com add for me today (I’ve been helping my mom pick out new barstools that better go with their new granite, which is remarkably like the granite y’all are taking out). Anyway, I thought these modern, metal and white barstools were amazing, immediately thought of y’all and had to share.
http://www.overstock.com/Home-Garden/White-Metal-Counter-Stools-Set-of-2/5954039/product.html?rcmndsrc=2
YoungHouseLove says
Haha- too funny! I had those open on my computer a few days ago. Love that they have backs for kiddos to sit on more easily. Definitely contenders!
xo,
s
Veronika says
It’s freakin’ awesome!!!
Love!!!! So amazing!!! Congrats!
Wait, was there wood flooring hiding under that wall? I thought there would be a gap in the floor?
YoungHouseLove says
Yup, there was a gap so we filled it by cutting a strip of wood paneling that we had leftover from the opening and setting it into the gap. It looks almost seamless with the oak floor (and will eventually be covered with cork flooring and a transition so everything is complete).
xo,
s
Veronika says
I see! Clever little Petersiks!
Stacey says
I was wondering this as well.
It looks awesome you guys! I love the way you detailed your little half wall. I’d agree with you that it looks like it should always have been that way. Way to go!
Jenna {Jenna Sais Quois} says
I think what I really like about YHL’s “as-you-go” renovation/decoration style is that you always find some sort of way to complete or finish things, even if you (and we) know your entire house is constantly evolving. Little things like plans to paint the trim (even before painting the cabinets) or filling that gap in the floor for now (even though you know you’ll be laying the cork floor eventually) make me happy.
I think a lot of people would just leave it until the whole thing is done…but I appreciate that you guys are living AND working in the space, and the last thing you want is a constant construction zone…
Sarah @ { rad: renovations are dirty } says
I love how much brighter the kitchen is now!
Our project this weekend was installing some real plaster crown moulding in our dining room… it’s all up but now we need to smooth out the joints with plaster.
Anyway, I have to say that I always eagerly await your updates – you guys do such a great job!
Wendy says
It looks amazing guys! Great job! Like it was always meant to be that way. I am truly amazed by how much stuff you guys get done – I can’t even finish painting a room in a month!!! Especially with a little person running around with you. Question, and maybe you’ve already answered this somewhere on the blog, but what’s your tool/machine inventory look like over there. There are lots of projects I want to do but never seem to have the right tools and I hate to run out and buy one all of the time. What would you recommend a DIY-er have in their toolbox to start? I’m thinking of asking for something for Christmas and wondered what one thing you’d recommend? I have basic hand tools and stuff, but nothing to cut with and nothing like a Dremel. Any thoughts?
YoungHouseLove says
I think beyond the basic things like a hammer and screwdriver and drill and pliers and all that we like these “extra credit” tools and use them a lot:
– a Kreg jig
– a miter saw
– a jigsaw
– a dremel
– a cheap manual nail punch
– a small hand sander
– a reciprocating saw
But we only buy things as we need them, so if you approach a project like hanging trim or crown molding and need a miter saw I would just buy one then. Take it one project at a time! Hope it helps!
xo,
s
Heidi says
the two angled shots with the furniture back in are my new favorite views in your whole house! :)
Elizabeth says
Looks awesome!!!
Sophie says
Wow, it’s looking amazing! Love the crisp white trim next to the grellow of your kitchen. At some point I’d love to see a picture from your living room through that smaller doorway next to your pantry to where the new doorway is. I love me some odd angles. :P
YoungHouseLove says
Oh yeah we’ll have to share that angle soon! Maybe after we paint everything!
xo,
s
Erin says
This is looks great and I love the way the pony wall centers the fireplace.
Tiffany says
You guys did a fantastic job! I’m curious though, and maybe you’ve already addressed this, but whatever happened to the two vents that were in the wall? I was wondering how you dealt with that issue, just so all us other DIYers can figure it out. :-)
YoungHouseLove says
We had an hvac pro come out and ensure that losing those vents wouldn’t compromise our system. Then with his blessing John went under the crawl space and disconnected and capped ‘em (so the vents you see aren’t connected to anything anymore). We actually did that in our first house for our kitchen remodel as well.
xo,
s
Tiffany says
Smart! I don’t think I would be skilled enough to do that on my own. Probably something I should leave to the professionals. LOL! I love how it all is coming along. The opening definitely makes the dining room feel more spacious and I can see some fantastic dinner parties in your future!
Letitia says
Woooooooooooooooow. Such a huge improvement!
annabelvita says
I love it! I think the trim really ties it in to the chunky white fireplace and that AMAZING bonus view through from the office to the frame wall is like a sneaky preview of how nice the view through from the front door will be (once the kitchen has the YHL treatment). Stellar stuff you guys!
Michelle says
Wow it looks great!
Melissa S. says
Great job, guys! It looks like a whole new place since when you bought it. I really thought you guys had lost your minds when you bought this place, that kitchen was so scary I couldn’t see the potential. You guys are so great at what you do!
Claire says
It looks absolutely incredible. Love how you guys can envision something you want and make it happen!