Adding a headboard to your bed is one of the best ways to add polish and coziness to your bedroom. And, lucky for you, making your own DIY upholstered headboard is super easy and affordable (ours only cost $66!). This means you can customize the fabric, size, and design to get exactly the look you want. Believe us, we’ve done A LOT of them over the years!
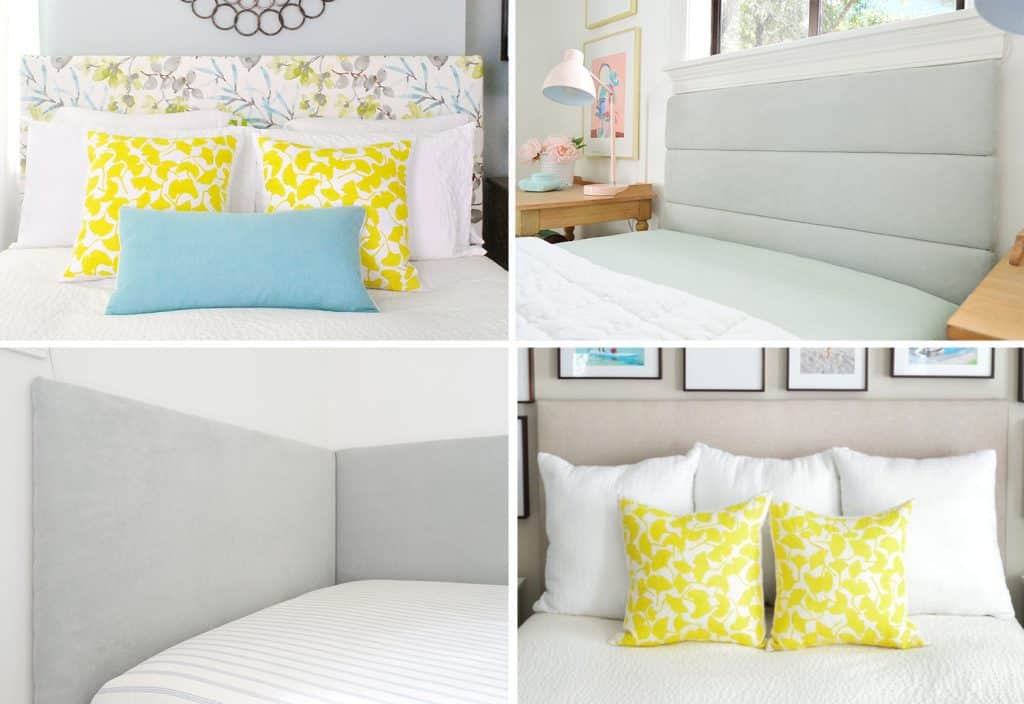
Today we’re going to take you through the step-by-step process to create the first headboard in the grid above (top left), but you can check out these other posts to learn more about the others:
- How to make a DIY channel-tufted headboard (top right)
- How to make a daybed-style headboard (bottom left)
- How to make a wall cleat to hang a headboard (bottom right)
Materials & Tools

Your exact supply list may vary from ours, but generally, this is what you’ll need to make your own upholstered headboard for your bed:
- Fabric of your choosing (we used 2 yards)
- Extra loft batting (we used 4 yards)
- 5/8″ plywood
- Two or three 1×3″ whitewood boards
- Miter, table, or circular saw to cut your wood (optional)
- Heavy-duty staple gun & staples
- Screwdriver and screws
Why Add A Fabric Headboard?
We explained why we personally wanted a headboard in this post. The short version is that we fell out of love with our 4-poster bed (so we cut off the posts!) and wanted something cozier instead. You know, something plush we could lean up against at night. And the short wood headboard that we currently had wasn’t cutting it.
But generally, headboards can add a lot of personality and polish to a bedroom. Bedrooms without proper headboards can scream “college dorm” or “first apartment,” so adding one is a no-brainer upgrade. Plus, depending on the fabric you choose, it can add some bold color and pattern to a room OR add to the restful, zen space you’re trying to create.
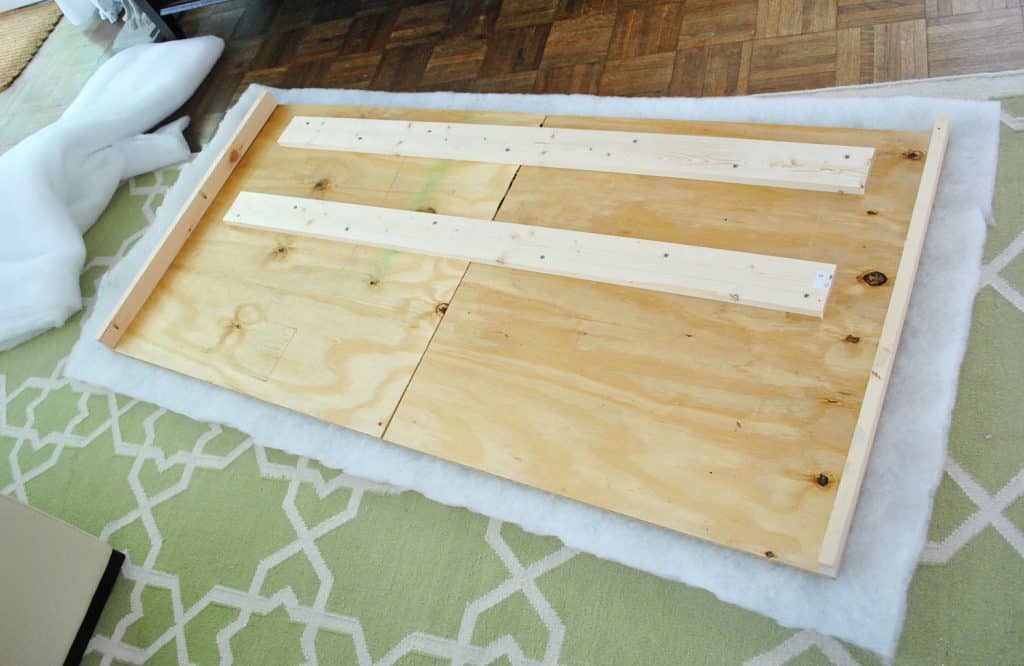
Step 1: Build Your Wood Frame
There are a few ways to create the wood frame for your headboard (including this super lightweight option) but for this particular bed, we constructed a sturdy plywood frame. If you want a simple rectangular design, this step can be as simple as cutting your plywood sheet to size (or having them cut it for you at the home improvement store). For our queen-sized bed, we ultimately decided on 65″ wide and 31″ tall. But you can easily customize your dimensions depending on your bed size or location.
Ours looked a little more complicated, and I’ll tell you why…
First of all, we were planning to place our DIY headboard around the existing headboard/posts leftover on our Ikea Edland bed. We concocted a plan that would sort of “wrap around” the existing posts, which we mocked up in Photoshop below. But this concept would also work if you wanted to create a popular “winged” headboard look as well.
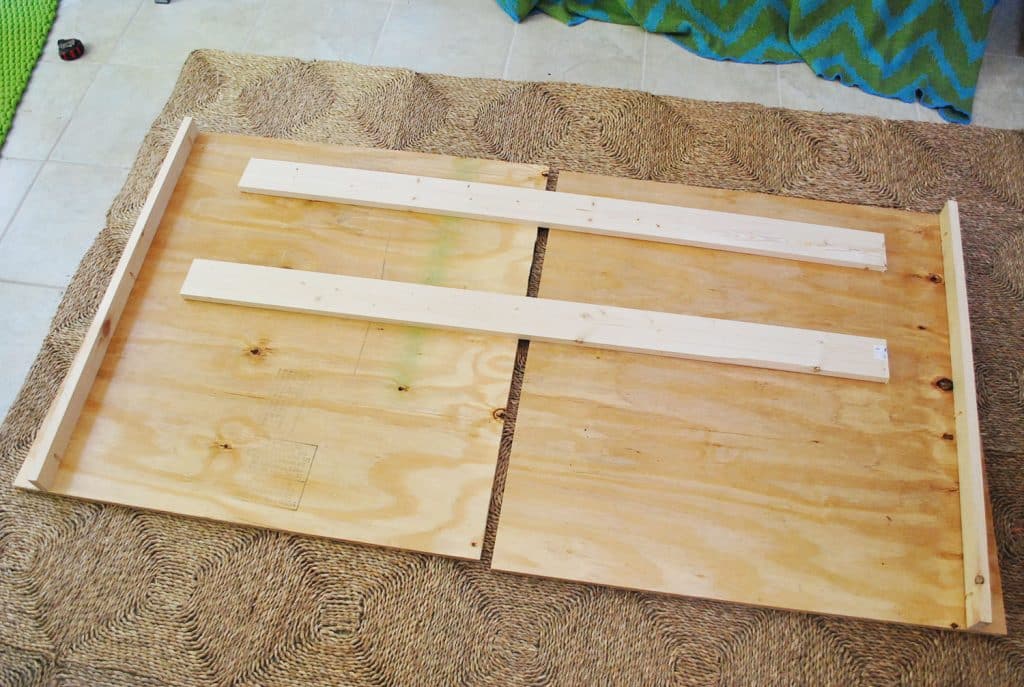
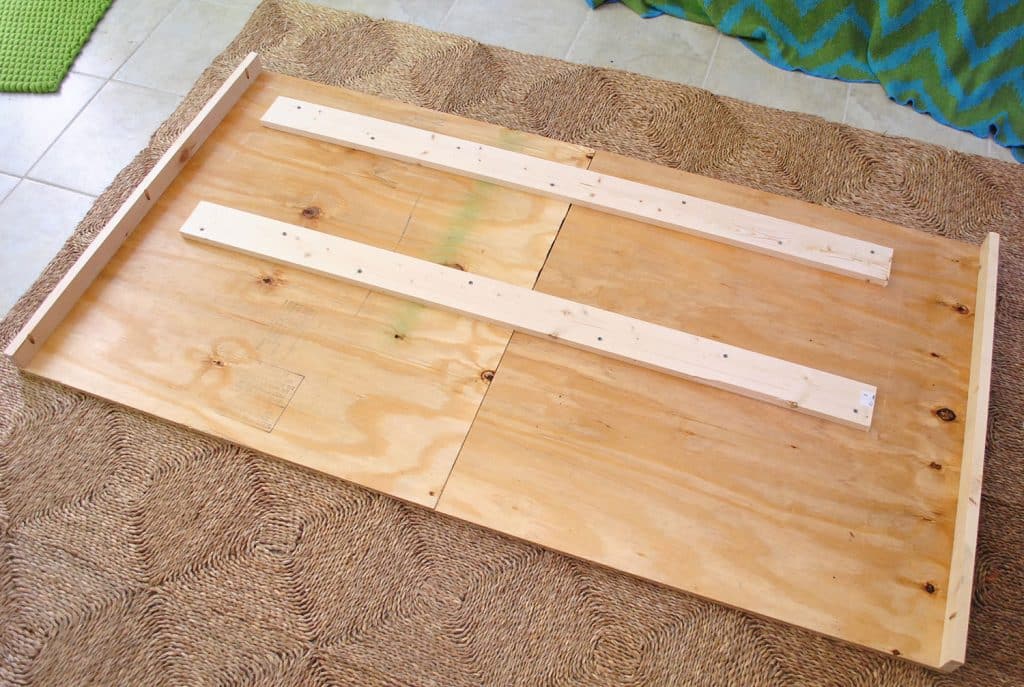
To add these small side pieces, we attached two 1×3 whiteboard boards to each edge using screws drilled into pocket holes we drill using our Kreg Jig.
The other reason ours was more complicated than a solid sheet of plywood was that we couldn’t fit it in our little car (ha!). So at Home Depot we had them rip it in half, and we reconnected the two halves at home with scrap pieces of whitewood boards. We’re fancy like that!
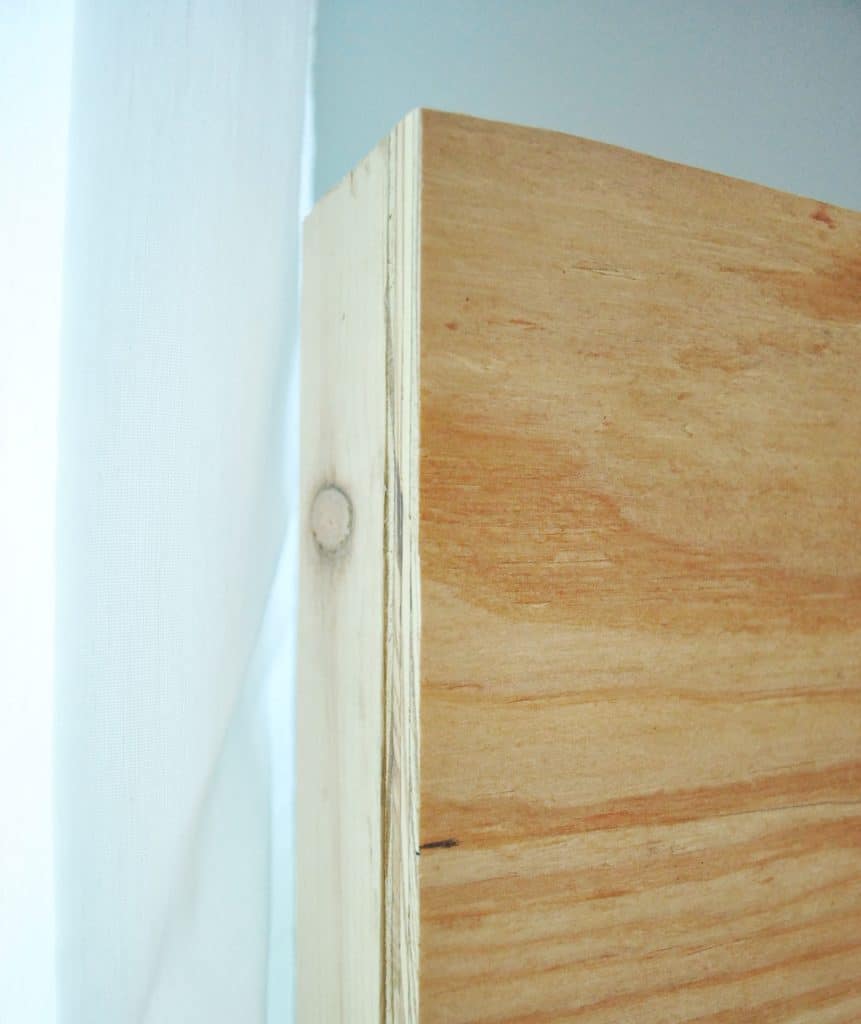
Before proceeding we upholstery, we brought our frame in to make sure it fit around the existing bed frame like we planned. Phew – it did!
You can also now see what that wrap-around piece looks like, and how it hides the existing bedpost. And since we’d soon be upholstering it with fabric, it didn’t matter that the edges were a little raw looking.
Step 2: Add Your Batting Layer
If the carpenter in you trembles at the idea of upholstery, just remember: if you can wrap a present, you can upholster a headboard!
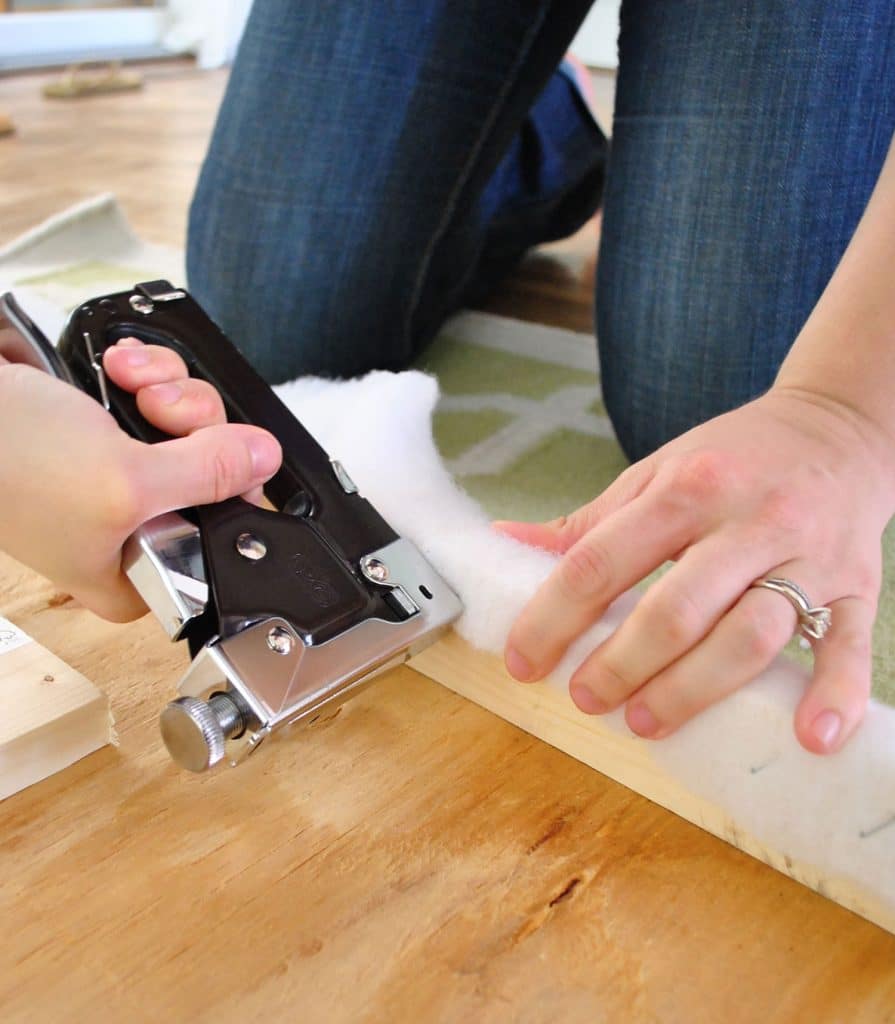
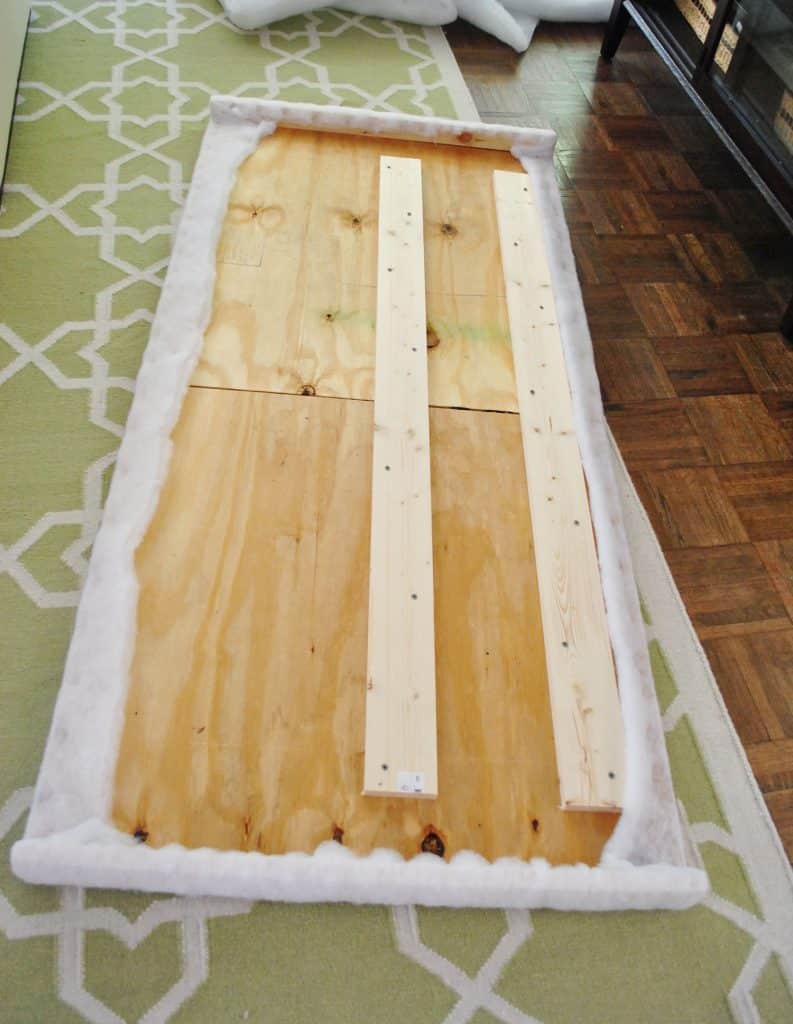
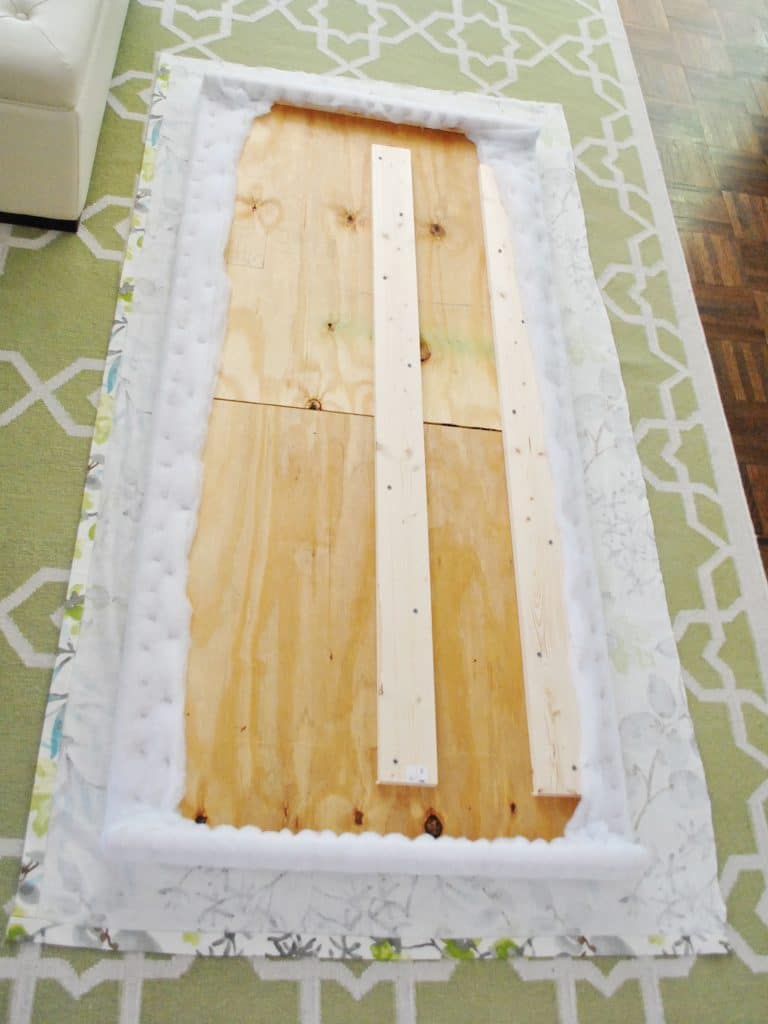
Before adding our fabric, we wanted to first add some padding in the form of extra loft batting. We decided to do two layers so it’d be plenty plush, but still not lose its shape. Sherry trimmed a 2-yard section of batting using regular scissors, laid it on the floor, and we placed our frame on top of it. You’ll want about a 2-3″ overhang on all sides.
Then we used our staple gun to begin attaching the batting. We just wrapped the batting tightly around the edge and stapled it every few inches.
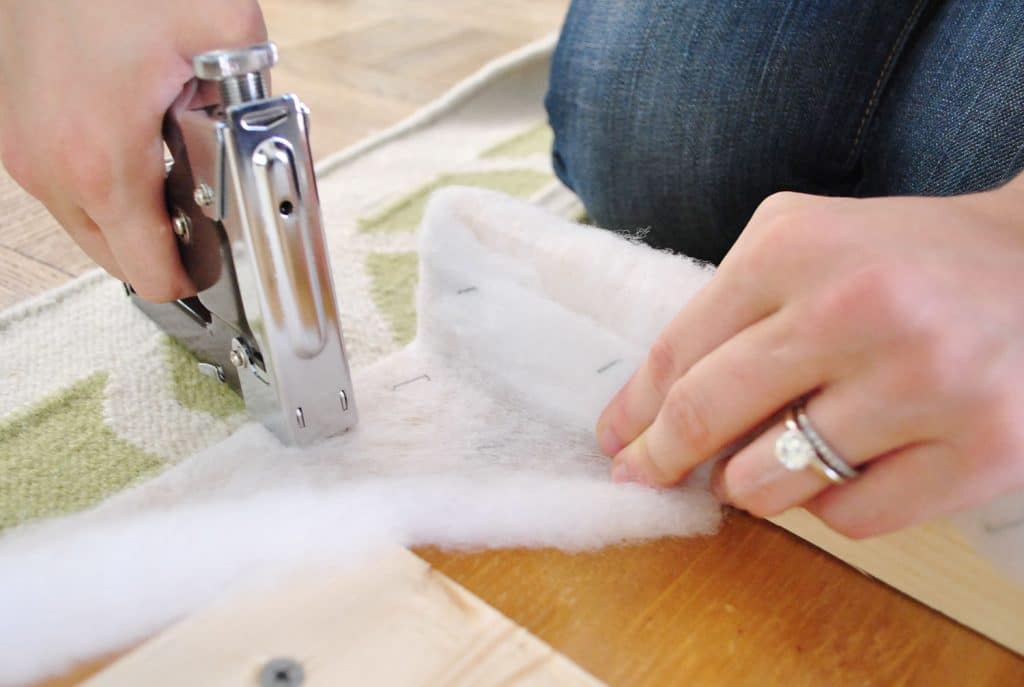
When we came to a corner, it was just like wrapping a present. You just fold it back and staple it so it all looks smooth from the front. Try to pull the batting tight so your corners don’t get too bulky. Bam, bam, bam – it’s done.
We just worked our way around the back of the headboard, stapling away. At some point John made me pose for this awkward photo too. Winning.
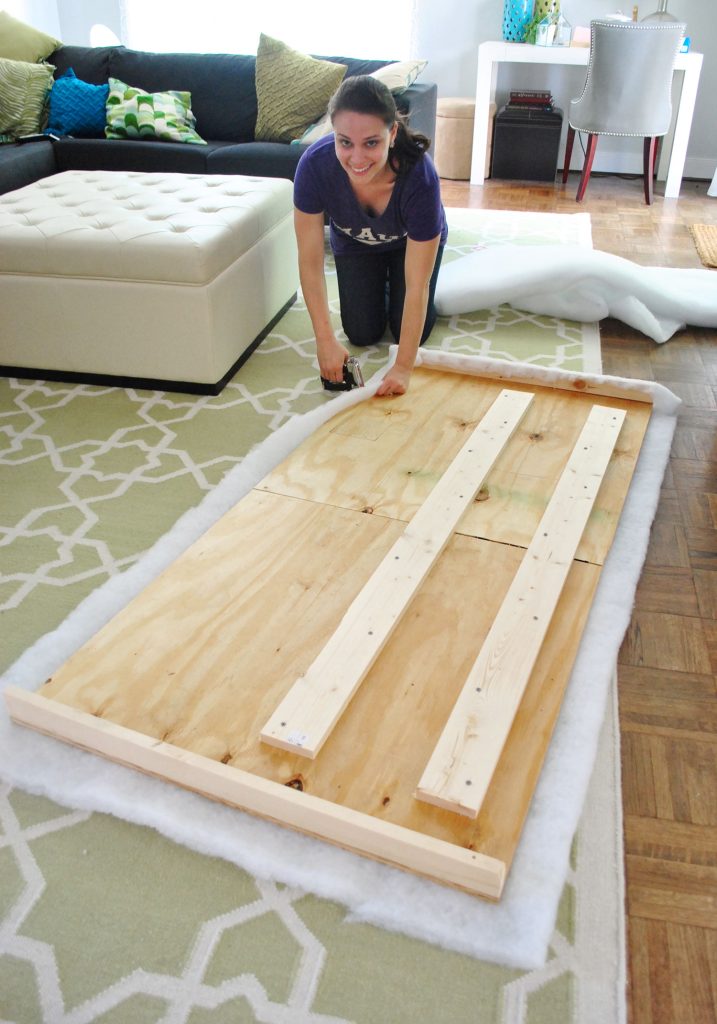
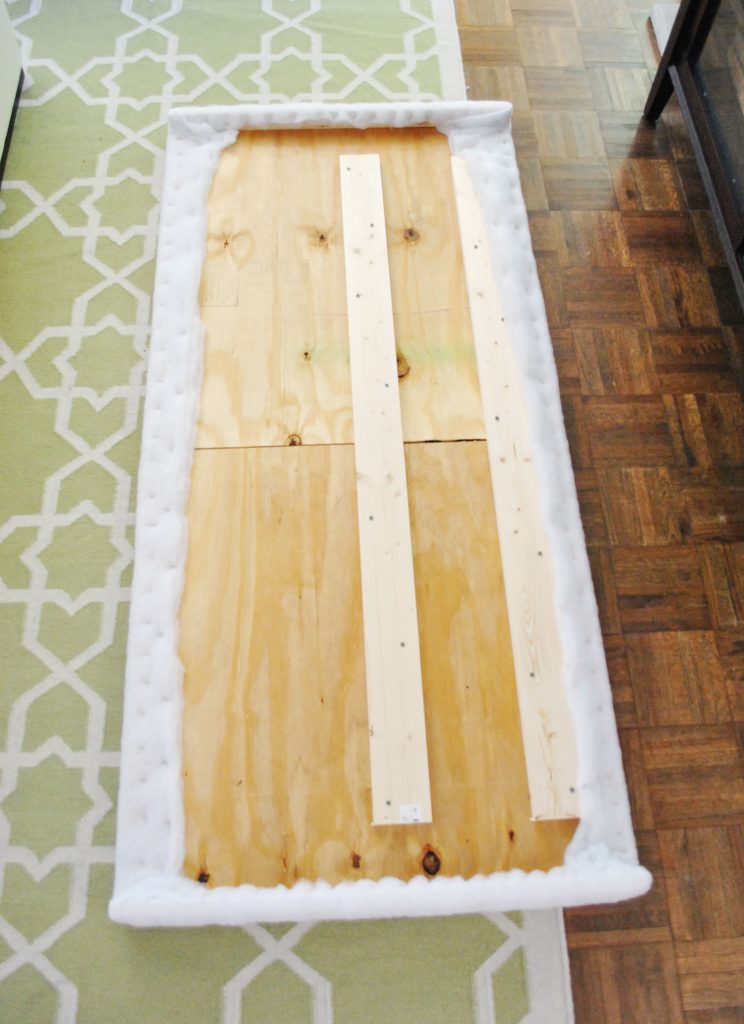
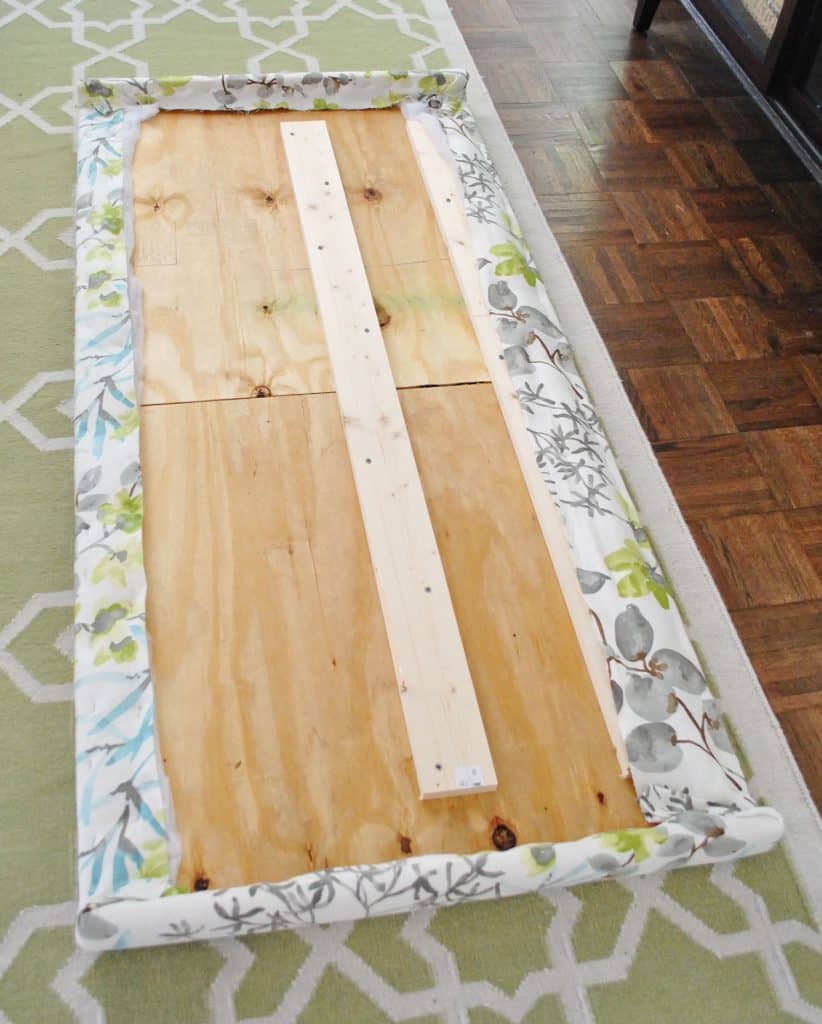
Eventually the whole thing was stapled nice and tightly around the back.
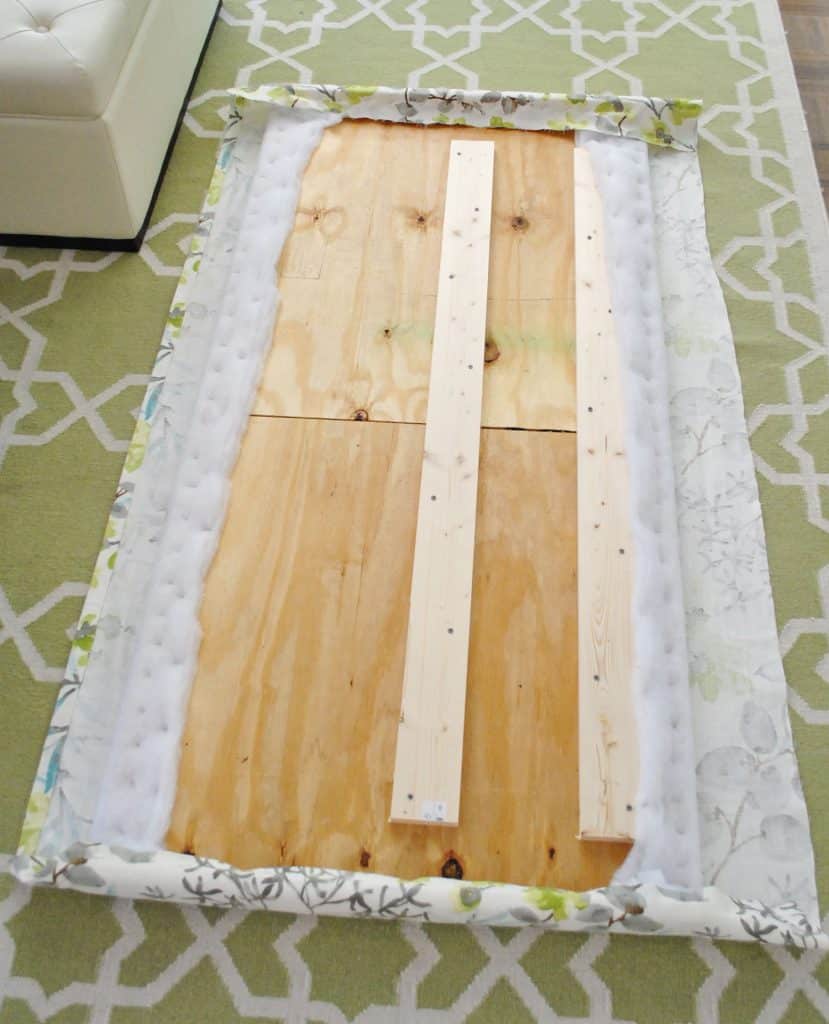
You can check yours at this point to see if one layer is enough. We decided to do a second to make sure the hard edges of the plywood were sufficiently padded. So we rolled out more batting for a second layer (call it extra credit when it comes to a cushy result).
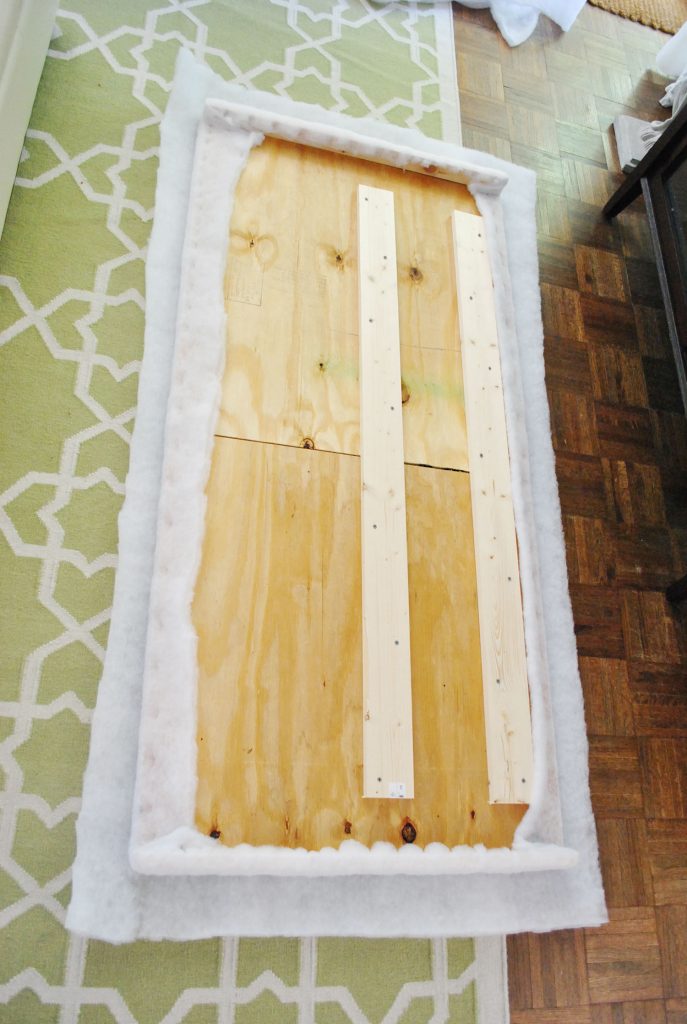
Again I trimmed around it and used the staple gun to secure it around the back perimeter of the frame, being sure to pull it tightly as I went.
Then John leaned it up so we could check it out again- just to make sure it was wrinkle-free and plenty soft. John even went in for a sensuous caress. To each his own, I guess.

Note: Another option is to use upholstery foam that you attach to your plywood with spray adhesive. We prefer the batting method since it’s easier to wrap around the edges. But if you’re looking for a much thicker, cushier feel – it may be faster to use foam, rather than wrap 4 or 5 layers of batting. Too many layers of batting can also make it difficult to staple into the wood.
Step 3: Staple On Your Fabric
Here’s where the fun really begins. Now you can repeat that process, but with your selected fabric! Just make sure it’s free of creases or wrinkles before you start, so you may need to give it a good ironing first.
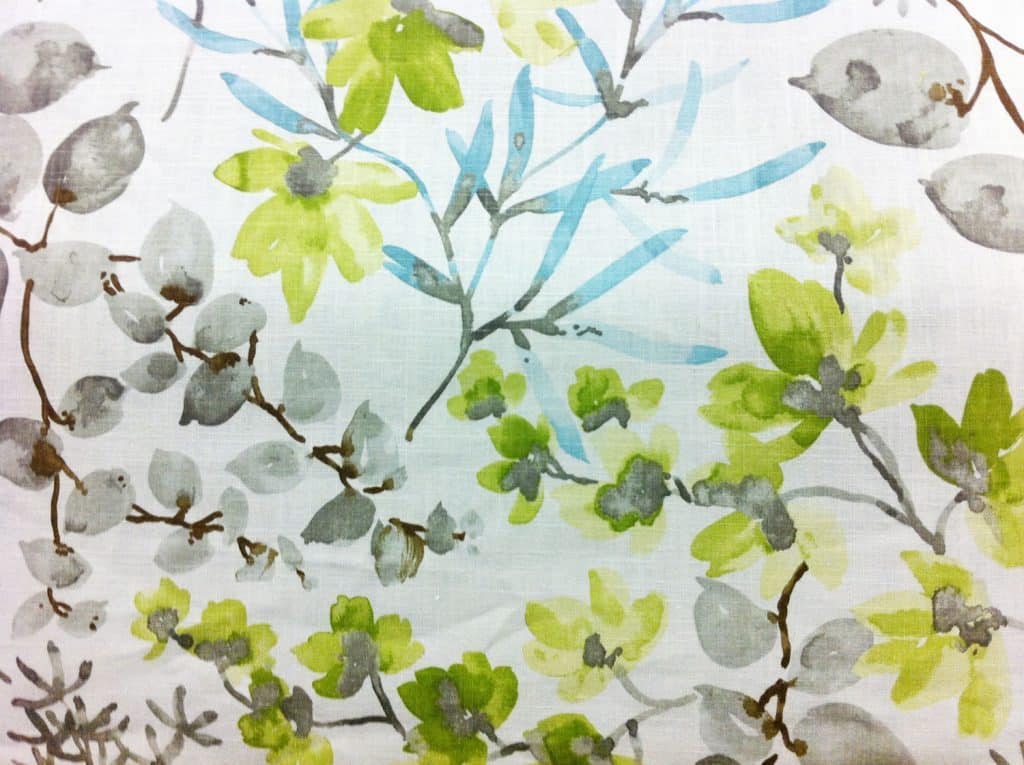
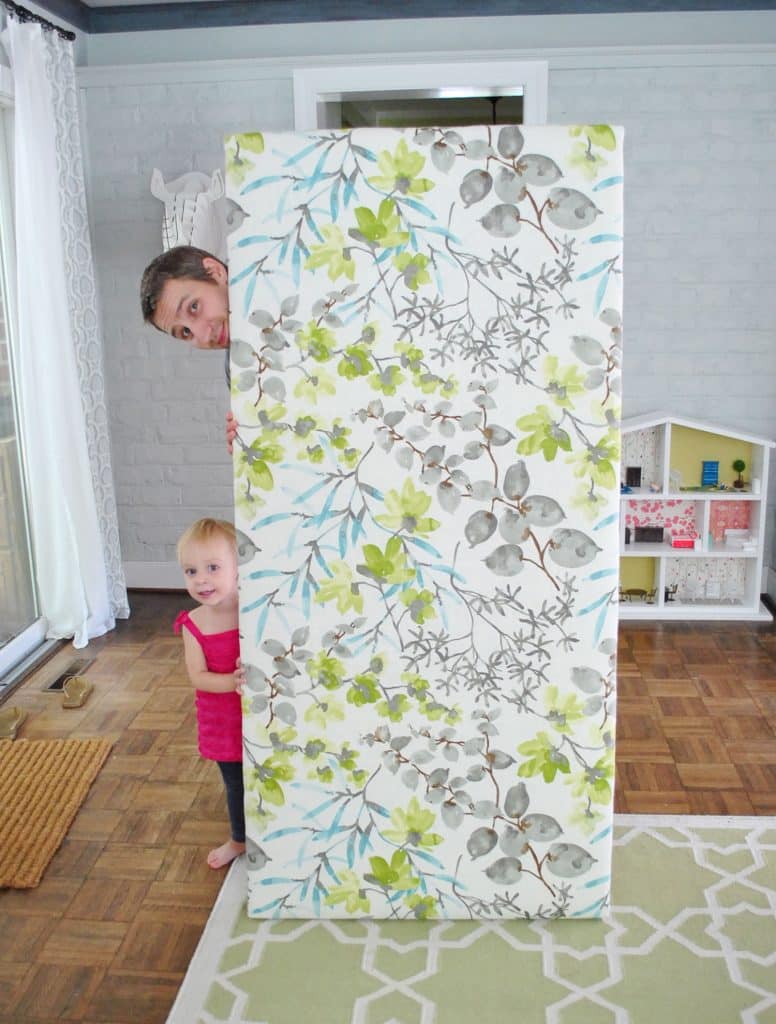
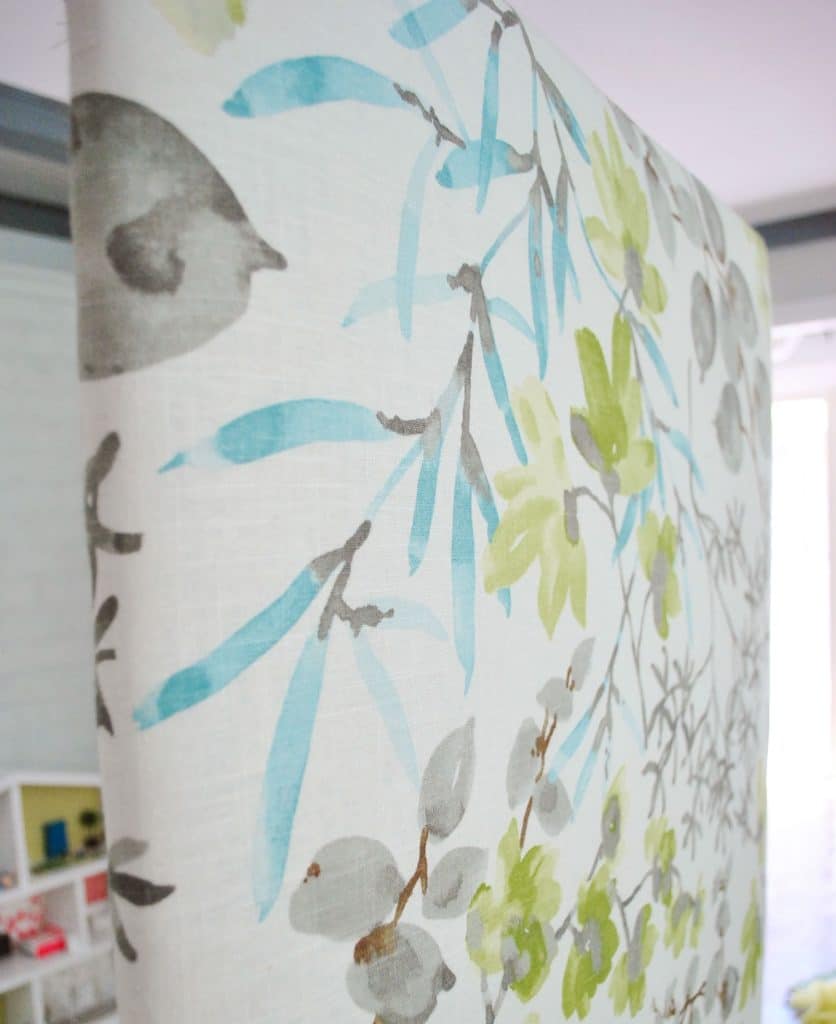
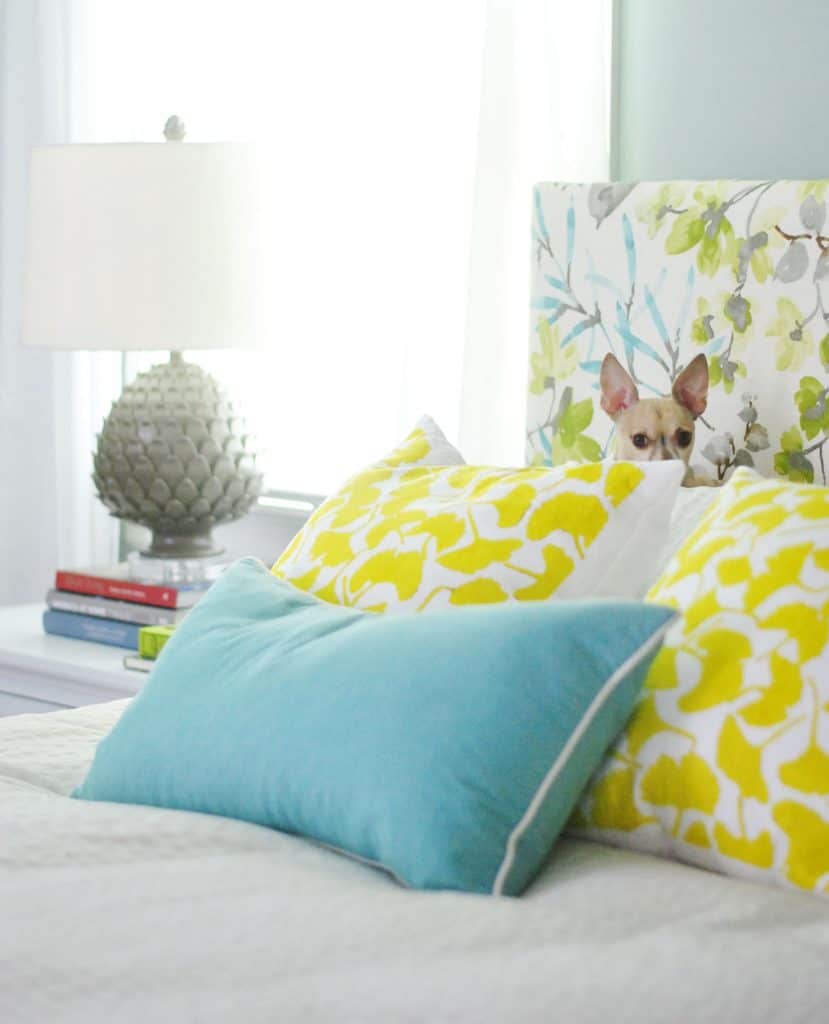
We were using this fabric we found at a local discount outlet called U-Fab. It’s by Braemore, called Gazebo Cloud (here’s an affiliate link to it on amazon for any non-locals). We liked how the leafy splashes of turquoise picked up that color in our geometric rug, but in more organic vibe.
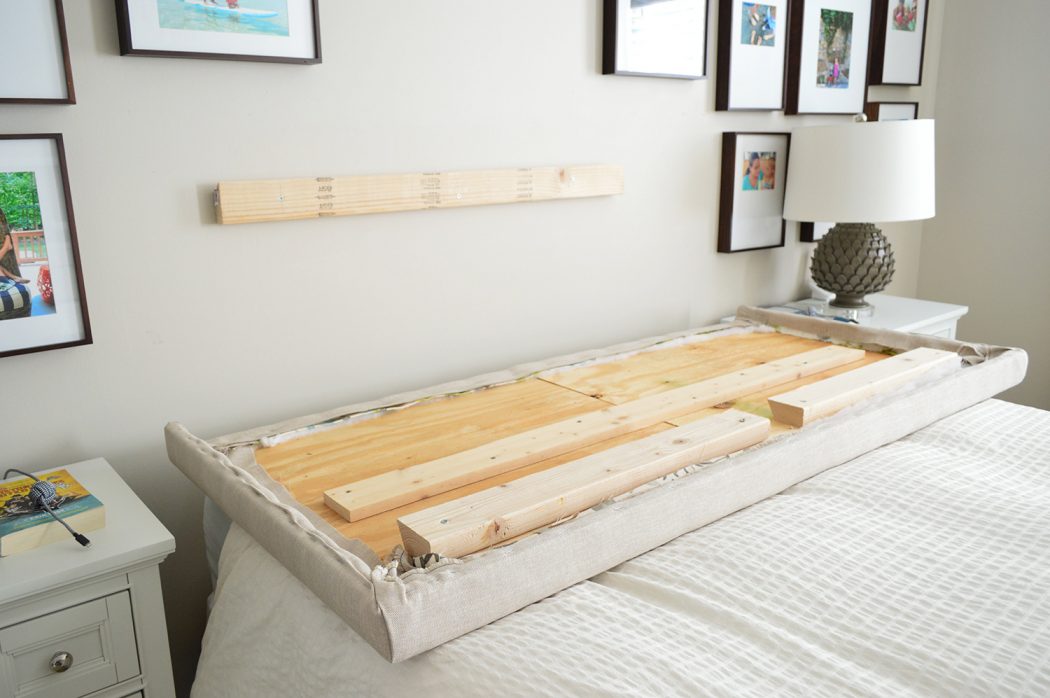
Just like with the batting, we laid it flat on the floor and placed our (now batting-covered) frame on top, making sure it was pulled taut underneath to avoid any wrinkles. Then I trimmed offthe excess fabric around the perimeter, leaving a few inches for it to be wrapped and stapled around the back, just as I had with the batting.
We started by stapling each side, being sure to pull it extra tight so it won’t end up all loose and baggy over time. I started with one side, pulling it all very tightly, then stapled along the opposite side, again pulling it nice and tight.
Once it was secured on those two sides, I did the same thing to keep it secured vertically, by pulling tightly and stapling the top side and pulling it tightly and stapling the bottom side as well.
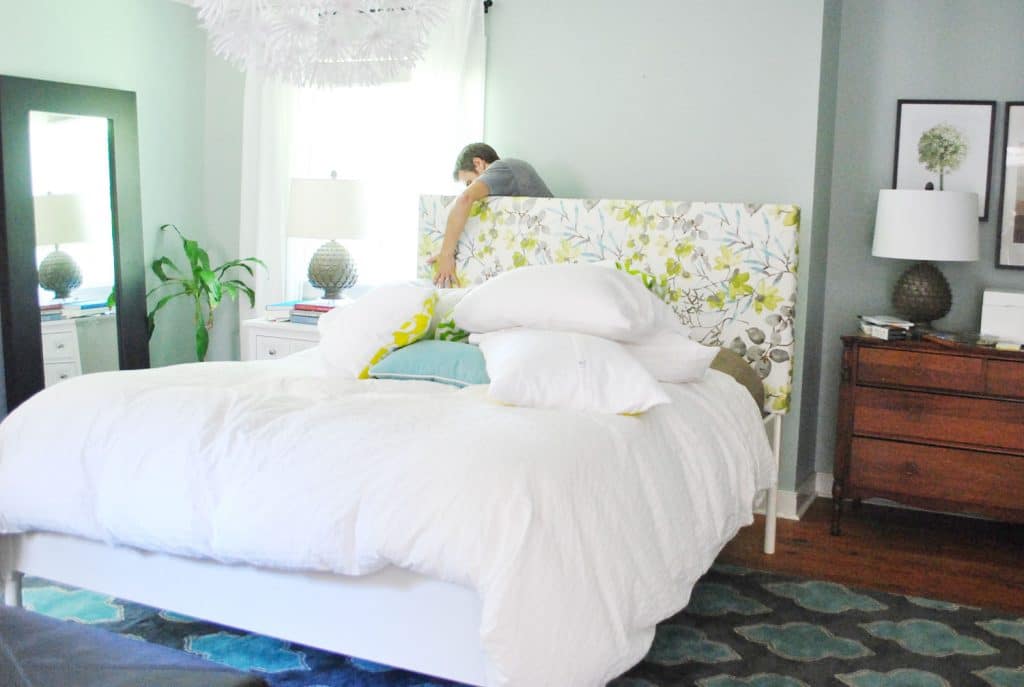
Then we flipped the headboard up to see it in all of it’s plush, tightly upholstered glory. Bing, bam, boom. The whole upholstery step took less than forty five minutes to complete. Is it weird to call it one of my favorite fabric projects to date? I just love love love the pattern.
It’s hard to tell above, but in this angle you can get a sense of how plush it is. It’s cushy, but still tight – so we won’t worry about it getting baggy with everyday lounging against it.
Step 4: Hang Your New Headboard
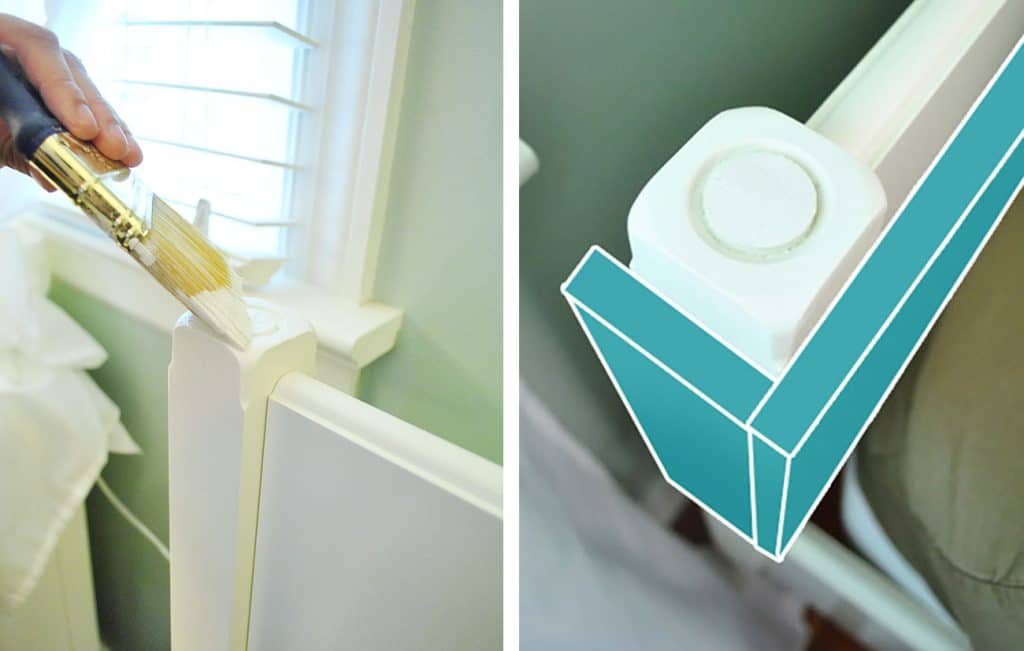
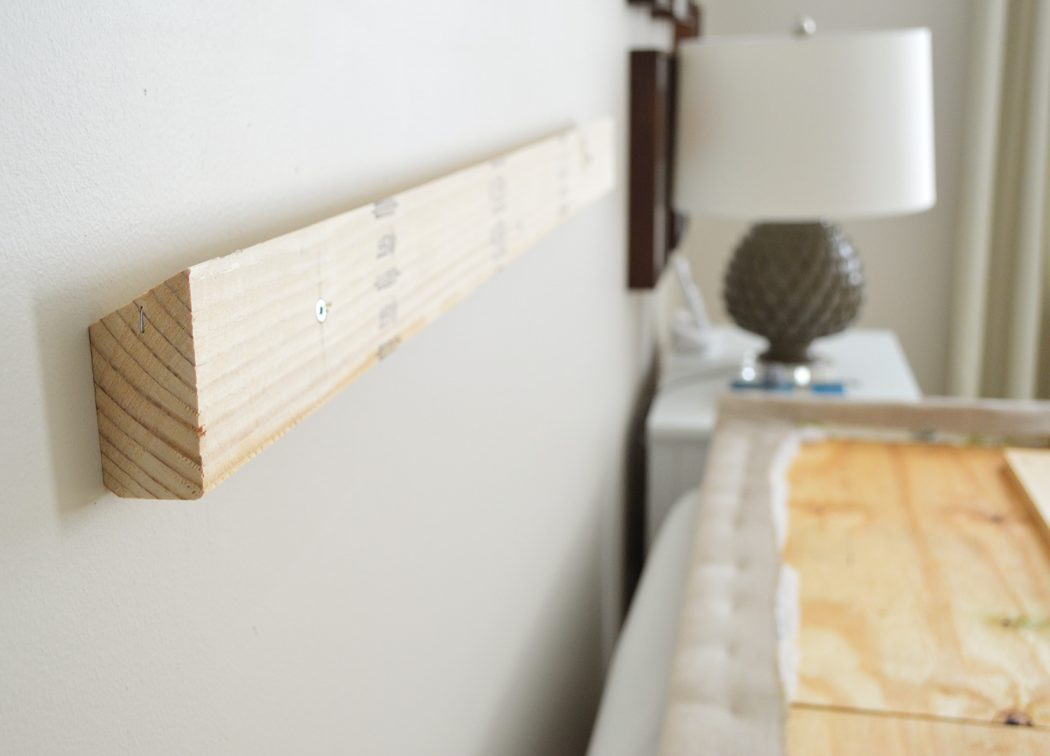
Now you’re ready to attach your headboard to your bed. This can be done in a few ways, depending on your bedframe. When typically like to install a headboard directly into the wall, since it’s often sturdier than attaching it to the bedframe. To do that, usually a french cleat works great. We cover how to DIY a french cleat in this post.
Actually, the headboard pictured above is the same one constructed during this tutorial – a few years later we just updated it for our new home with new fabric and a new top piece (just like we had added the sides pieces in this post). You can see the french cleat below, which is essentially two 2×4″ cut at an angle. One goes on the wall, the other on your headboard. You can also purchase pre-made metal cleats for just a few dollars.
TIP: Try to hang your headboard so it hits the top edge or slightly below the top edge of your mattress, that way there is no gap between the two.
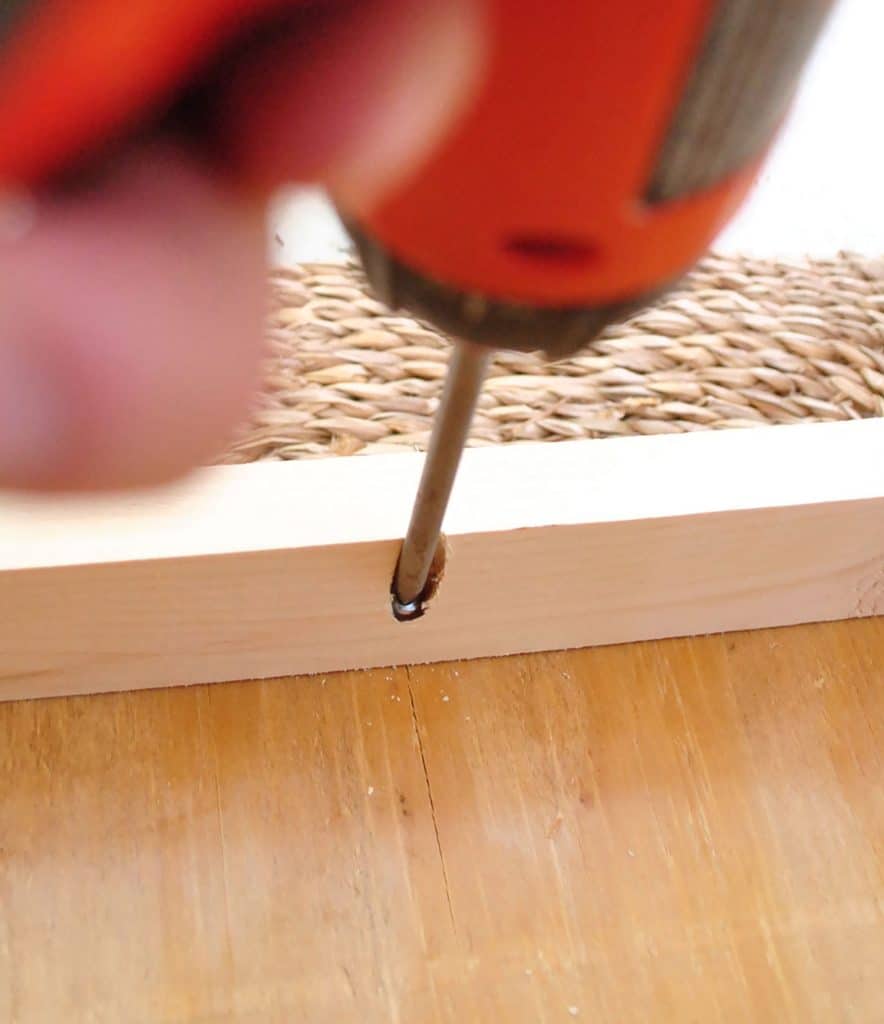
But in the case of our postless-four-poster bed, we chose to screw the new fabric headboard into old wooden one that was part of the existing bedframe, just careful to use screws that wouldn’t poke through the other side.
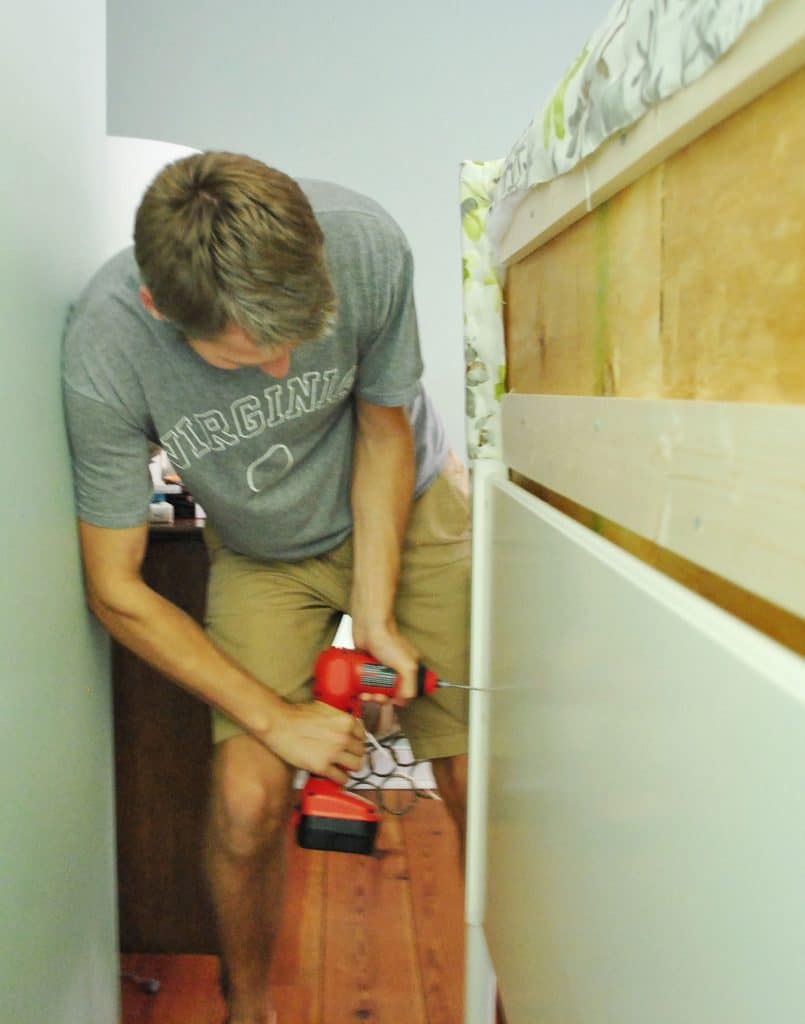
Here’s John putting the final screws in on the backside, pushing the new fabric headboard tight to the bedrame for a snug, secure fit.
Step 5: Enjoy Your Handiwork
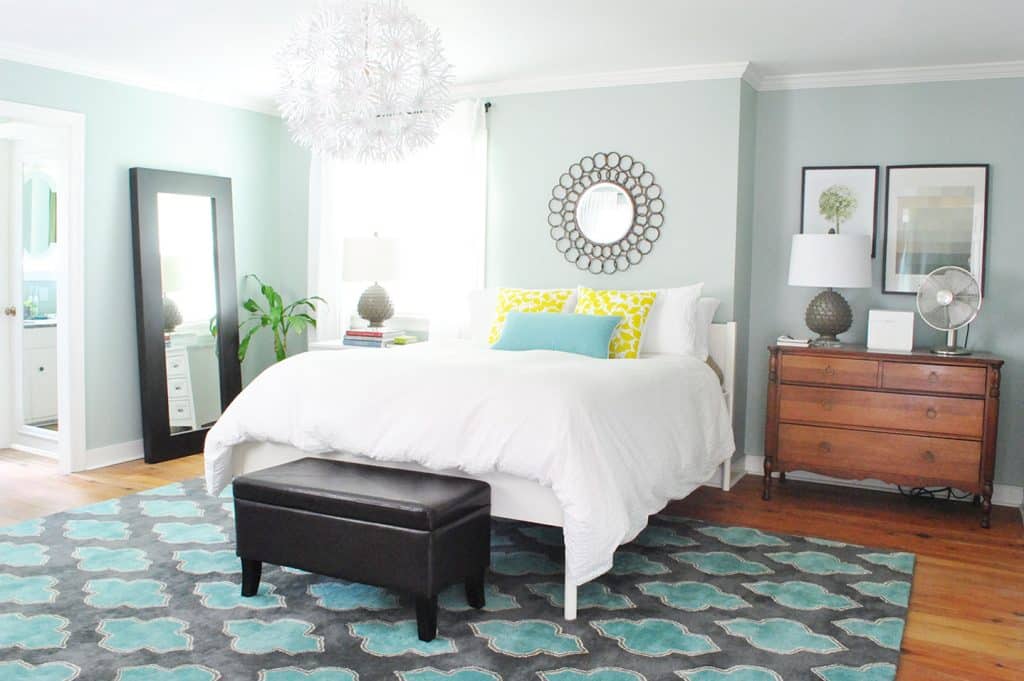
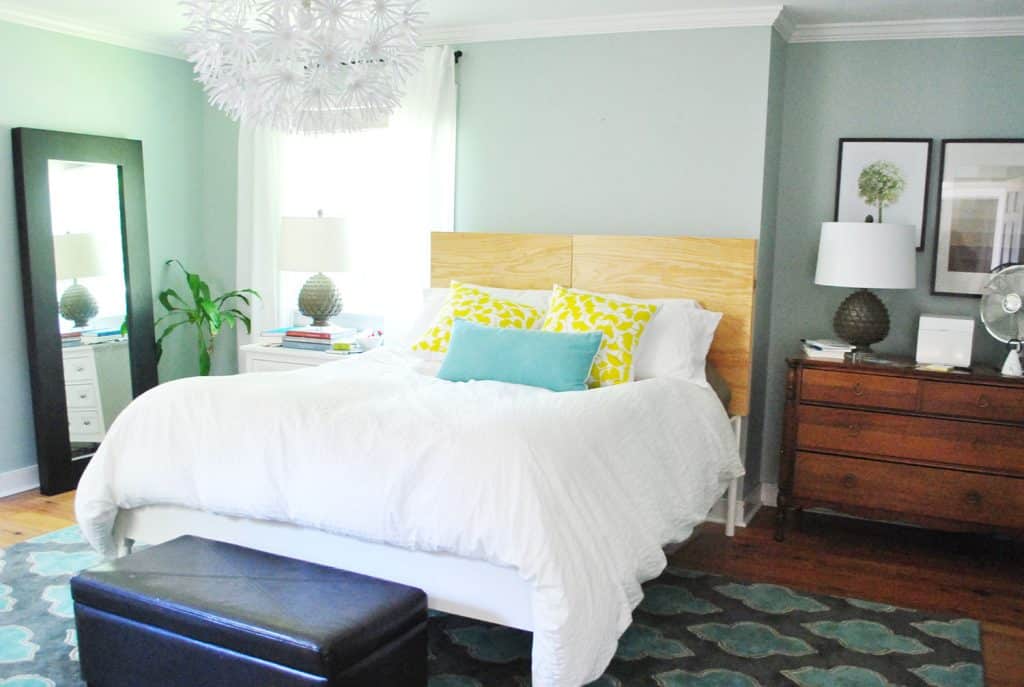
Once it was attached, we just pushed the bed back into place and beamed at it. If only it had been bedtime already that so we could immediately enjoy it’s plushness!
We loved how the fabric is sort of like the bridge between the yellow ginko pillows (since there are greeny-yellow flowers in the headboard fabric) and the turquoise in the rug (thanks to those subtle leafy sprigs of turquoise in the headboard).
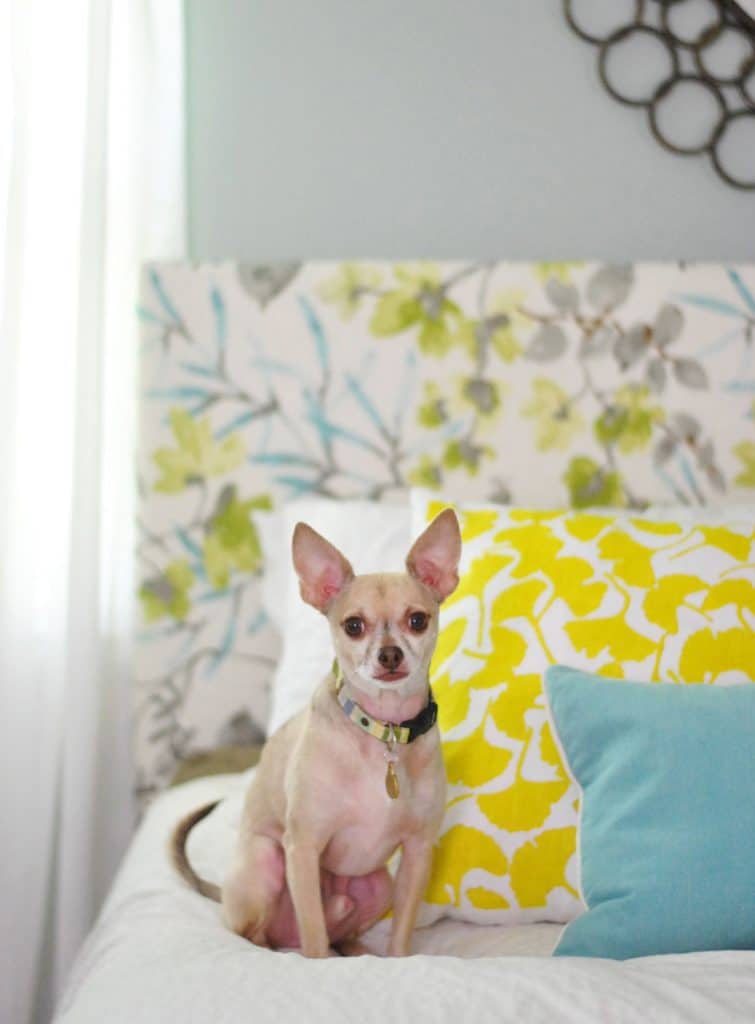
I even think Burger looks especially dapper in front of this new backdrop.
DIY Upholstered Headboard Cost
As for a budget breakdown here we go:
- Wood frame (plywood and some bracing boards from Home Depot): $22
- Two layers of extra loft batting (from JoAnn thanks to a 50% off coupon): $4
- Discount designer fabric (from a local fabric outlet called U-Fab): already owned – but it was originally $20/yard ($40 total)
- Total spent: $66 (if you add in the fabric we previously bought for a book project and reused for this)
Sixty six bucks isn’t pennies, but compared to upholstered headboards that are sold at places like Overstock, it’s at least $100-200 cheaper than even the most basic types. And considering places like Ballard Designs charge around $400-$700 for custom headboards (where you get to pick the fabric) it was awesome to get to choose the fabric and whip this up ourselves.
I’m sure things will still evolve over time in here, but this has been a huge upgrade for us already.
Is anyone else making headboards with fabric? What about wood or something even more unusual, like tin? We have four different DIY headboard projects in our book (all of which we made and shot in various corners of our house) and only one of them is fabric – so there are definitely other ways to go! I think we just were craving the plush softness of something padded to lean on. You know what they say (and by they I mean Al Green and Bill Withers): we all need somebody to lean on.

Update- We finally created this Shop Our House page to help you hunt down any furniture/accessories that you see in our house, along with all of our paint colors.
*This post contains affiliate links, so we may earn a small commission when you make a purchase through links on our site at no additional cost to you.

Kelly says
By any chance is your duvet from Ikea (Ofelia Vass)? If so, would you mind sharing what size is it and the size of your bed? The reason I ask is because I got a full/queen for our queen bed and it does not fit very well at all and yours looks super good. Thanks!
YoungHouseLove says
Yes! It’s an Ofelia Vass in a king size! We learned that we fight for covers in our queen bed if we don’t get a king duvet (but still use queen sheets). Hope it helps!
xo,
s
Kelly says
Thanks! I guess I will know next time that the King fits better. Great improvements by the way!
Emily says
I also learned that turning your duvet 90 degrees helps a lot with that… Buttons are supposed to be at the bottom, but I’d rather have more length side to side, so I go buttons on whichever side is less visible.
YoungHouseLove says
Smart!
xo,
s
kara says
I love love love the changes to your room. Prior to the rearranging of the furniture it seemed like you were going in a very static direction with the room – like it was all exactly equally balanced and very “matchy matchy”. I didn’t want to criticize, but to me that look is just boring. This looks much more organic and cozy and like the room “just growed” into what it is. Bedroom 1.0 looked sterile and cold. Bedroom 2.0 is a room that makes me want to curl up in bed with a book and a cup of tea. :)
YoungHouseLove says
I totally agree! We were so stuck with the first layout (since the door would hit any larger side tables) so it was so nice to reboot!!
xo,
s
Kate LS says
I love, love, love this room. It looks so cozy and full of character. The old arrangement also looked nice but it almost made your room look too big (does that make sense? It might just be the way the room photographed, but I just love how warm and inviting the room looks now). I absolutely LOVE the headboard fabric–fantastic choice, and how great is it that you already had the fabric on hand?
I would have to concur with the above commenter who encouraged you not to stain the dresser. The dresser is one of my favorite pieces in your house–I love clean lines, dark wood, white furniture, etc. but the dresser just adds a warmth and dimension to all your other stuff that, I think, would be sad to lose! But (obviously!) to each her own, and I understand that it might not look the same in person as it does in photographs. But dude–I love that dresser.
One more thing–is there a reason the headboard is an inch or so wider than the bed on each side? (You might have explained this before but I missed it if you did.) It looks great–just wondering because with no DIY experience, I would’ve just made the headboard exactly the same width of the bed.
Keep up the great work! As much as I love seeing hugely dramatic before-and-afters (like your gorgeous kitchen), I love seeing how you revamp spaces with things on hand just as much.
YoungHouseLove says
In order to wrap around the old posts (so they didn’t awkwardly show) the headboard had to be a wee bit wider, just to sort of “slipcover” the old one. It’s probably about half an inch wider on each side, but with the bed made it’s not really noticeable in person- just looks like a plush and cushy upholstered top, ya know?
xo,
s
Kate LS says
Oops, I definitely didn’t mean for the headboard width question to sound like a criticism–I didn’t mean it that way at all! I was just wondering and am trying to learn from your expertise. :) The headboard looks perfect.
YoungHouseLove says
Oh no worries, we didn’t take it as that! Just wanted to explain how it sort of covers the old one, but it’s not too noticeable in person! Hope it helps!
xo,
s
Cheltz says
I wasn’t sure about this new direction you were taking, and was almost offended when you sawed off Ed, but this looks SO much better! Good job!
YoungHouseLove says
Haha, thanks! I know, I felt bad for Ed too- but it was for a good cause! Haha.
xo,
s
Jennifer M. says
I LOVE the picture where you show how it would look with stained dresser and floor. Seems like it completes everything.
YoungHouseLove says
Aw thanks Jennifer!
xo,
s
knittingant says
This new layout looks absolutely stunning! Projects like this are the best. Nearly no money spent, working with what you’ve got and transforming a room to its best. Brilliant!
And can I just say, that I love the existing colour of the dresser in the nook and the floor?
YoungHouseLove says
Aw thanks so much!
xo,
s
Crystal says
I absolutely love it! And I like the moodier, darker paint color you’re thinking about. I love the way you guys don’t commit to something and instead, let your rooms evolve over time.
I made a headboard for my friend. It was a really fun project and really added a little something special to the bed. We found the super soft velveteen fabric from the awesome Mary Jo’s Fabric store: http://theweekendhomemaker.com/we-nailed-it
YoungHouseLove says
LOVE that! So cool!
xo,
s
Echo says
I really love that fabric! I’ve wanted to upholster a headboard for our bed for quite some time and I think I may actually do it sooner rather than later. lol.
Ronica says
Beautiful! So fresh and light–love it.
Meg says
I can’t get over the difference from when the bed was by the door. It is such a cozier space now! Yay!
Krystle @ ColorTransformedFamily says
I loved your room before but this is way better. Even though you haven’t done everything to it that you want to. It looks complete. I would love for this to be my bedroom!
YoungHouseLove says
Thanks so much Krystle!
xo,
s
Elizabeth says
So fancy fancy!! I love that fabric. And you know all of us readers would die to be able to visit you guys in person!
YoungHouseLove says
Haha, come on over!
xo,
s
graduate.living says
In the first few pictures I was a little skeptical of the fabric, but it looks GREAT! It sort of lends a more nature-y, whimsical ambiance to the room without being overwhelming. Stunning!
YoungHouseLove says
Aw thanks!
xo,
s
Ryan says
I’m team John on this one – the darker walls (and the darker floors) make the room.
YoungHouseLove says
I’m coming around! Haha. I just remember how LOOOOOONG it took to paint this room. It’s a big one.
xo,
s
Lindsay says
I loved the photoshop pic of the darker walls, too!! And the headboard looks fantastic!
Ellen says
Wow – this is simply gorgeous. Your bedroom is starting to compete with the new kitchen for my favorite room in your house! Thanks for your daily humor and projects – I always enjoy reading :)
Richelle says
Love the fabric, and I really like the photoshopped picture of the room painted a shade or two darker!
Andrea says
I love it…it looks terrific!!! I have a platform bed that I’ve been dreaming about making a headboard for since I bought it…9 years ago! I think this will be the necessary inspiration for my own ‘Dude, get on that already!’ challenge. =) Just to figure out the logistics…
Barb says
I love everything about it! The fabric is beautiful! Nice job. That roomis perfect now. Bravo guys!
Seriously….stunning!
B.
YoungHouseLove says
Aw, thanks Barb!
xo,
s
Jessaca says
Love it! So did you guys end up with a new duvet then? At this point I think keeping it white is the best thing. In fact, I think I’ll just go plain jane like that and add color in the pillows! I’m having the hardest time finding a duvet I like that fits the space. Maybe I can work up enough bravery to tackle a headboard. I’m in love.
YoungHouseLove says
Our duvet is from Ikea about a year back but I think they still sell it! It’s called Ophelia Vass and it’s in the king size (even though our bed is a queen) just so it’s nice and big!
xo,
s
Crystal @ 29 Rue House says
I’ve been using a king size duvet since college on a queen size bed. We love all that extra blanket and never have to worry about stealing each other’s covers!
The Mrs @ Success Along the Weigh says
I have always wanted to make a fabric headboard but have been way too intimidated. Almost makes me wish we’d done it instead of the nightmare we’ve gone through with C&B and the meh one we got as a replacement from PB. I’m bookmarking this for future reference though.
LOOOOOOOOOOOOVE the fabric!
YoungHouseLove says
Aw, thanks! This is totally a project anyone can do!
xo,
s
Allison says
I’ve been thinking about attempting a fabric headboard… you guys make it look so easy! Perhaps I’ll go on a fabric hunt this weekend.
Beth G says
I LOVE that fabric! It is the perfect bridge between the throw pillows and the rug (which I am completely jealous of, by the way! What a great deal!). The room is looking so much more balanced, light, happy, and homey at the same time. Keep it up!
Vidya @ Whats Ur Home Story says
I’m in love with the fabric. Great tutorial, will save it for future for sure. That pic of Clara and John is super cute. She looks like a doll. Are you planning to change the pillows? I have this nagging feeling that there might be a lot of clashing pattern in the room. Knowing you guys, I’m sure you will somehow make it work. Oh, I’m in the ‘please don’t paint the dresser’ camp too.
YoungHouseLove says
We actually love the pillows in person! Just hard to capture on film.
xo,
s
Teri says
Love the choice of fabric, it’s so perfect with the wall color and the rug. Sooo pretty. Please please please don’t stain the dresser. Everything will be too dark and it’s lovely and warm just as it is. I love Burger, lol he always manages to find the most comfy spots! (just like my Yorkie)
YoungHouseLove says
We promise to think long and hard about it and not rush into anything (have had it over a year and haven’t touched it yet…). Who knows where we’ll end up!
xo,
s
Lindsey d. says
One reason why your wide angle photos aren’t quite capturing the headboard to your liking is because your window is totally blown out and that extra light it leaking on to the headboard, washing it out. Try bracketing your aperture next time.
YoungHouseLove says
Totally the problem! Thanks for the tip!
xo,
s
Heather says
LOVE LOVE LOVE LOVE LOVE.
And now that I’m done gushing about Burger, on to the headboard =)
Oh my gosh you guys, it’s SO pretty! Your room is coming together so nicely and it looks absolutely beautiful!
I personally like the wall colors the way they are. The headboard is light and airy, added in with the white duvet and the light fixture, I think the darker color would make it feel gloomy rather than cheerful.
But oh my gosh… LOVE.
YoungHouseLove says
Aw, you’re so sweet Heather! Thanks!
xo,
s
Candace says
just gonna go ahead & join the Darker-Room-Color-Campain (DRCC). That is all. Carry on.
Sarah says
Love it! Recently discovering and working out how to layer patterns in our own home so I’m loving this transition :)
Also – totally digging the darker paint! Do it. Bacardi and cola. Do it. x
YoungHouseLove says
Haha, definitely thinking about it!
xo,
s
tracy a says
that headboard fabric is fabulous!! did you say where you got it?? if so, i missed it. would you mind letting us know the name or designer? thanks!! (and i’m still reeling over your rug purchase…been searching for months for the perfect rug -including price- and have had no luck!)
YoungHouseLove says
It’s by Braemore, called Gazebo in colourway “Cloud” – which was $20 a yard from a local fabric outlet called U-Fab. Hope it helps!
xo,
s
Ashley@AttemptsAtDomestication says
Love it! It looks fantastic! I always go to Joann, but looks like I need to check out U-Fab!
erica says
Looks awesome! & a great tutorial
I made mine out of a single panel curtain I found in fabric I liked and it ended up cheaper than I could find in a similar fabric! Just an idea for anyone thinking about making one :) And there was enough for upholstered buttons for tufting. My fabric was a little thin so I used an old sheet as an in between layer – to smooth things out between the batting and my fabric.
I LOVE your new furniture layout. Looks so natural
YoungHouseLove says
Such a cool idea!
xo,
s
Brooke says
And thanks to youk, I totally just realized I can use old curtains I have from another room (that we plan to replace) for my headboard. Yay for recycling!
Sarah says
I have pillows in that fabric!!!! I got them from Arhaus. Love it!
YoungHouseLove says
Love that!
xo,
s
Amber says
The room looks absolutely beautiful! I love it all! There’s no way my hubby would let me put all those flowery prints in the bedroom- extra points for John!
YoungHouseLove says
I was so happy John went for it. Thankfully he considered it more of a leafy nature-ish print than a floral. Whew!
xo,
s
Amber says
My husband is a botanist, so he’s very particular about printed fabric (as in he’s critical of whether or not the flowers or leaves are based on real plants or if they are just a shape someone thought was pretty). It can be quite frustrating even with a leafy nature-ish print. Needless to say, our house has very few botanical prints, but lots of real plants :)
Jess @ Little House. Big Heart. says
I love the earthy pattern of that fabric. It’s not too busy but still adds some interest against your wall.
Ed is lookin’ good!
Dianne says
Thanks for the descriptive and many-photo story; loved viewing your “process” including the final result. SO pleasant to the eye with existing elements and other colors/textures. Also loved seeing Burger’s collar and how it matches- he’s such a natural actor. :-)
YoungHouseLove says
Aw thanks Dianne!
xo,
s
kim c says
Stain the floor, paint the walls, but PLEASE don’t stain that dresser. It has a natural warmth to it that would be lost. It looks perfect as is. I’m not usually into older character pieces, my aesthetic skews more modern, but I feel I must advocate for the dresser. It really looks like it belongs, as is. I know it’s just a photoshop job, but I feel the darker stain would end up hiding the lines of the piece that give it it’s appeal, and it would just blend with the floor too much. Maybe swap out the handles if the DIYer in you just cannot handle leaving it alone ;) but I think it really would be a shame to stain it.
YoungHouseLove says
We promise not to do anything without thinking it through a nice long time! Up close the dresser has stains/scratches so it needs some love, but we’re not 100% sold on darkening it- just thinking about that now. Who knows where we’ll end up!
xo,
s
Claire says
I would also like to vote for the darker paint colour! The photoshopped version looks great!
Crystal @ 29 Rue House says
I just can’t believe how much your room has changed!! It all (including the headboard) looks fabulous! That last pic of Burger is perfect. What a cute pup. And now I really want to staple something.
The Shabby Tabby says
The fabric is lovely and the headboard looks great with the bed, but it’s the same color palette as the rest of the house (minus Clara’s, iirc). Be bold and break free of your comfort zone!
Don’t stain the dresser… it’s beautiful and provides a warmth that the bright colors cannot.
YoungHouseLove says
I think we just like what we like, so in our house we don’t mind that rooms relate and all feel like they’re part of one “whole.” We have lots of dark teal, turquoise, greeny-yellow, yellow, brown, gray, white, and smaller pops of red and orange going on in the house (like the art in the kitchen and playroom) along with some pinks and purple-grays in Clara’s room. So we feel like that’s basically every color of the rainbow, some just get more “action” than others!
xo,
s
Bonnie Morscher says
I, too, like the photoshopped darker walls. That’s a great color and I think it would really make the room more sophisticated. Also, I vote for darker wood on the dresser (which is beautiful, by the way) and the floors. Clara keeps getting cuter and cuter. She always seems to be smiling. Is she that good-natured all of the time?
YoungHouseLove says
Oh she has her moments! Haha. She’s a two year old! But she’s the apple of our eye, so most of the time we think she’s a doll. Haha.
xo,
s
Allyson of Lovely Explorer says
I think John is on to something with the darker walls..they play off of the rug so well!
Jillian {Her Split Ends} says
ummmmmm…LOVING IT! The pattern is amaze-balls!!!!!! Huge difference in the room and in case i haven’t told you i’m also SUPER pumped about your furniture rearranging! So brilliant
CHeers
~ Jillian
http://www.hersplitends.com
YoungHouseLove says
Aw thanks Jillian!
xo,
s
Sue says
Love it! Love that the color scheme for the whole house really flows nicely from room to room without being too matchy-matchy. And I have a serious crush on that headboard. makes me want to run out and make one!
Libby says
this is awesome!! i bought a tufted headboard from target.com last year for $150 and not only did it have a weird chemical smell and was covered with a really generic, solid colored microfiber (yuck), but it was HUGE. like, laughably huge. luckily i managed to get it shipped back for free.
what you’ve done is a million times better, and custom, and it looks fab! way to go.
YoungHouseLove says
Aw, thanks Libby! So sorry to hear about your bad pre-made headboard experience. There are definitely perks to DIYing it!
xo,
s
Melanie @ Mailbox Journey says
YHL! It looks amazing – Love it!
Amanda says
That headboard is so beautiful!! I love it. I’m starting to become a fan of the fabric headboards. I’ve never seen one before in real life (not one member of my family or friends has one). lol But, the photoshopped photo of the darker stains and walls looks AH-Mazing!
ashlee says
whoa! your room is doing a major transformation and it looks GREAT! LOVE the positioning of the bed.
normally i am absolutely crazy about pale colours. your walls look great in the pale blueish shade, but you know, i think i really like john’s idea of going darker!
your little whitish nightside table is adorable and fits in perfectly.
kari says
How long ago did you purchase this fabric?? I’m kind of in love with it and know it would look incredible in my living room. A trip to U-Fab may have to fit into my afternoon to snag some up.
YoungHouseLove says
It’s still there I think! We got it in Jan but have seen it since!
xo,
s
The Chatty Housewife says
Definitely go with the darker color on the walls! Makes the headboard stand out more.
Lindsay M says
Ok, can we just say wow?!?!?! It is amazing to me what a change for less than $100 and a couple of hours of your time. I love how light and airy the room feels!
One question? I loved the view of the sink area with the window from your bed’s previous location. What are y’all waking up to on the wall opposite to the new location?
YoungHouseLove says
It’s a window that looks out on the future-deck that we hope to convert to a french door out there someday- so that could be really pretty!
xo,
s