Adding a headboard to your bed is one of the best ways to add polish and coziness to your bedroom. And, lucky for you, making your own DIY upholstered headboard is super easy and affordable (ours only cost $66!). This means you can customize the fabric, size, and design to get exactly the look you want. Believe us, we’ve done A LOT of them over the years!
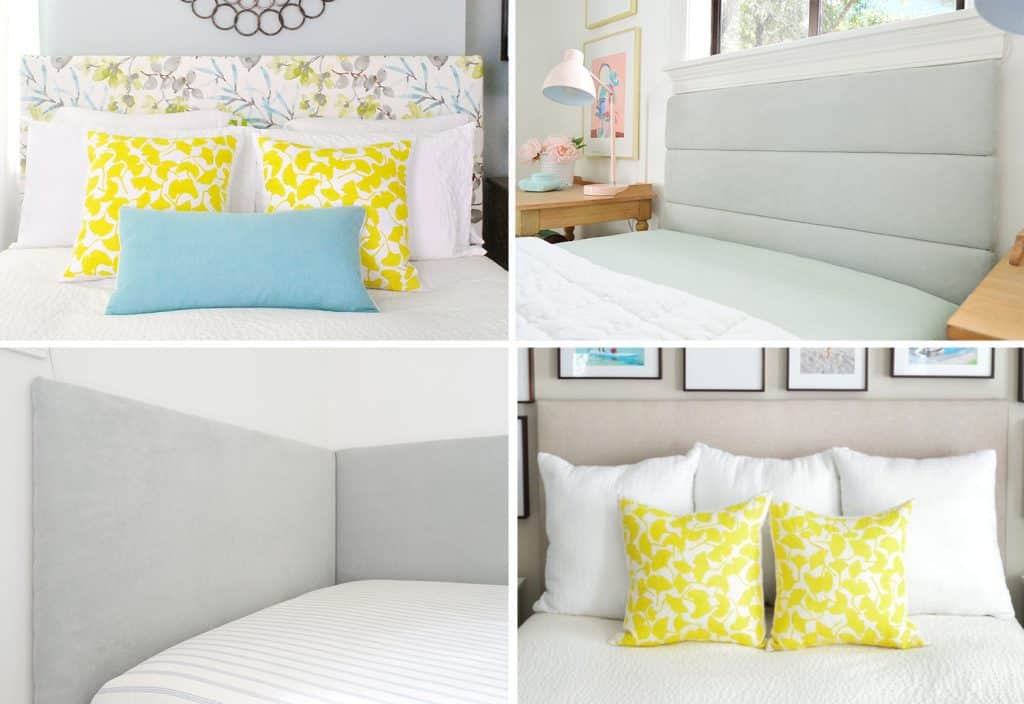
Today we’re going to take you through the step-by-step process to create the first headboard in the grid above (top left). It’s our favorite, classic headboard tutorial. But you can check out more headboard ideas below:
- How to make a channel-tufted headboard (top right)
- How to make a daybed-style headboard (bottom left)
- How to make a wall cleat to hang a headboard (bottom right)
Materials & Tools

Your exact supply list may vary from ours, but generally, this is what you’ll need to make your own upholstered headboard for your bed:
- Fabric of your choosing (we used 2 yards)
- Extra loft batting (we used 4 yards)
- 5/8″ plywood or MDF
- Two or three 1×3″ whitewood boards
- Miter, table, or circular saw to cut your wood (optional)
- Heavy-duty staple gun & staples
- Screwdriver and screws
Why Add A Fabric Headboard?
We wanted to add a headboard because fell out of love with our 4-poster bed (so we cut off the posts!) and wanted something cozier instead. You know, something plush we could lean up against at night. And the short wood headboard that we currently had wasn’t cutting it.
But generally, headboards can add a lot of personality and polish to a bedroom. Bedrooms without proper headboards can scream “college dorm” or “first apartment,” so adding one is a no-brainer upgrade. Plus, depending on the fabric you choose, it can add some bold color and pattern to a room OR add to the restful, zen space you’re trying to create.
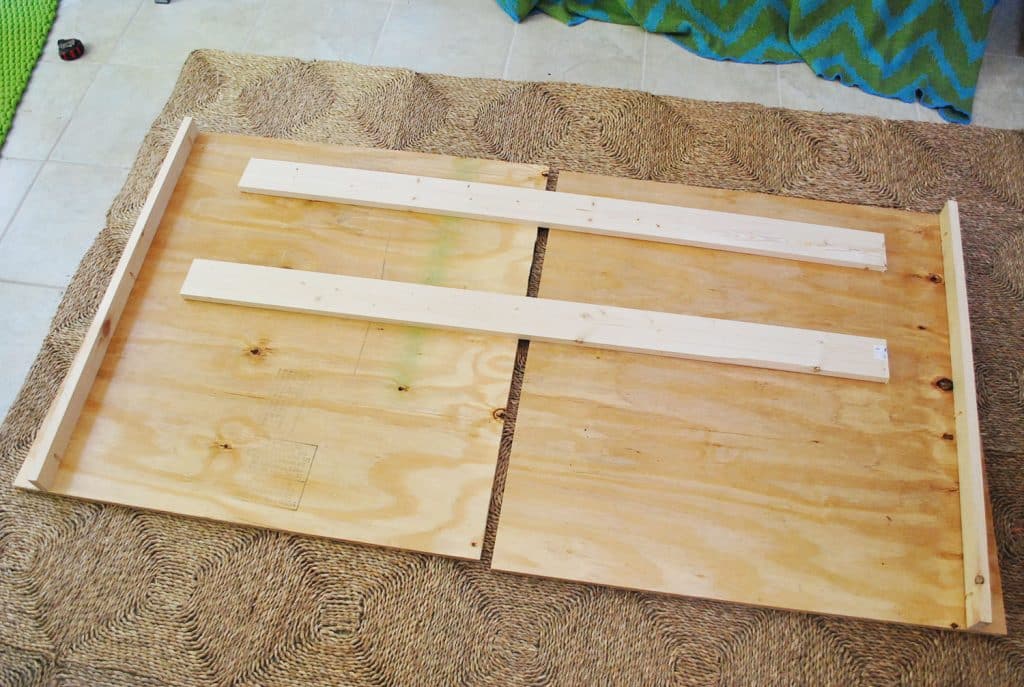
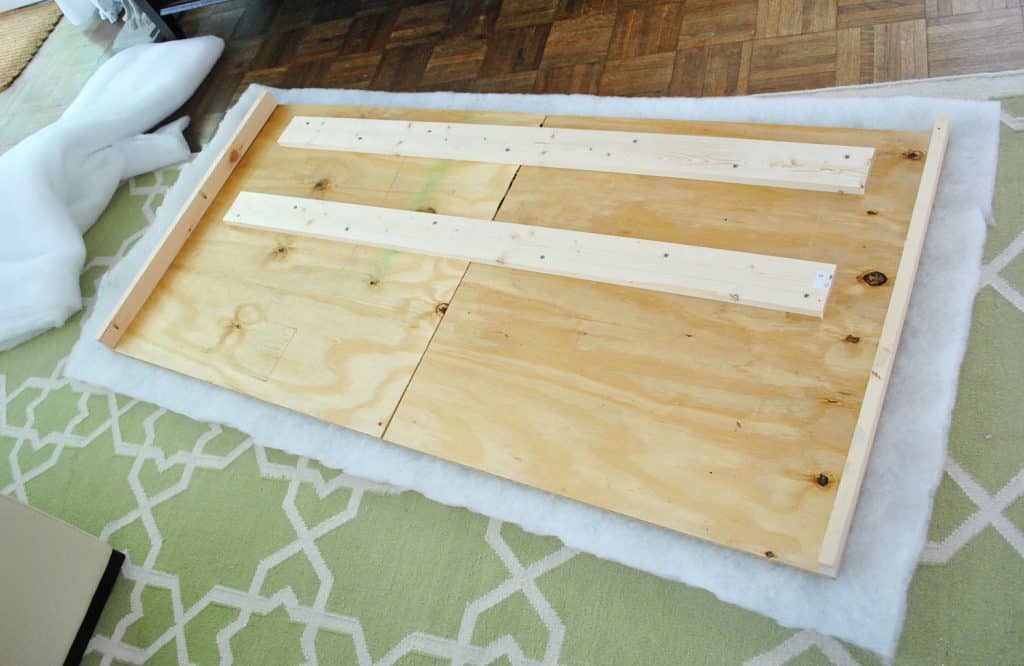
Step 1: Build Your Wood Frame
There are a few ways to create the wood frame for your headboard (including this super lightweight option) but for this particular bed, we constructed a sturdy plywood frame. If you want a simple rectangular design, this step can be as simple as cutting your plywood sheet to size (or having them cut it for you at the home improvement store). For our queen-size bed, we ultimately decided on 65″ wide and 31″ tall. But you can easily customize your dimensions depending on the location or width of your bed.
Ours looked a little more complicated, and I’ll tell you why…
First of all, we were planning to place our DIY headboard around the existing headboard/posts leftover on our Ikea Edland bed. We concocted a plan that would sort of “wrap around” the existing posts, which we mocked up in Photoshop below. But this concept would also work if you wanted to create a popular “winged” headboard look as well.
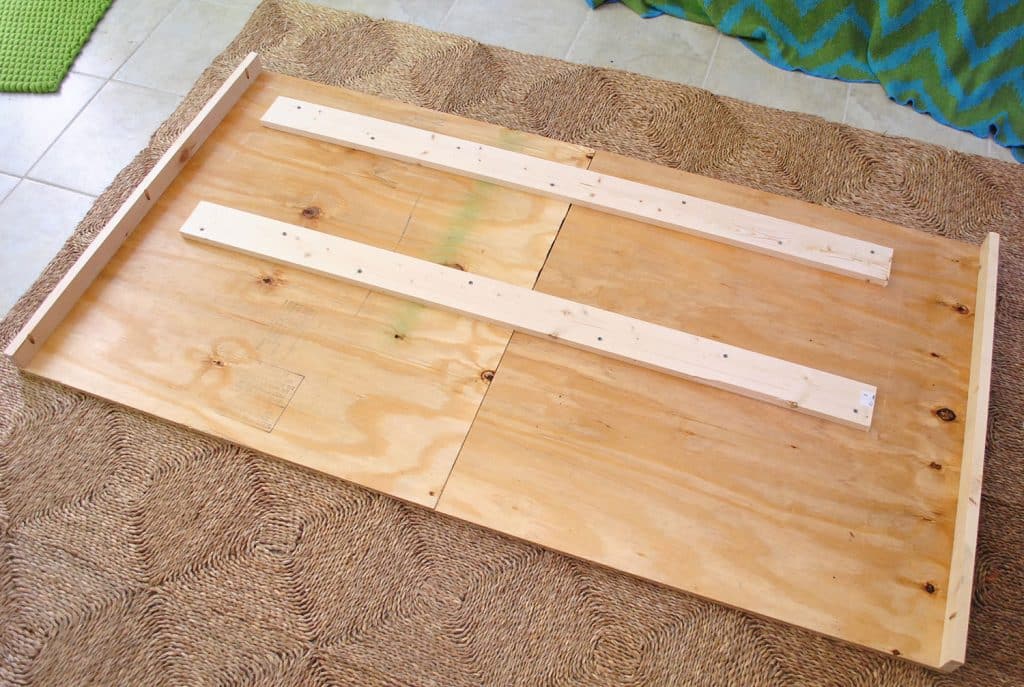
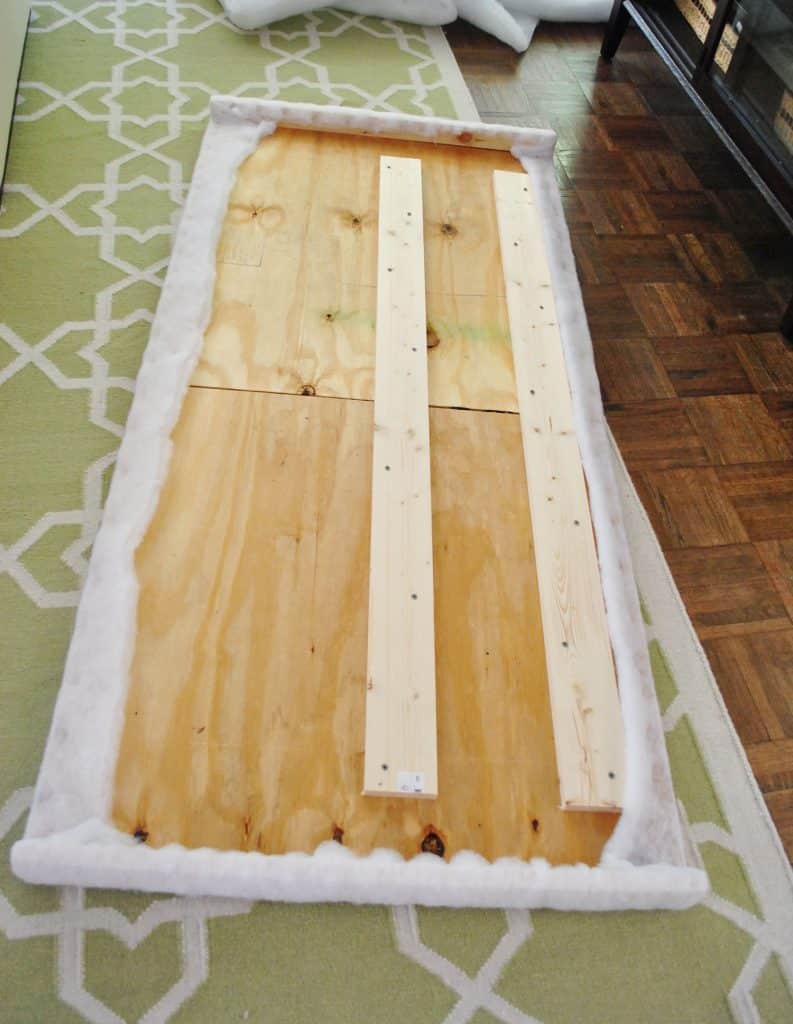
To add these small side pieces, we attached two 1×3 whiteboard boards to each edge using screws drilled into pocket holes we drill using our Kreg Jig. Alternatively we could’ve secured them with wood glue and nails.
The other reason ours was more complicated than a solid sheet of plywood was that we couldn’t fit it in our little car (ha!). So at Home Depot we had them rip it in half, and we reconnected the two halves at home with scrap pieces of whitewood boards. We’re fancy like that!
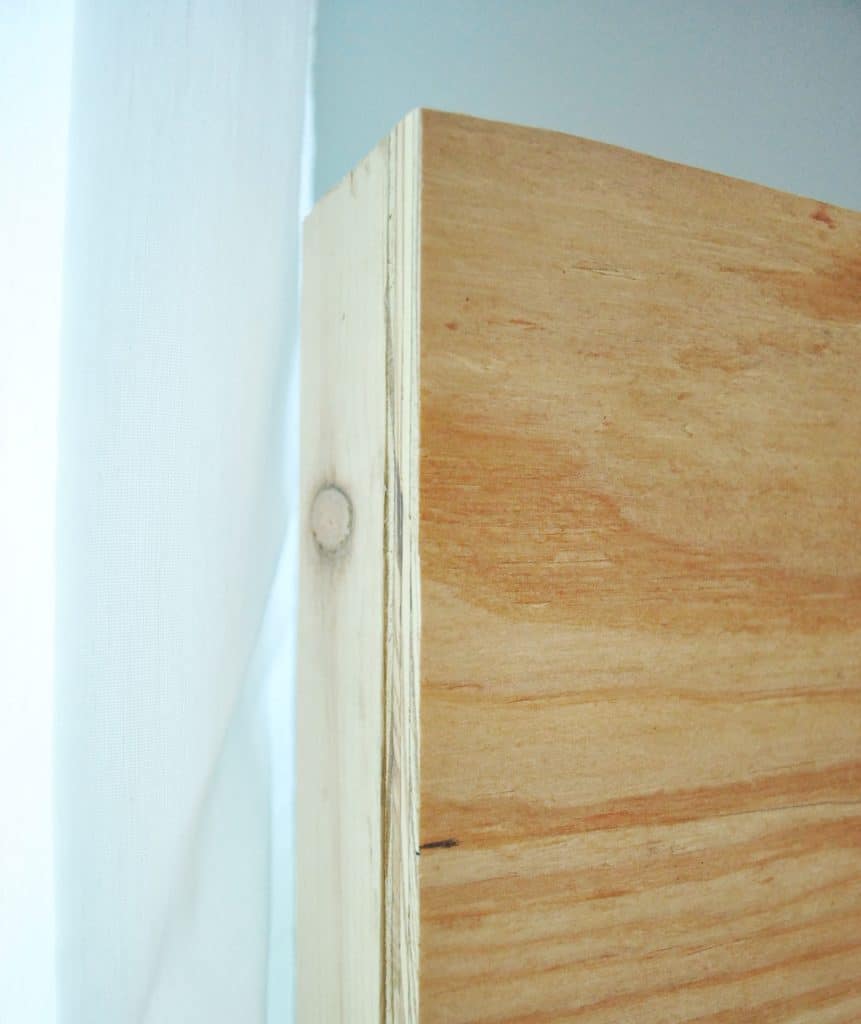
Before proceeding we upholstery, we brought our frame in to make sure it fit around the existing bed frame like we planned. Phew – it did!
You can also now see what that wrap-around piece looks like, and how it hides the existing bedpost. And since we’d soon be upholstering it with fabric, it didn’t matter that the edges were a little raw looking.
Step 2: Add Your Batting Layer
If the carpenter in you trembles at the idea of upholstery, just remember: if you can wrap a present, you can upholster a headboard!
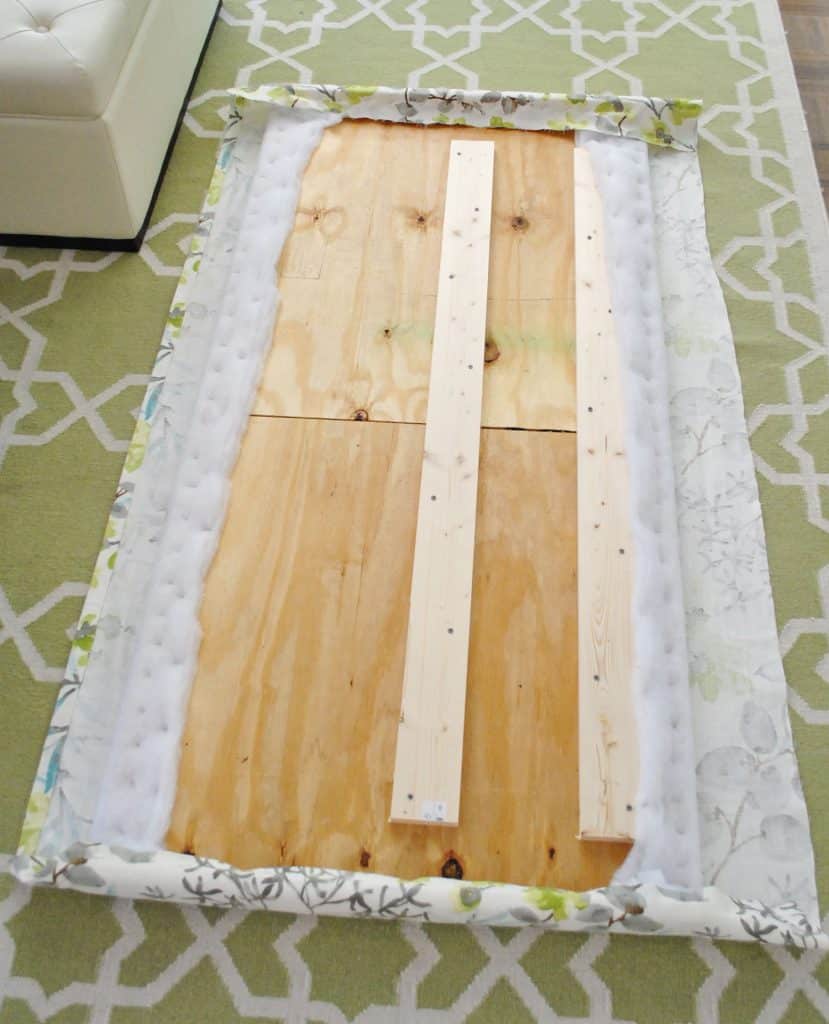
Before adding our fabric, we wanted to first add some padding in the form of extra loft batting. We decided to do two layers so it’d be plenty plush, but still not lose its shape. Sherry trimmed a 2-yard section of batting using regular scissors, laid it on the floor, and we placed our frame on top of it. You’ll want about a 2-3″ overhang on all sides.
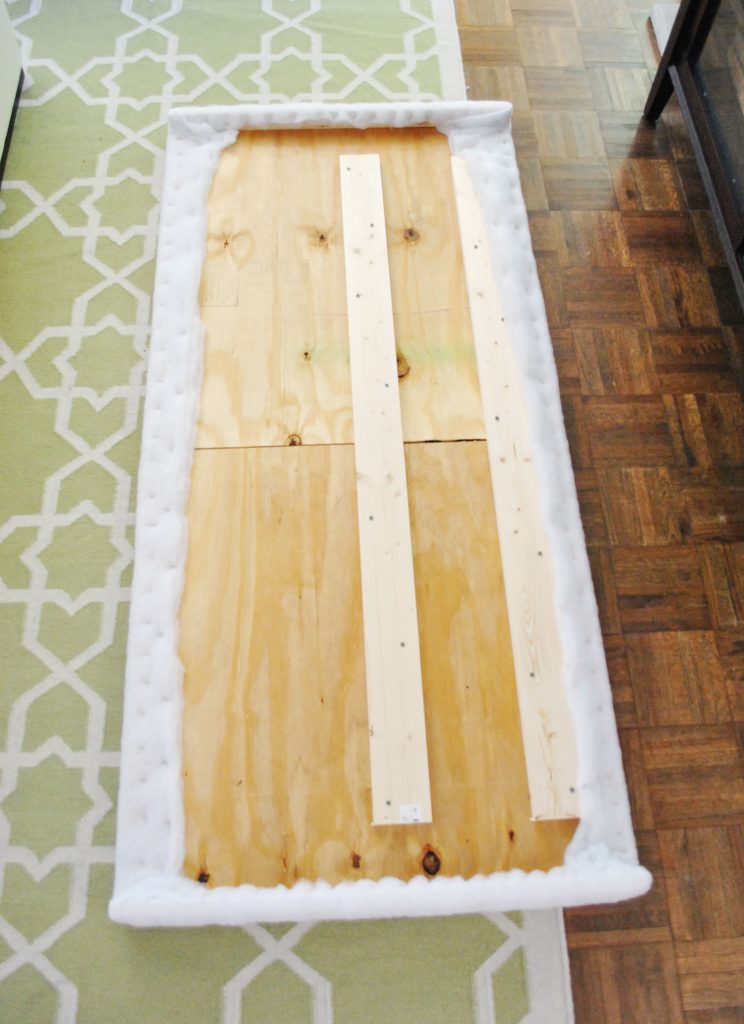
Then we used our staple gun to begin attaching the batting. We just wrapped the batting tightly around the edge and stapled it every few inches.
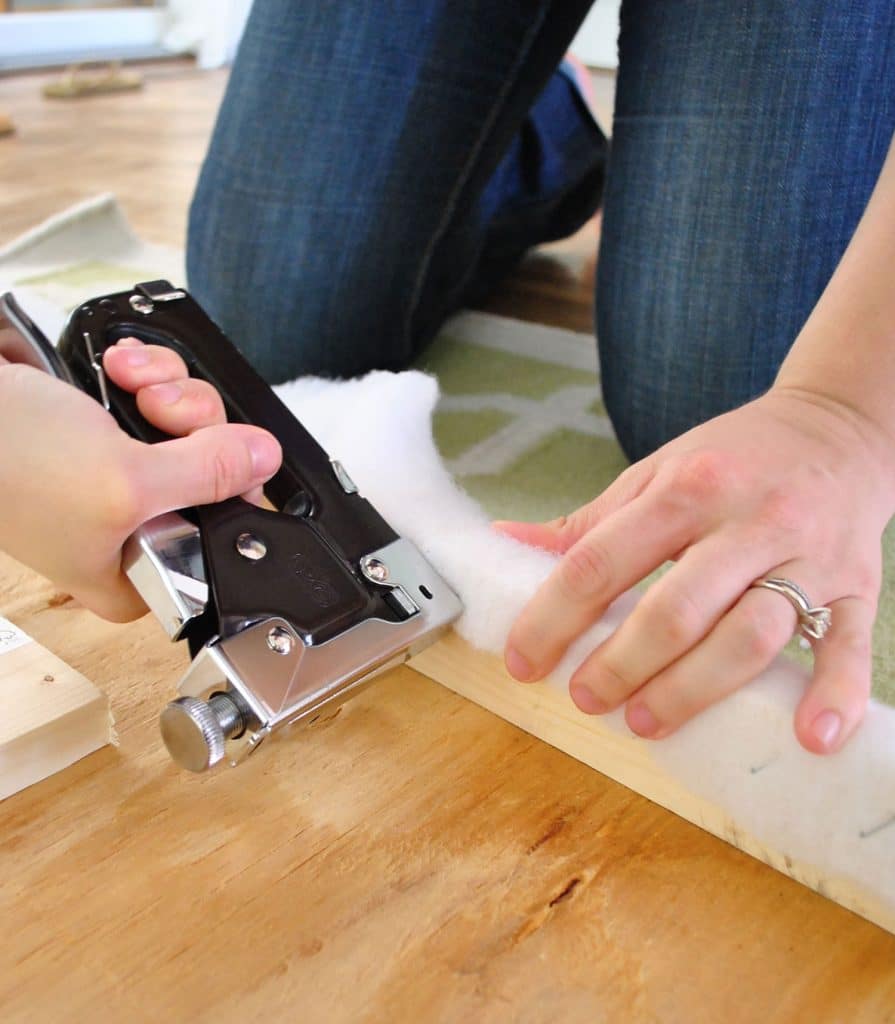
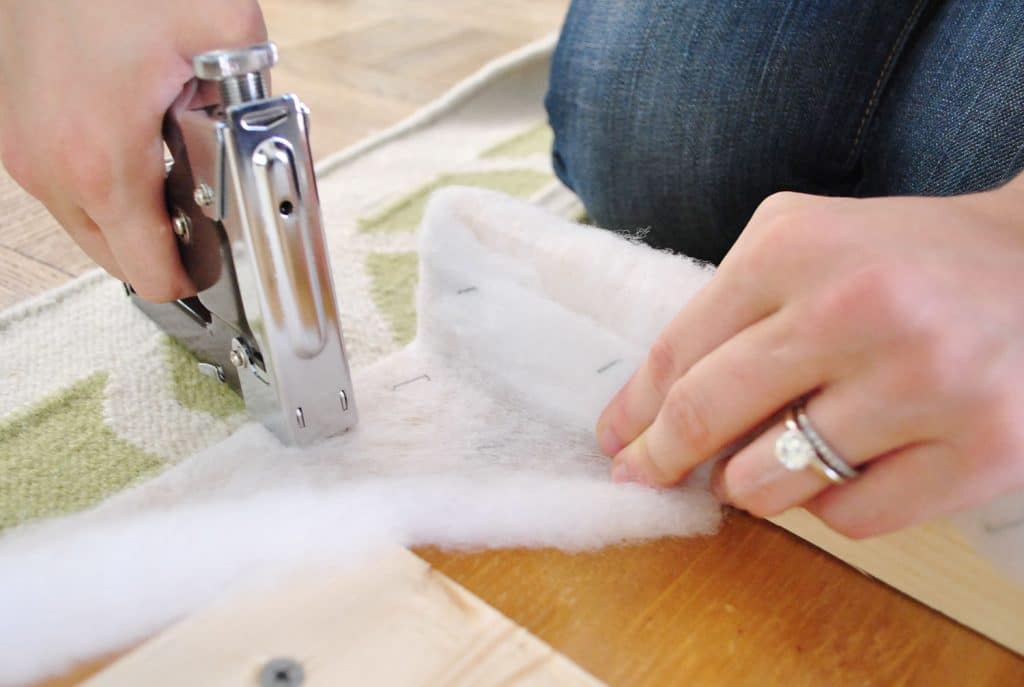
When we came to a corner, it was just like wrapping a present. You just fold it back and staple it so it all looks smooth from the front. Try to pull the batting tight so your corners don’t get too bulky. Bam, bam, bam – it’s done.
We just worked our way around the back of the headboard, stapling away. At some point John made me pose for this awkward photo too. Winning.
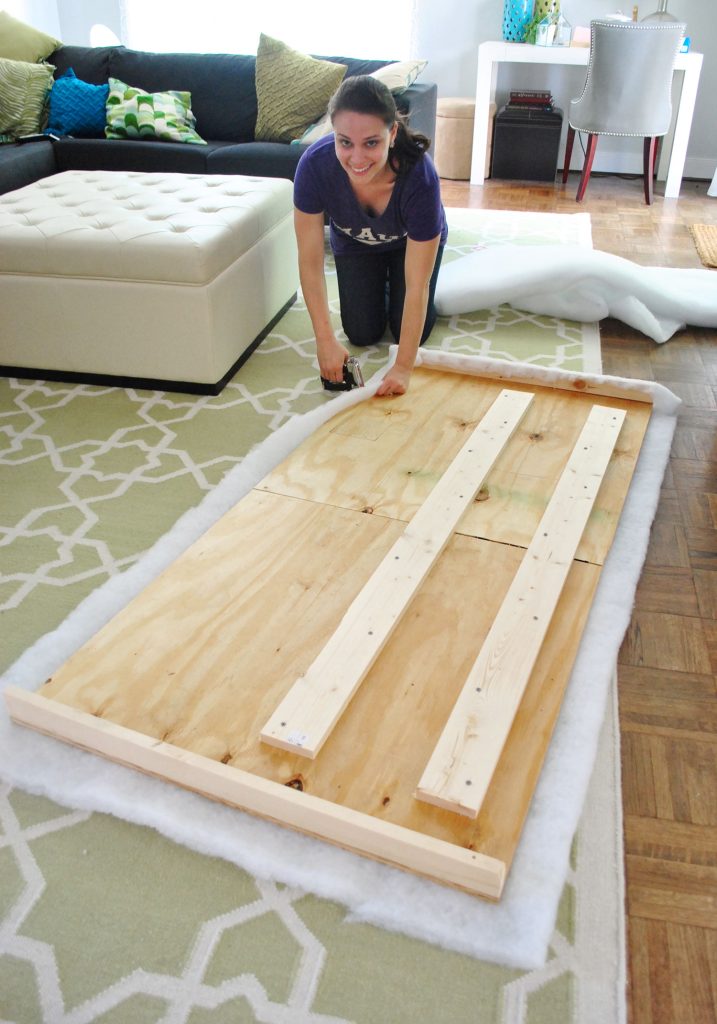
Eventually the whole thing was stapled nice and tightly around the back.
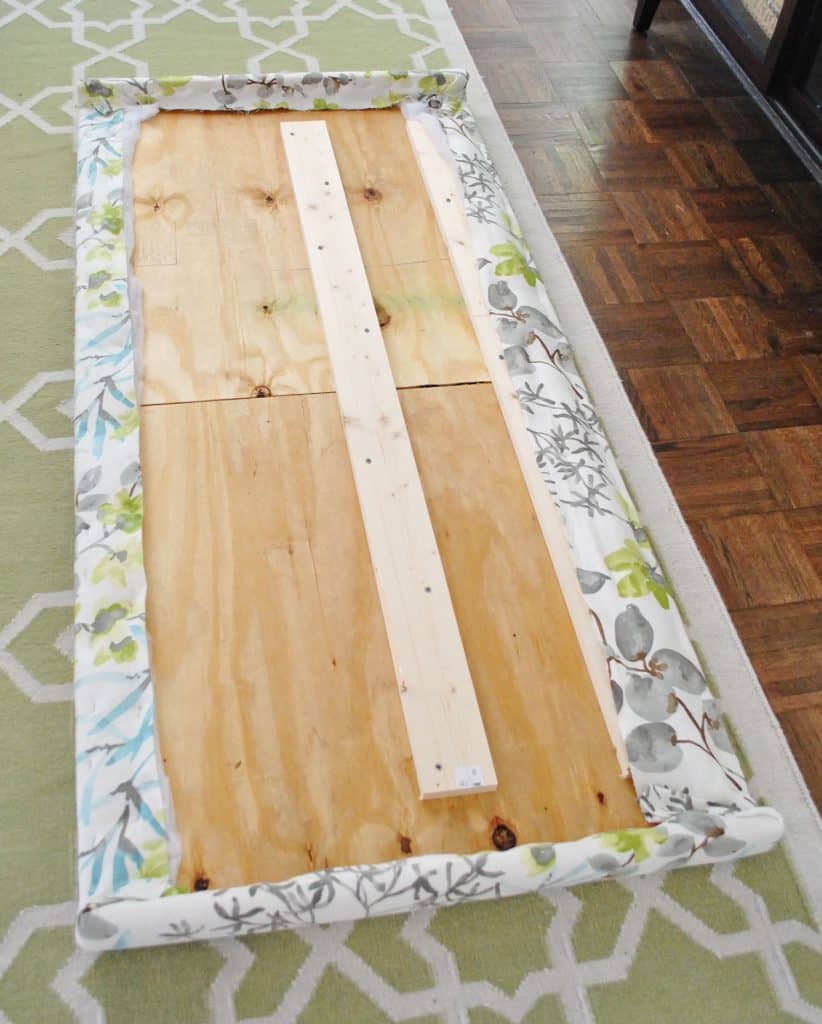
We decided to do a second layer of batting, just repeating this process. Here’ what it looked like with the double-thick batting!
Note: Another option is to use upholstery foam that you attach to your plywood with spray adhesive. We prefer the batting method since it’s easier to wrap around the edges. But if you’re looking for a much thicker, cushier feel – it may be faster to use foam, rather than wrap 4 or 5 layers of batting. Too many layers of batting can also make it difficult to staple into the wood.
Step 3: Staple On Your Fabric
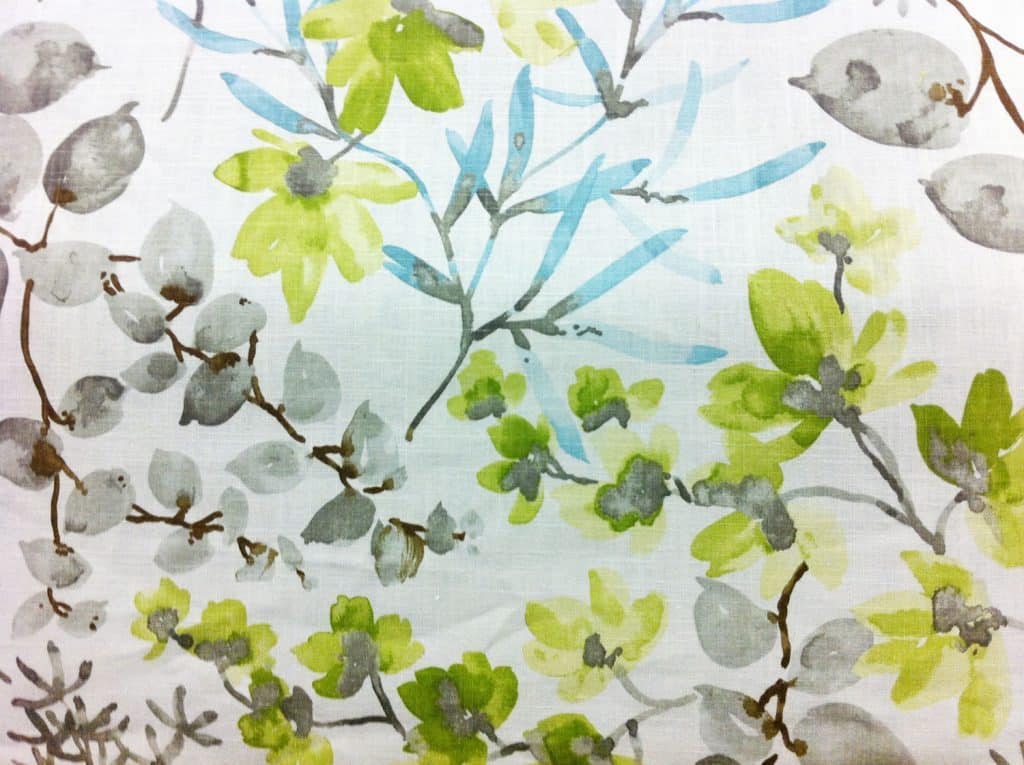
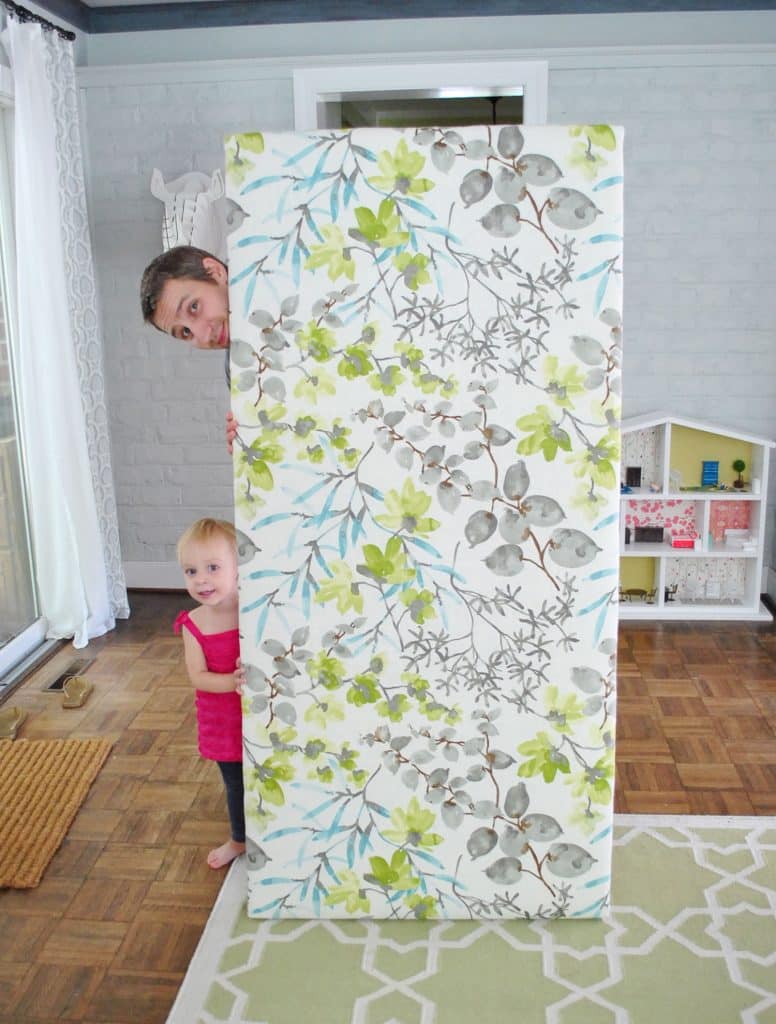
Here’s where the fun really begins. Now you can repeat that process, but with your selected fabric! Just give it a good ironing first to make sure it’s free of creases or wrinkles before you start.
Just like with the batting, we laid it flat on the floor and placed our (now batting-covered) frame on top, making sure it was pulled taut underneath to avoid any wrinkles. Then I trimmed offthe excess fabric around the perimeter, leaving a few inches for it to be wrapped and stapled around the back, just as I had with the batting.
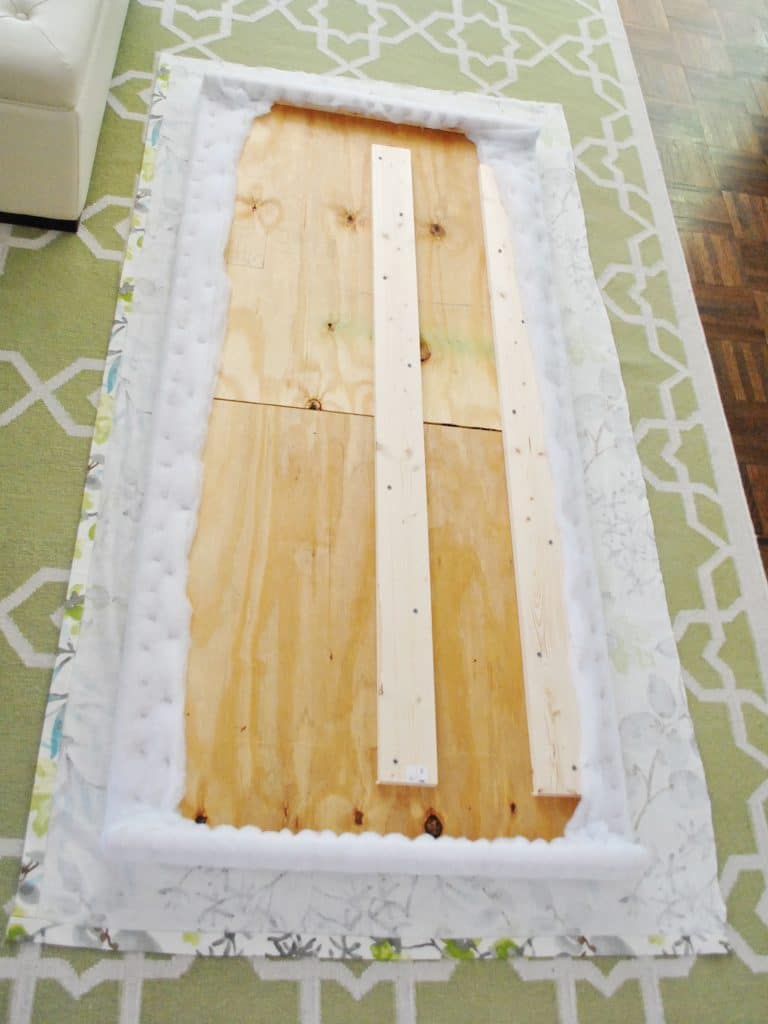
We started by stapling each side, being sure to pull it extra tight so it won’t end up all loose and baggy over time. I started with one side, pulling it all very tightly, then stapled along the opposite side, again pulling it nice and tight.
Once it was secured on those two sides, I did the same thing to keep it secured vertically, by pulling tightly and stapling the top side and pulling it tightly and stapling the bottom side as well.
Then we flipped the headboard up to see it in all of it’s plush, tightly upholstered glory. Bing, bam, boom. The whole upholstery step took less than forty five minutes to complete. Is it weird to call it one of my favorite fabric projects to date? I just love love love the pattern.
It’s hard to tell above, but in this angle you can get a sense of how plush it is. It’s cushy, but still tight – so we won’t worry about it getting baggy with everyday lounging against it.
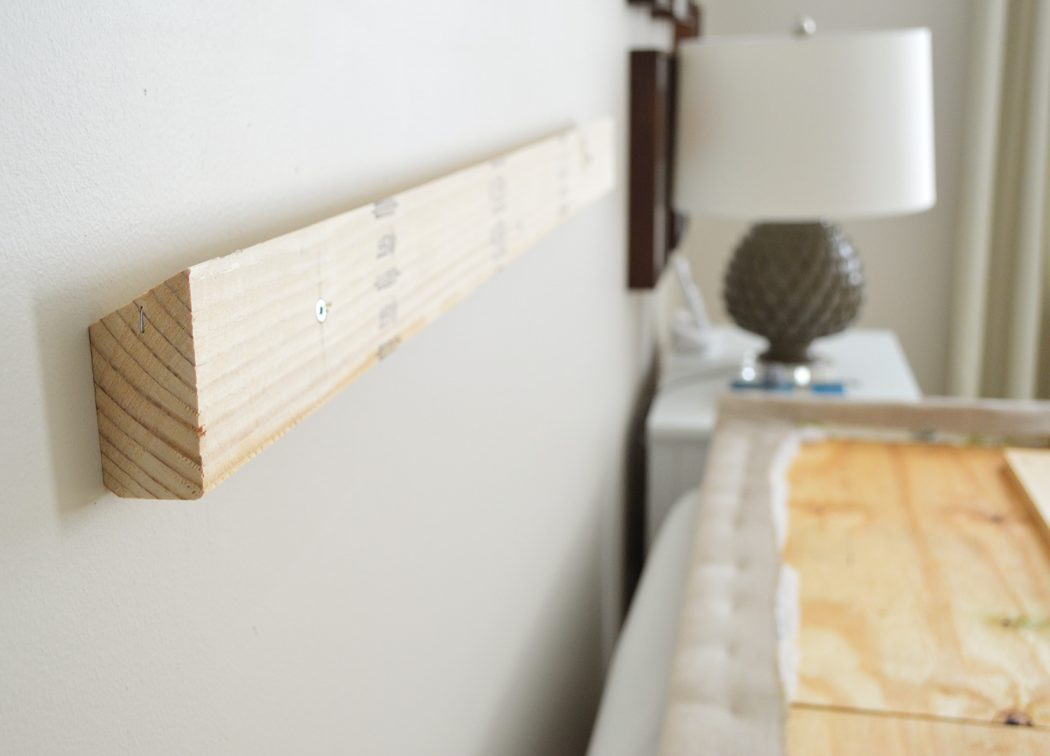
Step 4: Hang Your New Headboard
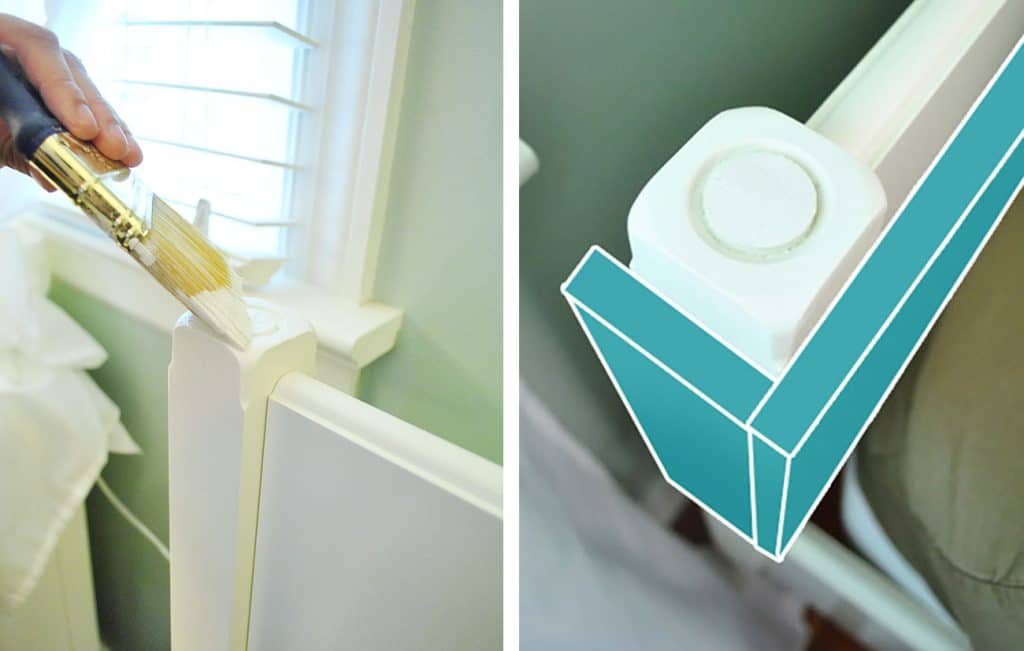
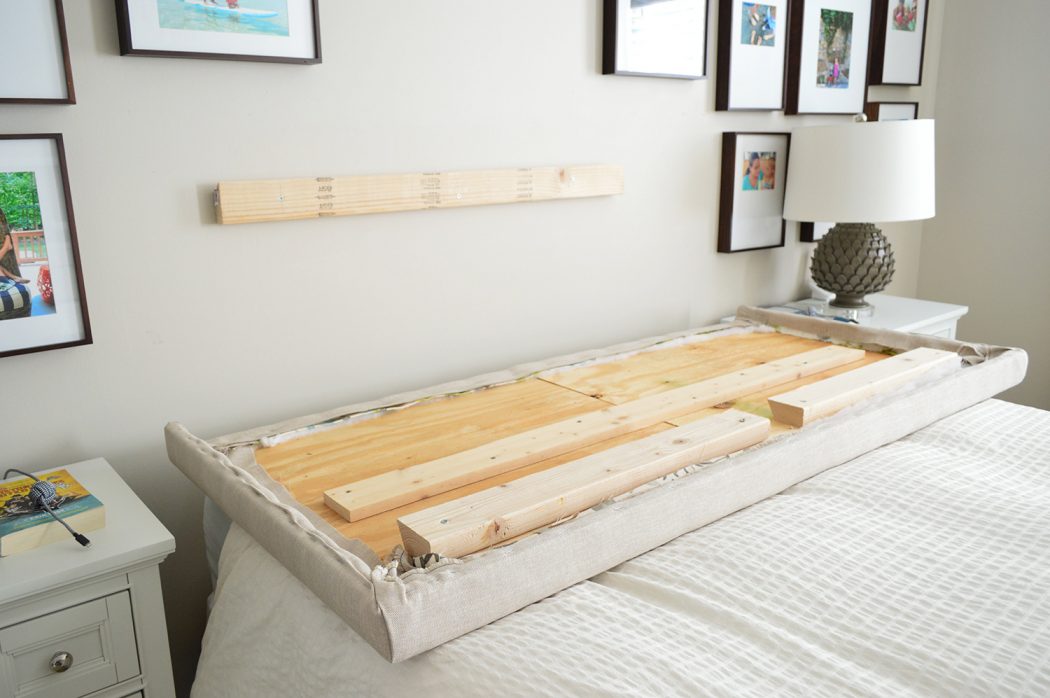
Now you’re ready to attach your headboard to your bed. This can be done in a few ways, depending on your bedframe. When typically like to install a headboard directly into the wall, since it’s often sturdier than attaching it to the bedframe. To do that, usually a french cleat works great. We cover how to DIY a french cleat in this post.
Actually, the headboard pictured above is the same one constructed during this tutorial – a few years later we just updated it for our new home with new fabric and a new top piece (just like we had added the sides pieces in this post). You can see the french cleat below, which is essentially two 2×4″ cut at an angle. One goes on the wall, the other on your headboard. You can also purchase pre-made metal cleats for just a few dollars.
TIP: Try to hang your headboard so it hits the top edge or slightly below the top edge of your mattress, that way there is no gap between the two.
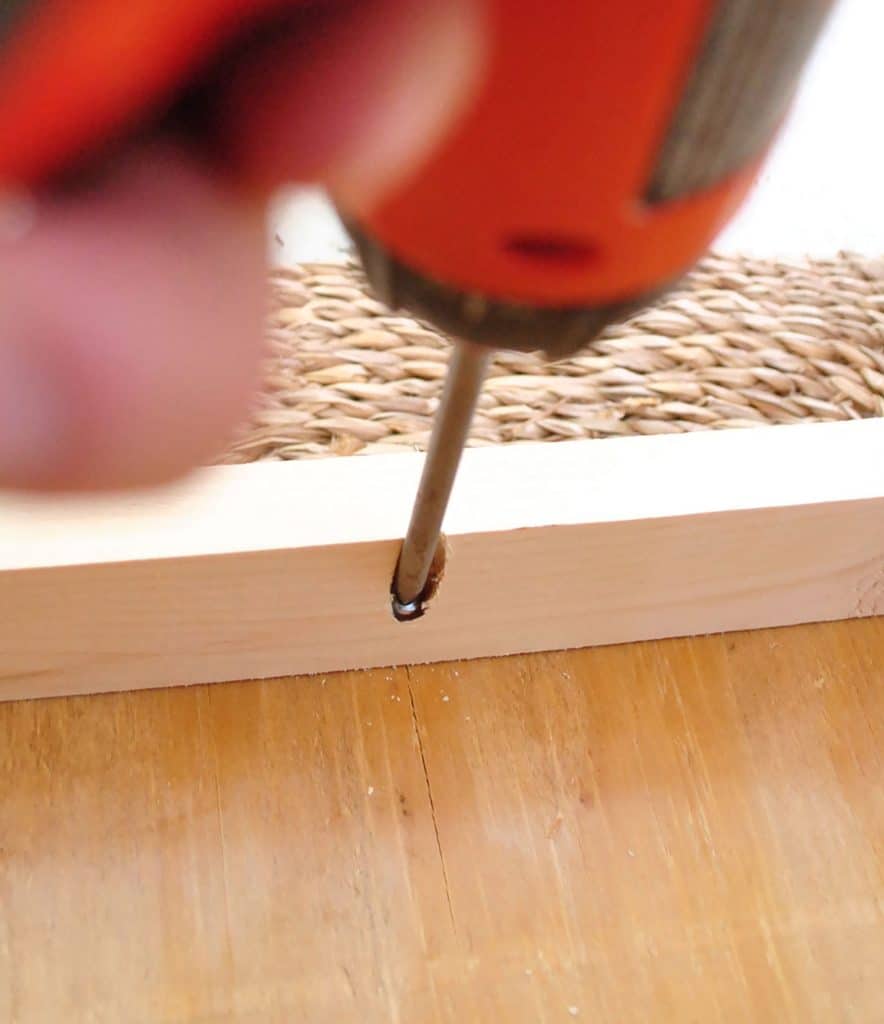
But in the case of our postless-four-poster bed, we chose to screw the new fabric headboard into old wooden one that was part of the existing bedframe, just careful to use screws that wouldn’t poke through the other side.
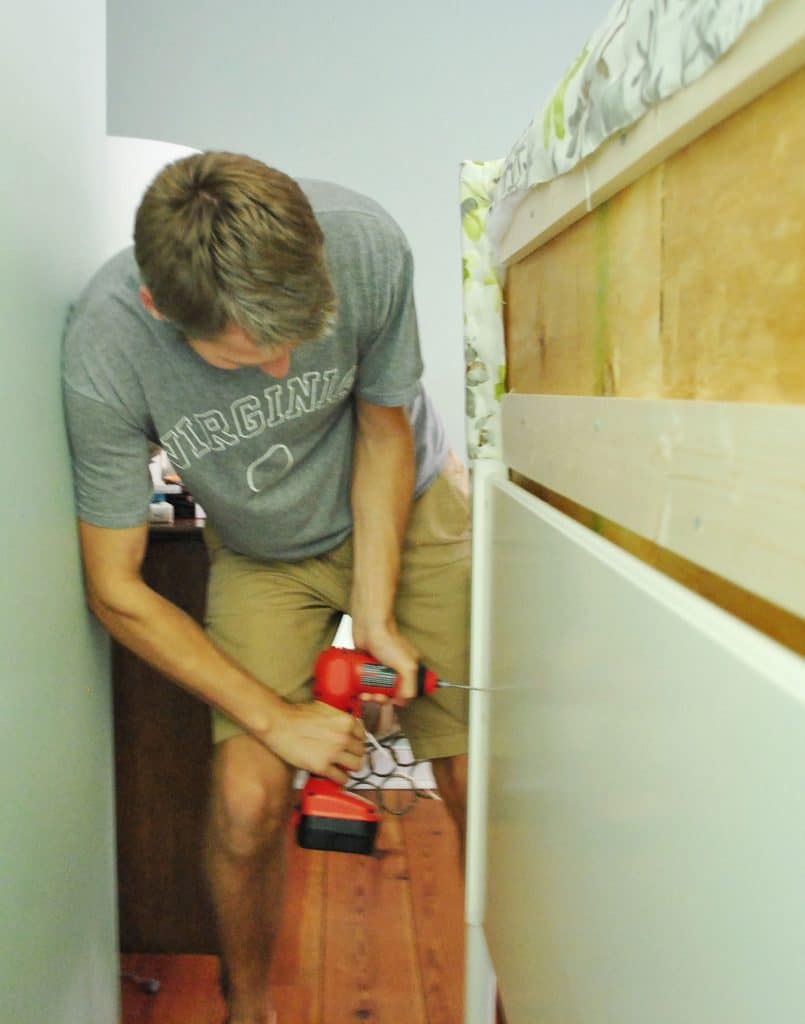
Here’s John putting the final screws in on the backside, pushing the new fabric headboard tight to the bedrame for a snug, secure fit.
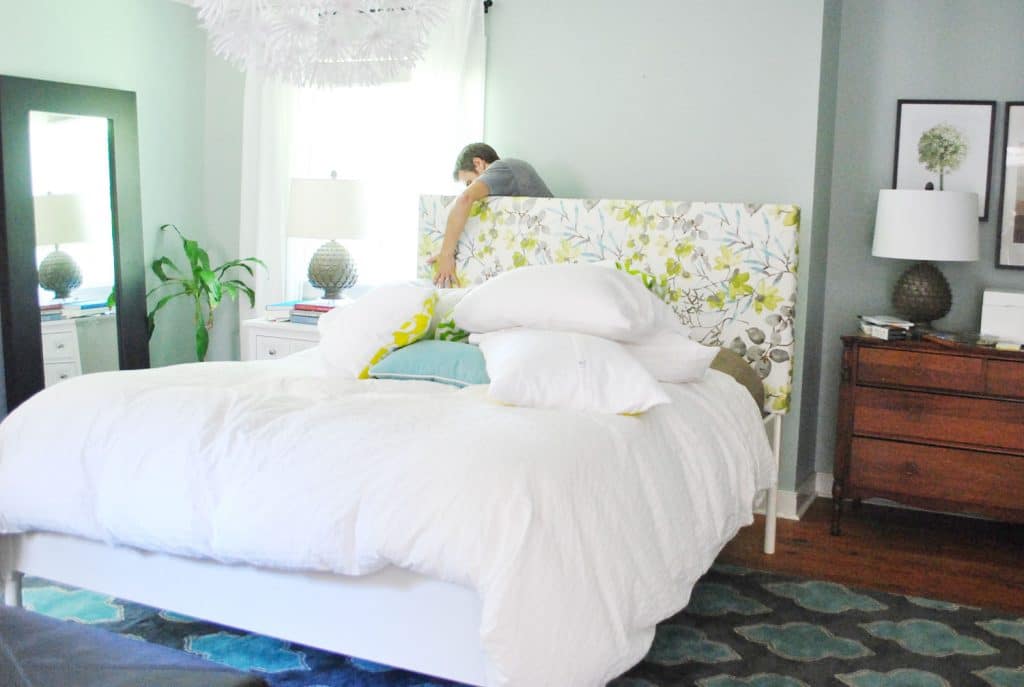
Step 5: Enjoy Your Handiwork
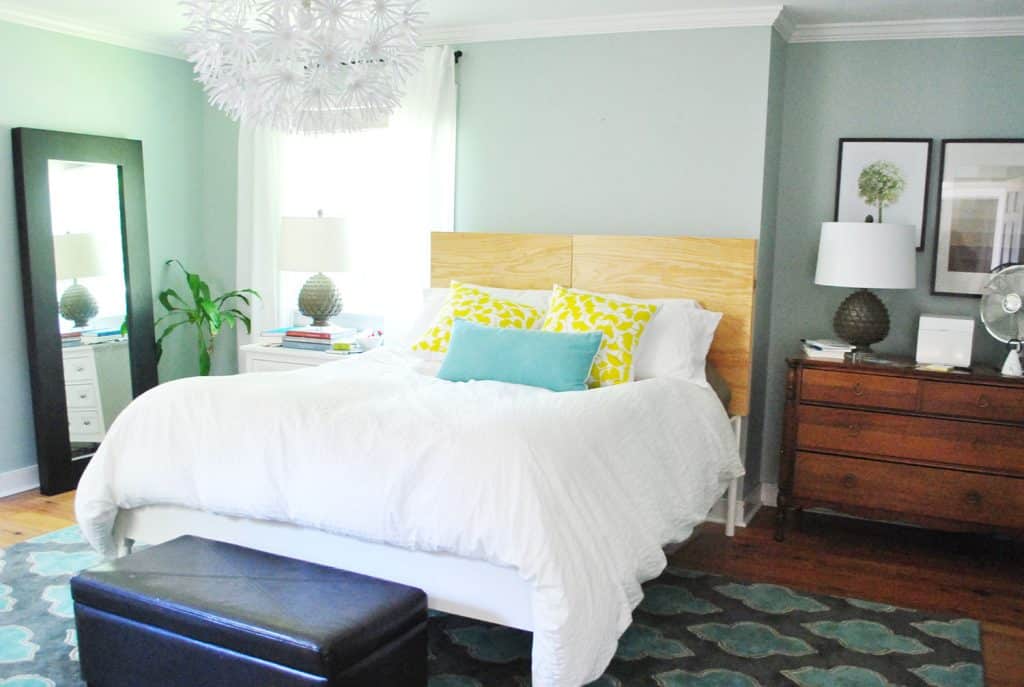
Once it was attached, we just pushed the bed back into place and beamed at it. If only it had been bedtime already that so we could immediately enjoy it’s plushness!
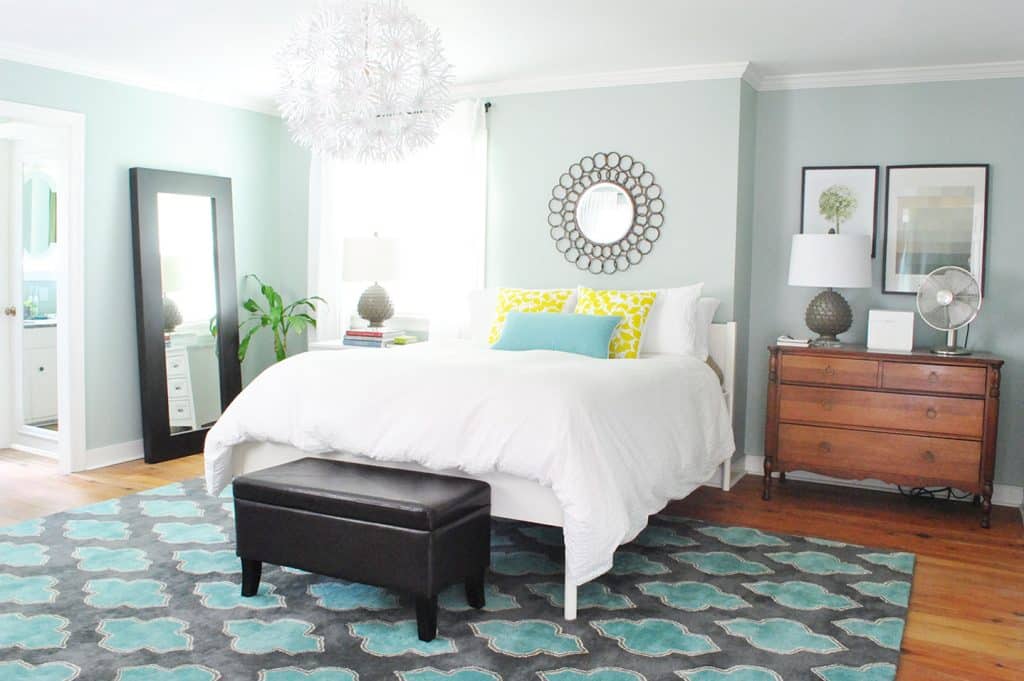
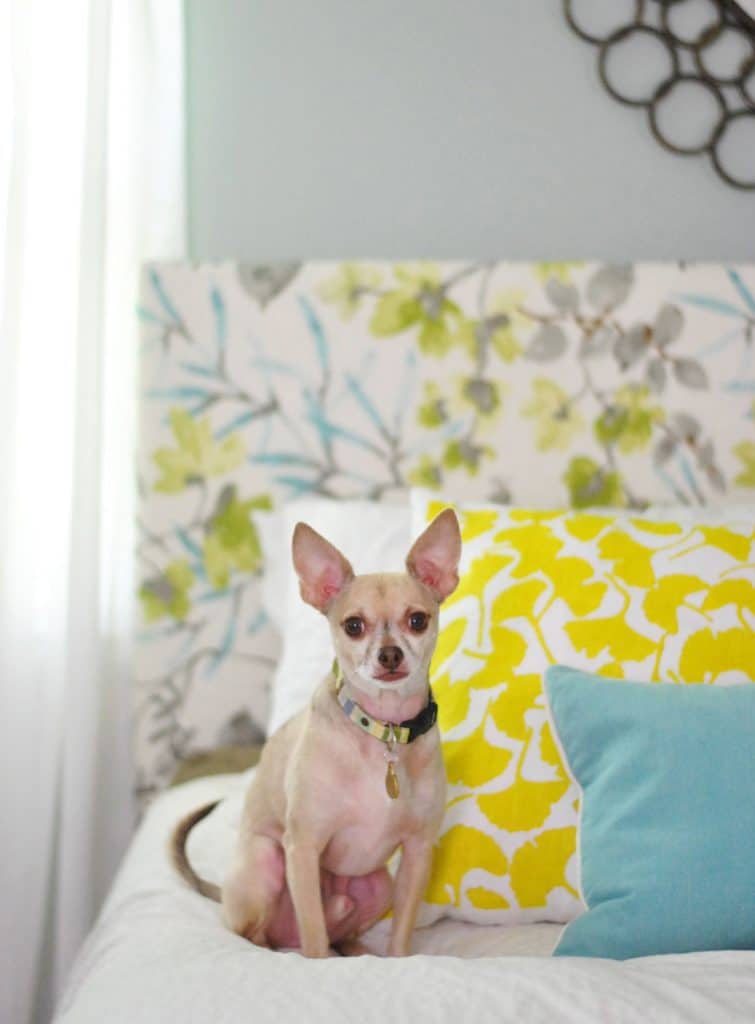
We loved how the fabric is sort of like the bridge between the yellow ginko pillows (since there are greeny-yellow flowers in the headboard fabric) and the turquoise in the rug (thanks to those subtle leafy sprigs of turquoise in the headboard).
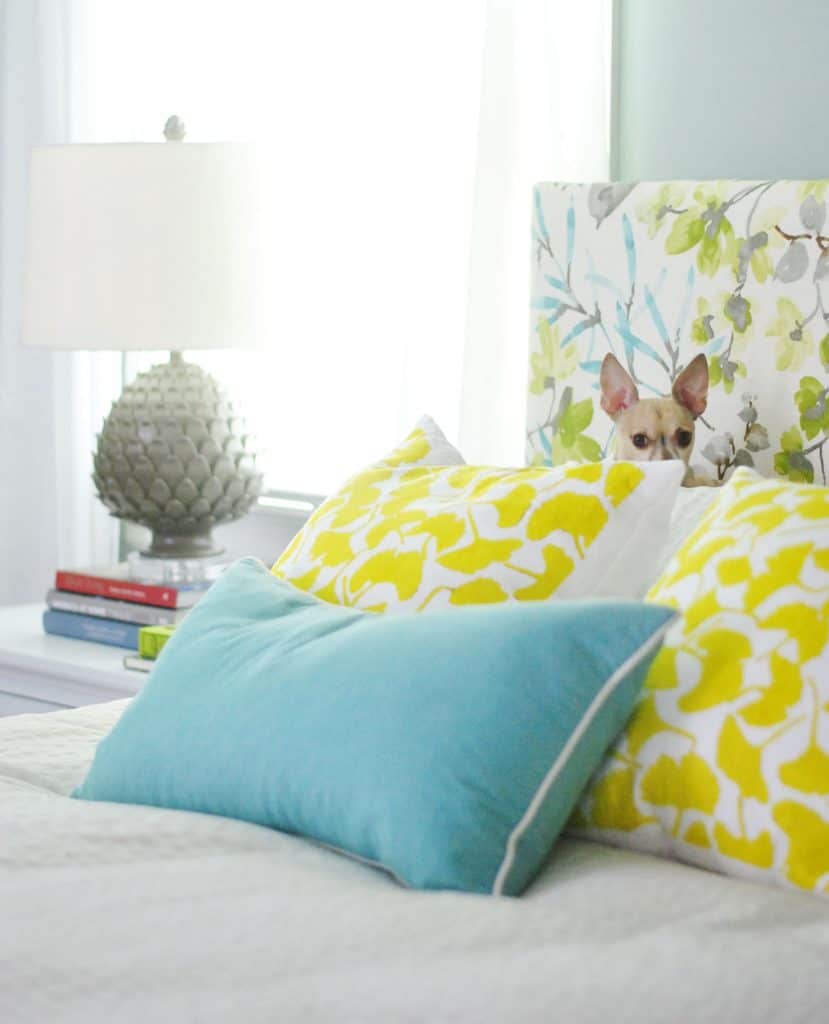
I even think Burger looks especially dapper in front of this new backdrop.
DIY Upholstered Headboard Cost
As for a budget breakdown here we go:
- Wood frame (plywood and some bracing boards from Home Depot): $22
- Two layers of extra loft batting (from JoAnn thanks to a 50% off coupon): $4
- Discount designer fabric (from a local fabric outlet called U-Fab): already owned – but it was originally $20/yard ($40 total)
- Total spent: $66 (if you add in the fabric we previously bought for a book project and reused for this)
Sixty six bucks isn’t pennies, but compared to upholstered headboards that are sold at places like Overstock, it’s at least $100-200 cheaper than even the most basic types. And considering places like Ballard Designs charge around $400-$700 for custom headboards (where you get to pick the fabric) it was awesome to get to choose the fabric and whip this up ourselves.
*This post contains affiliate links, so we may earn a small commission when you make a purchase through links on our site at no additional cost to you.

cassie says
i am loving it! the colors are awesome- that fabric is happy, elegant, bright…. perfect!
t says
I like the fabric you chose – it’s a nice flowy, soft pattern.
Don’t stain that dresser; it looks great the way it is. I think different woods, stains are more interesting in a room and give it more a layered look.
YoungHouseLove says
We promise to think long and hard before rushing into anything! In person the dresser needs some work (it has stains/scratches, etc) but we’re not rushing into anything!
xo,
s
sophie says
ditto – the fabric is lovely and it works well.
But don’t stain the dresser and floor darker. then it all starts to look generic, rather than fun. and it makes teh room much heavier and darker.(sure the dresser needs some work, but you can do the work without going dark)
YoungHouseLove says
We promise to take things one step at a time and just make our room fit for us! It’s probably not going to be the same exact series of choices that others would take if it were there room (everyone has to take their own path) but we try not to rush into anything, so who knows where we’ll end up! Will keep you posted for sure!
xo,
s
Jenny says
I agree! Try using a Tibet Almond Stick on those scratches. It can work miracles. xox
Jenny says
(about the dresser) :)
Lindsay @ A Walk in the Closet says
It looks great! I love how the pattern is more muted than the yellow pillows and blue carpet but picks up all the colors within the room.
What a perfect choice!
Alecia says
I am sooo not good at all the DIY stuff, but I need to get with it! This headbord is the bees knees and you guys always make things look easy! I am uber jealous of all of your cuteness! Nice job. Can I sleep in your room? So pretty!! :)
YoungHouseLove says
Haha, come on over! You can totally have John’s side (he’ll sleep on the sofa).
xo,
s
Jen says
Wow! Your room looks SO much better this way!
Steph says
Okay, I may have just laughed out loud at that picture of John creepily loving on the headboard in a conference room waiting for a meeting to start, hahaha!
The headboard looks perfect, like it was made for that room! The room is coming together so nicely with your latest upgrades to it! I also love how it looks like Burger is trying to be part of the design in the pattern, hah.
Bethindc says
A quiet vote here for not staining the dresser. The glowing reddish wood tones are perfect as is, and tho I know photoshop is a bit of a blunt instrument, a darker stain might really kill the charm of the piece. And–another argument–dark dresser, dark floor, dark mirror might verge on the dreaded matchy-matchy.
YoungHouseLove says
We don’t mind a few things having the same finish as long as other things are different (ex: we have a white nightstand, a light mocha chair, and a dark mirror- so if we stained the floors dark and the one night stand stayed white, we don’t think a dark dresser is too matchy- it’s all part of the mix). But who knows where we’ll end up!
xo,
s
E.Lefebvre says
I LOVE it! Beautiful! This is one of my favorite projects you’ve done, and I think it’s in part due to the fabric, which is great! I’m excited to see it with the refinished floor, although I have to say, I have a soft spot for the red/medium wood of your dresser. Anyway, it looks great!
Claire says
Hi, I’m a daily reader but almost-never commenter.
I love the headboard. You are so right about the combo of the geometric carpet + botanical-y print. Congratulations!
Can you tell us about your staple gun? What brand, etc.? Lightweight, heavyweight, easy to find replacement staples? I bought what I thought was a “basic” one once, and had lots of problems.
YoungHouseLove says
We got it for around $20 at Home Depot. Don’t even remember the brand and it’s just all silver (no brand name on it) but it seems to work well! Sorry I don’t have more info. Anyone else have a staple gun they love?
xo,
s
Christy says
Headboards are such an easy way to update a room. I’m totally a novice compared to you all, but I was able to make mine. I used an old quilted throw that I had bought that matched my summer and winter comforters as my fabric. Mine was a little more expensive because I used foam instead of batting material. Other than that, I did basically the same steps you did. Oh, and I used three small metal claw things (not sure what they are called) to mount it instead of a piece of wood. It just slides on and off.
Emily says
Ooooooh, it looks nice!!! I like it- love how your bedroom is constantly evolving.
Taya says
Looks great! I love the Teal/Yellow combination and the new arrangement makes it seem cozy yet airy and relaxing at the same time. Not going to lie…. I’m kind of jealous of your newly improved space!
Janelle D says
This turned out great! I’ve always wanted to try to make a headboard using this method. I love reading in bed too… So cozy.
Tara L says
Looks so beautiful! Any suggestions for how to incorporate a headboard when all you have is a bed frame? Is there a way to attach it to the bed, as opposed to hanging it on the wall behind it?
YoungHouseLove says
I would definitely attach to the wall if you have a frame (we have a tutorial on how to make/do that on our Projects page). Hope it helps!
xo,
s
carrie @ brick city love says
I made a tufted headboard that attached directly to my metal frame (as opposed to hanging on the wall). It worked out really well! Here – http://brickcitylove.com/2010/06/15/how-to-diamond-tufted-headboard-part-3/ – if you want to see it.
YoungHouseLove says
That’s awesome! Love it!
xo,
s
JMe says
I made a fabric covered headboard with a base of particle board. I used 2×4’s as “legs” – they are attached to the back of the base, inset from the sides and the same width apart as the brackets on my metal bed frame, so I just used framing screws to attach the pieces. Warning – the headboard is heavy!!!
carrie says
“John has actually been campaigning to repaint the walls…” That is so funny to me. I cannot imagine my husband requesting to repaint anything. Go John!
YoungHouseLove says
I know – it’s a total role reversal for us, but John really wants a dark cave-like bedroom. Haha.
xo,
s
Traci says
love the headboard! my husband and i made one a few years ago with a rounded top. just wondering – why did you guys decide to go with just batting and no foam under the batting layer?
YoungHouseLove says
We have had luck with batting in the past so we just went with what we knew (and it was $4, while foam is usually substantially more- maybe around $30+ for that size).
xo,
s
Jess @ life, happily ever after says
Wow! That looks great! It’s amazing how just moving the furniture, cutting some bed hair and a new headboard can completely transform a room! Also Sherry, your ring is GORGEOUS! I am not sure we have seen it that up close before, so I wanted to let you know!
YoungHouseLove says
Aw thanks Jess!
xo,
s
Martha says
I agree! Sherry’s ring is gorge! Speaking of, I’ve always wondered how she keeps it so clean with all the painting/DIYing/floor installing/staining/etc.
YoungHouseLove says
My secret to keeping it clean is to garden with gloves! Seriously I don’t own a ring cleaner, but inside a fabric glove in the garden it gets all steamy and I take off the glove and it’s all clean. Hahahahaha.
xo,
s
Andrea says
I noticed the ring, too! So classic and pretty.
Kristen @ Popcorn on the Stove says
I love the headboard, and I love the idea of darkening up the walls (since the headboard and comforter are a lot of white).
Shelly says
LOVE it! It definitely ties in the yellow pillows and I also like that it kind of reminds me of the art you had over the bed in the old arrangement.
Kristine says
Love the pic of John that looks like he is caressing the headboard. LMAO! Priceless!
Lindsay says
OMG I cannot say how in love with this I am. This may be my favorite room in the house now!
I’m curious, we have a wood headboard we got from someone else that is boring. The very top is a little wider than the rest so I have small candles on it. Is it hard to cover a headboard like that? I’m wondering if I should just make one like you did from scratch and sell our current one.
YoungHouseLove says
No, it should be just as easy and you already have it on hand! Just pull the fabric around back and staple it (after doing the batting layers of course!). Good luck!
xo,
s
bridget b. says
Thanks for the headboard tutorial. I’m with John on painting the room a little darker to make the room look even better.
I used another headboard tutorial of yours to make a headboard for my guestroom using Ikea tables: http://623designs.tumblr.com/post/22720574470/the-new-guest-room.
YoungHouseLove says
That looks awesome!
xo,
s
Reenie says
LOVE it!!! Love the pics of John and Clara with the headboard. Too cute!!!
Oh…..and I went home last week and re-arranged my bedroom. HA!! And I love it. =)
YoungHouseLove says
That’s awesome! Gotta love some free furniture shimmying!
xo,
s
Kacey says
i love this!
a question…
if you didn’t have a bed frame like you do (i.e., just a mattress and box spring on a plain old metal frame), how would you hang/adjust the headboard to attach to the wall or to fit the height of the bed?
YoungHouseLove says
Check our projects page where we have a tutorial for making a headboard that attaches to the wall (which works well with a boxspring/mattress combo).
xo,
s
skye @ neathering our fest says
We turned a door into a headboard and attached it to the metal frame by attached two 2x4s to the frame where the headboard would attach an then attached the door to the 2x4s. The 2×4 also run all the way to the floor for a little extra stability since the door was much heavier than a traditional headboard! it worked out quite nicely.
unfortunately, however, i don’t have a lovely and detailed post about it with pictures like john and sherry do. :( maybe that will help though?
YoungHouseLove says
That sounds awesome Skye! Thanks for sharing!
xo,
s
Jordan says
Y’all just never cease to amaze me! Soooo fun and neat to see the steps and layers and what a difference they make! Any chance for the horses to make a return to this room? Also, would you consider doing a “bedroom wall color fashion show (like the rug show)? Just wondering how a deeper charcoal would look on the walls.
YoungHouseLove says
Yes, I was thinking about them on the wall that’s bare (one is still hanging over the chair across from the bed, but the other one has been living in the playroom- poor guy!).
xo,
s
Monika says
It really looks like John is making out with the headboard. LOL! What a great job you guys!
YoungHouseLove says
Oh yeah, he’s into it.
xo,
s
Gabriella @ Our Life In Action says
Great! Now I want to do my headboard – I hope you are happy! ;-)
Seriously though, that is beyond gorgeous!!! I love it.
YoungHouseLove says
Haha, you might just fall in love…
xo,
s
Chrissy Henry says
Holy Crap your room is turning out amazing! See, like I said you two surprise me every time!! Beautiful for sure, and the photo shopped paint change makes it look so much warmer/welcoming… I hope you go for the darker color! Sunning so far, really, I secretly wish I could live in that room :)
YoungHouseLove says
Aw thanks so much Chrissy!
xo,
s
Jeremy says
Am I the only one to notice that Burger’s collar also works with your new headboard pattern?
YoungHouseLove says
Haha- that’s so funny!
xo,
s
tara or some call me "a rat" says
I noticed it!!!
Patty says
Not only that, Burger’s collar looks suspiciously like Sue the Napkin…
YoungHouseLove says
Haha- so funny! Totally subliminal!
xo,
s
Danica Allen says
Wow. I love every change you recently made to your bedroom and the headboard seems to bring it all together. nice work! This inspires me to get started on our bedroom.
Melissa @ HOUSEography says
OMG – I love it!! The colors are amazing. Everything is really coming together. The only thing I’m not in love with is the lamps on either side of your bed. They are great lamps but not sure they are working there. Might be better with unmatching but coordinating lamps (more along the lines of your office).
I also did a bed makeover in my house where I upholstered part of the existing headboard and footboard. http://www.houseography.net/2011/12/bed-makeover-upholstery.html
YoungHouseLove says
We like the matching-lamps-with-mismatched-side-table thing (and when we have matching tables or one long desk, like in the office, we like mismatched lamps to break things up). I think it’s that we like having one thing to help tie not-even-close-to-the-same objects together (like a small white nightstand and a bigger wood one), so the lamps connect those two pieces for us in our bedroom. But it’s definitely a personal preference thing! Oh and I love your bed makeover!
xo,
s
Melissa @ HOUSEography says
I see your point and I like the symmetry as well. Definitely a preference! I do love those lamps :)
Theresa says
So pretty. Even Burger’s collar is in the same color palette.
YoungHouseLove says
Haha- so funny!
xo,
s
Kristen says
Your bedroom looks stunning! It was nice before but these few changes have just taken it to the next level of perfection. The fabric is beautiful and all the pops of color on the bed look so nice together. Love it!
Claire says
Looks wonderful! Thanks for the tutorial because I’ve been wanting an upholstered headboard for quite some time, and your way is easier than what I was thinking of.
Since you didn’t mention it, I’m guessing you suffered no crashing trees from the storm yesterday?
YoungHouseLove says
Thankfully we returned from Atlanta to find our house unscathed, but a tree fell on our neighbor (and friend’s) house! Thankfully they’re ok!
xo,
s
Heidi P. says
That’s two times you’ve nearly missed trees falling!
I love that fabric. And the gray, blue, and green are so perfect for the room. What an easy, game-changing upgrade! The room looks so so different now, it’s funny that it all started with an unexpected bed shift!
The darker walls, etc are definitely moodier. I like both, lighter (how everything is now) or darker. :)
Lee says
I vote for keeping the dresser lighter than any future dark floor, too. Refinish if you must but don’t go too matchy-matchy. Love the whole re-arrange + headboard redo!
Christi says
Love it! I actually really like the different sides of the bed, it’s very “His and Hers” and I am excited for the day you stain your floors!
I loved Katie Bower’s post this morning, Will and Clara are too cute together!
Hannah Deutsch says
Ooo love it! I made my own headboard with diamond tufting, and I totally pet it every night before I go to bed. Truely one of the most satsifying things I’ve made.
I’m interested to know if you had thought about puting a board across the top, so that it wouldn’t be open on the top. My headboard leans against the wall, and it helped to have that added stability across the top.
YoungHouseLove says
We did think about that, but since there’s baseboard and the bed stands out from the wall a few inches it would never be able to rest against the wall, so this freestanding look works for us.
xo,
s
Katy says
Oh fun! I have always wanted to make a ruched headboard but maybe I should try this kind first! Now if only I had a bed that needed one! Shoot! Just out of curiosity, why does the wall in your bedroom jut out like that behind the bed?
YoungHouseLove says
That’s an exterior thing (from the back, out house has a pretty little bumped out peak with a giant picture window in the living room, so it’s part of that).
xo,
s
Allyn says
Looks so good! I especially love it with the future dark floors and darker walls.
The pics of Will and Clara were so cute! It’d be the best story ever if they wound up together some day.
ErinY says
Love it! And I think I’m on John’s side for darkening the paint just a tad. I think it would make things look more layered overall. But it all looks great as-is too!
Maureen says
Looks great! I really love that fabric. Everything looks so airy, comfy and bright.
YoungHouseLove says
Thanks Maureen!
xo,
s
amybeth says
I’m in love too! I pinned a DIY tufted head board a while ago but keep putting it off because it seems like so much work. This seems so easy and G0RGEOUS.
Diana says
Love the furniture rearrangement. Love the headboard fabric. Love the photoshop look! Hope john wins on the darker wall color. :)
I think entering the bedroom at the foot of the bed is an awesome look especially with your color scheme. Great job!
Marci says
I think it may be even weirder that I am in love with your bedroom. I may need to clone it to the extent possible. I’m also insanely jealous of that mirror. I think I’d give up my left pinky for it. I so need to work on my bedroom…
YoungHouseLove says
Aw, that’s from Hobby Lobby for 50% off! I hope you find one someday!
xo,
s
Jen Migonis says
Adore it, Sherry, and no, it isn’t weird at all if you are in love with it! :) i certainly would be too!
YoungHouseLove says
Aw thanks Jen!
xo,
s
WendyMI says
Love it… love how bright and flowery and springy it is in there!
And there’s nothing wrong with your photography… it’s just that from farther away that gorgeous turquoise in the fabric doesn’t show up well. But oh so easy to imagine that it looks FABULOUS with that carpet!
And I like the thought of both the darker stained floor and the darker painted walls..they just up the ante. Beautiful as is… just even more dramatic. :)
Caitlin says
Looks like a totally different bedroom. So much more personalized, comfortable and inviting after your tweaks. Nice work!
Izzy says
Just wondering how easy it will be to switch out the fabric in future if it gets dirty/you fancy a change?
YoungHouseLove says
It would just be the last two steps to switch it out (unscrew the headboard and staple a new fabric over the top, then rescrew it).
xo,
s
Faye Osborne says
Loved it was thinking of doing one myself thanks for the help.
Melissa says
The fabric on the headboard is so pretty! It really makes the room feel like a spring day. Definitely will keep you feeling optimistic on those cold winter days that Virginia is famously known for…hehe! I really like John’s idea of going a few shades darker with the walls, it really makes the headboard and the bed stand out. I love that darker shade of blue and have been considering it for my master bedroom/bathroom.
Jessica Hilbish says
Very cool. Nice job! Good work!
Michelle Kersey says
Oh. My. Gosh. I’ve missed so much!? You move the door? You built out the wall? New nightstands?! Where have I been! Must spend the next hour looking through everything! Wow! This looks a billion times better! Great job!
Oh, and I LURVE that fabric. Do you happen to know the name of it??? :D It’d be PERFECT in my bedrooms color scheme!
YoungHouseLove says
Aw thanks! The fabric is by Braemore, called Gazebo in colourway “Cloud” – which was $20 a yard from a local fabric outlet called U-Fab. We actually just moved the bed to another wall (instead of moving the door and building out the wall – and we reused furniture we had as night stands!). Hope it helps!
xo,
s
Michelle Kersey says
Thanks!!! I was so baffled by the changes! What a difference moving the bed makes! (I did that recently myself and it opened up my room a lot)