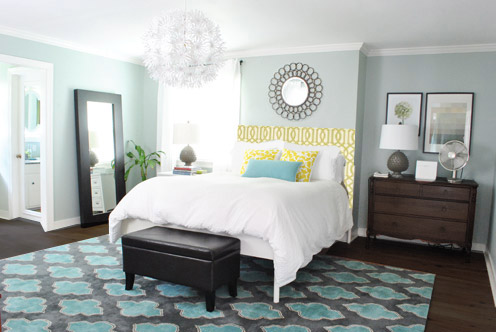
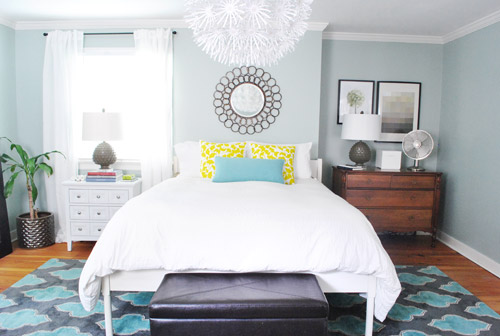
Yup, we finally gave Ed a little haircut. For over a year and a half we tried to work with the posts on Ed the bed, but the realization that we didn’t have a lofted ceiling or a floor plan that made sense of those big dramatic posts slowly worked its way into our conscious and we finally decided that just because Ed was born with long hair posts doesn’t mean that a little haircut is cruel and unusual bed punishment. So here he is before…
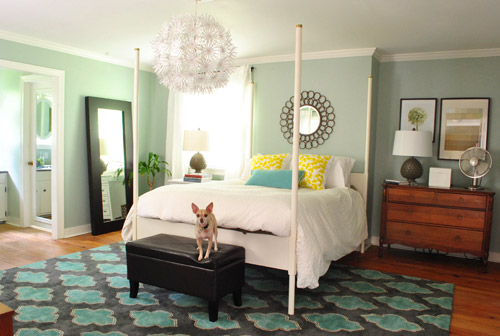
… during…
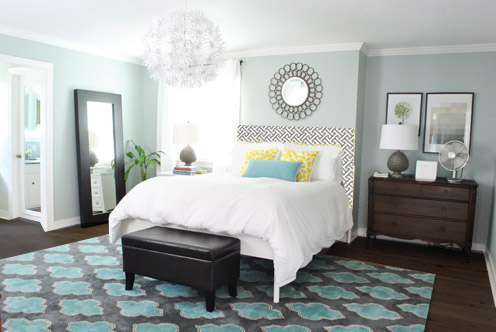
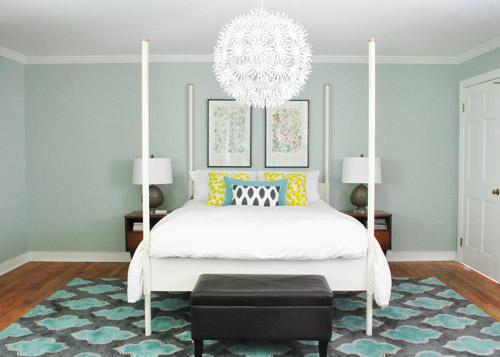
… and after…
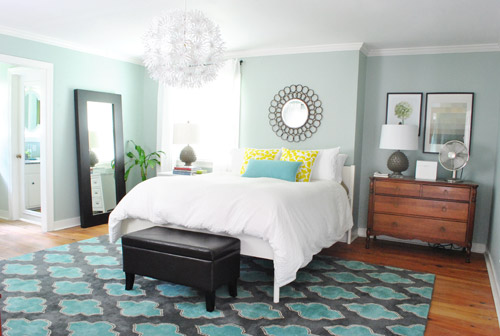
This whole bed-trimming project was free, took about an hour of work, and we totally dig the more open look. It was just too much vertical stuff going on- especially with the bed right next to the window (with those floor length curtains going on). Ed’s totally crying out for a large fabric headboard so we can raise the mirror above the bed about another foot or two (like this poorly photoshopped rendering) and someday we’d love to stain the floors (and possibly the dresser) darker…
… but we’re getting there. And just because I can’t stop at one photoshopped headboard option, here are some more I had fun with:
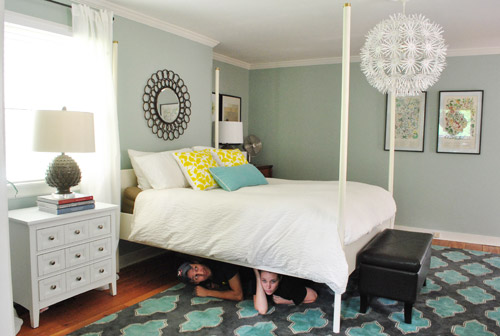
But back to reality. You know we like to use what we have, and we love Ed for so many reasons. The height, the comfort, and the thin airy legs that he sits on which allow us to hang out be weird under the bed…
… so instead of completely scrapping him (ex: craigslisting him and buying a new bed) we devised a completely reversible plan to give his posts a little trim. How is it reversible? Well, while they don’t just screw off or anything, they’re solid wood posts. So we can always reattach them by adding a nice long metal screw to the center of each post that we could just screw back into the bed frame to attach them (it’s how a bunch of Ikea items are made, like how Lack tables have legs that can be screwed on and off). So although we don’t foresee any reason to put those suckers back on, who knows… maybe someday we’ll end up in a house with lofted ceilings and we’ll wish we could put Ed back together – and now, theoretically we can. Haha.
So after concocting our little Ed-tweaking plan, this is how it all went down (complete with insanely embarrassing not-meant-to-sound-perverted comments by yours truly):
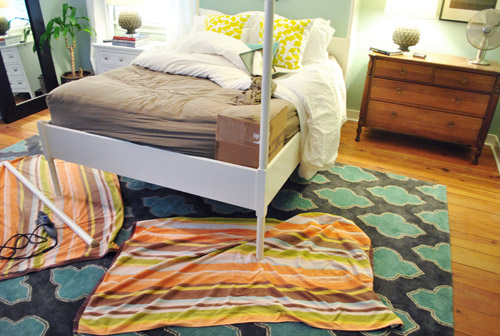
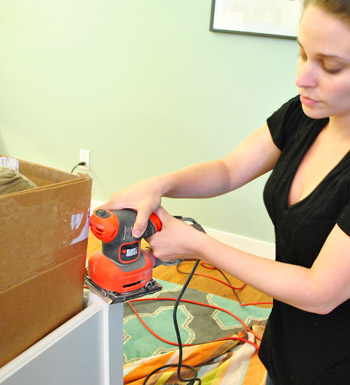
For those who can’t watch the video (perhaps you’re at work, although it pretty much tells the story on mute) we snapped some photos for ya too. We basically just lined the Dremel up (we have a Multimax, and used the wood cutting attachment) with the base of the post and slowly sawed around it.
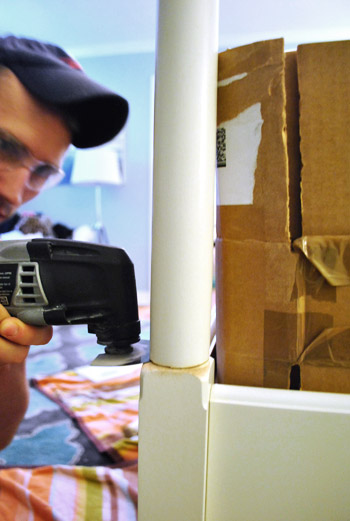
Oh and see how we put a piece of cardboard between the mattress and the post? Just wanted to make sure we didn’t get too chop-happy near the mattress (and moving our organic mattress takes the strength of ten vampires, so we just didn’t have it in us).
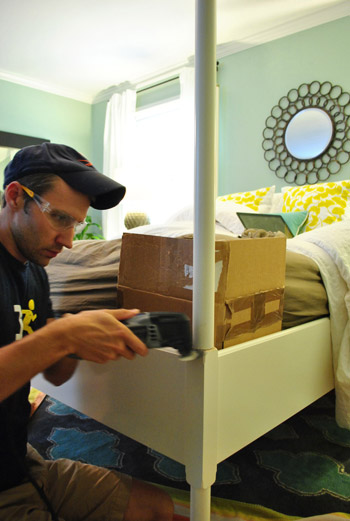
Thankfully we had no mattress casualties and each post came down after around five minutes of careful cutting.

We actually got much better at making super clean cuts as we went, so we’re glad we started on the two bottom posts of the bed (which will always be covered by the comforter anyway) and worked our way up to the top two posts, which are seen a lot more.
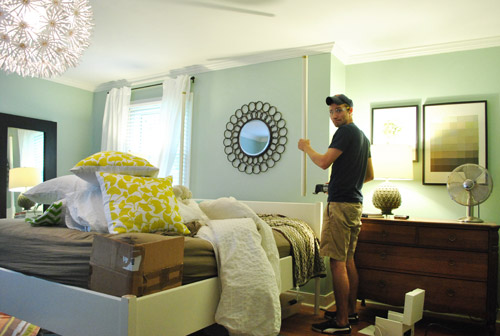
John even let me take a spin. I had to wrestle the Dremel from his cold dead tool-loving hands, but it was worth the trouble. Girls need a romp with a power tool every once in a while too. Especially because safety glasses are so undeniably sexy.
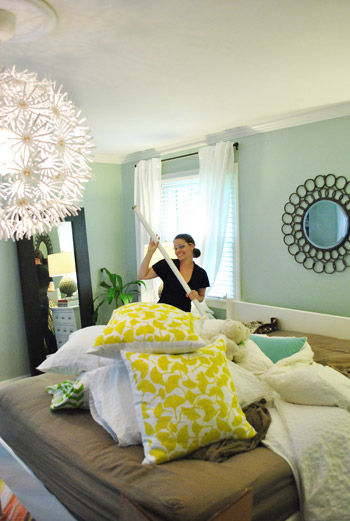
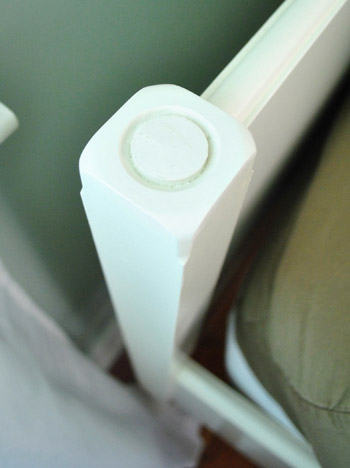
We were really surprised how nice the top posts looked when they were cut. See the circle detail that they ended up sporting (the bottom posts didn’t have those)? They made it look like a decorative design, so they looked convincing. Like they were meant to be this way. Total happy accident.
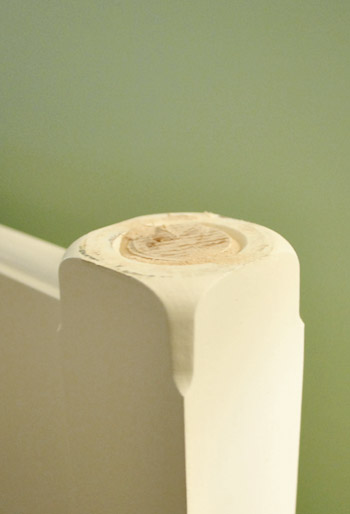
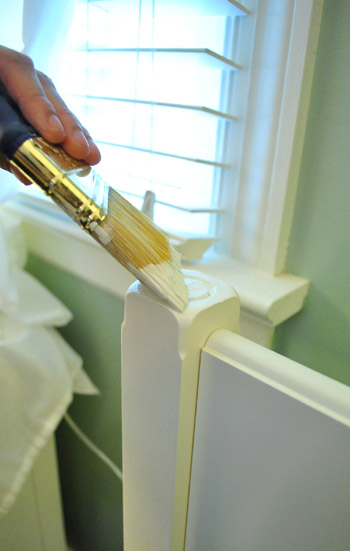
Then we just did some sanding to get everything smooth…
… and I used the Ikea-white paint (I did a little hunting to find the perfect white paint that matches Ikea’s white tone here) that we had leftover from another project.
Check out the top right post after cutting, sanding, and painting…

… and the top left post after the same rigmarole.
By the time the paint dried and we made the bed it totally looked like Ed was born this way. Cue the Lady Gaga dance-a-thon.
Here’s John breaking it down. Just kidding. He ran through the shot and kicked his leg up in some sort of weird victory cry and somehow the camera caught his ghosted karate move. Hilarious.
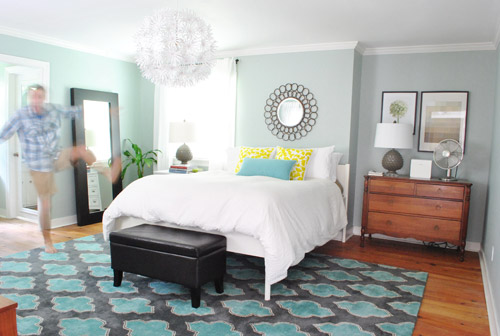
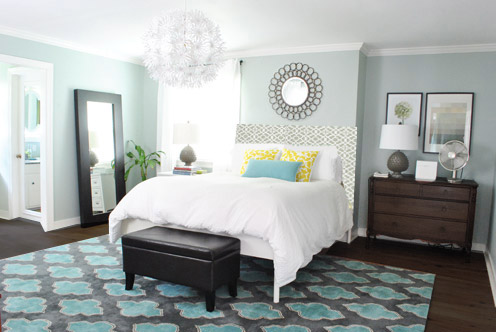
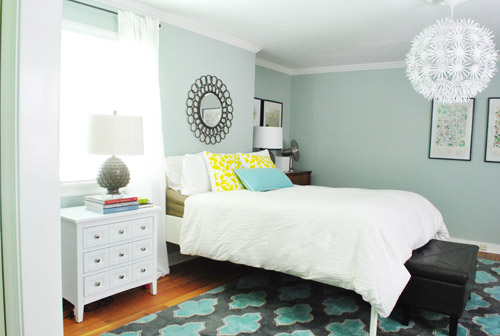
Here are things from another angle. Obviously we need nice large art where those botanicals are floating on that wall on the right of this picture (we’ll rehang the botanicals over a chair that we have in another corner), but we’re getting there. Especially once we build an upholstered headboard for Ed and move the mirror a bit higher, so it further ties into the chandelier.
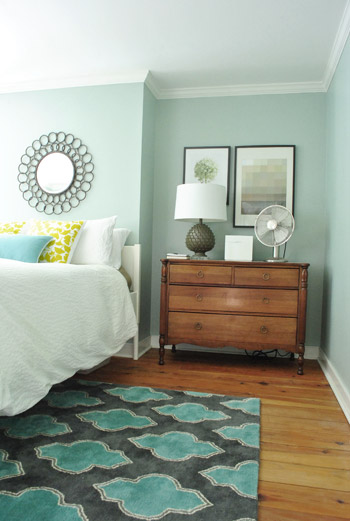
I can’t tell you how much we like this hand-me-down dresser from John’s parents in the nook. It’s the perfect fit.
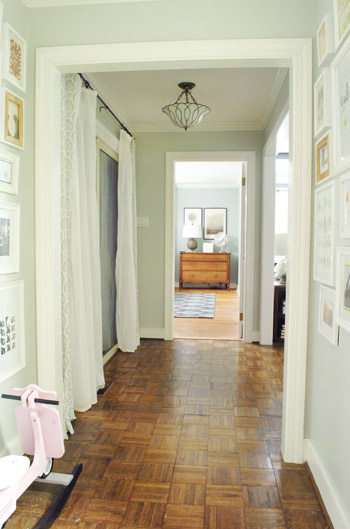
We already shared how it looks from the hallway in this morning’s post, but here’s that shot again, just to refresh the ol’ memory:
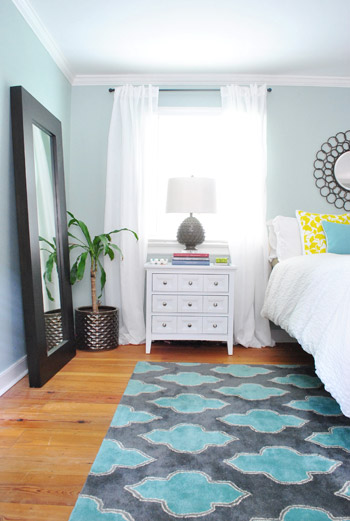
Although it definitely doesn’t match the wood dresser on the other side, there’s something charming about the little white nightstand in the window. And the fact that we have the same bedside lamps on each one sort of connects the two pieces, even though they’re very different.
Here’s a straight shot of the bed as it looks now. I’m definitely itching to get on that headboard project so I can bump the mirror up a bit higher so not everything will be in the same line (the art on the right and the mirror are so perfectly lined up, I think the bed will feel more special with a big fabric headboard and a higher focal point above it). And as for the color of the dresser and the white nightstand, we’re open to painting or staining something, but we’re not rushing into anything.
One thing is for sure, it definitely feels more homey and full than it used to look back when the bed was on the wall near the door.
And it’s so much nicer to walk into this view, instead of stepping three steps in the door and hitting the bed.
So that’s the latest bedroom tweak, but we’re probably a good dozen tweaks from being done in here. Haha, you know us. Inching along. But you know we’ll keep you posted when we tackle other things, like dealing with the bare wall across from the bed, making a giant fabric headboard and moving the mirror up, etc. Should be fun…
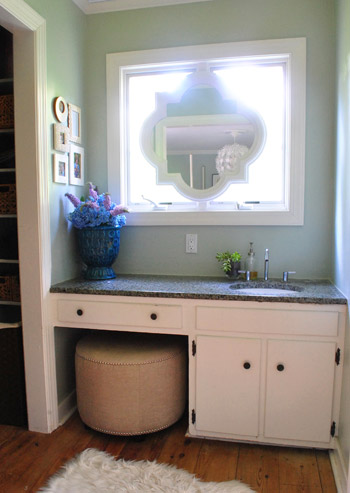
Oh and how funny is this? Every morning around 10am the sun shines through the window above the sink (this pic is from before Ed’s move and subsequent haircut)…
… and this shape is reflected on the rug:
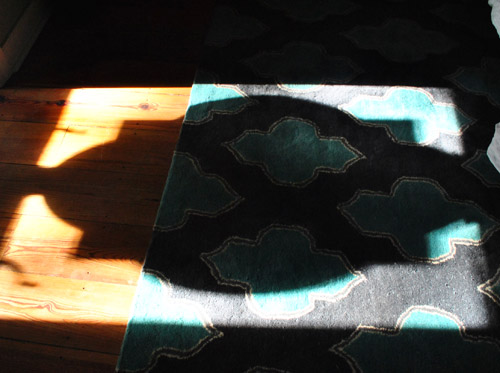
Yup, the elongated shadow is pretty much exactly the same shape that’s on the rug itself. The weirdest thing is that when we fell in love with this rug and snatched it up at a local outlet, we made absolutely no connection that it had a similar shape to the mirror above the sink. Hooray for happy accidents.
What are you guys up to in the bedroom (decor wise, I mean – let’s not get saucy). Has anyone else altered their bed to make it work better for their room? Or straight up built one from scratch? Anyone else planning to make a headboard in the next few weeks? I can’t wait to go fabric shopping…

Misty says
OOOHHH YEAH! THis looks sooo much better! love it! Well done!
dana says
i was waiting for this post (or now lack of 4)! looks great and i’m glad that ed got the haircut he needed.
Molly says
Ohmygosh, I never even thought of this as an option for you guys but it looks so good!
*Stands up and slow claps*
keri says
I can’t wait to see how you tackle the headboard! I have all the tools, fabric etc ready for my headboard project, but I have the IKEA MALM bed (their bottom of the line, low slung, modern bed) and can not for the life of me figure out how to add a headboard to a headboard – like yours, the malm has a short headboard, and I want a tall and cozy tufted headboard that sits in FRONT of the existing – at my house, it couldn’t sit flush on the wall since I have baseboard heat and there is a 4-5″ gap between the bed and wall.
So please, hurry up and do this, so I don’t have to figure this out on my own :) :) :)
Ted says
We also have the MALM headboard with the pull out side tables. We have a large dreamcatcher on the wall, but you can make a headboard and then mount it on the wall just an inch or two above the MALM headboard. Many hotels mount the bed headboard on the wall and not on the bed itself.
Gaidig says
I bet you could do with your MALM something similar to what Dan of Manhattan Nest did with his FJELLSE here: http://manhattan-nest.com/2010/07/23/a-whole-mess-of-staples/
YoungHouseLove says
Love that!!
xo,
s
keri says
Gaidig – I think I just pissed myself laughing reading manhattan nest. new favorite blog. thank you.
Niamh says
Keri! Check out mine here! We used a different Ikea bed, but you can kinda see where we got inspired and how we attached it to the already there headboard!
http://nearlydomesticated.blogspot.com/2012/05/guest-room-complete-ish.html
keri says
PS – with this in mind, if people want some Ed-esque poles, they can just do the exact opposite! take some dowels, and drill ’em in!
YoungHouseLove says
Haha, we’re already planning it. Here’s hoping we can share something next week after we get back from Haven!
xo,
s
Trish says
loved it before, but OMG, so much better! And I love that happy little accident of the shapes from rug and window!
TF
Kirsten says
Wow… it’s always amazing how little changes make such a big difference! Great call, yet again, John and Sherry… Can’t wait to see the additional tweaks to the bedroom. It’s such an important space in anyone’s home!
Emily says
I love how you re-jigged the layout. It looks so much better, but I am sad to see the posts go. I thought they added some nice interest. To each their own! Good job working with what you had.
Rebecca Crowell says
Have you considered making that whole wall above the bed into a headboard and ditching the mirror? Like some funky fabric maybe quilted on the wall up to the ceiling.
YoungHouseLove says
Always another possibility! I think we’re open to a lot at this point, so it should be fun to see where we end up!
xo,
s
Lauren says
I was just about to leave this same comment! I love the idea of doing a really large dramatic headboard all the way up (or nearly all the way up) the wall. It would be a great focal point!
YoungHouseLove says
We’ll definitely play around in photoshop and just do whatever we like best! You know we’ll keep ya posted!
xo,
s
Sara Dean says
I was going to say the same! I vote you paint the whole wall that sticks out the exact same color as the bed, then do a stencil on it!
Lauren says
I am trying to cover one window that sits above the bed…so going to try the whole wall in curtains for texture, drama and window only when wanted.
Carla says
My bedroom project is “inching along” just as fast as yours. I have had the materials and intentions to make a new headboard for a month! Since it is raining I have actual plans to start tonight. We’ll see if the plans turn into action!
YoungHouseLove says
Ooh, good luck Carla!
xo,
s
Jen says
Love the haircut!! Isn’t it weird how changing a room might take little or no money but the changes make a huge difference? Again, great job!!
Stefanie says
I wasn’t 100% about the new bed placement until the posts came off; Now it flows so nicely and just looks really open and inviting. Great room! Wish we had more space in our master…but that is a SoCal home for ya!
Kate says
Yes, much more open! I didn’t see this one coming – I loved your plan to paint the bed from a couple of weeks ago, but an upholstered headboard will be equally as fabulous!
We’re in the process of redoing our bedroom too. We just upgraded to a king sized bed and purchased a couple of vintage dressers that I love more than I should be allowed. A diy upholstered headboard is in our future too!
Looking forward to the next update!
Heather says
Wow. WOW. I can’t believe how good the bed looks without the posts. Such a dramatic change for not-too-much work. And the Photoshopped headboard + dark floors and dresser? WOW. That room is going to be amazing.
Okay since I just said Wow three times (make that 4)I’m going to hush up now. Just color me all sorts of impressed.
YoungHouseLove says
Aw, thanks Heather!
xo,
s
Linda says
I gave a sigh of relief when I saw the picture with the posts removed. It is more pleasing to the eye and makes the room feel more relaxing. Great job!
Hannah Deutsch says
I made my own headboard, and I love it! I did one with diamond tufting I found on Addicted2Decorating (can’t find the link because I’m not at home). The new arrangement looks AWESOME!
Karen F says
looks awesome – so much better. You guys are so gutsy!
Anne says
SERIOUSLY WOW. I never thought I’d see the day but it looks amazing! I never would have been brave enough to do something that dramatic! I guess it’s nice that ikea stuff isn’t so crazy expensive…in my mind it’s easier to try dramatic stuff on things that I didn’t spend a ton on in the first place.
Kateri says
Looking good! My husband and I made a headboard for our master bedroom a few months back. Picking out the fabric was the hardest but most fun part! Here is our family blog with a picture of it under the “this and that” post when you scroll down the page. Looking forward to seeing what you come up with. :)
http://kateriandpaul.blogspot.com/
Katrina says
1. I love that you moved your bed around so much more inviting !! 2. The ed bed looks so much better, I think because I’m not a huge fan of poster bed….the bedroom is coming along so nice :)
-alex says
Ooooh. I like Rebecca’s idea of a floor-to-ceiling headboard. I’ve even seen some where they tufted it and then mounted art on top of the headboard.
I do like the new layout a lot and Ed’s haircut. How do you feel about the lamp obscuring part of the art on the dresser? Just curious.
YoungHouseLove says
We don’t mind when things layer in and overlap like that, but it’s definitely a personal preference thing!
xo,
s
decoratica says
Much better!! It looks great! Loooove it!!
XO
D.
Stephanie says
LOL at “lets not get saucy”. I love Ed the Bed with his snazzy new haircut. I can’t wait to see what you do for a headboard.
I’m sort of in bed-room sprucing mode myself. I have a very oddly shaped bedroom so I’m trying to figure out how to stylishly fill the room. Right now I’m on the hunt for a dresser. I want something simple in design but I’m torn on color. And I’m definitely itching to make a headboard. All I have now is a metal frame.
Heidi says
First time commenter, longgggg time reader. :)
I’m so glad you guys did this! After you moved the bed in the last post I thought, “the bed posts…. if only the would vanish!” Good decision.
I love following along with your projects- you guys get me so jazzed to be done with school and own a home someday! Thanks for being one of my favorite reads over the course of my week :)
YoungHouseLove says
Aw thanks so much Heidi!
xo,
s
Megan says
You guys would be the perfect spokespeople for 3M Command hooks, with something along the lines of, “For as much as we change things, we need something easily removable.”
Currently accepting alternate taglines/slogans… :)
YoungHouseLove says
Haha, guilty as charged. Can’t resist a tweak.
xo,
s
Melody says
The bed looks better. I wasn’t a fan of the posts, since the ceiling wasn’t too high. Just want you to know, you’re the only blog I read on a daily basis. And sometimes I wonder, “What are they thinking?,” but then all the little projects add up to something wonderful!!! Keep it up! Still hoping that you all will do mood boards again someday. (yes?) :)
YoungHouseLove says
Haha- thanks Melody!We often wonder what the heck we’re thinking too!
xo,
s
Susan says
I am thinking of doing a fabric headboard and a bedroom switch-a-roo soon too! We are expecting at the begining of November and need to move somethings around in our bedroom to make room for the baby’s bassinett. I am excited about that you will be trying out a headboard as well. We already have the wood, I just need to hunt for fabric and foam!
Casey @ wafflingdesign says
I just built a floating shelf as a bedside table!
http://wafflingdesign.blogspot.ca/2012/05/new-bedside-table.html
I am loving your changes, definitely on the right path. Having your bed against that wall really improves the flow of the room because nothing is blocking the door.
But can you REACH your bedside tables? they look too far…however will you turn off the light to go to sleep or hit the snooze button??
YoungHouseLove says
Thankfully we can reach them! John’s side is the one with the nook, but my 6′ tall hubby has nice long arms, so they have been just fine so far! Our old night tables were actually really low, so these are nice since they’re the right height, even if they’re a bit further away.
xo,
s
Nichole says
Love the new placement and post-less Ed! I know you were thinking of adding built-in shelves in the nook and I think you still could and have them serve as a night stand. If you painted them white, they’d balance out the window too. I do love the hand-me-down dresser though. Gives the mostly contemporary room some vintage-y interest. Love seeing small transformations with big impact :)
Ammie says
Love the room. I’m itching to make a headboard myself. Any suggestions regarding the type of fabric you think would work best? I get to the fabric section and get overwhelmed not even knowing where to start!
YoungHouseLove says
Something “upholstery grade” is always best since it’s nice and strong/thick. I would stay away from anything thin or satiny (harder to work with).
xo,
s
Sarah says
This is probably going to sound a little wacky, but I made an upholstered headboard about a year ago and I actually used a left over curtain. We have a really weird wall-of-windows situation in our bedroom and ended up using an odd number of panels (they were dark gray black-out panels from ikea). I was so excited when I realized the panel was big enough to cover the headboard and was totally channeling the YHL “use what you have” mentality the whole time.
Our walls are a bright teal (were that way when we moved in – we rent) and the bedding is mostly white with hits of orange, so I feel like using the same dark gray across the room adds some balance.
Anyway, you should use something that won’t stretch out/warp if you give it a good (really good) tug or pill (do the Sarah Richardson test and rub two pieces of the fabric together vigorously to see if it generates any lint or fluff. Also, be aware that some silky fabric is prone to showing oily residue and you will be resting your head against this nightly.
YoungHouseLove says
Love that!
xo
s
Katy says
I just stumbled on a really nice tutorial for upholstered headboards. The photoshopped visions in this entry reminded me of it. You might find it helpful! Instead of buying printed fabric, this blogger bought inexpensive plain fabric and stenciled a geometric design on it. That way, you customize your pattern and color!
http://www.infarrantlycreative.net/2012/01/fabric-upholstered-headboardpainted-stenciled.html#comments
YoungHouseLove says
So smart!
xo,
s
Karen says
Wow… it looks like a totally different room! So airy and open and more spacious. Love the dresser in that nook… it’s a perfect fit. And Ed looks great.
I’m still dying over that rug!
heatherly says
The rearranging looks great! Just a thought…have you considered hanging curtains in the nook just to balance things a little more?
YoungHouseLove says
We thought about that but don’t think we’re going to go for it. We had curtained nooks on either side of our bed in our first house, so we’re happy to do something different here and embrace the not-as-matchy-but-still-balanced thing!
xo,
s
Annabelvita says
I think just painting the book white would really help balance out the window. I mean, it looks great as it is and I’m way excited about the headboard, but that was just something that crossed my mind as I looked at the pictures. BUT I love the dresser with the blue and the view down the hall.
Tamrah Ryan says
It’s so inspiring to see what you are doing with your bedroom… we also have a very awkward bedroom layout/windows and we are having a rough time figuring out where to put our bed. I love what you’ve done.
I also love what you did with Ed… it makes a world of difference!
Sara says
Looks wonderful – the new position of furniture and the postless bed and the view down the hall. What a difference. And its so much fun being able to have two placement options for the bed.
Alisa says
Hubba hubba. Looking good, Ed!
I think this bedroom arrangement looks a gazillion times better. Yep, more than a billion and trillion combined. You guys are so good.
Mara says
HA! It looks like John doesn’t have any pants on in the karate-kicking ghost photo. You know, because his shorts are khaki and he’s all blurry! I laughed so hard when I saw that picture!
Good call with the bed haircut. Totally opens up the room.
YoungHouseLove says
Naked Karate John. I love it.
xo,
s
Kim says
There’s a band in Cincinnati called the Naked Karate Girls. I’m dying that you inadvertently just made a reference to them. :)
YoungHouseLove says
Haha, so funny!
xo,
s
Laura M says
YES YES YES YES YES! (said in the Monica “Seven” voice…i hope youre friends fans!)
YoungHouseLove says
Hahahhhahahha, nice.
xo,
s
Coasting anon says
“Monica ‘Seven’ voice”. HA!! Love it!!
Lindsay says
FINALLY! Not gonna lie, I kind of always hated posts. And OMG with the dark floors. EEeeek I can’t wait until you can get those done. It will look great with the mirror and makes your walls and rug pop.
Emily says
OHHHHHHH I love it!!! It looks so great- I wasn’t sold on the bed move until you took off the posts and then I think I heard angels singing :) I love the future look of the room too with the dark floors and dark dresser! Can’t wait to see what y’all come up with next!!! :)
Melanie @ MJ says
Yayyy! I’m so glad you finally did this! I never liked those tall posts, it didn’t make sense to me why they were there, when you don’t have a canopy (?) connected to them. The bed looks soooo much better now, and the room is more open. Love!
Lizzy says
I love the change! Makes your room feel so much bigger! You had an earlier post that suggested building a large fabric headboard and I was wondering how the heck you’d work that into the original bed posts – now I think that would look great – and the fabric can be easily switched out to correspond with your changing tastes!
Doesn’t re-arranging furniture make you feel like a new person? Love it!
YoungHouseLove says
Amen! I’m like a new woman. And John (and Ed) are like new men! Haha.
xo,
s
Wrenaria says
Yes! I’ve been hoping the four posters would go away. With the big beautiful hanging light it felt a bit busy for me. This feels much more open and homey now. Less visual competition. Nice changes, guys! Brave work chopping up your bed!
My bedroom is inching along too, but at an even slower pace. I’m having the hardest time finding curtains I like. :(
Looking forward to seeing what you settle on in terms of headboard. I want an upholstered headboard so bad, but my honey has terrible dust mite allergies, so sadly it’s not really an option for us.
Marlena says
Fun! We just had plywood flooring installed in our bedroom. We have a cape cod, so it’s just one big open space that came with ugly carpeting. Seven years later, I figured out what I wanted, and the large sheets of plywood, coated twice with poly, looks FANTASTIC. The room is bright, modern, and we now want to spend more time in there! Best part, besides the obvious? It was 1/3 the cost of hardwood or Pergo.
Heather says
SO. MUCH. BETTER. I didn’t even realize I didn’t like the bedposts until I saw the bed without them! But this looks fantastic. Between the furniture re-arrangement and the de-posting of Ed, this room is completely transformed and looks so much more cozy and welcoming. Well done!
janetl says
Wow! I was so surprised but I really like how it turned out. The room seems so much bigger now.
r8chel says
Hooray! I’m glad you moved the bed. I’m glad your nightstands don’t match. And I’m SO glad you got rid of those posts.
Brenda says
Ed looks so much better! I feel like now the ball light has room to breathe.
Karen says
Very nice. I’m so glad you moved the bed. It bugged me that it was right in front of the door. Bad feng shui. The new arrangement is MUCH better.
Shellie says
Ohh man, this morning I was kinda on the fence with the move. I figured it was one of those have-to-be-there-to see-the-awesome kind of changes, but now I’m SO on board.
I used to have a poster bed with removable poles and couldn’t believe the difference just a little change like that could make.
It looks amazing! Makes the room look much more ‘grown up’ and real life I think.
Annie says
I’m obsessed with your bedroom rug. Obsessed!
I’m currently in the middle of painting a pair of dressers for our master bedroom…and I think it’s going to kill me.
heather says
Beautiful!! I was wondering what the color is on the walls?
YoungHouseLove says
It’s Carolina Inn Club Aqua by Valspar. Hope it helps!
xo,
s